GithubHelp home page GithubHelp logo

gokumohandas / made-with-ml Goto Github PK

View Code? Open in Web Editor NEW
35.6K 1.2K 5.7K 3.91 MB

Learn how to design, develop, deploy and iterate on production-grade ML applications.

Home Page: https://madewithml.com

License: MIT License

Jupyter Notebook 97.81% Makefile 0.01% Shell 0.07% Python 2.10%
machine-learning deep-learning pytorch natural-language-processing data-science python mlops data-engineering data-quality distributed-ml

made-with-ml's Introduction

Design · Develop · Deploy · Iterate
Join 40K+ developers in learning how to responsibly deliver value with ML.

     
🔥  Among the top ML repositories on GitHub


Lessons

Learn how to combine machine learning with software engineering to design, develop, deploy and iterate on production-grade ML applications.

lessons

Overview

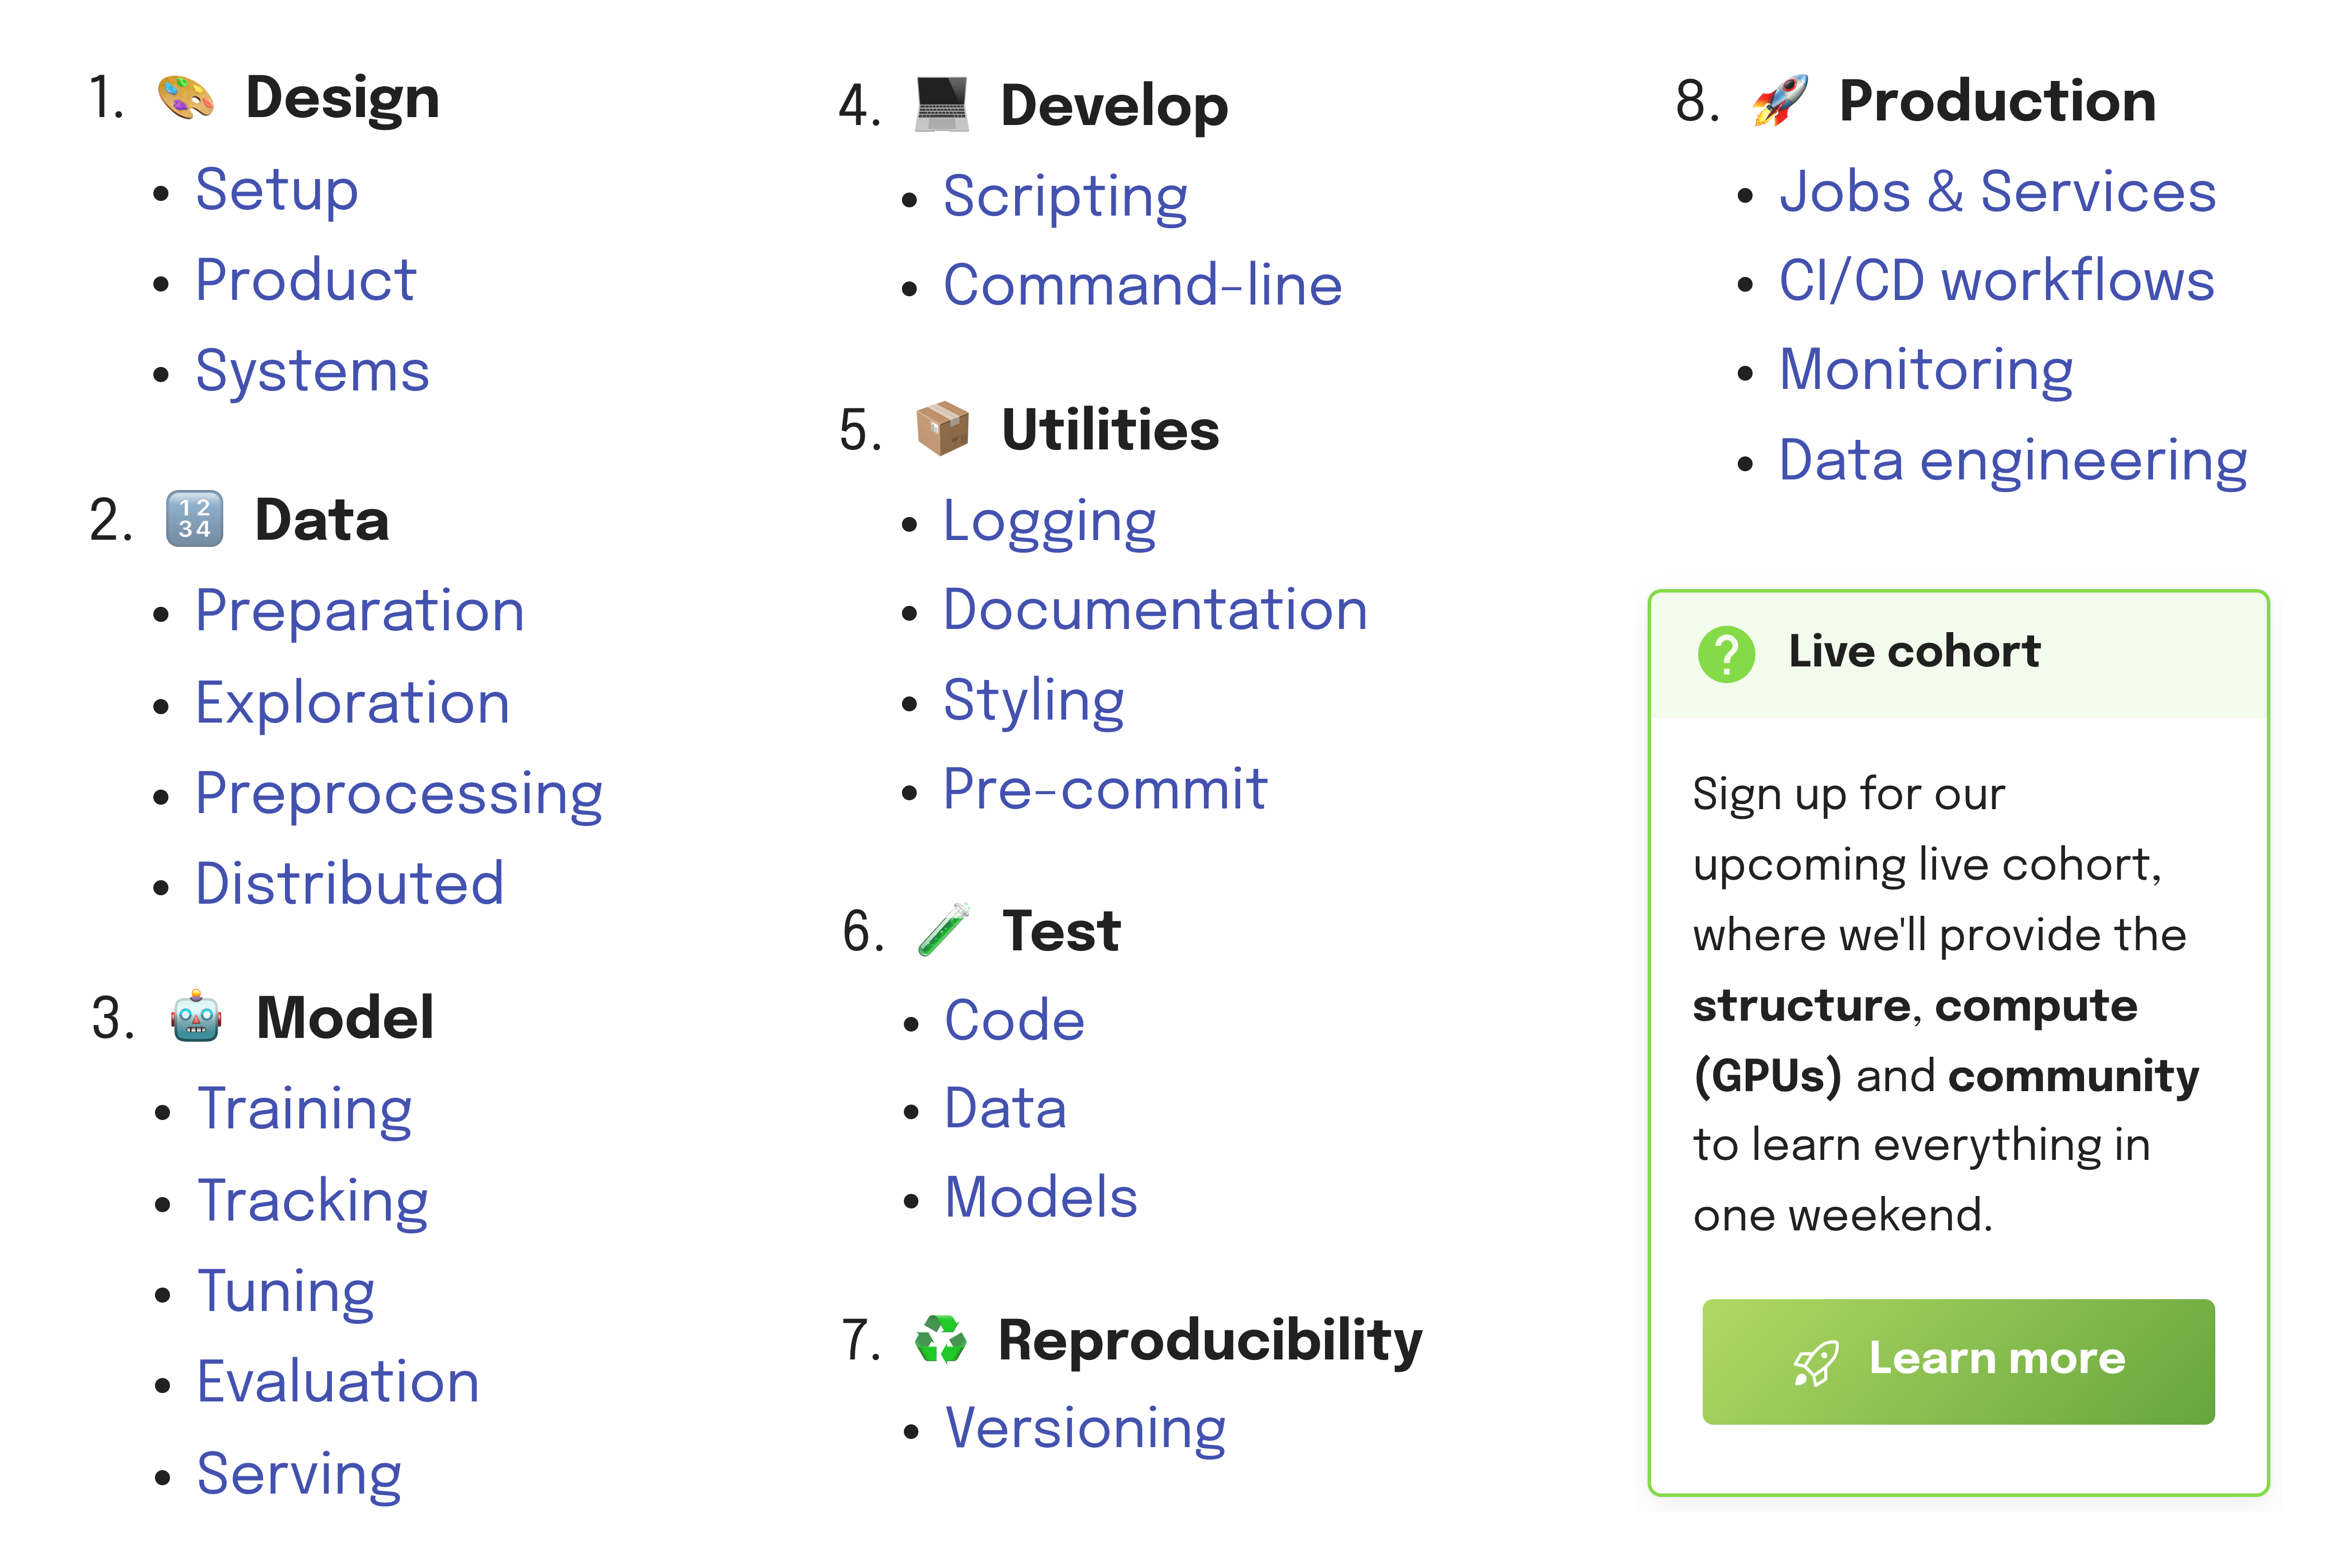
In this course, we'll go from experimentation (design + development) to production (deployment + iteration). We'll do this iteratively by motivating the components that will enable us to build a reliable production system.

  Be sure to watch the video below for a quick overview of what we'll be building.
Course overview video

  • 💡 First principles: before we jump straight into the code, we develop a first principles understanding for every machine learning concept.
  • 💻 Best practices: implement software engineering best practices as we develop and deploy our machine learning models.
  • 📈 Scale: easily scale ML workloads (data, train, tune, serve) in Python without having to learn completely new languages.
  • ⚙️ MLOps: connect MLOps components (tracking, testing, serving, orchestration, etc.) as we build an end-to-end machine learning system.
  • 🚀 Dev to Prod: learn how to quickly and reliably go from development to production without any changes to our code or infra management.
  • 🐙 CI/CD: learn how to create mature CI/CD workflows to continuously train and deploy better models in a modular way that integrates with any stack.

Audience

Machine learning is not a separate industry, instead, it's a powerful way of thinking about data that's not reserved for any one type of person.

  • 👩‍💻 All developers: whether software/infra engineer or data scientist, ML is increasingly becoming a key part of the products that you'll be developing.
  • 👩‍🎓 College graduates: learn the practical skills required for industry and bridge gap between the university curriculum and what industry expects.
  • 👩‍💼 Product/Leadership: who want to develop a technical foundation so that they can build amazing (and reliable) products powered by machine learning.

Set up

Be sure to go through the course for a much more detailed walkthrough of the content on this repository. We will have instructions for both local laptop and Anyscale clusters for the sections below, so be sure to toggle the ► dropdown based on what you're using (Anyscale instructions will be toggled on by default). If you do want to run this course with Anyscale, where we'll provide the structure, compute (GPUs) and community to learn everything in one day, join our next upcoming live cohort → sign up here!

Cluster

We'll start by setting up our cluster with the environment and compute configurations.

Local
Your personal laptop (single machine) will act as the cluster, where one CPU will be the head node and some of the remaining CPU will be the worker nodes. All of the code in this course will work in any personal laptop though it will be slower than executing the same workloads on a larger cluster.
Anyscale

We can create an Anyscale Workspace using the webpage UI.

- Workspace name: `madewithml`
- Project: `madewithml`
- Cluster environment name: `madewithml-cluster-env`
# Toggle `Select from saved configurations`
- Compute config: `madewithml-cluster-compute-g5.4xlarge`

Alternatively, we can use the CLI to create the workspace via anyscale workspace create ...

Other (cloud platforms, K8s, on-prem)

If you don't want to do this course locally or via Anyscale, you have the following options:

Git setup

Create a repository by following these instructions: Create a new repository → name it Made-With-ML → Toggle Add a README file (very important as this creates a main branch) → Click Create repository (scroll down)

Now we're ready to clone the repository that has all of our code:

git clone https://github.com/GokuMohandas/Made-With-ML.git .

Credentials

touch .env
# Inside .env
GITHUB_USERNAME="CHANGE_THIS_TO_YOUR_USERNAME"  # ← CHANGE THIS
source .env

Virtual environment

Local
export PYTHONPATH=$PYTHONPATH:$PWD
python3 -m venv venv  # recommend using Python 3.10
source venv/bin/activate  # on Windows: venv\Scripts\activate
python3 -m pip install --upgrade pip setuptools wheel
python3 -m pip install -r requirements.txt
pre-commit install
pre-commit autoupdate

Highly recommend using Python 3.10 and using pyenv (mac) or pyenv-win (windows).

Anyscale

Our environment with the appropriate Python version and libraries is already all set for us through the cluster environment we used when setting up our Anyscale Workspace. So we just need to run these commands:

export PYTHONPATH=$PYTHONPATH:$PWD
pre-commit install
pre-commit autoupdate

Notebook

Start by exploring the jupyter notebook to interactively walkthrough the core machine learning workloads.

Local
# Start notebook
jupyter lab notebooks/madewithml.ipynb
Anyscale

Click on the Jupyter icon    at the top right corner of our Anyscale Workspace page and this will open up our JupyterLab instance in a new tab. Then navigate to the notebooks directory and open up the madewithml.ipynb notebook.

Scripts

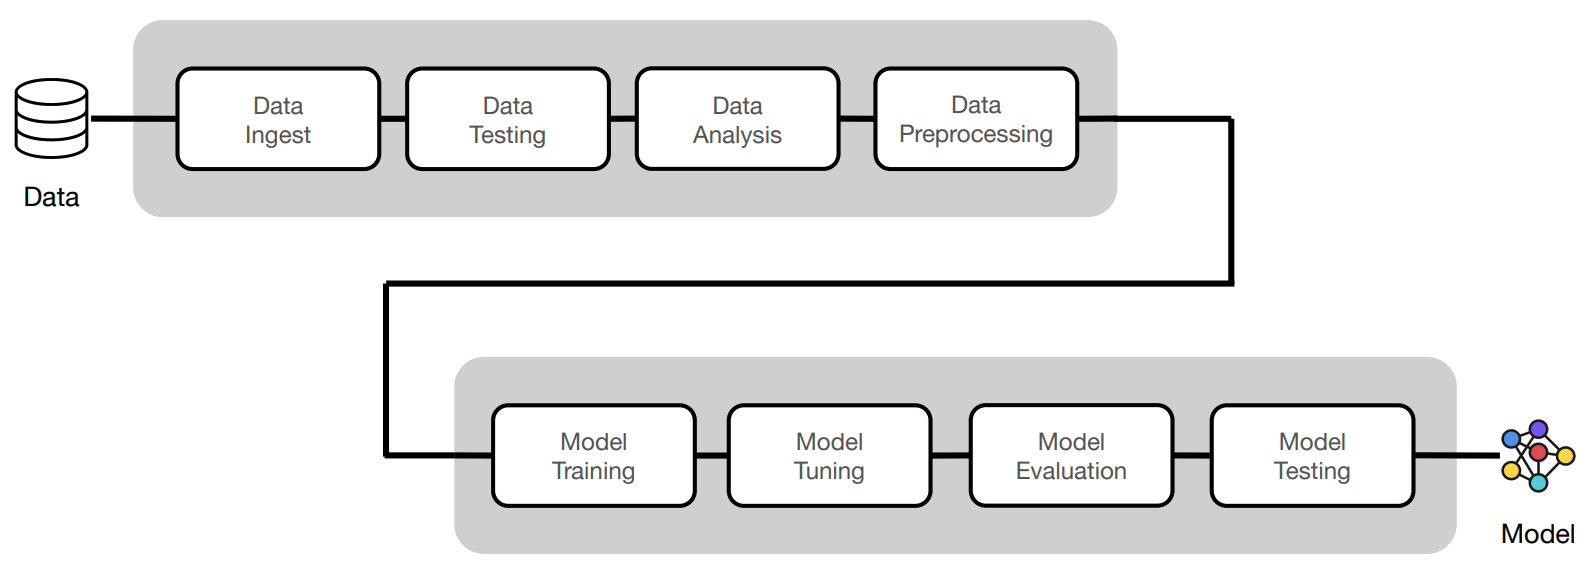
Now we'll execute the same workloads using the clean Python scripts following software engineering best practices (testing, documentation, logging, serving, versioning, etc.) The code we've implemented in our notebook will be refactored into the following scripts:

madewithml
├── config.py
├── data.py
├── evaluate.py
├── models.py
├── predict.py
├── serve.py
├── train.py
├── tune.py
└── utils.py

Note: Change the --num-workers, --cpu-per-worker, and --gpu-per-worker input argument values below based on your system's resources. For example, if you're on a local laptop, a reasonable configuration would be --num-workers 6 --cpu-per-worker 1 --gpu-per-worker 0.

Training

export EXPERIMENT_NAME="llm"
export DATASET_LOC="https://raw.githubusercontent.com/GokuMohandas/Made-With-ML/main/datasets/dataset.csv"
export TRAIN_LOOP_CONFIG='{"dropout_p": 0.5, "lr": 1e-4, "lr_factor": 0.8, "lr_patience": 3}'
python madewithml/train.py \
    --experiment-name "$EXPERIMENT_NAME" \
    --dataset-loc "$DATASET_LOC" \
    --train-loop-config "$TRAIN_LOOP_CONFIG" \
    --num-workers 1 \
    --cpu-per-worker 3 \
    --gpu-per-worker 1 \
    --num-epochs 10 \
    --batch-size 256 \
    --results-fp results/training_results.json

Tuning

export EXPERIMENT_NAME="llm"
export DATASET_LOC="https://raw.githubusercontent.com/GokuMohandas/Made-With-ML/main/datasets/dataset.csv"
export TRAIN_LOOP_CONFIG='{"dropout_p": 0.5, "lr": 1e-4, "lr_factor": 0.8, "lr_patience": 3}'
export INITIAL_PARAMS="[{\"train_loop_config\": $TRAIN_LOOP_CONFIG}]"
python madewithml/tune.py \
    --experiment-name "$EXPERIMENT_NAME" \
    --dataset-loc "$DATASET_LOC" \
    --initial-params "$INITIAL_PARAMS" \
    --num-runs 2 \
    --num-workers 1 \
    --cpu-per-worker 3 \
    --gpu-per-worker 1 \
    --num-epochs 10 \
    --batch-size 256 \
    --results-fp results/tuning_results.json

Experiment tracking

We'll use MLflow to track our experiments and store our models and the MLflow Tracking UI to view our experiments. We have been saving our experiments to a local directory but note that in an actual production setting, we would have a central location to store all of our experiments. It's easy/inexpensive to spin up your own MLflow server for all of your team members to track their experiments on or use a managed solution like Weights & Biases, Comet, etc.

export MODEL_REGISTRY=$(python -c "from madewithml import config; print(config.MODEL_REGISTRY)")
mlflow server -h 0.0.0.0 -p 8080 --backend-store-uri $MODEL_REGISTRY
Local

If you're running this notebook on your local laptop then head on over to http://localhost:8080/ to view your MLflow dashboard.

Anyscale

If you're on Anyscale Workspaces, then we need to first expose the port of the MLflow server. Run the following command on your Anyscale Workspace terminal to generate the public URL to your MLflow server.

APP_PORT=8080
echo https://$APP_PORT-port-$ANYSCALE_SESSION_DOMAIN

Evaluation

export EXPERIMENT_NAME="llm"
export RUN_ID=$(python madewithml/predict.py get-best-run-id --experiment-name $EXPERIMENT_NAME --metric val_loss --mode ASC)
export HOLDOUT_LOC="https://raw.githubusercontent.com/GokuMohandas/Made-With-ML/main/datasets/holdout.csv"
python madewithml/evaluate.py \
    --run-id $RUN_ID \
    --dataset-loc $HOLDOUT_LOC \
    --results-fp results/evaluation_results.json
{
  "timestamp": "June 09, 2023 09:26:18 AM",
  "run_id": "6149e3fec8d24f1492d4a4cabd5c06f6",
  "overall": {
    "precision": 0.9076136428670714,
    "recall": 0.9057591623036649,
    "f1": 0.9046792827719773,
    "num_samples": 191.0
  },
...

Inference

export EXPERIMENT_NAME="llm"
export RUN_ID=$(python madewithml/predict.py get-best-run-id --experiment-name $EXPERIMENT_NAME --metric val_loss --mode ASC)
python madewithml/predict.py predict \
    --run-id $RUN_ID \
    --title "Transfer learning with transformers" \
    --description "Using transformers for transfer learning on text classification tasks."
[{
  "prediction": [
    "natural-language-processing"
  ],
  "probabilities": {
    "computer-vision": 0.0009767753,
    "mlops": 0.0008223939,
    "natural-language-processing": 0.99762577,
    "other": 0.000575123
  }
}]

Serving

Local
# Start
ray start --head
# Set up
export EXPERIMENT_NAME="llm"
export RUN_ID=$(python madewithml/predict.py get-best-run-id --experiment-name $EXPERIMENT_NAME --metric val_loss --mode ASC)
python madewithml/serve.py --run_id $RUN_ID

Once the application is running, we can use it via cURL, Python, etc.:

# via Python
import json
import requests
title = "Transfer learning with transformers"
description = "Using transformers for transfer learning on text classification tasks."
json_data = json.dumps({"title": title, "description": description})
requests.post("http://127.0.0.1:8000/predict", data=json_data).json()
ray stop  # shutdown
Anyscale

In Anyscale Workspaces, Ray is already running so we don't have to manually start/shutdown like we have to do locally.

# Set up
export EXPERIMENT_NAME="llm"
export RUN_ID=$(python madewithml/predict.py get-best-run-id --experiment-name $EXPERIMENT_NAME --metric val_loss --mode ASC)
python madewithml/serve.py --run_id $RUN_ID

Once the application is running, we can use it via cURL, Python, etc.:

# via Python
import json
import requests
title = "Transfer learning with transformers"
description = "Using transformers for transfer learning on text classification tasks."
json_data = json.dumps({"title": title, "description": description})
requests.post("http://127.0.0.1:8000/predict", data=json_data).json()

Testing

# Code
python3 -m pytest tests/code --verbose --disable-warnings

# Data
export DATASET_LOC="https://raw.githubusercontent.com/GokuMohandas/Made-With-ML/main/datasets/dataset.csv"
pytest --dataset-loc=$DATASET_LOC tests/data --verbose --disable-warnings

# Model
export EXPERIMENT_NAME="llm"
export RUN_ID=$(python madewithml/predict.py get-best-run-id --experiment-name $EXPERIMENT_NAME --metric val_loss --mode ASC)
pytest --run-id=$RUN_ID tests/model --verbose --disable-warnings

# Coverage
python3 -m pytest tests/code --cov madewithml --cov-report html --disable-warnings  # html report
python3 -m pytest tests/code --cov madewithml --cov-report term --disable-warnings  # terminal report

Production

From this point onwards, in order to deploy our application into production, we'll need to either be on Anyscale or on a cloud VM / on-prem cluster you manage yourself (w/ Ray). If not on Anyscale, the commands will be slightly different but the concepts will be the same.

If you don't want to set up all of this yourself, we highly recommend joining our upcoming live cohort{:target="_blank"} where we'll provide an environment with all of this infrastructure already set up for you so that you just focused on the machine learning.

Authentication

These credentials below are automatically set for us if we're using Anyscale Workspaces. We do not need to set these credentials explicitly on Workspaces but we do if we're running this locally or on a cluster outside of where our Anyscale Jobs and Services are configured to run.

export ANYSCALE_HOST=https://console.anyscale.com
export ANYSCALE_CLI_TOKEN=$YOUR_CLI_TOKEN  # retrieved from Anyscale credentials page

Cluster environment

The cluster environment determines where our workloads will be executed (OS, dependencies, etc.) We've already created this cluster environment for us but this is how we can create/update one ourselves.

export CLUSTER_ENV_NAME="madewithml-cluster-env"
anyscale cluster-env build deploy/cluster_env.yaml --name $CLUSTER_ENV_NAME

Compute configuration

The compute configuration determines what resources our workloads will be executes on. We've already created this compute configuration for us but this is how we can create it ourselves.

export CLUSTER_COMPUTE_NAME="madewithml-cluster-compute-g5.4xlarge"
anyscale cluster-compute create deploy/cluster_compute.yaml --name $CLUSTER_COMPUTE_NAME

Anyscale jobs

Now we're ready to execute our ML workloads. We've decided to combine them all together into one job but we could have also created separate jobs for each workload (train, evaluate, etc.) We'll start by editing the $GITHUB_USERNAME slots inside our workloads.yaml file:

runtime_env:
  working_dir: .
  upload_path: s3://madewithml/$GITHUB_USERNAME/jobs  # <--- CHANGE USERNAME (case-sensitive)
  env_vars:
    GITHUB_USERNAME: $GITHUB_USERNAME  # <--- CHANGE USERNAME (case-sensitive)

The runtime_env here specifies that we should upload our current working_dir to an S3 bucket so that all of our workers when we execute an Anyscale Job have access to the code to use. The GITHUB_USERNAME is used later to save results from our workloads to S3 so that we can retrieve them later (ex. for serving).

Now we're ready to submit our job to execute our ML workloads:

anyscale job submit deploy/jobs/workloads.yaml

Anyscale Services

And after our ML workloads have been executed, we're ready to launch our serve our model to production. Similar to our Anyscale Jobs configs, be sure to change the $GITHUB_USERNAME in serve_model.yaml.

ray_serve_config:
  import_path: deploy.services.serve_model:entrypoint
  runtime_env:
    working_dir: .
    upload_path: s3://madewithml/$GITHUB_USERNAME/services  # <--- CHANGE USERNAME (case-sensitive)
    env_vars:
      GITHUB_USERNAME: $GITHUB_USERNAME  # <--- CHANGE USERNAME (case-sensitive)

Now we're ready to launch our service:

# Rollout service
anyscale service rollout -f deploy/services/serve_model.yaml

# Query
curl -X POST -H "Content-Type: application/json" -H "Authorization: Bearer $SECRET_TOKEN" -d '{
  "title": "Transfer learning with transformers",
  "description": "Using transformers for transfer learning on text classification tasks."
}' $SERVICE_ENDPOINT/predict/

# Rollback (to previous version of the Service)
anyscale service rollback -f $SERVICE_CONFIG --name $SERVICE_NAME

# Terminate
anyscale service terminate --name $SERVICE_NAME

CI/CD

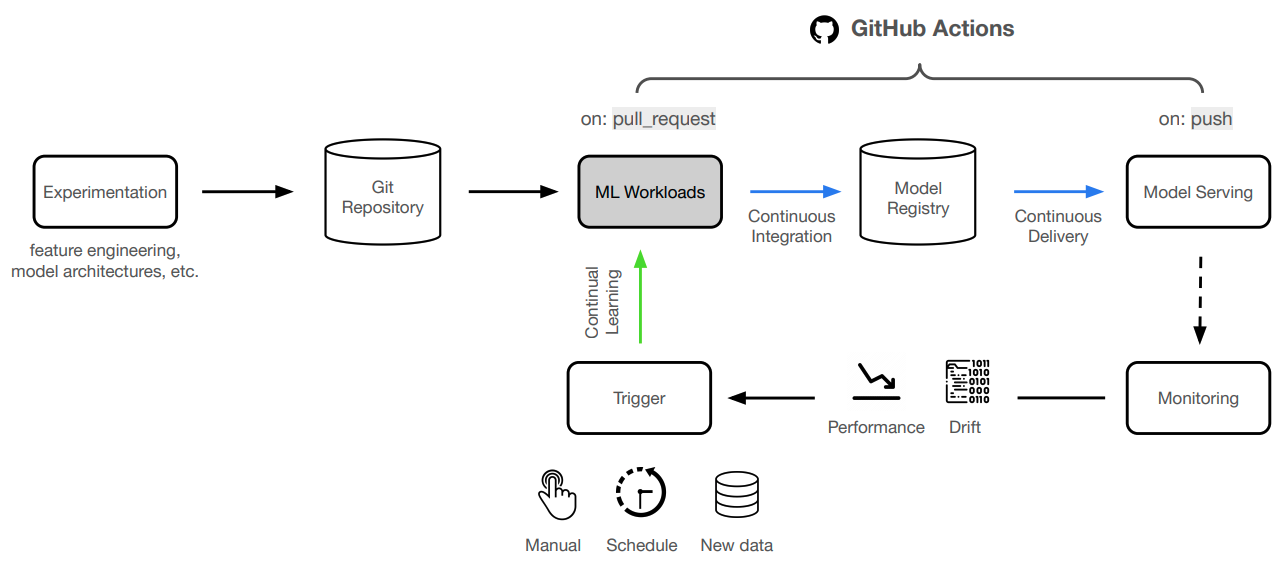
We're not going to manually deploy our application every time we make a change. Instead, we'll automate this process using GitHub Actions!

  1. Create a new github branch to save our changes to and execute CI/CD workloads:
git remote set-url origin https://github.com/$GITHUB_USERNAME/Made-With-ML.git  # <-- CHANGE THIS to your username
git checkout -b dev
  1. We'll start by adding the necessary credentials to the /settings/secrets/actions page of our GitHub repository.
export ANYSCALE_HOST=https://console.anyscale.com
export ANYSCALE_CLI_TOKEN=$YOUR_CLI_TOKEN  # retrieved from https://console.anyscale.com/o/madewithml/credentials
  1. Now we can make changes to our code (not on main branch) and push them to GitHub. But in order to push our code to GitHub, we'll need to first authenticate with our credentials before pushing to our repository:
git config --global user.name $GITHUB_USERNAME  # <-- CHANGE THIS to your username
git config --global user.email [email protected]  # <-- CHANGE THIS to your email
git add .
git commit -m ""  # <-- CHANGE THIS to your message
git push origin dev

Now you will be prompted to enter your username and password (personal access token). Follow these steps to get personal access token: New GitHub personal access token → Add a name → Toggle repo and workflow → Click Generate token (scroll down) → Copy the token and paste it when prompted for your password.

  1. Now we can start a PR from this branch to our main branch and this will trigger the workloads workflow. If the workflow (Anyscale Jobs) succeeds, this will produce comments with the training and evaluation results directly on the PR.
  1. If we like the results, we can merge the PR into the main branch. This will trigger the serve workflow which will rollout our new service to production!

Continual learning

With our CI/CD workflow in place to deploy our application, we can now focus on continually improving our model. It becomes really easy to extend on this foundation to connect to scheduled runs (cron), data pipelines, drift detected through monitoring, online evaluation, etc. And we can easily add additional context such as comparing any experiment with what's currently in production (directly in the PR even), etc.

FAQ

Jupyter notebook kernels

Issues with configuring the notebooks with jupyter? By default, jupyter will use the kernel with our virtual environment but we can also manually add it to jupyter:

python3 -m ipykernel install --user --name=venv

Now we can open up a notebook → Kernel (top menu bar) → Change Kernel → venv. To ever delete this kernel, we can do the following:

jupyter kernelspec list
jupyter kernelspec uninstall venv

made-with-ml's People

Contributors

gokumohandas avatar

Stargazers

 avatar  avatar  avatar  avatar  avatar  avatar  avatar  avatar  avatar  avatar  avatar  avatar  avatar  avatar  avatar  avatar  avatar  avatar  avatar  avatar  avatar  avatar  avatar  avatar  avatar  avatar  avatar  avatar  avatar  avatar  avatar  avatar  avatar  avatar  avatar  avatar  avatar  avatar  avatar  avatar  avatar  avatar  avatar  avatar  avatar  avatar  avatar  avatar  avatar  avatar  avatar  avatar  avatar  avatar  avatar  avatar  avatar  avatar  avatar  avatar  avatar  avatar  avatar  avatar  avatar  avatar  avatar  avatar  avatar  avatar  avatar  avatar  avatar  avatar  avatar  avatar  avatar  avatar  avatar  avatar  avatar  avatar  avatar  avatar  avatar  avatar  avatar  avatar  avatar  avatar  avatar  avatar  avatar  avatar  avatar  avatar  avatar  avatar  avatar  avatar

Watchers

 avatar  avatar  avatar  avatar  avatar  avatar  avatar  avatar  avatar  avatar  avatar  avatar  avatar  avatar  avatar  avatar  avatar  avatar  avatar  avatar  avatar  avatar  avatar  avatar  avatar  avatar  avatar  avatar  avatar  avatar  avatar  avatar  avatar  avatar  avatar  avatar  avatar  avatar  avatar  avatar  avatar  avatar  avatar  avatar  avatar  avatar  avatar  avatar  avatar  avatar  avatar  avatar  avatar  avatar  avatar  avatar  avatar  avatar  avatar  avatar  avatar  avatar  avatar  avatar  avatar  avatar  avatar  avatar  avatar  avatar  avatar  avatar  avatar  avatar  avatar  avatar  avatar  avatar  avatar  avatar  avatar  avatar  avatar  avatar  avatar  avatar  avatar  avatar  avatar  avatar  avatar  avatar  avatar  avatar  avatar  avatar  avatar  avatar  avatar  avatar

made-with-ml's Issues

Missing legend in the plot of Logistic Regression

Problem: only malignant legend was shown ( plot data section of the Logistic Regression lesson.)
image

Fix
I am not sure if I should create a PR for a notebook ... so I created this issue with a working code instead. Please see below

# Define X and y
X = df[["leukocyte_count", "blood_pressure"]].values
y = df["tumor_class"].values

# Split the data into separate arrays for benign and malignant classes
X_benign = X[y == "benign"]
X_malignant = X[y == "malignant"]

# Plot the data for each class separately
fig, ax = plt.subplots()
ax.scatter(X_benign[:, 0], X_benign[:, 1], c="blue", s=25, edgecolors="k", label="benign")
ax.scatter(X_malignant[:, 0], X_malignant[:, 1], c="red", s=25, edgecolors="k", label="malignant")
ax.set_xlabel("leukocyte count")
ax.set_ylabel("blood pressure")
ax.legend(loc="upper right")
plt.show()

Foundations --> Embeddings

  1. Typo under Model section: 3. We'll apply convolution via filters (filter_size, vocab_size, num_filters) should be embedding_dim to replace vocab_size?
  2. Typo under Experiments: first have to decice
  3. Typo under Interpretability padding our inputs before convolution to result is outputs is should be in
  4. Could there be a general explanation of moving models/data across devices? My current understanding is that they have to be both on the same place (cpu/gpu). If on gpu, just stay on gpu through the whole train/eval/predict session. I couldn't understand why under Inference device = torch.device("cpu") moves things back to cpu.
  5. interpretable_trainer.predict_step(dataloader) breaks with AttributeError: 'list' object has no attribute 'dim'. The precise step is F.softmax(z), where for interpretable_model, z is a list of 3 items and it was trying to softmax a list instead of a tensor.

Maybe a small error in Notebook ''Multilayer Perceptrons''?

In the cell of "Training" in Notebook ''Multilayer Perceptrons'', the sentence "6. Repeat steps 2 - 4 until model performs well." should be changed into "6. Repeat steps 2 - 5 until model performs well." Because gradient descent is implemented after each iteration.

Lambda function missing

Hi Goku,

I'm going through the Pandas and I noticed that in the Feature engineering section, you mentioned about applying a lambda function to create a new feature, but the code for it does not appear. I think it's just a minor typo.

Regards,
Roberto

Introducing RedisAI

First of all, thank you so much for such an amazing course material. I found that the product-inization is made using flask which is not really scalable. I understand usual scaling mechanism like TF serving is not easy to put in a beginner level course. Is it something in your roadmap already to try RedisAI as an alternative?

PS: I am core dev from RedisAI team

A Notebook on Visualization.

Should I do a notebook on data visualization using matplotlib | seaborn to be added to this already amazing repo?

Notebook

Could u pls release a instruction on Jupyter notebook, I mean how to run your code on Jupyter notebook. You know, in China, we cannot acsess Google.

Lessons page, Basic ML: "Notebook not found".

Problem: Starting from either https://practicalai.me/learn/lessons/ or https://github.com/practicalAI/practicalAI, when attempting to click any of the lessons I see "Notebook not found".
Proposed fix: Possibly "basic_ml" should be added to the path?

image

When I click "authorize with Github" I see the same thing:
image

The link given then does not work:
image

In the case of the "linear regression" notebook, the non-working link given on the "lessons" page is https://colab.research.google.com/github/practicalAI/practicalAI/blob/master/notebooks/04_Linear_Regression.ipynb

Whereas if you go find it on github directly, it is
https://colab.research.google.com/github/practicalAI/practicalAI/blob/master/notebooks/basic_ml/04_Linear_Regression.ipynb

Foundations --> Transformers

Hi Goku... I am really thankful for all your amazing tutorials.

I however was facing some issues in the Transformers lecture. There are a few minor bugs here with missing variables and imports; which was not an issue.

The training code however is missing the block:

# Train
best_model = trainer.train(
    num_epochs, patience, train_dataloader, val_dataloader)

Also when i wrote this and ran it, I got an error:

/usr/local/lib/python3.7/dist-packages/ipykernel_launcher.py:14: UserWarning: To copy construct from a tensor, it is recommended to use sourceTensor.clone().detach() or sourceTensor.clone().detach().requires_grad_(True), rather than torch.tensor(sourceTensor).
  
/usr/local/lib/python3.7/dist-packages/ipykernel_launcher.py:15: UserWarning: To copy construct from a tensor, it is recommended to use sourceTensor.clone().detach() or sourceTensor.clone().detach().requires_grad_(True), rather than torch.tensor(sourceTensor).
  from ipykernel import kernelapp as app
---------------------------------------------------------------------------
TypeError                                 Traceback (most recent call last)
[<ipython-input-68-8d0f0dee99db>](https://localhost:8080/#) in <module>()
      1 # Train
      2 best_model = trainer.train(
----> 3     num_epochs, patience, train_dataloader, val_dataloader)

6 frames
[/usr/local/lib/python3.7/dist-packages/torch/nn/functional.py](https://localhost:8080/#) in dropout(input, p, training, inplace)
   1277     if p < 0.0 or p > 1.0:
   1278         raise ValueError("dropout probability has to be between 0 and 1, " "but got {}".format(p))
-> 1279     return _VF.dropout_(input, p, training) if inplace else _VF.dropout(input, p, training)
   1280 
   1281 

TypeError: dropout(): argument 'input' (position 1) must be Tensor, not str

Apparently, the issue comes from the line :

seq, pool = self.transformer(input_ids=ids, attention_mask=masks)

wherein the "pool" returned is of class string.
Upon printing the type and the value of it i get the following :

<class 'str'>
pooler_output

Can you please have a look into this.
Thanks in Advance!!

Foundations --> Linear regression (Error in implementation)

Under Pytorch --> Interpretability:
b_unscaled = b * y_scaler.scale_ + y_scaler.mean_ - np.sum(W_unscaled*X_scaler.mean_)
This line seems to be missing a * (y_scaler.scale_/X_scaler.scale_) in the last np.sum term.

The table for W unscaled was also confusing.
It has a sum term shown there, which means if X began with 2 predictors (this lesson only used 1 predictor), the scaled W will have 2 predictors while the sum will aggregate the 2 weights into 1 unscaled weight? Can't wrap my head around this.

Also, under Pytorch --> Interpretability, W_unscaled = W * (y_scaler.scale_/X_scaler.scale_) there was no sum used here, so looks inconsistent with the formula in the table.

image

Foundations -> Utilities Errors and questions

  1. Under def predict_step, z = F.softmax(z).cpu().numpy() is shown on webpage. Notebook correctly assigns to y_prob = F.softmax(z).cpu().numpy() though
  2. Extra single quote after "k" Syntax Error plt.scatter(X[:, 0], X[:, 1], c=[colors[_y] for _y in y], s=25, edgecolors="k"') (happens 1x here, 2x in Data Quality page)
  3. Why did the softmax get manually calculated in Numpy section of Neural Networks page, but here in def train_step,
    the raw logits were passed directly at
z = self.model(inputs)  # Forward pass
J = self.loss_fn(z, targets)  # Define loss

without a apply_softmax = True

  1. Why did train_step's Loss need J.detach().item() but eval_step used J directly without detach and item
  2. In the collate_fn, batch = np.array(batch, dtype=object) was used but i didn't understand why convert to object. Adding a note on what happens without it VisibleDeprecationWarning: Creating an ndarray from ragged nested sequences (which is a list-or-tuple of lists-or-tuples-or ndarrays with different lengths or shapes) is deprecated. would be very helpful in preparing students for ragged tensors and padding in CNN/RNN later
  3. I was wondering why stack X and y. It seems that X is necessary because without stacking, float casting in X = torch.FloatTensor(X.astype(np.float32) breaks with ValueError: setting an array element with a sequence. because batch[:,0] indexing creates nested numpy array objects that can't be casted, but this nested array thing will not occur for y during batch[:,1], because y begun as a 1d object already, so no nested array, so no problem casting, so there's no need to stack y? (same for CNN stacking y)
    This question came about when going through CNN and thinking why was there no X stacking there. Then I realized int casting worked there because padded_sequences = np.zeros begun without nesting, and also numpy was able to implicitly flatten the sequence numpy array during padded_sequences[i][:len(sequence)] = sequence.

Issue in viewing the experiment in MLflow

I am running the tagifai.ipynb notebook on the windows platform but facing difficulty viewing the experiment in MLflow.

Steps Done:

  1. Cloned the repo
  2. Running the "mlops-course\notebooks\tagifai.ipynb" in vs code locally.
  3. To run the server "mlflow server -h 0.0.0.0 -p 8000 --backend-store-uri /experiments/" from the location of the notebook, experiments is the next folder inside it. # $PWD is omitted because of windows.
  4. Opening the "http://localhost:8000/#/"

Observation :

  1. No signs of experiment run.
  2. Image attached below for ref.
    image

Please provide assistance with this issue.

Thanks

Automate your cycle of Intelligence

Katonic MLOps Platform is a collaborative platform with a Unified UI to manage all data science activities in one place and introduce MLOps practice into the production systems of customers and developers. It is a collection of cloud-native tools for all of these stages of MLOps:

-Data exploration
-Feature preparation
-Model training/tuning
-Model serving, testing and versioning

Katonic is for both data scientists and data engineers looking to build production-grade machine learning implementations and can be run either locally in your development environment or on a production cluster. Katonic provides a unified system—leveraging Kubernetes for containerization and scalability for the portability and repeatability of its pipelines.

It will be great if you can list it on your account

Website -
Katonic One Pager.pdf

https://katonic.ai/

error in 10_Utilities

class Dataset 's method collate_fn needs a little change as otherwise following error in thrown when creating dataloader

ValueError: setting an array element with a sequence

Given Code

"""Processing on a batch."""
    # Get inputs
    batch = np.array(batch, dtype=object)
    X = batch[:, 0]    # This line execution throws above error 
    y = np.stack(batch[:, 1], axis=0)

Suggested solution

"""Processing on a batch."""
    # Get inputs
    batch = np.array(batch, dtype=object)
    X = np.stack(batch[:, 0] ,axis=0) 
    y = np.stack(batch[:, 1], axis=0)
```

Silly question: LabelEncoder

While creating the LabelEncoder class, I couldnt understand why return self in class method fit(self,y)?
My understanding is that when we call this method, the object variables are updated so no need for self?
Please correct me if I'm wrong, just trying to reason myself with each step of the code.

    def fit(self, y):
        classes = np.unique(y)
        for i, class_ in enumerate(classes):
            self.class_to_index[class_] = i
        self.index_to_class = {v: k for k,v in self.class_to_index.items()}
        self.classes = list(self.class_to_index.keys())
        return self #Why?

type in 07_PyTorch.ipynb

Under Gradients the text
$ y = 3x + 2 $
$ y = \sum{y}/N $
$ \frac{\partial(z)}{\partial(x)} = \frac{\partial(z)}{\partial(y)} \frac{\partial(z)}{\partial(x)} = \frac{1}{N} * 3 = \frac{1}{12} * 3 = 0.25 $

should be

$ y = 3x + 2 $
$ z = \sum{y}/N $
$ \frac{\partial(z)}{\partial(x)} = \frac{\partial(z)}{\partial(y)} \frac{\partial(y)}{\partial(x)} = \frac{1}{N} * 3 = \frac{1}{12} * 3 = 0.25 $

num_classes vs num_tokens

The following padding function used in https://madewithml.com/courses/foundations/convolutional-neural-networks/ refers to num_classes which in the example used comes up to 500. I was wondering if it should be referred as num_tokens (as used in other functions). Just getting confused since as per my understanding num_classes = 4.

def pad_sequences(sequences, max_seq_len=0):
      """Pad sequences to max length in sequence."""
      max_seq_len = max(max_seq_len, max(len(sequence) for sequence in sequences))
      num_classes = sequences[0].shape[-1]
      padded_sequences = np.zeros((len(sequences), max_seq_len, num_classes))
      for i, sequence in enumerate(sequences):
          padded_sequences[i][:len(sequence)] = sequence
      return padded_sequences

3d or 2d numpy array?

In the numpy notebook, in the section # 3-D array (matrix) I see that when you run the cell one of the outputs is x ndim: 2. Seems that the title is in conflict with how numpy categorizes it and I've always considered [[], []] to be 2d.

Foundations --> CNN Doubts

Hi, Thank you for such excellent lessons!!!

I had 3 doubts in the lecture, can you please explain them:

  1. When we pad the one-hot sequences to max number of seq length, why do we not put 1 at the 0th index? (so as to make it to correspond to < pad > token) Why is it currently all zeros ?

  2. When we're loading the weights in the interpretableCNN model, why dont we get the weight mis-match error ? (as we have dropped the FC layer part and we're also not using strict=False )

  3. My sns heatmap / conv_output have all the values 1 . It does not resemble yours...Can you help me with this?

image

feature.json not found

ERROR: failed to pull data from the cloud - Checkout failed for following targets:
features.json
projects.json
tags.json
features.parquet

Foundations --> CNN clarifications

  1. Under Modelling there is a sequence of 3D diagrams showing the flow of shapes. It seems that the vocab_size dimension disappeared after the convolution step. From the earlier gifs showing convolution, they only use integers in each cell instead of a one hot encoded vector. I was hoping for some explanation of where the vocab_size dimension went during convolution, like what kind of aggregation happened there.

  2. If there were annotations of the shapes as pytorch requires (including the manual axis 1,2 transpose) under each step will be very helpful. I had been trying to see the shapes throughout the flow using torchsummary.summary(model,(500,8,1)) but no matter what pattern i try it gives ValueError: too many values to unpack (expected 1).
    It is breaking at user-defined code which is strange because i thought it should be torchsummary's issue. If i try to turn this 3-tuple into a single integer, then this user-code passes but torchsummary breaks saying integer is not iterable.

Does torchsummary work by sending random values through the pipeline to get the shapes and that's why it has to run user-code and that's why i see this unpacking error? How do I use properly torchsummary to view CNN shapes?

     19 
     20         # Rearrange input so num_channels is in dim 1 (N, C, L)
---> 21         x_in, = inputs
     22         if not channel_first:
     23             x_in = x_in.transpose(1, 2)

"Product Design" page text cut-off

I'm look at the Product Design page, and I'm seeing two small errors:

  1. Small typo in the "Value Proposition" section

product: what needs to be build to help our users reach their goals?

  1. The article stops abruptly mid-sentence, see below
Screenshot 2023-07-26 at 11 20 45 AM

Foundations --> Logistic regression feedback/errors

  1. Webpage says W dimension is Dx1 but notebook says DxC. Prefer webpage to also show DxC to expose people to the more general multi-class W

  2. Two errors causing notebook to not run top-down
    a. Extra single quote behind k: plt.scatter(X[:, 0], X[:, 1], c=[colors[_y] for _y in y], s=25, edgecolors="k"')
    b. SyntaxError: Double quotes to index dictionary early closing double quotes for f-string (happens in 2 cells) print (f"m:b = {class_counts["malignant"]/class_counts["benign"]:.2f}")

  3. Hope the matrix calculus section had more explanation, feels to me like for people who understand it, they won't need the formulas, but for people who don't understand, it doesn't help much.
    Some questions I had going through that section.

    1. What's the physical meaning of y and j indexes in loss formula? Why does W have y subscript in numerator and sum across j in denominator? Why does denominator's W have no subscript. Seems to me like both y, j refer to one of the classes in a set of unique classes.
    2. In gradients formula, what is the physical meaning of Wy Wj, and why are we differentiating wrt to them?
    3. Why did i disappear from subscript of X in gradients section
    4. Why do some W have subscripts y/j while some W don't have any subscript
    5. Linking to some derivations like these (https://towardsdatascience.com/derivative-of-the-softmax-function-and-the-categorical-cross-entropy-loss-ffceefc081d1) would be very helpful
  4. How did db = np.sum(dscores, axis=0, keepdims=True) implementation come about? Was expecting a formula version describing gradient wrt bias but previous it's mentioned We'll leave the bias weights out for now to avoid complicating the backpropagation calculation

  5. W_{unscaled} includes sum in formula which it shouldn't?

Alternative to Colab and Binder for running `practicalAI` in the cloud

Hi @GokuMohandas,

I've been recently taking a look at the sample Notebooks in this project and I found them really interesting and valuable for teaching purposes. We're even thinking about adding part of them to our curriculum at https://rmotr.com/ (cofounder and teacher here), in our Data Science program.

We have a small service at RMOTR that lets you run a Jupyter environment online in a single click. Similar to Google Colab or Binder, but also with the ability of installing custom requirements, clone an entire GH repo, etc. We use it for our students, so they don't have to hit the initial wall of installing the whole local Jupyter setup when they are getting started in the DS world.

You can see how practicalAI looks like in the service using this link:
https://notebooks.rmotr.com/clone/gh/GokuMohandas/practicalAI

Note that all requirements listed in requirements.txt are already installed when the env is loaded, so people can start using it right away. That gives you the flexibility of adding any requirement, and not being tied to what Colab provides by default.

Do you think it would be a good choice to add it as a third launching option? Alternatively to Colab and Binder, already listed in the README.

I hope you like it, and I truly appreciate any feedback.

thanks.

Module not imported but called in the section Evaluating Machine Learning Model section

The website link https://madewithml.com/courses/mlops/evaluation/#intuition of Coarse-grained section suggests to import function precision_recall_curve by

from sklearn.metrics import precision_recall_curve

but another function precision_recall_fscore_support from the same module path is called for computing evaluation metrics by

overall_metrics = precision_recall_fscore_support(y_test, y_pred, average="weighted")

Which kind of model is better for keyword-set classification?

There exists a similar task that is named text classification.

But I want to find a kind of model that the inputs are keyword set. And the keyword set is not from a sentence.

For example:

input ["apple", "pear", "water melon"] --> target class "fruit"
input ["tomato", "potato"] --> target class "vegetable"

Another example:

input ["apple", "Peking", "in summer"]  -->  target class "Chinese fruit"
input ["tomato", "New York", "in winter"]  -->  target class "American vegetable"
input ["apple", "Peking", "in winter"]  -->  target class "Chinese fruit"
input ["tomato", "Peking", "in winter"]  -->  target class "Chinese vegetable"

Thank you.

alternative for colab notebook service in mainland china

hi!
appreciate your work here, me and my friends really learned a lot here
we happened to find a platform in mainland China providing similar service to google colab and kaggle ( as you may known there is connectivity problem to google services in mainland China) called KESCI(www.kesci.com). They provide dev-ready and up-to-date Python & R cpu environment all for free and an upcoming gpu support.
we also managed to translate the whole series to Chinese and applied for a column to publish them on KESCI, as a series. you can access it here : https://www.kesci.com/home/column/5c20e4c5916b6200104eea63
the Computer Vision notebook has already been translated but is still being trained in the transfer-learning section
also, do you think it is possible to add this as another launching option? i think there must be more people in China who could learn from your tutorials!

No Batch Normalization in CNN?

Hi there,
While doing CNN module, I found that no batch normalization is applied in the forward pass?

class CNN(nn.Module):
    def __init__(self, vocab_size, num_filters, filter_size,
                 hidden_dim, dropout_p, num_classes):
        super(CNN, self).__init__()

        # Convolutional filters
        self.filter_size = filter_size
        self.conv = nn.Conv1d(
            in_channels=vocab_size, out_channels=num_filters,
            kernel_size=filter_size, stride=1, padding=0, padding_mode="zeros")
        self.batch_norm = nn.BatchNorm1d(num_features=num_filters)

        # FC layers
        self.fc1 = nn.Linear(num_filters, hidden_dim)
        self.dropout = nn.Dropout(dropout_p)
        self.fc2 = nn.Linear(hidden_dim, num_classes)

    def forward(self, inputs, channel_first=False,):

        # Rearrange input so num_channels is in dim 1 (N, C, L)
        x_in, = inputs
        if not channel_first:
            x_in = x_in.transpose(1, 2)

        # Padding for `SAME` padding
        max_seq_len = x_in.shape[2]
        padding_left = int((self.conv.stride[0]*(max_seq_len-1) - max_seq_len + self.filter_size)/2)
        padding_right = int(math.ceil((self.conv.stride[0]*(max_seq_len-1) - max_seq_len + self.filter_size)/2))

        # Conv outputs
        z = self.conv(F.pad(x_in, (padding_left, padding_right)))
        # ---------MISSING Batch Normalization here ? -----------
        z = F.max_pool1d(z, z.size(2)).squeeze(2)

        # FC layer
        z = self.fc1(z)
        z = self.dropout(z)
        z = self.fc2(z)
        return z

[Discussion] End2end MLOps platform with notebook vs. Testable python modules

Hi thanks for these impressive courses, They really help me a lot in my career.
I have some thoughts that I want to discuss. As there are and more more end2end MLOps platforms that use notebooks to deliver models to production, what is your opinion about converting notebooks to fully testable python modules (in 2023)? Is that still bring some benefits if the platform could ensure the reproducibility for training/data processing...?

Thanks in advance for your reply.

Hanyuan

Removing outliers

Hello! Great content =]

But are you sure you want to remove outliers before feature engineering? E.g. if a feature has a power law distribution (as many do) then you would have outliers that are no longer outliers once you take the log of the feature.
Maybe you could add a warning or something. I makes sense to deal with outliers before your feature store but I wouldn't want to remove any outliers before having performed a thorough EDA. Now that I think about it the same goes for dealing with missing values. Of course we are talking MLOps so you might have meant that one should follow this guide once they have a model they are happy with but it seems more all encompassing what you have created.

Just a thought. Feel free to close this issue whenever you want.

Where is the old course?

Hi! Can you please post the old course in an archive. The new course does not have the foundations part.

Foundations --> Neural Network

  1. In the table at the top, outputs from second layer shows NxH should be NxC?

  2. SyntaxError: plt.scatter(X[:, 0], X[:, 1], c=[colors[_y] for _y in y], edgecolors="k"', s=25) Extra single quote behind "k" in notebook

  3. Is def init_weights(self): used anywhere? It seems this was defined but not applied anywhere, or does pytorch implicitly apply it during some step? I was expecting model.apply(init_weights) somewhere

  4. The objective is to have weights that are able to produce outputs that follow a similar distribution across all neurons
    Could there be more clarity on this statement? What exactly is a "distribution across neurons" , and what does "similar" mean? What are the objects that we want similar? Is it we have 1 distribution per layer of neurons, and each neuron's single output value contributes to this discrete distribution of outputs in a layer, and we're comparing similarity across layers? (but this sounds wrong because each layer would have different number of neurons, can discrete distributions with different number of items in x-axis be compared?)

  5. Is there missing - sign in term (with 1/y) on the left side of = a(y-1) in gradient derivation of dJ/dW2y

Recommend Projects

  • React photo React

    A declarative, efficient, and flexible JavaScript library for building user interfaces.

  • Vue.js photo Vue.js

    🖖 Vue.js is a progressive, incrementally-adoptable JavaScript framework for building UI on the web.

  • Typescript photo Typescript

    TypeScript is a superset of JavaScript that compiles to clean JavaScript output.

  • TensorFlow photo TensorFlow

    An Open Source Machine Learning Framework for Everyone

  • Django photo Django

    The Web framework for perfectionists with deadlines.

  • D3 photo D3

    Bring data to life with SVG, Canvas and HTML. 📊📈🎉

Recommend Topics

  • javascript

    JavaScript (JS) is a lightweight interpreted programming language with first-class functions.

  • web

    Some thing interesting about web. New door for the world.

  • server

    A server is a program made to process requests and deliver data to clients.

  • Machine learning

    Machine learning is a way of modeling and interpreting data that allows a piece of software to respond intelligently.

  • Game

    Some thing interesting about game, make everyone happy.

Recommend Org

  • Facebook photo Facebook

    We are working to build community through open source technology. NB: members must have two-factor auth.

  • Microsoft photo Microsoft

    Open source projects and samples from Microsoft.

  • Google photo Google

    Google ❤️ Open Source for everyone.

  • D3 photo D3

    Data-Driven Documents codes.