GithubHelp home page GithubHelp logo

diy-alexa's Introduction

ko-fi

DIY Alexa With the ESP32 and Wit.AI

All the source code for this tutorial is in GitHub

Introduction

This tutorial will guide you through the process of creating your own DIY Alexa using the ESP32 and Wit.ai.

There's a full video tutorial to accompany this available here:

Demo Video

First off, let's define what an Alexa is? What are we going to build?

The first thing we're going to need is some kind of "wake word detection system". This will continuously listen to audio, waiting for a trigger phrase or word.

When it hears this word it will wake up the rest of the system and start recording audio to capture whatever instructions the user has.

Once the audio has been captured it will send it off to a server to be recognised.

The server processes the audio and works out what the user is asking for.

An Alexa System

In some systems the server may process the user request, calling out to other services to execute the user's wishes. In the system we are going to build we'll just be using the server to work out what the user's intention was and then our ESP32 will execute the command.

We'll need to build three components:

  • Wake word detection
  • Audio capture and Intent Recognition
  • Intent Execution

We'll wire these together to build our complete system.


Getting Started

We're going to be using some hardware for our project - most of these components can be readily sourced from Amazon, eBay and Adafruit. You may also have local stockists in your own country who can supply the components.

We will need:

An ESP32 dev kit

These are readily available from a number of suppliers include Adafruit

ESP32 Dev Kit

A good environment for developing for the ESP32 is Platform.io and Visual Studio Code.

A microphone break out board

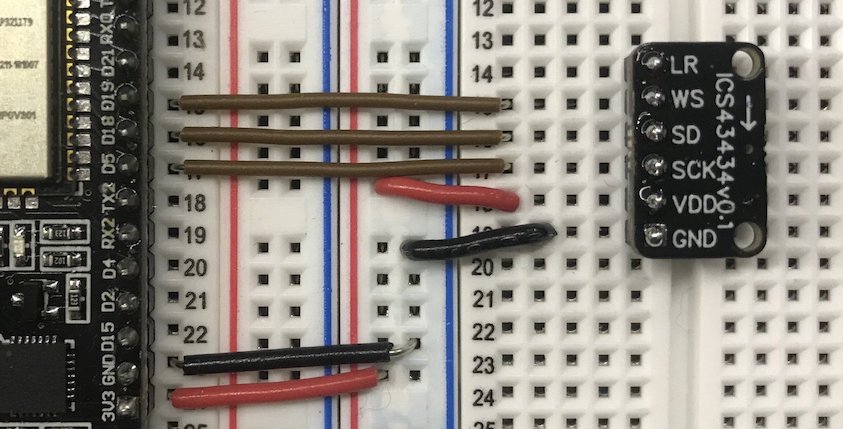
I recommend using an I2S MEMS microphone board. These are very low noise microphones that can be connected directly to the ESP32 using a digital interface and require only a few wires. A good choice is either the INMP441 microphone (available from Amazon or eBay) or the ICS-43434 (available from Tindie).

MEMS Microphone Board

A Speaker

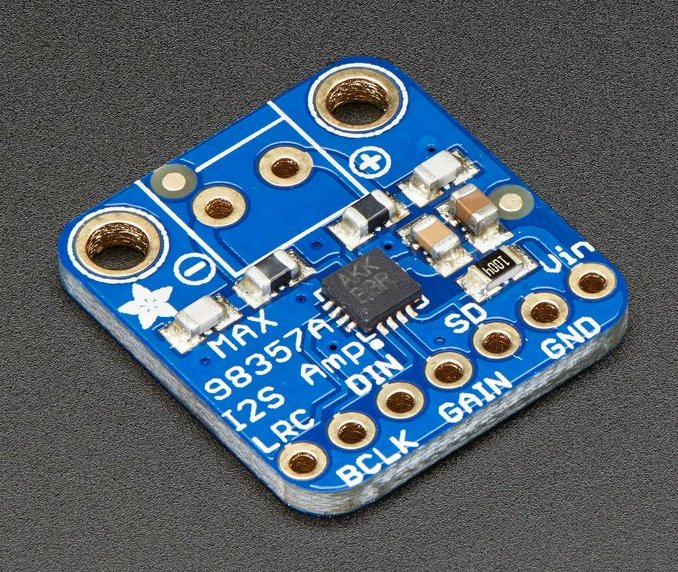
To get our Alexa to talk to us we'll need an amplifier and a speaker. For the amplifier I recommend an I2S breakout board such as this one from Adafruit. This will drive any 4Ω or 8Ω speaker.

Amplifier Board

Python3+

For the machine learning part of this project you'll need Python 3+ installed. To check to see what you have available try running:

python --version

or

python3 --version

If you need to install Python 3 please follow the instructions here.


Wake Word Detection

Let's start off with the Wake word detection. We need to create something that will tell use when a "wake" word is heard by the system. This will need to run on our embedded devices - an ideal option for this is to use TensorFlow and TensorFlow Lite.

Training Data

Our first port of call is to find some data to train a model against. We can use the Speech Commands Dataset. This dataset contains over 100,000 audio files consisting of a set of 20 core commands words such as "Up", "Down", "Yes", "No" and a set of extra words. Each of the samples is 1 second long.

One of these words in particular looks like a good candidate for a wake word - I've chosen to use the word "Marvin" for my wake word as a tribute to the android from The Hitch Hikers Guide to the Galaxy.

Here's a couple of samples of the word "Marvin":

Marvin1 |Marvin1

And here's a few of the other random words from the dataset:

Forward |Left |Right

To augment the dataset you can also record ambient background noise, I recorded several hours of household noises and TV shows to provide a large amount of random data.

Features

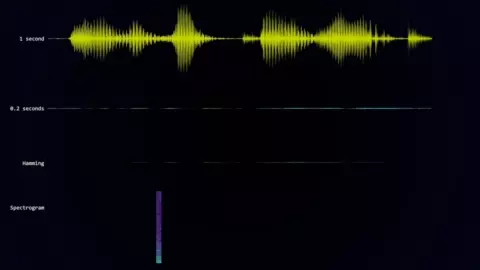
With our training data in place we need to think about what features we are going to train our neural network against. It's unlikely that feeding a raw audio waveform into our neural network will give us good results.

Audio Waveform

A popular approach for word recognition is to translate the problem into one of image recognition.

We need to turn our audio samples into something that looks like an image - to do this we can take a spectrogram.

To get a spectrogram of an audio sample we break the sample into small sections and then perform a discrete Fourier transform on each section. This will give us the frequencies that are present in that slice of audio.

Putting these frequency slices together gives us the spectrogram of the sample.

Spectrogram

In the model folder you'll find several Jupyter notebooks. Follow the setup instructions in the README.md to configure your local environment.

The notebook Generate Training Data.ipynb contains the code required to extract our features from our audio data.

The following function can be used to generate a spectrogram from an audio sample:

def get_spectrogram(audio):
    # normalise the audio
    audio = audio - np.mean(audio)
    audio = audio / np.max(np.abs(audio))
    # create the spectrogram
    spectrogram = audio_ops.audio_spectrogram(audio,
                                              window_size=320,
                                              stride=160,
                                              magnitude_squared=True).numpy()
    # reduce the number of frequency bins in our spectrogram to a more sensible level
    spectrogram = tf.nn.pool(
        input=tf.expand_dims(spectrogram, -1),
        window_shape=[1, 6],
        strides=[1, 6],
        pooling_type='AVG',
        padding='SAME')
    spectrogram = tf.squeeze(spectrogram, axis=0)
    spectrogram = np.log10(spectrogram + 1e-6)
    return spectrogram

This function first normalises the audio sample to remove any variance in volume in our samples. It then computes the spectrogram - there is quite a lot of data in the spectrogram so we reduce this by applying average pooling.

We finally take the log of the spectrogram so that we don't feed extreme values into our neural network which might make it harder to train.

Before generating the spectrogram we add some random noise and variance to our sample. We randomly shift the audio sample the 1-second segment - this makes sure that our neural network generalises around the audio position.

# randomly reposition the audio in the sample
voice_start, voice_end = get_voice_position(audio, NOISE_FLOOR)
end_gap=len(audio) - voice_end
random_offset = np.random.uniform(0, voice_start+end_gap)
audio = np.roll(audio,-random_offset+end_gap)

We also add in a random sample of background noise. This helps our neural network work out the unique features of our target word and ignore background noise.

# get the background noise files
background_files = get_files('_background_noise_')
background_file = np.random.choice(background_files)
background_tensor = tfio.audio.AudioIOTensor(background_file)
background_start = np.random.randint(0, len(background_tensor) - 16000)
# normalise the background noise
background = tf.cast(background_tensor[background_start:background_start+16000], tf.float32)
background = background - np.mean(background)
background = background / np.max(np.abs(background))
# mix the audio with the scaled background
audio = audio + background_volume * background

To make sure we have a balanced dataset we add more samples of the word "Marvin" to our dataset. This also helps our neural network generalise as there will be multiple samples of the word with different background noises and in different positions in the 1-second sample.

# process all the words and all the files
for word in tqdm(words, desc="Processing words"):
    if '_' not in word:
        # add more examples of marvin to balance our training set
        repeat = 70 if word == 'marvin' else 1
        process_word(word, repeat=repeat)

We then add in samples from our background noise, we run through each background noise file and chop it into 1-second samples, compute the spectrogram, and add these to our negative examples.

With all of this data we end up with a reasonably sized training, validation and testing dataset.

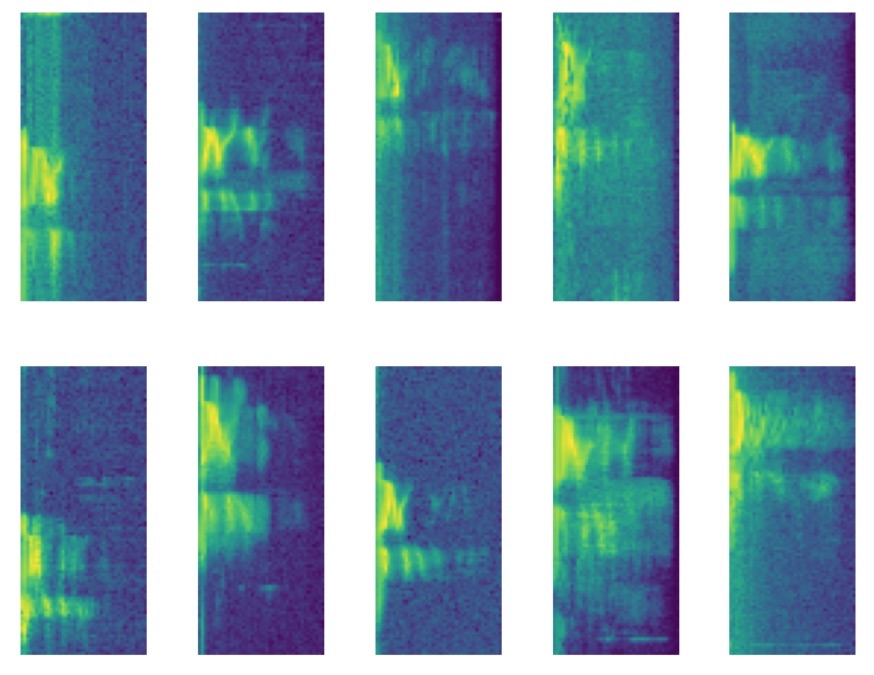
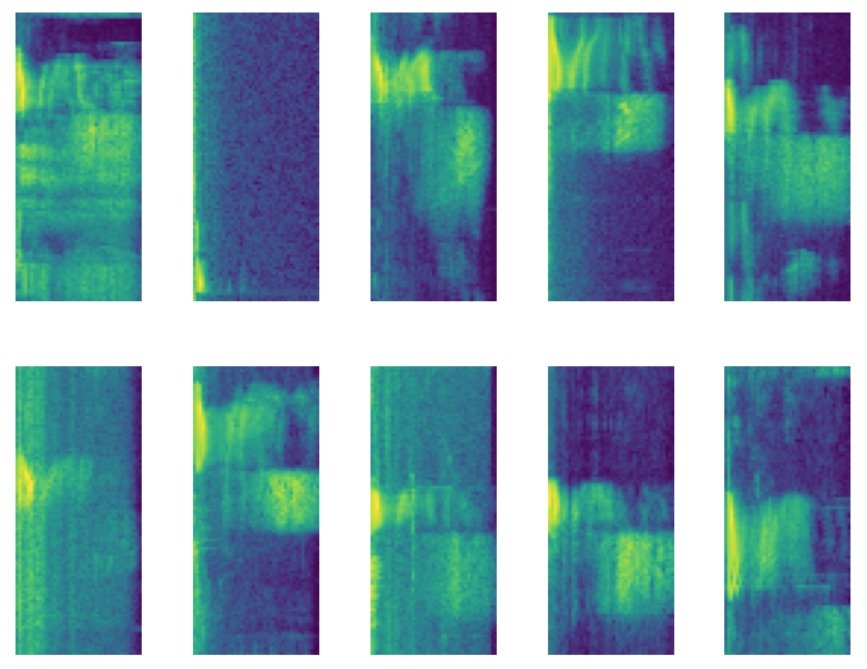
Marvin Spectrograms

Here's some examples spectrograms of the "Marvin", and here's some examples of the word "yes".

Yes Spectrograms

That's our training data prepared, let's have a look at how we train our model up.

Model Training

In the model folder you'll find another Jupyter notebook Train Model.ipynb. This takes the training, test and validation data that we generated in the previous step.

For our system we only really care about detecting the word Marvin so we'll modify our Y labels so that it is a 1 for Marvin and 0 for everything else.

Y_train = [1 if y == words.index('marvin') else 0 for y in Y_train_cats]
Y_validate = [1 if y == words.index('marvin') else 0 for y in Y_validate_cats]
Y_test = [1 if y == words.index('marvin') else 0 for y in Y_test_cats]

We feed this raw data into TensorFlow datasets - we set up our training data repeat forever, randomly shuffle, and to come out in batches.

# create the datasets for training
batch_size = 30

train_dataset = Dataset.from_tensor_slices(
    (X_train, Y_train)
).repeat(
    count=-1
).shuffle(
    len(X_train)
).batch(
    batch_size
)

validation_dataset = Dataset.from_tensor_slices((X_validate, Y_validate)).batch(X_validate.shape[0])

test_dataset = Dataset.from_tensor_slices((X_test, Y_test)).batch(len(X_test))

I've played around with a few different model architectures and ended up with this as a trade-off between time to train, accuracy and model size.

We have a convolution layer, followed by a max-pooling layer, following by another convolution layer and max-pooling layer. The result of this is fed into a densely connected layer and finally to our output neuron.

model = Sequential([
    Conv2D(4, 3,
           padding='same',
           activation='relu',
           kernel_regularizer=regularizers.l2(0.001),
           name='conv_layer1',
           input_shape=(IMG_WIDTH, IMG_HEIGHT, 1)),
    MaxPooling2D(name='max_pooling1', pool_size=(2,2)),
    Conv2D(4, 3,
           padding='same',
           activation='relu',
           kernel_regularizer=regularizers.l2(0.001),
           name='conv_layer2'),
    MaxPooling2D(name='max_pooling2', pool_size=(2,2)),
    Flatten(),
    Dropout(0.2),
    Dense(
        40,
        activation='relu',
        kernel_regularizer=regularizers.l2(0.001),
        name='hidden_layer1'
    ),
    Dense(
        1,
        activation='sigmoid',
        kernel_regularizer=regularizers.l2(0.001),
        name='output'
    )
])
model.summary()

When I train this model against the data I get the following accuracy:

Dataset Accuracy
Training Dataset 0.9683
Validation Dataset 0.9567
Test Dataset 0.9562

These are pretty good results for such a simple model.

If we look at the confusion matrix using the high threshold (0.9) for the true class we see that we have very few examples of background noise being classified as a "Marvin" and quite a few "Marvin"s being classified as background noise.

Predicted Noise Predicted Marvin
Noise 13980 63
Marvin 1616 11054

This is ideal for our use case as we don't want the device waking up randomly.

Converting the model to TensorFlow Lite

With our model trained we now need to convert it for use in TensorFlow Lite. This conversion process takes our full model and turns it into a much more compact version that can be run efficiently on our micro-controller.

In the model folder there is another workbook Convert Trained Model To TFLite.ipynb.

This notebook passes our trained model through the TFLiteConverter along with examples of input data. Providing the sample input data lets the converter quantise our model accurately.

Once the model has been converted we can run a command-line tool to generate C code that we can compile into our project.

xxd -i converted_model.tflite > model_data.cc

Intent Recognition

With our wake word detection model complete we now need to move onto something that can understand what the user is asking us to do.

For this, we will use the Wit.ai service from Facebook. This service will "Turn What Your Users Say Into Actions".

Wit.ai Landing Page

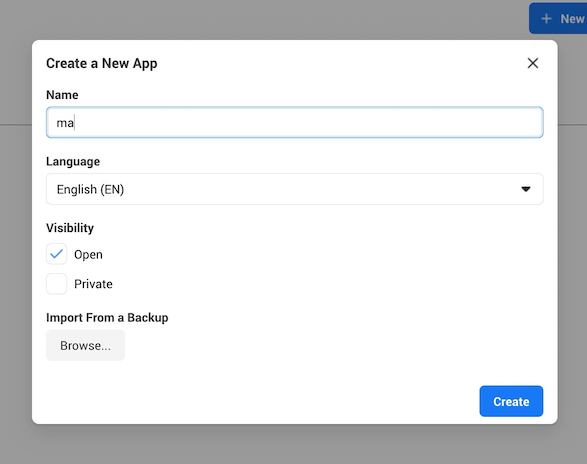
The first thing we'll do is create a new application. You just need to give the application a name and you're all set.

Wit.ai Create Application

With our application created we need to train it to recognise what our users will say. There are three main building blocks of a Wit.ai application:

  • Intents
  • Entities
  • Traits

We'll give our application sample phrases and train it to recognise what intent it should map the phase onto.

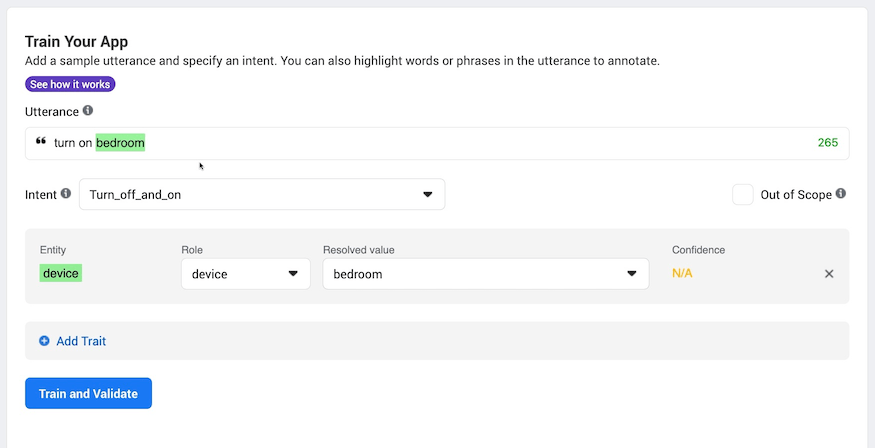
For our project we want to be able to turn devices on and off. Some sample phrases that we can use to train Wit.ai are:

"Turn on bedroom"
"Turn off kitchen"
"Turn on the lights"

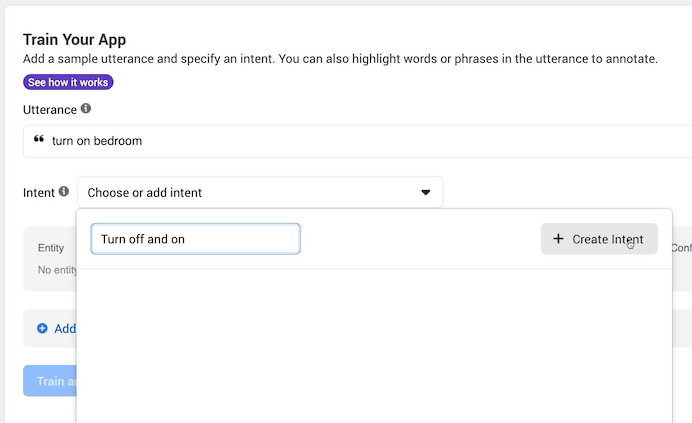
We feed these phrases into Wit.ai - for the first phrase we enter we'll create a new intent "Turn_on_device".

As we add more phrases we'll assign them to this new intent. As we give Wit.ai more examples it will learn what kind of phrase should map onto the same intent. In the future when it sees a new phrase it has never seen before - e.g. "Turn on the table" it will be able to recognise that this phrase should belong to the Turn_on_device intent.

Wit.ai Create Intent

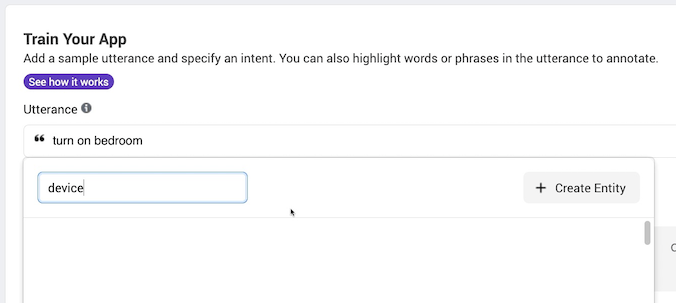
This gives us the user's intention - what are they trying to do? - we now need to work out what the object is that they are trying to effect. This is handled by creating entities.

Wit.ai Entity

We want to turn off and on devices so we will highlight the part of the phrase that corresponds to the device name. In the following phrase "bedroom" is the device: "Turn on bedroom". When we highlight a piece of text in the utterance Wit.ai will prompt us to assign it to an existing or a new Entity.

Wit.ai Entity

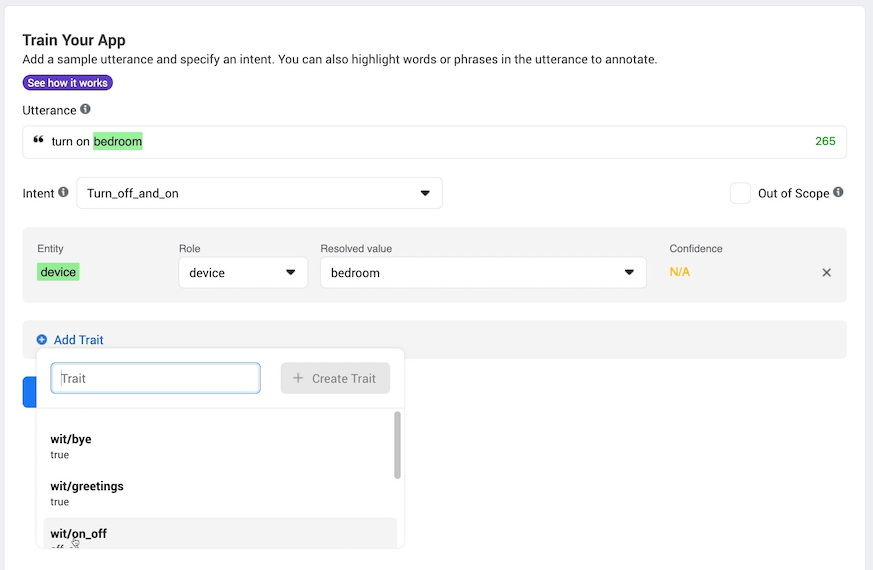
Finally we want to be able detect what the user is trying to do to the device. For this we use Traits. Wit.ai has a built-in trait for detecting "on" and "off" so we can use this for training.

Wit.ai Entity

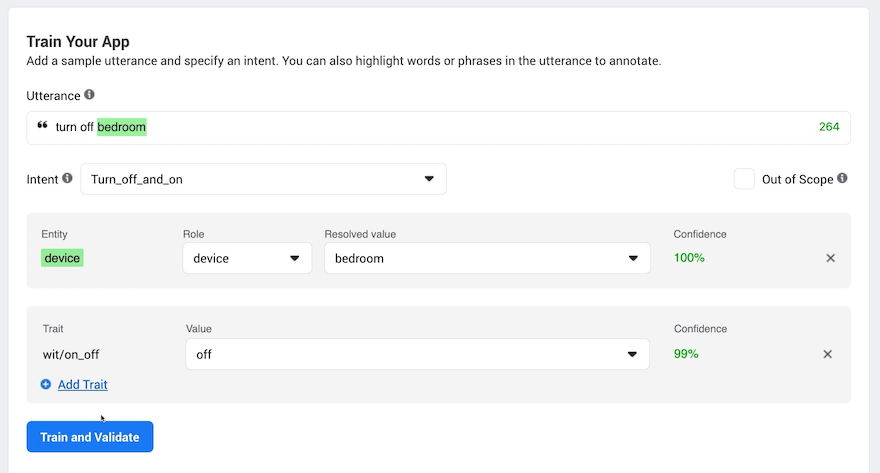
Once we've trained Wit.ai on a few sample phrases it will start to automatically recognise the Intent, Entity and Trait. If it fails to recognise any of these then you can tell it what it should have done and it will correct itself.

Wit.ai Entity

Once we are happy that Wit.ai is performing we can try it out with either text or audio files and see how it performs on real audio.

Here's a sample piece of audio:

Test Audio

To send this file to Wit.ai we can use curl from the command line.

curl -XPOST -H 'Authorization: Bearer XXX' -H "Content-Type: audio/wav" "https://api.wit.ai/speech?v=220201015" --data-binary "@turn_on.wav"

This curl command will post the contents of the audio file specified by turn_on.wav to the Wit.ai.

You can get the exact values for the Authorization header and the URL from the settings page of your Wit.ai application.

Wit.ai will process the audio file and send us back some JSON that contains the intent, entity and trait that it recognised.

For the audio sample above we get back:

{
  "text": "turn on kitchen",
  "intents": [
    {
      "id": "796739491162506",
      "name": "Turn_on_device",
      "confidence": 0.9967
    }
  ],
  "entities": {
    "device:device": [
      {
        "id": "355753362231708",
        "name": "device",
        "role": "device",
        "start": 8,
        "end": 15,
        "body": "kitchen",
        "confidence": 0.9754,
        "entities": [],
        "value": "kitchen",
        "type": "value"
      }
    ]
  },
  "traits": {
    "wit$on_off": [
      {
        "id": "535a80f0-6922-4680-b678-0576f248cdcc",
        "value": "on",
        "confidence": 0.9875
      }
    ]
  }
}

As you can see, it's worked out the intent "Turn_on_device", it's recognised the name of the device as "kitchen" and it's worked out that we want to turn the device "on".

Pretty amazing!


Wiring it all up

So that's our building blocks completed. We have something that will detect a wake word and we have something that will work out what the user's intention was.

Let's have a look at how this is all wired up on ESP32 side of things

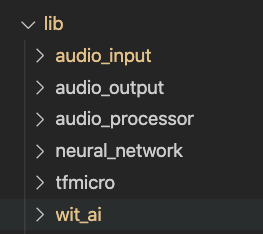
I've created a set of libraries for the main components of the project.

ESP32 Libraries

The tfmicro library contains the code from TensorFlow Lite and includes everything needed to run a TensorFlow Lite mode.

The neural_network library contains a wrapper around the TensorFlow Lite code making it easier to interface with the rest of our project.

To get audio data into the system we use the audio_input library. We can support both I2S microphones directly and analogue microphones using the analogue to digital converter. Samples from the microphone are read into a circular buffer with room for just over 1 seconds worth of audio.

Our audio output library audio_output supports playing WAV files from SPIFFS via an I2S amplifier.

To actually process the audio we need to recreate the same process that we used for our training data. This is the job of the audio_processor library.

The first thing we need to do is work out the mean and max values of the sample so that we can normalise the audio.

int startIndex = reader->getIndex();
// get the mean value of the samples
float mean = 0;
for (int i = 0; i < m_audio_length; i++)
{
    mean += reader->getCurrentSample();
    reader->moveToNextSample();
}
mean /= m_audio_length;
// get the absolute max value of the samples taking into account the mean value
reader->setIndex(startIndex);
float max = 0;
for (int i = 0; i < m_audio_length; i++)
{
    max = std::max(max, fabsf(((float)reader->getCurrentSample()) - mean));
    reader->moveToNextSample();
}

We then step through the 1 second of audio extracting a window of samples on each step and computing the spectrogram at each step.

The input samples are normalised and copied into our FFT input buffer. The input to the FFT is a power of two so there is a blank area that we need to zero out.

// extract windows of samples moving forward by step size each time and compute the spectrum of the window
for (int window_start = startIndex; window_start < startIndex + 16000 - m_window_size; window_start += m_step_size)
{
    // move the reader to the start of the window
    reader->setIndex(window_start);
    // read samples from the reader into the fft input normalising them by subtracting the mean and dividing by the absolute max
    for (int i = 0; i < m_window_size; i++)
    {
        m_fft_input[i] = ((float)reader->getCurrentSample() - mean) / max;
        reader->moveToNextSample();
    }
    // zero out whatever else remains in the top part of the input.
    for (int i = m_window_size; i < m_fft_size; i++)
    {
        m_fft_input[i] = 0;
    }
    // compute the spectrum for the window of samples and write it to the output
    get_spectrogram_segment(output_spectrogram);
    // move to the next row of the output spectrogram
    output_spectrogram += m_pooled_energy_size;
}

Before performing the FFT we apply a Hamming window and then once we have done the FFT we extract the energy in each frequency bin.

We follow that by the same average pooling process as in training. And then finally we take the log.

// apply the hamming window to the samples
m_hamming_window->applyWindow(m_fft_input);
// do the fft
kiss_fftr(
    m_cfg,
    m_fft_input,
    reinterpret_cast<kiss_fft_cpx *>(m_fft_output));
// pull out the magnitude squared values
for (int i = 0; i < m_energy_size; i++)
{
    const float real = m_fft_output[i].r;
    const float imag = m_fft_output[i].i;
    const float mag_squared = (real * real) + (imag * imag);
    m_energy[i] = mag_squared;
}
// reduce the size of the output by pooling with average and same padding
float *output_src = m_energy;
float *output_dst = output;
for (int i = 0; i < m_energy_size; i += m_pooling_size)
{
    float average = 0;
    for (int j = 0; j < m_pooling_size; j++)
    {
        if (i + j < m_energy_size)
        {
            average += *output_src;
            output_src++;
        }
    }
    *output_dst = average / m_pooling_size;
    output_dst++;
}
// now take the log to give us reasonable values to feed into the network
for (int i = 0; i < m_pooled_energy_size; i++)
{
    output[i] = log10f(output[i] + EPSILON);
}

This gives us the set of features that our neural network is expecting to see.

Finally we have the code for talking to Wit.ai. To avoid having to buffer the entire audio sample in memory we need to perform a chunked upload of the data.

We create the connection to wit.ai and then upload the chunks of data until we've collected sufficient audio data to capture the user's command.

m_wifi_client = new WiFiClientSecure();
m_wifi_client->connect("api.wit.ai", 443);
m_wifi_client->println("POST /speech?v=20200927 HTTP/1.1");
m_wifi_client->println("host: api.wit.ai");
m_wifi_client->printf("authorization: Bearer %s\n", access_key);
m_wifi_client->println("content-type: audio/raw; encoding=signed-integer; bits=16; rate=16000; endian=little");
m_wifi_client->println("transfer-encoding: chunked");
m_wifi_client->println();

We decode the results from Wit.ai and extract the pieces of information that we are interested in - we care about the intent, the device and whether the users wants to turn the device on or off.

const char *text = doc["text"];
const char *intent_name = doc["intents"][0]["name"];
float intent_confidence = doc["entities"]["device:device"][0]["confidence"];
const char *device_name = doc["entities"]["device:device"][0]["value"];
float device_confidence = doc["entities"]["device:device"][0]["confidence"];
const char *trait_value = doc["traits"]["wit$on_off"][0]["value"];
float trait_confidence = doc["traits"]["wit$on_off"][0]["confidence"];

Our application consists of a very simple state machine - we can be in one of two states - we can either be waiting for the wake word, or we can recognising a command.

When we are waiting for the wake word we process the audio as it streams past grabbing a 1-second window of samples and feeding it through the audio processor and neural network.

When the neural network detects the wake word we switch into the command recognition state.

This state makes a connection to Wit.ai - this can take up to 1.5 seconds as making an SSL connection on the ESP32 is quite slow.

We then start streaming samples up to the server - to allow for the SSL connection time we rewind 1 second into the past so that we don't miss too much of what the user said.

Once we've streamed 3 seconds of samples we ask wit.ai what the user said. We could get more clever here and wait until the user has stopped speaking.

Wit.ai processes the audio and tells us what the user asked, we pass that onto our intent processor to interpret the request and move to the next state which will put us back into waiting for the wake word.

Our intent processor simply looks at the intent name that wit.ai provides us and carries out the appropriate action.


What's next?

So there we have it, a DIY Alexa.

All the source code is in GitHub. It's MIT licensed so feel free to take the code and use it for your own projects.

How well does it actually work?

Reasonably well, we have a very lightweight wake word detection system, it runs in around 100ms and still has room for optimisation.

Accuracy is ok. We need more training data to make it really robust, you can easily trick it into activating by using similar words to "Marvin" such as "marvellous", "martin", "marlin" etc... More negative example words would help with this problem.

You may want to try changing the wake word for a different one or using your own audio samples to train the neural network.

The Wit.ai system works very well and you can easily add your own intents and traits to build a very powerful system. I've added additional intents to my own project to tell me jokes and you could easily hook the system up to a weather forecast service if you wanted to.

diy-alexa's People

Contributors

cgreening avatar ramainen avatar rbegamer avatar wiltonlazary avatar

Stargazers

 avatar  avatar  avatar  avatar  avatar  avatar  avatar  avatar  avatar  avatar  avatar  avatar  avatar  avatar  avatar  avatar  avatar  avatar  avatar  avatar  avatar  avatar  avatar  avatar  avatar  avatar  avatar  avatar  avatar  avatar  avatar  avatar  avatar  avatar  avatar  avatar  avatar  avatar  avatar  avatar  avatar  avatar  avatar  avatar  avatar  avatar  avatar  avatar  avatar  avatar  avatar  avatar  avatar  avatar  avatar  avatar  avatar  avatar  avatar  avatar  avatar  avatar  avatar  avatar  avatar  avatar  avatar  avatar  avatar  avatar  avatar  avatar  avatar  avatar  avatar  avatar  avatar  avatar  avatar  avatar  avatar  avatar  avatar  avatar  avatar  avatar  avatar  avatar  avatar  avatar  avatar  avatar  avatar  avatar  avatar  avatar  avatar  avatar  avatar  avatar

Watchers

 avatar  avatar  avatar  avatar  avatar  avatar  avatar  avatar  avatar  avatar  avatar  avatar  avatar  avatar  avatar  avatar  avatar  avatar  avatar  avatar

diy-alexa's Issues

Code functions

Screenshot_2021-12-14-21-06-52-82_40deb401b9ffe8e1df2f1cc5ba480b12

I my previous issue you tell me to understand the code , therefore i open this issue for get some idea of functions in code . Ok tell me why are you use tf micro folder and src folder in this code??

mfcc improve accuracy several % over spectrogram

https://github.com/StuartIanNaylor/simple_audio_tensorflow

simple_audio.py is the mini command set and much quicker just to play with
simple_audio.py is the full command set

Both the above are spectrograms

simple_audio_mfcc_frame_length1024_frame_step512.py is just mfcc hacked into the same
You do get a decent accuracy improvement by mfcc alone over spectrogram.

simple_audio_prune.py just checks each wav against the model and deletes if under a threshold (start at .1 and work up as the model will change on each run as the worst is removed)
Think i will post a csv or json of the complete pruned full command set as it may take some time :)

General esp32 question (spiffs)

so I don't think this is actually an issue with your code. It's more of a general esp32 question that I'm hoping you can give some insight on.

I've got the project running and working except I'm having trouble playing the .wav files. In one of the projects I was running before I was getting a 'SPIFFS failed to mount' error, but when I run this project, I don't get that error. However, I get some errors when trying to load the wave files:

ERROR: bit depth 16379 is not supported please use 16 bit signed integer
ERROR: sample rate 200 is not supported please us 16KHz
fmt_chunk_size=0, audio_format=0, num_channels=0, sample_rate=200, sample_alignment=7984, bit_depth=16379, data_bytes=1073469932

I get the exact same messages for every wav file that the app attempts to open. I've called SPIFFS.format() but that doesn't do much to help. I am getting a value returned when I check for the total size (~1.3MB). I thought the esp32 has 4MB of SPI flash, and I don't see this spiff size in the spiffs config anywhere so I haven't verified if this is the correct value yet. I've tried running the project on two different dev boards so far but both behave the same way.

I just tried out this esp32 data uploader for the arduino ide, was able to upload one of the joke files and the app successfully played the file. It seems like it's only able to play the file once though. Maybe it's a platform.io issue?

Anyways, if you have any insight, I would love to hear it. thanks.

DIY Alexa is not response

image

I correctly upload the codes but it's doesn't show any response when I am saying "Marvin" please help me I am waiting for your response I can't understand what is the reason for this please help me

Circuit Sketch Diagram Required

Greetings,

My project is somehow not working properly and i think its because of the circuit setup i may have done incorrectly.
Could you please provide a circuit sketch so that the connections become clear.

Thanks.

Limitations to .WAV file?

Hi,
Are there any limitations to the .WAV file in this project? I tried with the voice generator and it works fine but when I tried with music the speaker didn't respond at all. Any suggestions?
Best.

Hermes protocol ?

Hi, it could be fantastic implement Hermes protocol in order to use with Rhasspy.

FreeRTOS

I'm trying to build the code but I'm missing something with FreeRTOS.

How to install it into platformio?

With pio lib install... something?

Thanks

Custom Wake Words Recognition

testing.zip
Hello, I try to made my custom waking words using my own trained voice but it was not working.
the end result of generating the testing data shows empty results of words "testing"
image

  • I managed to get it run with any words from google command set audio file but no success if I try record my own words.

I did try Records 10 samples of words "testing" in audacity and export the results to 256 kb/s. 16.0kHz , 16 bits , 1 channel , PCM ( Little / Signed) .

The "Testing" folder was created inside the model\speech_data. and all of the wave files exported placed under "diy-alexa-master\model\speech_data\testing" folder.

In Generate Training Data.ipynb , I change the source as following :

1. Adding "Testing" to the words array.

#list of folders we want to process in the speech_data folder
from tensorflow.python.ops import gen_audio_ops as audio_ops
words = [
'backward',
'bed',
'bird',
'cat',
'dog',
'down',
'eight',
'five',
'follow',
'forward',
'four',
'go',
'happy',
'house',
'learn',
'left',
'marvin',
'nine',
'no',
'off',
'on',
'one',
'right',
'seven',
'sheila',
'six',
'stop',
'testing',
'three',
'tree',
'two',
'up',
'visual',
'wow',
'yes',
'zero',
'_background',
]

2. Replace the words "marvin" to word "testing" in the following code

#process all the words and all the files
for word in tqdm(words, desc="Processing words"):
if '_' not in word:
# add more examples of marvin to balance our training set
# repeat = 70 if word == 'marvin' else 1
repeat = 70 if word == 'testing' else 1
process_word(word, repeat=repeat)

print(len(train), len(test), len(validate))

3. Last , I added the following code to the end for testing

word_index = words.index("testing")

X_testing = np.array(X_train)[np.array(Y_train) == word_index]
Y_testing = np.array(Y_train)[np.array(Y_train) == word_index]
plot_images2(X_testing[:20], IMG_WIDTH, IMG_HEIGHT)
print(Y_testing[:20])

additional image for reference

image

I CANT GET SOUND OUTPUT

I biulded the projcet but i cant get voice output it takes the command like turns on the light but it cant create any sound to the speaker through I2S Amp
Screenshot 2022-05-11 114026

Code functions

What programming language is you used for made the audio input folder code?? Python or C++

problem releated to the code

image

In the middle of this picture, the code has a function named "get_files" highlighted in purple clour, Are you use this function to import the background audio files to the jupyter notebook ??

platform io (error)

image

I install the visual studio code and download the platform io extension but its home page didn't open, I was waited nearly 30 minutes to open it. What's the reason you think ??

problem releated to the code

image

In the middle of this picture, the code has a function named "get_files" highlighted in purple clour, Are you use this function to import the background audio files to the jupyter notebook ??

IDF port advice?

Hi atomic, many thanks for the firmware.

Apologies for opening an issue, as it's not an issue with your library.

A few months back I ported your firmware to IDF. While it works, I found when calling invoke() the response time was very slow (I think it was roughly 2.5 times the original).

I measured the time taken for code execution and the slow response came down to calling the TensorFlow function.

I was wondering if you had any insight into why this might be? Originally I thought it might be an issue with the C-linkage, however, I ran my code through Arduino too as .cpp.

If not, no worries; I was planning to wait for the C implementation for TensorFlow Micro 👍 . Cheers,

Guru Meditation Error

Hi,
I can wake it up when I called 'marvin' and it makes the 'ting' sound, but it no longer responds to subsequent commands and gives Guru Meditation Error as shown in the pic. Any suggestions please?

Screen Shot 2022-05-11 at 15 19 42

Dear Mr. atomic14, I look forward to your teaching

hi Dear Mr.atomic14
Based on your suggestions, I learned to report issues on GitHub, thank you!!!
Now I have successfully imported your project into PlatfromIO, but an error occurred when I compiled the project (lib\tfmicro/tensorflow/lite/kernels/internal/min.h:29:10: error:'fmin' is not a member of'std'), the error screenshot is as follows:
image
In addition, my steps are also marked in the screenshots, I look forward to your guidance~think you!

Directional microphone

Again not an issue but just wondering how much load an ESP32 can take but I2S is 2 channel so was wondering if digitally you could do something similar to this.

https://invensense.tdk.com/wp-content/uploads/2015/02/Low-Noise-Directional-Studio-Microphone-Reference-Design1.pdf

Beamforming
Beamforming involves processing the output of multiple microphones (or in this case, multiple mic arrays) to create a directional
pickup pattern. For recording and live sound applications it is important that the microphone only picks up sound from one
direction, such as from the singer or instrument, and attenuates the sound that is off the main axis. Beamforming is implemented in
this design using analog delays, an equalization filter, and a summing amplifier.
A two-element array is set up by placing two microphone boards distance, d, apart. A cardioid pattern
(Figure 4) is achieved by delaying the signal from one array board by amount of time it takes sound to travel between the two
boards, and subtracting this delayed signal from the signal from the first microphone array board. With this type of spatial response,
the microphone rejects sounds from the sides and rear, while picking up sounds incident to the front of the microphone.

We don't have the mic clusters but the stereo pair could be the two-element array with the delay of mic distance and subtraction done digitally?
Its just the delay part of https://hackaday.io/project/162628-audio-delay-and-vox-using-esp32 minus the vox.

Does the ESP32 lack the memory allocation to provide a stereo I2S input of the initial short delay of the mic distance of the speed of sound then enter the KW ring buffer?

Its poor mans beamforming but for many the improvement of having a directional mic rather than omnidirectional pickup of all, is a big plus for far field.

build error

hi,
I got a compilation error and he showed

lib\tfmicro/tensorflow/lite/kernels/internal/max.h:29:10: error: 'fmax' is not a member of 'std'
lib\tfmicro/tensorflow/lite/kernels/internal/min.h:29:10: error: 'fmin' is not a member of 'std'

_mar_sounds_ Directory

Can you write a few lines explanation about _mar_sounds_ directory?

If I choosed custom word "dinosaur", can I just put into this folder amount of wavs like "dikobrauz", "dundellion", "dinoland", "bulbasaur" and so on?
Are those files must be exactly 1 second * 16 kHz * 32 Bit?

Requeriments install problem

Hi! I'm having this when i run: python3 -m pip install -r requirements.txt

Building wheels for collected packages: pyaudio, jupyter-nbextensions-configurator, jupyter-latex-envs
Building wheel for pyaudio (setup.py) ... error
ERROR: Command errored out with exit status 1:
command: /home/neverhags/Development/diy-alexa/model/venv/bin/python3 -u -c 'import sys, setuptools, tokenize; sys.argv[0] = '"'"'/tmp/pip-install-unsihq35/pyaudio/setup.py'"'"'; file='"'"'/tmp/pip-install-unsihq35/pyaudio/setup.py'"'"';f=getattr(tokenize, '"'"'open'"'"', open)(file);code=f.read().replace('"'"'\r\n'"'"', '"'"'\n'"'"');f.close();exec(compile(code, file, '"'"'exec'"'"'))' bdist_wheel -d /tmp/pip-wheel-l9scct5u
cwd: /tmp/pip-install-unsihq35/pyaudio/
Complete output (16 lines):
running bdist_wheel
running build
running build_py
creating build
creating build/lib.linux-x86_64-3.8
copying src/pyaudio.py -> build/lib.linux-x86_64-3.8
running build_ext
building '_portaudio' extension
creating build/temp.linux-x86_64-3.8
creating build/temp.linux-x86_64-3.8/src
x86_64-linux-gnu-gcc -pthread -Wno-unused-result -Wsign-compare -DNDEBUG -g -fwrapv -O2 -Wall -g -fstack-protector-strong -Wformat -Werror=format-security -g -fwrapv -O2 -g -fstack-protector-strong -Wformat -Werror=format-security -Wdate-time -D_FORTIFY_SOURCE=2 -fPIC -I/home/neverhags/Development/diy-alexa/model/venv/include -I/usr/include/python3.8 -c src/_portaudiomodule.c -o build/temp.linux-x86_64-3.8/src/_portaudiomodule.o
src/_portaudiomodule.c:29:10: fatal error: portaudio.h: No existe el archivo o el directorio
29 | #include "portaudio.h"
| ^~~~~~~~~~~~~
compilation terminated.
error: command 'x86_64-linux-gnu-gcc' failed with exit status 1

ERROR: Failed building wheel for pyaudio

do you have some idea about what i can do? and thanks a lot! nice work with this voice control! i want to use to turn on/off my pc.

Input function

image

I use an I2S microphone then am I need to remove analog microphones ADC code from the firmware folder?? What programming language you used in this audio input file??

HTTP response status is 200 but content is empty

Hi Chris, thank you so much for this open source project. You might have heard my voice if you checked your wit.ai app for this project.

I set up my hardware and flashed this code, then it works well for "Marvin" wake-up and following "tell me a joke" "what's the life" command.

The issue is:
But when I replace the URL and access_key with my settings(which works well with curl and my local recorded .wav samples), I don't get the expected JSON content, I added this debugging line in getResults(), but the returned entities, intents and text are all empty.

if (status == 200) { char temp[1024]; int read_cnt = m_wifi_client->readBytes(temp, 1024); Serial.printf("Http str is: %s\n", temp); }

Do you possibly have any clue? I am really confused since the only difference is the replacement with my wit.ai settings. And in my app, I did receive the recorded and uploaded voice sample. But it seems that the HTTP response got something wrong.

Thank you so much for any guidance for debugging.

Best regards,
Xu

Command

Is this command work on windows cmd " xxd -i converted_model.tflite > model_data.cc " ??

Running into issues

Heya.

I tried to test deploy the repo to my ESP32 (Lolin D32) but I ran into several issues:

  • There was no .ino file so I renamed main.cpp to src.ino as Visual Studio Code (with Arduino plugin) and Arduino IDE both complained lack of .ino file, is this ok?
  • There were a lot of include errors and despite adding includePaths to c_cpp_propertier.json, it still didn't work so I added the header files onto src-folder, is this ok as well?
  • After doing so, I no longer got include errors but instead got this:
src:100:33: error: expected type-specifier before 'I2SMicSampler

 I2SSampler *i2s_sampler = new I2SMicSampler(i2s_mic_pins, false);

I can't seem to figure out what is the cause of this. I'm pretty sure I wasn't supposed to change those file names and locations but I couldn't get rid of the errors in any other means. Any tips?

export tflite model to c++

image

how to export tflite model to c++? please tell me I can't understand . can you explain a little bit please

Own key word

Hey,

Really nice work!

maybe a stupid question: how can i train my own key word? I am still a newby to this.

Greetings

Generate Training Data

when I make a new wake word using "Generate Training Data" then How is there a connection between code and Generate Training Data in this project ??

InvalidArgumentError: unknown file type: speech_data\backward\0165e0e8_nohash_0.wav [Op:IO>AudioReadableInit]

Hi there,

Firstly, what a great project and thank you for all the information you have provided!

I've been implementing my own version for the firmware, but am trying to use your jupyter notebook for preprocessing the dataset. I downloaded the same dataset, extracted the files using the same command and ran your notebook 'Generate Training Data.ipynb' but get the error:

InvalidArgumentError: unknown file type: speech_data\backward\0165e0e8_nohash_0.wav [Op:IO>AudioReadableInit]

Is there anything you could recommend to solve this or provide you with more information needed?

Thanks a lot!
Edward

The Google command set has a lot of bad samples

The Google Command Set has approx 10% badly cut, trimmed and padded words. There are 2 versions of the command set and the specific one was Ver2.0 but presume both are the same in terms of bad samples.
I was playing with https://github.com/linto-ai/linto-desktoptools-hmg which allows you to test your trained data and play failures.
I was shocked how many bad audio files are in the command set and how much that can effect accuracy.
I was using Ver2.0 as said and used the word "visualise" as it has 3 synonyms or phoneme obviously Marvin has 2 but more is better.
With HMG I played back the false positives and negatives and practically they where all junk.
So I deleted them and reran many times and ended up deleting about 10% of "visualise" and a lot of random junk files.
After I did this my recognition accuracy improved massively and the false negatives/positives dropped really low.

The Linto HMG is again just tensorflow but the GUI is really good for capturing those false positives/negatives and listening to see if it is likely a bad sample.

"Hey Marvin" would been a far better as said the more phoneme and unique the better.
With Deepspeech or Kaldi you can output a transcript of word occurrence in a sample and and with sox guessing you could grab "hey" from somewhere and tack it onto "marvin" with a bit of code.
Apart from the Gooogle command set I don't know of another word dataset as they seem to be all ASR sentence datasets but with the code above again you could extract words after running transcript output from Deepspeech or Kaldi.
https://github.com/jim-schwoebel/voice_datasets

I am not sure adding large quantities of words in a much bigger dataset actually increases accuracy for the work entailed to actually making sure what you feed is good.
Really do suggest you give HMG or some other tool and delete the dross out of the Google Command Set as I think you will be surprised how much affect bad samples can have on results.

frankie "whyengineer" fork of ARM's CMSIS for ESP32

Have no idea but soon as I saw it I thought oh that is interesting as https://github.com/UT2UH/ML-KWS-for-ESP32 is just an implementation of https://github.com/ARM-software/ML-KWS-for-MCU

Close off my 'issues' as they are really not just wondered like the beamforming stereo mic and using esp32s as a distributed array might be ideas of interest.

Thought I would post another and might be outdated now as this is the old 1.15 version of tensorflow but if you look at Accuracy of the models on validation set, their memory requirements and operations per inference in the table of the above.

The CRNN and DS-CNN architectures are really interesting and might be far better than a plain CNN if frankie "whyengineer" fork of ARM's CMSIS for ESP32 works as that is a collection of Arm boffin fast math where we don't have native libs to make the above examples work.

Maybe it not the fast math and just the driver pack but you will know with a faster glance than I or substitute math libs that do similar?

Different I2S Connection at M5Stack Atom Echo...any chance to adapt this?

Hi,

I currently try to port your "diy-alexa" to an Atom Echon from M5Stack. Atom Echo because it it very small.
The I2S connection diagram of the Atom is simpler and I wonder if it fits to your diy-alexa. (I2S_MIC_LEFT_RIGHT_CLOCK is missing!)
image

What I changed was the pin mapping at config.h like below...but it doesn't work.

// Which channel is the I2S microphone on? I2S_CHANNEL_FMT_ONLY_LEFT or I2S_CHANNEL_FMT_ONLY_RIGHT
#define I2S_MIC_CHANNEL I2S_CHANNEL_FMT_ONLY_LEFT

#define I2S_MIC_SERIAL_CLOCK GPIO_NUM_33
#define I2S_MIC_SERIAL_DATA GPIO_NUM_23

// Analog Microphone Settings - ADC1_CHANNEL_7 is GPIO35
#define ADC_MIC_CHANNEL ADC1_CHANNEL_7

// speaker settings
#define I2S_SPEAKER_SERIAL_CLOCK GPIO_NUM_19
#define I2S_SPEAKER_LEFT_RIGHT_CLOCK GPIO_NUM_33
#define I2S_SPEAKER_SERIAL_DATA GPIO_NUM_22
...

Any Chance to get "diy-alexa" running with the Atom Echo?

Thanks in advance

Steve

ProcessI2SData() ?

Hi, a question: what is the processI2SData function for?

void I2SMicSampler::processI2SData(uint8_t *i2sData, size_t bytesRead)
{
    int32_t *samples = (int32_t *)i2sData;
    for (int i = 0; i < bytesRead / 4; i++)
    {
        addSample(samples[i] >> 11);
    }
}

Outputs Average detection time 95ms. But system isn't working.

I have tried uploading the sketch but on successful upload, This is what happens:

--- Quit: Ctrl+C | Menu: Ctrl+T | Help: Ctrl+T followed by Ctrl+H ---
ts Jun Starting up
Total heap: 312308
Free heap: 236128
E (2513) SPIFFS: mount failed, -10025
[E][SPIFFS.cpp:89] begin(): Mounting SPIFFS failed! Error: -1
[E][vfs_api.cpp:22] open(): File system is not mounted
ERROR: bit depth 16379 is not supported please use 16 bit signed integer
ERROR: bit depth 200 is not supported please us 16KHz
fmt_chunk_size=0, audio_format=0, num_channels=0, sample_rate=200, sample_alignment=7984, bit_depth=16379, data_bytes=1073462756
[E][vfs_api.cpp:22] open(): File system is not mounted
ERROR: bit depth 200 is not supported please us 16KHz
fmt_chunk_size=0, audio_format=0, num_channels=0, sample_rate=200, sample_alignment=7984, bit_depth=16379, data_bytes=1073462756
[E][vfs_api.cpp:22] open(): File system is not mounted
ERROR: bit depth 200 is not supported please us 16KHz
fmt_chunk_size=0, audio_format=0, num_channels=0, sample_rate=200, sample_alignment=7984, bit_depth=16379, data_bytes=1073462756
[E][vfs_api.cpp:22] open(): File system is not mounted
ERROR: bit depth 200 is not supported please us 16KHz
fmt_chunk_size=0, audio_format=0, num_channels=0, sample_rate=200, sample_alignment=7984, bit_depth=16379, data_bytes=1073462756
[E][vfs_api.cpp:22] open(): File system is not mounted
ERROR: bit depth 200 is not supported please us 16KHz
fmt_chunk_size=0, audio_format=0, num_channels=0, sample_rate=200, sample_alignment=7984, bit_depth=16379, data_bytes=1073462756
[E][vfs_api.cpp:22] open(): File system is not mounted
ERROR: bit depth 200 is not supported please us 16KHz
fmt_chunk_size=0, audio_format=0, num_channels=0, sample_rate=200, sample_alignment=7984, bit_depth=16379, data_bytes=1073462756
[E][vfs_api.cpp:22] open(): File system is not mounted
ERROR: bit depth 200 is not supported please us 16KHz
fmt_chunk_size=0, audio_format=0, num_channels=0, sample_rate=200, sample_alignment=7984, bit_depth=16379, data_bytes=1073462756
[E][vfs_api.cpp:22] open(): File system is not mounted
ERROR: bit depth 200 is not supported please us 16KHz
fmt_chunk_size=0, audio_format=0, num_channels=0, sample_rate=200, sample_alignment=7984, bit_depth=16379, data_bytes=1073462756
[E][vfs_api.cpp:22] open(): File system is not mounted
ERROR: bit depth 200 is not supported please us 16KHz
fmt_chunk_size=0, audio_format=0, num_channels=0, sample_rate=200, sample_alignment=7984, bit_depth=16379, data_bytes=1073462756
Loading model
12 bytes lost due to alignment. To avoid this loss, please make sure the tensor_arena is 16 bytes aligned.
Used bytes 22604

Created Neral Net
m_pooled_energy_size=43
Created audio processor
Starting i2s
Average detection time 95ms
Average detection time 95ms - REPEATS.

Here is my hardware:
1 x INMP441 MEMS Omnidirectional Microphone Module High Precision/SNR Low Power I2C Interface Supports ESP32

1 x ESP32 Development Board WiFi+Bluetooth

1 x I2S Audio Breakout - MAX98357A (Sparkfun USA)

Hi Chris

I got an esp32 audio kit as its just a wrover with a codec built in https://www.banggood.com/ESP32-Aduio-Kit-WiFi-bluetooth-Module-ESP32-Serial-to-WiFi-Audio-Development-Board-with-ESP32-A1S-p-1449256.html

£13 not too pricey...

I got the ADF working which they just call https://github.com/Ai-Thinker-Open/ESP32-A1S-AudioKit its just download the toolchain set adf path to this and the idf path to the idf contained.

I have run a few of the examples and the complete ADF seems to work even if the onboard mics seem to be extremely insensitive.

I just wondered if you had done the same and tinkered with the ADF and maybe grasped how to set input volume or the ALC as seem to have it running but damned if I can tell the difference :)

Have you given them a go and the ADF as from about £9 they are at an interesting price point.

DIY Alexa not working

image

I gave my wifi router SSID and password correctly but it doesn't connect to wifi, when esp 32 tries to connect to wifi, wifi router LEDs blink and the serial monitor says connection failed. please help me, please I am waiting for your reply friend

Can you reuse pin for audio input and output ?

Hi, first I want to thank you for the series of tutorial videos on youtube.
If I configure input as left channel, and output as right channel, I wonder if I can share clock/word wires for both audio input and output? something like below

static const i2s_pin_config_t pin_config = {
    .bck_io_num = 4,
    .ws_io_num = 5,
    .data_out_num = 18,
    .data_in_num = 17,
};

Or, config pins separately, but use same pins for bck_io_num and ws_io_num :

// input
static const i2s_pin_config_t pin_config_0 = {
    .bck_io_num = 4,
    .ws_io_num = 5,
    .data_out_num = 18,
    .data_in_num = I2S_PIN_NO_CHANGE
};
i2s_set_pin(i2s_num_0, &pin_config_0);

// output
static const i2s_pin_config_t pin_config_1 = {
    .bck_io_num = 4,
    .ws_io_num = 5,
    .data_out_num = I2S_PIN_NO_CHANGE,
    .data_in_num = 17
};
i2s_set_pin(i2s_num_1, &pin_config_1);

Recommend Projects

  • React photo React

    A declarative, efficient, and flexible JavaScript library for building user interfaces.

  • Vue.js photo Vue.js

    🖖 Vue.js is a progressive, incrementally-adoptable JavaScript framework for building UI on the web.

  • Typescript photo Typescript

    TypeScript is a superset of JavaScript that compiles to clean JavaScript output.

  • TensorFlow photo TensorFlow

    An Open Source Machine Learning Framework for Everyone

  • Django photo Django

    The Web framework for perfectionists with deadlines.

  • D3 photo D3

    Bring data to life with SVG, Canvas and HTML. 📊📈🎉

Recommend Topics

  • javascript

    JavaScript (JS) is a lightweight interpreted programming language with first-class functions.

  • web

    Some thing interesting about web. New door for the world.

  • server

    A server is a program made to process requests and deliver data to clients.

  • Machine learning

    Machine learning is a way of modeling and interpreting data that allows a piece of software to respond intelligently.

  • Game

    Some thing interesting about game, make everyone happy.

Recommend Org

  • Facebook photo Facebook

    We are working to build community through open source technology. NB: members must have two-factor auth.

  • Microsoft photo Microsoft

    Open source projects and samples from Microsoft.

  • Google photo Google

    Google ❤️ Open Source for everyone.

  • D3 photo D3

    Data-Driven Documents codes.