Várias dicas de Django - assuntos diversos.
- Django boilerplate e cookiecutter-django
- Novo Django boilerplate
- Django extensions
- Django bulk_create e django-autoslug
- Django Admin personalizado
- Django Admin Date Range filter
- Geradores de senhas randômicas - uuid, hashids, secrets
- Rodando o ORM do Django no Jupyter Notebook
- Conhecendo o Django Debug Toolbar
- Escondendo suas senhas python-decouple
- Prototipagem de web design (Mockup)
- Bootstrap e Bulma + Colorlib
- Imagens: pexels e unsplash
- Cores
- Herança de Templates e Arquivos estáticos
- Busca por data no frontend
- Filtros com django-filter
- Criando comandos personalizados
- bulk_create e bulk_update
- Criando Issues por linha de comando com a api do github
- api github e click
- Criando issues por linha de comando com gitlab cli
- Criando issues por linha de comando com bitbucket cli
- Diferença entre JSON dump, dumps, load e loads
- Barra de progresso
- Rodando Shell script dentro do Python
- Rodando Python dentro do Shell script
- Retornando os nomes dos campos do model
- Admin: Usando short description
- Django Admin: Criando actions no Admin
- Django Admin: Editando direto na listview do Admin
- Django Admin: Pegando usuário logado no Admin
- Django Admin: Sobreescrevendo os templates do Admin
- Github cli
- Django: custom template tags
- Django: passando usuário logado no formulário
- Django: visualizando seus modelos com graph models
- Faker
- Django: Paginação + Filtros
- Python 3.8.2
- Django 2.2.20
- Clone this repository.
- Create virtualenv with Python 3.
- Active the virtualenv.
- Install dependences.
- Run the migrations.
git clone https://github.com/rg3915/dicas-de-django.git
cd dicas-de-django
python -m venv .venv
source .venv/bin/activate
pip install -r requirements.txt
python contrib/env_gen.py
python manage.py migrate
- Python 3.8.2
- Django 2.2.20
- Clone esse repositório.
- Crie um virtualenv com Python 3.
- Ative o virtualenv.
- Instale as dependências.
- Rode as migrações.
git clone https://github.com/rg3915/dicas-de-django.git
cd dicas-de-django
python3 -m venv .venv
source .venv/bin/activate
pip install -r requirements.txt
python contrib/env_gen.py
python manage.py migrate

python -m venv .venv
source .venv/bin/activate

pip install "cookiecutter>=1.7.0"
cookiecutter https://github.com/pydanny/cookiecutter-django
pip install -r requirements/local.txt
python manage.py migrate

createdb myproject -U postgres

python manage.py migrate
Novo boilerplate com Django 3.1.8
https://github.com/rg3915/django-boilerplate
https://django-extensions.readthedocs.io/en/latest/index.html
pip install django-extensions
# settings.py
INSTALLED_APPS = (
    ...
    'django_extensions',
)
python manage.py show_urls
python manage.py shell_plus
https://pypi.org/project/python-slugify/
from slugify import slugify

text = 'Dicas de Django'
print(slugify(text))
url = f'example.com/{slugify(text)}'https://docs.djangoproject.com/en/3.0/ref/models/querysets/#bulk-create
https://pypi.org/project/django-autoslug/
pip install django-autoslug
from autoslug import AutoSlugField
from django.db import models


class Article(models.Model):
    title = models.CharField('título', max_length=200)
    subtitle = models.CharField('sub-título', max_length=200)
    slug = AutoSlugField(populate_from='title')
    category = models.ForeignKey(
        'Category',
        related_name='categories',
        verbose_name='categoria',
        on_delete=models.SET_NULL,
        null=True,
        blank=True
    )
    published_date = models.DateTimeField(
        'criado em',
        auto_now_add=True,
        auto_now=False
    )

    class Meta:
        ordering = ('title',)
        verbose_name = 'artigo'
        verbose_name_plural = 'artigos'

    def __str__(self):
        return self.title


class Category(models.Model):
    title = models.CharField('título', max_length=50, unique=True)

    class Meta:
        ordering = ('title',)
        verbose_name = 'categoria'
        verbose_name_plural = 'categorias'

    def __str__(self):
return self.titlecategories = [
'dicas',
'django',
'python',
]
aux = []
for category in categories:
obj = Category(title=category)
aux.append(obj)
Category.objects.bulk_create(aux)
titles = [
{
'title': 'Django Boilerplate',
'subtitle': 'Django Boilerplate',
'category': 'dicas'
},
{
'title': 'Django extensions',
'subtitle': 'Django extensions',
'category': 'dicas'
},
{
'title': 'Django Admin',
'subtitle': 'Django Admin',
'category': 'admin'
},
{
'title': 'Django Autoslug',
'subtitle': 'Django Autoslug',
'category': 'dicas'
},
]
aux = []
for title in titles:
category = Category.objects.filter(title=title['category']).first()
article = dict(
title=title['title'],
subtitle=title['subtitle']
)
if category:
obj = Article(category=category, **article)
else:
obj = Article(**article)
aux.append(obj)
Article.objects.bulk_create(aux)
https://docs.djangoproject.com/en/3.0/ref/contrib/admin/#modeladmin-options
from django.conf import settings
from django.contrib import admin

from .models import Article, Category

# from .forms import ArticleAdminForm


@admin.register(Article)
class ArticleAdmin(admin.ModelAdmin):
    list_display = ('title', 'slug', 'get_published_date')
    search_fields = ('title',)
    list_filter = (
        'category',
    )
    readonly_fields = ('slug',)
    date_hierarchy = 'published_date'
    # form = ArticleAdminForm

    def get_published_date(self, obj):
        if obj.published_date:
            return obj.published_date.strftime('%d/%m/%Y')

    get_published_date.short_description = 'Data de Publicação'


@admin.register(Category)
class CategoryAdmin(admin.ModelAdmin):
    actions = None

    def has_add_permission(self, request, obj=None):
        return False

    if not settings.DEBUG:
        def has_delete_permission(self, request, obj=None):
            return False
https://github.com/tzulberti/django-datefilterspec
pip install django-daterange-filter
# settings.py
INSTALLED_APPS = (
    ...
    'daterange_filter'
)
# admin.py
from daterange_filter.filter import DateRangeFilter
...
@admin.register(Article)
class ArticleAdmin(admin.ModelAdmin):
...
list_filter = (
('published_date', DateRangeFilter),
'category',
)
https://docs.python.org/3/library/uuid.html
import uuid

uuid.uuid4()

uuid.uuid4().hex
# models.py
import uuid
from django.db import models
class UuidModel(models.Model):
slug = models.UUIDField(unique=True, editable=False, default=uuid.uuid4)
class Meta:
abstract = True
class Category(UuidModel):
title = models.CharField('título', max_length=50, unique=True)
...
https://pypi.org/project/shortuuid/
pip install shortuuid
>>> import shortuuid
>>>
>>> shortuuid.uuid()
'823MMBZx7LNEnnPBtCAorG'
>>>
>>> shortuuid.uuid(name='example.com')
'exu3DTbj2ncsn9tLdLWspw'
>>>
>>> shortuuid.ShortUUID().random(length=22)
'4CHN7TshKtrVnW4KLgVMhY'
>>>
>>> shortuuid.set_alphabet('regis')
>>> shortuuid.uuid()
'gerigigiesreissgisrsggrrseieereggierrgreriissreiiisiegrr'
>>> https://gist.github.com/rg3915/4684721a603cf6d0dd3b9495744482fe
https://pypi.org/project/hashids/
pip install hashids
from hashids import Hashids

hashids = Hashids()

>>> hashids.encode(42)
'9x'
>>> hashids.decode('9x')
(42,)
>>> hashids.encode(665190)
'k7qWJ'
>>> hashids.decode('k7qWJ')
(665190,)
>>> hashids.encode(1122, 4200, 32665)
'ELmhW0mFD7o'
>>> hashids.decode('ELmhW0mFD7o')
(1122, 4200, 32665)
>>> hashids = Hashids(alphabet='abcdefghijklmnopqrstuvwxyz1234567890', min_length=22)
>>> for i in range(10): hashids.encode(i)
...
'9xkwnvoj3ejwgp6481y5mq'
'ml6kz731jdkoe524rxn0yq'
'kwp7yx456gl9g91lm23v8n'
'0qr6jxo9memje214w8zlvp'
'9poy2jq1xdn0e037nwv4zl'
'nz97pw01jgo5el24yrxv6m'
'q4pkmy631epjenrxv70w5l'
'n97kyw8q0dq9eo143z2x6v'
'x7n4zl0pkgr4d6o3vq92wy'
'6y27mjnzkev3d3549vq0xl'
>>> https://pypi.org/project/django-hashid-field/
pip install django-hashid-field==3.1.3
# models.py
from hashid_field import HashidAutoField


class Article(models.Model):
    id = HashidAutoField(primary_key=True)
    ...
# python manage.py shell_plus
from hashid_field import Hashid
articles = Article.objects.all()
for article in articles:
hashid = Hashid(article.id)
print(article.id, hashid.id)https://www.howtogeek.com/howto/30184/10-ways-to-generate-a-random-password-from-the-command-line/
date +%s | sha256sum | base64 | head -c 32 ; echo

openssl rand -base64 32

strings /dev/urandom | grep -o '[[:alnum:]]' | head -n 30 | tr -d '\n'; echo

date | md5sum
# apt install -y gpw

gpw

gpw 3 32

gpw 1 5
import random

chars = "abcdefghijklmnopqrstuvwxyz01234567890ABCDEFGHIJKLMNOPQRSTUVWXYZ!@#$%^&*()?"
size = 8
secret_key = "".join(random.sample(chars,size))
print(secret_key)https://pynative.com/python-generate-random-string/
# Generate a random string of specific letters only

import random
import string


def randString(length=5):
    # put your letters in the following string
    your_letters='abcdefghi'
    return ''.join((random.choice(your_letters) for i in range(length)))

print("Random String with specific letters ", randString())
print("Random String with specific letters ", randString(5))https://docs.python.org/3/library/secrets.html
New in Python 3.6
import secrets

secrets.token_hex(16)

secrets.token_urlsafe(16)

url = 'https://mydomain.com/reset=' + secrets.token_urlsafe()vim contrib/env_gen.py
"""
Django SECRET_KEY generator.
"""
from django.utils.crypto import get_random_string

chars = 'abcdefghijklmnopqrstuvwxyz0123456789!@#$%^&*(-_=+)'

CONFIG_STRING = """
DEBUG=True
SECRET_KEY=%s
ALLOWED_HOSTS=127.0.0.1, .localhost
""".strip() % get_random_string(50, chars)

print(CONFIG_STRING)

# Writing our configuration file to '.env'
with open('.env', 'w') as configfile:
    configfile.write(CONFIG_STRING)
python contrib/env_gen.py
Instale
pip install ipython[notebook]
Rode
python manage.py shell_plus --notebook
Obs: No Django 3.x talvez você precise dessa configuração async-safety.
os.environ["DJANGO_ALLOW_ASYNC_UNSAFE"] = "true"
https://django-debug-toolbar.readthedocs.io/en/latest/
pip install django-debug-toolbar
INSTALLED_APPS = [
    # ...
    'django.contrib.staticfiles',
    # ...
    'debug_toolbar',
]

MIDDLEWARE = [
    # ...
    'debug_toolbar.middleware.DebugToolbarMiddleware',
    # Deve estar por último.
]

INTERNAL_IPS = [
    # ...
    '127.0.0.1',
    # ...
]

STATIC_URL = '/static/'
from django.conf import settings
from django.urls import include, path

if settings.DEBUG:
    import debug_toolbar
    urlpatterns = [
        path('__debug__/', include(debug_toolbar.urls)),
    ] + urlpatterns
Video do Henrique Bastos na Live de Python #97
https://github.com/henriquebastos/python-decouple
pip install python-decouple
Crie um arquivo .env com o seguinte conteúdo (de exemplo)
DEBUG=True
SECRET_KEY=c9^3g^bn6wgo8tabf*dl$@vx@m-!9ux%*9)88qnun&hk++sa90
ALLOWED_HOSTS=127.0.0.1,.localhost
POSTGRES_DB=mydb
POSTGRES_USER=myuser
POSTGRES_PASSWORD=mypass
DB_HOST=localhost

AWS_ACCESS_KEY_ID=
AWS_SECRET_ACCESS_KEY=
AWS_STORAGE_BUCKET_NAME=

# console ou smtp
EMAIL_BACKEND=django.core.mail.backends.console.EmailBackend
EMAIL_HOST=smtp.sendgrid.net
EMAIL_PORT=587
EMAIL_USE_TLS=True
EMAIL_HOST_USER=
EMAIL_HOST_PASSWORD=
repare que não deve haver espaços e nem aspas.
E em settings.py faça
SECRET_KEY = config('SECRET_KEY')
DEBUG = config('DEBUG', default=False, cast=bool)
ALLOWED_HOSTS = config('ALLOWED_HOSTS', default=[], cast=Csv())

EMAIL_BACKEND = config('EMAIL_BACKEND')
EMAIL_HOST = config('EMAIL_HOST')
EMAIL_PORT = config('EMAIL_PORT')
EMAIL_USE_TLS = config('EMAIL_USE_TLS')
EMAIL_HOST_USER = config('EMAIL_HOST_USER')
EMAIL_HOST_PASSWORD = config('EMAIL_HOST_PASSWORD')

DATABASES = {
    'default': {
        'ENGINE': 'django.db.backends.postgresql',
        'NAME': config('POSTGRES_DB'),
        'USER': config('POSTGRES_USER'),
        'PASSWORD': config('POSTGRES_PASSWORD'),
        'HOST': config('DB_HOST', 'localhost'),
        'PORT': '5432',
    }
}
getbootstrap.com/docs/4.5/examples
bulmatemplates.github.io/bulma-templates
color.adobe.com/pt/create/color-wheel
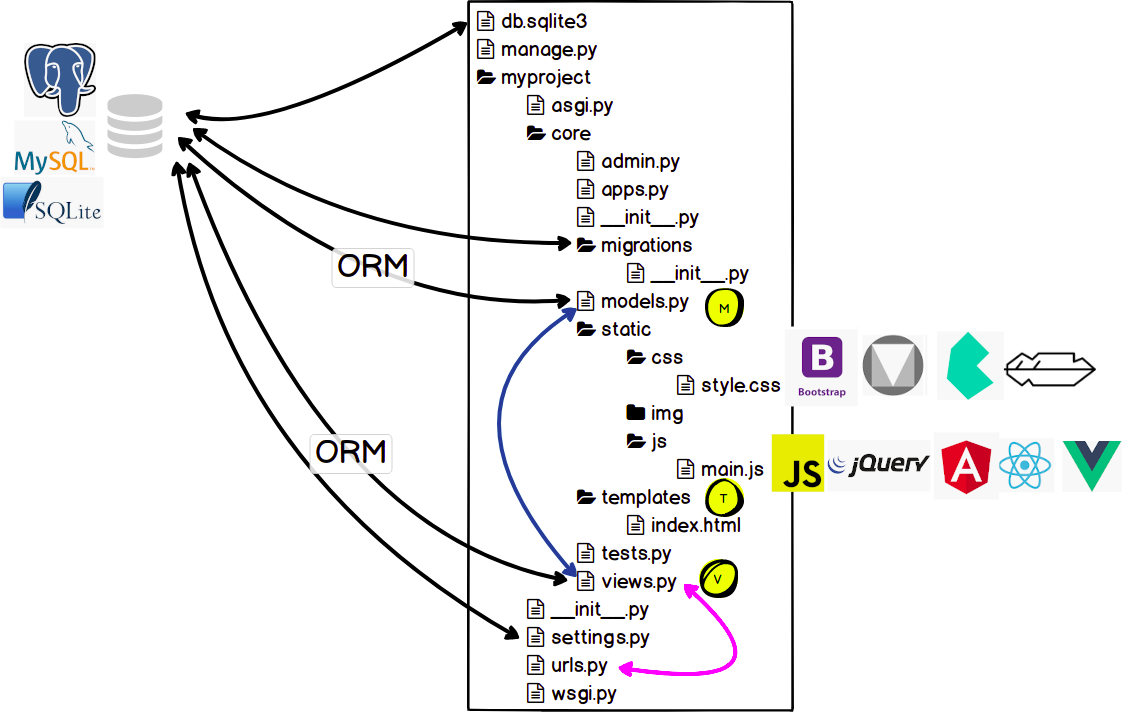
Video Introdução a Arquitetura do Django - Pyjamas 2019

Considere um template com os campos:
<input class="form-control" name='start_date' type="date">
<input class="form-control" name='end_date' type="date">
Em views.py basta fazer:
def article_list(request):
    template_name = 'core/article_list.html'
    object_list = Article.objects.all()

    start_date = request.GET.get('start_date')
    end_date = request.GET.get('end_date')

    if start_date and end_date:
        # Converte em data e adiciona um dia.
        end_date = parse(end_date) + timedelta(1)
        object_list = object_list.filter(
            published_date__range=[start_date, end_date]
        )

    context = {'object_list': object_list}
    return render(request, template_name, context)
Pra não precisar fazer o
end_date = parse(end_date) + timedelta(1)basta acrescentar date antes do range, dai fica assim:
object_list = object_list.filter(
    published_date__date__range=[start_date, end_date]
)
Agradecimentos a @walisonfilipe
16 - Filtros com django-filter
Instale o django-filter
pip install django-filter
Acrescente-o ao INSTALLED_APPS
INSTALLED_APPS = [
    ...
    'django_filters',
]
Crie um arquivo filters.py
import django_filters

from .models import Article


class ArticleFilter(django_filters.FilterSet):
    title = django_filters.CharFilter(lookup_expr='icontains')
    subtitle = django_filters.CharFilter(lookup_expr='icontains')

    class Meta:
        model = Article
        fields = ('title', 'subtitle')
Em views.py
from .filters import ArticleFilter


def article_list(request):
    template_name = 'core/article_list.html'
    object_list = Article.objects.all()
    article_filter = ArticleFilter(request.GET, queryset=object_list)

    ...

    context = {
        'object_list': article_filter,
        'filter': article_filter
    }
    return render(request, template_name, context)
Em article_list.html
  <div class="row">
    <div class="col-md-4">
      <form method="GET">
        {{ filter.form.as_p }}
        <input type="submit" />
      </form>
    </div>

    <div class="col-md-8">
      <table class="table">
        <thead>
          <tr>
            <th>Título</th>
            <th>Sub-título</th>
            <th>Data de publicação</th>
          </tr>
        </thead>
        <tbody>
          {% for obj in filter.qs %}
            <tr>
              <td>{{ obj.title }}</td>
              <td>{{ obj.subtitle }}</td>
              <td>{{ obj.published_date }}</td>
            </tr>
          {% endfor %}
        </tbody>
      </table>
    </div>
  </div>
Baseado em Criando novos comandos no django-admin e na Live 95 do Edu Live de Python.
Para criarmos um novo comando precisamos das seguintes pastas:
core
├── management
│   ├── __init__.py
│   ├── commands
│   │   ├── __init__.py
│   │   ├── novocomando.py
No nosso caso, teremos 2 novos comandos, então digite, estando na pasta myproject
mkdir -p core/management/commands
touch core/management/__init__.py
touch core/management/commands/{__init__.py,hello.py,search.py}
# hello.py
from django.core.management.base import BaseCommand


class Command(BaseCommand):
    help = 'Print hello world.'

    def add_arguments(self, parser):
        # Argumento nomeado (opcional)
        parser.add_argument(
            '--awards', '-a',
            action='store_true',
            help='Ajuda da opção aqui.'
        )

    def handle(self, *args, **options):
        self.stdout.write('Hello world.')
        if options['awards']:
            self.stdout.write('Awards')
# search.py
from django.core.management.base import BaseCommand
from myproject.core.models import Article
class Command(BaseCommand):
help = """Localiza um artigo pelo título ou sub-título."""
def add_arguments(self, parser):
parser.add_argument(
'--title', '-t',
dest='title',
default=None,
help='Localiza um artigo pelo título.'
)
parser.add_argument(
'--subtitle', '-sub',
dest='subtitle',
default=None,
help='Localiza um artigo pelo sub-título.'
)
def handle(self, title=None, subtitle=None, **options):
""" dicionário de filtros """
self.verbosity = int(options.get('verbosity'))
filters = {
'title__icontains': title,
'subtitle__icontains': subtitle,
}
filter_by = {
key: value for key,
value in filters.items() if value is not None
}
queryset = Article.objects.filter(**filter_by)
if self.verbosity > 0:
for article in queryset:
self.stdout.write("{0} {1}".format(
article.title, article.subtitle))
self.stdout.write(f'\n{queryset.count()} artigos localizados.')
O bulk_create serve para inserir uma grande quantidade de dados num banco de forma super rápida.
Vamos usar o
python manage.py shell_plus
Primeiro vamos criar uns dados aleatórios
import secrets
import string

N = 12
list_items = []

for i in range(100):
    res = ''.join(secrets.choice(string.ascii_lowercase) for i in range(N))
    list_items.append(res)
Agora vamos inserir os dados com bulk_create
aux = []
for item in list_items:
    obj = Article(title=item, subtitle=item)
    aux.append(obj)

Article.objects.bulk_create(aux)Como o nome já diz, o bulk_update serve para atualizar os dados.
articles = Article.objects.all()
category = Category.objects.first()
for article in articles:
    article.category = category

Article.objects.bulk_update(articles, ['category'])
pip install requests
import json

import requests
from decouple import config

# Autenticação
REPO_USERNAME = config('REPO_USERNAME')
REPO_PASSWORD = config('REPO_PASSWORD')

# O repositório para adicionar a issue
REPO_OWNER = config('REPO_OWNER')
REPO_NAME = config('REPO_NAME')


def make_github_issue(title, body=None, assignee=None, milestone=None, labels=None):
    '''
    Create an issue on github.com using the given parameters.
    '''
    url = 'https://api.github.com/repos/%s/%s/issues' % (REPO_OWNER, REPO_NAME)
    session = requests.Session()
    session.auth = (REPO_USERNAME, REPO_PASSWORD)
    # Create our issue
    issue = {
        'title': title,
        'body': body,
        'assignee': assignee,
        'milestone': milestone,
        'labels': labels
    }
    # Add the issue to our repository
    r = session.post(url, json.dumps(issue))
    if r.status_code == 201:
        print('Successfully created Issue "%s"' % title)
    else:
        print('Could not create Issue "%s"' % title)
        print('Response:', r.content)


if __name__ == '__main__':
    title = 'Criar github cli'
    body = 'API para criar issues por linha de comando.'
    make_github_issue(
        title=title,
        body=body,
        assignee='rg3915',
        milestone=None,
        labels=['enhancement']
    )
pip install click
import json

import click
import requests
from decouple import config

'''
https://docs.github.com/en/rest/reference/issues#create-an-issue

Usage: python github_cli2.py --title='Your title' \
            --body='Your description' \
            --assignee='Assignee name' \
            --labels='enhancement'
'''

# Autenticação
REPO_USERNAME = config('REPO_USERNAME')
REPO_PASSWORD = config('REPO_PASSWORD')

# O repositório para adicionar a issue
REPO_OWNER = config('REPO_OWNER')
REPO_NAME = config('REPO_NAME')


@click.command()
@click.option('--title', prompt='Title', help='Type the title.')
@click.option('--body', prompt='Description', help='Type the description.')
@click.option('--assignee', prompt='Assignee', help='Type the assignee name.')
@click.option('--labels', prompt='Labels', help='Type the labels.')
def make_github_issue(title, body=None, assignee=None, milestone=None, labels=None):
    '''
    Create an issue on github.com using the given parameters.
    '''
    url = 'https://api.github.com/repos/%s/%s/issues' % (REPO_OWNER, REPO_NAME)
    session = requests.Session()
    session.auth = (REPO_USERNAME, REPO_PASSWORD)
    # Create our issue
    issue = {
        'title': title,
        'body': body,
        'assignee': assignee,
        'milestone': milestone,
        'labels': [labels]
    }
    # Add the issue to our repository
    r = session.post(url, json.dumps(issue))
    if r.status_code == 201:
        print('Successfully created Issue "%s"' % title)
    else:
        print('Could not create Issue "%s"' % title)
        print('Response:', r.content)


if __name__ == '__main__':
    make_github_issue()
Como usar
python github_cli2.py --title='Your title' \
    --body='Your description' \
    --assignee='username' \
    --labels='enhancement'
Primeiro precisamos criar um arquivo /etc/myfile.cfg
sudo vim /etc/myfile.cfg # precisa do sudo
[global]
default = somewhere
ssl_verify = true
timeout = 5

[somewhere]
url = https://gitlab.com
private_token = your-token
api_version = 4
pip install python-gitlab
import gitlab

gl = gitlab.Gitlab.from_config('somewhere', ['/etc/myfile.cfg'])

issues = gl.issues.list()
for issue in issues:
print(issue.iid, issue.title)import gitlab
gl = gitlab.Gitlab.from_config('somewhere', ['/etc/myfile.cfg'])
issues = gl.issues.list()
project = gl.projects.get(ID-DO-PROJETO)
project.issues.create(
{'title': 'I have a bug',
'description': 'Lorem ipsum...'})
for issue in project.issues.list():
print(issue.iid, issue.title)import click
import gitlab
from decouple import config
'''
Usage: python glab-cli.py --title='Your title' --description='Your description'
'''
gl = gitlab.Gitlab.from_config('somewhere', ['/etc/myfile.cfg'])
project = gl.projects.get(config('GITLAB_PROJECT_ID'))
@click.command()
@click.option('--title', prompt='Title', help='Type the title.')
@click.option('--description', prompt='Description', help='Type the description.')
def create_issue(title, description):
response = project.issues.create(
{"title": f"{title}",
"description": f"{description}"})
click.echo(response.iid)
click.echo(response.title)
if __name__ == '__main__':
create_issue()
pip install bitbucket-python
Lembre-se de habilitar a criação de issues no repositório.
from bitbucket.client import Client
from decouple import config

email = config('BITBUCKET_EMAIL')
password = config('BITBUCKET_PASSWORD')
client = Client(email, password)

repository_slug = config('REPOSITORY_SLUG')

repo = client.get_repository(repository_slug)

data = {
    'title': 'Your title',
    'content': {'raw': 'Your description'},
    'kind': 'task'
}
# kind: task or bug

response = client.create_issue(repository_slug, data)import click
from bitbucket.client import Client
from decouple import config
'''
Usage: python bitbucket_cli.py --title='Your title' --description='Your description' --kind='task'
'''
@click.command()
@click.option('--title', prompt='Title', help='Type the title.')
@click.option('--description', prompt='Description', help='Type the description.')
@click.option('--kind', prompt='Kind', help='Kind is task or bug.')
def create_issue(title, description, kind):
email = config('BITBUCKET_EMAIL')
password = config('BITBUCKET_PASSWORD')
repository_slug = config('REPOSITORY_SLUG')
client = Client(email, password)
data = {
'title': title,
'content': {'raw': description},
'kind': kind
}
response = client.create_issue(repository_slug, data)
click.echo(response['title'])
if __name__ == '__main__':
create_issue()
Documentação: JSON

--

Serializa um objeto Python para uma string no formato JSON.
json.dumps(obj)
import json

my_dict = {
    "name": "Elliot",
    "age": 25
}
json.dumps(my_dict)Serializa um objeto Python para um arquivo no formato JSON.
json.dump(obj, fp)
onde fp significa file-like object.
import json

my_dict = {
    "name": "Elliot",
    "age": 25
}
with open('/tmp/file.txt', 'w') as f:
json.dump(my_dict, f)Deserializa uma string no formato JSON para um arquivo.
json.loads(s)
import json

text = """
{
    "name": "Darlene",
    "age": 27
}
"""
json.loads(text)Deserializa um arquivo no formato JSON para um arquivo.
json.load(fp)
import json

text = """
{
    "name": "Darlene",
    "age": 27
}
"""
with open('/tmp/file.txt', 'r') as f:
    data = json.load(f)

print(data)
Exemplo
# json_example.py
import json
from io import StringIO
from pprint import pprint


def json_to_string_with_dumps(my_dict):
    '''
    Serializa (encode) objeto para string no formato JSON.
    '''
    return json.dumps(my_dict, indent=4)


def json_to_string_with_dump_stringio(my_dict):
    '''
    Serializa (encode) objeto para string no formato JSON usando StringIO.
    '''
    io = StringIO()
    json.dump(my_dict, io, indent=4)
    return io.getvalue()


def json_to_file_with_dump_open_file(filename, my_dict):
    '''
    Serializa (encode) objeto para arquivo no formato JSON usando open.
    '''
    with open(filename, 'w') as f:
        json.dump(my_dict, f, indent=4)


def string_to_json_with_loads(text):
    '''
    Deserializa (decode) string no formato JSON para objeto.
    '''
    return json.loads(text)


def string_to_json_with_load_stringio(text):
    '''
    Deserializa (decode) string no formato JSON para objeto usando StringIO.
    '''
    io = StringIO(text)
    return json.load(io)


def file_to_json_with_load_open_file(filename):
    '''
    Deserializa (decode) string no formato JSON para arquivo usando open.
    '''
    with open(filename, 'r') as f:
        data = json.load(f)
    return data


if __name__ == '__main__':
    # Serialize (encode)

    my_dict = {
        "name": "Elliot",
        "age": 25
    }
    print(json_to_string_with_dumps(my_dict))
    print(type(json_to_string_with_dumps(my_dict)))

    my_dict = {
        "name": "Elliot",
        "full_name": {"first_name": "Elliot", "last_name": "Alderson"},
        "items": [1, 2.5, "a"],
        "pi": 3.14,
        "active": True,
        "nulo": None
    }
    print(json_to_string_with_dump_stringio(my_dict))
    print(type(json_to_string_with_dump_stringio(my_dict)))

    filename = '/tmp/file.txt'
    my_dict = {
        "name": "Elliot",
        "full_name": {"first_name": "Elliot", "last_name": "Alderson"},
        "items": [1, 2.5, "a"],
        "pi": 3.14,
        "active": True,
        "nulo": None
    }
    json_to_file_with_dump_open_file(filename, my_dict)

    # Deserialize (decode)

    text = """
    {
        "name": "Darlene",
        "age": 27
    }
    """
    pprint(string_to_json_with_load_stringio(text))
    print(type(string_to_json_with_load_stringio(text)))

    pprint(string_to_json_with_loads(text))
    print(type(string_to_json_with_loads(text)))

pprint(file_to_json_with_load_open_file(filename))# core/views.py
import json
from django.http import JsonResponse
def article_json(request):
text = '''
{
"title": "JSON",
"subtitle": "Entendento JSON dumps e loads",
"slug": "entendento-json-dumps-e-loads",
"value": "42"
}
'''
data = json.loads(text)
pprint(data)
print(type(data))
print(data['value'], 'is', type(data['value']))
data['title'] = 'Introdução ao JSON'
data['value'] = int(data['value']) + 1
data['pi'] = 3.14
data['active'] = True
data['nulo'] = None
return JsonResponse(data)# core/urls.py
...
path('articles/json/', v.article_json, name='article_json'),
...Leia mais em Working With JSON Data in Python.
- progress
- tqdm
- click - click progressbar
- progressbar 2
- clint
- with sys
- gist rg3915
- progressbar on Jupyter notebook
Leia mais em How to Easily Use a Progress Bar in Python
pip install progress
# example01_progress.py
from time import sleep

from progress.bar import Bar

with Bar('Processing...') as bar:
    for i in range(100):
        sleep(0.02)
        bar.next()
$ python example01_progress.py
pip install tqdm
from time import sleep

# example02_tqdm.py
from tqdm import tqdm

for i in tqdm(range(100)):
    sleep(0.02)
    # Do something
python example02_tqdm.py
pip install click
from time import sleep

# example03_click.py
import click

# Fill character is # by default, you can change it
# for any other char you want, or even change the color.
fill_char = click.style('=', fg='yellow')
with click.progressbar(range(100), label='Loading...', fill_char=fill_char) as bar:
    for i in bar:
        sleep(0.02)
python example03_click.py
pip install progressbar2
# example04_progressbar2.py
from time import sleep

from progressbar import progressbar

for i in progressbar(range(100)):
    sleep(0.02)
python example04_progressbar2.py
pip install clint
# example05_clint.py
from time import sleep

from clint.textui import progress

print('Clint - Regular Progress Bar')
for i in progress.bar(range(100)):
    sleep(0.02)

print('Clint - Mill Progress Bar')
for i in progress.mill(range(100)):
    sleep(0.02)
python example05_clint.py
import sys
# example06_sys.py
import time

toolbar_width = 40

# setup toolbar
sys.stdout.write("[%s]" % (" " * toolbar_width))
sys.stdout.flush()
sys.stdout.write("\b" * (toolbar_width+1)) # return to start of line, after '['

for i in range(toolbar_width):
    time.sleep(0.1) # do real work here
    # update the bar
    sys.stdout.write("-")
    sys.stdout.flush()

sys.stdout.write("]\n") # this ends the progress bar
python example06_sys.py
# example07_sys.py
import sys
import time


def progressbar(it, prefix="", size=60, file=sys.stdout):
    count = len(it)

    def show(j):
        x = int(size * j / count)
        file.write("%s[%s%s] %i/%i\r" %
                   (prefix, "#" * x, "." * (size - x), j, count))
        file.flush()
    show(0)
    for i, item in enumerate(it):
        yield item
        show(i + 1)
    file.write("\n")
    file.flush()


users = ['Regis', 'Abel', 'Eduardo', 'Elaine']


for user in progressbar(users, "Processing: "):
    time.sleep(0.1)
    # Do something.


for i in progressbar(range(42), "Processing: "):
    time.sleep(0.05)
    # Do something.
python example07_sys.py
$ jupyter notebook
# progressbar_jupyter.ipynb
import sys

if hasattr(sys.modules["__main__"], "get_ipython"):
    from tqdm import notebook as tqdm
else:
    import tqdm

from time import sleep

n = 0
for i in tqdm.trange(100):
    n += 1
    sleep(0.01)

url = "https://www.python.org/ftp/python/3.9.0/Python-3.9.0.tgz"
import httpx

with httpx.stream("GET", url) as response:
    total = int(response.headers["Content-Length"])
    with tqdm.tqdm(total=total) as progress:
        for chunk in response.iter_bytes():
            progress.update(len(chunk))
Para rodar Shell script dentro do Python só precisamos do subprocess.
# subprocess01.py
import subprocess
from datetime import datetime

subprocess.call('echo "Hello"', shell=True)

subprocess.run('echo "Running"', shell=True)

now = datetime.now()

subprocess.run(f'notify-send --urgency=LOW "{now}"', shell=True)


def write_numbers(n):
    return ' '.join([str(i) for i in range(n)])


# print(write_numbers(5))

subprocess.run(f'echo {write_numbers(10)} > /tmp/numbers.txt', shell=True)
subprocess.run('cat /tmp/numbers.txt', shell=True)

subprocess.run('wc -l /tmp/out.log', shell=True)
$ python subprocess01.py
Leia mais em:
Grande Portal - Shell script 1
Grande Portal - Shell script 2
Grande Portal - Shell script 3
Assista também:
Exemplo 1:
# running_python01.sh
python -c "print('Rodando Python dentro do Shell script')"
$ source running_python01.sh
Ou
$ chmod +x running_python01.sh
$ ./running_python01.sh
Exemplo 2:
# ./running_python02.sh 1 2
# ./running_python02.sh 2 1
# ./running_python02.sh 2 2

a=${1}
b=${2}

if [[ $a -eq $b ]]; then
    python -c "print('${a} é igual a ${b}')"
elif [[ $a -lt $b ]]; then
    python -c "print('${a} é menor que ${b}')"
else
    python -c "print('${a} é maior que ${b}')"
fi
chmod +x running_python02.sh
./running_python02.sh 1 2
./running_python02.sh 2 1
./running_python02.sh 2 2
Exemplo 3:
# ./running_python03.sh 1 10
# ./running_python03.sh 35 42

start_value=${1}
end_value=${2}

function join { local IFS="$1"; shift; echo "$*"; }

if [[ $start_value -gt $end_value ]]; then
    python -c "print('O valor inicial não pode ser maior que o valor final.')"
else
    IDS=$(seq -s ' ' $start_value $end_value)

    for id in $IDS; do
        python -c "print('$id')"
    done

    python -c "print('$IDS')"
    python -c "print('$IDS'.split())"
    python -c "print([int(i) for i in '$IDS'.split()])"
    python -c "print(sum([int(i) for i in '$IDS'.split()]))"
    python -c "ids=[int(i) for i in '$IDS'.split()]; print(ids)"
    # Não dá pra usar o laço for do Python na mesma linha, então façamos
    echo "IDS:" $IDS
    result=$(join , ${IDS[@]})
    echo "result:" $result
    python running_python03.py -ids $result
fi
# running_python03.py
import click
@click.command()
@click.option('-ids', prompt='Ids', help='Digite uma sequência de números separado por vírgula.')
def get_numbers(ids):
print('>>>', ids)
for id in ids.split(','):
print(id)
if __name__ == '__main__':
get_numbers()chmod +x running_python03.sh
./running_python03.sh 1 10
./running_python03.sh 35 42
Exemplo 4: Não está no video.
# running_python04.sh
# Como pegar o resultado do Python e usar numa variável no Shell script.

result=$(python -c "result = 42; print(result)" | xargs echo $var1)
echo 'Resultado:' $result
echo 'Dobro:' $(( $result*2 ))

result2=$(python -c "result = sum([i for i in range(11)]); print(result)" | xargs echo $var2)
echo 'Resultado:' $result2
echo 'Dobro:' $(( $result2*2 ))


# Como usar comandos multilinha.

result=$(python << EOF
aux = []
for i in range(1, 11):
    aux.append(i)
print(sum(aux))
EOF
)
echo 'Resultado:' $result

python << EOF
aux = []
for i in range(1, 11):
    print(i)
    aux.append(i)
print(f'Total: {sum(aux)}')
EOF

result=$(python fibonacci.py | xargs echo $f)
echo 'Fibonacci'
echo $result
# fibonacci.py
# Function for nth Fibonacci number
def Fibonacci(n):
if n < 0:
print("Incorrect input")
# First Fibonacci number is 0
elif n == 0:
return 0
# Second Fibonacci number is 1
elif n == 1:
return 1
else:
return Fibonacci(n - 1) + Fibonacci(n - 2)
print(Fibonacci(9))
# This code is contributed by Saket Modihttps://www.geeksforgeeks.org/program-for-nth-fibonacci-number/
$ python manage.py shell_plus

>>> [field.name for field in User._meta.get_fields()]
['logentry',
 'id',
 'password',
 'last_login',
 'is_superuser',
 'username',
 'first_name',
 'last_name',
 'email',
 'is_staff',
 'is_active',
 'date_joined',
 'groups',
 'user_permissions']

>>> [field.name for field in Article._meta.get_fields()]
['id', 'title', 'subtitle', 'slug', 'category', 'published_date']
Quando não conseguimos usar o dunder no list_display do admin, então usamos o short_description.
@admin.register(Article)
class ArticleAdmin(admin.ModelAdmin):
    list_display = ('id', 'title', 'slug', 'get_published_date', 'get_category')
    ...

    def get_published_date(self, obj):
        if obj.published_date:
            return obj.published_date.strftime('%d/%m/%Y')

    get_published_date.short_description = 'Data de Publicação'

    def get_category(self, obj):
        if obj.category:
            return obj.category.title

    get_category.short_description = 'Categoria'
https://docs.djangoproject.com/en/3.1/ref/contrib/admin/actions/
Em models.py considere
# models.py
STATUS_CHOICES = (
    ('d', 'Rascunho'),
    ('p', 'Publicado'),
    ('w', 'Retirado'),
)


class Article(models.Model):
    ...
    status = models.CharField(max_length=1, choices=STATUS_CHOICES)
E em admin.py
# admin.py
@admin.register(Article)
class ArticleAdmin(admin.ModelAdmin):
    ...
    actions = ('make_published',)

    def make_published(self, request, queryset):
        count = queryset.update(status='p')

        if count == 1:
            msg = '{} artigo foi publicado.'
        else:
            msg = '{} artigos foram publicados.'

        self.message_user(request, msg.format(count))

    make_published.short_description = "Publicar artigos"

# admin.py
...
list_editable = ('title', 'status')
...
Em models.py considere
# models.py
from django.contrib.auth.models import User


class Article(models.Model):
    ...
    user = models.ForeignKey(
        User,
        on_delete=models.SET_NULL,
        null=True,
        blank=True
    )
E em admin.py
# admin.py
@admin.register(Article)
class ArticleAdmin(admin.ModelAdmin):
    ...

    def save_model(self, request, obj, form, change):
        if not change:
            obj.user = request.user
            obj.save()
        super(ArticleAdmin, self).save_model(request, obj, form, change)

Se você olhar em
https://github.com/django/django/tree/main/django/contrib/admin/templates/admin
verá todos os templates usados no Admin.
Na pasta da virtualenv do seu projeto também.
ls -l .venv/lib/python3.8/site-packages/django/contrib/admin/templates/admin/
cat .venv/lib/python3.8/site-packages/django/contrib/admin/templates/admin/change_list.html
Olhando na doc do Django em Set up your projects admin template directories nós vemos que devemos ter a seguinte estrutura de pastas:
myproject
├── core
│   ├── templates
│   │   ├── admin
│   │   │   ├── base_site.html
│   │   │   ├── login.html
│   │   │   ├── core
│   │   │   │   ├── article
│   │   │   │   │   └── change_list.html
│   │   │   │   └── change_list.html
Então vamos criar nossas pastas
mkdir -p myproject/core/templates/admin/core/article
Agora vamos criar o primeiro change_list.html
touch myproject/core/templates/admin/core/change_list.html
E seu conteúdo será:
{% extends "admin/change_list.html" %}

{% block object-tools-items %}
  {{ block.super }}
  <li>
    <a href="botao-da-app/">
      Novo botão
    </a>
  </li>
{% endblock %}
Depois
touch myproject/core/templates/admin/core/article/change_list.html
Com o conteúdo:
{% extends "admin/change_list.html" %}

{% block object-tools-items %}
  {{ block.super }}
  <li>
    <a href="botao-artigo/">
      Botão do Artigo
    </a>
  </li>
{% endblock %}
Para que o Django Admin reconheça esses templates precisamos configurar o settings.py
# settings.py
TEMPLATES = [
    {
        ...
        'DIRS': [
            BASE_DIR,
            os.path.join(BASE_DIR, 'templates')
        ],
        ...
    },
]
Agora edite admin.py
from django.contrib import admin, messages
# admin.py
from django.shortcuts import redirect
from django.urls import path


@admin.register(Article)
class ArticleAdmin(admin.ModelAdmin):
    ...

    def get_urls(self):
        urls = super().get_urls()
        my_urls = [
            path(
                'botao-artigo/',
                self.admin_site.admin_view(self.minha_funcao, cacheable=True)
            ),
        ]
        return my_urls + urls

    def minha_funcao(self, request):
        print('Ao clicar no botão, faz alguma coisa...')
        messages.add_message(
            request,
            messages.INFO,
            'Ação realizada com sucesso.'
        )
        return redirect('admin:core_article_changelist')


@admin.register(Category)
class CategoryAdmin(admin.ModelAdmin):
    ...

    def get_urls(self):
        urls = super().get_urls()
        my_urls = [
            path(
                'botao-da-app/',
                self.admin_site.admin_view(self.minha_funcao_category, cacheable=True)
            ),
        ]
        return my_urls + urls

    def minha_funcao_category(self, request):
        print('Ao clicar no botão, faz alguma coisa em category...')
        messages.add_message(
            request,
            messages.INFO,
            'Ação realizada com sucesso.'
        )
        return redirect('admin:core_category_changelist')

Em AdminSite attributes nós temos o atributo AdminSite.login_template.
A partir daí podemos fazer
# admin.py
admin.site.login_template = 'myproject/core/templates/admin/login.html'
Vendo
cat .venv/lib/python3.8/site-packages/django/contrib/admin/templates/admin/login.html
cat .venv/lib/python3.8/site-packages/django/contrib/admin/templates/admin/base_site.html
E nos templates
touch myproject/core/templates/admin/login.html
<!-- myproject/core/templates/admin/login.html -->
{% extends "admin/login.html" %}
{% load static %}

{% block branding %}
  <h1 id="site-name">
    <a href="{% url 'admin:index' %}">
      <img src="{% static 'img/django-logo-negative.png' %}" alt="django-logo-negative.png" width="100px">
    </a>
  </h1>
{% endblock %}

{% block extrastyle %}
  {{ block.super }}
  <link rel="stylesheet" type="text/css" href="{% static "css/login.css" %}" />
  {{ form.media }}
{% endblock %}
E pra caprichar no CSS
/* myproject/core/static/css/login.css */
body.login {
    background: url("../img/headset.jpg") no-repeat center center;
    background-size: 100% auto;
}

html {
    min-height: 100%;
}
https://www.djangoadmintutorials.com/how-to-customize-django-admin-login-page/

Basta criar base_site.html
touch myproject/core/templates/admin/base_site.html
{% extends "admin/base_site.html" %}
{% load static %}

{% block branding %}
  <h1 id="site-name">
    <a href="{% url 'admin:index' %}">
      <img src="{% static 'img/django-logo-negative.png' %}" alt="django-logo-negative.png" width="70px">
    </a>
  </h1>
{% endblock %}
Importante: mude a ordem das apps em settings.py
# settings.py
INSTALLED_APPS = [
    'myproject.core',
    'django.contrib.admin',
    ...
]
https://books.agiliq.com/projects/django-admin-cookbook/en/latest/logo.html
gh auth login
gh repo clone rg3915/dicas-de-django
gh repo view
gh pr checks
gh pr create
gh pr status
gh pr merge
gh issue list
gh issue create --title "Github cli" --body "Experimentar Github cli https://cli.github.com" \
--label "enhancement" \
--assignee "@me"
gh issue create -t "Github cli" -b "Experimentar Github cli
https://cli.github.com" \
-l "enhancement" \
-a "@me"
Fechar issue
git commit -m 'Usando o github cli. close #34'
git push
https://docs.djangoproject.com/en/3.2/ref/templates/builtins/
{% for obj in object_list %}
  <tr>
    <td>{{ forloop.counter }}</td>
    ...
    {% if obj.category.title == 'Django' %}
      <td>{{ obj.category }}</td>
    {% endif %}
  </tr>
{% endfor %}...
<td>{{ forloop.counter }}</td>
<td>{{ obj.title|slugify }}</td>
<td>{{ obj.title|truncatechars:13 }}</td>
<td>{{ obj.subtitle|safe|default:"---" }}</td>
<td>{{ obj.published_date|date:"d/m/Y" }}</td>
...subtitle='<p>lorem</p>'
{{ obj.subtitle|safe }}https://docs.djangoproject.com/en/3.2/howto/custom-template-tags/#code-layout
core
├── __init__.py
├── models.py
├── templatetags
│   ├── __init__.py
│   ├── model_name_tags.py
│   └── usergroup_tags.py
https://docs.djangoproject.com/en/3.2/howto/custom-template-tags/#writing-custom-template-filters
mkdir myproject/core/templatetags
touch myproject/core/templatetags/__init__.py
touch myproject/core/templatetags/usergroup_tags.py
# usergroup_tags.py
from django import template

register = template.Library()


@register.filter('name_group')
def name_group(user):
    ''' Retorna o nome do grupo do usuário. '''
    _groups = user.groups.first()
    if _groups:
        return _groups.name
    return ''


@register.filter('has_group')
def has_group(user, group_name):
    ''' Verifica se este usuário pertence a um grupo. '''
    if user:
        groups = user.groups.all().values_list('name', flat=True)
        return True if group_name in groups else False
    return False
{% load usergroup_tags %}
{% if request.user|has_group:"Autor" %}
É Autor.
{% endif %}https://docs.djangoproject.com/en/3.2/howto/custom-template-tags/#writing-custom-template-tags
touch myproject/core/templatetags/model_name_tags.py
# model_name_tags.py
from django import template

register = template.Library()


@register.simple_tag
def model_name(value):
    '''
    Django template filter which returns the verbose name of a model.
    '''
    if hasattr(value, 'model'):
        value = value.model

    return value._meta.verbose_name.title()


@register.simple_tag
def model_name_plural(value):
    '''
    Django template filter which returns the plural verbose name of a model.
    '''
    if hasattr(value, 'model'):
        value = value.model

    return value._meta.verbose_name_plural.title()
{% load model_name_tags %}
Lista de {% model_name_plural model %}
# forms.py
from django import forms

from .models import Person


class PersonForm(forms.ModelForm):

    class Meta:
        model = Person
        fields = '__all__'

    def __init__(self, user=None, *args, **kwargs):
        super(PersonForm, self).__init__(*args, **kwargs)
        # my_field = MyModel.objects.filter(user=user)
        if user.is_authenticated:
            print(user)
        else:
            print('Não')
# views.py
def person_create(request):
template_name = 'core/person_form.html'
# Não esquecer do request.user como primeiro parâmetro.
form = PersonForm(request.user, request.POST or None)
if request.method == 'POST':
if form.is_valid():
form.save()
return redirect('person:person_list')
context = {'form': form}
return render(request, template_name, context)# models.py
class Person(UuidModel):
first_name = models.CharField('nome', max_length=50)
last_name = models.CharField('sobrenome', max_length=50, null=True, blank=True) # noqa E501
email = models.EmailField(null=True, blank=True)
class Meta:
ordering = ('first_name',)
verbose_name = 'pessoa'
verbose_name_plural = 'pessoas'
@property
def full_name(self):
return f'{self.first_name} {self.last_name or ""}'.strip()
def __str__(self):
return self.full_name
sudo apt-get install -y graphviz libgraphviz-dev pkg-config
python3 -m venv .venv
source .venv/bin/activate
pip install -r requirements.txt
pip install pygraphviz
pip uninstall pyparsing
pip install -Iv https://pypi.python.org/packages/source/p/pyparsing/pyparsing-1.5.7.tar.gz#md5=9be0fcdcc595199c646ab317c1d9a709
pip install pydot
pip install django-extensions
E em INSTALLED_APPS
INSTALLED_APPS = [
    ...
    'django_extensions',
    ...
]
Depois rode
python manage.py graph_models -e -g -l dot -o core.png core # only app core
python manage.py graph_models -a -g -o models.png # all


https://faker.readthedocs.io/en/master/
O Faker é uma biblioteca ideal para popular o seu banco de dados com dados aleatórios.
Vamos trabalhar em cima do model Person, e acrescentar mais uns campos no modelo.
# models.py
class Person(UuidModel):
    first_name = models.CharField('nome', max_length=50)
    last_name = models.CharField('sobrenome', max_length=50, null=True, blank=True)  # noqa E501
    email = models.EmailField(null=True, blank=True)
    bio = models.TextField('biografia', null=True, blank=True)
    birthday = models.DateField('nascimento', null=True, blank=True)
Instale o Faker
pip install faker
E vamos criar um novo comando em management
touch myproject/core/management/commands/create_data.py
# create_data.py
from django.core.management.base import BaseCommand
from django.utils.text import slugify
from faker import Faker

from myproject.core.models import Person
from myproject.utils.progress_bar import progressbar

fake = Faker()


def gen_email(first_name: str, last_name: str):
    first_name = slugify(first_name)
    last_name = slugify(last_name)
    email = f'{first_name}.{last_name}@email.com'
    return email


def get_person():
    first_name = fake.first_name()
    last_name = fake.first_name()
    email = gen_email(first_name, last_name)
    bio = fake.paragraph(nb_sentences=5)
    birthday = fake.date()
    data = dict(
        first_name=first_name,
        last_name=last_name,
        email=email,
        bio=bio,
        birthday=birthday,
    )
    return data


def create_persons():
    aux_list = []
    for _ in progressbar(range(100), 'Persons'):
        data = get_person()
        obj = Person(**data)
        aux_list.append(obj)
    Person.objects.bulk_create(aux_list)


class Command(BaseCommand):
    help = 'Create data.'

    def handle(self, *args, **options):
        create_persons()
Editar admin.py
admin.site.register(Person)
Criar progress_bar.py
mkdir myproject/utils
touch myproject/utils/progress_bar.py
# progress_bar.py
import sys


def progressbar(it, prefix="", size=60, file=sys.stdout):
    count = len(it)

    def show(j):
        x = int(size * j / count)
        file.write("%s[%s%s] %i/%i\r" %
                   (prefix, "#" * x, "." * (size - x), j, count))
        file.flush()
    show(0)
    for i, item in enumerate(it):
        yield item
        show(i + 1)
    file.write("\n")
    file.flush()
Editar views.py
# views.py
from django.views.generic import ListView


class PersonListView(ListView):
    model = Person
    template_name = 'core/person_list.html'
Editar urls.py
# urls.py
...
path('persons/', v.PersonListView.as_view(), name='person_list'),
Editar person_list.html
# person_list.html
{% extends "base.html" %}

{% block content %}
  <h1>Lista de pessoas</h1>

  <div class="row">
    <div class="col">
      <form action="." method="GET">
        <div class="row">
          <div class="col">
            <input name="search" class="form-control mb-2" type="text" placeholder="Buscar..." />
          </div>
          <div class="col-auto">
            <button class="btn btn-success mb-2" type="submit">OK</button>
            <button class="btn btn-link mb-2">Limpar</button>
          </div>
        </div>
      </form>
    </div>
  </div>

  <table class="table">
    <thead>
      <tr>
        <th>Nome</th>
        <th>Sobrenome</th>
        <th>E-mail</th>
        <th>Biografia</th>
        <th>Nascimento</th>
      </tr>
    </thead>
    <tbody>
      {% for object in object_list %}
        <tr>
          <td>{{ object.first_name }}</td>
          <td>{{ object.last_name }}</td>
          <td>{{ object.email }}</td>
          <td>{{ object.bio }}</td>
          <td>{{ object.birthday|date:"d/m/Y" }}</td>
        </tr>
      {% endfor %}
    </tbody>
  </table>
{% endblock content %}Primeiro vamos definir a paginação:
Edite views.py
# views.py
class PersonListView(ListView):
    model = Person
    template_name = 'core/person_list.html'
    paginate_by = 5
Edite person_list.html
<!-- person_list.html -->
...
{% include "includes/pagination.html" %}
Criar includes/pagination.html
mkdir myproject/core/templates/includes
touch myproject/core/templates/includes/pagination.html
<!-- pagination.html -->
<!-- https://gist.github.com/rg3915/01ca76f099f431c24bc0536bef83076b -->
<!-- Use https://gist.github.com/rg3915/01ca76f099f431c24bc0536bef83076b#file-pagination02-html -->
<div class="row text-center">
<div class="col-lg-12">
<ul class="pagination">
{% if page_obj.has_previous %}
<li class="page-item"><a class="page-link" href="?page={{ page_obj.previous_page_number }}">«</a></li>
{% endif %}
{% for pg in page_obj.paginator.page_range %}
<!-- Sempre mostra as 3 primeiras e 3 últimas páginas -->
{% if pg == 1 or pg == 2 or pg == 3 or pg == page_obj.paginator.num_pages or pg == page_obj.paginator.num_pages|add:'-1' or pg == page_obj.paginator.num_pages|add:'-2' %}
{% if page_obj.number == pg %}
<li class="page-item active"><a class="page-link" href="?page={{ pg }}">{{ pg }}</a></li>
{% else %}
<li class="page-item"><a class="page-link" href="?page={{ pg }}">{{ pg }}</a></li>
{% endif %}
{% else %}
{% if page_obj.number == pg %}
<li class="page-item active"><a class="page-link" href="?page={{ pg }}">{{ pg }}</a></li>
{% elif pg > page_obj.number|add:'-4' and pg < page_obj.number|add:'4' %} <!-- Mostra 3 páginas antes e 3 páginas depois da atual -->
<li class="page-item"><a class="page-link" href="?page={{ pg }}">{{ pg }}</a></li>
{% elif pg == page_obj.number|add:'-4' or pg == page_obj.number|add:'4' %}
<li class="page-item"><a class="page-link" href="">...</a></li>
{% endif %}
{% endif %}
{% endfor %}
{% if page_obj.has_next %}
<li class="page-item"><a class="page-link" href="?page={{ page_obj.next_page_number }}">»</a></li>
{% endif %}
</ul>
</div>
</div>Editar novamente views.py
# views.py
from django.db.models import Q

class PersonListView(ListView):
    model = Person
    template_name = 'core/person_list.html'
    paginate_by = 5

    def get_queryset(self):
        queryset = super(PersonListView, self).get_queryset()

        data = self.request.GET
        search = data.get('search')

        if search:
            queryset = queryset.filter(
                Q(first_name__icontains=search) |
                Q(last_name__icontains=search) |
                Q(email__icontains=search) |
                Q(bio__icontains=search)
            )

        return queryset
Criar templatetags url_replace.py
touch myproject/core/templatetags/url_replace.py
# url_replace.py
# https://stackoverflow.com/a/62587351/802542
from django import template

register = template.Library()


@register.simple_tag(takes_context=True)
def url_replace(context, **kwargs):
    query = context['request'].GET.copy()
    query.pop('page', None)
    query.update(kwargs)
    return query.urlencode()
E finalmente edite pagination.html trocando todos os href
<!-- pagination.html -->
{% load url_replace %}
...
href="?{% url_replace page=page_obj.previous_page_number %}"
...
href="?{% url_replace page=pg %}"
...
href="?{% url_replace page=page_obj.next_page_number %}"![dependabot[bot] avatar](https://avatars.githubusercontent.com/in/29110?v=4 "dependabot[bot]")
