This version uses React, Redux, Express, Passport, and PostgreSQL (a full list of dependencies can be found in package.json).
We STRONGLY recommend following these instructions carefully. It's a lot, and will take some time to set up, but your life will be much easier this way in the long run.
Before you get started, make sure you have the following software installed on your computer:
This guide explains the process of restoring a PostgreSQL database using the databasebackup.backup file saved in this repository. The database we'll be restoring is called changegrower. To successfully restore the database, we'll use the provided pool.js script, and you'll need to set up a .env file with the required environment variables.
Before proceeding with the database restoration process, ensure you have the following dependencies installed:
- Node.js and NPM (Node Package Manager)
- PostgreSQL database server installed on your machine or accessible via a remote connection.
-
Clone this Repo to your local machine: git clone cd
-
Install the required Node.js dependencies: -npm install
- Run
npm install - Create a
.envfile at the root of the project and paste this line into the file:While you're in your newSERVER_SESSION_SECRET=superDuperSecret.envfile, take the time to replacesuperDuperSecretwith some long random string like25POUbVtx6RKVNWszd9ERB9Bb6to keep your application secure. Here's a site that can help you: https://passwordsgenerator.net/. If you don't do this step, create a secret with less than eight characters, or leave it assuperDuperSecret, you will get a warning. - Start postgres if not running already by using
brew services start postgresql - Run
npm run server - Run
npm run client - Navigate to
localhost:3000
The .env file is used to set environment variables for the database connection. In this case, the pool.js script reads the PostgreSQL connection details from this file. Here's how you can set up the .env file:
- Open the
.envfile using a text editor and add the following configuration:DB_USERNAME=your-database-username DB_PASSWORD=your-database-password
Replace the placeholders (username, password, your-database-host, your-database-name, your-database-username, and your-database-password) with your actual database connection details USERNAME and PASSWORD are set in the .env file.
To debug, you will need to run the client-side separately from the server. Start the client by running the command npm run client. Start the debugging server by selecting the Debug button.

Then make sure Launch Program is selected from the dropdown, then click the green play arrow.

To use Postman with this repo, you will need to set up requests in Postman to register a user and login a user at a minimum.
Keep in mind that once you using the login route, Postman will manage your session cookie for you just like a browser, ensuring it is sent with each subsequent request. If you delete the localhost cookie in Postman, it will effectively log you out.
- Start the server -
npm run server - Import the sample routes JSON file v2 by clicking
Importin Postman. Select the file. - Click
CollectionsandSendthe following three calls in order:POST /api/user/registerregisters a new user, see body to change username/passwordPOST /api/user/loginwill login a user, see body to change username/passwordGET /api/userwill get user information, by default it's not very much
After running the login route above, you can try any other route you've created that requires a logged in user!
Before pushing to Heroku, run npm run build in terminal. This will create a build folder that contains the code Heroku will be pointed at. You can test this build by typing npm start. Keep in mind that npm start will let you preview the production build but will not auto update.
- Start postgres if not running already by using
brew services start postgresql - Run
npm start - Navigate to
localhost:5002 - The port can be update by change the values in these scripts
- server.js
// App Set
const PORT = process.env.PORT || 5002;
- package.json
"proxy": "http://localhost:5002",
Directory Structure:
src/contains the React applicationpublic/contains static assets for the client-sidebuild/after you build the project, contains the transpiled code fromsrc/andpublic/that will be viewed on the production siteserver/contains the Express App
NOTE:: If Restore fails all tables, views, and Store proceedure scripts can be found in:
database.sql
databaseSetupStoredPro.sql
To restore the changegrower database from the databasebackup.backup file, follow these steps:
If you would like to name your database something else, you will need to change prime_app to the name of your new database name in server/modules/pool.js
-
Ensure that the PostgreSQL database server is running.
-
Open a terminal in the root directory of the project.
-
Run the following command to restore the database:
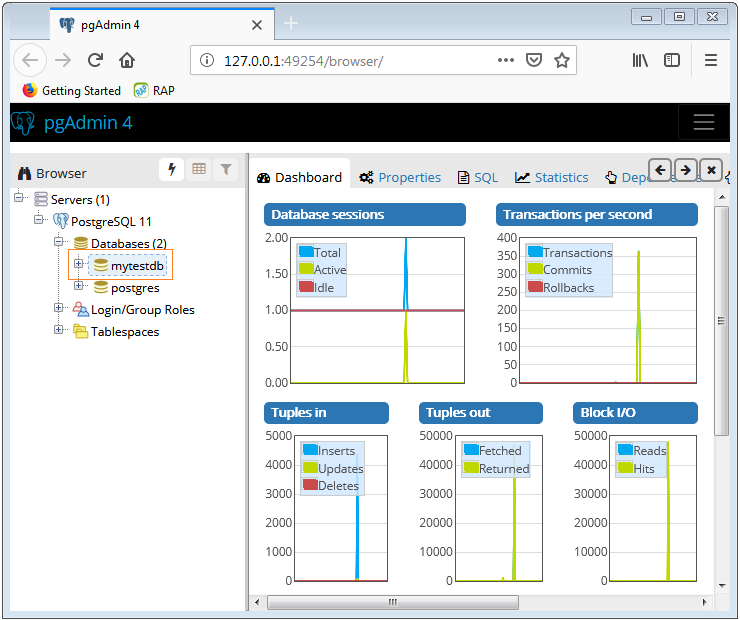
pg_restore -h your-database-host -U your-database-username -d changegrower -v databasebackup.backupBelow are images showing the steps to restore the database using the PostgreSQL graphical tool (pgAdmin):
-
Open pgAdmin and navigate to the 'Servers' section.
-
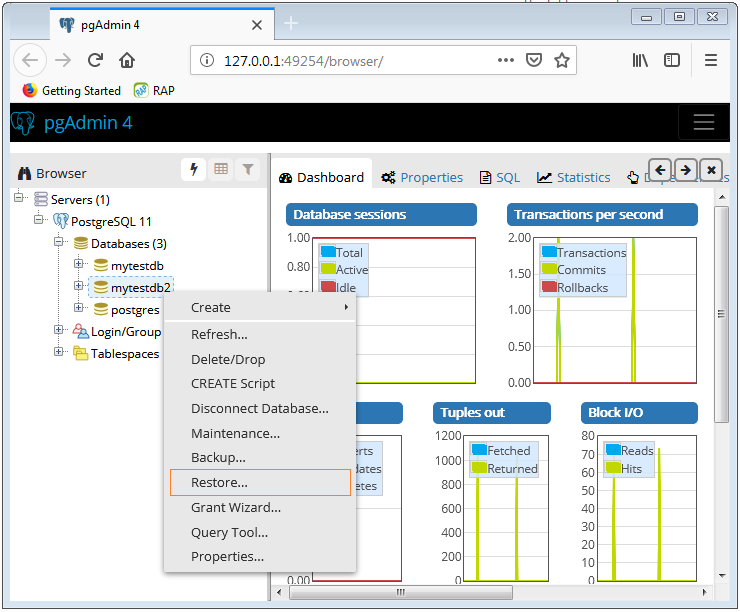
Right-click on the server where you want to restore the database and select 'Restore...'
-
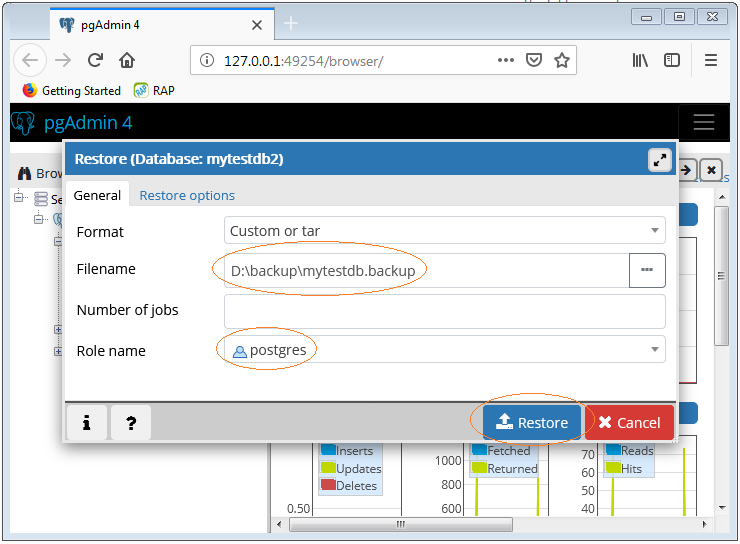
In the 'Filename' tab, browse and select the
databasebackup.backupfile. -
Go to the 'Restore Options' tab and set the 'Role name' to the user you want to use for the restore (usually the owner of the database). -image above
-
Click the 'Restore' button to begin the restoration process.
That's it! The changegrower database should now be restored from the databasebackup.backup file.
Remember to configure the .env file correctly to ensure that the pool.js script connects to the restored database.
-
Go to the AWS website and click on "Create an AWS Account."
-
Follow the instructions to create your AWS account. You'll need to provide your email address, password, and payment information.
-
Sign in to your AWS Management Console using the root user credentials.
-
Navigate to the Amazon S3 service.
-
Click on the "Create Bucket" button to start creating a new bucket.
-
Provide a unique name for your bucket, such as
my-bucket-name. Choose the AWS region where you want the bucket to be located. -
Keep the default settings for the rest of the options and click "Create Bucket."
-
Navigate to the IAM (Identity and Access Management) service in the AWS Management Console.
-
Click on "Users" in the left navigation panel and then "Add user."
-
Enter a user name, such as
projectname-user, and select "Programmatic access" as the access type. Click "Next." -
On the "Set permissions" screen, select "Attach policies directly."
-
Search for and select "AmazonS3FullAccess" policy, which provides full access to Amazon S3. This policy includes the necessary permissions for S3 operations. In the policy editor, replace the placeholders in the policy document with the appropriate information. The final policy might look like this:
{
    "Version": "2012-10-17",
    "Statement": [
        {
            "Sid": "Statement1",
            "Effect": "Allow",
            "Principal": {
                "AWS": "arn:aws:iam::YOUR_ACCOUNT_ID:user/projectname-user"
            },
            "Action": "s3:GetObject",
            "Resource": "arn:aws:s3:::my-bucket-name/*"
        },
        {
            "Sid": "Statement2",
            "Effect": "Allow",
            "Principal": {
                "AWS": "arn:aws:iam::YOUR_ACCOUNT_ID:user/projectname-user"
            },
            "Action": "s3:PutObject",
            "Resource": "arn:aws:s3:::my-bucket-name/*"
        }
    ]
}Before running the application, make sure you have completed the following steps:
-
Clone this repository to your local machine: git clone cd
-
Install the required Node.js dependencies:
npm installTo start the app on localhost, follow these steps:
Open a terminal and run the following command:
npm run clientThis command will start the React development server, which runs the front-end of the application. You should see output indicating that the development server is running, and the application is accessible at http://localhost:3000.
Open another terminal (keeping the previous one running for the client) and run the following command:
npm run serverThis command will start the Node.js server using the pool.js script provided earlier. The server will connect to the PostgreSQL database, and you should see output indicating that the server is running and listening for incoming requests.
With both the client and server running, you can now access the application in your web browser by navigating to: http://localhost:3000
This URL will take you to the front-end of the application served by the React development server. The front-end will communicate with the back-end server running at http://localhost:5002 to fetch and store data in the PostgreSQL database.
You can now interact with the application and test its functionality in the local environment.
Make sure to keep both terminals running while you are using the application on localhost. To stop the app, press Ctrl+C in each terminal.
That's it! You have successfully set up and run the app on your local machine. Enjoy exploring its features!
Summary: The Login/Register page allows users to either log in to their existing accounts or create new ones if they are new to the platform.
Related Scripts:
LoginPage --
LoginPage.jsx
LoginPageHeader.jsx
LoginPageFooter.jsx
LoginForm --
LoginForm.jsx
Sagas --
Login.saga.js
logindata.saga.js
registration.saga.js
user.saga.js
Reducers --
logindata.reducer.js
user.reducer.js
Summary: The Home Page is the main dashboard where users can view personalized content, to include new and most liked.
Related Scripts:
HomePage --
HomePage.jsx
HomeHeader.jsx
NewSectionjsx
RecommendedSection.jsx
ContentCard.jsx
Home.css
Reducers and Sagas used:
user
Summary: The Explore Page lets users discover new content. Users can search for specific content or browse through various categories.
Related Scripts:
ExplorePage:
Explore.Content.jsx
ExploreFilter.jsx
ExploreHeader.jsx
ExploerList.jsx
ExplorerPage.jsx
Summary: The User Page displays detailed information about a specific user, including their profile picture, bio, badges earned, and published journals.
Related Scripts:
templateComponents/UserPage:
userPage.css
UserPage.jsx
UserPageHeader.jsx
UserPageJournal.jsx
Summary: The Journals feature allows users to create, view, and edit their personal journals. They can add entries,and organize their thoughts.
Related Scripts:
Journals.jsx
Jornals.css
Summary: The Badges feature tracks users' achievements and rewards them with badges based on their activities and accomplishments.
Related Scripts:
Badges:
Badges.css
Badges.jsx
ProgessModal.css
ProgressModal.jsx
Summary: Admin Feature to Not fully Built, has links to uploads and About and Logout
Related Scripts:
TemplateComponents/AboutPage :
AboutPage.jsx
Summary: The File Uploads feature allows Admins to upload and attach media files, such as images or videos, to the entire webapp.
Related Scripts:
FileUploads:
fileUploads.jsx
FileUploads.css
Related Scripts:
Audio.router.js --Get, Delete to AWS and DB Audio data
badges.router.js -- Get Post to badges, badge_earned
favorites.router.js Get, Post to favorites
image.router.js Get, Delete to AWS and DB Audio data
journal.router.js Get, Post, Delete, Put to Journals
(contains logic to update badges_earned)
login.router.js Get, Post, to login - modifies. Login_history view (contains logic to update badges_earned)
user.router.js Get, Post to user
video.router.js Get, Delete to AWS and DB Audio data


