
Leading container-converged scale-out solution!
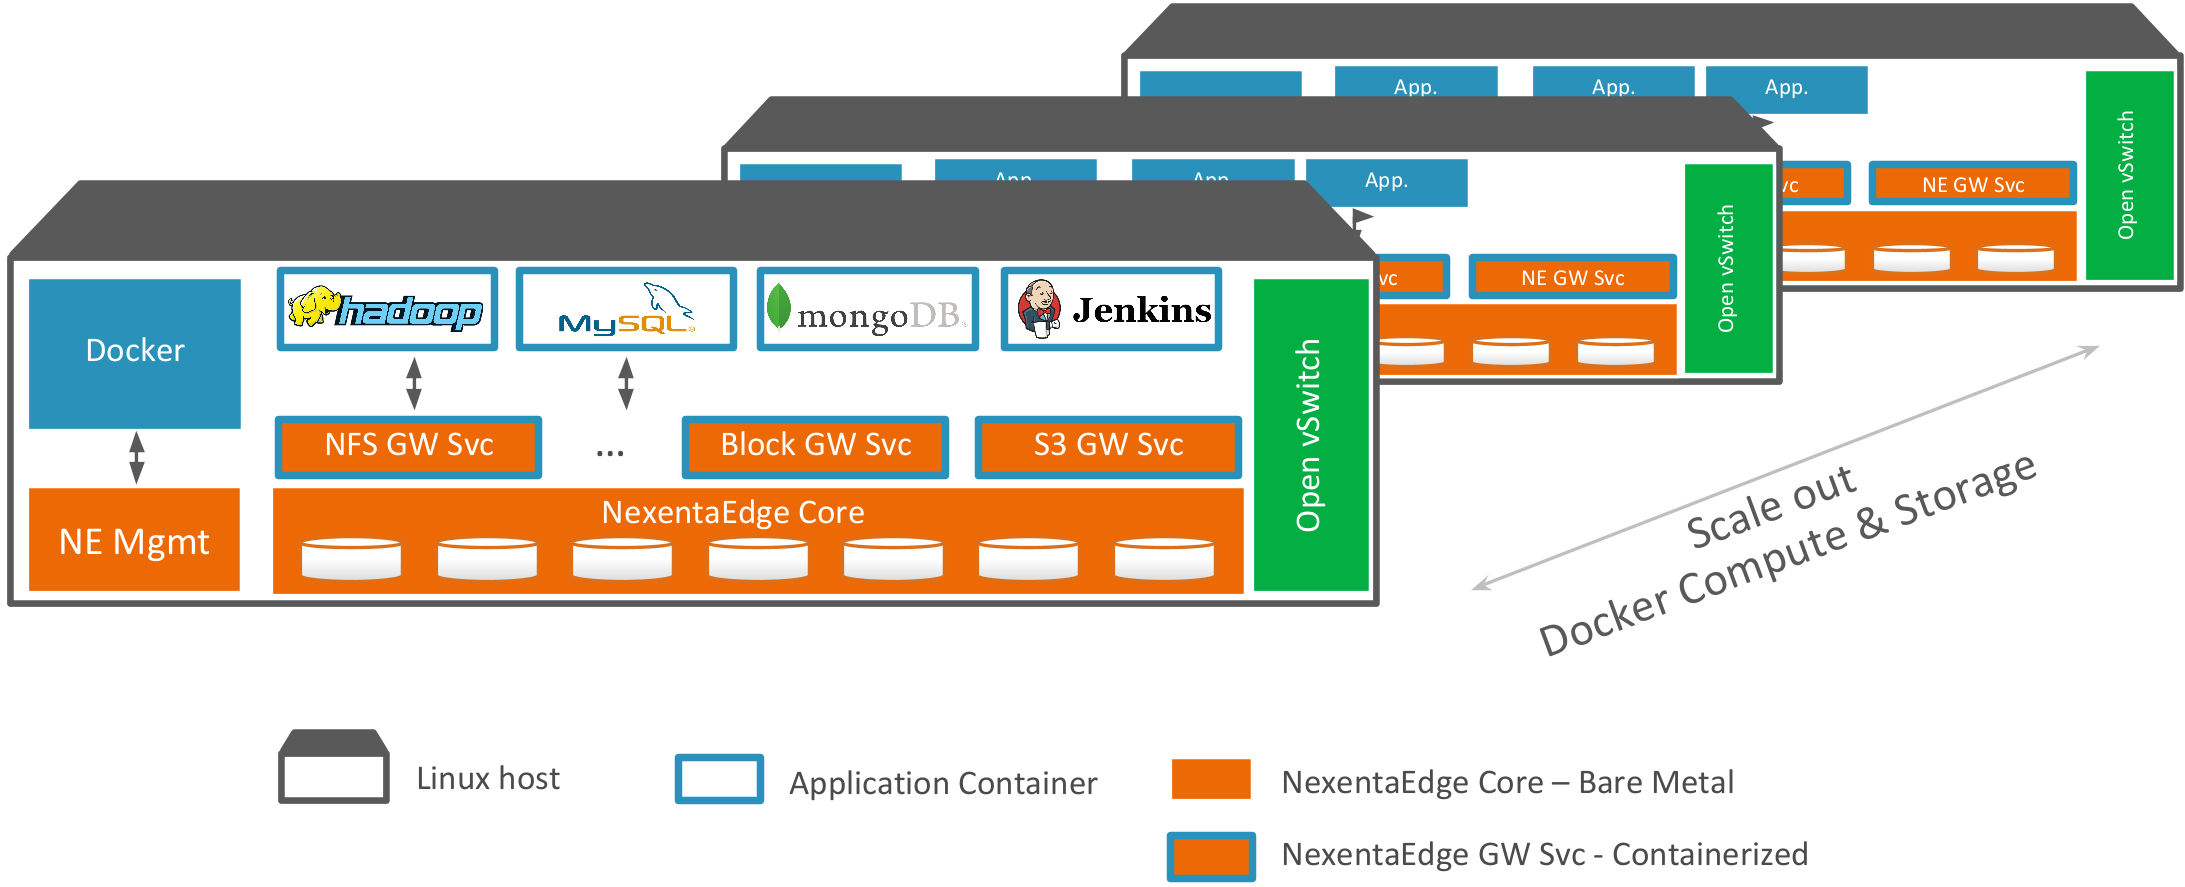
NexentaEdge DevOps Edition is purpose built, container converged scale-out storage solution with full set of Enterprise class features. Run Hadoop/Spark, Cassandra, Jenkins, or any application (Scale-out NFS, iSCSI block, S3/Swift Object) in Docker on commodity x86 servers
Containers, Orchestrations, Cloud technologies and proliferation of DevOps tools help make applications portable among private and public clouds. Elasticity and Flexibility are two missing properties of todays software defined data planes. A new, distributed approach is needed to storage, manage, and protect data across hybrid landscape. Using a modern, ultra scalable architecture, Nexenta software defined scale out solution NexentaEdge solves this problem. We call it Flexible Data Plane for Container-Converged solutions:
Flexible Data Plane overcomes the frictions and economics of traditional storage. It provides a single, programmable data management layer that spans across workloads, clouds and tiers.
Support any application and major data plane consumers. Traditional storage creates islands of SAN, NAS and object storage to support different applications and OSs. The Flexible Data Plane removes friction in management and necessity for extra copies between the islands by providing unified data storge platform
Span private and public clouds. Traditional storage doesn't natively support public clouds. The Flexible Data Plane spins up in any cloud, creating a single data layer that replicates among private or public sites. Integration for any types of data (SAN, NAS and Object), bi-directional and incremental transferring makes multi-site replication feature unique and flexible in usage
Collapse traditional storage tiers by introducing bottom up tenancy at storage, networking and compute level. Traditional storage platforms are designed for discrete tiers for isolated workloads. The Flexible Data Plane exposes comprehensive multi-tenancy way of managing IT infrastructure by providing unique way of combining data storage smart placements, storage / networking QoS and micro-services together
Utilize disk and network capacities to its maximum by introducing smart data placements. Every I/O in NexentaEdge placed efficiently, preserving QoS guarantees and at the maximum speed possible. Benefits provided by patented Replicasttm protocol and using high performance UDP transfers. Traditional storage makes poor choices of where I/O has to be placed which often causing I/O spikes and HW underutilization. The Flexible Data Plane maximizes return from HW investments
Provide end-to-end data integrity to application. NexentaEdge patented CCOWtm technology uses strong and flexible cryptographic checksums (SHA2 and SHA3) to detect and self-heal data corruptions. If a disk returns bad data transiently CCOW will detect it and retry the read. The Flexible Data Plane built on top of CCOW technology will both detect and correct the error: it will use the cryptographic hash to determine which copy is correct, provide good data to the application, and repair the damaged copy automatically.
Capabilities of Flexible Data Plane:
- Scale-out, high performance architecture
- Native multi-site replication to / from heterogeneous clouds and between data centers
- Full automation and orchestration support
- Micro-services specific data services
- Unique combination of scale up and scale out from one vendor via Fusion API framework
The NexentaEdge is the only software-defined solution built with the above capabilities. It was designed from the ground up as a modern, distributed unified storage platform that can run on any commodity server and in any public cloud.
Note:
The full NexentaEdge Enterprise Edition Documentation is available here
NexentaEdge is designed to run in Linux containers, as baremetal on-premis or in the cloud. It is true object storage high-performance scale out solution with File, Block and Object interfaces tightly integrated with container applications. Purporse built for usage with containers, to help design massively scalable and large data greedy applications.
It is highly recommended that you run NexentaEdge DevOps Edition on a system with at least 16GB RAM.
| Requirement | Notes |
|---|---|
| Kernel Version | 4.4 or higher |
| Docker Version | 1.12 or higher |
| CPU | 4 cores minimally recommended |
| Network | Dedicated, VLAN isolated networking interface for Replicast I/O |
| Memory | 16GB Minimum |
| OS | Ubuntu 16.04 LTS, CentOS7.2 with ELREPO kernel 4.4 |
Follow below steps to get familiarity with NexentaEdge by trying "all-in-one" deployment where Data and GW functions running in the same single container.
NexentaEdge designed for high performance and massive scalability beyond 1000 servers per single namespace physical cluster. It doesn't need to have central metadata server(s) or coordination server(s). Architecture is true "shared nothing" with metadata and data fully distributed across the cluster. To operate optimally NexentaEdge requires dedicated high-performance network, isolated with VLAN segment, set for use of Jumbo Frames and preferably non-blocking switch with Flow-Control enabled.
Data Container can be installed either in single or multiple instances per host. When it is installed as a single container, consider to use "--network host" option to simplify networking access for Replicast, Management and Client networks.
It is possible to install more then one Data Container and setup custom Replicast, Management and Client networks. Activation script needs to ensure that all networks exists and functional prior to starting container. For Replicast network it is recommended to use macvlan virtualization method. Example to use macvlan as a Replicast L2 bridge:
ifconfig enp0s9 mtu 9000 up
modprobe macvlan
docker network create -d macvlan --subnet 192.168.10.0/24 -o parent=enp0s9 repnet
- edit nesetup.json - download from "single-node" profile (located in conf directory) and copy it over to some dedicated container directory, e.g. /root/c0
- adjust broker_interfaces, example eth1. This is backend gateway container interface (Replicast)
- server_interfaces point to the same name, example eth1. This is also backend but for data container interface (Replicast)
- adjust rtrd section to point to the devices to be used. Use nezap utility to zap device(s). WARNING: ALL DATA ON SELECTED DISKS WILL BE WIPED OUT. Example:
ls -l /dev/disk/by-id
docker run --rm --privileged=true -v /dev:/dev nexenta/nedge /opt/nedge/sbin/nezap --do-as-i-say DEVID [JOURNAL_DEVID]
Make sure to zap all the devices you listed in nesetup.json. Use optional JOURNAL_DEVID parameter to additionally zap journal/cache SSD.
Set optimal host sysctl parameters:
echo "net.ipv6.conf.all.force_mld_version = 1" >> /etc/sysctl.conf
echo "net.core.optmem_max = 131072" >> /etc/sysctl.conf
echo "net.core.netdev_max_backlog = 300000" >> /etc/sysctl.conf
echo "net.core.rmem_default = 80331648" >> /etc/sysctl.conf
echo "net.core.rmem_max = 80331648" >> /etc/sysctl.conf
echo "net.core.wmem_default = 33554432" >> /etc/sysctl.conf
echo "net.core.wmem_max = 50331648" >> /etc/sysctl.conf
echo "vm.dirty_ratio = 10" >> /etc/sysctl.conf
echo "vm.dirty_background_ratio = 5" >> /etc/sysctl.conf
echo "vm.dirty_expire_centisecs = 6000" >> /etc/sysctl.conf
echo "vm.swappiness = 25" >> /etc/sysctl.conf
echo "net.ipv4.tcp_fastopen = 3" >> /etc/sysctl.conf
echo "net.ipv4.tcp_mtu_probing = 1" >> /etc/sysctl.conf
echo "net.ipv6.ip6frag_high_thresh = 10000000" >> /etc/sysctl.conf
echo "net.ipv6.ip6frag_low_thresh = 7000000" >> /etc/sysctl.conf
echo "net.ipv6.ip6frag_time = 120" >> /etc/sysctl.conf
sysctl -p
See Reference for detailed explanations for these.
- create empty var directory. This directory will persistently keep containers information necesary to have across restarts and reboots.
mkdir /root/c0/var
- starting with host networking configuration. Ensure that host has ports 8080 and 9982 not used and available. Port 8080 (default) will be used to respond to REST API requests and 9982 (default) will be used to serve S3 requests
netstat -ant|grep "8080\|9982"|grep LISTEN
docker run --ipc host --network host --name nedge-data-s3 \
	-e HOST_HOSTNAME=$(hostname) -e CCOW_SVCNAME=s3finance -d -t -i --privileged=true \
	-v /root/c0/var:/opt/nedge/var \
	-v /root/c0/nesetup.json:/opt/nedge/etc/ccow/nesetup.json:ro \
	-v /dev:/dev \
	-v /run/docker/plugins:/run/docker/plugins \
	-v /var/run/docker.sock:/var/run/docker.sock \
	-v /etc/localtime:/etc/localtime:ro \
        nexenta/nedge /opt/nedge/nmf/nefcmd.sh start -j ccowserv -j ccowgws3
- copy .neadmrc - download from "default" profile (located in conf directory) to /root/c0. If you planning to use neadm tool on a different host, you'll need to adjust API_URL to point to the right management IPv4 address. Default port 8080, and add "-v /root/c0/.neadmrc:/opt/neadm/.neadmrc" to the alias
- source .bash_completion - download from "default" profile (located in conf directory). This is optional step.
- setup neadm alias (optional)
source /root/c0/.bash_completion
docker pull nexenta/nedge-neadm
alias neadm="docker run -i -t --rm --network host nexenta/nedge-neadm /opt/neadm/neadm"
- use NEADM management tool to verify that data container(s) are online
neadm system status
- use NEADM management tool to initialize cluster
neadm system init
- register DevOps account here
- use e-mailed activation key to activate installation:
neadm system license set online LICENSE-ACTIVATION-KEY
- use NEADM management tool to create cluster name space "company-branch1" and tenant "finance"
neadm cluster create company-branch1
neadm tenant create company-branch1/finance
- use NEADM management tool to setup service parameters
neadm service create s3 s3finance
neadm service configure s3finance X-Service-Config '{"clusterName":"company-branch1","tenantName":"finance"}'
- restart s3 service so that it will pick up new values from the "s3finance" service definition
docker exec -it nedge-data-s3 /opt/nedge/nmf/nefcmd.sh adm restart ccowgws3
curl http://localhost:9982/
Follow below steps to get familiarity with NexentaEdge by trying simple 3-node deployment where Data and GW functions running in the same container, serving S3 protocol with NGNIX load balancing HTTP requests
Follow same networking configuration for all the 3 nodes as described in "single-node" example above. Make sure that networking interfaces are all configured with Jumbo and accessible in isolated VLAN (physical or emulated).
Follow same disk configuration for all the 3 nodes as described in "single-node" example above with following differences and additional stps:
- you will need to use and edit nesetup.json - download from "default" profile. Or use appropriate profile to enable SSD cache/journaling for high-performance hybrid configuration. Consider to use throughput profile if your use case is mostly large objects / files
- select one of containers also to have management role by changing "is_aggregator" to 1
Follow same container start steps as described in "single-node" example above. NexentaEdge will automatically discover new nodes and form a cluster.
Follow same initialization steps as described in "single-node" example above. Make sure to modify .neadmrc to set IPv4 address to point to a node with selected management role (i.e. where is_aggregator=1 in nesetup.json)
Follow same eservice configuration steps as described in "single-node" example above.
The goal is to set up an installation that has an Nginx reverse proxy server at the front and a set of upstream servers handling the requests. The Nginx server is the one directly communicating with clients. Clients don’t receive any information about particular upstream server handling their requests. The responses appear to come directly from the reverse proxy server.
Assuming that Edge containers running on servers with public IPv4 addresses (10.1.1.10, 10.1.1.11, 10.1.1.12), create simple reverse proxy configuration file:
mkdir /root/ngnix/{conf.d,certs}
# echo "upstream servers {
server 10.1.1.10:9982;
server 10.1.1.11:9982;
server 10.1.1.12:9982;
}

server {
listen 80;

location / {
proxy_pass http://servers;
}
}” > /root/nginx/default.conf
And start ngnix proxy container:
docker run -td -p 80:80 --name nginx-proxy \
	-v /var/run/docker.sock:/tmp/docker.sock:ro \
	-v /root/ngnix/conf.d:/etc/nginx/conf.d:ro \
        -v /root/ngnix/certs:/etc/nginx/certs:ro \
	jwilder/nginx-proxy
Observe that ngnix-proxy host (replace with IP address to access proxy) can transparently proxy and load-balance S3 requests to Edge cluster:
curl http://ngnix-proxy:9982/
As you use NexentaEdge, please share your feedback and ask questions. Find the team on NexentaEdge Forum.
If your requirements extend beyond the scope of DevOps Edition, then please contact Nexenta for information on NexentaEdge Enterprise Edition.
This file defines configuration used by CCOW client library.
| Field | Description | Example | Required |
|---|---|---|---|
| tenant/failure_domain | Defines desirable failure domain for the container. 0 - single node, 1 - server, 2 - zone | 1 | required |
| network/broker_interfaces | The network interface for GW function, can be same as in ccowd.json | eth0 | required |
This file defines configuration used by CCOW daemon.
| Field | Description | Example | Required |
|---|---|---|---|
| network/server_interfaces | The network interface for DATA function | eth0 | required |
| transport | Default transport mechanism. Supported options: rtrd (RAW Disk Interface), rtlfs (On top of FileSystem) | rtrd | required |
This file defines device configuration. Recommended for High Performance and better Disk space utilization as there is no filesytem overhead and data blobs written directly to device.
| Field | Description | Example | Required |
|---|---|---|---|
| devices/name | Unique device name as listed in /dev/disk/by-id/NAME | ata-VBOX_HARDDISK_VB370b5369-7d9ecbe0 | required |
| devices/device | Kernel device name (used only for device description) | /dev/sdb | required |
| devices/journal | Unique device name as listed in /dev/disk/by-id/NAME (SSD) to be used as WAL journal and caching | ata-VBOX_HARDDISK_VB370b5369-8e7a88e7 | optional |
This file defines device configuration.
| Field | Description | Example | Required |
|---|---|---|---|
| devices/name | Unique device name as listed in /dev/disk/by-id/NAME | disk1 | required |
| devices/path | Mountpoint to use. Supported file systems: EXT4, XFS and ZFS | /data/disk1 | required |
| devices/device | Kernel device name (used only for device description) | /dev/sdb | required |
This file defines StatsD protocol compatible statistic aggregator configuration.
| Field | Description | Example | Required |
|---|---|---|---|
| is_aggregator | Marks Data Container to become an aggregator and primary management endpoint | 0 | required |
To achieve best performance / reliability results some host parameters needs to be adjusted.
This section defines parameters which recommended for optimal performance.
| Field | Description | Value | Required |
|---|---|---|---|
| net.ipv6.conf.all.force_mld_version | Version of MLD protocol | 1 | required |
| vm.dirty_ratio | Percentage of system memory which when dirty, the process doing writes would block and write out dirty pages to the disks | 10 | required for hosts running Data containers |
| vm.dirty_background_ratio | Percentage of system memory which when dirty then system can start writing data to the disks | 5 | required for hosts running Data containers |
| vm.dirty_expire_centisecs | Defines when dirty data is old enough to be eligible for writeout to disks | 6000 | required for hosts running Data containers |
| vm.swappiness | Defines how aggressive the kernel will swap memory pages | 25 | required for hosts running Data containers |
| net.core.optmem_max | Maximum amount of option memory buffers | 131072 | required for 10G+ networks |
| net.core.netdev_max_backlog | Maximum amount of incoming packets for backlog queue | 300000 | required for 10G+ networks |
| net.core.rmem_default | Default socket receive buffer | 80331648 | required for 10G+ networks |
| net.core.rmem_max | Maximum socket receive buffer | 80331648 | required for 10G+ networks |
| net.core.wmem_default | Default socket send buffer | 33554432 | required for 10G+ networks |
| net.core.wmem_max | Maximum socket send buffer | 50331648 | required for 10G+ networks |
| net.ipv6.ip6frag_high_thresh | Maximum amount of memory to use to reassemble IP fragments | 10000000 | required for 10G+ networks |
| net.ipv6.ip6frag_low_thresh | Lower limit at which packets should start being assembled again | 7000000 | required for 10G+ networks |
| net.ipv6.ip6frag_time | Tells the IP fragmentation handler how long to keep an IP fragment in memory, counted in seconds | 120 | required for 10G+ networks |
| Resource | Limit |
|---|---|
| Max Total Used | 10TB |
| Max Number of Data Containers | 3 |
| Minimal number of disks per Data Container | 4 |

