
EmpowerEd is an educational platform developed with the aim to provide education resources to underprivileged children. The application has a range of features to make learning interactive, accessible and engaging for students while also allowing students to connect with mentors, and providing the avenue for parents to communicate conveniently with teachers. In summary, the Website aim to achieve the goal of creating an education enabled environment for students.
Django framework is utilized to build the website, which serves as the backend and handles tasks such as user authentication, data management, and routing. Moreover, the majority of the frontend is also handled by Django. A key feature of the website is the implementation of a React component that enables real-time communication and updates via WebSockets. As a result, users can enjoy a seamless and interactive experience, with parts of the website updating in real-time without the need to refresh the page. Overall, the website leverages Django's power and flexibility, as well as React and WebSockets' dynamic capabilities, to deliver a smooth and responsive user experience. The live website is available here
See projects
The development of the website has followed an Agile methodology, using GitHub's projects to prioritize and track user stories and features. The approach enabled the implementation of ideas based on their level of importance, ensuring that the website functionality and user experience were not compromised. The following categories were applied, as well as corresponding labels were created:
- must have
- should have
- would have
- could have
The project was constrained by time limitations, which resulted in some initially listed features not being implemented. However, AGILE methodology is incredibly helpful in situations like this, as it allows for the prioritization and tracking of user stories. Completed user stories are in the "Done" section and the ones that were not prioritised for the first iteration are currently in the "To Do" section to be covered in the next iteration.
See the current state of the project here. EmpowerEd
Using a hybrid architecture has a significant advantage of using Django's built-in tooling to handle authentication, which means that we can easily add authentication functionalities to our hybrid Django view without relying on complicated third-party authentication workflows. Another advantage of the hybrid architecture is that it allows us to send data to the frontend in two different ways, either by passing the data directly to the template using Django's templating system, or by providing the data through asynchronous APIs using JavaScript and Django REST framework. This method enables fast data loading using the native fetch API and authentication is handled seamlessly by the Django session cookie, without wrestling with CORS.
Using React for the frontend, specifically for a real-time Messenger, we can provide a smooth and responsive user experience due to React's performance benefits. React is also highly modular, enabling the easy scaling of different parts of the application independently as needed. This makes it simpler to add new features or make changes to the application without affecting other parts of the codebase, as well as simplifying the debugging and testing processes.
Empowered needed an inviting color that signifies the values of the company. A mixture of this color was made with
- #a2df9d
- #8288ee
- #fff
- #000
The contents of the website is required to be clear and legible for users. 'Inter' The bootstrap 5 default font family was the choice for typographic design as it answers the question of readability well.
The Website was pre-designed on a graphical paper. A pictogram of what the various pages of the website could look like in order to accomodate informations helpful for the user. wireframe
A hybrid architecture - a single-page React app (Messenger) integrated into a Django project. This approach allows for multiple types of pages in the same project.
Here is a scheme of the structure:
-
Sign In

-
Sign Up

-
Homepage

-
Navbar

-
User Profile and notification

-
User Profile

-
Edit User Profile

-
Parent Profile

-
Mentors Page

-
Resources Page

-
User Notifications

-
Messaging

-
Footer Links

 AllAuth is a flexible solution for managing user authentication and registration. It uses session-based authentication instead of Django's token-based authentication to store the user's authentication information in the user's session. When a user logs in, AllAuth generates a new session for the user and saves their identifying information, such as their ID or username, in the session. The library then sends a session ID to the client as a session cookie, which is stored in the browser. Subsequent requests from the client include the session ID in the Cookie header of the HTTP request, allowing django-allauth to authenticate the user by looking up the associated session.
One of the main reasons we chose to use django-allauth is because of its flexibility and support for various authentication methods. Another reason is because of its scalability.
The project uses a custom user model with email as a user id, instead of using Django's built-in User model, which means that users to register and log in to the website need to use their email address instead of a traditional username, it also uses a custom sign up form.
For User Profile role we implemented 3 models: Student, Parent and Mentor, instances of which are automatically created based on the role chosen when signing up. They are separate models from the User model and is connected to it through a OneToOneField. These User Profile models contains additional information about the user based on their role. The main reason for this is that it allows for better organisation and maintainability of the codebase.
Users can update their profile information at any time. This feature allows them to make changes to their personal information and a profile picture. This feature is beneficial for users as it allows them to keep their profile information up to date and accurate, which is in many ways essential for the purpose of the website.
Users can access the profile update page by clicking on their name in the top right corner of the website, and then clicking on the "Edit Profile" button. Once on the update page, they can edit the fields they wish to change and save the changes by clicking on the "Save" button.
The website has a real-time messaging feature that uses websockets to display a notification in the form of a badge on the messenger icon whenever a new message is received. The badge shows the number of unread messages, enabling the user to promptly gauge the amount of new messages they have received. The purpose of this feature is to enhance the user experience by providing an effortless way to access messages without having to navigate to a separate page. Users can access their messages with a single click on the messenger icon, and the badge serves as a visual indicator that there is a new message waiting for them.
The website's messenger function is there for users to communicate and schedule sessions. It was developed using React and Typescript and is integrated into a page in a Django App, where all messenger-related navigation is controlled by a React router. The real-time feature is achieved by using websockets in conjunction with Django Channels, a library that allows Django to handle websockets and HTTP requests. This results in a seamless and responsive experience where users can send and receive messages instantly, without having to refresh the page. Users can view their message history and receive notifications when they get new messages.
Django Channels was used to add websocket support to the Django project. It extends the functionality of Django by allowing the handling of multiple protocols, such as the HTTP protocol which is used by default, and the websocket protocol which enables real-time functionality.
To set up websockets in the project, Django Channels uses an asgi application, which is responsible for handling the HTTP protocol, and a URL router that handles the websocket protocol.
Daphne
Daphne is an ASGI server that can handle HTTP and WebSocket connections, and is designed specifically for use with Django Channels. On the other hand, Uvicorn is an ASGI server built on asyncio, which can handle both HTTP and WebSocket connections, but is not designed for use with Django Channels. The author chose to use Daphne for this project because of its support for WebSockets and other asynchronous protocols. However, Daphne may not be optimized for handling large numbers of traditional HTTP requests and may require a reverse proxy like Nginx or Apache when scaling up.
Redis
Redis is an in-memory data store that can be used as a backend for Django Channels. Channels are unique identifiers representing a connection between a client and server. Redis stores information about the list of channels and the clients subscribed to them, which helps in handling a large number of concurrent connections and messages in real-time. In this project, Redis is utilized as the channel layer to store information about groups of users connected to a WebSocket and enable efficient communication across different instances of the application. Additionally, Redis can be used as a caching system and to store session data, which can improve the application's performance.
The full conversation view allows users to view all the messages exchanged with another user in a conversation. The conversation is displayed in chronological order, with the most recent messages appearing at the bottom. The view initially loads the last 50 messages, and as the user scrolls up, more messages are loaded via infinite scroll, allowing the user to view the entire conversation without having to reload the page.
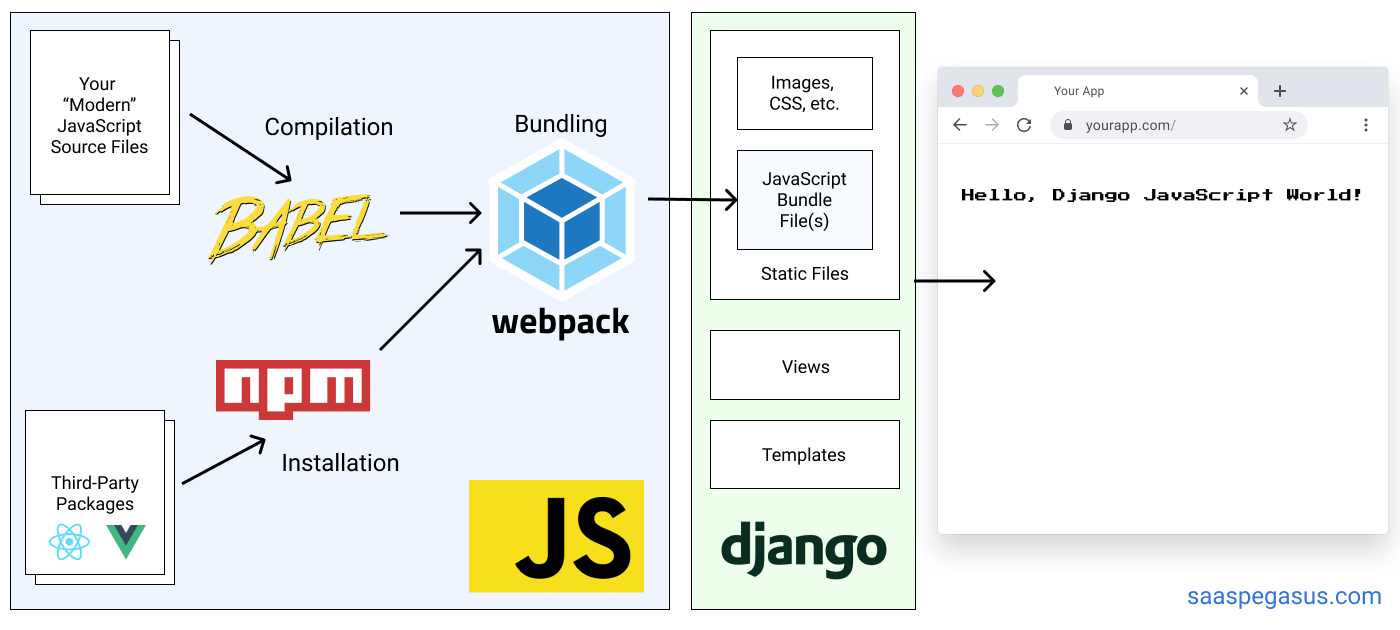
JavaScript bundling is an optimization technique we can use to reduce the number of server requests for JavaScript files. Webpack is a JavaScript bundler that allows to package and optimize JavaScript code for production use. In the project before bundling the code was compiled with Babel, a JavaScript transpiler that allows to write modern JS code and then converting it to a version that is compatible with older browsers.
Test are included in home
- HTML, CSS, JavaScript, TypeScript, Python+Django
- Django for backend and frontend functionality.
- React for Messenger app.
- Babel for compiling JS.
- React-Bootstrap for styling the React app.
- Django AllAuth for authentication registration and account management.
- Webpack for bundling JS.
- Django Channels for websockets and ASGI.
- Django Rest Framework for building API.
- Redis backend for handling WebSockets, to facilitate. Django Channels channel layers.
- Redis Cloud cloud database service based on Redis.
- PostgreSQL relational database.
- Psycopg PostgreSQL adapter for Python.
- Elephant SQL to manage PostgreSQL databases.
- Bootstrap for styling.
- Crispy Forms for pretty forms.
- Crispy Bootstrap for styling Crispy forms.
- Boxicons for icons.
- FontAwesome for icons.
- Google Fonts for typography.
- Gitpod IDE to develop the app.
- GitHub to host the source code.
- AWS S3 Amazon web services s3 for static storage.
- Heroku to deploy and host the live app.
- Git to provide version control (to commit and push code to the repository).
- Pillow to create fake images for testing.
- Unittest for Python unit-testing.
- Techsini to create the Mockup image in this README.
- W3C HTML Markup Validator to validate HTML code.
- W3C Jigsaw CSS Validator to validate CSS code.
- Code Institute's Template to generate the workspace for the project.
This project was deployed using Github and Heroku.
-
To create a new repository I took the following steps:
- Logged into Github.
- Clicked over to the ‘repositories’ section.
- Clicked the green ‘new’ button. This takes you to the create new repository page.
- Once there under ‘repository template’ I chose the code institute template from the dropdown menu.
- I input a repository name then clicked the green ‘create repository button’ at the bottom of the page.
- Once created I opened the new repository and clicked the green ‘Gitpod’ button to create a workspace in Gitpod for editing.
-
To fork my project you must;
- Sign in to Github and go to my repository
- Locate the Fork button at the top right of the page.
- Select this.
- The fork is now in your repositories.
-
To clone my project you must;
- Sign in to Github and go to my repository
- Above the list of files click the green ‘code’ button.
- This will bring up a few options as to how you would like to clone. You can select HTTPS, SSH or Github CLI, then click the clipboard icon to copy the URL.
- Open git bash
- Type ‘git clone’ and then paste the URL you copied. Press Enter.
First, ensure the following are set up on your IDE:
- PIP3 Python package installer.
- Python 3.8 or higher.
- Git version control. To clone the project up locally you can follow the following steps:
- Navigate to the repository - Repository
- Click the code dropdown button and copy the url.
- Open the terminal in your IDE and enter the following code:
-
git clone https://github.com/folarin-ogungbemi/EmpowerEd
-
- Install the dependencies needed to run the application by typing the following command into the terminal:
-
pip3 install -r requirements.txt
-
- To set up the database migrate the database models by typing the following commands into the terminal:
-
  python3 manage.py showmigrations
  python3 manage.py makemigrations
  python3 manage.py migrate
-
- Create a superuser to have access to the django admin dashboard type the following commands into the terminal:
-
python3 manage.py createsuperuser - Then set up the account by adding your username, email and password.
-
- Finally, run the app locally by typing the following command into the terminal:
-
python3 manage.py runserver
-
- Create a Heroku app:
- Go to Heroku and create an account if you do not have one yet.
- From the dashboard click on 'new app' button, name your app and choose the region closest to you.
- On the resources tab set up a new Postgres database by searching for 'Postgres'.
- On your IDE, install 'dj_database_url' & 'psycopg2' to enable the use of the Postgres database:
- In the terminal type the following commands:
-
  pip3 install dj_database_url
  pip3 install psycopg2-binary
-
- In the terminal type the following commands:
- Add the downloaded dependencies to the requirements file:
-
pip3 freeze > requirements.txt
-
- To setup the new database go to to settings.py, import 'dj_database_url', comment out the default database configuration and replace the default database with the following:
-
  import dj_database_url
  DATABASES = {
      'default': dj_database_url.parse("The URL of your Heroku Postgres database")
  }
-
- Run all migrations to the new Postgres database by entering the following command in the terminal:
-
python3 manage.py migrate
-
- Create a superuser by typing the following command into the terminal:
-
python3 manage.py createsuperuser - Then set up the account by adding your username, email and password.
-
- In settings.py set up the following to use the Postgres database when the app is running on Heroku and the SQLite3 when the app is running locally:
-
  DATABASES = {
      'default': dj_database_url.parse(os.environ.get("DATABASE_URL"))
-
- Install Gunicorn (which will act as our webserver) by typing the following commands into the terminal:
-
  pip3 install gunicorn
  pip3 freeze > requirements.txt
-
- Type the following into the procfile:
-
web: gunicorn greatkart.wsgi.application
-
- Log in into the Heroku terminal:
-
heroku login -i
-
- Disable collectstatic to prevent Heroku from collecting static files when deployed, by typing the following command into the terminal:
-
heroku config:set DISABLE_COLLECTSTATIC=1 --app "heroku_app_name"
-
- In settings.py add the hostname of the Heroku app, and allow localhost:
-
ALLOWED_HOSTS = ['"heroku_app_name".herokuapp.com', 'localhost']
-
- Deploy to Heroku by typing the following commands into the terminal:
-
  heroku git:remote -a "heroku_app_name"
  git push heroku main
-
- To set up automatic deployments in Heroku when pushing code to github:
- On the deploy tab, connect to github by searching for the repository name and clicking 'Connect'.
- Click 'Enable Automatic Deploys"
- Update the settings.py file to collect the secret key from the environment, and use an empty string as default:
-
SECRET_KEY = config('SECRET_KEY')
-
- Set debug to be true only if there's a variable called "DEVELOPMENT" in the environment.
-
DEBUG = 'DEVELOPMENT' in os.environ
-
- Go to to Amazon AWS and sign in/sign up.
- From the 'Services' tab on the AWS Management Console, search 'S3' and select it.
- Click the 'Create a new bucket' button:
- Enter a bucket name (recommended to be the same name as the Heroku App) and a region (enter the region that is closest to you)
- Uncheck the "Block all public access" checkbox and confirm that the Bucket will be public.
- Click the "Create bucket" button.
- Bucket settings changed to public access. 1. Go to the Bucket Policy in the permissions tab and added the below permissions: - Bucket policy { "Version": "2012-10-17", "Statement": [ { "Sid": "PublicReadGetObject", "Effect": "Allow", "Principal": "", "Action": "s3:GetObject", "Resource": "arn:aws:s3:::restaurant-booking/" } ] } 2. Go to the 'Access Control List' section, and set the object permission to 'Everyone'.
- To connect the S3 bucket to django install the following packages and add them to the requirements file:
-
  pip3 install boto3
  pip3 install django_storages
pip3 freeze > requirements.txt - Add (Django) storages to the list of INSTALLED_APPS in settings.py.
-
- Update the settings.py file to tell Django which bucket it should be communicating with.
- In Heroku update the config variables:
- USE_AWS = True
- AWS_ACCESS_KEY_ID = From the IAM user's data CSV file
- AWS_SECRET_ACCESS_KEY = From the the IAM user's data CSV file
- Remove the DISABLE_COLLECTSTATIC variable to allow django to collect static files and upload them to S3.
- In Heroku update the config variables:
-
- Login in or create an account on Redis Cloud.
- Create a new database, click
connect, the side panel will appear on the right. - Click
copybelow theRedic_CLIsection. Paste it in a text file for now and removeredis-clifrom the beginning, you will need it to begin withredis://. - Paste the value to your config vars as
REDISCLOUD_URL. - Paste the same value as
REDIS_URL_STUNNEL
The Images were products from Google
- Understanding of Bootstrap was obtained from documentation.
- Understanding of AllAuth was obtained from documentation.
- Understanding of Django Channels was obtained from documentation.
- Understanding of Redis was obtained from documentation.
A big hug for the effort through the process.


