


FeatureFlags makes it easy to configure feature flags, A/B and MVT tests via a JSON file which may be bundled with your app or hosted remotely. For remotely-hosted configuration files, you may enable / disable features without another release to the App Store, update the percentages of users in A/B test groups or even roll out a feature previously under A/B test to 100% of your users once you have decided that the feature is ready for prime time.
To learn more about how to use FeatureFlags, take a look at the keynote presentation, check out the blog post, or make use of the table of contents below:
- Feature flags
- A/B testing and MVT testing
- Feature A/B testing (where a feature is enabled vs a control group without the feature)
- Host your feature flags JSON configuration remotely allowing you to enable / disable features without releasing a new version of your app
- Use an existing JSON file or host an entirely new configuration
- Adjust the percentages of users in each test group remotely
- Convert an A/B test into a feature flag once you have decided whether the feature test was a success i.e. rollout a feature to 100% of users
- Visualise the state of your flags and tests using FeatureFlagsViewController in debug builds of your app
CocoaPods is a dependency manager which integrates dependencies into your Xcode workspace. To install it using RubyGems run:
gem install cocoapods
To install FeatureFlags using Cocoapods, simply add the following line to your Podfile:
pod "FeatureFlags"
Then run the command:
pod install
For more information see here.
Carthage is a dependency manager which produces a binary for manual integration into your project. It can be installed via Homebrew using the commands:
brew update
brew install carthage
In order to integrate FeatureFlags into your project via Carthage, add the following line to your project's Cartfile:
github "rwbutler/FeatureFlags"
From the macOS Terminal run carthage update --platform iOS to build the framework then drag FeatureFlags.framework into your Xcode project.
For more information see here.
With the framework integrated into your project, the next step is configuration using a JSON file which may be bundled as part of your app or hosted remotely. The JSON file may be newly-created or could be an existing configuration JSON file that you're using already. Simply add a key called features at the top level of your file mapping to an array of features as follows:
{
    "features": []
}
The contents of the array depends on the feature flags and tests to be configured.
To let FeatureFlags know where to find your configuration file:
guard let featuresURL = Bundle.main.url(forResource: "features", withExtension: "json") { return }
FeatureFlags.configurationURL = featuresURL
Or:
guard let featuresURL = URL(string: "https://www.exampledomain.com/features.json") else { return }
FeatureFlags.configurationURL = featuresURL
In the event that you opt to host your JSON file remotely, you may provide a bundled fallback as part of your app bundle:
guard let fallbackURL = Bundle.main.url(forResource: "features", withExtension: "json") { return }
FeatureFlags.localFallbackConfigurationURL = fallbackURL
Your remotely-hosted JSON file will always take precedence over bundled settings and remotely-defined settings will be cached so that in the eventuality that the user is offline, the last settings retrieved from the network will be applied.
In order to configure a feature flag add a feature object to the features array in your JSON configuration.
{
    "features": [{
        "name": "Example Feature Flag",
        "enabled": false
    }]
}
Then add an extension on Feature.Name to import your feature flag in code as follows:
import FeatureFlags

extension Feature.Name {
	static let exampleFeatureFlag = Feature.Name(rawValue: "Example Feature Flag")
}
Make sure that the raw value matches the string in your JSON file. Then call the following to check whether the feature flag is enabled:
Feature.isEnabled(.exampleFeatureFlag))
If the string specified in your Feature.Name extension doesn't match the value in your JSON file, the default value returned is false. If you need to check the feature exists, you can write:
if let feature = Feature.named(.exampleFeatureFlag) {
	print("Feature name -> \(feature.name)")
	print("Feature enabled -> \(feature.isEnabled())")
}
To configure an A/B test, add the following feature object to the features array in your JSON file:
{
	"name": "Example A/B Test",
	"enabled": true, // whether or not the test is enabled
	"test-variations": ["Group A", "Group B"]
}
The only difference between a feature flag and an A/B test involves adding an array of test variations. FeatureFlags will assume that you are configuring an A/B test if you add two test variations to the array - add any more and the test will automatically become a multivariate test (MVT).
Import your feature into code with an extension on Feature.Name:
extension Feature.Name {
	static let exampleABTest = Feature.Name(rawValue: "Example A/B Test")
}
And then use the following to check which group the user has been assigned to:
if let test = ABTest(rawValue: .exampleABTest) {
	print("Is in group A? -> \(test.isGroupA())")
	print("Is in group B? -> \(test.isGroupB())")
}
Alternatively, you may prefer the following syntax:
if let feature = Feature.named(.exampleABTest) {
	print("Feature name -> \(feature.name)")
	print("Is group A? -> \(feature.isTestVariation(.groupA))")
	print("Is group B? -> \(feature.isTestVariation(.groupB))")
	print("Test variation -> \(feature.testVariation())")
}
A feature A/B test is a subtle variation on (and subtype of) an A/B test. In a generic A/B test you may want to check whether a user has been placed in the blue background or red background test variation. A feature A/B test specifically tests whether the introduction of a new feature is an improvement over a control group without the feature. Thus in a feature A/B test - the feature is either off or on.
To configure a feature A/B test use the following JSON:
{
	"name": "Example Feature A/B Test",
	"enabled": true, // whether or not the test is enabled
	"test-variations": ["Enabled", "Disabled"]
}

extension Feature.Name {
	static let exampleFeatureABTest = Feature.Name(rawValue: "Example Feature A/B Test")
}
By naming the test variations Enabled and Disabled, FeatureFlags knows that your intention is to set up a feature A/B test.
Configuring a feature A/B test has the advantage over a generic A/B test in that instead of having to write:
if let feature = Feature.named(.exampleFeatureABTest) {
	print("Feature name -> \(feature.name)")
	print("Is group A? -> \(feature.isTestVariation(.enabled))")
	print("Is group B? -> \(feature.isTestVariation(.disabled))")
	print("Test variation -> \(feature.testVariation())")
}
You may simply use the following to determine which test group the user has been assigned to:
Feature.isEnabled(.exampleFeatureABTest))
Ordinarily using the Feature.enabled() method tests to see whether a feature is globally enabled; in this specific instance it will return true if the user belongs to the group receiving the new feature and false if the user belongs to the control group. Note that this method also return false if the enabled property is set to false in the JSON for this feature i.e. the test is globally disabled.
Configuration of a multivariate test follows much the same pattern as that of an A/B test. Add the following feature object to the features array in your JSON file:
{
	"name": "Example MVT Test",
	"enabled": true, // whether or not the test is enabled
	"test-variations": ["Group A", "Group B", "Group C"]
}
FeatureFlags knows that you are configuring a MVT test if you add more than two test variations to the array. Again, import your feature into code with an extension on Feature.Name:
extension Feature.Name {
	static let exampleMVTTest = Feature.Name(rawValue: "Example MVT Test")
}
Using the following to check which group the user has been assigned to:
if let feature = Feature.named(.exampleMVTTest) {
	print("Feature name -> \(feature.name)")
	print("Is group A? -> \(feature.isTestVariation(.groupA))")
	print("Is group B? -> \(feature.isTestVariation(.groupB))”)
	print("Is group C? -> \(feature.isTestVariation(.groupC))”)
	print("Test variation -> \(feature.testVariation())”)
}
You are free to name your test variations whatever you wish:
{
	"name": "Example MVT Test",
	"enabled": true, // whether or not the test is enabled
	"test-variations": ["Red", "Green", "Blue"]
}
Simply create an extension on Test.Variation to map your test variations in code:
extension Test.Variation {
	static let red = Test.Variation(rawValue: "Red")
	static let green = Test.Variation(rawValue: "Green")
	static let blue = Test.Variation(rawValue: "Blue")
}
Then check which group the user has been assigned to:
if let feature = Feature.named(.exampleMVTTest) {
	print("Feature name -> \(feature.name)")
	print("Is red? -> \(feature.isTestVariation(.red))")
	print("Is green? -> \(feature.isTestVariation(.green))")
	print("Is blue? -> \(feature.isTestVariation(.blue))")
	print("Test variation -> \(feature.testVariation())")
}
By default for any A/B or MVT test, the user is equally likely to be assigned each of the specified test variations i.e. for an A/B test, there's a 50%/50% chance of being assigned one group or another. For a MVT test with four variations, the chance of being assigned to each is 25%.
It is possible to configure a test bias such that the likelihood of being assigned to each test variation is not equal. To do so, simply add the following JSON to your feature object:
{
	"features": [{
		"name": "Example A/B Test",
		"enabled": true,
		"test-biases": [80, 20],
		"test-variations": ["Group A", "Group B"]
	}]
}
The number of weightings specified in the test-biases array must be equal to the number of test variations and must amount to 100 otherwise the weightings will be ignored and default to equal weightings.
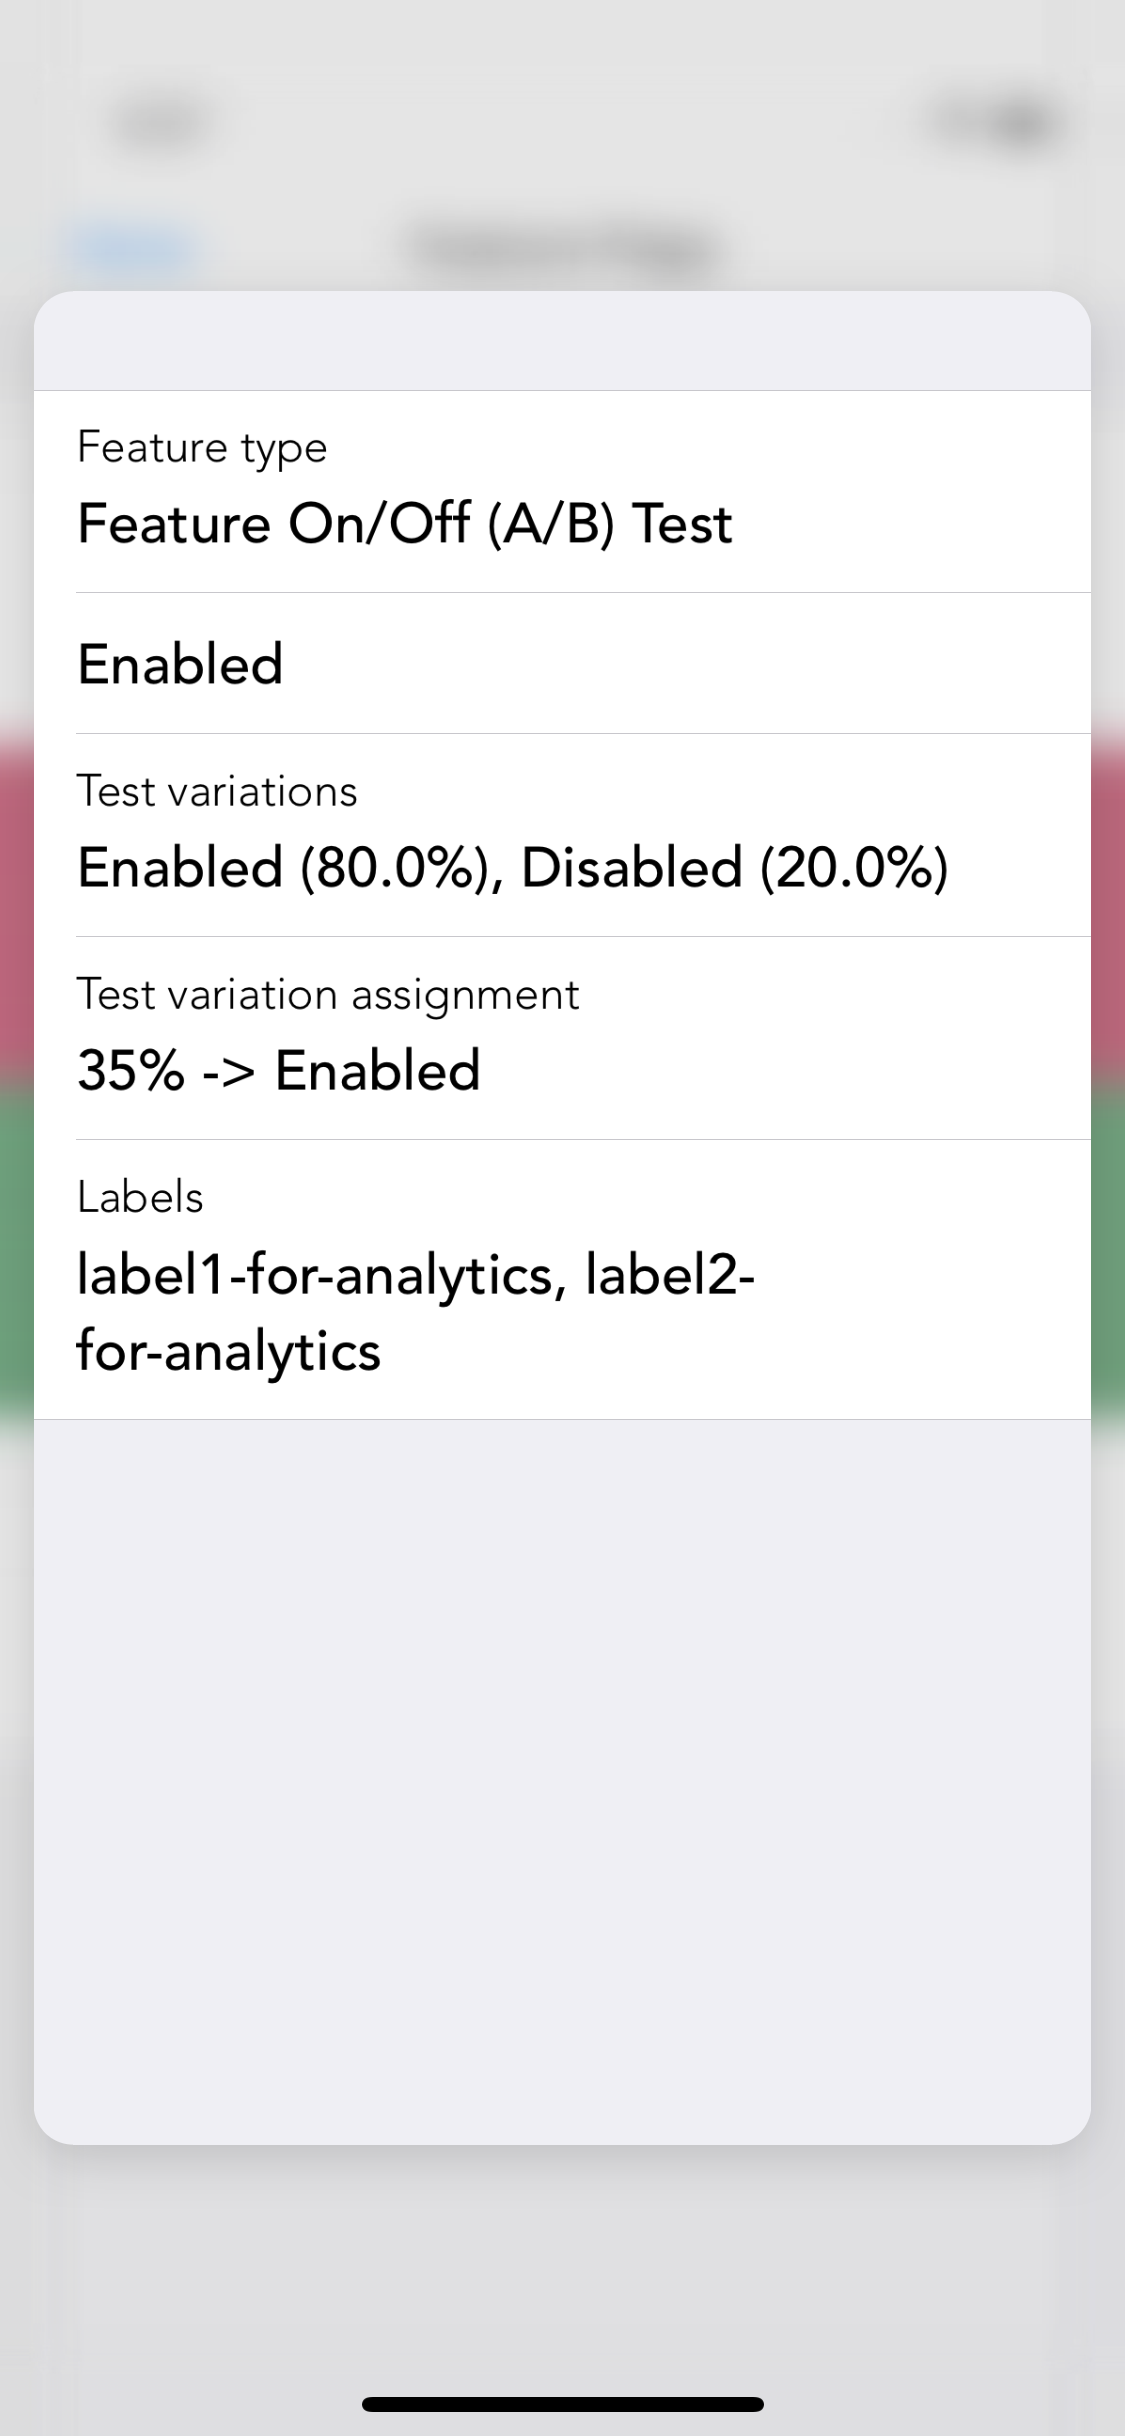
It is possible to attach labels to test variations in case you wish to send analytics respective to the test group to which a user has been assigned.
To do so, define an array of labels of equal length to the number of test variations specified:
{
	"features": [{
		"name": "Example A/B Test",
		"enabled": true,
		"test-biases": [50, 50],
		"test-variations": ["Group A", "Group B"],
		"labels": ["label1-for-analytics", "label2-for-analytics"]
	}]
}
Then to retrieve your labels in code you would write the following:
if let feature = Feature.named(.exampleABTest) {
	print("Group A label -> \(feature.label(.groupA))")
	print("Group B label -> \(feature.label(.groupB))")
}
The most powerful feature of the FeatureFlags framework is the ability to adjust the test biases in your remote JSON configuration file and have the users automatically be re-assigned to new test groups. For example, you might decide to roll out a feature using a 10%/90% (whereby 10% of users receive the new feature) split in the first week, 20%/80% in the second week and so on.
Simply update the weightings in the test-biases array and the next time the framework checks your JSON configuration, groups will be re-assigned.
When you are done A/B or MVT testing a feature you will have gathered enough analytics to decide whether or not to roll out the feature to your entire user base. At this point, you may decide to disable the feature entirely by setting the enabled flag to false in your JSON file or in the case of a successful test, you may decide to roll out the feature to all users by adjusting the feature object in your JSON file from:
{
	"features": [{
		"name": "Example A/B Test",
		"enabled": true,
		"test-biases": [50, 50],
		"test-variations": ["Group A", "Group B"],
		"labels": ["label1-for-analytics", "label2-for-analytics"]
	}]
}
To a feature flag globally enabled for all users as follows:
{
	"features": [{
		"name": "Example A/B Test",
		"enabled": true
	}]
}
In order to test that both variations of your new feature work correctly you may need to adjust the status of your feature flags / tests at runtime. To this end FeatureFlags provides the FeatureFlagsViewController which allows you to toggle features flags on/off in debug builds of your app or cycle A/B testing or MVT testing variations.
To display the view controller specify the navigational preferences desired and then push the view controller by providing a UINavigationController:
 let navigationSettings = FeatureFlagsViewControllerNavigationSettings(autoClose: true, closeButtonAlignment: .right, closeButton: .save, isNavigationBarHidden: false)

FeatureFlags.pushFeatureFlags(delegate: self, navigationController: navigationController, navigationSettings: navigationSettings)
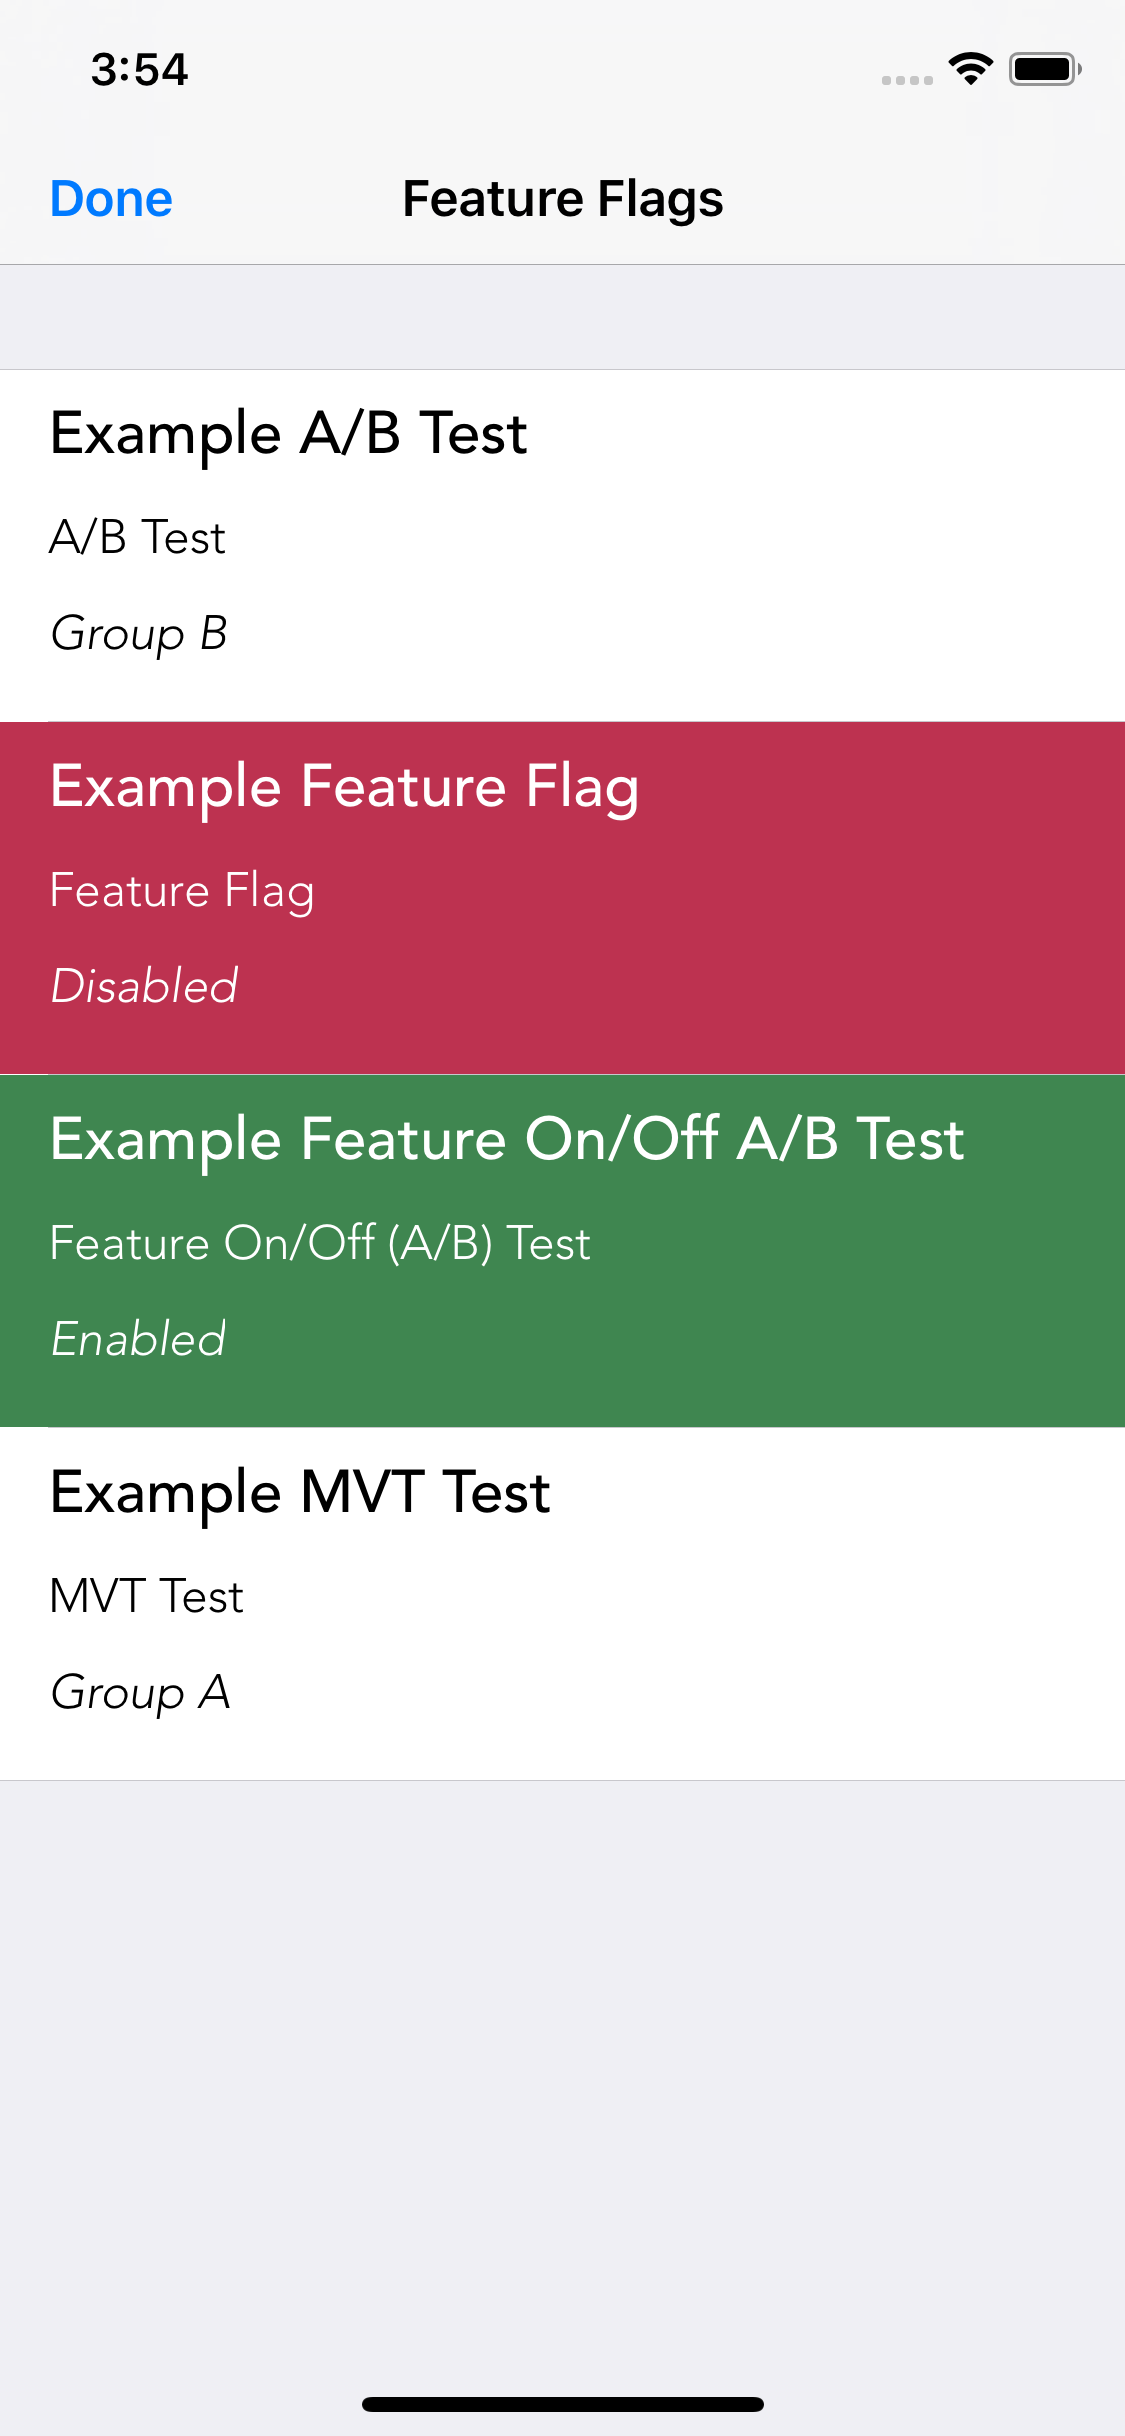
Should you need further information on the state of each feature flag / test, you may use 3D Touch to peek / pop more information.
Should you need to refresh your configuration at any time you may call FeatureFlags.refresh() which optionally accepts a completion closure to notify you when the refresh is complete.
If you have opted to include your feature flag information as part of an existing JSON file which your app has already fetched you may wish to use the following method passing the JSON file data to avoid repeated network calls:
FeatureFlags.refreshWithData(_:completion:)
Ross Butler
FeatureFlags is available under the MIT license. See the LICENSE file for more info.
- Connectivity - Improves on Reachability for determining Internet connectivity in your iOS application.
- FeatureFlags - Allows developers to configure feature flags, run multiple A/B or MVT tests using a bundled / remotely-hosted JSON configuration file.
- Skylark - Fully Swift BDD testing framework for writing Cucumber scenarios using Gherkin syntax.
- TailorSwift - A collection of useful Swift Core Library / Foundation framework extensions.
- TypographyKit - Consistent & accessible visual styling on iOS with Dynamic Type support.
- Palette - Makes your TypographyKit color palette available in Xcode Interface Builder.
| Connectivity | FeatureFlags | Skylark | TypographyKit | Palette |
|---|---|---|---|---|
 |
 |
 |
 |


