GithubHelp home page GithubHelp logo

4ms / stm32mp1-baremetal Goto Github PK

View Code? Open in Web Editor NEW
150.0 15.0 28.0 86.68 MB

Baremetal framework and example projects for the STM32MP15x Cortex-A7 based MPU

License: Other

Shell 0.28% GDB 0.01% Makefile 1.37% C++ 60.86% C 31.68% Assembly 5.57% Python 0.24%
cortex-a7 baremetal stm32 stm32mp1 cortex-a bare-metal

stm32mp1-baremetal's Introduction

C/C++ CI

STM32MP1 Cortex-A7 bare-metal example projects

This is a set of example and template projects for bare-metal applications on the STM32MP15x Cortex-A7 microprocessor. I use "bare-metal" to mean no OS, so unlike most STM32MP1 or Cortex-A tutorials, there is no Linux or RTOS. Basic systems such as handling interrupts, setting up a stack, memory management, etc. are handled in these projects, as well as more advanced featues like parallel processing (multiple cores) and coprocessor control.

The target audience is the developer who is already familiar with the Cortex-M series. Rather than give a ground-up introduction to microcontrollers/processors, these projects assume you are familiar with MCUs such as the Cortex-M0/M3/M4/M7 or perhaps AVR (ATMEGA) chips. Requirements:

  • You should be comfortable with the concepts of interrupts, stacks, HAL, etc.
  • You should be able to build a Makefile project from the command line, or be fluent in some IDE such that you can convert a Makefile project to your preferred format.
  • You should be able to understand simple C++ code, at least at a basic level.

If not, you'll need to brush up on microcontroller and command-line fundamentals before proceeding.

I am actively refining and adding new example projects to this. If you want to see something, please ask! (open a github issue)

Here's a list of the example projects:

  • Minimal Boot: Hello World project to prove the bootloader and your hardware is working.
  • Ctest: Demonstrates the startup code for a C/C++ project: setting up the stack, initializing globals, etc.
  • Basic IRQ: Basic interrupt handling with the A7's Generic Interrupt Controller.
  • Nested IRQ: More sophisticed interrupt handling: interrupts interrupting interrupts! (and using lambdas as handlers!)
  • Multicore_a7: Demonstrates running both A7 cores in parallel.
  • Copro_rproc: Using the rproc feature of U-Boot to load and run firmware on the M4 core in parallel with the A7 core.
  • Copro_embedded: Embedding the M4 firmware binary into the A7's firmware binary, and loading it on demand. Wacky, but cool.
  • Audio Processor: A fun practical project that lets you select one of several audio synths to play. Requires STM32MP1 Discovery board. Uses STM32-HAL, some DaisySP example projects, and some Faust algorithms. TODO: use multi-core A7.
  • USB MSC Device: Simple example that creates a USB Mass Storage Class device (aka "USB thumb drive").
  • USB MIDI Host: Demonstrates USB host functionality using a MIDI keyboard, sequencer or controller.

To run an application on the STM32MP1, a bootloader must load it. There are two bootloaders to choose from:

  • U-Boot: the standard bootloader, officially supported by ST. Lots of features and support for many platforms.

  • MP1-Boot: a lightweight, fast and minimal featured bootloader.

Overview

The STM32MP157 is a powerful chip, with two Cortex-A7 cores running at 650MHz or 800MHz, L1 and L2 caches, up to 1GB of external 533MHz RAM, a Cortex-M4 core and a suite of peripherals. The peripherals are familiar to anyone having used the STM32F7 or STM32H7 series (and sometimes STM32 HAL-based F7/H7 code can be used as-is in the MP1 A7).

Each project in the examples/ directory is meant to demonstrate a simple idea with as few dependencies as possible. The CMSIS device header for the STM32MP157 chip is used to access the hardware registers, and in some cases I've written a simple driver class that lives in examples/shared/drivers/. There also is some shared initialization code in examples/shared/system/, such as setting up the MMU and the caches. For the most part you can use these as-is, although you will need to modify the MMU setup if your project needs areas of RAM to be non-cacheable in order to use a DMA, for example.

Bootloader Overview

The bootloader is responsible for initializing the system and loading the application from the SD Card (or other boot medium) into RAM, and then running the application. Unlike a Cortex-M, where there is internal Flash memory to store your application, the Cortex-A series typically runs the application on an external RAM chip. The STM32MP1 has an internal ROM bootloader (called BOOTROM) which automatically copies your bootloader from the SD Card into internal SYSRAM, and then executes it. The bootloader is then responsible to enable the external RAM, and load and start the application.

The application ultimately needs to live on the SD card as well, but it can be flashed into RAM using an SWD/JTAG flasher, making debugging much easier than having to copy files to an SD card each time the code is changed.

There are two bootloader choices in this repo: U-Boot and MP1-Boot. Either one is complelely optional, however you must use one.

U-Boot is a third-party tool that is the standard bootloader supported by ST. It's quite common to see an embedded Linux project using U-Boot. Pre-built U-Boot images are included in this repo, so all you have to do is load them onto an SD card and never think about it again unless you start using custom hardware or need to change the boot command (as is optionally done in the corpo_rproc example project).

U-Boot is a two-stage bootloader: the first stage loads the second stage, which then loads the application.

I've also provided a script to build U-Boot, too. If you're familiar with Linux kernel and device driver code, you'll notice some similarities.

U-Boot has lots of features and is quite powerful. With great power, however, comes great complexity. A more simple bootloader is also included in this repo:

MP1-Boot is a lightweight bootloader written by me. It does the minimum tasks necessary to boot an application, with no extra features. MP1-Boot is a single-stage bootloader.

Requirements

You need:

  • Any STM32MP15x Discovery board, or an OSD32MP1-BRK board
  • A computer with the arm-none-eabi-gcc toolchain installed (v8 or later)
    • See Setup for details on installing the required software on your computer.
  • Various common USB cables, depending on which board you select
  • A micro SD card
  • A USB-to-serial cable (only if you use the OSD32 board) such as the FTDI cable
  • Optionally, a J-Link or ST-LINK debugger (only if you use the OSD32 board -- the Discovery board has an ST-LINK on-board)

Image of STM32MP157A-DK1 board STM32MP157A-DK1 Discovery board

Image of OSD32MP1-BRK board

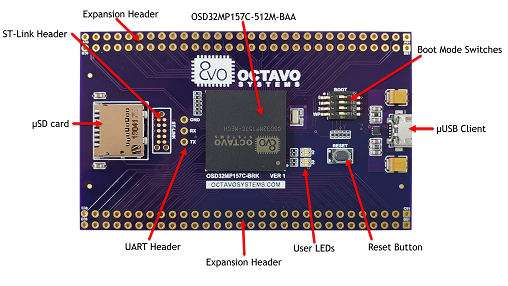
Octavo OSD32MP1-BRK board

Details:

These projects will build and run on any of the STM32MP15x Discovery boards, or the OSD32MP1-BRK board. The OSD32MP1-BRK is simply a breakout board for the OSD32MP15x SiP, which is an STM32MP157 chip plus DDR3 RAM and PMIC and other stuff in a BGA package. These example projects work the same on either board (you may need to select your board type at the top of main.cc). Each board requires a bootloader compiled for it.

The Discovery boards have a built-in USB/UART and a built-in ST-LINK, so you just need a USB cable to debug and view UART output on the console. However, AFAIK you can only use gdb to debug (not JLinkGdbServer/Ozone or TRACE32) since there is no direct access to the SWD or JTAG pins (not even a good place to solder some on). These boards also have a lot more external hardware on the PCB (codec, buttons, ethernet jack, HDMI, an option for a DSI screen,...), but have far fewer pins brought out to headers than the OSD32MP1 board.

The OSD32MP1-BRK board has an SWD/JTAG header so you can use a programmer like the SEGGER J-Link or an ST-LINK to debug with a variety of tools (gdb/OpenOCD, Ozone, TRACE32). The board has a 10 exposed pads designed to fit a 10-pin pogo adaptor, such as this one from Tag-Connect or Digikey. While you're shopping, pick up these helpful accessories too: retaining clip , and 20-to-10-pin-adaptor.

If you use the OSD32MP1-BRK board, you'll need a USB-to-UART cable to view the UART output on the console. The OSD32 board has UART pins exposed, and you can solder 0.1" pitch header pins and connect such a cable. FTDI makes the TTL-232R-3V3, available from Digikey, or there are other options like a host adaptor such as the Binho Nova.

You also can use custom hardware, it will be as easy as creating a board configuration header file to define things like which pins the UART uses, etc. See examples of these files here and here.

1) Setup:

Clone the repo:

git clone https://github.com/4ms/stm32mp1-baremetal

On macOS, if you intend to compile U-Boot, you may need to install gsed and set your PATH to use it instead of sed. This is only needed for building U-Boot. See Caveats section in brew info gnu-sed for details.

# MacOS only, if you intend to build U-Boot:
brew install gnu-sed
export PATH="/usr/local/opt/gnu-sed/libexec/gnubin:$PATH"`  ##or add it to your .zshrc/.bashrc

2) Build a bootloader:

I've added some pre-built images for U-Boot, so you can get up and running more quickly. If you want to use the pre-built images, skip to step 3).

If you want to compile U-Boot yourself, see the next step 2a).

If you want to use MP1-Boot, go to step 2b).

2a) Building U-Boot (optional)

Build U-Boot using the script. The output will be in third-party/u-boot/build/:

cd stm32mp1-baremetal
scripts/build-u-boot.sh

The script will prompt you to enter the board you selected. Depending on your selection, the script will set a value for DEVICE_TREE when building U-Boot. Note: Ignore warnings about "format string is not a string literal", it happens with some arm-none-eabi-gcc versions

Verify the output files were created:

ls -l third-party/u-boot/build/u-boot-spl.stm32
ls -l third-party/u-boot/build/u-boot.img

2b) Build MP1-Boot (optional)

From the mp1-boot directory, edit main.cc and uncomment the line for your board (OSD32 or STM32Disco). Then run make:

cd bootloaders/mp1-boot
vi main.cc # uncomment the correct line to select your board
make

Verify the output file:

ls -l build/fsbl.stm32

3) Loading the bootloader onto your SD card

Now you need to format and partition an SD card. Insert a card and do:

scripts/partition-sdcard.sh /dev/XXX 

Where /dev/XXX is the actual device name, such as /dev/sdc or /dev/disk3. Take care to get the device name right because the script will FULLY ERASE whatever device you tell it!

This script will create four partitions, and format the fourth to FAT32.

If you need to find out what the device is, you can type ls -l /dev/sd or ls -l /dev/disk and then hit Tab. Or, on macOS you can type mount instead of ls -l /dev/disk<TAB> Take note of what it lists. Then remove (or insert) the SD card, and repeat the command. Whatever changed is the SD card's device name(s). Use the base name, e.g. /dev/sdc, not /dev/sdc3.

I recommend you eject and re-insert the card at this point (you might get some cryptic errors if you don't).

Then run the script to copy the bootloader to the first two or three partitions:

# To use pre-built U-Boot images for OSD32MP1 board:
scripts/copy-bootloader.sh /dev/diskX bootloaders/u-boot-images/osd32mp1-brk/

# To use pre-built U-Boot images for STM32MP157A-DK1 Discovery board:
scripts/copy-bootloader.sh /dev/diskX bootloaders/u-boot-images/stm32mp157a-dk1-disco/

# To use U-Boot images that you built yourself:
scripts/copy-bootloader.sh /dev/diskX third-party/u-boot/build/

# To use MP1-Boot:
cd bootloaders/mp1-boot
make load SD_DISK_DEV=/dev/diskX

# Where /dev/diskX is something like /dev/disk2 or /dev/sdc1

4) Power up the board

This is a good moment to test your hardware setup. You can skip this step if you've done this before. Remove the SD card from the computer and insert into the OSD32 or STM32MP1 Discovery board. Attach a USB-to-UART device to the UART pins on the OSD32 board, or a micro-USB cable to the Discovery board's ST-LINK jack. Start a terminal session that connects to the USB driver (I use minicom; there are many fine alternatives). The baud rate is 115200, 8N1 (which you might have to set up, so read the minicom help file if you don't know how).

Example:

minicom -D /dev/cu.usbmodemXXXXX

Insert the card into the board and power it on. You should see boot messages, and then finally an error when it can't find the application. Now it's time to build that file.

5) Build the application

cd examples/minimal_boot
make 
ls -l build/main.elf
ls -l build/a7-main.uimg

You should see the elf and the uimg files. Each of these is the compiled application, and either one must be loaded into DDR RAM at 0xC2000040. There are two ways to load the application to RAM. One way is to load the elf file by using a debugger/programmer (ST-LINK or J-Link). The other way is to copy the uimg file to the SD card. With U-Boot, it gets copied to the fourth partition the same way you would copy any file with your OS. With MP1-Boot, it gets copied to the third paritition the same way we copied to bootloaders to the SD Card (using dd).

The direct loading with a debugger method requires a debugger to be attached, and the code will not persist after power down. However, it's much more convenient so it's preferred for Debug builds. That said, not everything gets reset/cleared when you do it this way, so sometimes you need to do a cold boot and run your firmware from the SD card.

With the copy-to-SD-card method, the application firmware is stored on the SD card, so this is the method for production or long-term testing. With this method, the bootloader will automatically load the application into 0xC2000040 on boot.

I recommend using the copy-to-SD-card method for your first try, since it's more robust and has fewer moving parts (no debugger or host computer software).

6) Copy the application to the SD card

There are two ways to do this if you have U-Boot, and one way if you have MP1-Boot:

The Simple Way (when U-Boot is the bootloader):

Physically remove the SD card from the OSD32 or Discovery board and insert it into your computer. Then do:

cp build/a7-main.uimg /Volumes/BAREAPP/

Of course, adjust the command above to use the actual path to the mounted SD card. Or you can use drag-and-drop within your OS's GUI.

The Convenient Way (when U-Boot is the bootloader):

The more convenient way (if it works) is to use the USB gadget function. If you have the UART and USB cable connected (and your particular OS happens to be compatible with usb-gadget) then you might be able to mount the SD card directly over the USB connection without having to physically touch the card. It works for me on macOS and an Ubuntu box, but YMMV.

Do this:

  1. When the board is booting, up look for the message Hit any key to stop autoboot, and press a key.
  2. You will see a UBOOT> prompt. Type the command: ums 0 mmc 0
  3. In another terminal window, look to see that there's a new device, e.g. /dev/sdX or /dev/disk#. The 4th partition might automatically mount on your computer, if not you can mount it manually.

Copy it like a normal file to a normal USB stick:

cp build/a7-main.uimg /Volumes/BAREAPP/

Of course, adjust the command above to use the actual path to the mounted SD card. Or you can use drag-and-drop within your OS's GUI.

If your OS didn't automatically mount the drive, do: sudo mount -o user /dev/sdX /tmp/sdcard_root or use some other path where you mount things. Then copy the file as above.

Make sure the file is named a7-main.uimg on the SD card. U-Boot looks for a file with this exact name, in the root dir of a FAT32 filesystem on partition 4.

There's also a script to copy the file. Really, it's worthless except it shows you the before/after file sizes:

../../scripts/copy-app-to-sdcard.sh build/a7-main.uimg /Volumes/BAREAPP/

The example projects have a make install target, so you can just type that. The path to the SD card is hard-coded into the Makefile, so you can either edit examples/shared/makefile-common.mk or do this:

SDCARD_MOUNT_PATH=/path/to/SDCARD make install
The MP1-Boot Way:

For MP1-Boot, insert the SD Card into your computer and run this command:

sudo dd if=path/to/app/a7-main.uimg of=/dev/diskX3

where /dev/diskX3 is the 3rd partition, like /dev/disk4s3 or /dev/sdb3

Or from the project directory, you can use the make install-mp1-boot target:

SD_DISK_DEV=/dev/diskX3 make install-mp1-boot

7) Debug application

This is completely optional, but is very convenient when developing. You must have a working bootloader (at least SPL) which is responsible for initializing the DDR3 RAM. Once that's established, you can use a J-Link or ST-LINK programmer as well as debugger software on your host computer to load a new application image into RAM and debug it.

This README isn't a tutorial on using gdb or debuggers or SEGGER Ozone and J-Link, so I won't go into detail here. I experience some quirks and odd behavior, which is common when debugging remote targets with software from SEGGER, or OpenOCD. The process is no different than debugging on any other STM32 device: you have an elf file and you use gdb (or Ozone or TRACE32) to load it and then set breakpoints, step through code, inspect variables and memory, etc.

Debugging with Segger Ozone (OSD32 board only)

This requires an SWD connection, which is only found on the OSD32MP1-BRK board. It also requires a J-Link debugger. Within Ozone, create a new project for the STM32MP15xx Core A7, and load the elf file created back in step 4. You can load a new elf file after re-compiling, and debug as normal.

With TRACE32, the process is similar (Lauterbach supplies some helper scripts).

I found that often the unit requires a hard reset before I can load new firmware. My recommendation is to have an SD Card with the U-Boot and the minimal_boot application loaded on it. Press the reset button on the board and wait until the UART console shows that it's done booting. At this point, you can use Ozone or TRACE32 to load new firmware.

An even more streamlined technique is to omit U-Boot proper entirely and just load U-Boot SPL onto partitions 1 and 2 of the SD Card. Leave partitions 3 and 4 empty. The unit will boot up and quickly display "Trying to boot from MMC1" and then hang. At this point, you can load the elf file with your debugging software. The reason this works is that SPL initializes the DDR3 RAM, which is all we need to copy our firmware onto the board.

Debugging with gdb and OpenOCD or JLinkGDBServer (all boards)

If you use OpenOCD with a USB cable connected to the ST-LINK micro-USB jack of the Discovery board, run this command in one terminal window:

openocd -f board/stm32mp15x_dk2.cfg

Alternatively, you can run JLinkGDBServer and then select the STM32MP15x Core A7 as the target.

In another terminal window, run this command (from the project directory):

arm-none-eabi-gdb -f build/main.elf

From the gdb prompt, type:

target extended-remote localhost:3333
load

The port number (3333) may be different for you, check the output of openocd or JLinkGDBServer to see what port it's listening on. There may be a different port for each core.

Remember, any file you load using a debugger will only get loaded into RAM. As soon as you power down, it will be lost.

Resources:

The ARM Cortex-A Programmer's Guide. Don't expect anything to make sense until you at least skim this!

Bare-metal ARM E-book Very helpful, well written and easy to read. Geared for a different platform, but valuable information. The Ctest and Minimal Boot projects are loosely based on this. U-Boot is also used here.

Motivation

There are plenty of resources for using a Cortex-A with Linux. Why am I using it for a bare-metal project? The answer is simple: real-time audio processing. Lots of fast RAM and two fast processors (plus an M4 coprocessor) make this a great platform for real-time processing.

Everything I've read about Cortex-A series chips say they're not for real-time systems. Why not? I wanted to find out... And what I've discovered is that they can be used for real-time systems! Interrupt response is a little slower (in the order of 100's of nanoseconds slower) but that's made up for by all the other speed improvements (cache, faster RAM, faster clock speed), and the M4 coprocessor is there if you really do need those few 100ns.

Of course you don't get all the awesome benefits of having Linux. But many embedded applications don't need Linux. If you just need raw processing power and fast RAM and caches, then hopefully these example projects can be a good foundation for your first Cortex-A bare-metal project.

Or, if you're writing your own OS or RTOS, or porting an existing framework such as Zephyr or FreeRTOS to the STM32MP1, then hopefully this project will be of some assistance (please let me know about it, if you do port a RTOS or custom OS!).

The STM32MP157 is a powerful chip, with two Cortex-A7 cores running at 650MHz or 800MHz, L1 and L2 caches, up to 1GB of 533MHz RAM, a Cortex-M4 core and a suite of peripherals. There's a large gap between this and the next chip down in ST's lineup: the STM32H755, which has two cores (480MHz M7 + 240MHz M4) but can only use SDRAM at 143MHz, which can be painfully slow for algorithms that perform a lot of reads and writes to memory (e.g. reverb).

The peripherals on the STM32MP1 are often identical to the peripherals on ST's Cortex-M7 chips such as the STM32H750 or H743. That means once you have the basic bare-metal framework up and running on the Cortex-A7, you may be able to just run your M7 project and all the I2C, SPI, SAI, UART, GPIO, etc will "just work".

For a real-life example, I ported a very complex project (~1MSLOC) involving three SPI buses, two I2C buses, a 240x240 RGB565 display, external ADCs and DAC chips, a full-duplex 48kHz/24-bit codec, an external PWM LED driver, and a few other goodies. A few peripherals needed some minor tweaks that were well documented in the datasheet, but for the most part the project just ported over seamlessly -- with tons more free cycles for processing the audio stream!

Feedback

I welcome any issues, questions, bug reports or pull requests, high-fives, or even just a "Hi I'm curious about this, kthxbye!" I've found almost no support or example projects for using this powerful chip in a baremetal (or even RTOS) context, so I'm figuring this out as I go along and would appreciate knowing if anyone else finds this interesting too!

TODO

[ ] Try TFA (trusted firmware), make sure we start app in secure mode

[ ] Try latest U-Boot from STM32MP1 Ecosystem v4.0

[ ] MMU tutorial

[ ] Split this README into logical sections. Use github wiki? github pages?

stm32mp1-baremetal's People

Contributors

cody84 avatar danngreen avatar

Stargazers

 avatar  avatar  avatar  avatar  avatar  avatar  avatar  avatar  avatar  avatar  avatar  avatar  avatar  avatar  avatar  avatar  avatar  avatar  avatar  avatar  avatar  avatar  avatar  avatar  avatar  avatar  avatar  avatar  avatar  avatar  avatar  avatar  avatar  avatar  avatar  avatar  avatar  avatar  avatar  avatar  avatar  avatar  avatar  avatar  avatar  avatar  avatar  avatar  avatar  avatar  avatar  avatar  avatar  avatar  avatar  avatar  avatar  avatar  avatar  avatar  avatar  avatar  avatar  avatar  avatar  avatar  avatar  avatar  avatar  avatar  avatar  avatar  avatar  avatar  avatar  avatar  avatar  avatar  avatar  avatar  avatar  avatar  avatar  avatar  avatar  avatar  avatar  avatar  avatar  avatar  avatar  avatar  avatar  avatar  avatar  avatar  avatar  avatar  avatar  avatar

Watchers

 avatar  avatar  avatar  avatar  avatar  avatar  avatar  avatar  avatar  avatar  avatar  avatar  avatar  avatar  avatar

stm32mp1-baremetal's Issues

Building under linux, C++ projects are not building. C build fine

UPDATE: This problem only occurs when using newer cross compiler toolchains than 12.3. Use the compiler version in the docs.

I'm getting the strangest error trying to build the C++ projects.

rm -rf build
honey@Heavy:~/stm32mp1-baremetal/examples/usb_midi_host$ make
Building startup.s at -O3
Building main.cc at -O3
In file included from midi_host.hh:11,
                 from main.cc:13:
../../shared/drivers/interrupt.hh:14:30: error: 'function' in namespace 'std' does not name a template type
   14 |         using ISRType = std::function<void(void)>;
      |                              ^~~~~~~~
../../shared/drivers/interrupt.hh:4:1: note: 'std::function' is defined in header '<functional>'; did you forget to '#include <functional>'?
    3 | #include <functional>
  +++ |+#include <functional>
    4 |
../../shared/drivers/interrupt.hh:19:35: error: 'ISRType' has not been declared
   19 |         Interrupt(IRQType irqnum, ISRType &&func)
      |                                   ^~~~~~~

Now, <functional> is indeed include in interrupt.hh. I checked. So the header seems to be empty, but that can't be right?
So the error message is wrong.

Do you have any idea why this is happening?

Edit: This might be the problem: The compiler is possibly for a freestanding environment.

As of C++20 a compiler for a freestanding environment needs only supply the following headers (from C++20 §complicance/2):

17.2 Types
17.3 Implementation properties , , ,
17.4 Integer types
17.5 Start and termination
17.6 Dynamic memory management
17.7 Type identification
17.8 Source location <source_location>
17.9 Exception handling
17.10 Initializer lists <initializer_list>
17.11 Comparisons
17.12 Coroutines support
17.13 Other runtime support
Clause 18 Concepts library
20.15 Type traits <type_traits>
26.5 Bit manipulation
Clause 31 Atomics

So my question then, would be what now? If that's the case I'm not sure how to move forward.

From examples to custom code (ADC and DDR)

After getting Dan's help, I succeeded in compiling the provided examples starting from the simplest, I got the 'A' back from the minimal_boot program and then moved to the other examples.
But I wish to know how far is the application I need to finally implement and even if it is feasible at all.

I work with the OSD32MP1-BRK board. I wish to acquire data by the embedded A/D converter (or by an external SPI driven ADC) and quickly store those data into the internal DDR memory. Later, when the acquisition is over (it would last hours at high acquisition rate and it's for this reason that I need a big memory) I would like to access the DDR in some way from a PC and download the acquired data on its hard disk.

Does the bare metal approach allow this ? If yes, how can I get started to manage DDR and ADC from my C code ?

Thanks in advance,
Marco

VS CODE IDE & OpenOCD debugging support

Hi @danngreen,

You know, vs code is a practical and lightweight IDE so I'd like to introduce how to add vs code IDE and how to configure the OpenOCD gdb server.

For a demonstration, I created a repo, you can run vs code and open the folder "mp1-boot".

This is just a sample for mp1-boot, you can organize the IDE for other programs if needed.

STM32MP1_Debugging

Download to ram with debugger

HI!

I followed your guide and found it very helpful. I managed to get U-Boot running on the board.

I connected my SEGGER to the DK1 boards swd interface. I am able to connect to the board using the stm32cube programmer. I am trying to write to the ram as you mention in section 5 in the README, however if verify is enabled it prints a verification error, and if I try to read the memory address the value hasn't changed. Do you have any idea what could cause this? Any help will be highly appreciated

README should also describe debugging on Discovery board.

Hello,
thanks a lot for this project! I'll test that once the board is here, but to be honest I'm a bit confused by your highlighting of debug capability on the Octavo based board. Not sure if I read README correctly, but it feels like you completely ignore debug capability built into the STM32mp1 discovery board. Please let me know, have you used builtin ST-Link interface for A7 debugging on the board? Do you know about this capability? If it's new to you, then perhaps you can enhance the README. If for whatever reason it's not so great and have bugs, then this may also be mentioned there. Thanks!

Suggestion to Use STM32MP13 HAL Library for STM32MP1 Project

Hello,
After reviewing your project, I am wondering if it might be possible to use the STM32MP13 HAL library instead of the STM32MP1's. From ST's official perspective, the STM32MP1's HAL library is designed for the Cortex-M4 core, and thus lacks support for many of the hardware features controllable by the Cortex-A7. On the other hand, the STM32MP13 HAL library is specifically designed for the Cortex-A7 and hardware-wise, it resembles a scaled-down version of the STM32MP15.

Makefile errors under windows 11 with MSys

I'm not able to build u-boot using the scripts under the scripts folder. I'm syntax errors and such when running make.

I was hoping you could help clear this up.

Pardon all the spew.

make[1]: Leaving directory '/home/gazto/stm32mp1-baremetal/third-party/u-boot/build'
make[1]: Entering directory '/home/gazto/stm32mp1-baremetal/third-party/u-boot/build'
/bin/sh: command substitution: line 1: syntax error near unexpected token `('
/bin/sh: command substitution: line 1: `arm-none-eabi-gcc -Wall -Wstrict-prototypes -Wno-format-security -fno-builtin -ffreestanding -std=gnu11 -fshort-wchar -fno-strict-aliasing -O2 -g -D__KERNEL__ -D__UBOOT__  -Iinclude  -I/home/gazto/stm32mp1-baremetal/third-party/u-boot/u-boot-stm32mp1-baremetal/include  -I/home/gazto/stm32mp1-baremetal/third-party/u-boot/u-boot-stm32mp1-baremetal/arch//include -include /home/gazto/stm32mp1-baremetal/third-party/u-boot/u-boot-stm32mp1-baremetal/include/linux/kconfig.h -nostdinc -isystem C:/Program Files (x86)/Arm GNU Toolchain arm-none-eabi/13.2 Rel1/bin/../lib/gcc/arm-none-eabi/13.2.1/include -print-libgcc-file-name'
dirname: missing operand
Try 'dirname --help' for more information.
  GEN     ./Makefile
scripts/kconfig/conf  --syncconfig Kconfig
  CHK     include/config.h
  UPD     include/config.h
/bin/sh: -c: line 1: syntax error near unexpected token `('
/bin/sh: -c: line 1: `echo '  CFG     u-boot.cfg'; arm-none-eabi-gcc -E -Wall -Wstrict-prototypes -Wno-format-security -fno-builtin -ffreestanding -std=gnu11 -fshort-wchar -fno-strict-aliasing -O2 -g -D__KERNEL__ -D__UBOOT__ -D__ARM__ -Wa,-mimplicit-it=always           -ffunction-sections -fdata-sections -fno-common -ffixed-r9     -pipe -Iinclude  -I/home/gazto/stm32mp1-baremetal/third-party/u-boot/u-boot-stm32mp1-baremetal/include -I/home/gazto/stm32mp1-baremetal/third-party/u-boot/u-boot-stm32mp1-baremetal/arch/arm/include -include /home/gazto/stm32mp1-baremetal/third-party/u-boot/u-boot-stm32mp1-baremetal/include/linux/kconfig.h -nostdinc -isystem C:/Program Files (x86)/Arm GNU Toolchain arm-none-eabi/13.2 Rel1/bin/../lib/gcc/arm-none-eabi/13.2.1/include  -DDO_DEPS_ONLY -dM /home/gazto/stm32mp1-baremetal/third-party/u-boot/u-boot-stm32mp1-baremetal/include/common.h > u-boot.cfg.tmp && { grep 'define CONFIG_' u-boot.cfg.tmp > u-boot.cfg; rm u-boot.cfg.tmp; } || { rm u-boot.cfg.tmp; false; }'
make[2]: *** [/home/gazto/stm32mp1-baremetal/third-party/u-boot/u-boot-stm32mp1-baremetal/scripts/Makefile.autoconf:77: u-boot.cfg] Error 2
make[2]: *** Waiting for unfinished jobs....
/bin/sh: -c: line 1: syntax error near unexpected token `('
/bin/sh: -c: line 1: `echo '  GEN     include/autoconf.mk.dep'; arm-none-eabi-gcc -x c -DDO_DEPS_ONLY -M -MP -Wall -Wstrict-prototypes -Wno-format-security -fno-builtin -ffreestanding -std=gnu11 -fshort-wchar -fno-strict-aliasing -O2 -g -D__KERNEL__ -D__UBOOT__ -D__ARM__ -Wa,-mimplicit-it=always           -ffunction-sections -fdata-sections -fno-common -ffixed-r9     -pipe -Iinclude  -I/home/gazto/stm32mp1-baremetal/third-party/u-boot/u-boot-stm32mp1-baremetal/include -I/home/gazto/stm32mp1-baremetal/third-party/u-boot/u-boot-stm32mp1-baremetal/arch/arm/include -include /home/gazto/stm32mp1-baremetal/third-party/u-boot/u-boot-stm32mp1-baremetal/include/linux/kconfig.h -nostdinc -isystem C:/Program Files (x86)/Arm GNU Toolchain arm-none-eabi/13.2 Rel1/bin/../lib/gcc/arm-none-eabi/13.2.1/include -MQ include/config/auto.conf /home/gazto/stm32mp1-baremetal/third-party/u-boot/u-boot-stm32mp1-baremetal/include/common.h > include/autoconf.mk.dep || { rm include/autoconf.mk.dep; false; }'
make[2]: *** [/home/gazto/stm32mp1-baremetal/third-party/u-boot/u-boot-stm32mp1-baremetal/scripts/Makefile.autoconf:48: include/autoconf.mk.dep] Error 2
/bin/sh: -c: line 1: syntax error near unexpected token `('
/bin/sh: -c: line 1: `echo '  CFG     spl/u-boot.cfg'; arm-none-eabi-gcc -E -Wall -Wstrict-prototypes -Wno-format-security -fno-builtin -ffreestanding -std=gnu11 -fshort-wchar -fno-strict-aliasing -O2 -g -D__KERNEL__ -D__UBOOT__ -D__ARM__ -Wa,-mimplicit-it=always           -ffunction-sections -fdata-sections -fno-common -ffixed-r9     -pipe -Iinclude  -I/home/gazto/stm32mp1-baremetal/third-party/u-boot/u-boot-stm32mp1-baremetal/include -I/home/gazto/stm32mp1-baremetal/third-party/u-boot/u-boot-stm32mp1-baremetal/arch/arm/include -include /home/gazto/stm32mp1-baremetal/third-party/u-boot/u-boot-stm32mp1-baremetal/include/linux/kconfig.h -nostdinc -isystem C:/Program Files (x86)/Arm GNU Toolchain arm-none-eabi/13.2 Rel1/bin/../lib/gcc/arm-none-eabi/13.2.1/include -DCONFIG_SPL_BUILD -DDO_DEPS_ONLY -dM /home/gazto/stm32mp1-baremetal/third-party/u-boot/u-boot-stm32mp1-baremetal/include/common.h > spl/u-boot.cfg.tmp && { grep 'define CONFIG_' spl/u-boot.cfg.tmp > spl/u-boot.cfg; rm spl/u-boot.cfg.tmp; } || { rm spl/u-boot.cfg.tmp; false; }'
make[2]: *** [/home/gazto/stm32mp1-baremetal/third-party/u-boot/u-boot-stm32mp1-baremetal/scripts/Makefile.autoconf:81: spl/u-boot.cfg] Error 2
make[1]: *** No rule to make target 'include/config/auto.conf', needed by 'include/config/uboot.release'.  Stop.
make[1]: Leaving directory '/home/gazto/stm32mp1-baremetal/third-party/u-boot/build'
make: *** [Makefile:167: sub-make] Error 2

partition-sdcard.sh gives tons of errors

Hi, I am following your tutorial step by step but am unable to fix these errors thrown when I execute your partition-sdcard.sh script:

Device /dev/sdb found, removing partitions
sudo sgdisk -o /dev/sdb


Found invalid GPT and valid MBR; converting MBR to GPT format
in memory.


Non-GPT disk; not saving changes. Use -g to override.

Partitioning...
sudo sgdisk --resize-table=128 -a 1 -n 1:34:545 -c 1:fsbl1 -n 2:546:1057 -c 2:fsbl2 -n 3:1058:5153 -c 3:ssbl -N 4 -c 4:prog -p /dev/sdb


Found invalid GPT and valid MBR; converting MBR to GPT format
in memory.


Setting name!
partNum is 0
Setting name!
partNum is 1
Setting name!
partNum is 2
Setting name!
partNum is 3
Disk /dev/sdb: 60526592 sectors, 28.9 GiB
Model: SD/MMC
Sector size (logical/physical): 512/512 bytes
Disk identifier (GUID): 215D93C7-D96B-49E6-B733-814245383042
Partition table holds up to 128 entries
Main partition table begins at sector 2 and ends at sector 33
First usable sector is 34, last usable sector is 60526558
Partitions will be aligned on 1-sector boundaries
Total free space is 0 sectors (0 bytes)

Number Start (sector) End (sector) Size Code Name
1 34 545 256.0 KiB 8300 fsbl1
2 546 1057 256.0 KiB 8300 fsbl2
3 1058 5153 2.0 MiB 8300 ssbl
4 5154 60526558 28.9 GiB 8300 prog
Non-GPT disk; not saving changes. Use -g to override.

Formatting partition 4 as FAT32

mkfs.fat -F 32 /dev/sdb4
mkfs.fat 4.2 (2021-01-31)
mkfs.fat: unable to open /dev/sdb4: No such file or directory
umount: /dev/sdb: not mounted.
Done!

Thanks for helping,
Marco

Ethernet example please

Hi Dan,

thanks for providing these introductory projects. If possible, could you provide a very basic ethernet example? E.g maybe just hook up to a network with ARP and send or receive a UDP datagram.

All the best

Trustzone problem with bare metal program

Hello,

Thanks for your great thing to make a bare metal program work.
I've tried with my board stm32mp157a-dk1 to run the gdb debug boot loader mp1-boot image and got stuck at function SystemClocks::init_core_clocks(Board::HSE_Clock_Hz, Board::MPU_MHz);
It looks like there is an issue related to the trust zone, I've also checked the register RCC_TZCR value is 0x3.
Is there any way to access RCC_TZCR in none secure app?

Thanks

Docker container

Having a Docker container that can build the examples would make it easier for anyone coming across this project to get the toolchain running

stm32mp157 baremetal programming (on SEGGER Embedded Studio)

Hi,
I am very new to the Cortex A7 series micro processors . I can able build the simple interfaces like UART , GPIO etc . But now i am having the trouble with interrupt handling. I can able to trigger the second A7 core . I want to interact with the second A7 core's in the stm32mp157 through the software generated interrupts(means core 0 to core 1). for this how to handle the software interrupts i am unable to understand . I had tried by enabling the GICD and GICD blocks using the registers setting. I had seen the code in the git hub to control the interrupts. if i am trying the compile with Segger embedded studio ide lot errors we are facing . I need what is registers settings we need to set for the GIC and GICD both please help us in this regards.

STM32MP13x support

There's no available hardware yet AFAICT, but ST have published Linux kernel support about this device and there's some info online. So it's a simpler MPU with 1 A7 core running up to 900 Mhz, no M4 coprocessor. There will be a discovery board from ST.

Seems to be largely compatible with STM32MP15x on software side.

SD card formatting and partitioning

Hi Dan,

First of all I want to apologize as this issue is not really related to the bare metal code project per se.

Unfortunately I'm a beginner when it comes to Linux and I'm stumbling at the first hurdle - getting my SD card configured and loaded with the bootloader and application.

I am using 8GB SD cards (I've tried several, some brand new). I've tried using the format and partition scripts in the scripts directory but have also used other tools. I can see that the 4 partitions have been created however cannot format the 4th partition as FAT32 (error is too few blocks for a viable filesystem).

Even though I cannot seem to format the 4th partition I try to copy the bootloader (I'm using MP1-Boot) to the 1st and 2nd partitions. And then an example (in this case ctest) to the 3rd.

I'm using the STM Discovery board - it doesn't boot at all. No messages from the debug UART output.

Is there anything I need to do to a virgin SD card in order to prepare it for the above steps? Perhaps I am missing something silly?

I'm hoping you can help because I'm really looking forward to writing my application in bare metal (my eyes lit up when I saw your project because as you mention, there are next to no resources like this available).

Thanks in advance,
Andrew.

SPI Examples?

I've been trying to get SPI to work (with DMA) on this device using your bare metal code. I've imported the HAL declarations and implementations for SPI but I cannot figure out the clocks, the dividers and the DMA setup, all of which is just different enough from what I'm used to that it's losing me.

And I'm pretty easily lost at this point admittedly, being fairly new to ARMs and brand new to Cortex As.

I was trying to use STM32CubeMX to cheat my way through some of it, but it's not working out. Also tried decoding devicetrees - which I can read a little of due to using zephyr, but I'm not getting very far.

Board Variants

@danngreen

Your docs refer to STM32MP157A-DK1 but that seems to be discontinued and there's a (newer?) variant STM32MP157D-DK1 do think this will matter?

Very interesting

@danngreen

This is very interesting, I'm interested in seeing what minimal environment one would need to be able to host the .Net CLR. It seems to me that currently such boards need Linux, Windows or perhaps some RTOS. Your detailed examples are giving me insights into the processor too.

I work on Windows, I use Visual Studio for much of my work and a powerful extension VisualGDB for MCU projects, this seamlessly integrates into Visual Studio.

It seems your setup here expects a user to be running Linux, is that right?

python error

I like this project very much because it is an entry point in bare metal programming of not only the A7 on the STM32MP1 but also other Cortex Cores.
But trying this out initially I had a problem with the Python script creating the UImage header:

Creating uimg file
python ../../scripts/uimg_header.py build/main.bin build/a7-main.uimg
Traceback (most recent call last):
File "../../scripts/uimg_header.py", line 37, in
image_name = bytes("stm32mp1-baremetal image", "ascii")
TypeError: str() takes at most 1 argument (2 given)
make: *** [../../shared/makefile-common.mk:127: build/a7-main.uimg] Error 1

After searching I found that there is a simple solution in shared/makefile-common.mk:127:
python has to be replaced with python3.

Greeting,
Thomas

Btw. I got your code working on an Avenger96: https://wiki.dh-electronics.com/index.php/Avenger96

USB example

Hi Dan,

I've been watching progress here for a while and would like to know if you've considered adding USB support as one of the examples. It's sort of possible to add USB device/host with OTG peripheral on A7 cores despite only Linux being supported by ST officially, see here - https://community.st.com/s/question/0D53W00000GYk3RSAT/how-to-manage-usb-with-a-baremetal-application-

Supposingly working implementation is at https://github.com/ua1arn/hftrx/tree/develop/src/hal

Regards, Stas

DDR3L memory

Nice work, and thanks for making this available!
Just a quick question about the RAM that I often see on the MP1 dev boards from ST. Is the RAM available and controlled automatically, or is this something that needs to be done to get that up and running?

Comipling Source code error

Hi,
Thanks for sharing the code. We have cloned the source code but when we run the following script scripts/build-u-boot.sh
we are getting following error.
Error
We have installed gcc version then also we are getting same error. How can i resolve this error.

U-boot can't start example app, but mp1-boot can

Great stuff!

I have a STM32MP157F-DK2.
I built your u-boot, mp1-boot and hal_lib app.

When I follow the instructions to use u-boot to load the app, I get this error:

mmc0 is current device
55040 bytes read in 34 ms (1.5 MiB/s)

Booting kernel from Legacy Image at c2000040 ...

Image Name: stm32mp1-baremetal image
Created: 2023-06-08 4:36:08 UTC
Image Type: ARM Linux Kernel Image (uncompressed)
Data Size: 55040 Bytes = 53.8 KiB
Load Address: c2000040
Entry Point: c2000040
Verifying Checksum ... Bad Data CRC
ERROR: can't get kernel image!
UBOOT>

Everything seems fine when I set up the sd card to use mp1-boot:

MP1-Boot

MPU clock: 648000000 Hz
Initializing RAM
Testing RAM.
Booted from SD Card
Loading app image...
Jumping to app
ABC
Hello from HAL Driver!
And hi to you too!
0
1
2
3
4
5

Any thoughts on why this might be happening?

Recommend Projects

  • React photo React

    A declarative, efficient, and flexible JavaScript library for building user interfaces.

  • Vue.js photo Vue.js

    🖖 Vue.js is a progressive, incrementally-adoptable JavaScript framework for building UI on the web.

  • Typescript photo Typescript

    TypeScript is a superset of JavaScript that compiles to clean JavaScript output.

  • TensorFlow photo TensorFlow

    An Open Source Machine Learning Framework for Everyone

  • Django photo Django

    The Web framework for perfectionists with deadlines.

  • D3 photo D3

    Bring data to life with SVG, Canvas and HTML. 📊📈🎉

Recommend Topics

  • javascript

    JavaScript (JS) is a lightweight interpreted programming language with first-class functions.

  • web

    Some thing interesting about web. New door for the world.

  • server

    A server is a program made to process requests and deliver data to clients.

  • Machine learning

    Machine learning is a way of modeling and interpreting data that allows a piece of software to respond intelligently.

  • Game

    Some thing interesting about game, make everyone happy.

Recommend Org

  • Facebook photo Facebook

    We are working to build community through open source technology. NB: members must have two-factor auth.

  • Microsoft photo Microsoft

    Open source projects and samples from Microsoft.

  • Google photo Google

    Google ❤️ Open Source for everyone.

  • D3 photo D3

    Data-Driven Documents codes.