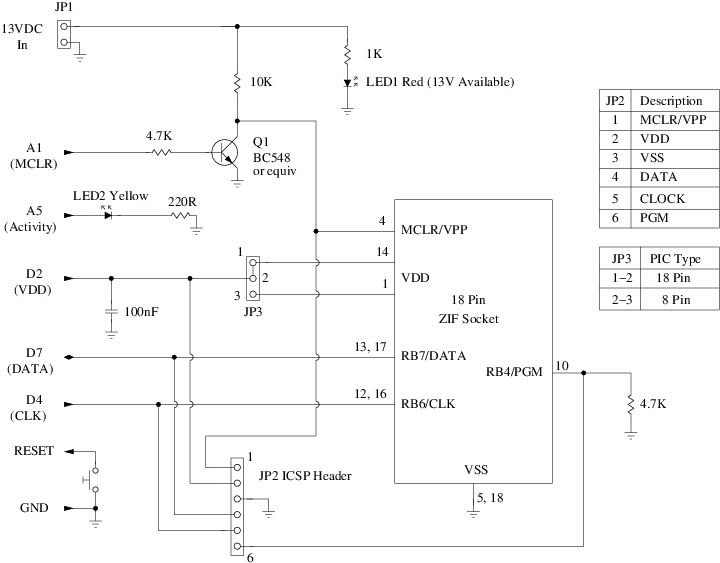
This version of the Arduino PIC programming sketch now performs low voltage programming on the PIC 16F1454/55/59. It will probably not work with most other PICs. And there is no option to change back to high voltage programming. In this respect this is a dirty hack! Maybe I will clean this up later. Maybe someone selse will. For now this version is meant to be used to flash the USB-to-serial PIC in the Frienduino project.
To perfom low voltage programming you have to connect the PIC as follows:
- Pin RC1 (pin 9 of the 16F1454) to digital pin 4 of your programmer Arduino (ICPSCLK)
- Pin RC0 (pin 10 of the 16F1454) to digital pin 7 of your programmer Arduino (ICPSDAT)
- Pin !MCLR (pin 4 of the 16F1454) to analog pin 1 of your programmer Arduino
- Vdd (pin 1 of the 16F1454) to +5V of your programmer Arduino
- Vss (pin 14 of the 16F1454) to ground of your programmer Arduino
This distribution contains an Arduino-based solution for programming PIC microcontrollers from Microchip Technology Inc, such as the PIC16F628A and friends. The solution has three parts:
- Circuit that is built on one or more prototyping shields to interface to the PIC and provide the 13V programming voltage.
- Sketch called ProgramPIC that is loaded into an Arduino to directly interface with the PIC during programming. The sketch implements a simple serial protocol for interfacing with the host.
- Host program called ardpicprog; a drop-in replacement for picprog that implements the serial protocol and controls the PIC programming process on the computer side.
See the documentation for more information on the project.
Support for 16F1454/55/59 added by @jgeisler0303
Support added for 16F1454/55/59 with info from http://ww1.microchip.com/downloads/en/DeviceDoc/41620C.pdf. For this purpose I also change some timing constants (increased delay times) and changed the order of setting the clock and data signals low before turning off VDD. Also, the data line is returned to low after every clock cycle. I am not sure which of these changes were exactly necessary to make it work for the 16f1454 but hope they don't break it for the other PICs.
The 16F1454 must be programmed via ICSP. The data-sheet states that the programming voltage should be between 8 and 9V. So, I used a 9V batterie instead of the 13V supply. Because the Vpp pin takes too much current, the voltage drop across the 10k pull-up is too high, so I changed it to 4.7k. Also, I used a logic-level n-channel mosfet instead of the BC548, because that's what I had at hand.
Finally I changed the activity LED to pin 13, because my Arduino board has a LED installed there already and I didn't want to bread-board more components than necessary.
Support for 16F877 added by @Alchemycs
Support added for 16F877 with info from http://ww1.microchip.com/downloads/en/DeviceDoc/39025f.pdf and some poking around in picprog
The 16F877 is a 40pin device so you must use the ICSP to program it
WARNING The power supplied for Vdd by pin D2 doesn't supply enough current for the 16F877 to work.
I found simply not using the Vdd supplied by the ardpicprog and using a bench supply worked fine if you
use the following sequence:
- Power off all supplies and unplug the
ardpicprogfrom your computer - Connect the
ardpicprogICSP to the 16F877 - Ensure the
ardpicprogand bench supply to the 16F877 share common GND - Apply bench power to the 16F877
- Apply power/plugin the
ardpicprogto your computer - Program your 16F877
- Remove power from the
ardpicprog - Remove power from the bench supply to the 16F877
- Remove the ICSP connection from the 16F877
Once you apply power back to your 16F877 (make sure you have your ~MCLR reset circuit wired correctly) all should be fine.
The sources for ardpicprog are available from the project
git repository. Then read the
installation instructions.
For more information on Ardpicprog, to report bugs, or to suggest improvements, please contact the original author Rhys Weatherley via email or open an Issue in my repo's issues area. Patches to support new device types are very welcome.