This project demonstrates how to connect to a Raspberry Pi via Wifi and use a General Purpose Input/Output (GPIO) pin to turn an LED on and off.
** This has only been tested with a Raspberry Pi 3 Model B
Set the following environment variables first:
MIX_TARGET(Example: "rpi3")NERVES_NETWORK_KEY_MGMT(Example: "WPA2-PSK")NERVES_NETWORK_SSID(Your network SSID)NERVES_NETWORK_PSK(Your network PSK)
Un-comment and set the node name line in rel/vm.args:
- -name networked_light@
(Raspberry Pi IP address)
To start your Nerves app:
- Install dependencies with
mix deps.get - Create firmware with
mix firmware - Burn to an SD card with
mix firmware.burn
Send firmware to Raspberry Pi via wifi:
- mix firmware.push
(Raspberry Pi IP address)--target rpi3
You will need a single LED connected to GND and a GPIO pin with a 270 Ω resistor.
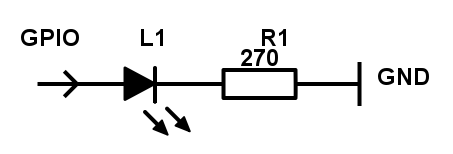
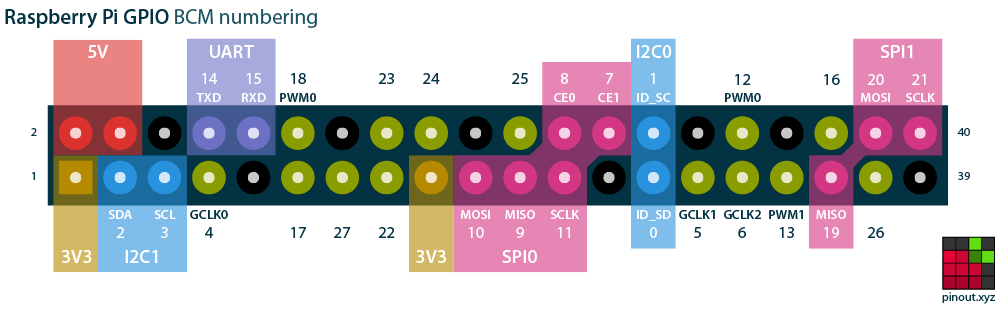
The default configuration uses GPIO pin 26, which can be found on a Raspberry Pi using the following diagram from https://pinout.xyz:
You can connect to the Raspberry Pi node with the following command:
- iex --name "me@mynode" --cookie jeeplife --remsh "networked_light@(Your Raspberry Pi IP Address)"
-
NetworkedLights.Server.led_on
-
NetworkedLights.Server.led_off
- Official docs: https://hexdocs.pm/nerves/getting-started.html
- Official website: http://www.nerves-project.org/
- Discussion Slack elixir-lang #nerves (Invite)
- Source: https://github.com/nerves-project/nerves
