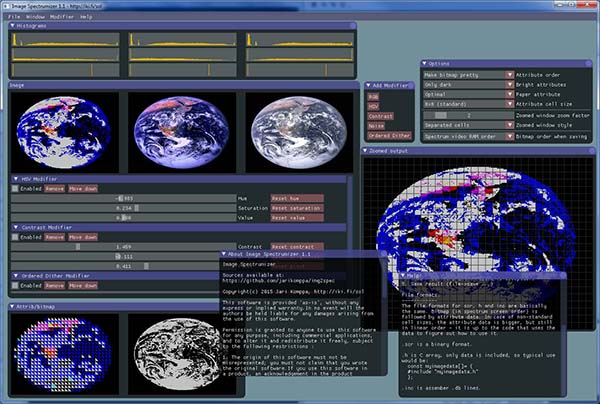
This is a GUI tool to help convert normal images suitable to be used in ZX Spectrum (and similar devices). Note that the resolution is, by default, 256x192. Feeding the tool smaller or bigger images works, but the internal image size remains the same. (The internal resolution can be changed in options, but there are limits).
Instead of trying to be completely automated, this tool lets you interactively adjust the source image while letting you see the results in real time. Any number of modifiers can be stacked on top of each other, and their order can be changed.
Output can be saved as a PNG, or in raw, C header, or assembler include file.
If wanted, the tool can be used to convert image automatically, by feeding it the input image and a workspace file on commandline, along with option to save output.
http://iki.fi/sol/zip/img2spec_40.zip
https://github.com/jarikomppa/img2spec
Unlike most of programs that convert images to zx spectrum format, Image Spectrumizer is primarily meant to be an artist tool. It does a lot of things automatically, but there is no single "best" conversion from RGB images to the limited graphics zx spectrum offers.
Here's one image converted in a bunch of different ways (these were all made in a few minutes). It all depends on what you're after, really. (I did not even go crazy with false-color stuff here).

- The window can be resized.
- Various helper windows can be opened from the window menu.
- Don't hesitate to play with conversion options.
- Load an image (file->load image)
- Add modifiers (modifiers->...)
- (optionally) open options (window->options) and change conversion options
- Tweak modifiers until result is acceptable
- Export result (file->export ...)
If you keep the image file open in image spectrumizer and the image editor of your choice (such as photoshop), image spectrumizer can detect when the file has changed and reloads the image automatically. This way you can keep editing the source image with (potentially) better tools than image spectrumizer can offer, and see the results relatively quickly.
This feature is enabled by default, and can be disabled from the options.
The file formats for scr, h and inc are basically the same. Bitmap (in spectrum screen order) is followed by attribute data. In case of non-standard cell sizes, the attribute data is bigger, but still in linear order - it is up to the code that uses the data to figure out how to use it.
The Timex hi-color device always uses 8x1 attribute cells (one standard attribute byte per bitmap byte, as per the Timex/SCLD hi-color mode). Saved output is the bitmap followed by the attribute bytes in linear order - at 256x192 with the bitmap in spectrum screen order this is the standard 12288 byte .mlt file layout.
When the active device uses 8x1 attributes (the Timex hi-color device, or the ZX Spectrum device with the 8x1 cell size), "Export .mlt" is also available and always writes the standard .mlt byte order (screen order bitmap, linear attributes) regardless of the save order option. On the command line, use -m.
The ZX Spectrum Next device saves a 512 byte palette block (256 entries in the nextreg $44 byte pair format: %RRRGGGBB, %0000000B) followed by the bitmap in the mode's native memory layout: Layer 2 256x192 row by row (49152 bytes, .nxi layout with the palette), Layer 2 320x256 and 640x256 column by column (81920 bytes; in the 16 color mode the high nibble is the left pixel), LoRes 128x96 linear (12288 bytes) and Radastan 128x96 nibble packed linear (6144 bytes). The palette can be optimized per image (median cut in the 9-bit color space) or fixed to the hardware default.
If you prefer the data to be in linear order (not in spectrum screen order), you can change that from the options.
.scr is a binary format, basically memory dump of the spectrum screen.
.h is C array, only data is included, so typical use would be:
    const char myimagedata[]= {
    #include "myimagedata.h"
    };
.inc is assembler .db lines.
Any image or workspace file names given as arguments are loaded (in the order given). If multiple loadable images or workspaces are given, the last ones are the ones that are used.
(Well, all of them do get loaded, they just replace the earlier ones in memory).
To save results on commandline, use the following flags:
- -p pngfilename.png
- -h headerfilename.h
- -i incfilename.inc
- -s scrfilename.scr
- -m mltfilename.mlt
Example:
img2spec cat.png mush.isw -h cat.h
Output files are overwritten without a warning, but I trust you know what you're doing.
In this mode, two sets of attributes are calculated, and the application is expected to swap between the two every frame. This creates approximately 3*64 colors (due to double blacks, the actual number of colors is quite much lower). The effect flickers on emulators but works "fine" on CRTs. (Why 3x64 and not 192? because there's three sets of (about) 64 color palettes, and each cell can use 2 from one of those).
Note that the color reproduction results in real hardware will differ from the simulated, depending on the capabilities of the display device, and may be a flickering nightmare.
Copyright (c) 2015-2016 Jari Komppa, http://iki.fi/sol
This software is provided 'as-is', without any express or implied warranty. In no event will the authors be held liable for any damages arising from the use of this software.
Permission is granted to anyone to use this software for any purpose, including commercial applications, and to alter it and redistribute it freely, subject to the following restrictions:
- The origin of this software must not be misrepresented; you must not claim that you wrote the original software. If you use this software in a product, an acknowledgement in the product documentation would be appreciated but is not required.
- Altered source versions must be plainly marked as such, and must not be misrepresented as being the original software.
- This notice may not be removed or altered from any source distribution.


