
The trains-server is the infrastructure for TRAINS. It allows multiple users to collaborate and manage their experiments.
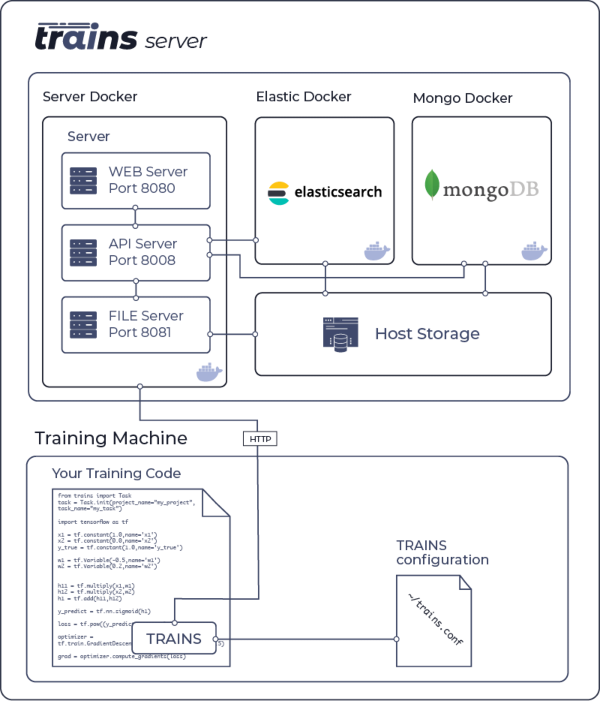
The trains-server contains the following components:
- the Web-App which is a single-page UI for experiment management and browsing
- a REST interface for:
- documenting and logging experiment information, statistics and results
- querying experiments history, logs and results
- a locally-hosted file server for storing images and models making them easily accessible using the Web-App
You can quickly setup your trains-server using a pre-built Docker image (see Installation).
When new releases are available, you can upgrade your pre-built Docker image (see Upgrade).
The trains-server's code is freely available here.
This section contains the instructions to setup and launch a pre-built Docker image for the trains-server.
Please Note:
-
This Docker image was tested with Linux, only. For Windows users, we recommend running the server on a Linux virtual machine.
-
All command-line instructions below assume you're using
bash.
You must be logged in as a user with sudo privileges.
You must install Docker to run the pre-packaged trains-server.
-
See Supported platforms in the Docker documentation for instructions
-
For example, to install in Ubuntu / Mint (x86_64/amd64):
sudo apt-get install -y apt-transport-https ca-certificates curl software-properties-common
curl -fsSL https://download.docker.com/linux/ubuntu/gpg | sudo apt-key add -
. /etc/os-release
sudo add-apt-repository "deb [arch=amd64] https://download.docker.com/linux/ubuntu $UBUNTU_CODENAME stable"
sudo apt-get update
sudo apt-get install -y docker-ce
To run the ElasticSearch Docker container, you must setup the Docker daemon by modifying the default values required by Elastic in your Docker configuration file (see Notes for production use and defaults). We provide instructions for the most common Docker configuration files.
You must edit or create a Docker configuration file:
-
If your system contains a
/etc/sysconfig/dockerDocker configuration file, edit it.Add the options in quotes to the available arguments in the
OPTIONSsection:OPTIONS="--default-ulimit nofile=1024:65536 --default-ulimit memlock=-1:-1" -
Otherwise, edit
/etc/docker/daemon.json(if it exists) or create it (if it does not exist).Add or modify the
defaults-ulimitssection as shown below. Be sure thedefaults-ulimitssection contains thenofileandmemlocksub-sections and values shown.Note: Your configuration file may contain other sections. If so, confirm that the sections are separated by commas (valid JSON format). For more information about Docker configuration files, see Daemon configuration file in the Docker documentation.
The trains-server required defaults values are:
{
    "default-ulimits": {
        "nofile": {
            "name": "nofile",
            "hard": 65536,
            "soft": 1024
        },
        "memlock":
        {
            "name": "memlock",
            "soft": -1,
            "hard": -1
        }
    }
}
You must restart the Docker daemon after modifying the configuration file:
sudo service docker stop
sudo service docker startThe maximum number of memory map areas a process can use is defined
using the vm.max_map_count kernel setting.
Elastic requires that vm.max_map_count is at least 262144 (see Production mode).
-
For CentOS 7, Ubuntu 16.04, Mint 18.3, Ubuntu 18.04 and Mint 19 users, we tested the following commands to set
vm.max_map_count:sudo echo "vm.max_map_count=262144" > /tmp/99-trains.conf sudo mv /tmp/99-trains.conf /etc/sysctl.d/99-trains.conf sudo sysctl -w vm.max_map_count=262144
-
For information about setting this parameter on other systems, see the elastic documentation.
You must choose a directory on your system in which all data maintained by the trains-server is stored, create that directory, and set its permissions. The data stored in that directory includes the database, uploaded files and logs.
For example, if your data directory is /opt/trains, then use the following command:
sudo mkdir -p /opt/trains/data/elastic && sudo chown -R 1000:1000 /opt/trainsLaunch the Docker containers. For example, if your data directory is /opt/trains,
then use the following commands:
sudo docker run -d --restart="always" --name="trains-elastic" -e "ES_JAVA_OPTS=-Xms2g -Xmx2g" -e "bootstrap.memory_lock=true" -e "cluster.name=trains" -e "discovery.zen.minimum_master_nodes=1" -e "node.name=trains" -e "script.inline=true" -e "script.update=true" -e "thread_pool.bulk.queue_size=2000" -e "thread_pool.search.queue_size=10000" -e "xpack.security.enabled=false" -e "xpack.monitoring.enabled=false" -e "cluster.routing.allocation.node_initial_primaries_recoveries=500" -e "node.ingest=true" -e "http.compression_level=7" -e "reindex.remote.whitelist=*.*" -e "script.painless.regex.enabled=true" --network="host" -v /opt/trains/data/elastic:/usr/share/elasticsearch/data docker.elastic.co/elasticsearch/elasticsearch:5.6.16sudo docker run -d --restart="always" --name="trains-mongo" -v /opt/trains/data/mongo/db:/data/db -v /opt/trains/data/mongo/configdb:/data/configdb --network="host" mongo:3.6.5sudo docker run -d --restart="always" --name="trains-fileserver" --network="host" -v /opt/trains/logs:/var/log/trains -v /opt/trains/data/fileserver:/mnt/fileserver allegroai/trains:latest fileserversudo docker run -d --restart="always" --name="trains-apiserver" --network="host" -v /opt/trains/logs:/var/log/trains allegroai/trains:latest apiserversudo docker run -d --restart="always" --name="trains-webserver" --network="host" -v /opt/trains/logs:/var/log/trains allegroai/trains:latest webserverAfter the trains-server Dockers are up, the following are available:
- API server on port
8008 - Web server on port
8080 - File server on port
8081
Once you've installed the trains-server, please make sure to configure trains to use your locally installed server (and not the demo server).
If you've already installed trains, run the trains-init command for an interactive setup or edit your trains.conf file and make sure the api.host value is configured as follows:
api {
    host: "http://localhost:8008"
}
See Installing and Configuring TRAINS for more details.
We are constantly updating, improving and adding to the trains-server. New releases will include new pre-built Docker images. When we release a new version and include a new pre-built Docker image for it, upgrade as follows:
-
Shut down and remove each of your Docker instances using the following commands:
 sudo docker stop <docker-name>
 sudo docker rm -v <docker-name>
The Docker names are (see Launching Docker Containers):
trains-elastictrains-mongotrains-fileservertrains-apiservertrains-webserver
-
We highly recommend backing up your data directory!. A simple way to do that is using
tar:For example, if your data directory is
/opt/trains, use the following command:sudo tar czvf ~/trains_backup.tgz /opt/trains/dataThis back ups all data to an archive in your home directory.
To restore this example backup, use the following command:
sudo rm -R /opt/trains/data sudo tar -xzf ~/trains_backup.tgz -C /opt/trains/data -
Launch the newly released Docker image (see Launching Docker Containers).
Server Side Public License v1.0
trains-server relies heavily on both MongoDB and ElasticSearch. With the recent changes in both MongoDB's and ElasticSearch's OSS license, we feel it is our job as a community to support the projects we love and cherish. We feel the cause for the license change in both cases is more than just, and chose SSPL because it is the more general and flexible of the two.
This is our way to say - we support you guys!