This is the code for this video on Youtube by Siraj Raval on Azure Machine Learning. This repo walks you through the development and operationalization of a Linear regression Machine learning model using Azure Machine Learning workbench. Credits for this code go to brijrajsingh.
- Prepare a Data Science Virtual Machine on Azure (you can use your local machine but DSVM comes pre-installed with Lots of ML libraries.
Select Windows server 2016 Data center and the region as East US 2 and Size as Standard B2ms (2 vcpus, 8 GB memory) for this workshop.
- Install Azure Machine learning workbench
- On Data science VM the setup of Azure Machine learning workbench with the name "AmlWorkbenchSetup" can be found on desktop
- For local installation you can download it from here for both Windows and MacOS
- We will be using the Azure container service for deploying our machine learning model but you can chose to do the local deployment using Docker container. Know more here
- Start an Azure ML workbench project
- Prepare the data
- Build the Model
- Operationlize the Model
Open the Azure ML workbench and login into your Azure account.
Install the Azure-Cli-ML tool using the below commmand - run it in Command prompt as Administrator
pip install azure-cli

pip install azure-cli-ml
if you have a previous version installed, please uninstall it using following
pip uninstall azure-cli-ml
Note - Command line interface can also be installed from the Azure ML workbench using the following command
pip install -r https://aka.ms/az-ml-o16n-cli-requirements-file
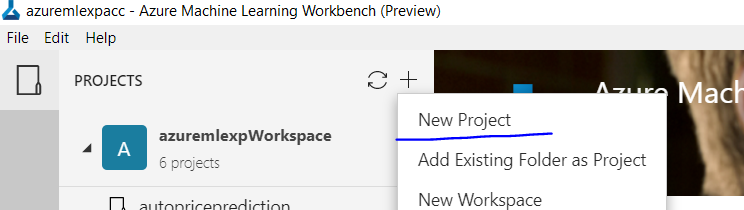
Create a new Workspace and give it a name like "azuremlexpworkspace" Click on the + sign and select create new project
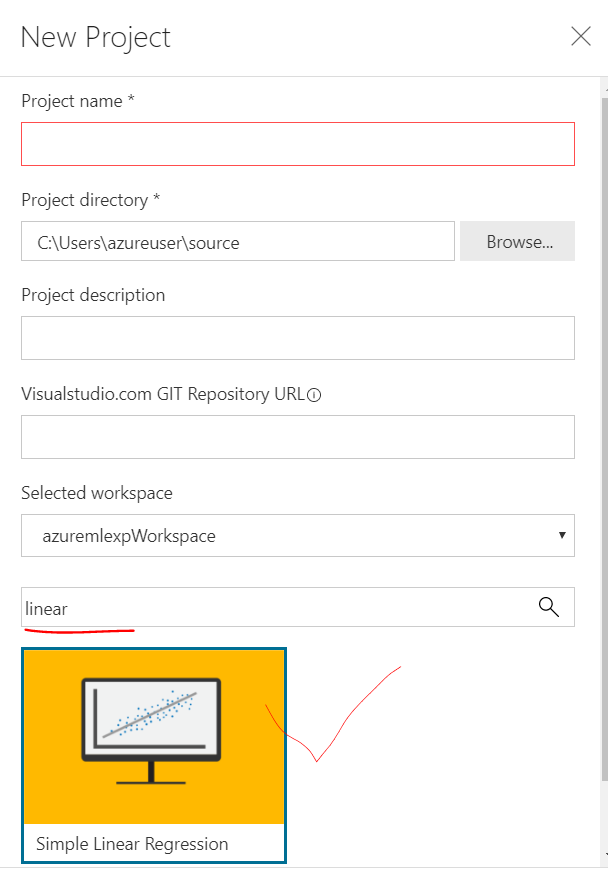
Fill up the shown form, give your project a name like "weightprediction" and select the Linear regression as the sample template by typing in linear in the search box as shown in the picture.
This will give us a template that we will edit to our own need, you may also download this repo and copy its contents in the same folder to make it work but that won't be fun :)
However our model can also run with static array of data, we will still see how to bring data from different sources and prepare them for use in our ML models.
Copy the file assets/weight-height.csv given in this repo to the assets folder in your assets folder.
Click on the left hand side option of data and add the new data source, in the "file selection" tab select the Path as 'local' and select the weight-height.csv file here, let all other options be as it is.
![]()
This is how the data tab looks like after the file is imported.
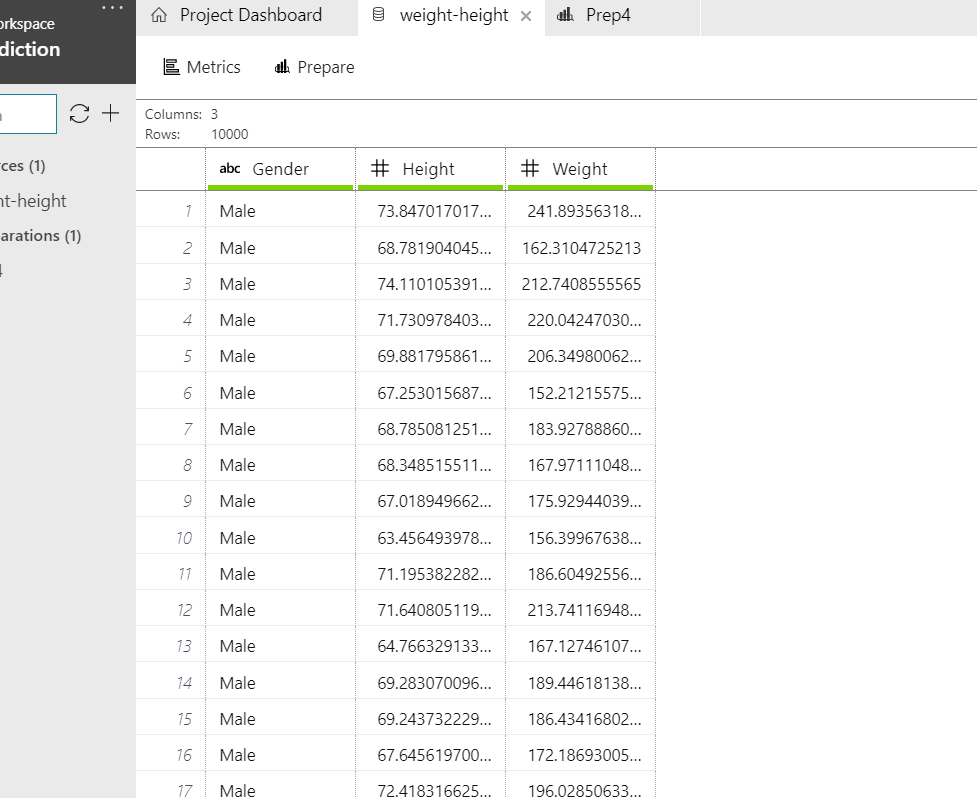
As you can see the data has height in inches and weight in Pounds. We need to change the height to feets and weight to Kgs. Click on the "prepare" icon and select "New data preparation package" and give it a name like "Prep1". It'll show you a similar tab but now you can play with the data and each step will be recorded for you.
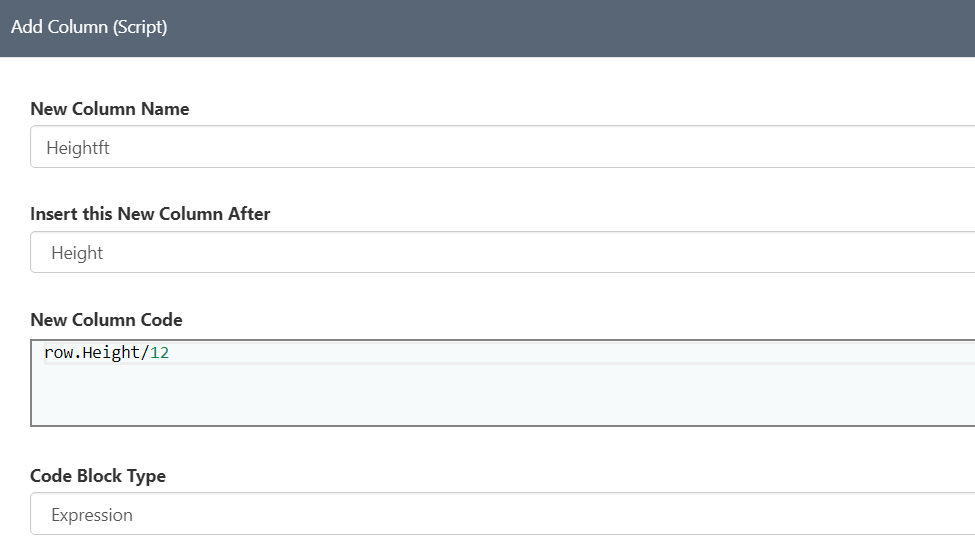
- Convert Height in inches to Feet - Right click on the Height column header and select optin "add Column (script)" - Name the new column as "Heightft" and the expression formula as row.Height/12 as shown in Picture
A new column will show up right next to Height column with this name, we must adjust the precision now, right click on header of "Heightft" and select option "Adjust precision" and select decimal places as 1 2. Convert Weight in Pounds to Kg - Similar to the above step the formula will be row.Weight/2.2 and keep the column name as "WeightKg" - don't forget to adjust the precision.
Note - There are many options for data wrangling in the preparation tab, take time to play with them. Also observe that there is a .prep file being generated as you work on your data in preparation. This file ensures you can run it on the new data source again and again and train/re-train your data models.
We will be building the model in 2 phases - First we'll see how a basic linear regression looks like with some static data and then we will bring our data prep package to deliver us the real world data on which we can re-train our model.
Click on the "folder" icon on the left pane, and create a file "linear_regression.py" or write this in the "train.py" file already present in the folder. you'll realize you can't edit the file in-place in the Azure workbench. Click on the "edit" option on the right side of the file tab itself, it will open a dialog box for you to provide path to your editor. Select the Path to Visual Studio code. You can now edit the file in VS Code.
Running the Python code - Open the file in workbench and click on the Play icon that says "Run", you can also run the python files from VS code but that run won't give you history which can be really important at times.
Lets visualize a sample data set with help of this python code, where we have a Height array and a Weights array.
import numpy as np
import pandas as pd
from sklearn import linear_model
from sklearn.cross_validation import train_test_split
import pickle
from matplotlib import pyplot as plt

height=[[4.0],[4.5],[5.0],[5.2],[5.4],[5.8],[6.1],[6.2],[6.4],[6.8]]
weight=[  42 ,  44 , 49, 55  , 53  , 58   , 60  , 64  ,  66 ,  69]

print("height weight")
for row in zip(height, weight):
    print(row[0][0],"->",row[1])

plt.scatter(height,weight,color='black')
plt.xlabel("height")
plt.ylabel("weight")
plt.show()
There are library references that you may not need right now and that's alright, we'll use them later. The above code will show you a plot like this
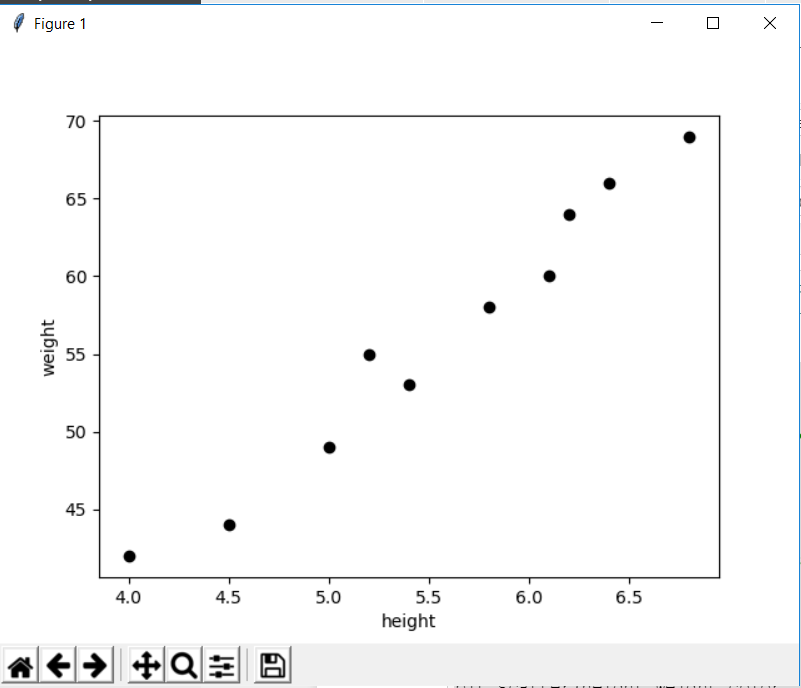
A perfect case by the way of Linear regression where the weight seems to be proportional (not exactly) to height, the regression is very much visible from data itself.
the relationship between Weight and Height can be interpreted as
Y`i = mX + b
Where Y is Height and X is Weight.
In other words, if X increases by 1 unit, Y will increase by exactly m units. b is a constant which will be derived after learning from the linear regression model and is also known as Intercept.
Lets declare the linear regression function and call its fit method to learn from the given data
reg=linear_model.LinearRegression()
reg.fit(height,weight)

#emit slope and intercept
m=reg.coef_[0]
b=reg.intercept_
print("slope=",m, "intercept=",b)
Now that we know the slope and intercept lets draw a line to fit the data points
plt.scatter(height,weight,color='black')
predicted_values = [reg.coef_ * i + reg.intercept_ for i in height]
plt.plot(height, predicted_values, 'b')
plt.xlabel("height")
plt.ylabel("weight")
plt.show()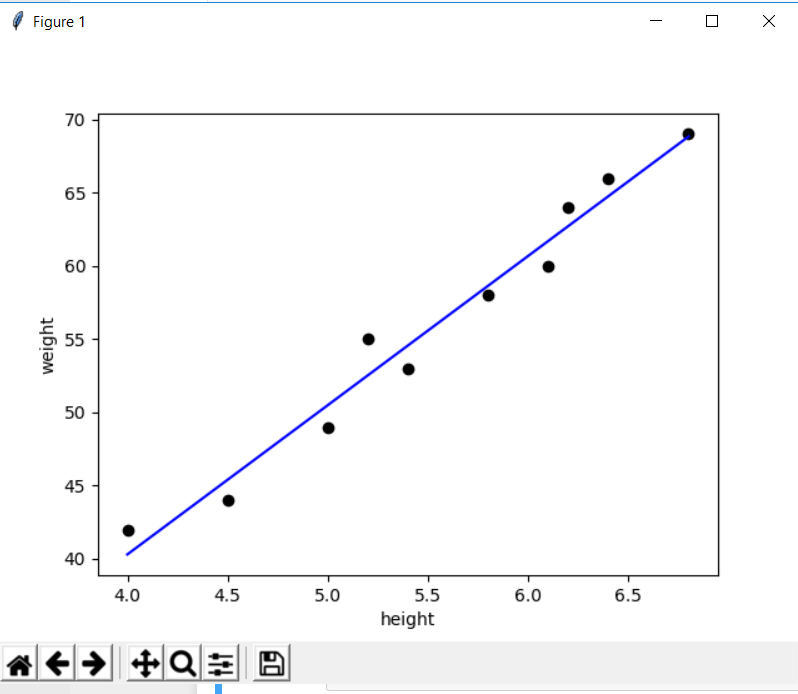
You can see that the points are near or around this line, The model would rarely be fully fit unless its a pure linear relationship. We are not looking for the prefect linear relationship either. Lets predict some real values
predictedVal = reg.predict(6.1)
print(predictedVal)
Its that simple, lets bring in some real data we prepared earlier. Get rid of the Height weight array and replace with the below lines
from azureml.dataprep import package

# This call will load the referenced package and return a DataFrame.
# If run in a PySpark environment, this call returns a
# Spark DataFrame. If not, it will return a Pandas DataFrame.
df = package.run('Prep1.dprep', dataflow_idx=0,spark=False)
# printing the first 10 rows to chekc if everything is alright
print(df.head(10))
# reconstructing the height, weight structures from the dataframe for given values
height = pd.DataFrame(df, columns=["Heightft"]).values
weight = pd.DataFrame(df, columns=["Weightkg"]).values
Rest of the code remains the same, we must also emit this model as Pickle file for later operationalization of this model as a web service. Use the code shown below to do the same
print ("Export the model to model.pkl")
f = open('./outputs/model.pkl', 'wb')
pickle.dump(reg, f)
f.close()
After running the file you'll relaize there is no outputs folder getting generated :) because its not there at all, its in the run time of the AML workbench and wemust get our model.pkl file from there or write to an absolute location.
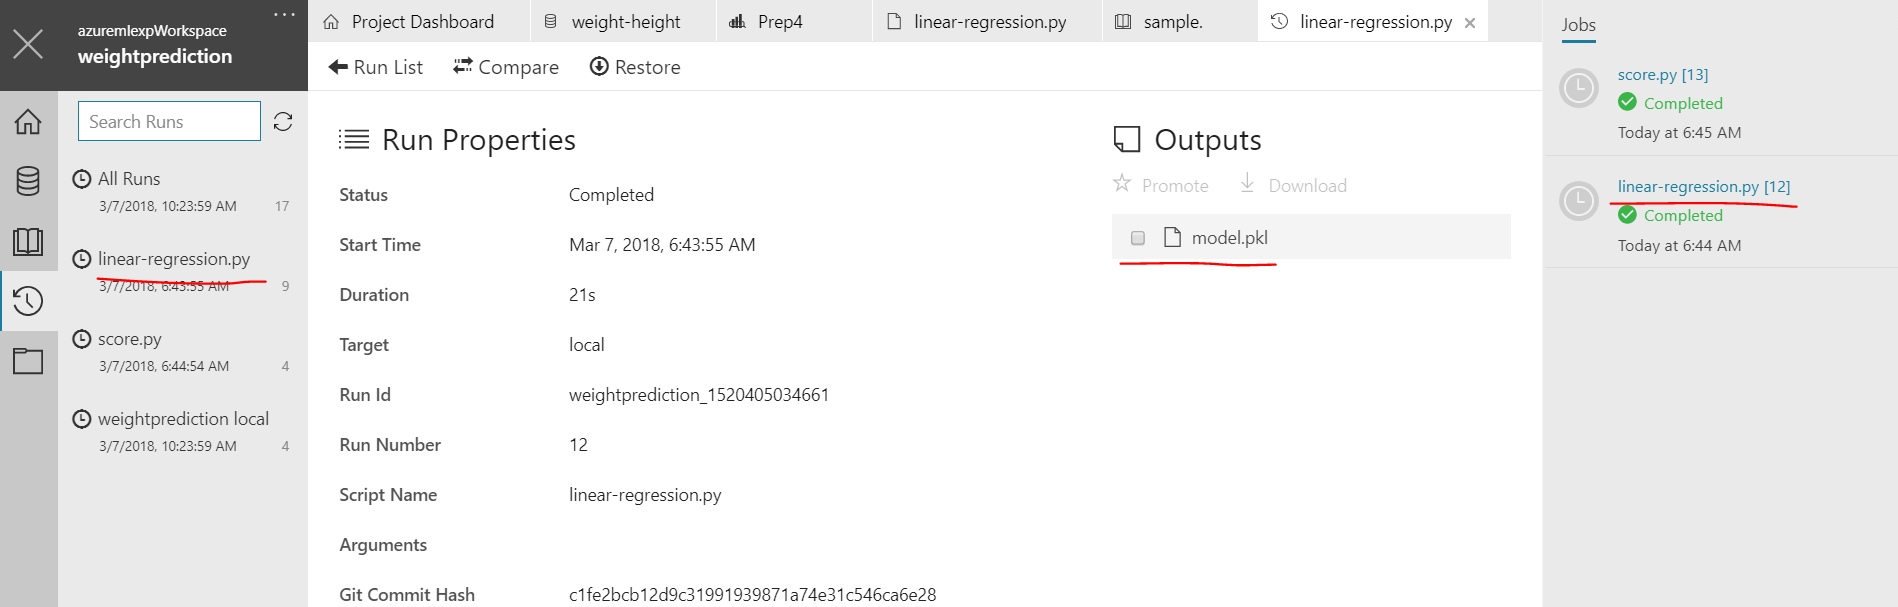
There are 2 ways to get this file, either click on the "Watch" icon in the left pane which also says "Runs" or click on the right side pane of "Jobs" for the python run of your file. select the file in outputs and click on "download" icon to download it to code folder.
Now that we have our model saved as a pickle file which is a binary json representation of our compiled linear regression model, we need to create a scoring file and a sample json file which exposes the schema for our web deployed model.
The score.py will do 3 things
- Load the pickle file as Model
- Provide an interface for webservice to receive input and return the prediction
- Generate the API schema which will be used for our Swagger documentation
Below code shows loading the pickle file as Model
def init():
    # load the model file
    global model
    model = joblib.load('model.pkl')
Interface for Webservice to receive inut and return prediction
def run(input):
    prediction = model.predict(input)
    print(prediction)
    return str(prediction)
Generating the API Schema
def generate_api_schema():
    import os
    print("create schema")
    input=6.0
    inputs = {"input": SampleDefinition(DataTypes.STANDARD, input)}
    os.makedirs('outputs', exist_ok=True)
    print(generate_schema(inputs=inputs, filepath="outputs/schema.json", run_func=run))
Main function in Score.py runs the above methods and tests if init, run are working well and generate the api schema
if __name__ == '__main__':
    # Import the logger only for Workbench runs
    from azureml.logging import get_azureml_logger

    logger = get_azureml_logger()

    import argparse
    parser = argparse.ArgumentParser()
    parser.add_argument('--generate', action='store_true', help='Generate Schema')
    args = parser.parse_args()

    print(args)
    #forecfully setting the generate to true
    args.generate=True
    if args.generate:
        print('generating api schema')
        generate_api_schema()

    init()
    input = 6.1
    result = run(input)
    logger.log("Result",result)
Just like you downloaded the pkl file before download the schema.json and review it.
We are now ready to deploy this model on Azure.
Before you start the deployment, you need to register a few environment providers. Use the following command to register for these providers
az provider register -n Microsoft.MachineLearningCompute

az provider register -n Microsoft.ContainerRegistry

az provider register -n Microsoft.ContainerService
Open the Command shell from the Azure ML workbench file option
- Login to azure account
az login - Setup the environment
az ml env setup -n myamlenvcluster -l eastus2 -cabove command takes about 20 minutes to setup the cluster. The -c switch is the switch to create cluster and if you omit this it'll create the local environment which is very quick but you must have Docker installed. You can check the status of cluster creation using commandaz ml env show -g myamlenvclusterrg -n myamlenvcluster - Once the cluster is deployed, you can set the environemnt using command
az ml env set -n myamlenvcluster -g myamlenvclusterrg - Setup the Account for model management - this is where your Models are managed in Azure.
az ml account modelmanagement create -n myamlacct -l eastus2 -g myamlenvclusterrg - We are now ready to deploy the service
az ml service create realtime -n weightpredictservice -m model.pkl -f score.py -s schema.json -c aml_config\conda_dependencies.yml -r python --debugOmit the debug switch if you don't want to see lots of debug information. This step canalso take upto 10 minutes to complete. At the end of service deployment you'll see an output like this
Done
Service ID: weightpredictservice.myamlenvcluster-09075485.eastus2
Usage for cmd: az ml service run realtime -i weightpredictservice.myamlenvcluster-09075485.eastus2 -d "{\"input\": 6.0}"
Usage for powershell: az ml service run realtime -i weightpredictservice.myamlenvcluster-09075485.eastus2 --% -d "{\"input\": 6.0}"
Additional usage information: 'az ml service usage realtime -i weightpredictservice.myamlenvcluster-09075485.eastus2'
Go ahead run the command from this prompt itself to check if everything is working well
az ml service run realtime -i weightpredictservice.myamlenvcluster-09075485.eastus2 -d "{\"input\": 6.0}"
Run the command az ml service usage realtime -i weightpredictservice.myamlenvcluster-09075485.eastus2 for more details about usage, it'll throw a lot of information
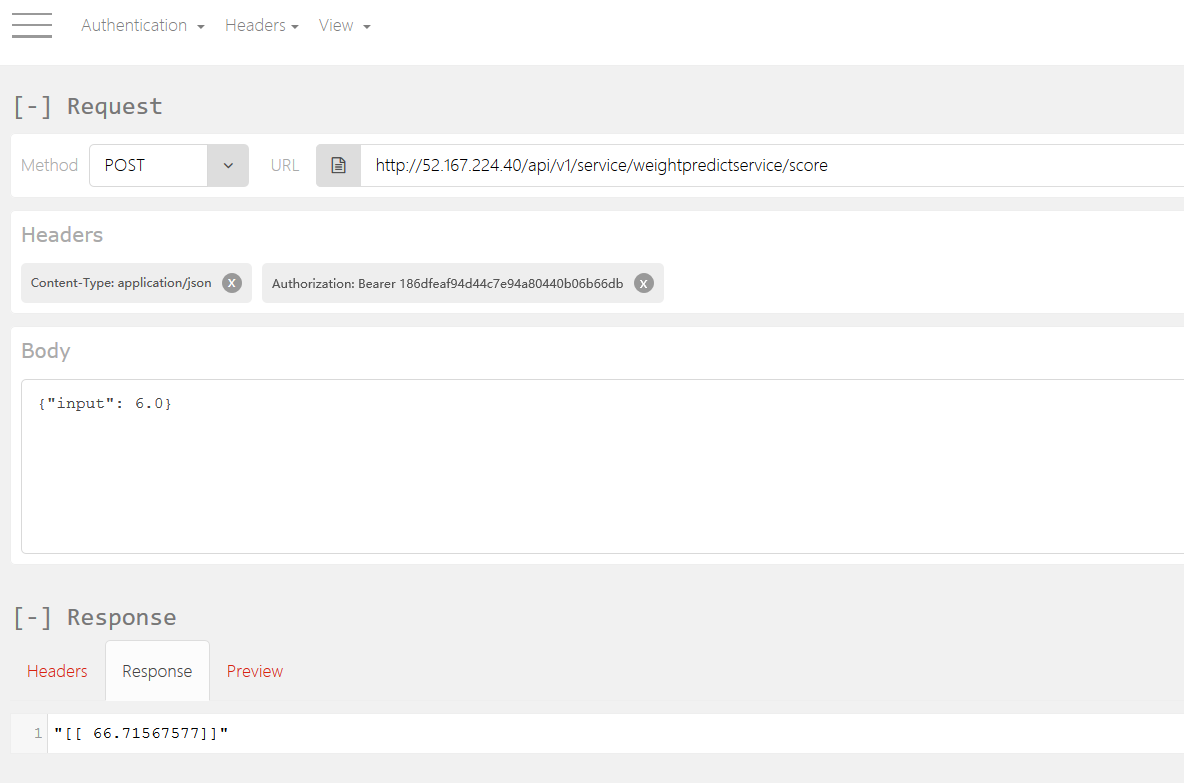
We are interested in the sample CURL Call. We must generate the keys for API which we need to use in the Authorization header. Run command az ml service keys realtime -i weightpredictservice.myamlenvcluster-09075485.eastus2
This command will generate a pair of keys, keep them with you. Use Any REST API client and create Header objects, one for Content-Type as application/json and another for Authoriization as Bearer PrimaryKey. Use the Method type as POST and use the CURL POST URL and data format. At the end this is how your REST API call should look like
Note - Continue with Tear down only after speaking with your workshop Mentor as there may be another workshop ahead where you may need the same VM of ML environment/account setup.
It could be expensive to keep this runnig in your test environment, use the below commands for tear-down
az ml service delete realtime --id weightpredictservice.myamlenvcluster-09075485.eastus2

az ml account modelmanagement delete --name myamlacct -g myamlenvclusterrg

az ml env delete -n myamlenvcluster -g myamlenvclusterrg
If you still find the VMs after sometime that means the same resource group may not have been used, in which case you must delete the resource group separately.
- https://towardsdatascience.com/simple-and-multiple-linear-regression-in-python-c928425168f9
- https://quickkt.com/tutorials/artificial-intelligence/machine-learning/linear-regression-python-scikit-learn/
- https://blogs.technet.microsoft.com/machinelearning/2017/09/25/deploying-machine-learning-models-using-azure-machine-learning/
- https://docs.microsoft.com/en-us/azure/machine-learning/data-science-virtual-machine/provision-vm


