Thanks to this tutorial on Tech Compose and the devise and devise-jwt gems. Also this blog post on token recovation strategies was helpful to me.
This article is all about authentication in rails 6 using devise and devise-jwt with fast_jsonapi response.
Fast_jsonapi A lightning fast JSON:API serializer for Ruby Objects. It is better in performance compared to Active Model Serializer.
Devise-jwt is a devise extension which uses JSON Web Tokens(JWT) for user authentication. With JSON Web Tokens (JWT), rather than using a cookie, a token is added to the request headers themselves (rather than stored/retrieved as a cookie). This isn’t performed automatically by the browser (as with cookies), but typically will be handled by a front-end framework as part of an AJAX call.
In this step, We need to create a rails application with api_only mode with optional database params(If you want to change).
$ rails new rails-jwt-tutorial -–api -–database=postgresql -T
Here, I have created a rails 6 application using postgresql (Default SQLite). (Note: If you are using postgresql then you have to setup database.yml)
As this is an API Only application, we have to handle ajax requests. So for that, we have to Rack Middleware for handling Cross-Origin Resource Sharing (CORS)
To do that, Just uncomment the
gem 'rack-cors'
line from your generated Gemfile. And uncomment the contents of config/initialzers/cors.rb the following lines to application.rb, adding an expose option in the process:
# config/initializers/cors.rb
Rails.application.config.middleware.insert_before 0, Rack::Cors do
  allow do
    origins '*'
    resource(
     '*',
     headers: :any,
     expose: ["Authorization"],
     methods: [:get, :patch, :put, :delete, :post, :options, :show]
    )
  end
end
Here, we can see that there should be an "Authorization" header exposed which will be used to dispatch and receive JWT tokens in Auth headers.
Here, we are going to add gem like ‘devise’ and ‘devise-jwt’ for authentication and the dispatch and revocation of JWT tokens and ‘fast_jsonapi’ gem for json response.
gem 'devise'
gem 'devise-jwt'
gem 'fast_jsonapi'
Then, do
bundle installBy running the following command to run a generator
$ rails generate devise:install
It is important to set our navigational formats to empty in the generated devise.rb by uncommenting and modifying the following line since it’s an api only app.
config.navigational_formats = []
Also, add the following line to config/environments/development.rb
config.action_mailer.default_url_options = { host: 'localhost', port: 3000 }
You can create a devise model to represent a user. It can be named as anything. So, I’m gonna be going ahead with User. Run the following command to create User model.
$ rails generate devise User
Then run migrations using,
$ rails db:create
$ rails db:migrate
We need to create two controllers (sessions, registrations) to handle sign ups and sign ins.
rails g devise:controllers users -c sessions registrations
specify that they will be responding to JSON requests. The files will look like this:
class Users::SessionsController < Devise::SessionsController
  respond_to :json
end
class Users::RegistrationsController < Devise::RegistrationsController
respond_to :json
endThen, add the routes aliases to override default routes provided by devise in the routes.rb
Rails.application.routes.draw do
  devise_for :users, path: '', path_names: {
    sign_in: 'login',
    sign_out: 'logout',
    registration: 'signup'
  },
  controllers: {
    sessions: 'users/sessions',
    registrations: 'users/registrations'
  }
endAdd the following lines to devise.rb
config.jwt do |jwt|
    jwt.secret = Rails.application.credentials.fetch(:secret_key_base)
    jwt.dispatch_requests = [
      ['POST', %r{^/login$}]
    ]
    jwt.revocation_requests = [
      ['DELETE', %r{^/logout$}]
    ]
    jwt.expiration_time = 30.minutes.to_i
end
Here, we are just specifying that on every post request to login call, append JWT token to Authorization header as “Bearer” + token when there’s a successful response sent back and on a delete call to logout endpoint, the token should be revoked.
The jwt.expiration_time sets the expiration time for the generated token. In this example, it’s 30 minutes.
Revocation of tokens is an important security concern. The devise-jwt gme comes with three revocation strategies out of the box. You can read more about them in this blog post on token recovation strategies.
For now, we'll be going with the one they recommended with is to store a single valid user attached token with the user record in the users table.
Here, the model class acts itself as the revocation strategy. It needs a new string column with name jti to be added to the user. jti stands for JWT ID, and it is a standard claim meant to uniquely identify a token.
It works like the following:
- When a token is dispatched for a user, the
jticlaim is taken from thejticolumn in the model (which has been initialized when the record has been created). - At every authenticated action, the incoming token
jticlaim is matched against thejticolumn for that user. The authentication only succeeds if they are the same. - When the user requests to sign out its
jticolumn changes, so that provided token won't be valid anymore.
In order to use it, you need to add the jti column to the user model. So, you have to set something like the following in a migration:
def change
  add_column :users, :jti, :string, null: false
  add_index :users, :jti, unique: true
  # If you already have user records, you will need to initialize its `jti` column before setting it to not nullable. Your migration will look this way:
  # add_column :users, :jti, :string
  # User.all.each { |user| user.update_column(:jti, SecureRandom.uuid) }
  # change_column_null :users, :jti, false
  # add_index :users, :jti, unique: true
end
To add this, we can run
rails g migration addJtiToUsers jti:string:index:unique
And then make sure to add null: false to the add_column line and unique: true to the add_index line
Important: You are encouraged to set a unique index in the jti column. This way we can be sure at the database level that there aren't two valid tokens with same jti at the same time.
Then, you have to add the strategy to the model class and configure it accordingly:
class User < ApplicationRecord
  include Devise::JWT::RevocationStrategies::JTIMatcher

  devise :database_authenticatable, :registerable, :validatable,
         :jwt_authenticatable, jwt_revocation_strategy: self
end
Be aware that this strategy makes uses of jwt_payload method in the user model, so if you need to use it don't forget to call super:
def jwt_payload
  super.merge('foo' => 'bar')
end
In our case, we won't be needing to interact with the jwt_payload directly, so we can move on for now. Next, we'll run migrations using
rails db:migrateAs we already added the fast_jsonapi gem, we can generate a serializer to configure the json format we'll want to send to our front end API.
$ rails generate serializer user id email created_at
It will create a serializer with a predefined structure. Now, we have to add the attributes we want to include as a user response. So, we'll add the user's id, email and created_at. So the final version of user_serializer.rb looks like this:
class UserSerializer
  include FastJsonapi::ObjectSerializer
  attributes :id, :email, :created_at
end
We can access serializer data for single record by,
UserSerializer.new(resource).serializable_hash[:data][:attributes]
And multiple records by,
UserSerializer.new(resource).serializable_hash[:data].map{|data| data[:attributes]}
Now, we have to tell devise to communicate through JSON by adding these methods in the RegistrationsController and SessionsController
class Users::RegistrationsController < Devise::RegistrationsController
  respond_to :json
  private

  def respond_with(resource, _opts = {})
    if resource.persisted?
      render json: {
        status: {code: 200, message: 'Signed up sucessfully.'},
        data: UserSerializer.new(resource).serializable_hash[:data][:attributes]
      }
    else
      render json: {
        status: {message: "User couldn't be created successfully. #{resource.errors.full_messages.to_sentence}"}
      }, status: :unprocessable_entity
    end
  end
end

class Users::SessionsController < Devise::SessionsController
  respond_to :json
  private

  def respond_with(resource, _opts = {})
    render json: {
      status: {code: 200, message: 'Logged in sucessfully.'},
      data: UserSerializer.new(resource).serializable_hash[:data][:attributes]
    }, status: :ok
  end

  def respond_to_on_destroy
    if current_user
      render json: {
        status: 200,
        message: "logged out successfully"
      }, status: :ok
    else
      render json: {
        status: 401,
        message: "Couldn't find an active session."
      }, status: :unauthorized
    end
  end
end
Remember, you can use the attribute method in a serializer to add a property to the JSON response based on an expression you return from a block that has access to the object you're serializing. For example, you can modify the column name and data format by overwrite attribute:
attribute :created_date do |user|
       user && user.created_at.strftime('%d/%m/%Y')
end
Here, we're adding a created_date attribute that will reformat the user's created_at value in the one we specify.
Here you can get detailed information on fast_jsonapi.
We'll probably want to create an endpoint that will return the current user given a valid JWT in the headers. This will be useful in our frontend code to be able to recognize if we have an active session before visiting a client side route that shouldn't be accessible without an active session.
rails g controller current_user indexAnd then in config/routes.rb find this line:
get 'current_user/index'and replace it with
get '/current_user', to: 'current_user#index'Now, fill in the CurrentUserController so it looks like this:
class CurrentUserController < ApplicationController
  before_action :authenticate_user!
  def index
    render json: current_user, status: :ok
  end
end
Adding the before_action :authenticate_user will ensure that we only see a 200 response if we have a valid JWT in the headers. If we don't this endpoint should return a 401 status code.
If you're going to use this api with a React application, you may want to set the default port to 3001 so that it won't conflict with the react dev server. If you set the default to port for the API to 3001, you'll have consistency with the two ports when you run both servers simultaneously. If you don't do this, you'd always need to make sure you start the front end dev server before the backend one to make sure that the ports are consistent.
To do this, you'll need to make changes in two different files: config/environments/development.rb and config/puma.rb. In config/environments/development.rb, replace the following:
# config/environments/development.rb
config.action_mailer.default_url_options = { host: 'localhost', port: 3000 }
with
config.action_mailer.default_url_options = { host: 'localhost', port: 3001 }And, in config/puma.rb, replace the following:
port ENV.fetch("PORT") { 3000 }with
port ENV.fetch("PORT") { 3001 }After you've made these changes, you can run
rails sAnd it will boot up the server on port 3001.
Now you can add the following line in any controller to authenticate your user.
before_action :authenticate_user!
To test it, you can try this in the browser console
fetch("http://localhost:3000/signup", {
  method: "post",
  headers: {
    "Content-Type": "application/json",
  },
  body: JSON.stringify({
    user: {
      email: "[email protected]",
      password: "password",
    },
  }),
})
  .then((res) => {
    if (res.ok) {
      console.log(res.headers.get("Authorization"));
      localStorage.setItem("token", res.headers.get("Authorization"));
      return res.json();
    } else {
      throw new Error(res);
    }
  })
  .then((json) => console.dir(json))
  .catch((err) => console.error(err));
If everything worked correctly, we should see the token logged to the console as well as the server response looking something like this:

After you've got the token stored locally, you can try it out to make a request that requires authentication. To do this, we'd need to actually have a route like this that requires users to be logged in to get a response.
rails g controller private test
class PrivateController < ApplicationController
  before_action :authenticate_user!
  def test
    render json: {
      message: "This is a private message for #{current_user.email} you should only see if you've got a correct token"
    }
  end
end
And now, to test this out in the browser, you can run this:
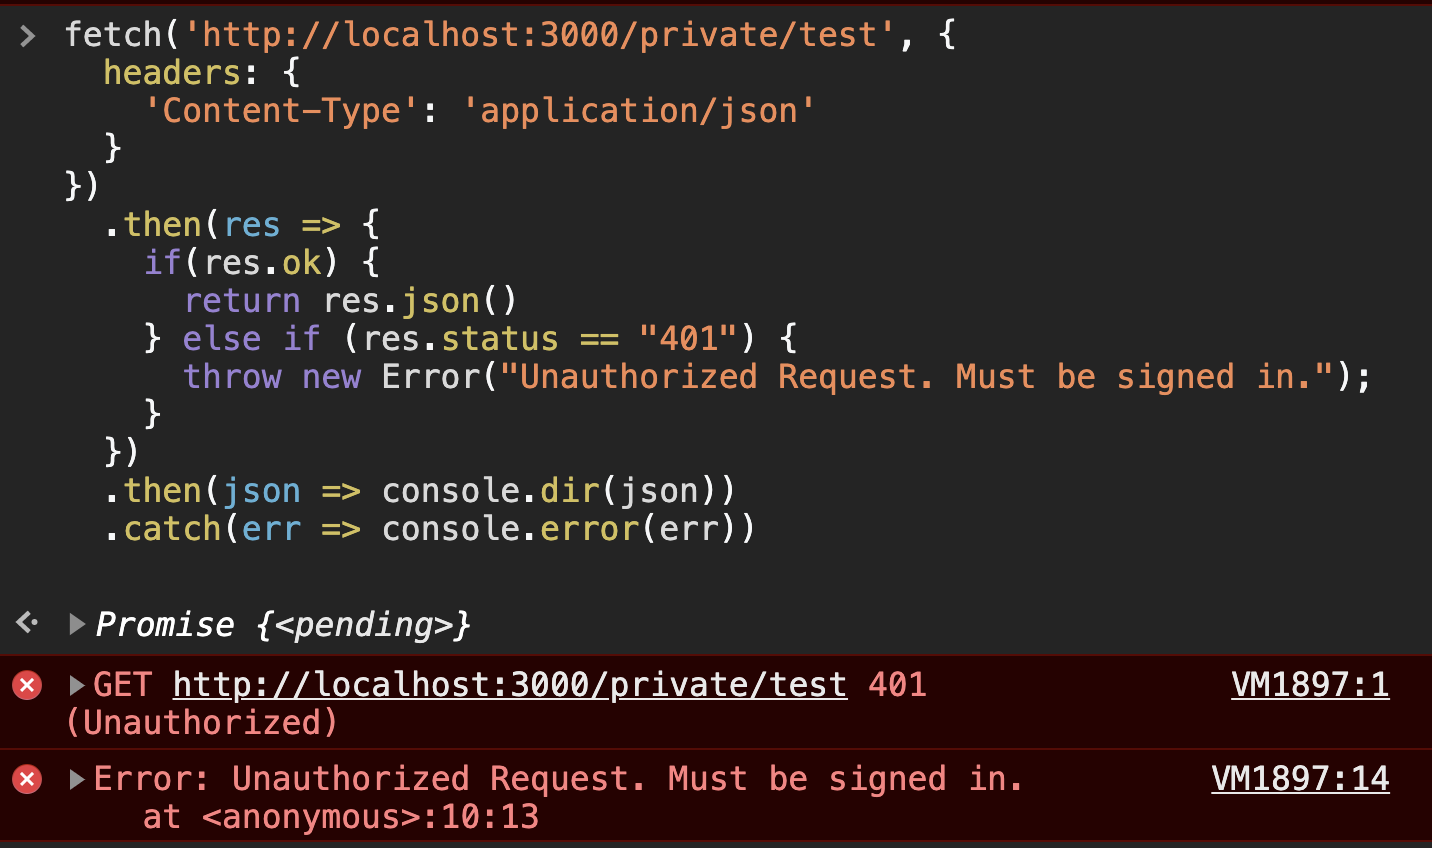
fetch("http://localhost:3000/private/test", {
  headers: {
    "Content-Type": "application/json",
  },
})
  .then((res) => {
    if (res.ok) {
      return res.json();
    } else if (res.status == "401") {
      throw new Error("Unauthorized Request. Must be signed in.");
    }
  })
  .then((json) => console.dir(json))
  .catch((err) => console.error(err));
Because we're not including the authorization token in the header, the response status should be unauthorized (401) and the error will be thrown, resulting in a rejected promise. See below:
As expected, without our JWT, the request is unauthorized because we have the before_action :authenticate_user! in our controller. So, now we can add the token in the header and see the difference
fetch("http://localhost:3000/private/test", {
  headers: {
    "Content-Type": "application/json",
    Authorization: localStorage.getItem("token"),
  },
})
  .then((res) => {
    if (res.ok) {
      return res.json();
    } else if (res.status == "401") {
      throw new Error("Unauthorized Request. Must be signed in.");
    }
  })
  .then((json) => console.dir(json))
  .catch((err) => console.error(err));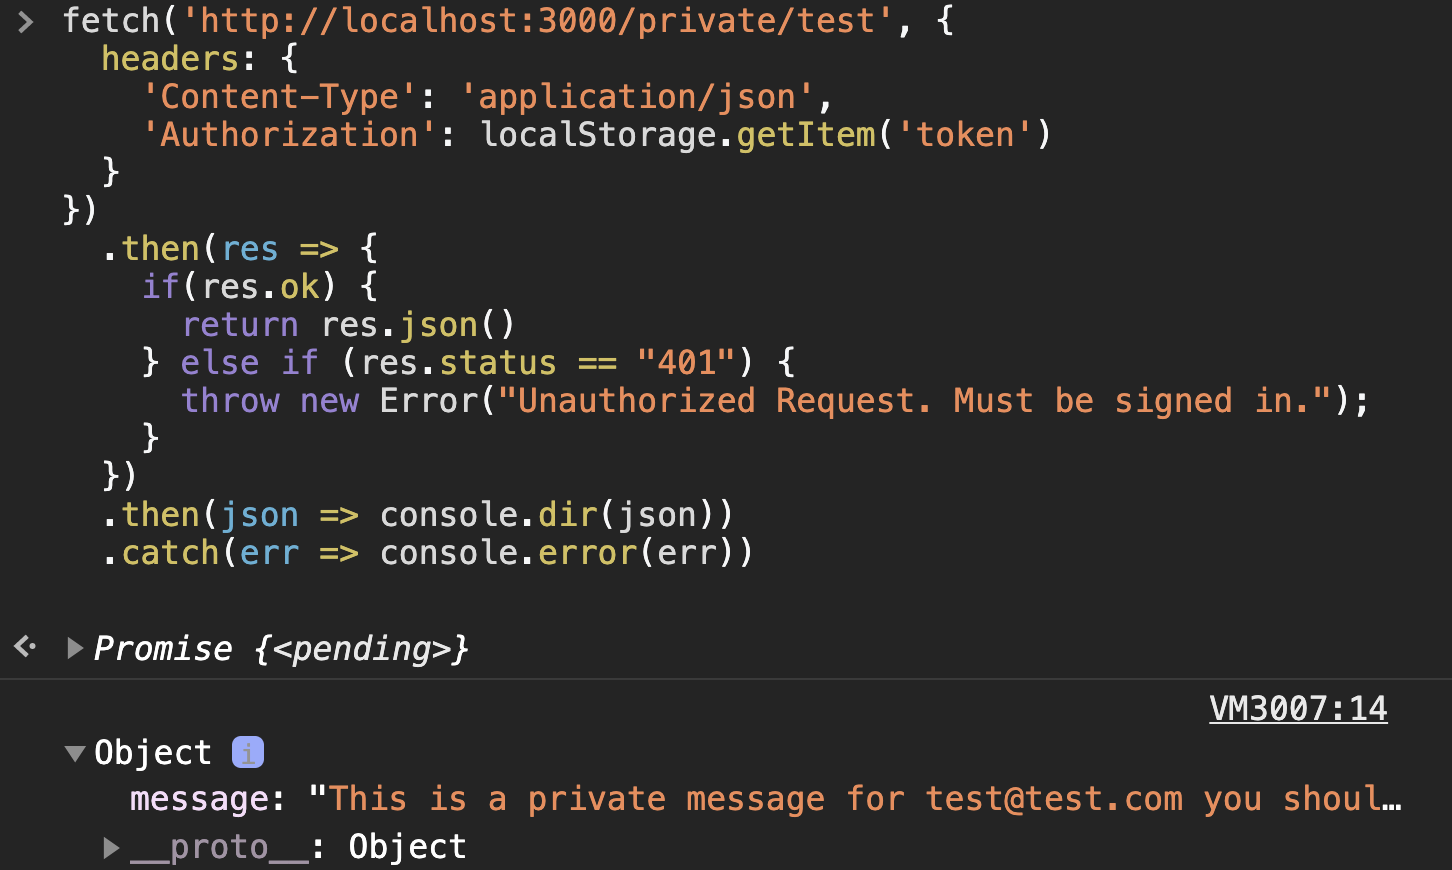
Notice that this time we're actually able to access the private message and it includes information about the current_user which is now accessible on the server side because the JWT in the authorization header has correctly identified us to the server on the subsequent request.
Finally, we want to be able to log a user out of our application. Our tokens only last for 30 minutes, so we'll esentially be logged out after 30 minutes of no activity. That said, we'd like to allow users to end their sessions a bit early if they so choose. To test this out. We'll want to sign in first, store the token, make a request to /private/test and make sure it works then logout and make another request to /private/test and it shouldn't work.
fetch("http://localhost:3000/login", {
  method: "post",
  headers: {
    "Content-Type": "application/json",
  },
  body: JSON.stringify({
    user: {
      email: "[email protected]",
      password: "password",
    },
  }),
})
  .then((res) => {
    if (res.ok) {
      console.log(res.headers.get("Authorization"));
      localStorage.setItem("token", res.headers.get("Authorization"));
      return res.json();
    } else {
      return res.text().then((text) => Promise.reject(text));
    }
  })
  .then((json) => console.dir(json))
  .catch((err) => console.error(err));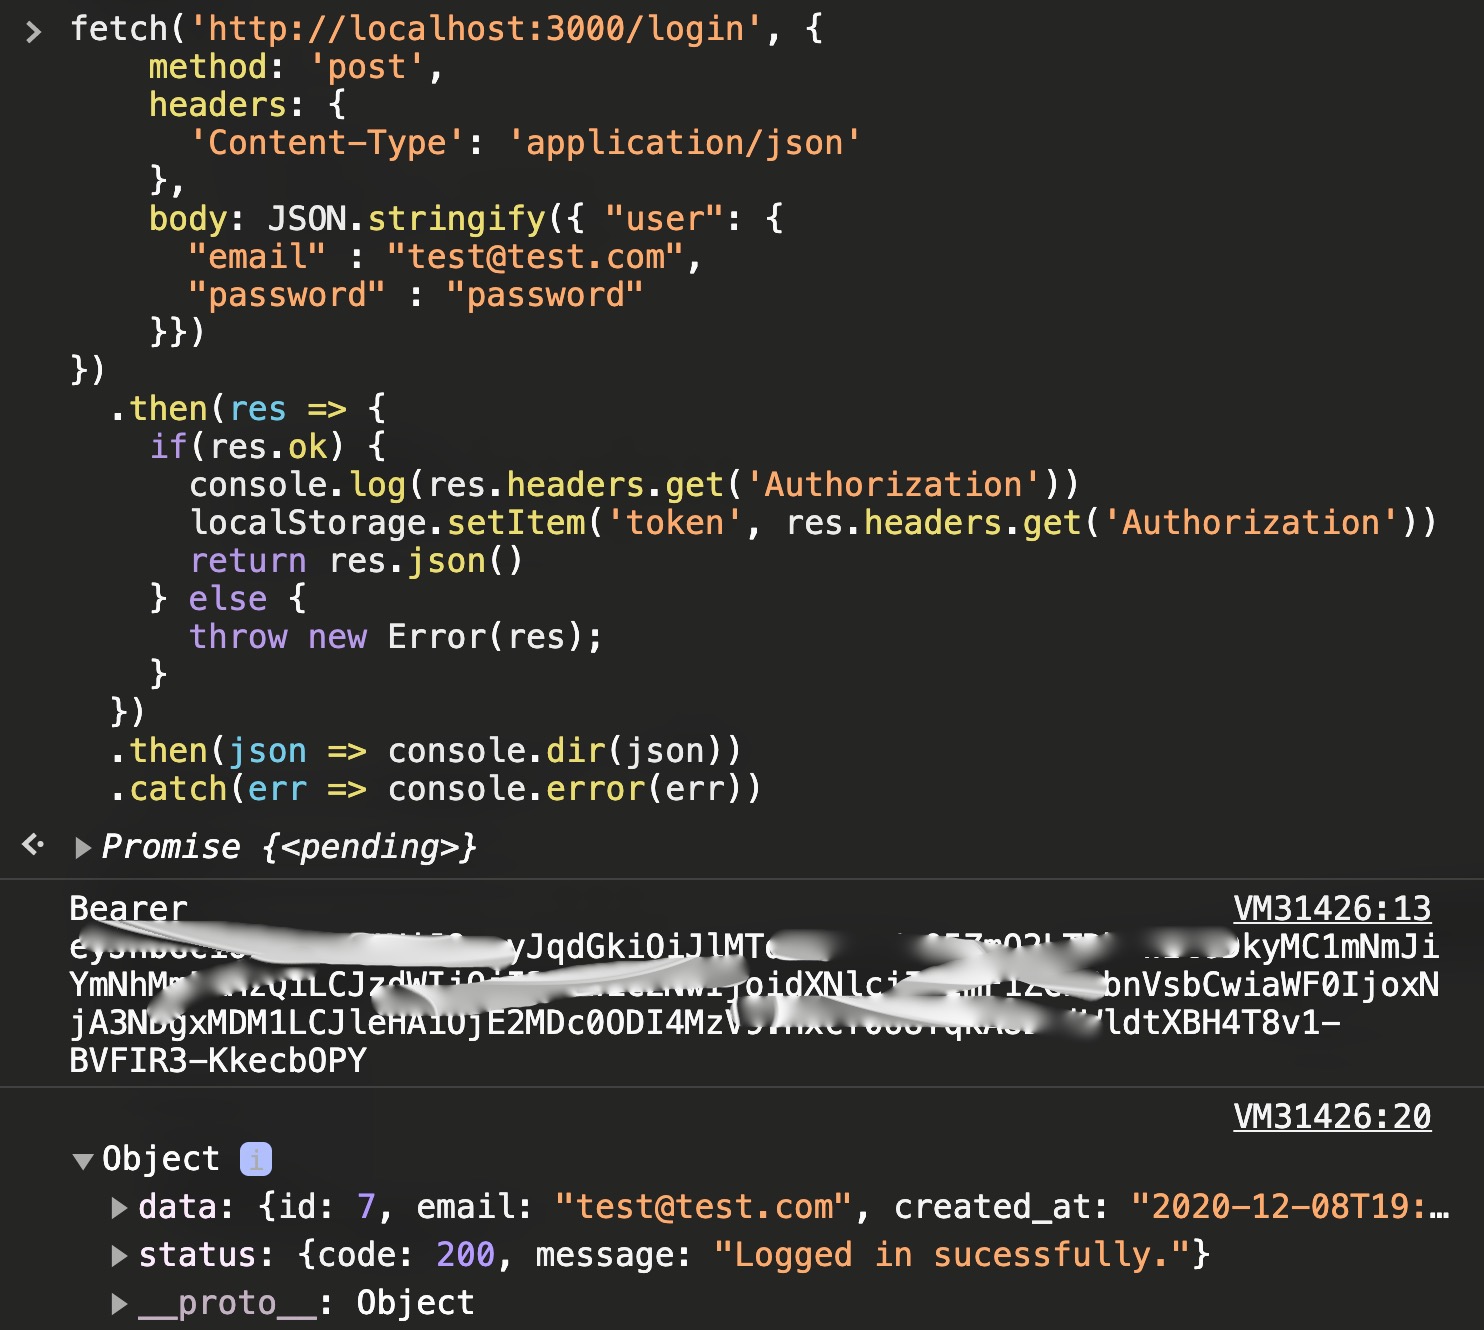
Notice here we see the token logged again.
Next we'll want to make the request to logout. At this point, we won't actually remove the token from localStorage, just to confirm that the same token no longer allows us to make authenticated requests. When you actually use this code, you'll want to remove the token from localStorage upon successful logout. We don't need to store a token if it's no longer valid and having a token in localStorage could be used as an indicator of an active session in conditional logic if we remove the token after a session expires.
*** Note, you'll need to make sure you include the JWT in the authorization headers of this logout request, otherwise Devise won't know which user's token to revoke.
fetch("http://localhost:3000/logout", {
  method: "delete",
  headers: {
    "Content-Type": "application/json",
    Authorization: localStorage.getItem("token"),
  },
})
  .then((res) => {
    if (res.ok) {
      return res.json();
    } else {
      return res.json().then((json) => Promise.reject(json));
    }
  })
  .then((json) => {
    console.dir(json);
  })
  .catch((err) => console.error(err));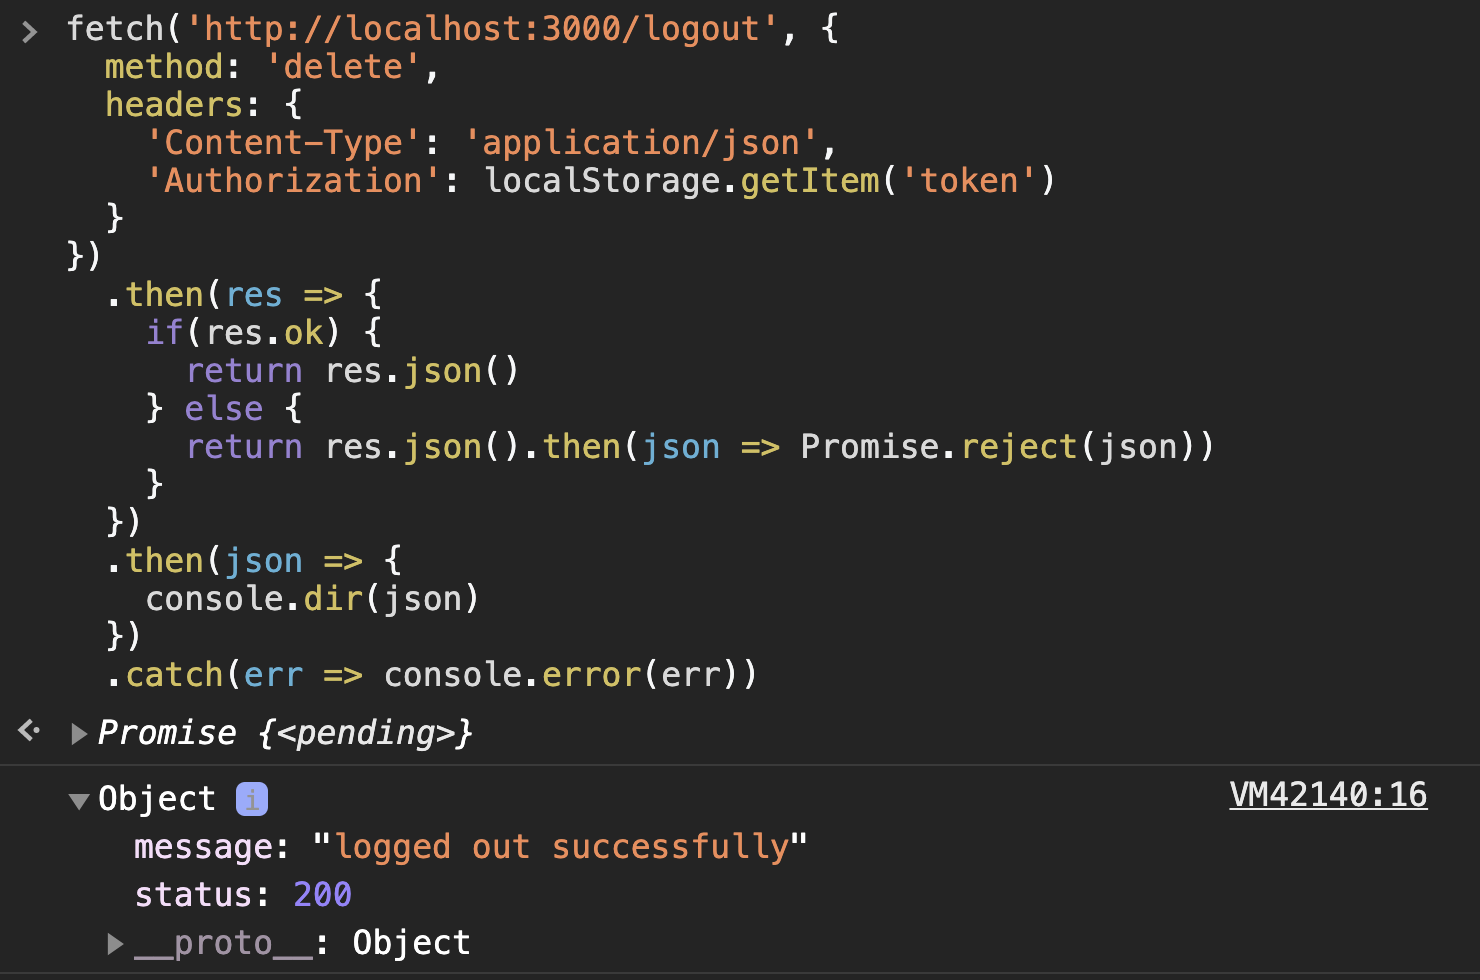
Now if we make the the request for private/test again using the same token (still in localStorage) using the following code:
fetch("http://localhost:3000/private/test", {
headers: {
"Content-Type": "application/json",
Authorization: localStorage.getItem("token"),
},
})
.then((res) => {
if (res.ok) {
return res.json();
} else if (res.status == "401") {
return res.text().then((text) => Promise.reject(text));
}
})
.then((json) => console.dir(json))
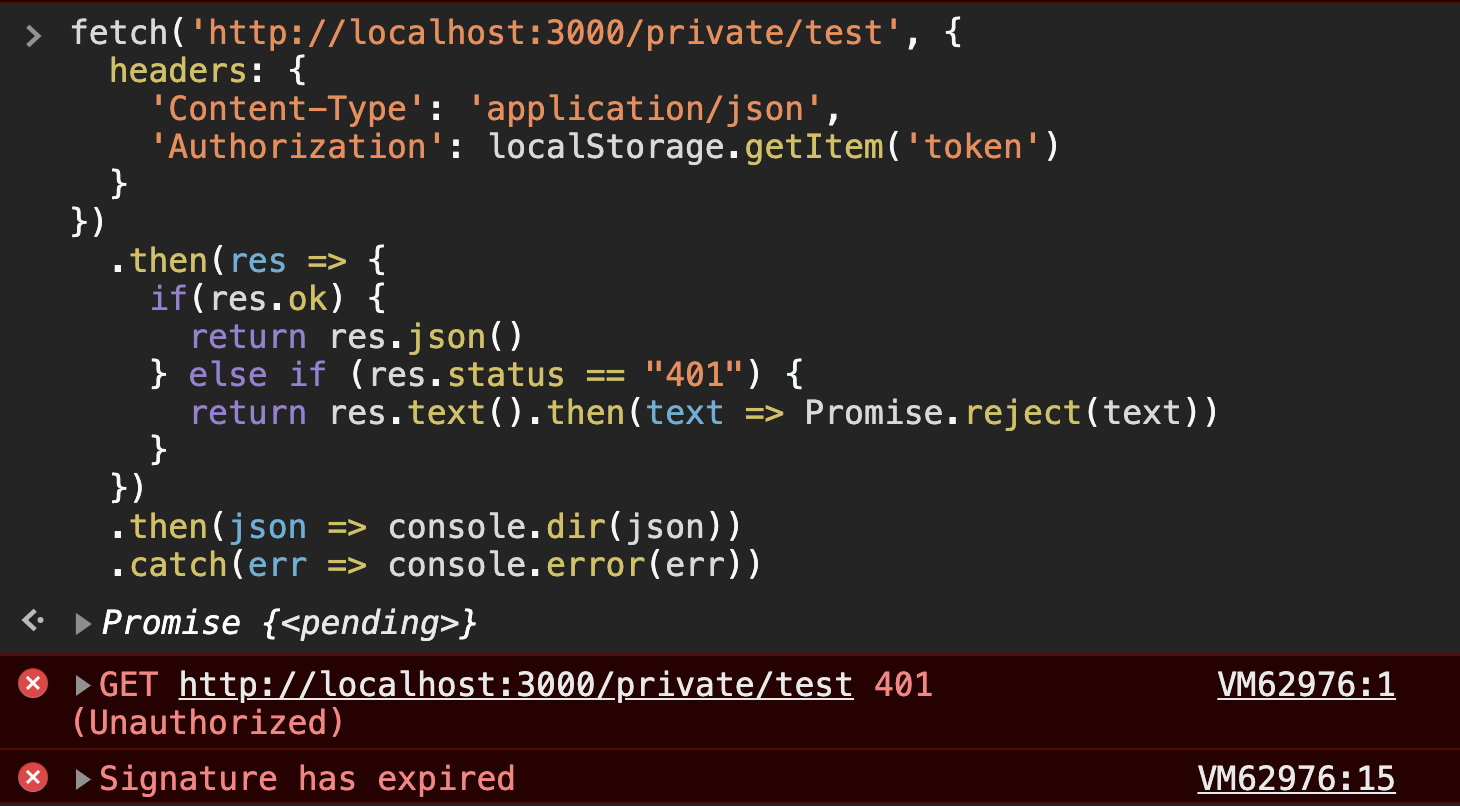
.catch((err) => console.error(err));We'll get an error when we do so letting us know we have a revoked token.

We actually had to use res.text() here instead of res.json() to read this response properly. Let's see what happens if we use the same code to request the private route, but use an expired token.
Finally, let's try out the request with the header present but no token. To do this, let's remove the token from localStorage and then run the fetch again.
localStorage.removeItem("token");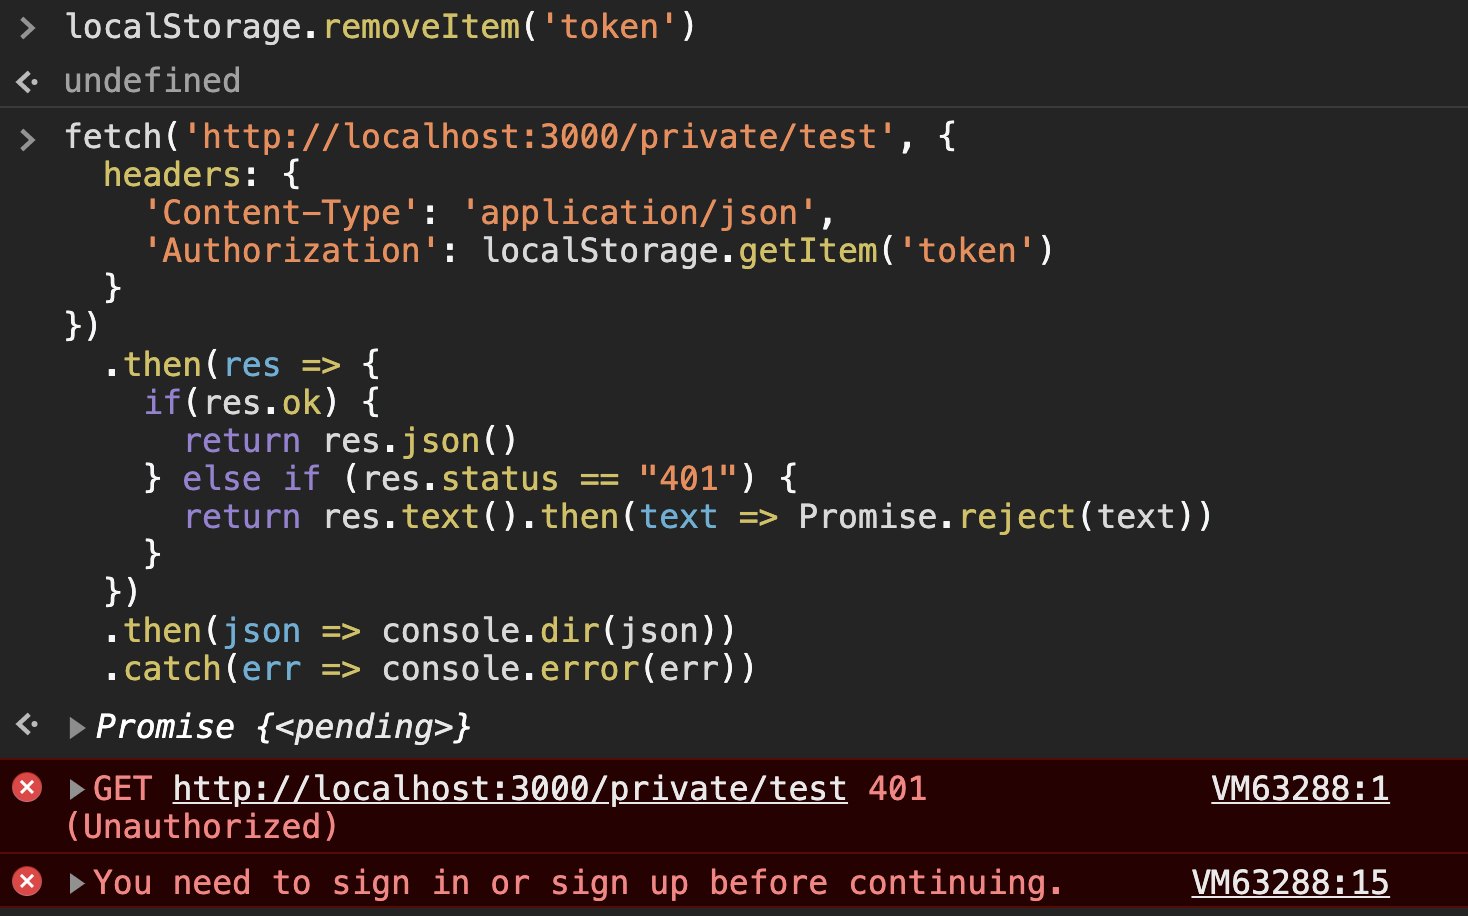
You can see here how your API will respond to requests made to protected routes in differing states of authorization.
| Header | Status | Content |
|---|---|---|
| Authorization Header with valid JWT | 200 | successful response containing JSON |
| Authorization Header with expired JWT | 401 | text response indicating Signature has expired |
| Authorization Header with no JWT | 401 | text response indicating You need to sign in or sign up before continuing. |
If we want to have a separate error messages for our users if their session is expired, then we can leave things as they are. If we just wanted our users to see the You need to sign in or signup message, we could also store the time that a token was created in localStorage. We can introduce a function to retrieve the token and only return the token if it was created less than 30 minutes ago (or whatever your jwt expiration time is set to in the config/initializers/devise.rb initializer).
function setToken(token) {
  localStorage.setItem("token", token);
  localStorage.setItem("lastLoginTime", new Date(Date.now()).getTime());
}
function getToken() {
  let now = new Date(Date.now()).getTime();
  let thirtyMinutes = 1000 * 60 * 30;
  let timeSinceLastLogin = now - localStorage.getItem("lastLoginTime");
  if (timeSinceLastLogin < thirtyMinutes) {
    return localStorage.getItem("token");
  }
}

fetch("http://localhost:3000/login", {
  method: "post",
  headers: {
    "Content-Type": "application/json",
  },
  body: JSON.stringify({
    user: {
      email: "[email protected]",
      password: "password",
    },
  }),
})
  .then((res) => {
    if (res.ok) {
      setToken(res.headers.get("Authorization"));
      return res.json();
    } else {
      return res.text().then((text) => Promise.reject(text));
    }
  })
  .then((json) => console.dir(json))
  .catch((err) => console.error(err));

// Then wait 30 minutes and do this:

fetch("http://localhost:3000/private/test", {
  headers: {
    "Content-Type": "application/json",
    Authorization: getToken(),
  },
})
  .then((res) => {
    if (res.ok) {
      return res.json();
    } else if (res.status == "401") {
      return res.text().then((text) => Promise.reject(text));
    }
  })
  .then((json) => console.dir(json))
  .catch((err) => console.error(err));
