- Secure, remote access to cameras
- Secure access with IdP (Okta, Google, etc.)
- Nginx reverse proxy to access cameras
- Secure, remote access to host for management (I use this even when I'm on network)
- Applications run in containers
- Run on older Raspberry Pi (armv7l)
- Bonus: Pi-hole
- Learn how to run multiple containers and networks on a single host
- Learn to use .env file to configure secrets in docker compose using 1Password CLI
- Learn to use service account with 1Password CLI
On the home server we need to have a secure connection to the web cameras. We want to limit who can access the cameras, and we don't want to run a VPN. And while we're at it, we might as well run the Pi-hole DNS blackhole on it and point the IoT devices to use the Pi-hole. Finally, I'd like to have remote access to the server, so I added a 2nd Cloudflare tunnel so I can SSH to the host.
Cloudflare tunnels work well, and I've used them for more than a year. Cloudflare now calls this service, Cloudflare Zero Trust, because hey, everyone wants zero trust now days.
I had to update my edge Raspberry Pi OS to Ubuntu 22.10, and decided to add Pi-hole to it as well. And since I'm upgrading, I wanted to up my game and finally learn to use Docker.
I had to install cloudflared, nginx, and pihole containers on the Raspberry Pi 3 B from 2015. (Aren't these things amazing?).
I'm using a Docker image msnelling/cloudflared because I'm running this on an older Pi, but if you're using a newer one, you can use the official Cloudflare image cloudflare/cloudflared:latest. You can configure this as environment variable in the .env file.
The diagram shows the connectivity between the system components, both internal and external, physical and virtual.
When the cloudflared container is created, it creates a bridge network named cloudflared. The nginx and pihole containters are added to cloudflared network so they can be available over the Cloudflare tunnel created by the cloudflared container.
The camera network connects to the nginx container, restricting access to the camera webservers to the cloudflared tunnel. These are what Cloudflare calls Self-hosted applications and authentication can be controlled by your IdP such as Okta or Google for example. The diagram below shows the connectivity between the system components.
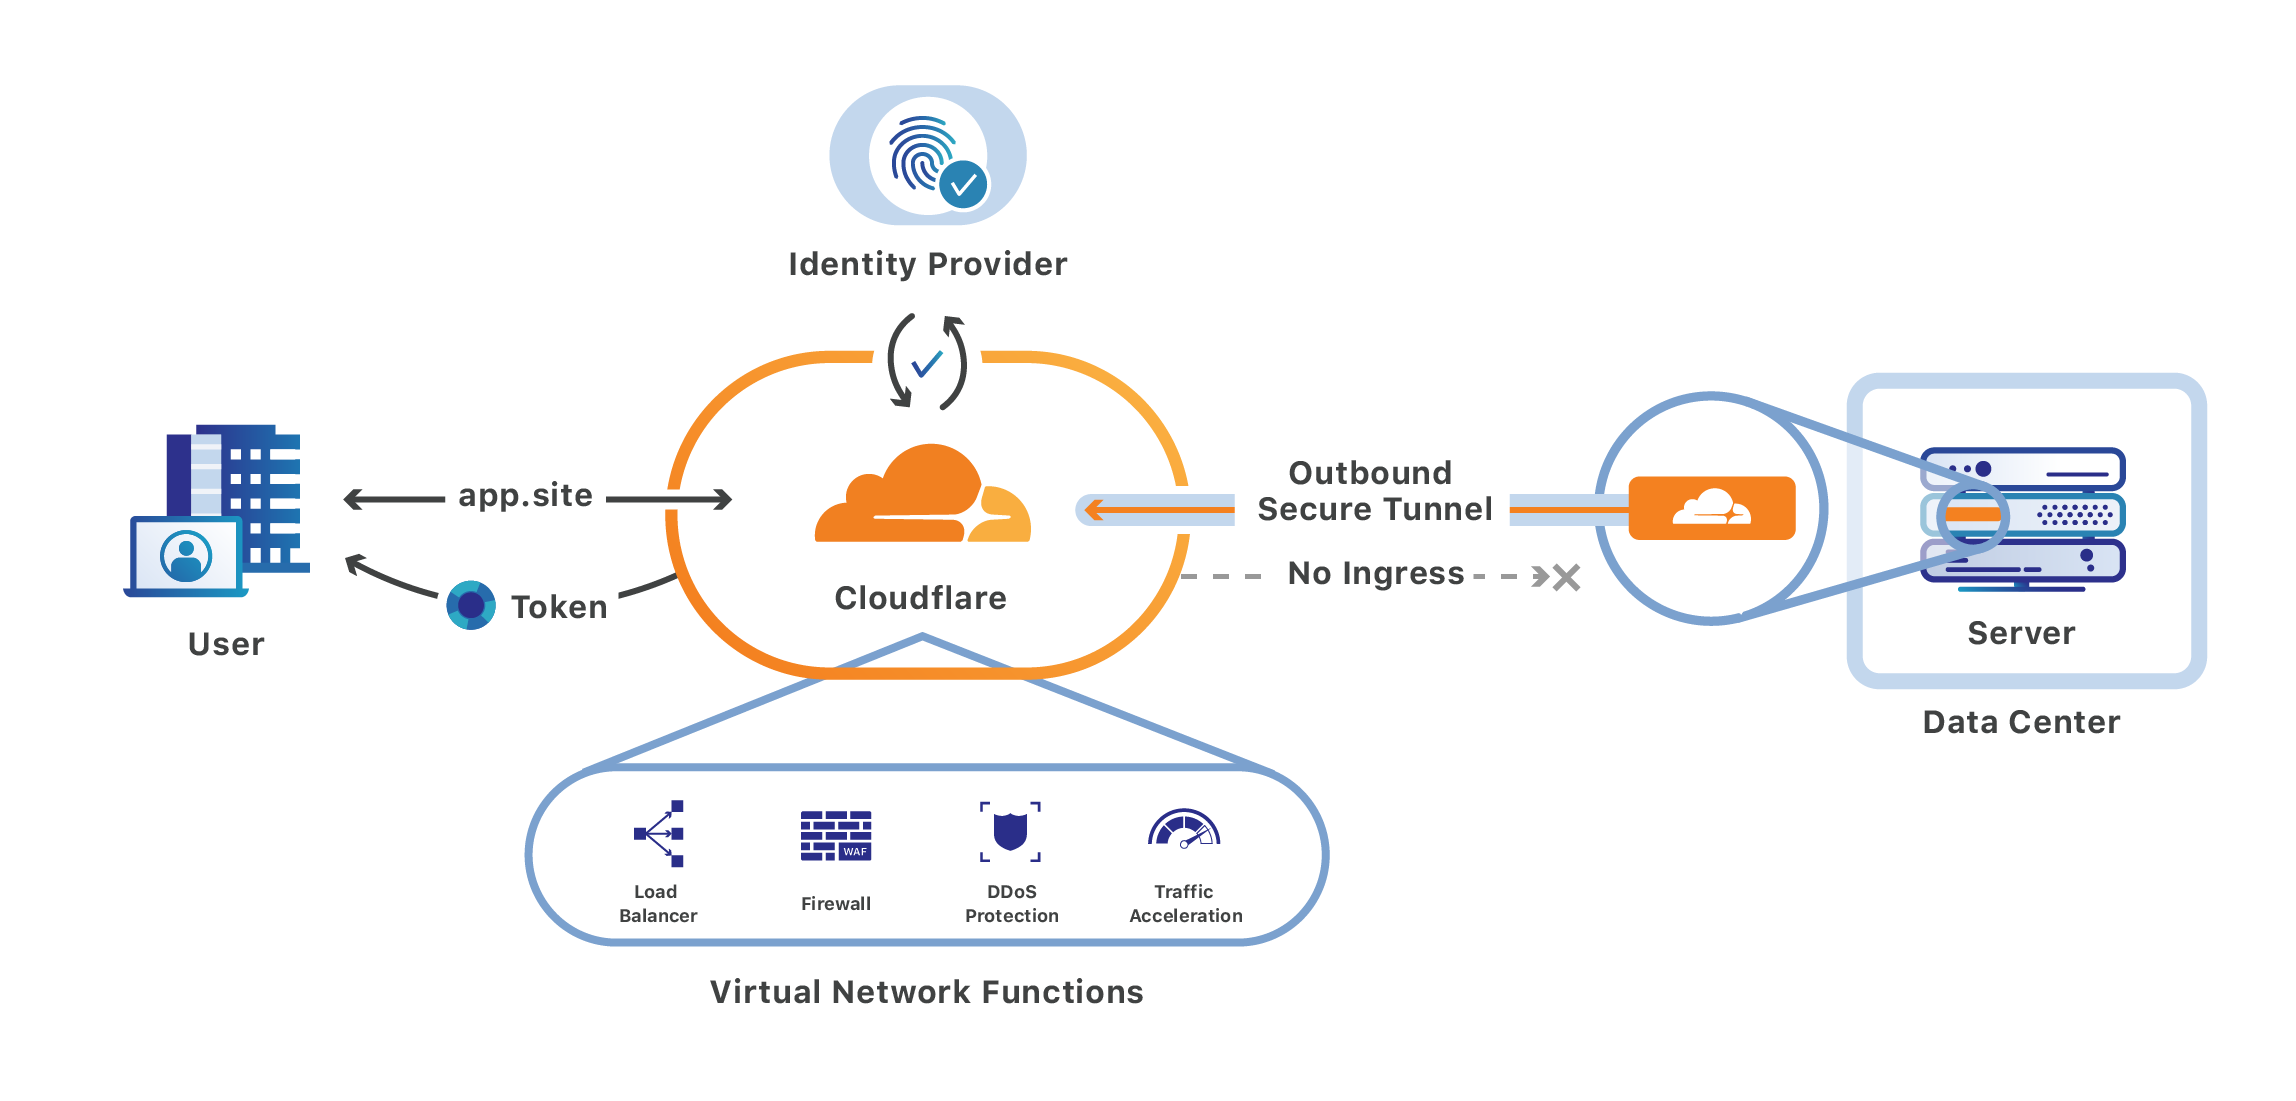
The diagram below shows the connections on the server and to internal and external sites.


This repo has the code to create services for our home server running:
- cloudflared - to create a private tunnel with a proxy managed by Cloudflare
- nginx - a reverse proxy for the camera webpages
- pihole - a DNS sinkhole and ad blocker
- cloudflared-host - tunnel to the host for SSH
- .env file with secrets and image name for cloudflared
I recommend you break this down into pieces if you're using Cloudflare Tunnels for the first time. Start with the cloudflared-host container that connects you to the Raspberry Pi host and see if you can SSH to it, then move on to the other components. You could also hard code your secrets to make things easier to test, and then go back and change the code to use 1Password.
- Ubuntu 22.10
- Docker installed and running
- docker-compose installed
- Cloudflare account and domain
- Configure your application(s) in Cloudflare
- 1Password CLI installed
- Create the
dockergroup:sudo groupadd docker - Add your user to the
dockergroup:sudo usermod -aG docker $USER - Logout and log back in
- Verify that you can run
dockerwithoutsudo:docker run hello-world
See Instructions from Docker if there's any trouble.
Clone this repo to host in your home directory
gh repo clone beckitrue/home-remote-server
We're saving our secrets in an .env file and referencing them with 1Password. This ensures that the secrets don't get saved to GitHub. Instructions for referencing 1Password values can be found here. It's a good idea to run op read op://<your credential> to verify that your credential reference is correct.
- Create a 1Password service account
- Set your op service account environment variable
export OP_SERVICE_ACCOUNT_TOKEN=<token> - Save your cloudflared tokens and your PiHole web password in 1Password
- Change the values in the .env file to the correct values for your cloudflared tokens and PiHole password using your 1Password credential references
- Set the cloudflared image you want to use. The official image is
cloudflare/cloudflared:latest. The image I'm using works on the older arm7l Pi architecture.
- Build and start cloudflared docker container from the
home-remote-serverdirectory runop run --env-file=".env" -- docker compose -f cloudflared-host/docker-compose.yaml up -d - Go to Tunnels dashboard and verify that tunnel is healthy.
- SSH to the host using the Cloudflare tunnel
https://your_app.yourdomain
- Build and start cloudflared docker containerfrom the
home-remote-serverdirectory runop run --env-file=".env" -- docker compose -f cloudflared/docker-compose.yaml up -d - Go to Tunnels dashboard and verify that tunnel is healthy.
We're manging the Nginx configuration and content files by mounting to a local directory on the Pi. Any changes in those directories will show up in the container. You'll restart your containter to pull the config and / or new content.
sudo mv ~/home-remote-server/nginx/default.conf /var/nginx/conf/default.confThis is where you'll change your nginx config file(s)sudo mv ~/home-remote-server/nginx/index.html /var/www/index.htmlThis is where you'll change your content file(s)- Build and start nginx docker container
docker compose -f ~/home-remote-server/nginx/docker-compose.yaml up -d - Go to nginx webpage and verify it's working. (use your URL)
- Build and start pihole docker container from the
home-remote-serverdirectory runop run --env-file=".env" -- docker compose -f pihole/docker-compose.yaml up -d - Go to pihole admin page (use your own URL) and verify it's working
- Follow the instructions for Installing on Ubuntu on the pi-hole GitHub site. This is to make the pi-hole the DNS server running on the Raspberry Pi.
- Follow the Post-Install instructions to complete the configuration Make sure you have connectivity and the pi-hole is resolving DNS before making these changes, or you may not have DNS available
- Enable the default blocklist to get started. Follow the instructions for Pi-Hole V5.
- Pull latest image:
docker pull pihole/pihole cd ~/home-remote-server/piholeop run --env-file="../.env" -- docker-compose up --build --remove-orphans --force-recreate -d
Running these services in Docker containers was meant to be a learning experience for me, and it was. Here are some troubleshooting steps I had to take to troubleshoot DNS, network connectivity, and re-creating containers to use configuration changes.
- Assumes that your Cloudflare tunnel is working and you have your Application(s) configured in Cloudflare. Refer to Cloudflare documentation if your tunnel isn't working.
- Assumes that you are using the settings in the
docker-compose.yamlfiles for ports, names, etc. - Assumes you have configured the upstream DNS servers in Pi-hole
- Assumes that you have 1Password CLI installed on your host machine
- Make sure you are running your services in the same network as your
cloudfaredcontainer is running in. cloudflaredwill create a bridge network namedcloudflared, so you might as well put your services in that network. The Docker documentation on networking is very good. Check it out if this is new to you.- You specify the network in the
docker-compose.yamlfile, and you can check out the details in the Networking in Compose documentation. If you use the code in this repo, you'll see the network is specified in thedocker-compose.yamlfile. The containers are named, so we can use their names instead of IP addresses. - You can see which networks are configured by running
docker network lsand you should seecloudflaredlisted - You can get details about the network by running
docker network inspect cloudflared - You can see details about the container network configuration by running
docker inspect <container_name>
- Check connectivity from a client computer such as your laptop, and verify that you can connect to the Pi-hole web UI
http://<server-ip>:8080/admin/index.php - To check connectivity from
cloudflaredtopi-holecontainer rundocker exec -it cloudflared sh -c 'wget http://<container-ip-of-pi-hole>'(you'll want to clean up and delete theindex.htmlfile when you're done). - Check connectivity between containers:
docker exec cloudflared ping pihole -c2or use the IP addressdocker exec cloudflared ping 172.18.0.4See more excellent networking tips here - Run commands from within the container. The
cloudflaredcontainers runsh, and thenginxandpiholecontainers usebash
- From the server host run
resolvectl statusto verify which DNS servers are configured. It should be the IP address of thepi-holecontainer in thecloudflarednetwork,127.0.0.1or the IP address of the server. - The
docker-compose.yamlfiles are configured to use thepi-holefor DNS. You can verify the configuration for the containers by runningdocker inspect <container_name>. Check the DNS settings match what you expect them to be. - From your client device, run
nslookup google.com <Pi-Hole Public IP Address>and you should get a list of hosts
I had a devil of a time with getting this setup until I made the config file name default.conf. After that, the configuration worked. But if you have trouble you can try using these documents to help:
op run --env-file="../.env" -- docker-compose up --build --remove-orphans --force-recreate -d from the server command line in the conatiner-directory will kill the container and force a rebuild.
- /etc/netplan/50-cloud-init.yaml file
Make use of Docker Compose environment variablesDONEMake use of Pi-hole environment variablesConfigure DoH with cloudflared- Add code scanning
- Deploy with Terraform

![renovate[bot] avatar](https://avatars.githubusercontent.com/in/2740?v=4 "renovate[bot]")