Input sample video is rat.avi placed in the root directory.
Output video demonstration is placed on the link below.
After processing the input video(s) by the script track.py you will get new directory <current date>_distance with CSV table
| Animal | Distance | Run Time |
|---|---|---|
| ratN | 56.38 | 420.1 |
| ... | ... | ... |
and two subdirectories
- timing with processed video(s) as above
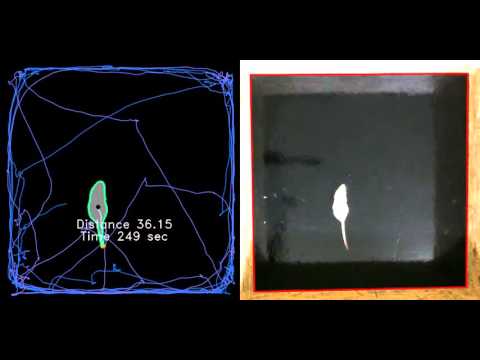
- tracks with images of animal(s) track(s) as on the left side of processed video
Tracking is based on very simple image preprocessing and processing algorithms implemented in OpenCV, therefore OpenCV is the only requirement. To install it on your python environment type pip install opencv-python in your terminal.
Initially the script takes no arguments, scans its own directory and searches all AVI files encoded with H.264, but it is up to you which file extension the script will search. To make a choice just replace all *.avi strings in the source code by your own extension.
Since the pixels of an animal contour is embedded to the floor and the floor contour is embedded to the box walls (animal ⊂ floor ⊂ walls), the floor have to be as contrast to its neighbors in this triplet as possible for better distinction between all of them. For example: white walls, black floor, and white animal or vice versa is the best case.

Because it's hard to fit the floor of the box within camera frame in the laboratory, the script makes some preprocessing. The script takes a certain part of each frame of the videos. It takes a right square frame[:, w-h:w] of a frame with sides equal to height h of a frame.

That's why the box with an animal have to be placed in the right area of camera field of view.
(You are free to change this behavior replacing frame[:, w-h:w] (right square) by frame[:, 0:w-h] (left square), or just flip horizontally your video if you want to leave the script untouched.)
If requirements are complied then after starting the script you will get a 1st frame of video to be proccesed

The right is the ordinary frame with the floor highlighted by the red quad. This highlighted area is stretched by homographic transform up to the square area on the left.
If you're satisfied the look of the floor you can press any key except ESC or click right mouse button to continue. Else you are free to determine the right way of highlighting the area of the floor. To do that click left button on each corner of the floor strarting with any one.


Immediately after click on the 4th corner the processing will start.


