To use this project make sure you have Docker installed then run the following command on your terminal:
docker-compose upAnd go to http://localhost:8080
Congratulations! You have run your first Docker container! Although you can manage it very easily if you are using Docker Desktop, let's look at a couple of the most common commands to manage it on the command line:
docker image ls

# OR

docker container ls
Will show you a list of all the images or containers you have on your system at the moment. Because hello-world stops as soon as it's finished printing the test message, it does not keep running forever like a container running a web app would. You won't see it in your list of containers, but you will see it in your list of images.
Both the ID of the image/container and the name are important to be able to lookup because they allow you to refer to those images/containers to start/stop them.
When you stop running a container it doesn't get deleted. That is a good thing! It means it's super fast to just start it up again the next time you need it without downloading and installing it again.
While working with Docker you'll find that sometimes these images and containers begin to pile up when you change things or build new versions. To quickly remove all old/unused ones you can run:
docker image prune

# OR

docker container prune
If these don't seem too helpful now, don't worry, but keep them in mind because you will likely want to refer back to them later.
Before we get any further into Docker, let's build a small web app we can use to help demonstrate some of the more advanced features of Docker. We're going to build a simple web server in Node.js and Express:
I've created a new empty directory called docker-template and initialized an NPM repo inside of it.
mkdir docker-template
cd docker-template
npm init
npm install express
server.js
const express = require("express");
const app = express();
const port = 8080;

app.get("/", async (req, res) => {
  res.setHeader("Content-Type", "text/html");
  res.status(200);
  res.send("<h1>Hello world</h1>");
});

app.listen(port, () => {
  console.log(`Example app listening at http://localhost:${port}`);
});
Now run your app with:
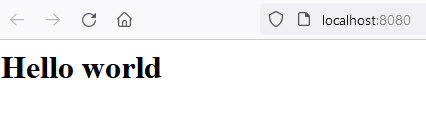
node server.jsAnd go to http://localhost:8080 to see:
One extra thing we would like to enable for this project is file watching and automatic reloading of the server whenever the file is changed.
The easiest way to do that is a tool called nodemon.
npm install nodemon --save-devThen add a start script to your package.json file:
package.json
{
  "name": "server",
  "version": "1.0.0",
  "description": "",
  "main": "server.js",
  "scripts": {
    "start": "nodemon server.js"
  },
  "author": "me",
  "license": "ISC",
  "dependencies": {
    "express": "^4.17.2",
  },
  "devDependencies": {
    "nodemon": "^2.0.15"
  }
}
Run your app with:
npm run startTry editing your server.js file when your app is running (change "hello world" to "hello world!!!!" or something) and verify that your Node app reloads and you see the change in your browser when you hit the refresh button (the file watching won't trigger a browser refresh automatically).
Once that is working continue to the next step!
This next part is kinda fun. Let's intentionally turn this server into a legacy project.
We'll be assuming you are running a recent version of Node (15 or later). You can check by running:
node --versionMy output is v16.11.1. If yours is older than 15 you can either use NVM or just read along. Installing a specific Node version of your machine is not required for this part. In fact it's exactly the problem we're going to solve with Docker in the next section.
In Node 15 there is a breaking change in the way that unhandled rejected promises are handled. Before version 15 a Javascript promise that was rejected without a catch would give a warning and keep running, but after v15 of Node an unhandled promise will crash the program.
So it's possible for use to add some code that will make our server work on versions of Node older than 15, but not work on new versions of Node.
Let's do that now:
server.js
// @ts-check

const express = require("express");
const app = express();
const port = 8080;

app.get("/", async (req, res) => {
  res.setHeader("Content-Type", "text/html");
  res.status(200);
  res.send("<h1>Hello world</h1>");
});

app.listen(port, () => {
  console.log(`Example app listening at http://localhost:${port}`);
});

const myPromise = new Promise((resolve, reject) => {
  setTimeout(() => {
    resolve("good");
  }, 300);
  reject("bad");
});

myPromise.then(() => {
  console.log("this will never run");
});
The code above creates a new promise that always rejects. It will run (with a warning) on Node.js v14, but will crash on v15 and above. Try running it yourself on v15 and above and you get code: 'ERR_UNHANDLED_REJECTION'.
Now obviously we could just... add a catch block (or remove the code entirely), but we are trying to replicate a scenario where you are working with an older codebase and you may not necessarily have those options available to you.
Let's say for one reason or another this app must be run on Node v14 or earlier to work. Every developer on the team must be prepared to operate in that environment... but our company also has a new app that runs on Node v17! So we need that environment available too.
And while we're at it, some other tool on version X! I only have version Y on my machine! Who knows what version the other members of my team are running. Or the guy I send the app to for testing.
What do I do!?
Enter Docker.
With Docker we can use code to generate the environment that our app runs in. We'll begin by searching Docker hub for a Node.js image. The official Node image is just called node.
You'll notice when you look at supported tags there are a lot of versions. Just like having a certain version on your machine, there's Docker images for pretty much every version you could want. Of course Node itself needs to be installed on some kind of operating system so that's usually the other part of the tag.
The default Node image runs on Debian, however one of the most popular versions runs on something called Alpine Linux.
The main reason Alpine is popular is because of its small size, it's a distro of Linux designed to strip out all but the most necessary parts. This means it will be faster and more cost effective to run and distribute our app on this image (assuming it meets our needs).
For our simple app, it does.
Remember we specifically want an older version of Node (older than v15 so our app runs without crashing) so I am going to choose the image tagged node:14-alpine3.12. That's Node v14 and Alpine v3.12.
We can pull the image in advance with docker pull node:14-alpine3.12 just like we did with hello-world, but it's not necessary. By adding it to our Dockerfile Docker will automatically pull it from Docker Hub if it doesn't find it on our machine.
Let's create a file called Dockerfile (no extension) in the root of our project next to server.js:
Dockerfile
# select your base image to start with
FROM node:14-alpine3.12

# Create app directory
# this is the location where you will be inside the container
WORKDIR /usr/src/app

# Install app dependencies
# A wildcard is used to ensure both package.json AND package-lock.json are copied
# where available (npm@5+)
# copying packages first helps take advantage of docker layers
COPY package*.json ./

RUN npm install
# If you are building your code for production
# RUN npm ci --only=production

# Bundle app source
COPY . .

# Make this port accessible from outside the container
# Necessary for your browser to send HTTP requests to your Node app
EXPOSE 8080

# Command to run when the container is ready
# Separate arguments as separate values in the array
CMD [ "npm", "run", "start"]
I've added a lot of comments to help explain each piece of the Dockerfile. You can learn more about Dockerfiles here, I would highly encourage you to skim through that page to get familiar with the commands that are available.
Before we continue I would like to touch briefly on Docker's layers & cache because they are very important topics!
One common question for a simple Dockerfile like this is:
"Why are you using the COPY command twice? Isn't the first COPY unnecessary since the second one copies the whole directory?"
The answer is actually "no" and the reason is because of one of Docker's best features called layers.
Every time you use one of FROM, COPY, RUN, CMD it creates another image which is based off the previous layer. That image can be cached and only needs to be created again if something changes.
So by creating a specific COPY line on package-*.json we are creating a layer that is based off the content of that file before we run npm install. That means that unless we change package.json, the next time we build Docker will use the cache layer where npm install has already been run and we don't have to install all dependencies every time we run docker build. That will save us an enormous amount of time.
The next COPY looks at every file in our project directory, so that layer will be rebuilt on any file change (basically any time we update anything OTHER than package.json in our app). But that's exactly what we want.
This is just one example of efficiencies you can take advantage of when working with Docker, but I would encourage you to read the whole list of best practices for Dockerfiles.
Now that your Dockerfile is created we have just one last thing we need to do before we build.
Similar to .gitignore that you're probably familiar with (used to prevent committing auto-generated files and private secrets to public repositories), Docker has a similar concept to keep you from unnecessarily copying files that your container doesn't need.
Let's create a .dockerignore file now:
.dockerignore
node_modules
npm-debug.log
Both of those will be generated inside the container, so we don't want to copy our local versions of them over.
At this point we are ready to build. Run the following command:
docker build . -t my-node-appThat will build the image describe by the Dockerfile in the current directory . and give it a name called my-node-app. When it's done you can see the image and all its details with:
docker image lsWith the image created, we are now ready to build a container off our image which will run our app:
docker run -p 3000:8080 --name my-node-app-container my-node-appThis command tells Docker to use our image to build a running container. The --name flag lets us name the container (to make it easier to identify and stop/start later, otherwise the name will be randomly generated).
I used the name my-node-app-container to differentiate it from the last argument which is the name of the image we are building from (my-node-app).
We use the -p flag to bind ports from our host machine (our computer) environment to the container environment.
If you recall we wrote EXPOSE 8080 in our Dockerfile which is the port our app runs on. The above command maps port 3000 on our machine to port 8080 in the container.
(Note you can map the same port like 8080:8080 if you like, we just mixed it up in this example to show that it's possible)
Double check that your container started successfully with:
docker container lsMy output looks like:
CONTAINER ID   IMAGE         COMMAND                  CREATED         STATUS         PORTS                    NAMES
b6523b2602e1   my-node-app   "docker-entrypoint.s…"   6 minutes ago   Up 6 minutes   0.0.0.0:3000->8080/tcp   my-node-app-container
(Sorry if the words wrap and it make it difficult to line things up)
We can see that the container is up for X minutes. That means that our app is running on port 8080, we can access that port on our machine using port 3000 so open up your browser to http://localhost:3000/ to see:

Great! You've created your first custom Docker image and container with your own app running in it!
So now that you have your environment setup, naturally one of the next things you might want to do is update your app. If you make a change to server.js and save the file, are you going to see those changes when you reload the page?
No you won't. The app is running based on a copy of server.js inside the container which has no direct relation to the one in your project directory. Is there a way that we can "connect" them somehow?
Of course there is, we need to introduce Docker volumes.
Docker uses the concept of volumes to allow you to persist data between running containers.
You can imagine you might want to have your app save some data, but with the way Docker works your containers are designed to be destroyed and recreated casually.
There are two primary ways to use volumes. You can create one in advance and give it a name. This will save all the volume data by default in the /var/lib/docker/volumes directory (in a Linux environment, it would be somewhere different but equivalent on Windows).
To create a named volume (you don't need to run this command for this tutorial, it's simply an example):
docker volume create my-named-volumeThen you would map any directory in your container to that directory on your machine. You can do so by adding the --volume flag to your docker run command like so: --volume my-named-volume:/usr/src/app my-node-app.
That example would map the working directory in your container to the Docker volume on your machine. This does not help us however because we want to synchronize a specific directory (our project directory) with the one in the container so we can edit files in our project and have them update in the container.
We can do this as well.
First we need to stop the existing container (which doesn't have a volume), remove it, and then run it again with the volume:
docker container stop my-node-app-container

docker container rm my-node-app-container

docker run -p 3000:8080 --name my-node-app-container --volume  ${PWD}:/usr/src/app my-node-app
In most terminals PWD means "print working directory" so it will map the current directory to the /usr/src/app directory inside your container. This will accomplish our goal of syncing the files between our project on our computer and the one in our container.
Since we have already set up file watching and reloading with nodemon earlier in the tutorial, you should now be able to edit server.js in your project directory while the container is running (just edit the hello world text), then refresh your browser to see the changes.
And that's it! You now have a Dockerized Node app where you can make changes on your machine and see the updates happen live inside your container.
At this point we have mostly completed our introduction to Docker itself. We have completed our implementation of our first "scenario" where we use coded instructions to recreate the environment that our app requires in order to operate.
We now need to address our second common scenario: in order to function our application relies on other services, like a database for example. We could technically add the instruction to install the database in our Dockerfile, but that would not realistically mimic the environment our app would be deployed in.
It's not guaranteed that our Node app and our database would be hosted on the same server. In fact it's probably not even likely. Not only that, we don't want to have to boot up our web server to make edits to our database, and vice-versa. Is there a way that we can still use Docker, but create a separation between multiple services that rely on each other?
Yes we can.
Best described in their own words:
Compose is a tool for defining and running multi-container Docker applications. With Compose, you use a YAML file to configure your application’s services. Then, with a single command, you create and start all the services from your configuration.
The process is to define the instructions for each of your services with Dockerfiles, and then use Docker Compose to run all those containers together and facilitate network communications between them.
In this tutorial we are going to connect our Node app to a PostgreSQL database. Before we can connect them of course we need to establish the database container.
Similar to Node, Docker Hub has a super simple easy to use image for PostgreSQL. Of course theres also images for MySQL, Mongo, Redis, etc, etc. There's no reason you couldn't substitute your favourite out if you want (though if you're still new to Docker I'd suggest you stick with the tutorial for now).
We search Docker Hub for the official postgres image. We don't need anything beyond the bare minimum so once again we'll choose the version running on Alpine. Image postgres:14.1-alpine.
Unlike our Node image, we don't need to copy any files or run any installation scripts, so we don't actually need a Dockerfile for our PostgreSQL installation. There are some configurations that we do need (like password and ports for example) but we can manage those with our upcoming docker-compose.yml file.
So aside from deciding which image you are going to use, there is really nothing else we need to do before we create our config file.
Before we create the Docker Compose configure file to link the database container, we need to update our app to actually use it.
Our goal here is going to be to create a database with some very simple data (like a list of employees), see it with some sample data, and then query that data with our Node app.
We'll also create a simple frontend to display that data.
First we need to install the PostgreSQL NPM package:
npm install pgNext we are going to create a .sql file that will automatically seed out database with some sample data to read from. In the root of the project create the following file:
database-seed.sql
CREATE TABLE employees
(
    id SERIAL,
    name text,
    title text,
    CONSTRAINT employees_pkey PRIMARY KEY (id)
);

INSERT INTO employees(name, title) VALUES
 ('Meadow Crystalfreak ', 'Head of Operations'),
 ('Buddy-Ray Perceptor', 'DevRel'),
 ('Prince Flitterbell', 'Marketing Guru');
(Note I got those ridiculous names from the random name generator on the "whimsical" setting)
Next we update our Node server to query these values. In addition to doing that, we are going to use express.static to serve up an entire directory rather than just sending HTML as sa string. This will allow us to serve an HTML file along with some CSS and Javascript as well, to create a full-fledged frontend.
Comments are added to explain all the new pieces:
server.js
// Import the postgres client
const { Client } = require("pg");
const express = require("express");
const app = express();
const port = 8080;

// Connect to our postgres database
// These values like `root` and `postgres` will be
// defined in our `docker-compose-yml` file
const client = new Client({
  password: "root",
  user: "root",
  host: "postgres",
});


// Serves a folder called `public` that we will create
app.use(express.static("public"));

// When a GET request is made to /employees
// Our app will return an array with a list of all
// employees including name and title
// this data is defined in our `database-seed.sql` file
app.get("/employees", async (req, res) => {
  const results = await client
    .query("SELECT * FROM employees")
    .then((payload) => {
      return payload.rows;
    })
    .catch(() => {
      throw new Error("Query failed");
    });
  res.setHeader("Content-Type", "application/json");
  res.status(200);
  res.send(JSON.stringify(results));
});

// Our app must connect to the database before it starts, so
// we wrap this in an IIFE (Google it) so that we can wait
// asynchronously for the database connection to establish before listening
(async () => {
  await client.connect();

  app.listen(port, () => {
    console.log(`Example app listening at http://localhost:${port}`);
  });
})();

const myPromise = new Promise((resolve, reject) => {
  setTimeout(() => {
    resolve("foo");
  }, 300);
  reject("oops");
});

myPromise.then(() => {
  console.log("hello");
});
In the above code update you can see that we are serving up a directory called public that we have not created yet. That directory will contain an index.html file to act as the nice looking frontend for our app.
We'll begin by creating the public directory that is being served from our Node app:
mkdir publicThen add the following files:
public/index.html
<!DOCTYPE html>
<html lang="en">
  <head>
    <meta charset="UTF-8" />
    <meta name="viewport" content="width=device-width, initial-scale=1.0" />
    <title>My Docker Template</title>
    <script src="script.js"></script>
    <link rel="stylesheet" href="styles.css" />
  </head>
  <body>
    <template>
      <div class="card">
        <img src="https://res.cloudinary.com/dqse2txyi/image/upload/v1639943067/blogs/docker-node/profile-picture_eav2ff.png" alt="Avatar" width="240px" />
        <div class="container">
          <h4>Placeholder</h4>
          <p>Placeholder</p>
        </div>
      </div>
    </template>
  </body>
</html>
Our index.html file takes advantage of HTML templates for the employee cards.
public/styles.css
body {
  padding: 12px;
  display: flex;
  flex-direction: row;
  column-gap: 24px;
}

.card {
  box-shadow: 0 4px 8px 0 rgba(0, 0, 0, 0.2);
  transition: 0.3s;
  border-radius: 5px;
  transition: 0.3s;
}

.card:hover {
  transform: scale(1.03);
}

.container {
  padding: 0 12px;
}

img {
  border-radius: 5px 5px 0 0;
}
Above in styles.css is some simple CSS to give a clean look to the employee card templates, and flex them out in a row across the page.
public/script.js
fetch("/employees")
  .then((response) => response.json())
  .then((data) => {
    data.forEach((employee) => {
      // Select the <template> we created in index.html
      const cardTemplate = document.querySelector('template');

      // Clone a copy of the template we can insert in the DOM as a real visible node
      const card = cardTemplate.content.cloneNode(true);

      // Update the content of the cloned template with the employee data we queried from the backend
      card.querySelector('h4').innerText = employee.name;
      card.querySelector('p').innerText = employee.title;

      // Append the card as a child with the employee data to the <body> element on our page
      document.body.appendChild(card);
    });
  });
When our app is loaded it will load script.js which will use the browser fetch API to query the /employees route on our Node server and get the employee information from out PostgreSQL database.
Once it is returned it will iterate through each employee and clone the HTML template that we defined in index.html to make a custom employee card with that employee's name and title.
Phew! Now that we have our app established and ready to read from the database, we are finally ready to connect our Node container and our PostgreSQL container together with Docker Compose.
For a brief intro to compose see here, and for more details than you can ever handle about the compose file spec see here.
We're going to be creating a simple docker-compose.yml file to link our Node app with our PostgreSQL database. Let's jump right in and create the file in our project root directory. I'll use lots of comments to explain everything:
docker-compose.yml
version: '3.8'
services:
  # These are the configurations for our Node app
  # When Docker Compose starts this container it will automatically
  # use the Dockerfile in the directory to configure it
  app:
    build: .
    depends_on:
      # Our app does not work without our database
      # so this ensures our database is loaded first
      - postgres
    ports:
      - "8080:8080"
    volumes:
      # Maps our current project directory `.` to
      # our working directory in the container
      - ./:/usr/src/app/
      # node_modules workaround for volumes
      # https://stackoverflow.com/a/32785014
      - /usr/src/app/node_modules

  # This is the configuration for our PostgreSQL database container
  # Note the `postgres` name is important, in out Node app when we refer
  # to  `host: "postgres"` that value is mapped on the network to the
  # address of this container.
  postgres:
    image: postgres:14.1-alpine
    restart: always
    environment:
      # You can set the value of environment variables
      # in your docker-compose.yml file
      # Our Node app will use these to connect
      # to the database
      - POSTGRES_USER=root
      - POSTGRES_PASSWORD=root
      - POSTGRES_DB=root
    ports:
      # Standard port for PostgreSQL databases
      - "5432:5432"
    volumes:
      # When the PostgreSQL container is started it will run any scripts
      # provided in the `docker-entrypoint-initdb.d` directory, this connects
      # our seed file to that directory so that it gets run
      - ./database-seed.sql:/docker-entrypoint-initdb.d/database-seed.sql
So with that docker-compose.yml file in place we are finally ready to run our new and highly improved application "suite" that includes a backend, frontend and database.
From the root directory of the project, all your have to do is type:
docker-compose up --build(Note the --build flag is used to force Docker to rebuild the images when you run docker-compose up to make sure you capture any new changes. If you simply want to restart existing containers that haven't changed you can omit it)
Once active you can finally test it out. In our docker-compose.yml config we are mapping post 8080 directly to 8080 so go to http://localhost:8080 to see:

With a cute little hover transition and everything! Congratulations!
If you are using the Docker Desktop GUI application you'll have a lot of options to stop all the containers at once, or view each one individually. If you are using the command line you can stop both containers with this simple command (run from the project root directory for context):
docker-compose downAnd there you have it, a fullstack Node.js application with its own SQL database bundled along with it. You can now deploy this literally anywhere that has Docker installed and you know that it will work because you have defined all the parameters of the exact environment it needs to function.
Here's a quick little bonus for those of you who are using PostgreSQL. Adding the pgAdmin panel container to this app setup is a breeze. Simply update your docker-compose.yml config to include the following:
docker-compose.yml
version: '3.8'
services:
    app:
        build: .
        depends_on:
            # Our app does not work without our database
            # so this ensures our database is loaded first
            - postgres
        ports:
            - "8080:8080"
        volumes:
            # Maps our current project directory `.` to
            # our working directory in the container
            - ./:/usr/src/app/

    # This is the configuration for our PostgreSQL database container
    # Note the `postgres` name is important, in out Node app when we refer
    # to  `host: "postgres"` that value is mapped on the network to the
    # address of this container.
    postgres:
        image: postgres:14.1-alpine
        restart: always
        environment:
            # You can set the value of environment variables
            # in your docker-compose.yml file
            # Our Node app will use these to connect
            # to the database
            - POSTGRES_USER=root
            - POSTGRES_PASSWORD=root
            - POSTGRES_DB=root
        ports:
            # Standard port for PostgreSQL databases
            - "5432:5432"
        volumes:
            # When the PostgresSQL container is started it will run any scripts
            # provided in the `docker-entrypoint-initdb.d` directory, this connects
            # our seed file to that directory so that it gets run
            - ./database-seed.sql:/docker-entrypoint-initdb.d/database-seed.sql

    pgadmin-compose:
        image: dpage/pgadmin4
        environment:
            PGADMIN_DEFAULT_EMAIL: "[email protected]"
            PGADMIN_DEFAULT_PASSWORD: "fakepassword123!"
        ports:
            - "16543:80"
        depends_on:
            - postgres
Notice the pgAdmin panel configuration added at the bottom.
When you run docker-compose up --build now and go to:
You'll be greeted with the pgAdmin panel. Enter the PGADMIN_DEFAULT_EMAIL and PGADMIN_DEFAULT_PASSWORD credentials from the docker-compose.yml file to access it.
Once inside click Add New Server.
For General -> Name pick a name. Can be whatever you want.
On the Connection tab values must match the docker-compose.yml file:
- Host:
postgres - Username:
root - Password:
root
Now you can navigate from the left bar:
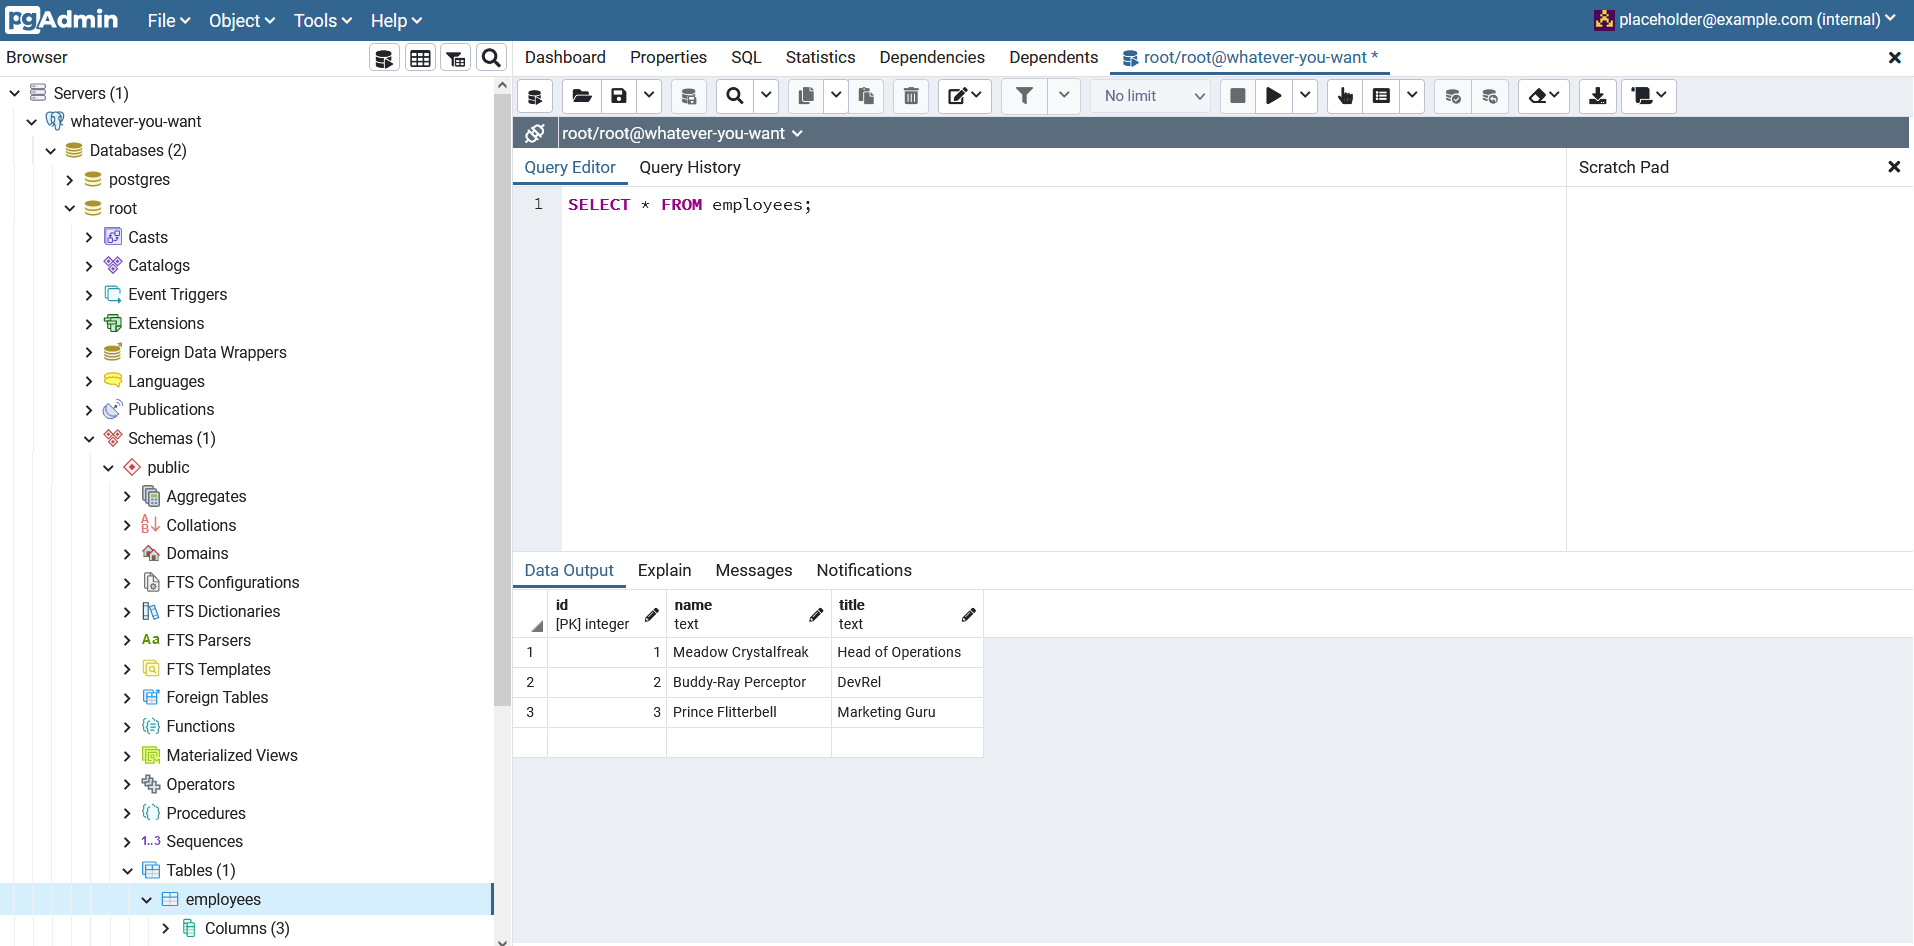
Servers -> whatever-you-want -> Databases -> root -> Schemas -> public -> Tables -> employees
Right click employees an Query Tool:
SELECT * FROM employees;To see your data.
List all containers, images, volumes or networks, for example docker image ls.
docker {container}/{image}/{volume}/{network} lsRemove a container, image, volume or network where ID is the id of the container/image/volume or network.
docker {container}/{image}/{volume}/{network} rm IDStart a container in the background (as a daemon):
docker run -d IMAGE_IDView logs of a container:
docker container logs CONTAINER_IDView information about a container:
docker container inspect CONTAINER_IDOpen a shell inside an active container so you can run terminal commands inside of it.
docker exec -it CONTAINER_ID /bin/shStop a container:
docker container stop CONTAINER_IDRemove all dangling/unused Docker data (cached layers, volumes no longer used, etc):
docker system pruneYou can also use the above command with a specific type, like docker container prune.
