GithubHelp home page GithubHelp logo

clean-blog's Introduction

Hi there 👋

I'm KohHom(许峰)⛰️,

  • 🔭 I’m currently working at TikTok
  • 🌱 I’m currently learning sicpjs
  • 💬 Ask me about anything
  • 📫 How to reach me: [email protected](Open for any remote/overseas opportunities(especially open source))
  • ⚡ Fun fact: I eat OMAD(One Meal a Day) as a VEGAN🥬 No more because I want to gain weight lol

Top Langs

clean-blog's People

Contributors

clean99 avatar

Stargazers

 avatar

Watchers

 avatar  avatar

clean-blog's Issues

How I Use ChatGPT in My Daily Work&Study?

1. Background

ChatGPT has garnered significant attention since its release and has become a popular tool for many professionals. While it's been widely discussed, it's important to explore how ChatGPT can benefit us in our day-to-day work. In this article, I will be sharing some of the practical applications of ChatGPT that I have found to be particularly useful.

2. Ways to Use It

2.1 Coding

2.1.2 Generate Code

ChatGPT can generate code for you. With the help of modularity technique, you can generate a large system with ChatGPT very quickly. Refer to my previous post: Use Modular Design with ChatGPT to Generate Code #13

2.1.2 Explain Code

It can explain your code super clearly. One tip is that you should provide the context as much as possible or the bot will guess what a function is for according to the function name and parameter, which may lead to low accuracy.
Here is a random code snippet I picked from my textbook.

chatgpt

2.1.3 Write Test Cases / Storybook(and Much More Things) for Me

I have to say chatGPT is an expert at testing and storybooks use case writing, I rarely need to change what it gives me. Let's look at an example:

2.1.3.1 Unit testing

chatgpt

import { render, screen } from '@testing-library/react';
import MessageBubble from './MessageBubble';

describe('<MessageBubble />', () => {
  const text = 'Hello, world!';
  const direction = 'left';
  const imgUrl = 'https://via.placeholder.com/50';
  const username = 'Alice';

  it('should render the message text, avatar, and username', () => {
    render(
      <MessageBubble
        text={text}
        direction={direction}
        imgUrl={imgUrl}
        username={username}
      />
    );

    const messageText = screen.getByText(text);
    const avatarImg = screen.getByAltText(`${username}'s avatar`);
    const usernameText = screen.getByText(username);

    expect(messageText).toBeInTheDocument();
    expect(avatarImg).toHaveAttribute('src', imgUrl);
    expect(usernameText).toBeInTheDocument();
  });

  it('should display the message bubble in the correct direction', () => {
    render(
      <MessageBubble
        text={text}
        direction={direction}
        imgUrl={imgUrl}
        username={username}
      />
    );

    const messageBubble = screen.getByTestId('message-bubble');

    if (direction === 'left') {
      expect(messageBubble).toHaveClass('left');
    } else if (direction === 'right') {
      expect(messageBubble).toHaveClass('right');
    }
  });
});

2.1.3.2 Storybook

chatgpt

import React from 'react';
import { Story, Meta } from '@storybook/react';
import MessageBubble, { MessageBubbleProps } from './MessageBubble';

export default {
  title: 'MessageBubble',
  component: MessageBubble,
} as Meta;

const Template: Story<MessageBubbleProps> = (args) => <MessageBubble {...args} />;

export const LeftBubble = Template.bind({});
LeftBubble.args = {
  text: 'Hello, world!',
  direction: 'left',
  imgUrl: 'https://via.placeholder.com/50',
  username: 'Alice',
};

export const RightBubble = Template.bind({});
RightBubble.args = {
  text: 'Hi there!',
  direction: 'right',
  imgUrl: 'https://via.placeholder.com/50',
  username: 'Bob',
};

2.2 Documentation

ChatGPT also good at handling documentation. Here are some use cases:

2.2.1 Document optimization

  • Paragraph before optimization:

Backgroud: ChatGPT has become famous after publishing. Everyone is using chatGPT, everyone is talking about chatGPT. But how does it help us in our daily work? Today I want to share some of the use cases of chatGPT I found very useful.

  • Paragraph after optimization:

Backgroud: ChatGPT has garnered significant attention since its release and has become a popular tool for many professionals. While it's been widely discussed, it's important to explore how ChatGPT can benefit us in our day-to-day work. In this article, I will be sharing some of the practical applications of ChatGPT that I have found to be particularly useful.

2.2.2 Extend Your Ideas

Give chatGPT this text:

Profit model:

  1. Membership: charging members monthly to get profit.
  2. Ads: use google ads to make a profit.
  3. Donation: add a "buy me a coffce page" for people to donate.
    Help me to extend the profit model.
    After extension:
  4. Premium Features: Offer advanced or exclusive features that can only be accessed through a paid subscription or one-time payment. This can include more in-depth analysis, personalized recommendations, or access to a larger database of information.
  5. Affiliate Marketing: Partner with other companies and earn commission on products or services sold through referral links. This can be a great way to earn additional revenue while also promoting products that align with your audience's interests.
    .....

2.2.3 Summary

Tell chatGPT to summarize the above paragraph:
The paragraph discusses different ways to monetize a platform or niche. Premium features can be offered for a fee, affiliate marketing involves earning commission on products or services sold through referral links, sponsorship involves partnering with relevant brands to create paid content, consulting allows the offering of expert advice for a fee, e-commerce involves selling products related to the platform or niche, and licensing allows for the monetization of content or data by other organizations.
Feel free to summarize longer text, like a book.

2.3 Design

2.3.1 What should I use?(Dependency Selection)

Show chatGPT about your requirements. ChatGPT will help you to find tools.
I gonna create a social network app, the load is on query user's relationship, and I want the database design to be more simple, what database should I use?
Here is the answer:
If you're looking for a simpler database design and your main focus is on querying user relationships, a graph database may be a good fit for your social network app.
Graph databases like Neo4j or Amazon Neptune are designed specifically for handling complex relationships between data points, making them a good fit for social network apps where users are connected through various relationships. In a graph database, relationships are first-class citizens and the data model is centered around nodes (representing entities) and edges (representing relationships between nodes). This can make querying and analyzing relationships more intuitive and efficient.
In addition, graph databases are optimized for traversing relationships, which can make them faster for certain types of queries than traditional relational databases. They are also designed to scale horizontally, so they can handle large amounts of data and traffic.
Overall, a graph database could be a good choice if your focus is on user relationships and you want a simpler data model. However, it's important to carefully evaluate your specific requirements and consult with a database expert or development team to determine the best option for your app.

2.4 Learning

2.4.1 Plan My Study(Roadmap Generation)

Q:

I want to become a frontend developer, what topics should I learn?

A:

If you want to become a frontend developer, you should start by learning the following topics:

  1. HTML: Hypertext Markup Language is the foundation of every website, and it is used to structure and organize content.
  2. CSS: Cascading Style Sheets is used to style and design websites, making them visually appealing and responsive.
  3. JavaScript: A programming language that is used to add interactivity, dynamic behavior, and functionality to websites.
  4. User Experience (UX): UX design is about creating an intuitive and easy-to-use website that provides a positive experience for the user.
    .....

2.4.2 Suggest Free Resources for Learning something

Q:

I want to learn reactjs as a beginner, what free resources do you recommend me to study?

A:

There are many free resources available for learning ReactJS as a beginner. Here are some of the best free resources that I would recommend:

  1. Official ReactJS Documentation: The official ReactJS website provides extensive documentation and tutorials that cover everything from the basics to advanced topics.
  2. ReactJS Tutorial by Codecademy: Codecademy offers a free interactive tutorial that covers the basics of ReactJS and helps you build your first React app.
  3. ReactJS Crash Course by Traversy Media: This free YouTube video tutorial is a great introduction to ReactJS and covers the basics of creating components and handling state.
  4. ReactJS Fundamentals by Egghead: Egghead is a platform that offers free and paid courses on various programming topics, including ReactJS. The ReactJS Fundamentals course is a great resource for beginners, covering topics like JSX, props, and state.
    ......

2.4.3 Am I Getting It Right?

One of the biggest pains for self-learning is there isn't a teacher to tell you if you are learning, understanding in the right way. ChatGPT can serve as a teacher to tell you if you are doing right.

2.4.3.1 Mock exam

Q:

mock an exam for reactjs, 10 questions

A:

Sure, here's a mock exam with 10 questions to test your knowledge of ReactJS:

  1. What is JSX, and how does it differ from regular JavaScript syntax?
  2. What is a component in ReactJS, and how do you define and use components?
  3. What is the purpose of the "props" object in React, and how do you pass data from a parent component to a child component?
  4. What is the difference between state and props in React, and when would you use one over the other?
  5. What is the virtual DOM in React, and how does it improve performance in web applications?
    ......

2.4.3.2 Mock Interview

Me:

Could you mock a tiktok 2-1 frontend tech interview for me?

ChatGPT:

Sure, I can conduct a mock interview for a TikTok 2-1 frontend tech position. Here's the first question:
Question: What is your experience with React.js, and how have you used it in previous projects?

Me:

I have 3 years of experience with ReactJS, I used it in my side project and work.

ChatGPT:

Great! Can you tell me about a specific feature you implemented using React.js in one of your previous projects? What challenges did you face while implementing it and how did you overcome them?
......

3. Summary

ChatGPT can help us to write code, explain code, write test cases and documentation and even serve as a teacher through mock exams and interviews. It can do much more in the future since it is become stronger everyday. The key to using ChatGPT effectively is to break down big problems into smaller ones and provide clear context for the AI model. Overall, ChatGPT can be a powerful tool for optimizing workflows and improving productivity. I would like to see more use cases about it.

The Software Engineering Concept behind Tailwind CSS(Compared with StyleX)

Background

This article will show you how TailwindCSS can really increase our productivity and project maintainability by better organizing our code in certain scenarios.

Performance Effect

How TailwindCSS will affect our website's performance?

This is a crucial question for most developers, but it is not the main topic that we will discuss in this article. For more information, check out Controlling File Size - Tailwind CSS official doc. The basic takeaway from this doc is that introducing TailwindCSS is very hard to end up with more than 10kb of compressed CSS.

The Design of CSS

The design of CSS is affected by the design of HTML. CSS was born when HTML first came up, and was used for more than 20 years until now. As we know, before libraries/frameworks like React/Vue came up, websites were separated into HTML, CSS, and JavaScript. There isn't modularity for website pages. Each website page is written in a single HTML/CSS/JavaScript file.
In order to provide a means of abstraction for reusing styles, CSS provides a class to help developers combine styles and reuse them in different places.

// Without CSS Class feature
<p style="color: red; font-weight: bold;">This is a highlighted paragraph.</p>
<p style="color: red; font-weight: bold;">Another highlighted paragraph.</p>

// Class provide means of abstraction
// HTML
<p class="highlight">This is a highlighted paragraph.</p>
<p class="highlight">Another highlighted paragraph.</p>
// CSS
.highlight {
    color: red;
    font-weight: bold;
}

React Brought Modularity and Makes CSS Class Redundant

React started using modularity concepts in websites, which treat websites as a combination of pages, and pages are a combination of components. Each component has its own HTML structure(JSX), style(CSS), and logic(JS) for reusing as a module.

The previous example in React is like:

const HighlightP = ({ children }) => (<p class="highlight">{children}</p>)
// CSS
.highlight {
    color: red;
    font-weight: bold;
}
// App
<HighlightP>This is a highlighted paragraph.</HighlightP>
<HighlightP>Another highlighted paragraph.</HighlightP>

We soon find that the class that is provided by CSS is unnecessary because React already does modularity including style:

const HighlightP = ({ children }) => (<p style={{ color: 'red', fontWeight: 'bold' }}>{children}</p>)

// App
<HighlightP>This is a highlighted paragraph.</HighlightP>
<HighlightP>Another highlighted paragraph.</HighlightP>

By doing this, we reduce the map from CSS class to react component. This is the basic concept of TailwindCSS.

You might wonder what's wrong with CSS class? We let compare them a bit more:

  1. Naming is hard. By writing CSS class, you must invent a name for each node that you wanna add style. This is wasting energy.
  2. Code for the same components is everywhere. If you write CSS class, you put component code in two places, the readability and maintainability reduced. E.g. When you delete the code, you might forget to delete the corresponding CSS class.
  3. Safe from Bugs. CSS is global and you might accidentally overwrite certain styles when you make changes.

Use TailwindCSS to Replace Inline Style

TailwindCSS provides better functionality than inline style:

  1. Designing with constraints. Using inline styles, every value is a magic number. With utilities, you’re choosing styles from a predefined design system, which makes it much easier to build visually consistent UIs.
/** @type {import('tailwindcss').Config} */
module.exports = {
  theme: {
    screens: {
      sm: '480px',
      md: '768px',
      lg: '976px',
      xl: '1440px',
    },
    colors: {
      'blue': '#1fb6ff',
      'purple': '#7e5bef',
      'pink': '#ff49db',
    // ...
}
  1. Responsive design. You can’t use media queries in inline styles, but you can use Tailwind’s responsive utilities to build fully responsive interfaces easily.
<!-- Width of 16 by default, 32 on medium screens, and 48 on large screens -->
<img class="w-16 md:w-32 lg:w-48" src="...">

// CSS
@media (min-width: 640px) { ... }
5. Hover, focus, and other states.  Inline styles can’t target states like hover or focus, but Tailwind’s [state variants](https://tailwindcss.com/docs/hover-focus-and-other-states) make it easy to style those states with utility classes.
<button class="bg-sky-500 hover:bg-sky-700 ...">
  Save changes
</button>

// CSS
.btn-primary {
  background-color: #0ea5e9;
}
.btn-primary:hover {
  background-color: #0369a1;
}

A Brief Introduction to StyleX

Meta open-sourced a new CSS framework recently StyleX. It provides a different way of organizing CSS code than TailwindCSS.

I did some investigation and I'd like to share the fundamental ideas of StyleX here.

OOCSS(Object-Oriented CSS) Conventions

StyleX thinks that Utility Classes make HTML markup poor readability. So they still use traditional OOCSS as a way to organize code.

import * as stylex from '@stylexjs/stylex';

const styles = stylex.create({
  foo: {
    color: 'red',
  },
  bar: {
    backgroundColor: 'blue',
  },
});

function MyComponent({style}) {
  return <div {...stylex.props(styles.foo, styles.bar, style)} />;
}

While it managed to solve some issues of OOCSS Architecture by using CSS-in-JS, TypeScript, and Compiling:

  1. Modularity: Traditional OOCSS is global and it is poor in modularity. StyleX defines styles as a markup in component JS code to make it locally.
  2. Type-Safe CSS: By using TypeScript, StyleX is type-safe like other props of a component.
type alignContent =
  | 'flex-start'
  | 'flex-end'
  | 'center'
  | 'space-between'
  | 'space-around'
  | 'stretch'
  | all;
  1. Avoid Bloated CSS(?): According to the official document, StyleX produces deterministic results not only when merging multiple selectors, but also when merging multiple shorthand and longhand properties. (e.g. margin vs margin-top).
    But when I try locally, it doesn't manage to merge anything.
const s = stylex.create({
  foo: {
    color: "red",
    margin: 10,
    marginTop: 6,
  },
  zoo: {
    color: "blue",
  }
});

export default function Home() {
  return (
    <main {...stylex.props(s.foo, s.zoo)}>
    </main>
  );
}

// after complie

.x1oin6zd:not(#\#) {
  margin: 10px;
}
.xju2f9n:not(#\#):not(#\#) {
  color: blue;
}
.x1e2nbdu:not(#\#):not(#\#) {
  color: red;
}
.x1k70j0n:not(#\#):not(#\#):not(#\#) {
  margin-top: 6px;
}

Conclusion

  • Performance: As the class grows in the codebase, the performance will become lower, but if it is a small project, it is likely to outperform TailwindCSS since TailwindCSS will import unnecessary utility classes, and styleX only imports what we write in code.
  • Maintainability & Readability: Utility classes(TailwindCSS) have their advantages but make the HTML markup ugly, styleX solves some issues of OOCSS but still leaves naming and class bloating unsolved.

Crafting GPT-based Customer Support Chatbot from 0 to 1 — Algorithm Portion

Abstract

This article introduces how to craft a smart GPT-based customer support chatbot that can answer users' questions and interact with them by applying different kinds of techniques from OpenAI.

The techniques we use mainly include:

  1. Embeddings: This technique turns our knowledge base (documents like FAQs and product designs) into a set of vectors, so that we can easily search for related contexts for a question by comparing the vectors of text. Learn more about embeddings from the OpenAI API.
  2. "Few-shot" Prompting: By providing a few examples to GPT, we can let it easily learn how to solve a new task. This is called "few-shot" prompting. Learn more about in-context learning from Wikipedia.
  3. Vector Database (Vector Similarity Search Engine): This is where we store the vectors after processing embeddings. It provides a convenient and highly efficient search API for finding the top k closest vectors.
  4. Paraphrasing: In order to make our chatbot aware of context, we need to paraphrase users' questions to provide contextual information.
  5. Intent Classification: To allow our chatbot to process different types of tasks, we need to classify the type of query first to decide which instruction we will use. Intent classification is a technique that classifies query intention based on GPT.

Stage 1: Answering Customers' Questions Based on Documents

Answering questions using GPT-3.5 with a few FAQ texts

It is easy to let GPT answer questions based on short texts. We will create a function that calls the OpenAI GPT-3.5 model with reference text and the user's question when they ask a question.

Scaling to Answer Questions with Embeddings and Vector Database

Our chatbot needs to remember more text without consuming too many tokens when asking questions. However, GPT has limitations when it comes to remembering a lot of text. To address this issue, we will introduce Embeddings and Vector Database to our system.

To start, we will use openai's embeddings model "text-embedding-ada-002" to process a large document as data for our chatbot. This will turn the text into a set of vectors.

After that, we will store those vectors in a vector database called qdrant. This will allow us to later query the text snippets that are most related to the user's questions.

When a user asks a question, our chatbot will first query context information in the vector database. It will then bring together that context with the question to prompt GPT.

Stage 2: Supporting Contextual Answering

Our chatbot can answer users' different questions no matter how large the knowledge base is. However, there is still a critical issue: the chatbot cannot remember the chat history between the user and itself. For example, if a user asks, "What is A?" and our chatbot answers, "A is xxxx...," and then the user asks another question, "Do I need to connect to the internet to use it?" Our chatbot is likely unable to answer that because it doesn't know what "it" means.

To address this issue, we introduce a technique called paraphrasing, which allows us to restructure the question before asking our chatbot. During paraphrasing, we replace some words like "it" in user questions (paraphrasing does more than that; it also optimizes the question) according to the chat history. We use GPT to accomplish this task.

Prompting Engineering Improvement during Paraphrasing

We use "Few-shot" Prompting to help GPT better understand how to paraphrase questions based on context.

Before letting GPT paraphrase questions, we will provide a practice round. The prompt will be similar to the following example, which can be adjusted as needed:

[
  {
    "role": "user",
    "content": """
      Paraphrase user's question according to background information. // instruction
      """
  },
  {
    "role": "assistant",
    "content": "Ok, I will do that. Let's do a practice round"
  },
  {
    "role": "user",
    "content": practice_round["user_question"] // example user's question
  },
  {
    "role": "assistant",
    "content": practice_round["query"]
  },
  {
    "role": "user",
    "content": practice_round["background"]
  },
  {
    "role": "assistant",
    "content": practice_round["answer"] // provide an example generated question here.
  },
  {
    "role": "assistant",
    "content": "Ok, I'm ready."
  },
// put real query here
]

Stage 3: Supporting Appeasing Customers and Calling External APIs

We want our chatbot to be able to handle more types of tasks, not just answering questions. For example, we want it to appease customers who are complaining, or we want it to call an API to query a user's balance when they ask about their money.

To provide this ability, we add another layer to analyze the user's intention before handling the task. This step is called Intent Classification.

How can we know what the user really wants based on their message? GPT is good at this task. Refer to Intent Classification - OpenAI for more information.

Modularity: We can now treat our previous process as a module called the answerQuestion module. Assuming we have two more modules, namely the appease and getBalance modules, we can create three categories of user intention: questioning, complaining, and queryingBalance (just examples).

When a user sends a message, we prompt GPT as follows:

  • System: You will be provided with customer service queries. Classify each query into different categories. Provide your output in JSON format with the keys: category.

    Categories: questioning, complaining, queryingBalance.

  • User: Your product is a piece of s@it!

After we get the JSON with categories, we can start calling the corresponding module to handle the user's message. This way we don't mix different types of tasks together, which makes our system more scalable.

Summary

In this article, we learn how to craft a customer support chatbot using the latest GPT techniques from simple to complex. We will introduce you to techniques such as embeddings, "few-shot" prompting, vector database, paraphrasing, and intent classification. The article also details the process of scaling the chatbot and supporting contextual answering, appeasing customers, and calling external APIs. Our approach is guided by software engineering principles such as modularity, making the chatbot more scalable and easier to manage.

Use Modular Design with ChatGPT to Generate Code

You can find all the code of this article in this codesandbox.

A lot of people aren't aware that, nowadays, AI can really help us to write code! Trust me, I've been using chatGPT to help me write thousands of lines of code. Let me show you how.
I will take a frontend component as an example, show you how to build a product ready component. We use React to help us modulize our code, so chatGPT can generate code more precisely.
Just like humans, chatGPT is also not good at handling complex things at one time, so we need to make things simplier for chatGPT. One of the powerful ways to handle our system's complexity is modulization. We will start by building the most simple components, and then combining them together, to become a page. For demonstration, I will just do a simple <DialogBox /> component here. You can use the same concept to build a big system(some dudes use it to build a new language).

Requirements:

Level 1:

  1. <DialogBox />: The DialogBox component should be able to display a conversation between two users, with input area.

Clearly, if we just put the requirement above into chatGPT, it likely won't get us a satisfactory result. Because the module we gonna build is too big to describe it clearly. So let's split it into these several parts:

Level 2:

  1. <Messages />: The Messages box should display users' conversation lists, on the left hand side is the other user's message. On the right hand side is the user's message.
  2. <TextArea />:The TextArea should show placeholder to guide user input something, and when press enter key, it should call sendMessage.

We break a big component into two components. Now the problem has become smaller, but still a bit too much for chatGPT. Let's break it into pieces.

Level 3:

  1. <MessageBubble />: The MessageBubble component should display the message text entered by a user, with the direction left or right.
  2. <Avatar />: The Avatar component should display a profile picture or other visual representation of a user.
  3. <TextArea />:Same as above.

These should be small enough for chatGPT to generate the code. So let's invite our AI friend, chatGPT, to help us finishned the components.

Implementations:

All right! Before really starting development, we need to make sure that chatGPT and us are in the same context. We need to declare the dependencies that we have(for demonstration we only introduce simple dependencies, you can add much more if you want):

chatgpt

As you can see, chatGPT is happy to help us write code. Let's go! Let's start from Level 3(the small peices) to Level 1.

Level 3:

  1. <TextArea />

Let me describe the requirements to chatGPT:

chatgpt

Here is what chatGPT return me:

chatgpt

Here is the effect of the code:

chatgpt

LGTM, the only thing I want to change is to make the textarea unable to resize. This is simple enough, so I just do it by myself. You can ask chatGPT to do it for sure.

  1. <Avatar />

Let's finish the avatar component as well:

chatgpt

chatgpt

As you can see, it generates a super considerate code for me, a lot of the details that I didn't specify in my requirements! But we can bring the code to the next level without typing in any code. We just tell chatGPT to do so. Let me show you how(Here is just the demonstrate of how to let chatGPT improve the code, some code is unnecessary hah):

chatgpt

Look at those codes, I think they are pretty good! What do you think?

chatgpt

chatgpt

The result is like this,

chatgpt

  1. <MessageBubble />

chatgpt

ChatGPT return this:

// MessageBubble.tsx
import React, { FC } from "react";
import styles from "./MessageBubble.module.scss";
import Avatar, { AvatarSize, AvatarType } from "../Avatar";

type Props = {
  text: string;
  direction: "left" | "right";
  imgUrl?: string;
  username?: string;
  avatarSize?: AvatarSize;
  avatarType?: AvatarType;
};

const MessageBubble: FC<Props> = ({
  text,
  direction,
  imgUrl,
  username,
  avatarSize = "small",
  avatarType = "square"
}) => {
  return (
    <div className={`${styles.messageBubble} ${styles[direction]}`}>
      {imgUrl && (
        <div className={styles.avatarWrapper}>
          <Avatar imgUrl={imgUrl} size={avatarSize} type={avatarType} />
        </div>
      )}
      <div className={styles.contentWrapper}>
        {username && <div className={styles.username}>{username}</div>}
        <div className={styles.messageText}>{text}</div>
      </div>
    </div>
  );
};

export default MessageBubble;
// MessageBubble.module.scss
.messageBubble {
  display: flex;
  align-items: center;
  .contentWrapper {
    display: inline-block;
    max-width: 80%;
    margin: 0.5rem;
    padding: 0.75rem;
    border-radius: 1rem;
    box-shadow: 0 1px 2px 0 rgba(0, 0, 0, 0.05), 0 2px 6px 0 rgba(0, 0, 0, 0.05);
    background-color: #fff;
  }
}
.left {
  justify-content: flex-start;
}

.right {
  flex-direction: row-reverse;
  .username {
    display: flex;
    justify-content: flex-end;
  }
}

.avatarWrapper {
  margin-top: 0.5rem;
  margin-right: 0.5rem;
}

.username {
  font-size: 0.75rem;
  font-weight: 600;
  color: #999;
  margin-bottom: 0.25rem;
}

.messageText {
  font-size: 1rem;
  font-weight: 400;
  line-height: 1.5;
  color: #333;
}

chatgpt

The result is not bad, expect some style problems need to be adapted. Most of the code has no need to modify it.

Level 2:

From level 2, what we need to do is to combine the components that chatGPT previously built. Let's tell chatGPT to do so.

  1. <Messages />

chatgpt

// Messages.tsx
import { FC } from 'react';
import styles from './Messages.module.scss';
import MessageBubble from '../MessageBubble';
import { Message } from './types';

type Props = {
  messages: Message[];
};

const Messages: FC<Props> = ({ messages }) => {
  return (
    <div className={styles.messagesWrapper}>
      {messages.map((message, index) => (
        <MessageBubble
          key={index}
          text={message.text}
          direction={message.direction}
          imgUrl={message.avatar}
          username={message.username}
        />
      ))}
    </div>
  );
};

export default Messages;
// Messages.module.scss
.messagesWrapper {
  display: flex;
  flex-direction: column;
  align-items: flex-start;
  margin-top: 1rem;
  margin-bottom: 1rem;
}

chatgpt

Looks pretty good~

Level 1:

  1. <DialogBox />

chatgpt

// Dialogbox.tsx
import { FC, useState, useEffect } from 'react';
import styles from './DialogBox.module.scss';
import Messages from './Messages';
import TextArea from './TextArea';
import { Message } from './types';

type Props = {
  getMessages: () => Promise<Message[]>;
  sendMessage: (text: string) => Promise<void>;
};

const DialogBox: FC<Props> = ({ getMessages, sendMessage }) => {
  const [messages, setMessages] = useState<Message[]>([]);

  useEffect(() => {
    const interval = setInterval(() => {
      getMessages().then((messages) => setMessages(messages));
    }, 1000);
    return () => clearInterval(interval);
  }, [getMessages]);

  const handleSendMessage = async (text: string) => {
    await sendMessage(text);
    const updatedMessages = await getMessages();
    setMessages(updatedMessages);
  };

  return (
    <div className={styles.dialogBox}>
      <div className={styles.messagesWrapper}>
        <Messages messages={messages} />
      </div>
      <div className={styles.textAreaWrapper}>
        <TextArea sendMessage={handleSendMessage} />
      </div>
    </div>
  );
};

export default DialogBox;
.dialogBox {
  display: flex;
  flex-direction: column;
  align-items: stretch;
  height: 100%;
  margin: 1rem;
}

.messagesWrapper {
  flex: 1;
}

.textAreaWrapper {
  margin-top: 1rem;
}

chatgpt

As you can see, most of the time, I'm not coding. Instead, I just design the components and tell chatGPT what it is. ChatGPT will just give me quite a satisfactory result. After a simple code review, the development is done. The key is to separate big problems into small problems, so that we can describe them clearly and chatGPT is easier to understand. We can use this method to build some huge systems. It is possible.

React Server Component Internals(Source Code Review)

What is React Server Component(RSC)?

React Server Component is a new feature of React that allows the server and the client(browser) to collaborate in rendering React applications. Simply put, it moves part of the rendering process to the server to improve the overall performance.

Typical Construction Flow of React Element Tree

To better understand why we need to move the rendering process to the server, let's look at how the client-side render method renders a react element tree(JSX):

// App Component
function App() {
  return (
    <div>
      <ComponentA />
      <ComponentB />
    </div>
  );
}

// ComponentA
function ComponentA() {
  return <h1 onClick={() => alert("cool!")}>Hello from Component A</h1>;
}

// ComponentB
function ComponentB() {
  const data = await fetchDataApi();
  return <div>{data} fetched from Component B</div>;
}

The above Components will be transformed into Virtual DOM(react element tree) after we use React.createElement to render it:

const App = {
  $$typeof: Symbol(react.element),
  type: "div",
  props: {
    children: [
      {
        $$typeof: Symbol(react.element),
        type: ComponentA,
        props: {
          children: [
             $$typeof: Symbol(react.element),
              type: "h1",
              props: {
                onClick: () => alert("cool!")
              },
          ]
        },
      },
      {
        $$typeof: Symbol(react.element),
        type: ComponentB,
        props: {
          children: [
            // ...
          ]
        },
      }
    ]
  },
}

Then ReactDOM.render will render this react element tree into HTML format and attach it to HTML.

Two things to notice here are:

  1. The whole tree construction process is done in the browser: This means that if one of your components has heavy logic like ComponentB's fetchData, it will slow down the tree construction and occupy the resource of the browser.
  2. There are function existed in this tree(type, onClick prop): This makes the Serialization(Turn the tree to a JSON string) infeasible.

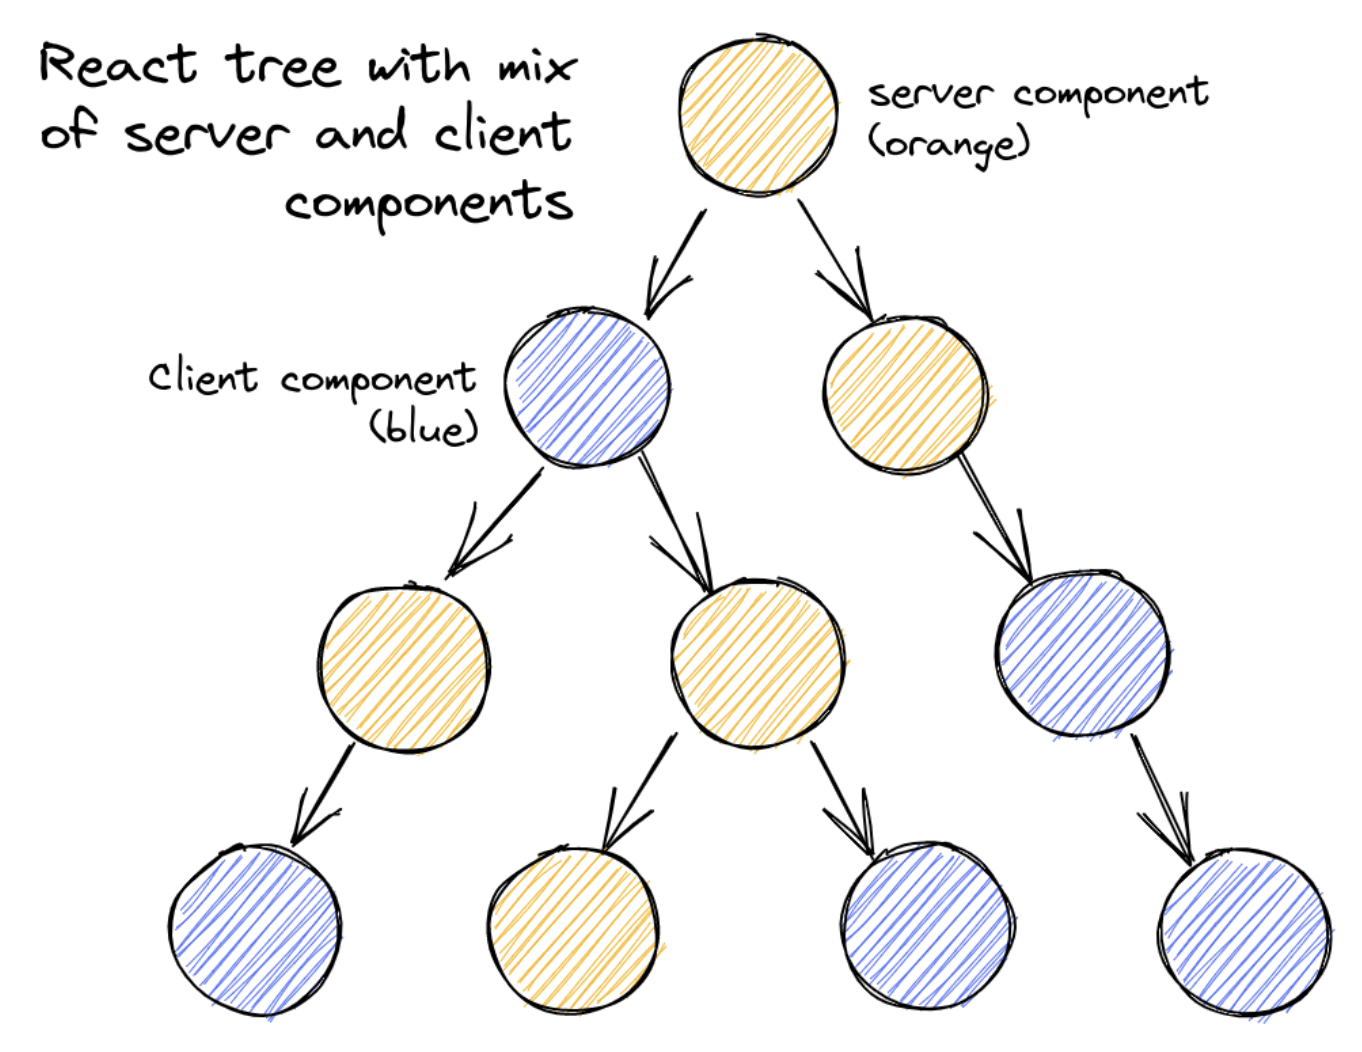
RSC Construction Flow of React Element Tree

RSC improves the performance via separating those calculation-intense components rendered as server components, while those components that create interactive logic are handled by the client as client components.

When a client requires a server component, the server side will first construct the react element tree by parsing all server components on the tree skipping all client components, and leaving a placeholder with an instruction to tell the client side to fill it up in a browser(We will walk through the detail implementation later).

So when user open a page build with rsc, they will typically see server components are rendered, and then the components with interactive logic are rendered.

What's the differences between RSC and SSR?

There is another concept that is easy to mix with RSC, which is SSR(server-side rendering). Though they all doing some jobs in server side, they are quite different.

The main difference is granularity. SSR renders a page on server side each request, while the RSC render a component each request, and it request the client side to fill up all the placeholder inside the component to finish.

In other word, SSR's output is a HTML, and RSC's output is a react element tree.

In SSR, after client side gets the HTML, it will use (hydrate(reactNode, domNode, callback?)[https://react.dev/reference/react-dom/hydrate] to attach the html with react node, so that the react can take care of DOM(enabling interactive events). And RSC doesn't require hydrate process because client components are rendered in browser.

Why RSC?

So what is the benefits of RSC? The browser is a good place for this, because it allows your React application to be interactive — you can install event handlers, keep track of state, mutate your React tree in response to events, and update the DOM efficiently. But in these use cases, react server components could be a better choice:

  1. Rendering a slice of data(fetching a lot of data): Rendering the component in server side can allow you directly access the data, you don't need to hop through different public API endpoint. And if your component only require a small slice of data, this can reduce the bundle size of client request because it only return the data that it needs.
  2. Access sensitive logic and data: server component is stored and ran in server, which means that you don't need to expose your data and logic to public, this increases safety.
  3. Loading heavy code module: When other people try hard to think about how to use limited resource of browser to load heavy code module(like using service worker), you put the code in server instead, the server is more scalable and stable with much more resource than browser.

Components

Without further ado, let's start introducing how react(and other frameworks) implement RSC. To control the complexity, we will separate the RSC system into several components, simplified them and build them one by one.

Serialization

The life of a page using RSC always starts at the server, server will render an incomplete serializable react element tree and send to client, let the client to fill up the tree and render as HTML. Let's start by looking at how server render an serializable react element tree in this section.

  • Separate server component from client component: In order to handle the component correctly, we need a way to separate server/client component. React team defines this based on the extension of the file: .server.jsx and .client.jsx. This Definition is easy for humans and bundlers to tell them apart.

We modify our previous example a bit using RSC like this:

// App.server.jsx
function App() {
  return (
    <div>
      <ComponentA />
      <ComponentB />
    </div>
  );
}

// ComponentA.client.jsx
function ComponentA() {
  return <h1 onClick={() => alert("cool!")}>Hello from Component A</h1>;
}

// ComponentB.server.jsx
function ComponentB() {
  const data = await fetchDataApi();
  return <div>{data} fetched from Component B</div>;
}

The serialization output is like this:

const App = {
  $$typeof: Symbol(react.element),
  type: "div",
  props: {
    children: [
      // ComponentA client component
      {
        $$typeof: Symbol(react.element),
        type: ComponentA,
        props: {
          children: [
             $$typeof: Symbol(react.element),
              type: "h1",
              props: {
                onClick: () => alert("cool!")
              },
          ]
        },
      },
      //  ComponentB server component
      {
        $$typeof: Symbol(react.element),
        type: ComponentB,
        props: {
          children: [
            // ...
          ]
        },
      }
    ]
  },
}

There are two things that it is not available to serialize here:

  1. The type field: type field is a function when it is a react component, which is not JSON-serializable.(It is coupling with memory.)
  2. The props of client component: client component may contain onClick: () => alert("cool!") function, which is also not JSON-serializable.

To JSON-stringify everything, react passes a replacer function to JSON.stringify, to deal with the type function reference and replace client component with a placeholder. Check out the source code (resolveModelToJSON)[https://github.com/facebook/react/blob/42c30e8b122841d7fe72e28e36848a6de1363b0c/packages/react-server/src/ReactFlightServer.js#L368].

Here I create a simplified version to help you understand:

// value is the react model we pass
// this is in server side so we have request context
export function resolveModelToJSON(request, parent, key, value) {

  while  (
    typeof value === 'object' &&
    value !== null &&
    value.$$typeof === REACT_ELEMENT_TYPE
  ) {
    const element: React$Element<any> = value;
    // server component or plain html element
    try {
      value = attemptResolveElement(
        element.type,
        element.key,
        element.ref,
        element.props,
      );
    }
  }
  // client side component
  if (isModuleReference(value)) {
      // get file path like "./src/ClientComponent.client.js"
      // name is the file export, e.g. name: "default" -> ClientComponent is the default export...
      const moduleMetaData: ModuleMetaData = resolveModuleMetaData(
        request.bundlerConfig,
        moduleReference,
      );
      // placeholder++
      request.pendingChunks++;
      // assign an ID for this module
      const moduleId = request.nextChunkId++;
      // add module meta data to chunk
      emitModuleChunk(request, moduleId, moduleMetaData);
      // cache
      writtenModules.set(moduleKey, moduleId);
      // return id as a reference
      return serializeByValueID(moduleId);
  }
}

  function attemptResolveElement(
    type: any,
    key: null | React$Key,
    ref: mixed,
    props: any,
  ): ReactModel {
    // ...
    if (typeof type === 'function') {
      // This is a server-side component.
      // render it directly using props and return the result
      return type(props);
    } else if (typeof type === 'string') {
      // This is a host element. E.g. HTML.
      // It is already serializable, return it directly
      return [REACT_ELEMENT_TYPE, type, key, props];
    }
    // client component, leave it here
    // This might be a built-in React component. We'll let the client decide.
    // Any built-in works as long as its props are serializable.
    return [REACT_ELEMENT_TYPE, type, key, props];
    // ...
  }

type ModuleMetaData = {
  id: string,
  name: string,
};

function resolveModuleMetaData() {
  // ...
  return {
    id: moduleReference.filepath,
    name: moduleReference.name,
  };
}

The output of client component is like this:

{
  $$typeof: Symbol(react.element),
  // The type field  now has a reference object,
  // instead of the actual component function
  type: {
    $$typeof: Symbol(react.module.reference),
    // ClientComponent is the default export...
    name: "default",
    // from this file!
    filename: "./src/ClientComponent.client.js"
  },
  props: { children: "oh my" },
}

This whole process happens during bundling. React has a official react-server-dom-webpack loader which can match *.client.jsx and turn them to moduleReference object.

At the end of the serialization process, we send a JSON that represent this serializable React tree to client like this:

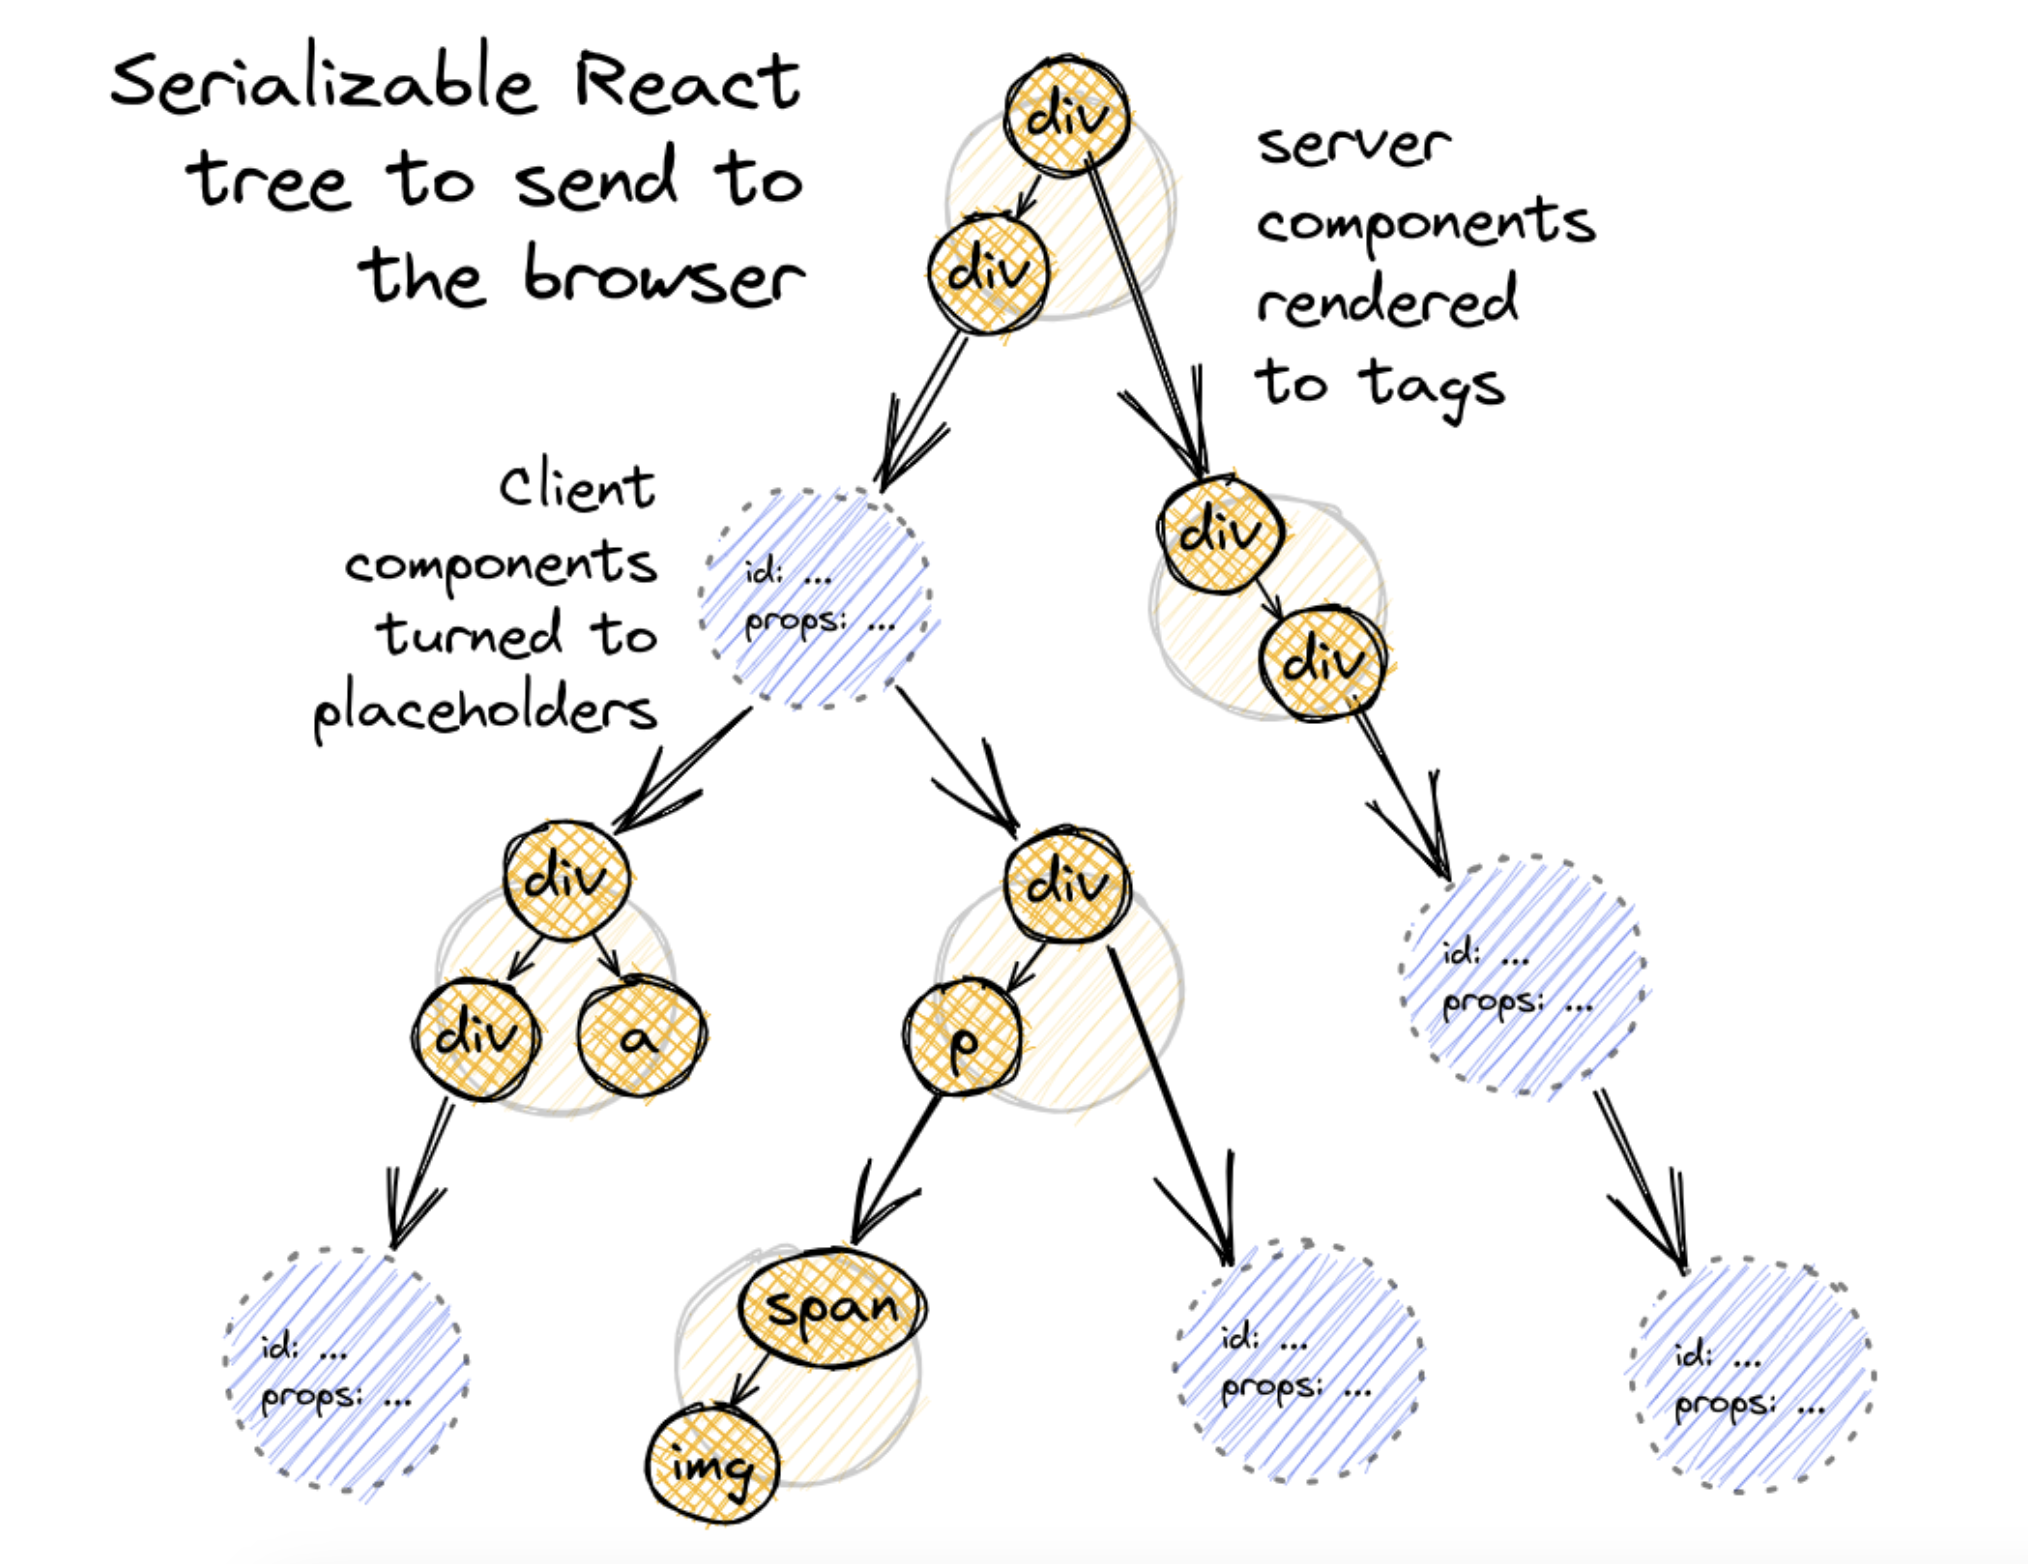
Three things happened:

  1. html tags keep the same.
  2. server components rendered.
  3. client components became moduleReference object.

Suspense(Streaming)

Now we managed to separate part of work to server, so that we can expect a better performance when rendering. Because the output is serializable, we can do even more. Now client side needs to wait until the whole react element tree is received from server side, there are a lot of time is wasted in client side. We can apply streaming concept to make this process progressively. Streaming means that server side will send the react element tree slice by slice during the construction process, instead of sending the whole tree until the construction is done. The Suspense feature in react plays an important role to implement this.

// The Suspense component allows us to wait for the DataFetchingComponent to load
// while showing some fallback content.
// When the DataFetchingComponent is loaded, it will replace the fallback content.
function DataFetchingComponent() {
  const [data, setData] = useState(null);

  // Fetch data on component mount
  useEffect(() => {
    fetchData().then(data => setData(data));
  }, []);

  // If data is not yet fetched, return null
  if (!data) return null;

  return <div>{data}</div>;
}

function App() {
  return (
    // Wrap the data fetching component inside the Suspense component
    <Suspense fallback={<div>Loading...</div>}>
      <DataFetchingComponent />
    </Suspense>
  );
}

There are two places that RSC will use suspense feature to optimaze performance:

  1. Server component rendering
    Server component utilizes this feature to output a suspense placeholder(promise) when the server component is fetching data, or doing heavy calculation before finishing rendering. Once the rendering is finished, it will push a completed component chunk to client side and ask it to fill up the tree.

Here is the simple implementation:

export function resolveModelToJSON(
  request: Request,
  parent: {+[key: string | number]: ReactModel} | $ReadOnlyArray<ReactModel>,
  key: string,
  value: ReactModel,
): ReactJSONValue {
  // Resolve server components.
  while (
    typeof value === 'object' &&
    value !== null &&
    value.$$typeof === REACT_ELEMENT_TYPE
  ) {
    // TODO: Concatenate keys of parents onto children.
    const element: React$Element<any> = (value: any);
    try {
      // Attempt to render the server component.
      value = attemptResolveElement(
        element.type,
        element.key,
        element.ref,
        element.props,
      );
    } catch (x) {
      if (typeof x === 'object' && x !== null && typeof x.then === 'function') {
        // Something suspended, we'll need to create a new segment and resolve it later.
        request.pendingChunks++;
        const newSegment = createSegment(request, value);
        const ping = newSegment.ping;
        // when x promise is finished, push completed chunk to client side
        x.then(ping, ping);
        return serializeByRefID(newSegment.id);
      }
    }
  }
}
  1. Client component rendering

Remember when server sends react element tree to client side, client components are still yet to render, so they will suspense first until the client renders them.

This suspense and stream feature enable the browser too incrementally render the data as they become available.

You might wonder how can a react element tree(JSON) become a stream, react server component use a simple format to make this possible. The format is like this:

M1:{"id":"./src/ClientComponent.client.js","chunks":["client1"],"name":""}
J0:["$","@1",null,{"children":["$","span",null,{"children":"Hello from server land"}]}]

The lines that start with M defines a client component module reference, with the information needed to look up the component function in the client bundles.

The line starting with J defines an actual React element tree, with things like @1 referencing client components defined by the M lines.

This format is very streamable — Given that each row is a module/component, as soon as the client has read a whole row, it can parse a snippet of JSON and make some progress.

// Tweets.server.js
import { fetch } from 'react-fetch' // React's Suspense-aware fetch()
import Tweet from './Tweet.client'
export default function Tweets() {
  const tweets = fetch(`/tweets`).json()
  return (
    <ul>
      {tweets.slice(0, 2).map((tweet) => (
        <li>
          <Tweet tweet={tweet} />
        </li>
      ))}
    </ul>
  )
}

// Tweet.client.js
export default function Tweet({ tweet }) {
  return <div onClick={() => alert(`Written by ${tweet.username}`)}>{tweet.body}</div>
}

// OuterServerComponent.server.js
export default function OuterServerComponent() {
  return (
    <ClientComponent>
      <ServerComponent />
      <Suspense fallback={'Loading tweets...'}>
        <Tweets />
      </Suspense>
    </ClientComponent>
  )
}

The output stream is like this:

M1:{"id":"./src/ClientComponent.client.js","chunks":["client1"],"name":""}
S2:"react.suspense"
J0:["$","@1",null,{"children":[["$","span",null,{"children":"Hello from server land"}],["$","$2",null,{"fallback":"Loading tweets...","children":"@3"}]]}]
M4:{"id":"./src/Tweet.client.js","chunks":["client8"],"name":""}
J3:["$","ul",null,{"children":[["$","li",null,{"children":["$","@4",null,{"tweet":{...}}}]}],["$","li",null,{"children":["$","@4",null,{"tweet":{...}}}]}]]}]

J0 now has a suspense boundary, and inside the boundary, there is a @3 that has not finished rendering and pushed to the stream. RSC continue push M4 to the stream and when @3 is ready, it is push to the stream as J3.

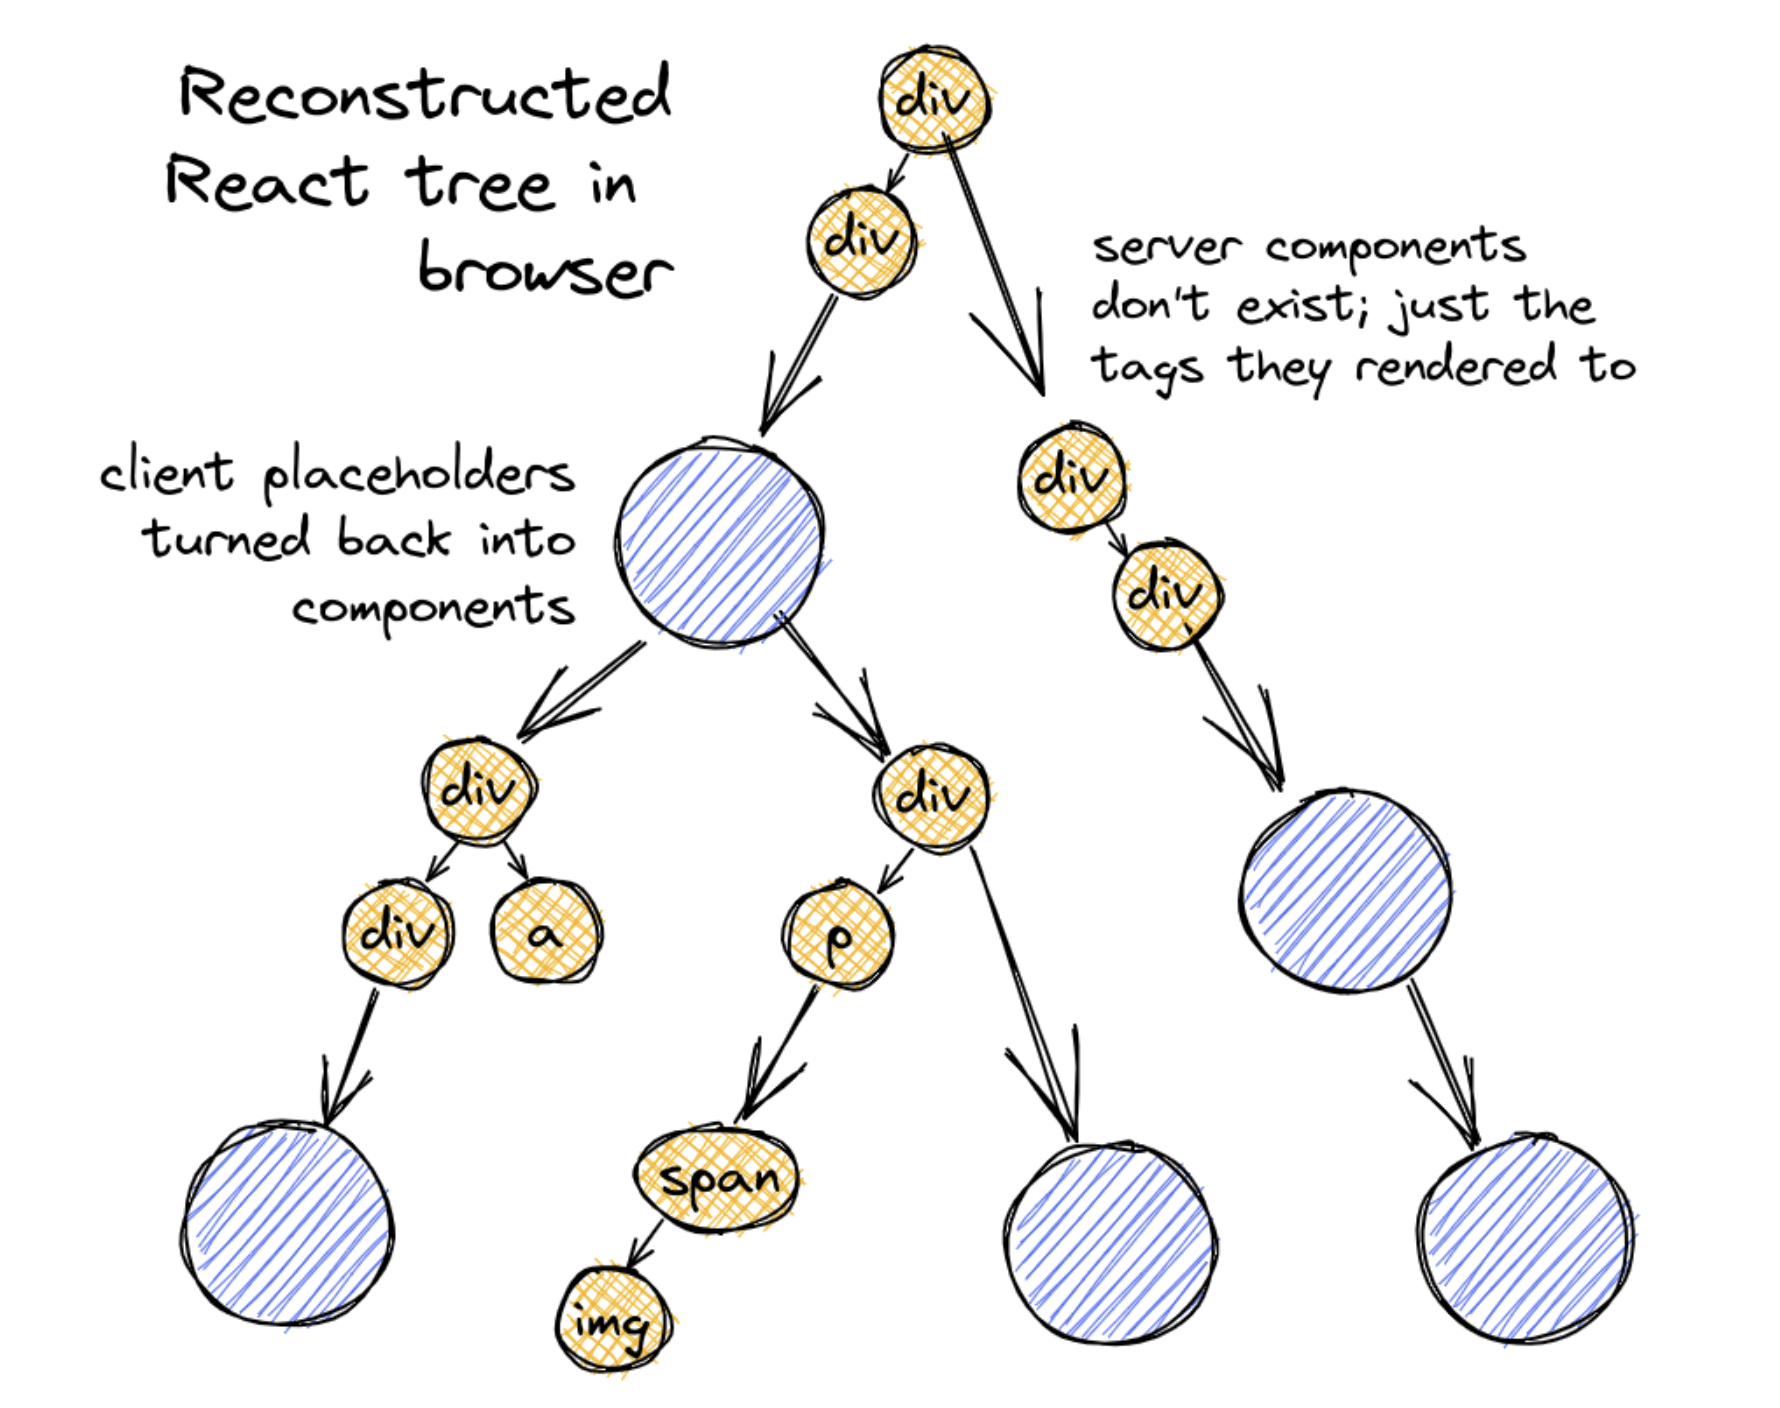
Client Reconstructs the React Tree

When client receives the React Tree stream, it will start reconstructing the completed React tree and render to HTML progressively.

React provides a method called createFromFetch in react-server-dom-webpack to render RSC. The basic usage is like this:

import { createFromFetch } from 'react-server-dom-webpack'
function ClientRootComponent() {
  // fetch() from our RSC API endpoint.  react-server-dom-webpack
  // can then take the fetch result and reconstruct the React
  // element tree
  const response = createFromFetch(fetch('/rsc?...'))
  return <Suspense fallback={null}>{response.readRoot() /* Returns a React element! */}</Suspense>
}

response.readRoot() read the stream from /rsc?... and update the react element progressively.

Some Common Mistakes in React Testing

Most of the frontend developers (at least those who I met) dislike writing tests. I asked them why, and the answer is simple: We don't have time to do that! Well, I would like to tell you that, writing tests in the right way will significantly increase your effectiveness of development (especially in the long-term), instead of wasting your time.

Writing tests forces you to think about whether the abstraction you made is reasonable, and if it doesn't, you won't even be able to test it. And if you don't have a well understanding of what your abstraction can do, you may get your hand dirty when writing tests for it. And that is exactly why some folks don't like writing tests. But if you start to write tests for your project, you will gain the benefit of improving your programming skill.

I want to help you write more clean and reasonable tests at beginning of your testing journey, so you can really get the benefit of tests. And here are some mistakes that you should avoid when you writing tests:

Mistake 1: testing implementation details

This is the NO.1 mistake in testing, which is the biggest reason why developers give up testing(I think).

What are the implementation details? In simple words, it is about how to do it. We should keep in mind that we only want to test what is it.

Why is it so bad to test how? Shouldn't we make sure that our function runs exactly like what we expect? Here is a simple example:

Here is the component we wanna test:

// Calculator.jsx

class Calculator extends React.Component {
  state = { number: 0 }
  
  setNumber = number => this.setState({ number })
  
  render() {
    const { number } = this.state
    
    return (
      <div>
        <div>Count: {number}</div>
        <button onClick={() => this.setNumber(number + 1)}>add1</button>  
      </div>
    )
  }
}

We may test its implementation details like this(we will use Enzyme because it expose API that can test implementation details):

// Calculator.test.jsx

import * as React from 'react'
import Enzyme, {mount} from 'enzyme'
import EnzymeAdapter from 'enzyme-adapter-react-16'
import Calculator from '../Calculator'

// Setup enzyme's react adapter
Enzyme.configure({adapter: new EnzymeAdapter()})

test('Calculator render number in state', () => {
    const wrapper = mount(<Calculator />)
    
    expect(wrapper.props().children).toBe(0)
})

test('setNumber should sets the number state properly', () => {
  const wrapper = mount(<Calculator />)
  
  expect(wrapper.state('number')).toBe(0)
  
  wrapper.instance().setNumber(1)
  
  expect(wrapper.state('number')).toBe(1)
})

False negatives

By testing implementation details, you are basically saying that: the application should do in this way! So you are ruling out the possibility of applying other implementations at the same time. What about we need to refactor with other state management libraries (like Redux, Mobx)? You will definitely get a fail after your refactor, while your implementation works correctly. This is false negatives.

False positives

Because you are testing how to do it, you likely forget some of the details(because the details are always so complex), which makes you don't have the confidence that the result is what you want.

Let's say developer Joe just join our team and he decides to move the inline function to the outside. The change is like this:

// Calculator.jsx

class Calculator extends React.Component {
  state = { number: 0 }
  
  setNumber = number => this.setState({ number })
  
  render() {
    const { number } = this.state

    // Joe carelessly missed the value of setNumber
    const handleOnClick = () => this.setNumber()

    return (
      <div>
        <div>Count: {number}</div>
        <button onClick={handleOnClick}>add1</button>  
      </div>
    )
  }
}

He runs all of the tests and they are all passed. So he happily makes a commit and pushes his code into the codebase. Soon, he gets complaints from his user: Why is the calculator not working? He doesn't know why either because the tests are all passed. So he has to open his laptop and look into the codebase again to revise the code.

This is because your tests don't even make any promise that your code result is correct, so it's not strange that you may get the wrong result in the product while the test keeps passing.

Writing too many harmful tests

In our example, the implementation is quite simple, so we don't need to write a lot of tests when we test the implementation details. But what about some complex components? You need to write thousands of lines of tests which not only can't increase your confidence but also restrict the possibility of refactoring. That is why most developers start writing tests and then give up quickly.

Testing Use Cases

What about we don't test How, and test What? By testing the use cases(what will do in special cases), we are saying that: It should do something by giving some input(event).

This will give you the possibility to refactor or replace some implementation while you can promise that your product is doing the same thing.

Let's write the correct tests for the above example(we will use react-testing-library):

import { screen, render } from '@testing-library/react'
import userEvent from '@testing-library/user-event'
import Calculator from './Calculator'

// zero
test('it should show 0 initially', () => {
  render(<Calculator />)
  
  // expect screen show text Count: 0
  expect(screen.getByText('Count: 0')).toBeInTheDocument()
})

// one
test('it should add 1 when user click add1', async () => {
  render(<Calculator />)
  
  // simulate user click on button
  await userEvent.click(screen.getByRole('button'))

  // expect screen show text Count: 1
  expect(screen.getByText('Count: 1')).toBeInTheDocument()
})

// many
test('it should add 3 when user click add1 three times', async () => {
  render(<Calculator />)
  
  // simulate user click on button
  await userEvent.click(screen.getByRole('button'))
  await userEvent.click(screen.getByRole('button'))
  await userEvent.click(screen.getByRole('button'))

  // expect screen show text Count: 3
  expect(screen.getByText('Count: 3')).toBeInTheDocument()
})

You can see that the tests like this allow you to refactor while it can provide you the confidence that your application is running correctly. That is awesome!

Mistake 2: 100% code coverage

If you are trying to achieve 100% coverage in every case, you are likely wasting time, especially in frontend. Code coverage may give you the illusion that your code is well tested. But in fact, it can only tell you How much code will run during your test. Instead of Will this code work according to the business requirements.

Always keep in mind that you are writing tests for increasing your confidence, and there is a trade-off of what code should you cover in testing. One thing is more important than another thing. For example, writing tests for the "About Us" pages won't increase too much confidence for you, right? We have a lot of pure UI pages in frontend, we could cover them by snapshot testing, which frees your hand to do something more important.

For some common libraries, trying to go for 100% coverage is totally appropriate because they are usually more isolated and small, and they are really important code due to the fact that they're shared in multiple projects.

Mistake 3: repeat/coupling testing

Tests should always work in isolation. There are two types of tests that are not isolating:

Repeat testing

Let's say you have 100 tests in E2E testing that need an authenticated user. How many times do you need to run through the registration flow to be confident that the flow works? 100 times or 1 time? I think it is safe to say that if it worked once, it should work every time. Those 99 extra runs are wasted effort.

So instead of running through the happy path every time, it's a better idea to make the same HTTP request that your application makes when you register and log in a new user. Those requests will be much faster than clicking and typing around the page.

Coupling testing(This name is created by me🤣)

Let's take a simple example here:

import * as React from 'react'

const Counter = (props) => {
  const [count, setCount] = React.useState(0)
  const isMax = count >= props.maxCount

  const handleReset = () => setCount(0)
  const handleClick = () => setCount(currentCount => currentCount + 1)

  return (
    <div>
      <span>Count: {count}</span>
      <button onClick={handleClick} disabled={isMax}>
        add one
      </button>
      {isMax ? <button onClick={handleReset}>reset</button> : null}
    </div>
  )
}

export {Counter}

We could write tests for the component like this:

import * as React from 'react'
import {render} from '@testing-library/react'
import userEvent from '@testing-library/user-event'
import {Counter} from '../counter'

const { getByText, getByRole } = render(<Counter maxCount={2} />)
const addOneButton = getByRole('button', { name: 'add one' })


test('it should render initial count 0', () => {
  expect(getByText('Count: 0')).toBeInTheDocument()
})

test('it should render 1 when click add one button', async () => {
  await userEvent.click(addOneButton)
  
  expect(getByText('Count: 1')).toBeInTheDocument()
})

test(`it should disable add one button and show reset button when it's hit the maxCount`, async () => {
  await userEvent.click(addOneButton)
  
  expect(getByRole(addOneButton)).toBeDisabled()
  expect(getByRole('button', { name: 'reset' })).toBeInTheDocument()
})

test('it should reset count to 0 when click reset button', async () => {
  await userEvent.click(addOneButton)
  
  expect(getByText('Count: 0')).toBeInTheDocument()
})

Looks pretty good, right? We have 100% coverage of code, we are very confident to say that our code is been well tested. But wait, now developer joe takes our project and looks at those tests. He considers that the second test is unnecessary because the add one button is already tested in the following test case, so he decides to delete it. Boom! He got 3 fail tests immediately:

This is because those tests are not isolated, instead, they rely on each other. So if we refactor or skip one of them, other tests are likely to fail.

The solution is we can wrap the render utils into a function, and call it in every test. So that every test will get its own instance and isolate it from other tests. (You can use beforeEach to do the same thing here but I will show you why I don't like it later.)

import * as React from 'react'
import {render} from '@testing-library/react'
import userEvent from '@testing-library/user-event'
import {Counter} from '../counter'

function renderCounter(props) {
  const { getByText, getByRole } = render(<Counter maxCount={2} {...props} />)
  const addOneButton = getByRole('button', { name: 'add one' })
  return { getByText, getByRole, addOneButton }
}

test('it should render initial count 0', () => {
  const { getByText } = renderCounter()
  expect(getByText('Count: 0')).toBeInTheDocument()
})

test('it should render 1 when click add one button', async () => {
  const { getByText, addOneButton } = renderCounter()
  await userEvent.click(addOneButton)
  
  expect(getByText('Count: 1')).toBeInTheDocument()
})

test(`it should disable add one button and show reset button when it's hit the maxCount`, async () => {
  const { getByRole, addOneButton } = renderCounter()

  await userEvent.click(addOneButton)
  await userEvent.click(addOneButton)

  expect(addOneButton).toBeDisabled()
  expect(getByRole('button', { name: 'reset' })).toBeInTheDocument()
})

test('it should reset count to 0 when click reset button', async () => {
  const { getByText, getByRole } = renderCounter()

  await userEvent.click(addOneButton)
  await userEvent.click(addOneButton)
  await userEvent.click(getByRole('button', { name: 'reset' }))

  expect(getByText('Count: 0')).toBeInTheDocument()
})

How Testing Speeds Up Your Development

As frontend developers, most of us don't like to write testing because "it will slow down development". I didn't write tests before and I can feel your pain about writing tests for a "fast-changing" frontend project. But I do want to tell you that in most cases testing can speed up your development instead of slow it down. Unless you are writing the wrong tests. I have an article to show you {% post_link Some-Common-Mistakes-in-React-Testing %} that cause you to feel pain during your development. And in this article, I want to show you why the right tests can speed up your development.

What is development?

We are developers and we develop software every day. But really, what is development? What do we actually do in our daily work?
In working effectively with legacy code, the author thinks that development is all about behavior changes. There are four types of the development process:

  1. Adding a feature
  2. Fixing a bug
  3. Improving the design
  4. Optimizing resource usage

Each of them requires a different kind of behavior changes:development typeAs you can see, We want to add a new behavior in the software when we add a new feature, and we want to change the old behavior when we fix a bug. But when we are optimizing or refactoring, we usually don't want our behavior to change. If we make some unexpected changes in our software behavior, we call it regression.

Software rot

Most of us have the experience that fixing bugs or adding a new feature in a legacy project(a big project without well code structure and testing) is more painful and harder than doing a new project from zero to one. This is because software gets rot day by day when we keep adding new features to it. The code will become very complex and eventually very hard to maintain. Luckily we have React / Vue frame that modulizes our website to pages, and pages to components. So it usually won't become very complex in every component, but it will be at some kind of the point. Even the team with the best code quality can't prevent software from getting rot, because decoupling doesn't mean that you don't add any couple at all.

Maintaining is getting harder and harder

So, when the behaviors are getting more and more complex, we will find it even harder to do development while making sure that the existing behavior doesn't change. When we add behavior in a component, the state, or the dom structure will change. How to guarantee that the existing behavior is preserved? How to guarantee that the new behavior doing what we expected? And, how to guarantee our new behavior can work well with our existing behavior?
Testing can give you confidence.
preserving behavior

The role of testing

Tests can play two roles in development. One is for validation, another is for preventing regression. Those two kind of testing can help you develop with confidence and speed up in the different development lifecycle.

Validation testing

When we add new behavior to our program, we want to know that the new behavior act as we want, how? Most frontend developers will write code and then go to the local dev env to check the behavior changing. This is called manual testing. So what's wrong with this kind of testing? Why automatic testing can be much more effective than manual testing? Here is an example:
You developed a small component that appears after a bunch of steps. Let's say we want to develop a message box that will show after submitting a form that needs to fill 20 fields.
So if you use manual testing:

  • You need to type in 20 fields(click, click, type......) just like your users and then click submit.
  • You need to pray that the server(both your localhost server and backend) won't break while you are testing.
  • You need to pray that the dependencies(In this example, the Form component) work correctly.
  • You need to pray that the whole process can work correctly at one time. If it doesn't, guess what? You need to debug the components related to this whole process, including but not limited to, Form component, API, and Message box.
  • Your colleague reviews your code and wants you to change some of the code, you need to do the click type cycle again with considerate test cases. It's just awful!

As you can see manual testing is all about praying(just kidding). It will become even more awful when there are more dependencies and the component itself is more complex.
What about automatic testing?
You can just write a couple of lines of test to validate that this message box will show the correct message with the corresponding response status code. And then you can write a test with some mock field data to test it can submit to backend with expected data and format.
I can promise you that you will spend much less time writing those tests and running them(within several seconds for typically frontend tests) than you click click and type and submit in local dev. What's more, you can know which part is broken if your test failed. Instead of debugging the whole system. And your testing can run thousands of times, the is a significant benefit of automated testing.
It's all about isolation. Tests help you to isolate every component, so you can gain fast, precise feedback every time you change code. With just a couple more codes to write.

Regression testing

The validation testing is all about validating our new behavior, while the regression testing is for ensuring the old behavior won't change as we modify our code.
You just join a new team and your boss doesn't really like you, he gives some tickets to fix bugs and add new features to a "legacy" project. When you first look into the project's codebase, you got stock by the mass structure and it doesn't have any test and document! So you have to do a lot of research (by running the project's features one by one) to check what this project can do, and which part is broken.
After several days, you have the courage to modify the code, you fix a bug by changing some of the state hooks. But guess what, you still have a high risk to introduce new bugs because you don't know what this state hook is for.
So if the project has written tests before, what you need to do is just to check its test cases, because the test cases can serve as documentation, you can know what the project(components) will do in the specific situation. And if you modify the code, you can have the confidence to say that you didn't break the important features after you run all of the tests. So now the tests are serviced as regression testing to prevent regression.
It will be lucky if you are handling a project that has tests. And for the project without any test, you can still add by yourself to cover that behavior around the code that you want to modify.

Other benefits

There are some other benefits that automatic testing can give you, here are some of them:

  • Documentation: Tests can serve as documentation of your project because it simulates how user interact with the project and how the project react.
  • Force you to understand your requirement: If you don't know what your requirements are, you can't write tests, because tests are basically a translation from human word to script. And if you are using {% post_link Testing-Best-Practice-Tdd %}, you need to write tests first according to your requirements, that will be even better to force you to think about requirements first.
  • Force you to decouple your code in a good structure: If your code is coupled and all of the stuff is written in a single component, you are hard to write tests for it since you can't isolate them anymore. So tests can help you to consider whether that code structure and design are appropriate.

Why I Moved My Blog from Hexo to GitHub Issues

My Principles

When it comes to blogging, my guiding principles are:

  • simplicity: Post my blog with one click. Easy to modify. Easy to deploy.
  • ease of communication: It should be a platform that most developers are using, and it should be easy to leave comments and discuss.
  • minimalism: No unnecessary features is included.

Options

  1. SegmentFault (or Similar Platforms)
  • Pros:
    • Focused on technology-related content.
    • Supports Markdown.
  • Cons:
    • Overall quality is currently not very high.
    • Primarily a Single-language platform, limiting interaction with a global audience.
  1. Hexo
  • Pros:
    • Supports Markdown.
    • User-friendly and highly customizable in terms of style, offering better search engine optimization (SEO).
  • Cons:
    • Not conducive for community interaction, as developers do not like to leave comments on this platform.
  1. GitHub Issues
  • Pros:
    • Markdown support.
    • Easy to communicate and discuss, community of developers worldwide.
    • Integrates well with my work and network on GitHub.
  • Cons:
    • Navigation is not as intuitive.
    • Limited customization options for style and page layout.

Though git issues are basically zero SEO and style customization, I still choose it because it is the best for communication.

How to Design GOOD Test Cases

Testing for software is hard. Good test cases can help you increase maintainability and stability of your code, while bad test cases not only can not benefit you, some things can even slow down your development process.

It is good to see many test cases written in our team now, but some of them are not really benefit our team and even become burden of the development. I think part of the reason is because we don't have instructions for how to design good test cases that really help us out. So I'd like to build a basic framework about how to write test cases in UT and E2E.

In order to understand the reason why frameworks are constructed that way, we need to learn generic knowledge of testing first. We will discuss this in a bit.

Why do We Need Tests?

In order to write good test cases, we need to understand our goals. There are lots of reasons why we need tests when we develop software. Here is the most obvious one:

  • Safe from bugs: To ensure our software is correct today and correct in the unknown future.

As your software grows, you will inevitably need to verify more and more logic in order to ensure your modification of code is correct and doesn't break something that already exists accidentally. Automatic testing is a good way to reduce the cost of verifying.

Why Software Testing is Hard?

The key challenge of software testing are two things:

  1. The space of possible test cases is generally too big to cover exhaustively. Let say we wanna test a 32-bit floating-point multiply operation, a*b. There are 2(64) test cases!
  2. Software behavior varies discontinuously and discretely across the space of possible inputs. For example, if we wanna test abs(a)function, it behaves differently when a < 0 and a >= 0.

The system may seem to work fine across a broad range of inputs, and then abruptly fail at a single boundary point.

Therefore, test cases must be chosen carefully and systematically.

Warm Up: Design Test Cases for Multiply Function

/**
 * ...
 * @param a  an argument
 * @param b  another argument
 * @returns the multiply of a and b.
 */
 function multiply(a: number, b: number): number;

What is a good test suite for this function?

Systematic Testing

Systematic testing means that we are choosing test cases in a principled way, with the goal of designing a test suite with three desirable properties:

  • Correct. A correct test suite accepts all legal implementations of the spec. This gives us the freedom to change the implementation internally without having to change the test suite.
  • Thorough. A thorough test suite finds as many actual bugs in the implementation as possible.
  • Small. We wanna write fewer test cases while keeping it thorough.

Choosing test cases by partitioning

Software usually has a wide range of input values that produce different behaviors in different ranges. We want to pick a set of test cases that are small enough to be easy to write and maintain and quick to run, yet thorough enough to find bugs in the program.

To do this, we divide the input space into partitions, each consisting of a set of inputs.

Then we choose one test case from each partition, and that’s our test suite.

The idea behind partitions is to divide the input space into sets of similar inputs on which the program has similar behavior.

Let's look at abs(a) function:

/**
 * ...
 * @param a  the argument whose absolute value is to be determined
 * @returns the absolute value of the argument.
 */
 function abs(a: number): number

We focus on where this function will produce different behaviors in input space:

  1. When a >= 0, abs() returns a.
  2. When a < 0, abs() returns -a.

So we can divide the input space a: number into a < 0 and a >= 0 partitions like this:

And then we pick one test case from each partition and form our test suite:

// case 1: negative input
expect(abs(-1)).toBe(1);
// case 2: non negative input
expect(abs(2)).toBe(2);

Include boundaries in the partition

Bugs often occur at boundaries between partitions. Some examples:

  • 0 is a boundary between positive numbers and negative numbers
  • the maximum and minimum values of numeric types, like Number.MAX_SAFE_INTEGER or Number.MAX_VALUE.
  • emptiness for collection types, like the empty string, empty array, or empty set
  • the first and last element of a sequence, like a string or array

Why are these boundaries dangerous? Here are two main reasons:

  1. programmers often make off-by-one mistakes, like writing <= instead of <, or initializing a counter to 0 instead of 1.
  2. boundaries may be places of discontinuity in the code’s behavior: When a number variable used as an integer grows beyond Number.MAX_SAFE_INTEGER, for example, it suddenly starts to lose precision.

So we can add another test case in our abs() test suite:

// case 1: negative input
expect(abs(-1)).toBe(1);
// case 2: non negative input
expect(abs(2)).toBe(2);
// case 3: 0 is the boundary case
expect(abs(0)).toBe(0);

Cover Multiple Partition in The Same Test Case

In the previous example, we use pick one input of a partition as one test case. That's nice. But as the program becomes more complex and there are multiple dimensions of inputs, we might face the issue that even if we just pick one test case for one partition, the number of combinations of inputs is still overwhelming, so that it breaks the rule that we want our test suite to be small and fast.

Let's take a look at the multiply example:
/**
 * ...
 * @param a  an argument
 * @param b  another argument
 * @returns the multiply of a and b.
 */
 function multiply(a: number, b: number): number;

This function has a two-dimensional input space, consisting of all the pairs of integers (a,b). According to the rules of multiplication, we can separate the input space into these partitions:

  • a and b are both positive.The result is positive
  • a and b are both negative.The result is positive
  • a is positive, b is negative. The result is negative
  • a is negative, b is positive. The result is negative

And then, we add the boundary cases:

  • a or b is 0, because the result is always 0
  • a or b is 1, the identity value for multiplication
    To ensure that it works when the input number is very large, we also need to test Number.MAX_SAFE_INTEGER, Number.MIN_SAFE_INTEGER. So we have:
  • a or b is small or large (i.e., small enough to represent exactly in a number value, or too large for a number)

After separate each dimension into:

  • 0
  • 1
  • small positive integer (≤ Number.MAX_SAFE_INTEGER and > 1)
  • small negative integer (≥ Number.MIN_SAFE_INTEGER and < 0)
  • large positive integer (> Number.MAX_SAFE_INTEGER)
  • large negative integer (< Number.MIN_SAFE_INTEGER)

We end up having a complex partitions graph like this:

If we pick one test case(dots on the graph) for each partition, there are 36 combinations. That's a lot! This is a so-called combinatorial explosion. And this is only two dimensions.

How to solve it? We realize that our test cases increase as the dimensions increase: O(n) = s^n where s is the partitions for each dimension, and n is the number of dimensions. And we are repeatedly covering the same partition from a single dimension perspective. So we can treat the features of each input a and b as two separate partitions of the input space. One partition only considers one value:

// partition on a:
//   a = 0
//   a = 1
//   a is small integer > 1
//   a is small integer < 0
//   a is large positive integer
//   a is large negative integer
//      (where "small" fits in a TypeScript number, and "large" doesn't)

// partition on b:
//   b = 0
//   b = 1
//   b is small integer > 1
//   b is small integer < 0
//   b is large positive integer
//   b is large negative integer

And then we combine those values together without repeating them. We can form a test suite that covers all partitions of each dimension, and the complexity won't increase when dimensions increase: O(n) = s.

This indeed increases the risk of bugs, but we can add another layer of partition to cover some of the combinations:

// a and b are both positive, a is a small integer, b is a LARGE_NUMBER
expect(multiply(5, LARGE_NUMBER)).toBe(5 * LARGE_NUMBER);

// a and b are both negative, a is a small negative integer, b is NEGATIVE_LARGE_NUMBER
expect(multiply(-4, NEGATIVE_LARGE_NUMBER)).toBe(-4 * NEGATIVE_LARGE_NUMBER);

// a is positive and b is negative, a is a LARGE_NUMBER, b is a small negative integer
expect(multiply(LARGE_NUMBER, -3)).toBe(LARGE_NUMBER * -3);

// a is negative and b is positive, a is NEGATIVE_LARGE_NUMBER, b is a small positive integer
expect(multiply(NEGATIVE_LARGE_NUMBER, 2)).toBe(NEGATIVE_LARGE_NUMBER * 2);

// one or both are 0, a is 0, b is a 1
expect(multiply(0, 1)).toBe(0);

// one or both are 0, a is a 1, b is 0
expect(multiply(1, 0)).toBe(0);

Build a Redux from Scratch(Redux Source Code Review)

A state is nothing more than a getter/setter.

What You Will Learn From This Article

  1. Redux and React-Redux Design and Implementation: This article provides a deep dive into the design and implementation of Redux and React-Redux, demonstrating how they manage application state and facilitate communication between components.
  2. State Management (Getter, Setter): You will understand the fundamental pattern of state management and be able to understand any other state management tools.
  3. Publish/Subscribe Design Pattern: This article explains the publish/subscribe pattern, a key concept in Redux's state update and notification mechanism.

What is Redux?

Redux is a predictable state container for JavaScript apps. It's like a more powerful version of React's state. While React's state is limited to each component, Redux allows you to manage the state of your entire application in one place.

Redux solves this problem by storing the state of your entire application in a single JavaScript object within a single store. This makes it easier to track changes over time, debug, and even persist the state to local storage and restore it on the next page load.

redux arch

Redux contains these several components:

  • Action: A plain object describing what happened and the changes to be made to the state.
  • Dispatcher: A function that takes an action object and sends it to the store to change the state.
  • Store: The central repository that holds the state of the application. It allows access to the state, dispatching actions, and registering listeners.
  • View: The user interface that displays the data provided by the store. It can trigger actions based on user interactions.

If some action on the application, for example pushing a button causes the need to change the state, the change is made with an action. This causes re-rendering of the view.

Let's take a look at the implementation of a counter:

redux arch

The impact of the action on the state of the application is defined using a reducer. In practice, a reducer is a function that is given the current state and an action as parameters. It returns to a new state.

Let's now define a reducer for our application:

    // the first state is the current state in store, and the function return
    // a new state after action.
    const counterReducer = (state, action) => {
    if (action.type === 'INCREMENT') {
        return state + 1;
    } else if (action.type === 'DECREMENT') {
        return state - 1;
    } else if (action.type === 'ZERO') {
        return 0;
    }

    return state;
    }

And an action is like this:

    {
        type: 'INCREMENT',
    }

With the reducer, we can use redux to define a store.

    import { createStore } from 'redux';
    // initial state is 0
    const counterReducer = (state = 0, action) => {
        // ...
    };

    const store = createStore(counterReducer);

A store has two core methods: dispatch, subscribe. A function can be subscribe to a store, and a dispatch takes an action and changes the state, when the state is changed, the functions that subscribe to the store will be called.

    const store = createStore(counterReducer);
    console.log(store.getState());
    store.dispatch({ type: 'INCREMENT' });
    store.dispatch({ type: 'INCREMENT' });
    store.dispatch({ type: 'INCREMENT' });
    console.log(store.getState());
    store.dispatch({ type: 'ZERO' });
    store.dispatch({ type: 'DECREMENT' });
    console.log(store.getState());

    // console output
    0
    3
    -1

Publish/Subscribe Pattern

redux is following Publish/Subscribe design pattern. Where store is a channel from subscribing and publishing messages. The dispatch method is used to publish messages to the store. When an message is dispatched, the state of the application is changed. And subscribe method allows functions (subscribers) to subscribe to the store. These subscribers are notified when the state changes due to dispatched messages.

subscribe

Here are some benefits of Publish/Subscribe Pattern:

  • Loose coupling between components: the component that publish something doesn't need to who subscribe to the channel, making the system more modular and flexible.

  • High scalability (in theory, Pub/Sub allows any number of publishers to communicate with any number of subscribers).

Redux Implementation

The following code is simplified, check the original code: createStore.ts -- github

As we can see, the core of redux is the function createStore, and the dispatch, subscribe methods of a store. We will skip other methods first and implement these functions.

We first define their interfaces:

    interface Action {
        type: string;
        [extraProps: string]: any;
    }

    interface Reducer<T> {
        (state: T, action: Action): T;
    }
    // a store should have dispatch, subscribe methods
    interface Store<T> {
        dispatch: (action: Action) => void; // setter
        subscribe: (listener: () => void) => void;
        getState: () => T; // getter
    }
    // accept a reducer and initial state, return a store object
    function createStore<T>(reducer: Reducer<T>, initialState?: T): Store<T>; // create

The first step, we implement the storage logic and the basic framework:

    function createStore<T>(reducer: Reducer<T>, initialState?: T): Store<T> {
        // store reduce and state to local variable
        let currentReducer = reducer;
        let currentState: T | undefined = initialState;
        // store listen(function that subscribe to this store) in a map id -> func
        let currentListeners: Map<number, ListenerCallback> | null = new Map();
        // a id that will assign to the listener
        let listenerIdCounter = 0;
        
        function subscribe(listener: () => void) {
            // store listener
            const listenerId = listenerIdCounter++;
            currentListeners.set(listenerId, listener);
        }

        function dispatch(action: Action) {}

        function getState() {}

        return {
            dispatch,
            subscribe,
            getState,
        }
    }

And then we will start implement dispatch logic. When dispatch an action, the current state will change, and it will call all listeners subsequently.

    function createStore<T>(reducer: Reducer<T>, initialState?: T): Store<T> {
        // store reduce and state to local variable
        let currentReducer = reducer;
        let currentState: T | undefined = initialState;
        // store listen(function that subscribe to this store) in a map id -> func
        let currentListeners: Map<number, ListenerCallback> | null = new Map();
        // a id that will assign to the listener
        let listenerIdCounter = 0;
        
        function subscribe(listener: () => void) {
            // store listener
            const listenerId = listenerIdCounter++;
            currentListeners.set(listenerId, listener);
        }

        function dispatch(action: Action) {
            // We will call reducer using action and current state, and update current state
            currentState = currentReducer(currentState, action);
            // Call all listener one by one after update the state
            currentListeners.forEach(listener => {
                listener();
            });
        }

        function getState() {
            return currentState;
        }

        return {
            dispatch,
            subscribe,
            getState,
        }
    }

Now our toy redux is done. Notice that this is a simplified system without any error handling, if you take a look at redux's source code you shall see almost half of the code is handling error.

Introduce React-Redux

So the front part of redux flow is done, we can now: dispatch an action -> store state update. But how to update the view? We need to introduce react-redux, React Redux provides a pair of custom React hooks that allow your React components to interact with the Redux store.

useSelector reads a value from the store state and subscribes to updates(getter) the view, while useDispatch returns the store's dispatch method to let you dispatch actions(setter). When dispatch something, the propagation happens and informs all components with useSelector to update their values.

// store
ReactDOM.render(
  <Provider store={store}>
    <App />
  </Provider >,
  document.getElementById('root')
);

export function Counter() {
    // getter
    const count = useSelector((state) => state.count)
    // setter
    const dispatch = useDispatch()

    return (
        <div>
        <div className={styles.row}>
            <button
            className={styles.button}
            aria-label="Increment value"
            onClick={() => dispatch(increment())}
            >
            +
            </button>
            <span className={styles.value}>{count}</span>
            <button
            className={styles.button}
            aria-label="Decrement value"
            onClick={() => dispatch(decrement())}
            >
            -
            </button>
        </div>
        {/* omit additional rendering output here */}
        </div>
    )
}

Subscription(Propagation)

The core principle of react-redux is propagation. propagation represent the process that when there is a state changed, it will inform the root node about the change and the root node will carry the information to its children nodes, and thus the information is propagation through the whole tree.

We will create a Subscription interface, which contains:

export interface Subscription {
    // add children subscription, thus a tree structure is formed
    addNestedSub: (listener: VoidFunc) => VoidFunc
    // propagate the information to its children nodes
    notifyNestedSubs: VoidFunc
    // check whether the node is subscribed
    isSubscribed: () => boolean
    // do something when the node is notified
    handleChangeWrapper: VoidFunc
    // this is for component to attach their function to this node so that handleChangeWrapper can call it
    onStateChange?: VoidFunc | null
    // try to subscribe to a store
    trySubscribe: VoidFunc
    // unsubscribe the node for garbage collection
    tryUnsubscribe: VoidFunc
}
interface ListenerCollection {
    notify: () => void;
    subscribe: (callback: () => void) => void;
    unsubscribe: 
}[]

export function createSubscription(store: any, parentSub?: Subscription) {
    // for store unsubscribe function
    let unsubscribe: VoidFunc | undefined;
    // for store the listeners
    // for simplification we don't implement the listener methods here, we will do some wishful thinking and assume that we have a ListenerCollection class which is a link list that stores all the listeners(callback)
    let listeners: ListenerCollection;
    // Is this specific subscription subscribed (or only nested ones?)
    let selfSubscribed = false;

    function isSubscribed() {
        return selfSubscribed;
    }

    function trySubscribe() {
        // if it is a root node, subscribe its method to store
        // else add to parent's listeners
        if (!unsubscribe) {
            unsubscribe = parentSub
                ? parentSub.addNestedSub(handleChangeWrapper)
                : store.subscribe(handleChangeWrapper);
            // create a empty link list of listener for preparing a space for its children nodes
            listeners = createListenerCollection();
        }
    }

    function tryUnsubscribe() {
        if (unsubscribe) {
            // call unsubscribe method, unsubscribe from store or parent listeners
            unsubscribe();
            unsubscribe = undefined;
            // clear its listeners
            listeners.clear();
            listeners = null;
        }
    }
    // for children nodes to add their listener to parent node
    function addNestedSub(listener: () => void) {
        const cleanupListener = listeners.subscribe(listener);

        return () => {
            // unsubscribe
            tryUnsubscribe();
            // clear its listeners
            cleanupListener();
        };
    }
    // force rerender
    function handleChangeWrapper() {
        subscription.onStateChange();
    }

    // propagate change
    function notifyNestedSubs() {
        listeners.notify()
    }

    const subscription: Subscription = {
        addNestedSub,
        notifyNestedSubs,
        handleChangeWrapper,
        isSubscribed,
        trySubscribe,
        tryUnsubscribe,
    };

    return subscription;
}

Now we have a way to create subscriptions that is associated with a certain store. The basic flow is:

  1. Call createSubscription with store and call trySubscribe to get a root subscription, we can also assign a callback to onStateChange.
  2. Call createSubscription with store and root to get a child subscription, when call trySubscribe, instead of binding the onStateChange to store, it will be added to root listeners list.
  3. When store is changed, onStateChange of root will be called, and root will call notifyNestedSubs to notify children subscriptions, and the children subscriptions will do the same thing and notify their children subscriptions recursively. Thus, all nodes in the tree is informed. This process is called propagation.

Provider

First of all, we need to store our state in somewhere, react-redux use Context to store.

Here is a simple Context example:

const CounterContext = React.createContext('counter');


class App extends React.Component {
  render() {
    return (
      <CounterContext.Provider value={0}>
        <Counter />
      </CounterContext.Provider>
    );
  }
}

And the components that are child node of Provider can access CounterContext via a useContext:

const Counter = () => {
    const counter = useContext(CounterContext);

    return (<div>
        {counter}
    </div>);
}

We first take a look at how to implement Provider, which create and injects the store and a subscription to the children components.

const ReactReduxContext = React.createContext(null);

function Provider({store, children}){
    // provider will create a subscription when store with root is changed.
    const contextValue = useMemo(() => {
        const subscription = new Subscription(store);
        subscription.onStateChange = subscription.notifyNestedSubs;
        return {
            store,
            subscription,
        };
    }, [store]);
    // get initial state
    const previousState = useMemo(() => store.getState(), [store]);

    // when previousState or contextValue change, try to subscribe again
    useLayoutEffect(() => {
        const { subscription } = contextValue
        // subscribe to new store
        subscription.trySubscribe()
        // if the state is changed, notify listeners
        if (previousState !== store.getState()) {
            subscription.notifyNestedSubs()
        }
        
        return () => {
            subscription.tryUnsubscribe()
            subscription.onStateChange = null
        }
    }, [contextValue, previousState])

    return (
        // inject subscription and store to children nodes
    	<ReactReduxContext.Provider value={contextValue}>{children}</ReactReduxContext.Provider>
    );
}

useSelector

Now we have a way to get store and root subscription in children components, we start implement a useSelector hook, which add a subscription to the subscription tree, and force component to re-render when state is changed.

Here we use useReducer for telling the component to rerender.

function MyComponent() {
    // when dispatch is call, the component will rerender
    const [state, dispatch] = useReducer((s) => s + 1);

    return // ...
}

Then we implement a simplified useSelector hook:

// whenever the state in store is changed, update the state and inform a rerender.
// a selector callback for filter the state we want, equalityFn is for compare state change, here we use strictly equal ===
function useSelector(selector, equalityFn = (a, b) => a === b) {
    // get store and root subscription from context
    const { store, subscription: contextSub } = useContext(ReactReduxContext);
    // utilize the forceRender function for rerender
    const [, forceRender] = useReducer((s) => s + 1, 0);
    // create a new subscription for the component that call this hook with root subscription
    const subscription = useMemo(() => new Subscription(store, contextSub), [
        store,
        contextSub,
    ]);
    // get current state when re-render
    const storeState = store.getState();
    // store selected state
    let selectedState;
    // cache selector, store state, selected state when every time render
    const latestSelector = useRef();
    const latestStoreState = useRef();
    const latestSelectedState = useRef();
    useLayoutEffect(() => {
        latestSelector.current = selector;
        latestStoreState.current = storeState;
        latestSelectedState.current = selectedState;
    });

    // if the cache is needed to update
    if (
        selector !== latestSelector.current ||
        storeState !== latestStoreState.current
    ) {
        // calculate new selected state
        const newSelectedState = selector(storeState);
        // if new selected state is not equal to the previous state
        if (
            latestSelectedState.current === undefined ||
            !equalityFn(newSelectedState, latestSelectedState.current)
        ) {
            // update state
            selectedState = newSelectedState
        } else {
            // use previous state
            selectedState = latestSelectedState.current
        }
    } else {
        // use previous state
        selectedState = latestSelectedState.current
    }

    // attach checkForUpdates to the subscription's onStateChange
    //Every time subscriptions are updated, checkForUpdates will be called
    useLayoutEffect(() => {
        // compare store state with current state
        // if it is not equal, update current state
        // force re-render the component
        function checkForUpdates() {
            try {
                const newStoreState = store.getState();
                const newSelectedState = latestSelector.current(newStoreState);

                if (equalityFn(newSelectedState, latestSelectedState.current)) {
                    return;
                }

                latestSelectedState.current = newSelectedState;
                latestStoreState.current = newStoreState;
            } catch (err) {
            }
            // re-render anyway
            forceRender();
        }
        // attach checkForUpdates to the subscription's onStateChange
        subscription.onStateChange = checkForUpdates;
        subscription.trySubscribe();
        // call checkForUpdates for initialization
        checkForUpdates();

        return () => subscription.tryUnsubscribe();
    }, [store, subscription]);
    
    // return state we want
    return selectedState;
}

useReducer

As you can see we use useReducer here to trigger a state update and trigger a render. You might wonder why we don't use useState to do the same thing. The useState indeed can be used to force a re-render, but it requires writing extra code.

    // useReducer
    const [, forceRender] = useReducer((s) => s + 1, 0);
    // useState
    const [, setState] = useState(0);
    const forceRender = () => setState(prev => prev + 1);

useDispatch

useDispatch is relatively simple, it get the dispatch function from the context:

useDispatch() {
    const { store } = useContext(ReactReduxContext);
    return store.dispatch;
}

Testing Best Practice Tdd

Background

When we say that someone's code quality is bad, in most of the time, what we really mean is that the code is hard to understand. Many developers prefer to start a new project from scratch rather than add features to a legacy project, because the mental cost of understanding the code is much higher than creating something new. As the features of the project increases, it inevitably becomes more difficult to understand. Therefore, it's important to have a way to measure and control the code's complexity and understandability.

In this article, I will introduce two mainstream methods for measuring code complexity - cyclomatic complexity and cognitive complexity. While explaining why cyclomatic complexity may not always be sufficient, I will also introduce you cognitive complexity. Using its rules, I will explain which programming behaviors can make code harder to comprehend.

Cyclomatic Complexity

Cyclomatic Complexity was initially formulated as a measurement of the “testability and maintainability” of the control flow of a module.

Cyclomatic Complexity measuring code complexity via those metrics:

  • Number of decision points: The number of decision points in the code, such as loops, conditionals, and case statements.
  • Number of independent paths: The number of independent paths through the code. This is calculated using the formula V(G) = E - N + 2, where E is the number of edges in the code's control flow graph, and N is the number of nodes.

Flow Graph

Image we have a function with flow graph above, we can calculate the cyclomatic complexity is V(G) = 9(edges) - 8(nodes) + 2 = 3. So when the numbers of decision points increases, while the node numbers is not changing, We will say it is more complex in cyclomatic complexity metric.

Simply put, we can calculate cyclomatic complexity via counting the independent flow paths(decision points) that our abstraction can take while executing.

Code Example

function makeConditionalState(x){
  const state = createEmptyState();
  if(x){
    state.push(x);
  }
  return state;
}
          // Entry
   
          // StatementA -> Always executes
   
          // Conditional
   |      
   |      // If conditional is true execute StatementB
     
          // Exit conditional
   
          // Exit

The presence of the conditional statement if(x) in this program creates a decision path, resulting in a cyclomatic complexity of 2.

An illustration of the problem

Cyclomatic complexity is a useful metric to measure code complexity, but it has its problem. Let’s looks into two examples:

function sumOfPrimes(max) { // +1
  let total = 0;
  OUT: for (let i = 1; i <= max; ++i) { // +1
    for (let j = 2; j < i; ++j) { // +1
      if (i % j === 0) { // +1
        continue OUT;
      }
    }
    total += i;
  }
  return total;
}
// Cyclomatic Complexity 4
function getWords(number) { // +1
  switch (number) {
    case 1: // +1
      return "one";
    case 2: // +1
      return "a couple";
    case 3: // +1
      return "a few";
    default:
      return "lots";
  }
}
// Cyclomatic Complexity 4

While Cyclomatic Complexity gives equal weight to both the sumOfPrimes and getWords methods, it is apparent that sumOfPrimes is much more complex and difficult to understand than getWords. This illustrates that measuring understandability based solely on the paths of a program may not be sufficient.

Cognitive Complexity

Cognitive Complexity is a more comprehensive metric than Cyclomatic Complexity, as it measures not only the number of control flow structures, but also how they interact with each other and the mental effort required to understand the code. It assigns a cognitive weight to each control flow construct based on its complexity and interactions with others, enabling a more accurate assessment of code readability and maintainability. This is important because certain code constructs, such as nested loops and conditional statements, can be more difficult for humans to understand and reason about than others.

Basic criteria and methodology

A Cognitive Complexity score is assessed according to three basic rules:

  1. Ignore structures that allow multiple statements to be readably shorthanded into one
  2. Increment (add one) for each break in the linear flow of the code
  3. Increment when flow-breaking structures are nested

Additionally, a complexity score is made up of four different types of increments:

  1. Nesting - assessed for nesting control flow structures inside each other
  2. Structural - assessed on control flow structures that are subject to a nesting
    increment, and that increase the nesting count
  3. Fundamental - assessed on statements not subject to a nesting increment
  4. Hybrid - assessed on control flow structures that are not subject to a nesting
    increment, but which do increase the nesting count

These rules and the principles behind them are further detailed in the following sections.

Ignore shorthand

A guiding principle in the formulation of Cognitive Complexity has been that it should incent
good coding practices. That is, it should either ignore or discount features that make code
more readable.

Null-coalescing

// bad practice
function something(a) {
	if(a != null) { // +1
		return a.map(item => item + 1);
  }
}

// good practice
function something(a) {
  return a?.map(item => item + 1);
}

Cognitive Complexity will ignore null-coalescing to incent good coding practices.##

Increment for breaks in the linear flow

Another guiding principle in the formulation of Cognitive Complexity is that structures that
break code’s normal linear flow from top to bottom, left to right
require maintainers to work
harder to understand that code.

Some of them are:

  • Loop structures: for, while, do while, ...
  • Conditionals: ternary operators, if, #if, #ifdef, ...

Catches

try { // +1
  // something
} catch(err) {
  // something
}

A try...catch will contribute complexity very similiar to if...else . So it also increment to cognitive complexity.

Switches

A switch and all its cases combined incurs a single structural increment. This is different than cyclomatic complexity, which incurs increment for each case.

But for maintainer’s point of view, a switch with cases is much easier to understand than if...else if chain.

function getAnimalSound(animal) {
  switch (animal) {
    case "cat":
      return "meow";
    case "dog":
      return "woof";
    default:
      return "unknown";
  }
}

function getAnimalSound(animal) {
  if (animal === "cat") {
    return "meow";
  } else if (animal === "dog") {
    return "woof";
  } else {
    return "unknown";
  }
}

When we using switch we only need to compare a single variable to a named set of literal values, making it easier to understand and maintain.

Sequences of logical operators

a && b
a && b && c && d
a || b && c || d // +1

Understanding the first two lines isn’t very difficult. On the other hand, there is a marked difference in the effort to understand the third line.

When mixed operators, boolean expressions become more difficult to understand.

if (a // +1 `if`
  && b && c // +1
  || d || e // +1
  && f) // +1

if (a // +1 `if`
  && // +1
  !(b && c)) // +1

Recursion

Unlike Cyclomatic Complexity, Cognitive Complexity adds a fundamental increment for each
method in a recursion cycle, whether direct or indirect. Because Recursion contribute very similiar complexity like Loop.

Increment for nested flow-break structures

Nesting flow-break is something that heavily increase code complexity, five if...else nested is much harder to understand than same five linear series of if...else .

void myMethod () {
	try {
		if (condition1) { // +1
			for (int i = 0; i < 10; i++) { // +2 (nesting=1)
				while (condition2) {  } // +3 (nesting=2)
			}
		}
	} catch (ExcepType1 | ExcepType2 e) { // +1
		if (condition2) {  } // +2 (nesting=1)
	}
}

Intuitively ‘right’ complexity scores

Let’s look back to our first example, where cyclomatic complexity give them the same score.

function sumOfPrimes(max) {
  let total = 0;
  OUT: for (let i = 1; i <= max; ++i) { // +1
    for (let j = 2; j < i; ++j) { // +2
      if (i % j === 0) { // +3
        continue OUT; // +1
      }
    }
    total += i;
  }
  return total;
}
// Cyclomatic Complexity 7
function getWords(number) {
  switch (number) { // +1
    case 1:
      return "one";
    case 2:
      return "a couple";
    case 3:
      return "a few";
    default:
      return "lots";
  }
}
// Cyclomatic Complexity 1

The Cognitive Complexity algorithm gives these two methods markedly different scores,
ones that are far more reflective of their relative understandability.

Metrics that are valuable above the method level

With Cyclomatic Complexity, it can be difficult to differentiate between a class with a large number of simple getters and setters and one that contains complex control flow, as both can have the same number of decision points. However, Cognitive Complexity addresses this limitation by not incrementing for method structure, making it easier to compare the metric values of different classes. As a result, it becomes possible to distinguish between classes with simple structures and those that contain complex control flow, enabling better identification of areas of a program that may be difficult to understand and maintain.

Industry Standard

Cyclomatic Complexity Code Quality Readability Maintainability
1-10 Clear and well-structured High Low
11-20 Somewhat complex Medium Moderate
21-50 Complex Low Difficult
51+ Very complex Poor Very difficult
Cognitive Complexity Code Quality Readability Maintainability
1-5 Simple and easy to follow High Easy
6-10 Somewhat complex Medium Moderate
11-20 Complex Low Difficult
21+ Very complex Poor Very difficult

Setup Complexity Metrics for You Code with ESLint

One effective way to manage complexity metrics for your code is by using ESLint, a popular linting tool that can help detect and report on various code issues, including Cyclomatic and Cognitive Complexity.

Cyclomatic Complexity

To set up ESLint to report on Cyclomatic Complexity, you can use the eslint-plugin-complexity plugin, which provides a configurable rule for enforcing a maximum Cyclomatic Complexity threshold. First, you'll need to install the plugin by running npm install eslint-plugin-complexity. Then, you can add the plugin to your ESLint configuration file and configure the maximum threshold value:

{
  "plugins": ["complexity"],
  "rules": {
    "complexity": ["error", 10]
  }
}

In this example, we've set the maximum threshold to 10. If the Cyclomatic Complexity of a function or method exceeds this threshold, ESLint will report an error.

Cognitive Complexity

To set up ESLint to report on Cognitive Complexity, you can use the eslint-plugin-cognitive-complexity plugin, which provides a configurable rule for enforcing a maximum Cognitive Complexity threshold. First, you'll need to install the plugin by running npm install eslint-plugin-cognitive-complexity. Then, you can add the plugin to your ESLint configuration file and configure the maximum threshold value:

{
  "plugins": ["cognitive-complexity"],
  "rules": {
    "cognitive-complexity": ["error", 15]
  }
}

In this example, we've set the maximum threshold to 15. If the Cognitive Complexity of a function or method exceeds this threshold, ESLint will report an error.

By setting up these metrics in ESLint, you can proactively monitor and manage the complexity of your code, making it easier to understand and maintain over time.

Summary

In conclusion, code complexity is a crucial factor that can significantly impact work efficiency and project maintainability. The use of Cyclomatic Complexity and Cognitive Complexity metrics can help measure and manage code complexity, allowing developers to identify potential problem areas and optimize code readability and maintainability.

There are several ways to reduce code complexity, like using design patterns and applying TDDTesting Best Practice Tdd #12. Overall, by understanding and managing code complexity, developers can build better, more maintainable software that delivers value and meets user needs.

Introducing Code Complexity Metric: Cognitive Complexity

Background

When we say that someone's code quality is bad, in most of the time, what we really mean is that the code is hard to understand. Many developers prefer to start a new project from scratch rather than add features to a legacy project, because the mental cost of understanding the code is much higher than creating something new. As the features of the project increases, it inevitably becomes more difficult to understand. Therefore, it's important to have a way to measure and control the code's complexity and understandability.

In this article, I will introduce two mainstream methods for measuring code complexity - cyclomatic complexity and cognitive complexity. While explaining why cyclomatic complexity may not always be sufficient, I will also introduce you cognitive complexity. Using its rules, I will explain which programming behaviors can make code harder to comprehend.

Cyclomatic Complexity

Cyclomatic Complexity was initially formulated as a measurement of the “testability and maintainability” of the control flow of a module.

Cyclomatic Complexity measuring code complexity via those metrics:

  • Number of decision points: The number of decision points in the code, such as loops, conditionals, and case statements.
  • Number of independent paths: The number of independent paths through the code. This is calculated using the formula V(G) = E - N + 2, where E is the number of edges in the code's control flow graph, and N is the number of nodes.

Flow Graph

Image we have a function with flow graph above, we can calculate the cyclomatic complexity is V(G) = 9(edges) - 8(nodes) + 2 = 3. So when the numbers of decision points increases, while the node numbers is not changing, We will say it is more complex in cyclomatic complexity metric.

Simply put, we can calculate cyclomatic complexity via counting the independent flow paths(decision points) that our abstraction can take while executing.

Code Example

function makeConditionalState(x){
  const state = createEmptyState();
  if(x){
    state.push(x);
  }
  return state;
}
          // Entry
   
          // StatementA -> Always executes
   
          // Conditional
   |      
   |      // If conditional is true execute StatementB
     
          // Exit conditional
   
          // Exit

The presence of the conditional statement if(x) in this program creates a decision path, resulting in a cyclomatic complexity of 2.

An illustration of the problem

Cyclomatic complexity is a useful metric to measure code complexity, but it has its problem. Let’s looks into two examples:

function sumOfPrimes(max) { // +1
  let total = 0;
  OUT: for (let i = 1; i <= max; ++i) { // +1
    for (let j = 2; j < i; ++j) { // +1
      if (i % j === 0) { // +1
        continue OUT;
      }
    }
    total += i;
  }
  return total;
}
// Cyclomatic Complexity 4
function getWords(number) { // +1
  switch (number) {
    case 1: // +1
      return "one";
    case 2: // +1
      return "a couple";
    case 3: // +1
      return "a few";
    default:
      return "lots";
  }
}
// Cyclomatic Complexity 4

While Cyclomatic Complexity gives equal weight to both the sumOfPrimes and getWords methods, it is apparent that sumOfPrimes is much more complex and difficult to understand than getWords. This illustrates that measuring understandability based solely on the paths of a program may not be sufficient.

Cognitive Complexity

Cognitive Complexity is a more comprehensive metric than Cyclomatic Complexity, as it measures not only the number of control flow structures, but also how they interact with each other and the mental effort required to understand the code. It assigns a cognitive weight to each control flow construct based on its complexity and interactions with others, enabling a more accurate assessment of code readability and maintainability. This is important because certain code constructs, such as nested loops and conditional statements, can be more difficult for humans to understand and reason about than others.

Basic criteria and methodology

A Cognitive Complexity score is assessed according to three basic rules:

  1. Ignore structures that allow multiple statements to be readably shorthanded into one
  2. Increment (add one) for each break in the linear flow of the code
  3. Increment when flow-breaking structures are nested

Additionally, a complexity score is made up of four different types of increments:

  1. Nesting - assessed for nesting control flow structures inside each other
  2. Structural - assessed on control flow structures that are subject to a nesting
    increment, and that increase the nesting count
  3. Fundamental - assessed on statements not subject to a nesting increment
  4. Hybrid - assessed on control flow structures that are not subject to a nesting
    increment, but which do increase the nesting count

These rules and the principles behind them are further detailed in the following sections.

Ignore shorthand

A guiding principle in the formulation of Cognitive Complexity has been that it should incent
good coding practices. That is, it should either ignore or discount features that make code
more readable.

Null-coalescing

// bad practice
function something(a) {
	if(a != null) { // +1
		return a.map(item => item + 1);
  }
}

// good practice
function something(a) {
  return a?.map(item => item + 1);
}

Cognitive Complexity will ignore null-coalescing to incent good coding practices.##

Increment for breaks in the linear flow

Another guiding principle in the formulation of Cognitive Complexity is that structures that
break code’s normal linear flow from top to bottom, left to right
require maintainers to work
harder to understand that code.

Some of them are:

  • Loop structures: for, while, do while, ...
  • Conditionals: ternary operators, if, #if, #ifdef, ...

Catches

try { // +1
  // something
} catch(err) {
  // something
}

A try...catch will contribute complexity very similiar to if...else . So it also increment to cognitive complexity.

Switches

A switch and all its cases combined incurs a single structural increment. This is different than cyclomatic complexity, which incurs increment for each case.

But for maintainer’s point of view, a switch with cases is much easier to understand than if...else if chain.

function getAnimalSound(animal) {
  switch (animal) {
    case "cat":
      return "meow";
    case "dog":
      return "woof";
    default:
      return "unknown";
  }
}

function getAnimalSound(animal) {
  if (animal === "cat") {
    return "meow";
  } else if (animal === "dog") {
    return "woof";
  } else {
    return "unknown";
  }
}

When we using switch we only need to compare a single variable to a named set of literal values, making it easier to understand and maintain.

Sequences of logical operators

a && b
a && b && c && d
a || b && c || d // +1

Understanding the first two lines isn’t very difficult. On the other hand, there is a marked difference in the effort to understand the third line.

When mixed operators, boolean expressions become more difficult to understand.

if (a // +1 `if`
  && b && c // +1
  || d || e // +1
  && f) // +1

if (a // +1 `if`
  && // +1
  !(b && c)) // +1

Recursion

Unlike Cyclomatic Complexity, Cognitive Complexity adds a fundamental increment for each
method in a recursion cycle, whether direct or indirect. Because Recursion contribute very similiar complexity like Loop.

Increment for nested flow-break structures

Nesting flow-break is something that heavily increase code complexity, five if...else nested is much harder to understand than same five linear series of if...else .

void myMethod () {
	try {
		if (condition1) { // +1
			for (int i = 0; i < 10; i++) { // +2 (nesting=1)
				while (condition2) {  } // +3 (nesting=2)
			}
		}
	} catch (ExcepType1 | ExcepType2 e) { // +1
		if (condition2) {  } // +2 (nesting=1)
	}
}

Intuitively ‘right’ complexity scores

Let’s look back to our first example, where cyclomatic complexity give them the same score.

function sumOfPrimes(max) {
  let total = 0;
  OUT: for (let i = 1; i <= max; ++i) { // +1
    for (let j = 2; j < i; ++j) { // +2
      if (i % j === 0) { // +3
        continue OUT; // +1
      }
    }
    total += i;
  }
  return total;
}
// Cyclomatic Complexity 7
function getWords(number) {
  switch (number) { // +1
    case 1:
      return "one";
    case 2:
      return "a couple";
    case 3:
      return "a few";
    default:
      return "lots";
  }
}
// Cyclomatic Complexity 1

The Cognitive Complexity algorithm gives these two methods markedly different scores,
ones that are far more reflective of their relative understandability.

Metrics that are valuable above the method level

With Cyclomatic Complexity, it can be difficult to differentiate between a class with a large number of simple getters and setters and one that contains complex control flow, as both can have the same number of decision points. However, Cognitive Complexity addresses this limitation by not incrementing for method structure, making it easier to compare the metric values of different classes. As a result, it becomes possible to distinguish between classes with simple structures and those that contain complex control flow, enabling better identification of areas of a program that may be difficult to understand and maintain.

Industry Standard

Cyclomatic Complexity Code Quality Readability Maintainability
1-10 Clear and well-structured High Low
11-20 Somewhat complex Medium Moderate
21-50 Complex Low Difficult
51+ Very complex Poor Very difficult
Cognitive Complexity Code Quality Readability Maintainability
1-5 Simple and easy to follow High Easy
6-10 Somewhat complex Medium Moderate
11-20 Complex Low Difficult
21+ Very complex Poor Very difficult

Setup Complexity Metrics for You Code with ESLint

One effective way to manage complexity metrics for your code is by using ESLint, a popular linting tool that can help detect and report on various code issues, including Cyclomatic and Cognitive Complexity.

Cyclomatic Complexity

To set up ESLint to report on Cyclomatic Complexity, you can use the eslint-plugin-complexity plugin, which provides a configurable rule for enforcing a maximum Cyclomatic Complexity threshold. First, you'll need to install the plugin by running npm install eslint-plugin-complexity. Then, you can add the plugin to your ESLint configuration file and configure the maximum threshold value:

{
  "plugins": ["complexity"],
  "rules": {
    "complexity": ["error", 10]
  }
}

In this example, we've set the maximum threshold to 10. If the Cyclomatic Complexity of a function or method exceeds this threshold, ESLint will report an error.

Cognitive Complexity

To set up ESLint to report on Cognitive Complexity, you can use the eslint-plugin-cognitive-complexity plugin, which provides a configurable rule for enforcing a maximum Cognitive Complexity threshold. First, you'll need to install the plugin by running npm install eslint-plugin-cognitive-complexity. Then, you can add the plugin to your ESLint configuration file and configure the maximum threshold value:

{
  "plugins": ["cognitive-complexity"],
  "rules": {
    "cognitive-complexity": ["error", 15]
  }
}

In this example, we've set the maximum threshold to 15. If the Cognitive Complexity of a function or method exceeds this threshold, ESLint will report an error.

By setting up these metrics in ESLint, you can proactively monitor and manage the complexity of your code, making it easier to understand and maintain over time.

Summary

In conclusion, code complexity is a crucial factor that can significantly impact work efficiency and project maintainability. The use of Cyclomatic Complexity and Cognitive Complexity metrics can help measure and manage code complexity, allowing developers to identify potential problem areas and optimize code readability and maintainability.

There are several ways to reduce code complexity, like using design patterns and applying TDD({% post_link Testing-Best-Practice-Tdd %}). Overall, by understanding and managing code complexity, developers can build better, more maintainable software that delivers value and meets user needs.

Learning How React Hooks Work by Building a Naive useState

An Interview Question

Have you been asked questions like this during interviews?:

  • Why react hook cannot be written in conditional or loop statements?

(This is a classic question of Chinese style interview, we call it '八股文', which basically means that the questions is too classic and everyone can answer it by remembering it)

In this article, we will learn the software engineering principles behind the scenes. After learning these principles, you will easily understand how other state management tools(redux, jotal) work.

The Rules of Hooks

  • Don’t call Hooks inside loops, conditions, or nested functions

Learning How React Hooks Work by Building a Naive useState

Part 1: What is a State?

A state is nothing more than a getter and a setter.

You can see the concept of state exists in almost all programming languages. (Some programming languages use stream instead given that the issues state causes)

  • It is a powerful abstraction given that we ordinarily view the world as populated by independent objects, each of which has a state that changes over time.
  • An object is said to "have state" if its behavior is influenced by its history.

Let's take an example using Javascript:
Say, we wanna build a bank account system. Whether we can withdraw a certain amount of money from a bank account depends upon the history of deposit and withdrawal transactions.

function bankAccount(deposit){
    let balance = deposit;
    
    return (amount) => {
        // check amount history and decide whether to withdraw
        if (balance >= amount) {
            balance -= amount;
            return true;
        }
        return false;
    }    
}

const withdraw = bankAccount(666);
// success, balance is 111 now.
withdraw(555);
// failed
withdraw(666);

As you can see, in javascript, the state is pretty simple:

  • init: use keyword let to define a state let balance = 50;
  • setter: use = to assign(set) a new value to state balance = 666;
  • getter: use the variable name to get the value balance

Part 2: Implement useState

Once you understand the essence of state, you can easily understand react state too.

React state is nothing but a state abstraction with a rerender mechanism in react component.

I will walk through how to build a useState step by step. Before that, let's sort out what features we need to react state.

  • init: init a state, in react useState() init a state in a component.
  • getter: the first value of return array of useState() is the getter.
  • setter: the second value of return array of useState() is the setter.
  • rerender: when set a new state, it should trigger react component rerender using the latest state.
// init a state balance with value 666
// get state using balance
// set state using setBalance method
const [balance, setBalance] = useState(666);
Javascript already provides a state abstraction, and react provides a function render to rerender a component. Let's build our useState upon these abstraction.
let state;
function useState(initialValue) {
    state = state || initialValue;
    function setter(newState) {
        state = newState;
        render(<App />, document.getElementById('root'));
    }
    return [state, setter];
}

Here is how we use our state:

const App = () => {
    const [balance, setBalance] = useState(666);
    
    return (<div onClick={() => setBalance(888)}>{balance}</div>);
}

Now it works pretty well! But as our react component becomes more complex, we find that this implementation is not sophisticated enough, it will break when there are multiple states are declared.

Multiple States

It breaks when we add a name state:

const App = () => {
    const [balance, setBalance] = useState(666);
    const [name, setName] = useState('handsome');

    return (<div onClick={() => setBalance(888)}>
        {balance}
        I'm {name}
    </div>);
}

// return: 666 I'm 666, should be: 666 I'm handsome

This is because we only store states in a single variable. Now we change it to Array(List), we need a cursor to indicate the index of the current state, so that we can get the correct state:

let state = [];
let cursor = 0;

function useState(initialValue) {
    // get current cursor by order
    const currentCursor = cursor;
    state[currentCursor] = state[currentCursor] || initialValue;
    // assign next cursor to next useState
    cursor++;
    function setter(newState) {
        state[currentCursor] = newState;
        // reset cursor
        cursor = 0;
        render(<App />, document.getElementById('root'));
    }
    return [state[currentCursor], setter];
}

Now let's take a look at what happens when we call the code below:

const [balance, setBalance] = useState(666);
// state = [666], cursor = 1
// balance = state[0]
// setBalance = (newState) => state[0] = newState //...

const [name, setName] = useState('handsome');
// state = [666, 'handsome'], cursor = 2
// name = state[1]
// setBalance = (newState) => state[1] = newState //...

// When we call setter:
setBalance(777);
// state = [777, 'handsome'], cursor = 0, rerender

Why is Order Important?

As you can see, the order is very important because we use array and index to help useState to map to correct state's getter and setter.
Let's take a look if we write hook inside a conditional statement:

let firstRender = true;

if (balance === '666') {
    const [balance, setBalance] = useState(666);
    firstRender = false;
}

const [name, setName] = useState('handsome');

setBalance(777);
First render, the if statement is true, it executes as previous:
const [balance, setBalance] = useState(666);
// state = [666], cursor = 1
// balance = state[0]
// setBalance = (newState) => state[0] = newState //...

const [name, setName] = useState('handsome');
// state = [666, 'handsome'], cursor = 2
// name = state[1]
// setBalance = (newState) => state[1] = newState //...
After setBalance is called, if become false and rerender:
// When we call setter:
setBalance(777);
// state = [777, 'handsome'], cursor = 0, rerender

const [balance, setBalance] = useState(666);
// state = [666], cursor = 1
// balance = state[0]
// setBalance = (newState) => state[0] = newState //...


const [name, setName] = useState('handsome');
// state = [666, 'handsome'], cursor = 1
// name = state[0]
// setBalance = (newState) => state[0] = newState //...

As you can see, the name state is mapped to the wrong state using the wrong cursor. This is why we cannot break the order of state execution using conditional or loop statements in react.

Does Github Copilot Worth It?

I personally use copilot to speed up my coding for a long time. I've discovered some use cases where git copilot can help me a lot. For me, copilot speeds up my coding progress by at least 30%. So it's definitely a good deal for me to subscribe to it for the cost of a cup of coffee (10$ per month).
Here I want to show you some scenarios where copilot can accelerate our development. Also provide some similiar tools for you to apply in your daily work.

Testing your code

One pain-point of writing tests for FE developers is the unfamiliarity of the test framework's APIs. And automatic testing often includes some simple script and also a lot of repeat, which is what AI is good at. After a period of use, I found that TDD is one of the best ways to combine testing with copilot.
Copilot works well with all kinds of testing, such as unit testing, e2e testing. The dataset behind copilot is almost the whole open source community. You don't need to worry about whether there exist any APIs that copilot didn't meet before.

Trying to combine it with TDD

The reason why I use TDD with copilot is that the copilot will read your code base and give you hints. So if I write tests first, then the copilot will try to write code based on the tests I wrote before. This saves the amount of time to write unnecessary comments just for copilot to write code.
Here is a simple todo component with TDD and copilot.

{% youtube VhRrEiR2rY0 %}

Writing Stylesheet

I hate remembering loads of APIs and style rules. To be honest, humans are not experts at remembering. But computer are. So when I want to write some stylesheet with some unfamiliar style rules, I will ask the copilot to help me with that. For instance, I am not really familiar with the functions and rules of grid, so I use copilot to help me up.

CSS with Copilot

Creating some useful mapping

Frontend developer needs to create mapping for localization. We can just use copilot to do that instead of searching on the internet.

Mapping with Copilot

Generating stubs data

If you write a lot of tests, you need to generate stubs that are random enough. You will find that they are just some similar and repeat data. Copilot is also good at doing this.

Stubs with Copilot

Regular expressions / Validator

When I write regular expressions or validators, I always need to go to search on the internet, and then open an online regular expression runner to test if it works properly. Now we have copilot, we can just tell it what rules we need, and it will generate the expression / validator for us. You can write some unit tests for sure.

Validator with Copilot

Signal-flow style process

One of the powerful techniques to handle data is thinking of it as signal flow, which makes the whole process easily decouple into several units(like filtering, mapping, reducing...). Copilot works well in this pattern. We only need to write a comment which tells copilot(and developers) how the data flows, and the code will be generated perfectly.
Tips: Design that has more modularity is always easier to create, modify and test. Copilot will also generate more accurate code when the design is good.

Signal with Copilot

Some helpful utils

I randomly picked this safeStringify util function in my code base. It ends up that the copilot wrote a better version than mine.

Utils with Copilot

Write vscode setting.json(or some thing like that)

Another useful case is that when I want to setup something on my vscode, I will just put a comment and let the copilot do that for me. Most of the time, it works well.
Here is an example of setup eslint auto save for my vscode:

Vscode with Copilot

Other helpful / competing tools

ChatGPT

I would say chatGPT is a much more powerful tool for us because it is not limited to code generation. It can also explain code, refactor code and tell you why the code is broken.(There are many creative ways to use it.) But copilot cooperates better with IDE. Now chatGPT is still an individual website, the vscode plugin of chatGPT doesn't work.

Query

Feel free to ask chatGPT anything. Some questions are: How to install xxx in linux? What is the best database for social network apps? I have a system like this... How can I improve it? What is the best material to learn react?

Query with ChatGPT

Add tests based on a list of use cases

Tell the bot what your use cases are, it will give you a super accurate test code. Awesome!

Tests with ChatGPT

Explain code

It can explain your code super clearly. One tip is that you should provide the context as much as possible or the bot will guess what a function is for according to the function name and parameter, which may lead to low accuracy.
Here is a random code snippet I picked from my textbook.

Explain with ChatGPT

Refactor

I was shocked that it not only provides the refactored code, but also tells you why it will refactor that way.

Refactor with ChatGPT

Why my code is broken?

To tell you why your code messes up. Very helpful when you are learning a new language or library.

Broken with ChatGPT

Tabnine

Tabnine's function is basically the same as github copilot, while it has more language support and enphasizes privacy. Also, github copilot is one model for all, while tabnine prefers individualised language models. This will cause some differences in their suggestion.
I tried Tabnine pro and it just does not work that well like I thought. It seems didn't read my code base and even provide ts syntax in js files.
My suggestion is to use github copilot if the language you use are support by github copilot.

Tabnine compare with Copilot

Summary

There are still a lot of scenarios where AI can help me to have a better life. But the key principle is to know what humans are good at, and what are the limitations of humans. I'm the person who don't like do repeat work or remember a lot of details at all. So I'm super happy that AI came out to help me do loads of work. Will AI replace humans? Probably not. Because AI still doesn't have creativity like humans do now. But with the help of AI, we can focus on what we are good at, and do the job more effectively and joyfully.

Applying Automatic Testing in The Development Cycle

Background

Testing is a critical aspect of any software development process. Ensuring that an application functions as expected and is free of defects is essential for delivering a high-quality product to end-users. In this section, we will discuss the importance of testing in the development cycle and highlight the benefits of automating this process.

Testing is an integral part of the production process, and it is crucial to remember that your software will be tested eventually, whether by you, your automated testing scripts, or the end-user. Neglecting to test a product thoroughly can result in subpar performance, errors, and, ultimately, dissatisfied customers.

Most testing tasks are simple and repetitive, making them excellent for automation. By automating testing processes, you can save valuable time and resources, improve accuracy, and reduce the likelihood of human error(Alway bear in mind that Humans are not prefect, they make a lot of stupid mistakes). Automated testing can also be run as frequently as needed, ensuring that defects are identified and addressed promptly.

Throughout the development cycle, various types of testing should be implemented to catch bugs and issues as early as possible, making them easier to resolve. By incorporating different testing techniques, such as unit testing and end-to-end (E2E) testing, you can ensure that your application is thoroughly vetted at every stage of development. In the following sections, we will explore the standard development cycle and discuss how to apply automated testing effectively within this framework.

Development Cycle

A standard agile workflow for the software development lifecycle (SDLC) typically consists of several stages, each with its purpose and goals. These stages include:

Agile Software Development Life Cycle

  1. Ideation: This phase involves generating ideas, identifying opportunities, and defining the project's goals and requirements.
  2. Development: This includes UX/UI, architecting design, coding, integrating.
  3. Testing: This phase involves verifying the software's functionality, performance, and overall quality.
  4. Deployment: In this stage, the software is released to a production environment gradually.
  5. Operations: The final phase involves maintaining and updating the software as needed, addressing any issues that arise, and continuously improving the product based on user feedback and performance metrics.

Different companies may have unique variations of the SDLC, tailored to their specific needs and workflows. In my team, our SDLC follows this structure:

Software Development Life Cycle of My Team

  1. Write BRD/PRD (Business Requirements Document/Product Requirements Document): These documents outline the project's goals, objectives, and requirements. They serve as the foundation for subsequent stages of development.
  2. PRD Review: Team members(Including Developer) review the PRD to ensure the design is reasonable from both user and developer’s point of view.
  3. Write TRD (Technical Requirements Document): This document outlines the technical specifications and architecture of the software, detailing how the product requirements will be implemented.
  4. TRD Review: The technical requirements are reviewed by relevant stakeholders, ensuring that the proposed solution aligns with the project's goals and constraints.
  5. Implementation (Front-end/Back-end): Developers begin coding the application, focusing on both front-end and back-end components.
  6. Code Review: Other team members review the code to ensure it adheres to best practices and meets the project requirements.
  7. Refactoring: Any necessary changes or improvements to the code are made during this stage.
  8. QA Testing: Quality assurance testing is conducted, including manual and automated tests, to ensure the software meets the desired quality standards.
  9. Small Traffic: The application is gradually rolled to a small group of users, closely monitoring performance and user feedback.
  10. Full Traffic: The software is finally deployed to all intended users, marking the completion of the development cycle.
  11. Maintenance: There isn’t any prefect system in the world, and the requirement is changing. So we need to frequently maintain and iterate our system.

The Limitations of Manual Testing

Although the development cycle can produce quality products, my team still encounters occasional bugs and incidents, some of which are my own responsibility. In March 2023, we experienced five incidents, and while none were severe, they highlighted the need for improvement. Human error is inevitable, which is why automation is essential. Let's examine some specific problems in my team's incidents.

Code Changes and QA Testing Overlap

Code Changes and QA Testing Overlap

Ideally, testing should always follow code changes. However, in practice, this isn't always feasible. After the QA testing phase, developers must fix bugs, resolve conflicts when merging code, and more. With only manual testing, the process becomes time-consuming and resource-intensive, making it impractical to perform thorough QA testing repeatedly.

Consider this example from my team's incidents:

  1. Merging conflicts led to a missing route: Rapid product iterations and simultaneous requirements led to frequent conflict resolution. Resolving conflicts can introduce bugs, especially when the person handling the conflict only write part of the code. Focusing manual testing on the requirements themselves allows such incidents to occur.

Dependency on Black Box Modules

Dependencies Explosion

Our systems heavily depend on numerous external dependencies. Modularity is crucial for building complex systems, but it often means relying on black box modules. Trusting these dependencies can lead to bugs.

Consider these incidents:

  1. Dependency changes caused a product entrance to disappear: Developers may not be aware of the impact their changes have on downstream products. It isn't practical to have QA manually test all downstream products when a dependency changes.
  2. Outdated JS Bridge (JSB) documentation led to malfunctioning features in some app versions: It's unreasonable to expect developers or QA to test every app version when developing a new feature that uses JSB. Developers trust documentation, but when it's outdated, incidents can occur.

Combinatorial Explosion

Combinatorial Explosion

Our team serves global users across various regions, languages, platforms, and app versions. Features also have multiple combinations. The number of possible combinations O(m^n) (A * B * C * D ...) is enormous, and most are repetitive. Humans are not well-suited for this task, as demonstrated by this incident:

  1. A feature was missing in some regions: Our team released a feature across multiple regions, but it was missing in some regions for a month. The simple reason was that no one tested it in those regions. It's impractical to expect QA to test every region individually for each requirement.

Applying Automatic Testing in SDLC

One of the keys to enhancing software development agility is automation. Considering the limitations of manual testing, we know that manual work is time-consuming and prone to error. Thus, we need to incorporate automatic testing in our SDLC. In this section, I will introduce how to apply various types of automatic testing into SDLC and demonstrate their effectiveness in preventing incidents and bugs in our products.

Software Development Life Cycle with Automatic Testing

TRD: Writing & Reviewing Test Cases

During the TRD phase, it's crucial to document test cases for each new module and have them reviewed by other developers. With the introduction of automated testing, test cases provide an excellent way to describe user interactions with our modules. Test cases might look like: "It should display something when the user clicks something," or "It should return something when inputting something." They describe how users (end-users or developers) interact with the modules, serving as documentation in our codebase for maintainability.

Development: Unit Testing & TDD

During development, we create test scripts for individual units and strive to pass each test case. These tests act as our first users of the modules. Writing unit tests offers numerous benefits, such as isolating problems, simplifying troubleshooting, testing boundary cases, and reusing existing tests to ensure we don't accidentally break anything. By adopting Test-Driven Development (TDD), you can reap even more benefits from unit testing. Check out my blog posts on How Testing Speeds Up Your Development #9 and Testing Best Practice Tdd #12 for more information.

Integration & Testing: E2E Testing

Once we've completed both front-end and back-end development, we can initiate end-to-end (E2E) testing. By automating manual testing, we significantly reduce the complexity of QA testing. Additionally, we can reuse our previous test cases for regression testing. This allows developers to confidently modify code and resolve conflicts, knowing that E2E tests will follow their changes and ensure the overall integrity of the application.

Patrol, Load Testing, Performance Testing, and More

We can set up E2E testing patrols for our production environment to detect issues as quickly as possible, rather than waiting for user feedback. By implementing load testing and performance testing, we can assess our product's quality from various perspectives, ensuring a more robust and reliable end product.

Conclusion

In summary, incorporating automatic testing into the development cycle can significantly reduce development time while improving reliability, maintainability, and scalability. By implementing these testing methods, the majority of incidents above can be prevented, leading to a more agile and efficient SDLC. Applying automatic testing as a vital part of the development process results in higher quality products and a smoother experience for both developers and end-users.

Recommend Projects

  • React photo React

    A declarative, efficient, and flexible JavaScript library for building user interfaces.

  • Vue.js photo Vue.js

    🖖 Vue.js is a progressive, incrementally-adoptable JavaScript framework for building UI on the web.

  • Typescript photo Typescript

    TypeScript is a superset of JavaScript that compiles to clean JavaScript output.

  • TensorFlow photo TensorFlow

    An Open Source Machine Learning Framework for Everyone

  • Django photo Django

    The Web framework for perfectionists with deadlines.

  • D3 photo D3

    Bring data to life with SVG, Canvas and HTML. 📊📈🎉

Recommend Topics

  • javascript

    JavaScript (JS) is a lightweight interpreted programming language with first-class functions.

  • web

    Some thing interesting about web. New door for the world.

  • server

    A server is a program made to process requests and deliver data to clients.

  • Machine learning

    Machine learning is a way of modeling and interpreting data that allows a piece of software to respond intelligently.

  • Game

    Some thing interesting about game, make everyone happy.

Recommend Org

  • Facebook photo Facebook

    We are working to build community through open source technology. NB: members must have two-factor auth.

  • Microsoft photo Microsoft

    Open source projects and samples from Microsoft.

  • Google photo Google

    Google ❤️ Open Source for everyone.

  • D3 photo D3

    Data-Driven Documents codes.