This README is an update to several articles that I used as a reference a majority has been copied to be updated at a later time. Main difference is that I used ERB instead of HAML and active storage for image uploads and stored on heroku
http://pin-clone-020722.herokuapp.com/ working demo
David Allen - Build a Pinterest Clone
Digital Ocean - Using PostgreSQL on Rails
Digital Ocean - Add Bootstrap to Rails
BootrAils - Rails 6 Bootstrap 5
In this tutorial you will get a Ruby on Rails Pinterest Clone up and running on your local server, and will push your work into Github.
A few helpful links if you’re just getting started with Ruby on Rails:
Sublime Text 2
How to use the Mac Terminal
How to use Github
How to Install Ruby on Rails
I’m on Elementary OS a Ubuntu based Linux distro, so everything is going to be easier for a Linux/Debian user to follow along with.
Your NUMBER 1 job as a developer is to learn how to learn; read, listen, watch… just figure out how the hell to build something from nothing, using any resources you can get your hands on. So, I’m hoping if you get stuck in this tutorial, you can reinforce yourself with the mantra: “Oh wait, I can just google that sh!t”.
~ David Allen
House-keeping almost done. Getting closer to lift-off… I’m going to run through this tutorial as I would do them. It’s not necessarily the way to do it, just how I do it, and — loosely — how Mackenzie Child does it in his tutorial.
Table of Contents
- What are we building?
- Navigating the Command line, Creating the app
- First Git Commit
- Opening the App in Sublime, Installing Gems
- Generate a Pin Model (video)
- Generate a Pin Controller, and Setting up an Index Action and View
- Inside the routes.rb file
- Setting the Homepage
- CRUD, Form Building (video)
- Show Action and View
- List All Pins in Index Page (video)
- Edit, Update and Destroy a Pin (video)
- Devise Gem, Adding Users (video)
- Adding Associations (video)
- Customizing User Views (video)
- Adding Style (video)
- Paperclick Gem, Add Ability to Upload Images (video)
- Masonry (video)
- Acts as Votable (video)
- Authentication
- More Style (video)
We are building a pinterest-like application! It’ll look something like this:
Features: Pins (image-uploading, title and description for each pin, users can edit and delete) user log-in and authentication, voting, masonry (so that pins scale to the size of the view-port).
link to video
You may already know how to move about the command line interface, but stick with me here and let’s make sure this content is accessible to those who aren’t familiar yet.
Jumping in… here is an explanation of the commands you’ll see me use in the command line terminal
cd = "change directory"

ls = "list files inside directory"

mkdir = "make a directory"

rails new pin_board = "rails, please make me a new application called pin_board"

rails s = "rails, please start up the local server!"
I’m going to save my new app inside Home/Projects, so I first need to navigate there in the command line:
cd Projects
If you need to make a Projects folder use mkdir command followed by the name of the directory.
mkdir Projects && cd Projects
The && command lets you do something based on whether the previous command completed successfully - that's why you tend to see it chained as command_one && command_two.
then…
rails new pinclone --database=postgresql && cd pinclone
I happen to have multiple version of rails installed as a result I have to specify which version of rails to use.
rails _6.1.4.4_ new pinclone etc
The flag --database=postgresql creates a rails database using postgresql instead of the default sqlite. We are using postgres because Heroku so the whole world can see your application.
Heroku is a clould platform that lets you deploy, run and manage apps
then…
ls
look at the new files! hooray! add pictures
then…
rails s
add pictures start up the server! Navigate to http://localhost:3000/
Great. A nice little vid of this whole process: link to video
You will most likely get an error because we have not set up the postgresql database.
I followed this great write up by digital ocean # How To Install PostgreSQL on Ubuntu 20.04 [Quickstart]
I stopped after step 3 as rails will create the DB for you
Hold down control and hit “c” to kill the server…
git init
git status
git add .
git status
git commit -m "first commit"
git remote add origin https://github.com/your_github_username7/pinterest-clone.git
git push -u origin master
Open your application directory in VSCode.
gem 'simple_form', '~> 4.0', '>= 4.0.1'
Add these to your gemfile, save your gemfile, and run an install in your terminal:
bundle install
In the command line:
rails g model Pin title:string description:text
This command creates a model and a migration. You can find both of the files in your Ruby app, and I suggest you go hunt them down.
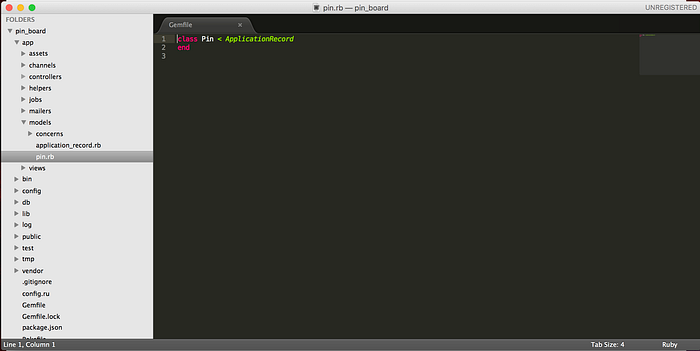
app/models/pin.rb
app/db/migrate/some_timestamp_file_name.rb
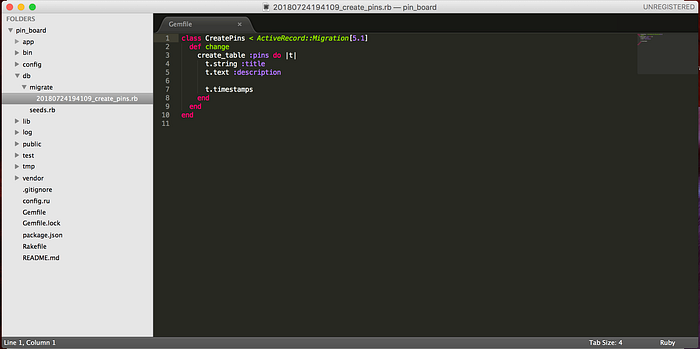
Now to run the migration:
rake db:migrate

Moving forward.
We have a model (think: database) for our Pins, now let’s generate a Pin Controller.
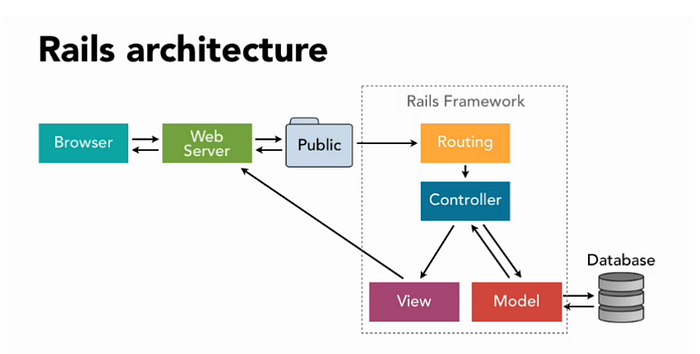
NOTE: You should understand the basic MVC framework of a Ruby on Rails web app. Also applies to other frameworks. M = Model, V = View, C = Controller. Here’s a great article on the subject that I recommend you read.
Ok, the controller:
rails g controller Pins
and then let’s go find that controller file we just made…
Inside the controller… MC: “let’s go ahead and set up some pages…”
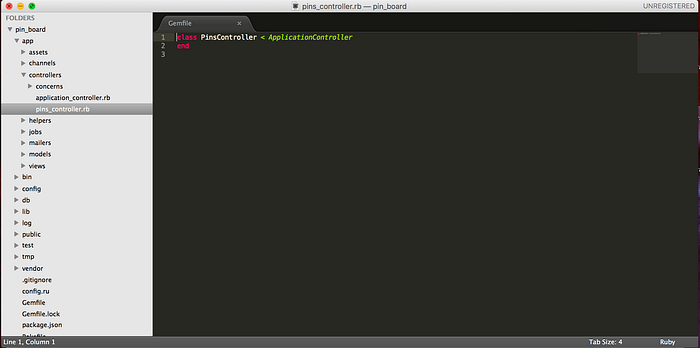
Let’s create an index action:
class PinsController < ApplicationController
  def index
  end
end
How easy was that?
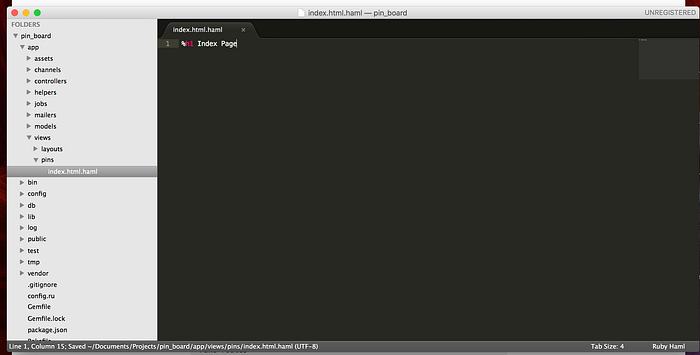
Now for the Index view!
First, create a file called index.html.erb underneath app/views/pins
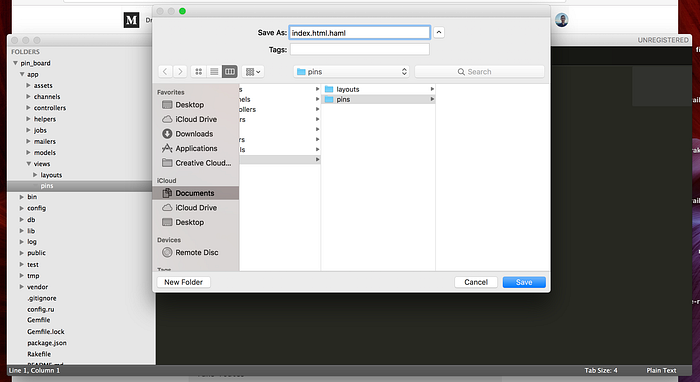
Next, I’m going to give the page a header… Just so we know it’s the Index page:
Cool. Now, don’t worry, I’m going to tie this all together, but first I want to introduce you to the routes.rb file:
Before we make any changes to this routes.rb file, try running this command:
rake routes

No routes defined!
Now, let’s make a change to our routes file:
Rails.application.routes.draw do
  resources :pins
end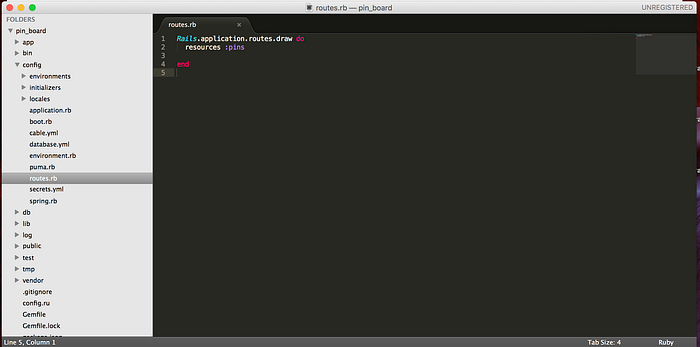
Now, re-run that rake routes command:
rails routes

Neat! Routes! You might think of routes as links. Together with the controller, the routes.rb file can help you set up links through the controller to your views (think: webpage).
The views may display data that you are calling from your model. Remember the MVC structure. The C helps connect the M to the V.
Ok, moving forward.
We’ve created an Index action in the Pins controller, and we’ve created an Index view. Now, let’s set the homepage of our app to the Index page!
We’ll do this in the routes.rb file:
Rails.application.routes.draw do
  resources :pins

  root "pins#index"

end
translation:
root "pins#index" =
  "rails, please make the homepage the index action inside of the pins controller"
The index action is blank though, WTF is going on?
It’s pretty simple. The index action doesn’t have much to do, it’s just going to show the index view, with no data-fetching tasks being passed on to the Model.
Let’s fire up the rails server and see this in action:
Cool. We’re flying here. Moving forward.
CRUD = Create, Read, Update, Destroy
These are actions. You might even remember from our routes.rb experiment that these actions also have routes associated with them.
Imagine clicking a “delete” button, or an “edit” button in the browser. Those buttons are connected to routes that are connected to these CRUD actions in the Pins controller.
So, back inside the pins_controller.rb file…
class PinsController < ApplicationController
	def index
 	end

	def new
		@pin = Pin.new
	end

	def create
  		@pin = Pin.new(pin_params)
	end

	private

	def pin_params
  		params.require(:pin).permit(:title, :description)
 	end
end
Translations (Forgive me for any mistaken interpretations here. I’m learning, too!):
- We’ve created an action for creating a new pin. It’s a two step process. Inside that action, we’re telling the Controller how to talk to the Model: “please understand that when I say “@pin” I’m trying to create a new entry in the Pin.rb database!”
- When I create a new pin, please consider only the information I’m trying to pass inside this instance variable “@pin” and only permit a title and description. I don’t need any other info from you, browser!
That was a sketchy translation at best. Read up on this here.
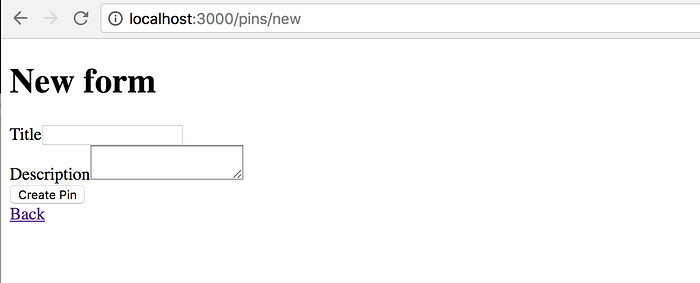
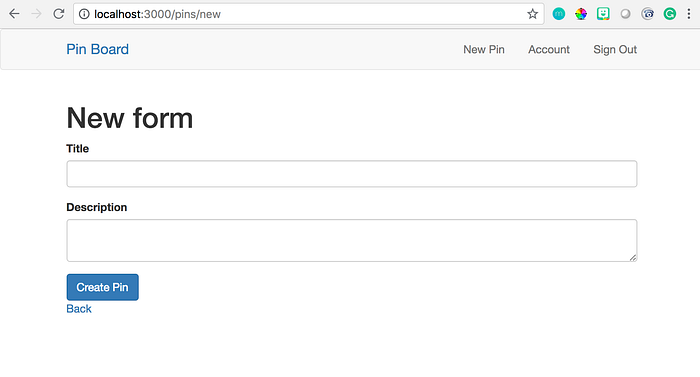
Next, we’re going to create a view for the New action…
app/views/pins/new.html.haml
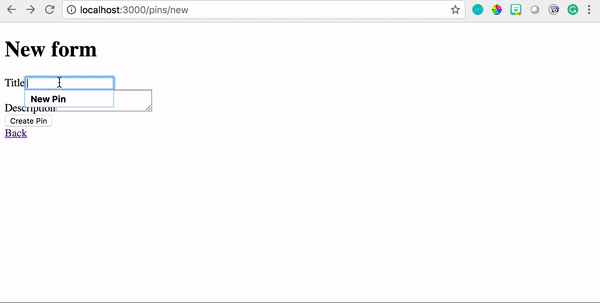
Now we’re going to create a way for the user to submit the data we’re interested in... A Title & Description for a Pin.
<h1>New Pin</h1>

<%= render 'form' %>

<%= link_to "Back", root_path %>
Notice the second line there? We’re asking the browser to render a “partial” called form. It’s sorta like rendering a webpage inside another webpage.
Let’s create that partial:
app/views/pins/_form.html.haml
Cool. Now to build the form…
We still need to tinker with setting up simple_form before we can use it…
MC is referencing this document for his simple_form install…
rails g simple_form:install --bootstrap
Cool. Back to the form partial… We’re here in the video if you’d like to follow along…
<%= simple_form_for @pin, html: {multipart: true} do |f| %>
	<% if @pin.errors.any? %>
		<div id="errors">
			<%= pluralize(@pin.errors.count, "error") %>
			<h1>prevented this Pin from saving</h1>
			<ul>
			<% @pin.errors.full_messages.each do |msg| %>
				<li>
					<%= full_message %>
				</li>
				<% end %>
			</ul>
		</div>
	<% end %>

	<div class="form-group">
		<%= f.input :title, input_html: {class: 'form-control'} %>
	</div>
	<div class="form-group">
		<%= f.input :description, input_html: {class: 'form-control'} %>
	</div>
		<%= f.button :submit, class: "btn btn-primary" %>
	<% end %>
Annnnnnnnnd start that server up and navigate to http://localhost:3000/pins/new
Neat-o.
Back inside the Pin Controller, let’s add some logic to our Create action:
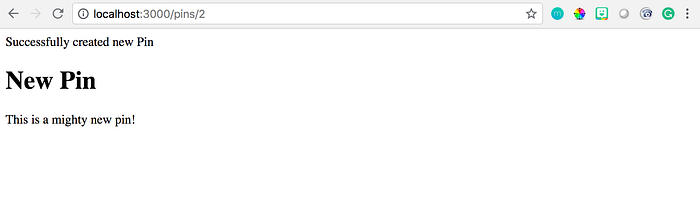
def create
@pin = Pin.new(pin_params)
if @pin.save
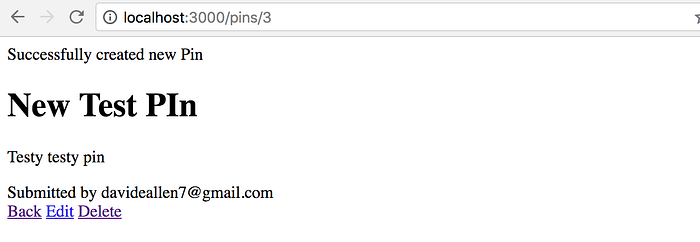
redirect_to @pin, notice: "Successfully created new Pin"
else
render 'new'
end
endIf we can save the new pin, redirect to the pin show page and display the notice “Successfully created new Pin”
Else, render the new page again.
You should note that we don’t yet have a show page. We’ll create one shortly…
But first, let’s make sure this notice can show up in our view!
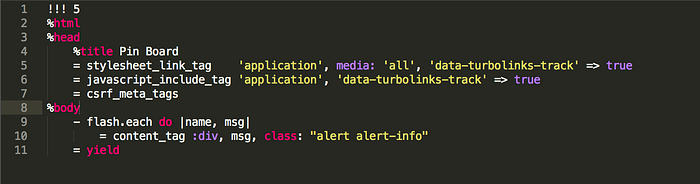
Updated application.html.erb file:
%html
%head
%title Pin Board
= stylesheet_link_tag 'application', media: 'all', 'data-turbolinks-track' => true
= javascript_include_tag 'application', 'data-turbolinks-track' => true
= csrf_meta_tags
%body
- flash.each do |name, msg|
= content_tag :div, msg, class: "alert alert-info"
= yield
<!DOCTYPE html>
<html>
<head>
<title>Romero Pin Board</title>
<meta name="viewport" content="width=device-width,initial-scale=1">
<%= csrf_meta_tags %>
<%= csp_meta_tag %>
<!-- Warning !! ensure that "stylesheet_pack_tag" is used, line below -->
<%= stylesheet_pack_tag 'application', media: 'all', 'data-turbolinks-track': 'reload' %>
<%= javascript_pack_tag 'application', 'data-turbolinks-track': 'reload' %>
</head>
<body>
<nav class="navbar navbar-dark bg-dark">
<div class="container">
<div class="navbar-brand">
<%= link_to "Pin Board", root_path %>
</div>
</div>
</nav>
<div class="container">
<% flash.each do |name, msg| %>
<%= content_tag :div, msg, class: "alert alert-info" %>
<% end %>
<%= yield %>
</div>
</body>
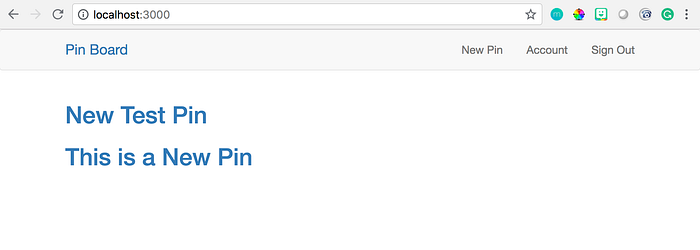
</html>Now, let’s try creating a new pin:

Oops! You’re page might look like this if you forget to rename the application file from .erb to .haml…
Ok, creating a pin:
No show action! (And no show view!)
Step 10: Show Action and View
Ok, so let’s create a show action inside the Pin Controller:
def show
end
And then we’re going to create a private method that will be used for the show, edit, update, destroy actions.
We could write this like so:
def show
	@pin = Pin.find(params[:id])
end
But instead, because we’re going to use this middle part for several actions…
@pin = Pin.find(params[:id])…we’re going to move this piece to a private method, and then create a before_action statement that runs this query before processing the show, edit, update or destroy actions. Get it?
The whole controller file looks like so:
class PinsController < ApplicationController
	before_action :find_pin, only: [:show, :edit, :update, :destroy]
	def index
	end

	def show
 	end

	def new
  		@pin = Pin.new
 	end

	def create
  		@pin = Pin.new(pin_params)

		if @pin.save
   			redirect_to @pin, notice: "Successfully created new Pin"
  		else
   			render 'new'
  		end
 	end

	private

	def pin_params
  		params.require(:pin).permit(:title, :description)
 	end

	def find_pin
  		@pin = Pin.find(params[:id])
 	end
end
Ok, now we need that show page, don’t we? We are here in the video.
Inside the app/views/pins/show.html.haml file:
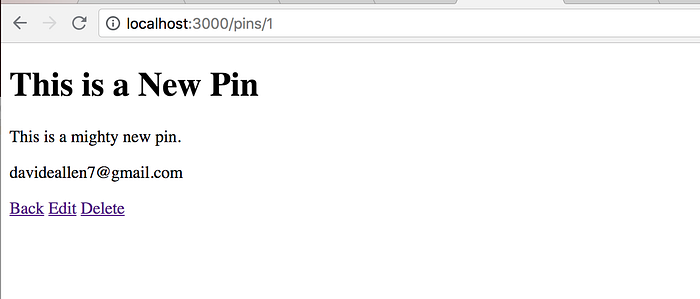
<h1><%= @pin.title %></h1>

<p><%= @pin.description %></p>
Fire up the server…
Cool.
Now to add a back link…
<h1><%= @pin.title %></h1>

<p><%= @pin.description %></p>

<%= link_to "Back", root_path %>
Nice.
Neeeext… we’ll list out all of the pins in the Index page…
Inside the Index View file…
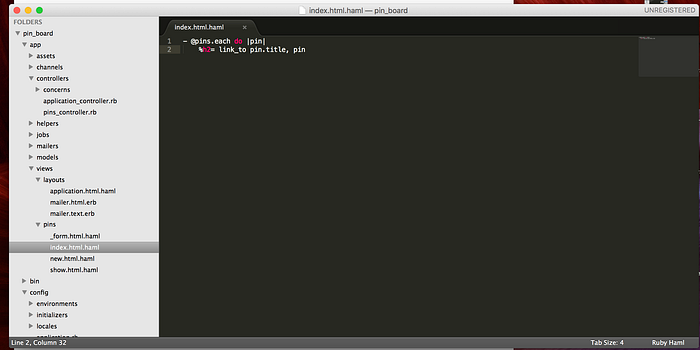
<% @pins.each do |pin| %>

<h1><%= link_to pin.title, pin %></h1>

<% end %>
Refresh that index page aaaaaaaand:
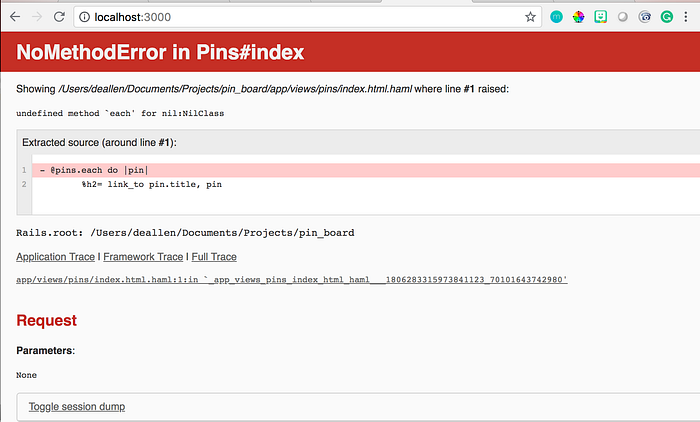
No method error! That’s because our Index action looks like:
def index
end
Let’s do something about that…
def index
	@pins = Pin.all.order("created_at DESC")
end
Refresh the index page…

Success.
now to add the ability to Edit and Destroy a Pin…
Before we jump in and create these new actions, remember that we already have written the first part of each of these methods…
before_action :find_pin, only: [:show, :edit, :update, :destroy]That find_pin method looks like:
def find_pin
	@pin = Pin.find(params[:id])
end
So basically, each of these actions already looks like:
def edit
	@pin = Pin.find(params[:id])
end

def update
	@pin = Pin.find(params[:id]
end

def destroy
	@pin = Pin.find(params[:id])
end
Moving forward…
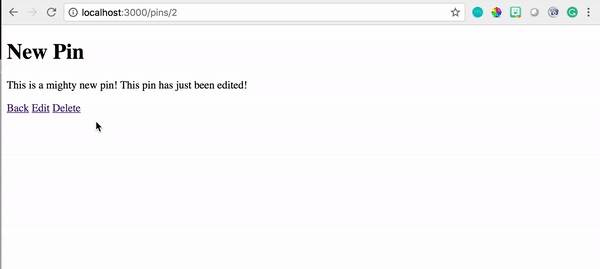
def update
	if @pin.update(pin_params)
   		redirect_to @pin, notice: "Pin was Successfully updated!"
  	else
   		render 'edit'
  	end
end
Guess what? Yep, you got it! We need to create an edit view…
And we need to create an edit link on the show page…
Inside the edit.html.haml file we just created:
<h1>Edit Pin</h1>

<%= render 'form' %>

<%= link_to "Cancel", pin_path %>
And inside the show page:
<h1><%= @pin.title %></h1>

<p><%= @pin.description %></p>

<%= link_to "Back", root_path %>

<%= link_to "Edit", edit_pin_path %>
Cool. Try it out!

It works. Great. GRAND. WONDERFUL.
Now, the ability to destroy (or delete).
def destroy
	@pin.destroy
  	redirect_to root_path
end
And then in our show page, we need a delete link…
<h1><%= @pin.title %></h1>

<p><%= @pin.description %></p>

<%= link_to "Back", root_path %>

<%= link_to "Edit", edit_pin_path %>

<%= link_to "Destroy", pin_path, method: :delete, data: { confirm: "Are you sure?" } %>
Refresh our page…
Great! Working…
Now, how about we add a link to add a new pin in our index page?
<% @pins.each do |pin| %>
	<h2><%= link_to pin.title, pin %></h2>
<% end %>
It works. Don’t believe me? Check your index page.
Next, let’s add USERS!
Find the latest and greatest devise gem version at rubygems.org…
gem 'devise', '~> 4.4', '>= 4.4.3'Add to your gemfile…
So now all of the gems we’ve added are looking like dis:
gem 'simple_form', '~> 4.0', '>= 4.0.1'
gem 'devise', '~> 4.4', '>= 4.4.3'
Great. Save. And Bundle install!
bundle install
Now, visit the devise docs on github…
Next, let’s do the install!
rails g devise:installthen…
Follow the directions…
Step 1: add this line to the development.rb file under Config/environments…
config.action_mailer.default_url_options = { host: 'localhost', port: 3000 }And then we’ve already done step 2…
Step 3, we’ve done. Check the application.html.erb file, lines 9 and 10…
Step 4, skip!
Step 5, let’s do it!!!
rails g devise:views
Ok, moving on.
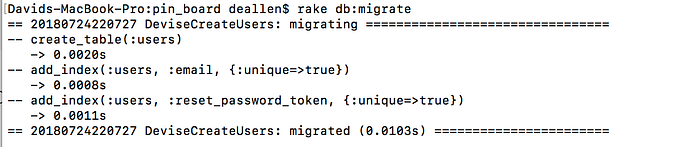
Let’s generate a devise model.
rails g devise User
and then, we need to run:
rails db:migrate
Ok, we’re flying.
Let’s make sure it’s working!
Fire up the server, and navigate to http://localhost:3000/users/sign_up
check it:
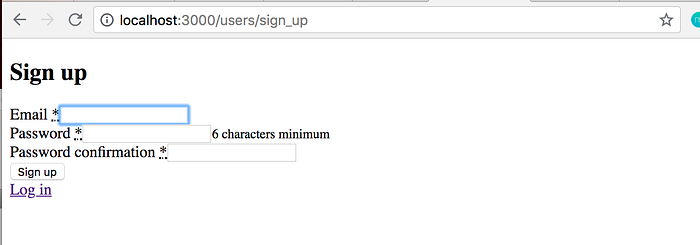
Now to create a new user!
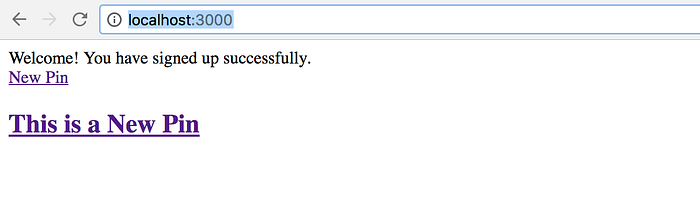
Success.
Now to add associations between our pin.rb model and our user.rb model…
Inside the user.rb file:
class User < ApplicationRecord
  # Include default devise modules. Others available are:
  # :confirmable, :lockable, :timeoutable and :omniauthable
  devise :database_authenticatable, :registerable,
         :recoverable, :rememberable, :trackable, :validatable
  has_many :pins
end
And inside the pin.rb file:
class Pin < ApplicationRecord
	belongs_to :user
end
And now, we need to generate a migration so that our pins have a user_id column!
rails g migration add_user_id_to_pins user_id:integer:index
And then…
rake db:migrate
Great. Check it out:
Onward.
Let’s jump into the rails console!
rails c
and then
@pin = Pin.first
and then, we’re going to assign any saved pins to the first user…
@user = User.first
then…
@pin.user = @user
And then…
@pin.save
Cool. All together now:
Now, let’s give each of our pins an author:
Inside the show.html.erb file:
<h1><%= @pin.title %></h1>

<p><%= @pin.description %></p>

<p>Submitted by <%= @pin.user.email %></p>

<%= link_to "Back", root_path %>
<%= link_to "Edit", edit_pin_path %>
<%= link_to "Destroy", pin_path, method: :delete, data: { confirm: "Are you sure?" } %>
And then let’s check the view:
Now we need to make sure that all new pins are associated with a user…
Back inside the controller…
We need to update both our new and create actions…
def new
	@pin = current_user.pins.build
end

def create
	@pin = current_user.pins.build(pin_params)

	if @pin.save
  		redirect_to @pin, notice: "Successfully created new Pin"
  	else
   		render 'new'
  	end
end
Now, we should be able to create a new pin, and it’ll be associated with the user…
Cool. Moving onwards. Time to style!
Here are the tools I used for this tutorial. Older versions may work, but I didn't try.
$> ruby --version
=> 3.0.0
$> rails --version
=> 6.1.3
$> node --version
=> 14.15.1
$> yarn --version
=> 1.22.10
$/myapp/else
cd Projects/myappCreate a controller as follow in app/controllers/welcome_controller.rb
# inside app/controllers/welcome_controller.rb
class WelcomeController < ApplicationController
end
Configure a default route in config/routes.rb as follow by commenting out the following
Rails.application.routes.draw do
	# devise_for :users
	# resources :pins

	# root "pins#index"
end
and add the following
# inside config/routes.rb
Rails.application.routes.draw do
  get "welcome/index"
  root to: "welcome#index"
end
Now we have to make this simple example complex enough 😬 to ensure all CSS, JavaScript component works.
Don't worry, just copy/paste the code below into app/views/welcome/index.html.erb
<!-- inside app/views/welcome/index.html.erb -->
<div class="collapse" id="navbarToggleExternalContent">
  <div class="bg-dark p-4">
    <h5 class="text-white h4">Collapsed content</h5>
    <span class="text-muted">Toggleable via the navbar brand.</span>
  </div>
</div>
<nav class="navbar navbar-dark bg-dark">
  <div class="container-fluid">
    <button class="navbar-toggler" type="button" data-bs-toggle="collapse" data-bs-target="#navbarToggleExternalContent" aria-controls="navbarToggleExternalContent" aria-expanded="false" aria-label="Toggle navigation">
      <span class="navbar-toggler-icon"></span>
    </button>
  </div>
</nav>

<main>
  <section class="py-5 text-center container">
    <div class="row py-lg-5">
      <div class="col-lg-6 col-md-8 mx-auto">
        <h1 class="fw-light">Album example</h1>
        <p class="lead text-muted">Something short and leading about the collection below—its contents, the creator, etc. Make it short and sweet, but not too short so folks don’t simply skip over it entirely.</p>
        <p>
          <a href="#" class="btn btn-primary my-2">Main call to action</a>
          <a href="#" class="btn btn-secondary my-2">Secondary action</a>
        </p>
      </div>
    </div>
  </section>
</main>
Ensure the application works by running
$/myapp> bin/rails serverAnd open localhost:3000 to your browser
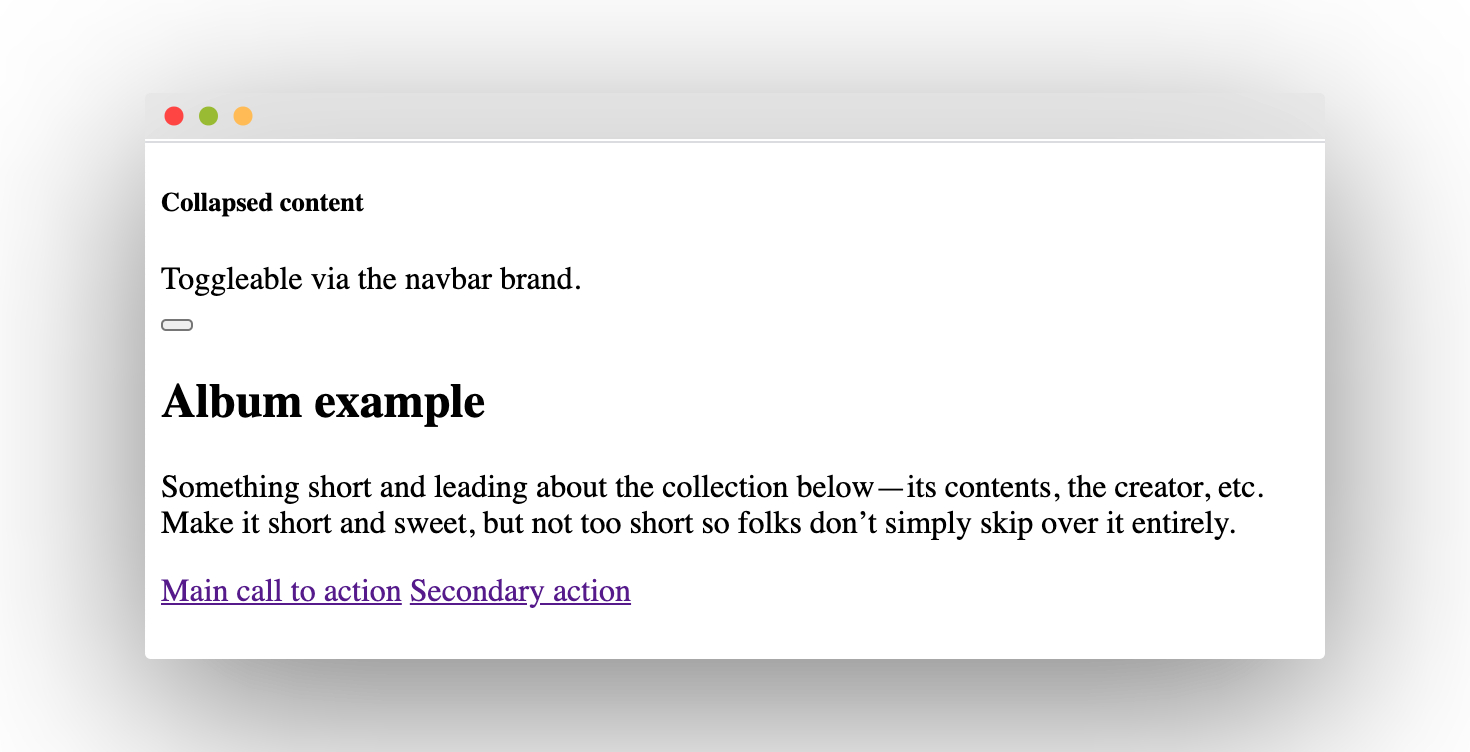
Raw image, Bootstrap v5 is not yet installed
Ok, no style so far.
For historical reasons, Rails 6 has two different tools to manage frontend assets (CSS, JavaScript, images, etc). The old one is named "Sprockets", and is not much used outside the Rails scope. The new one is named "Webpacker", and relies on mature, widely used Webpack. Therefore, I don't recommend using Sprockets anymore for new projects, especially since version 5 of webpacker. It is a lot more stable, and can handle multiple packs.
Ensure your Gemfile include at least version 5 of webpacker :
gem 'webpacker', '~> 5.0'If not, include version 5 as above and run "bundle install"
Now we want webpacker to handle all our assets, not just JavaScript. Rename app/javascript to app/frontend, like this :
$/myapp> mv app/javascript app/frontendIn webpacker.yml, warn webpack that we changed the name of the assets folder :
# Inside webpacker.yml, first lines
default: &default
source_path: app/frontend # Change hereAdd latest Bootstrap version, and PopperJs (a mandatory dependency) as follow :
$/myapp> yarn add bootstrap jquery @popperjs/coreconfig/webpack/environment.jsInside the file, add the webpack library, along with a ProvidePlugin that tells Bootstrap how to interpret JQuery and Popper variables.
Add the following code to the file:
~/rails-bootstrap/config/webpack/environment.js
const { environment } = require('@rails/webpacker')
const webpack = require("webpack")

environment.plugins.append("Provide", new webpack.ProvidePlugin({
  $: 'jquery',
  jQuery: 'jquery',
  Popper: ['popper.js', 'default']
}))

module.exports = environment
The ProvidePlugin helps us avoid the multiple import or require statements we would normally use when working with JQuery or Popper modules. With this plugin in place, webpack will automatically load the correct modules and point the named variables to each module’s loaded exports.
Save and close the file when you are finished editing.
Next, open your main webpack entry point file, app/frontend/packs/application.js:
nano app/frontend/packs/application.js
Inside the file, add the following import statements to import Bootstrap and the custom scss styles file that you will create next:
import "bootstrap"
import "../stylesheets/application"
Save and close the file when you are finished editing.
Next, create a stylesheets directory for your application style sheet:
mkdir app/frontend/stylesheetsOpen the custom styles file:
app/javascript/stylesheets/application.scssThis is an scss file, which uses Sass instead of CSS. Sass, or Syntactically Awesome Style Sheets, is a CSS extension language that lets developers integrate programming logic and conventions like shared variables into styling rules.
In the file, add the following statements to import the custom Bootstrap scss styles and Google fonts for the project:
~/rails-bootstrap/app/jfrontend/stylesheets/application.scss
@import "~bootstrap/scss/bootstrap";
Bootstrap has been added to your site!
run
rails serverWe are going to create a partial view for the navigation toolbar.
create the file _navigation.html.erb under app/views/layout/
paste the following
<nav class="navbar navbar-expand-lg navbar-dark bg-dark">
	<div class="container">
		<%= link_to "PinClone", root_path, class: "navbar-brand" %>
		<button class="navbar-toggler" type="button" data-bs-toggle="collapse" data-bs-target="#navbarText" aria-controls="navbarText" aria-expanded="false" aria-label="Toggle navigation">
			<span class="navbar-toggler-icon"></span>
		</button>

		<div class="collapse navbar-collapse" id="navbarText">
			<ul class="navbar-nav me-auto mb-2 mb-lg-0">
				<%= link_to "Pins", pins_path, class: "nav-item nav-link" %>
			</ul>
			<ul class="navbar-nav mb-2 mb-lg-0">
				<% if user_signed_in? %>
					<%= link_to "New Pin", new_pin_path, class: "nav-item nav-link" %>
					<%= link_to current_user.email, edit_user_registration_path, class: "nav-item nav-link" %>
					<%= link_to "Sign out", destroy_user_session_path, method: :delete, class: "nav-item nav-link" %>
				<% else %>
					<%= link_to "Sign up", new_user_registration_path, class: "nav-item nav-link" %>
					<%= link_to "Login", new_user_session_path, class: "nav-item nav-link" %>
				<% end %>
			</ul>
		</div>
	</div>
</nav>
This partial view will be rendered by the application view app/views/layout/application.html.erb with the following code.
<header>
	<%= render 'layouts/navigation' %>
</header>
The updated application.html.erb should look like so.
<!DOCTYPE html>
<html>
	<head>
		<title>Romero Pin Board</title>
		<meta name="viewport" content="width=device-width, initial-scale=1">
		<%= csrf_meta_tags %>
		<%= csp_meta_tag %>

  		<!-- Warning !! ensure that "stylesheet_pack_tag" is used, line below -->
		<%= stylesheet_pack_tag 'application', media: 'all', 'data-turbolinks-track': 'reload' %>
		<%= javascript_pack_tag 'application', 'data-turbolinks-track': 'reload' %>
	</head>
	<body>
		<header>
			<%= render 'layouts/navigation' %>
		</header>

  		<div class="container">
			<% flash.each do |name, msg| %>
				<%= content_tag :div, msg, class: "alert alert-info" %>
			<% end %>
			<main role="main">
				<%= content_for?(:content) ? yield(:content) : yield %>
			</main>
		</div>
	</body>
</html>
Makes the home page look like:
Now let’s do a little bit of work on the form…
We saved ourselves a little bit of trouble by adding the -bootstrap flag when we first installed simple_form… The form already looks pretty good:
But we’re still going to tweak the layout a bit…
Inside the new.html.haml file:
<div class="col-md-6 col-md offset-3">
	<h1>New Pin</h1>

	<%= render 'form' %>

	<%= link_to "Back", root_path %>
</div>
We’ll do the same exact thing to the edit.html.haml page…
<div class="col-md-6 col-md offset-3">
	<h1>Edit Pin</h1>

	<%= render 'form' %>

	<%= link_to "Cancel", pin_path %>
</div>
Next, let’s add the ability to upload images…
What’s Active Storage? Well it’s a very simple, but powerful way of uploading files to cloud storage services (Amazon S3, Google Cloud Storage, or Microsoft Azure Storage).
Active Storage also provides disk service for local deployment and testing. It’s able to attach files to Active Record objects without you having to create another column in your model tables.
Curious about how this work? Well, long story short, Active Storage uses polymorphic associations through the Attachment join model, which then connects to the Blob model (this model stores attachment metadata like filename, content-type, etc. and their identifier key). Both models are built-in models backed by Active Record.
Okay, let’s get into how to set up Active Storage in your application. First you’re going to run rails active_storage:install into your console/command line while inside of the application folder:

This will create a new migration in your db/migrate folder. Then, run
rails db:migrate
to migrate these new tables into your schema file.
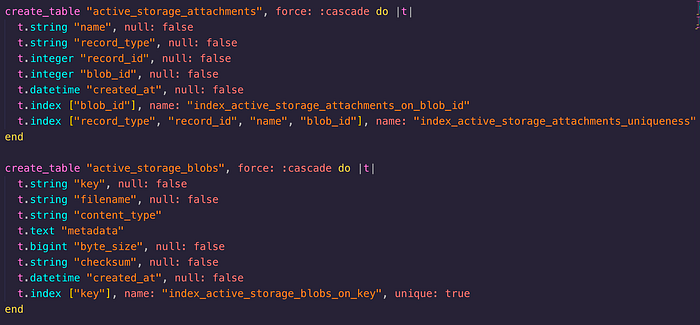
The two tables that are added to your schema are active_storage_attachments and active_storage_blobs.
Active Storage table migrations
Next install Imagemagick. It provides the necessary libraries that allow image processing.
sudo apt install imagemagick
apt install libvips42After creating your migration, go to the model file that you would like your image to be associated with. For my movie review application, I wanted a user to be able to upload an image of a movie poster, so in my case it was to the movie model.

app/model/movie.rb
The has_one_attached method allows you to attach a single image to your model, but you can also use the has_many_attached method to attach multiple images.
Heres an example from the Active Storage README.md:
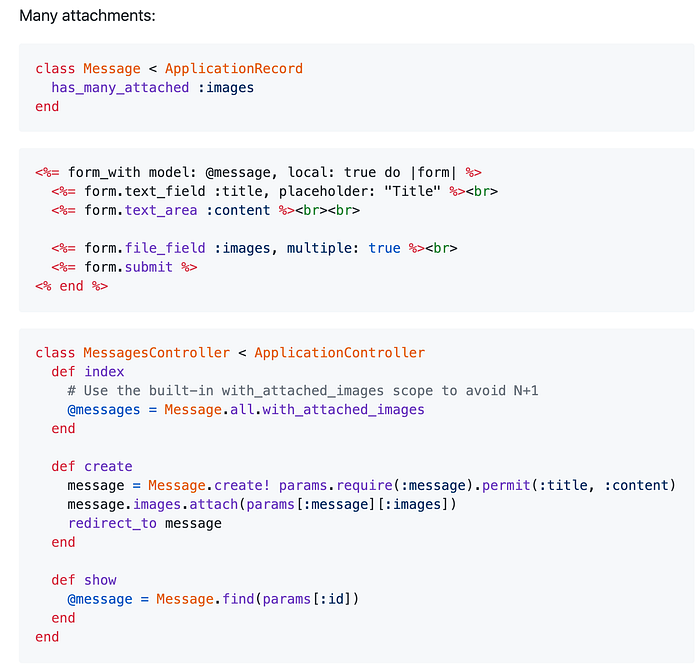
Okay, so your model definition is set. Next up is your model controller. Inside of your params definition, you need to add your :image attribute as a permitted parameter.
Here’s an example from my movie_controller.rb file:
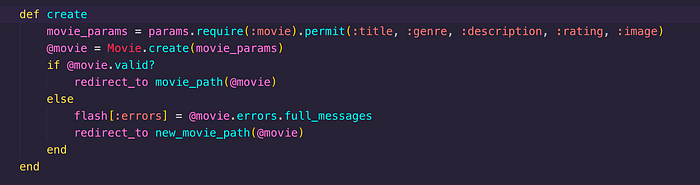
app/controllers/movie_controller.rb
So far you’ve set up your model and controller. Now it’s time to set up the form field that’ll allow your users to upload their image. To do this, you’ll be using form.file_field in your erb file.
Here’s an example of the _form.html.erb file used in the movie review app example:
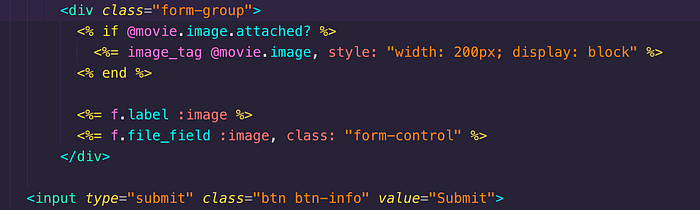
app/views/movies/_form.html.erb
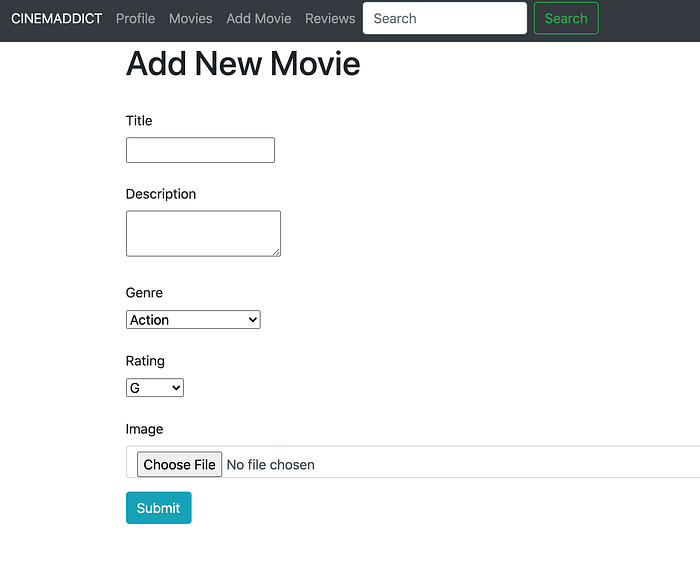
new movie form page
Then using the image_tag helper, we’re now able to display this image wherever we want in our view files.
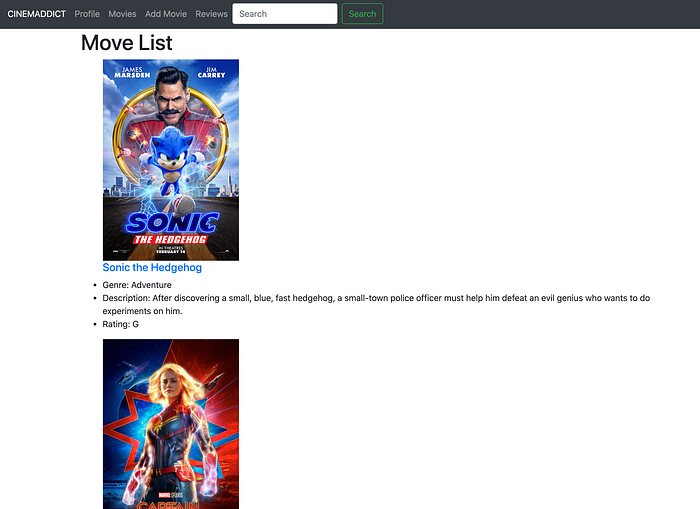
Here’s an example of the index page from the app:

app/views/movies/show.html.erb
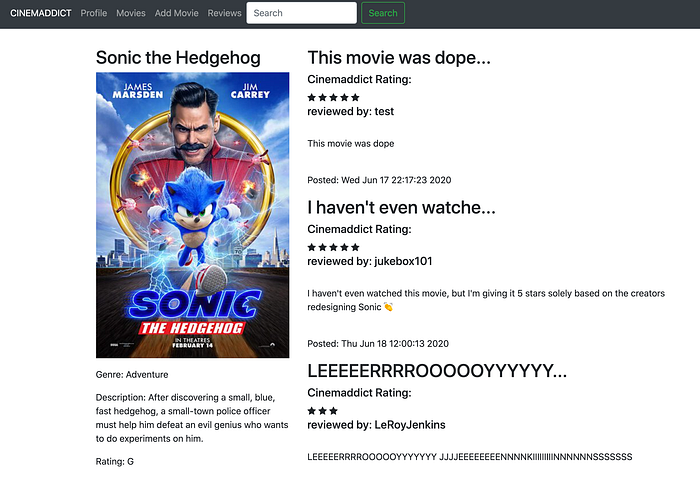
show page example
Now you might be wondering, “what’s the deal with that .variant(resize: “500 x 500”) at the end of our image call?”
Well, Active Storage allows for image transformations using the ImageProcessing::MiniMagick module, which is installed with the image_processing gem.
To use this gem, all you have to do is uncomment out the image_processing gem in your Gemfile.

image_processing gem in Gemfile
Now you can use all of the methods available through the image_processing gem to transform your images from its original size to one that suits your app.
Here’s another example:

app/views/movies/index.html.erb
index page example
So how do we upload images in our rails project using Active Storage?
- Run
rails active_storage:install - Run
rails db/migrate - Model: call the
has_one_attachedmethod with a symbol, which will become an attribute on each model instance (in our example we used:imageas our symbol, but you can name it anything) - Controller: permit our image attribute in our params definition
- View: add a
file_fieldto our form and useimage_tagto display our uploaded image
Hopefully you found this helpful, and will be doing some awesome things in your projects with your new found information!
