
笔者最近在做新零售智慧门店的相关项目,主要涵盖人流量、人物活动区域轨迹等。那么本篇其实是笔者在实践过程中一个"失败"的案例,因为其应用复用在现实场景的时候效果非常差,所以只是当做练习题抛出来。本篇是受《YOLOv3目标检测、卡尔曼滤波、匈牙利匹配算法多目标追踪》启发,感谢这位作者! 笔者之前没有做过追踪领域的研究,了解的比较浅显,如果有小伙伴在这块儿有相同的困惑,或是已经有好的解决方案,欢迎留言讨论~
CSDN博文:https://blog.csdn.net/sinat_26917383/article/details/86557399
笔者公众号:

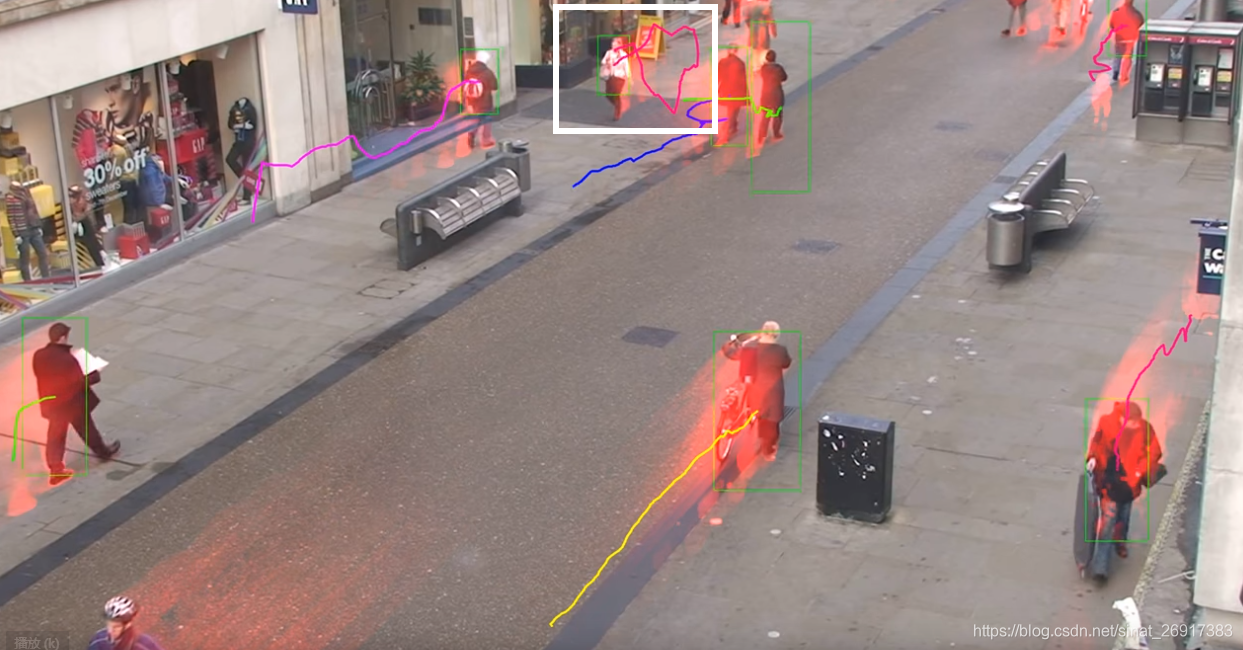
先来看一则图:
来看一下常规的update里面发生了什么?(简单贴一下)
# 第一段
       cost = np.zeros(shape=(N, M))   # Cost matrix
       for i in range(len(self.tracks)):
           for j in range(len(detections)):
               try:
                   diff = self.tracks[i].prediction - detections[j]
                   distance = np.sqrt(diff[0][0]*diff[0][0] +
                                      diff[1][0]*diff[1][0])
                   cost[i][j] = distance
               except:
                   pass

# 第二段
row_ind, col_ind = linear_sum_assignment(cost)
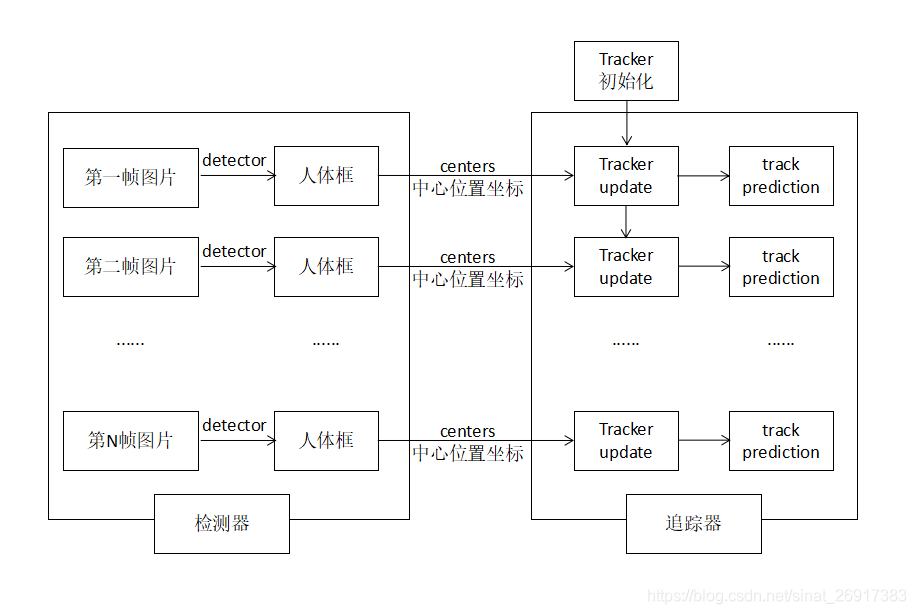
新的一帧物体中心点centers给入之后,tracker与给出预测值prediction ,同时预测值与实际detections的距离去迭代匈牙利算法匹配(linear_sum_assignment)。
当然这套算法好处是在,可以任意组合比较好的detector/tracker算法,项目Smorodov/Multitarget-tracker中就是Opencv中的 face detector + Kalman filter multitarget tracker。 笔者引用的是项目:srianant/kalman_filter_multi_object_tracking中的KF算法。
但是这一整套方法论有非常多的问题:
**问题一:**在刚刚检测到新人的时候,第一次轨迹预测的时候容易飘逸
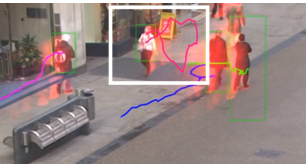
来看一下上图中的笔者白色框给出的人体检测,一开始出现的时候,轨迹拉的非常长,这是一开始预测的时候还不够收敛的情况。
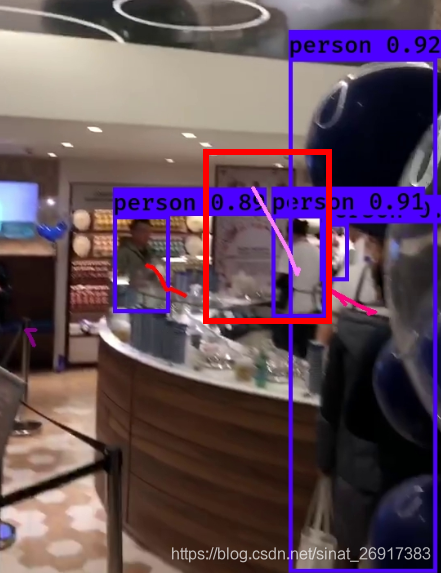
**问题二:**one-stage算法的缺陷是不够稳定,笔者本项目尝试的是keras-yolov3,在开阔场景没问题,但是在一切人密度较大,遮挡物较多,像素不够高清的视频上发现检测器容易遗漏物体,前两帧可以检测,后面几帧断了,然后又续上了。这个时候,detector都出现问题,tracker当然会出现loss丢失掉之前的物体。
一些网友也提出过很多解决方案:
- (1)多帧融合;
- (2)在第一帧有物体的时候就用快速跟踪的手段取代检测器,雷达与物体bbox匹配。
笔者引用的是项目:srianant/kalman_filter_multi_object_tracking中的KF算法。
笔者也针对上面提到的问题一进行了微调改进,修复了一下首次检测的物体给出的轨迹会“乱来”的情况。
那先从该项目的KF算法Tracker开始,项目中预设了几个调节选项:
- dist_thresh: distance threshold. When exceeds the threshold, track will be deleted and new track is created,距离阈值:超过阈值时,将删除轨迹并创建新轨迹
- max_frames_to_skip: maximum allowed frames to be skipped forthe track object undetected,超过多少帧没有识别,就放弃该物体,未检测到的跟踪对象允许跳过的最大帧数,可以设置小一些
- max_trace_lenght: trace path history length
- trackIdCount: identification of each track object,每个跟踪对象的标识基数(在此之上累加)
来看看修复问题的点是,红框标出的,首次检测的飘逸轨迹,那么飘逸轨迹的特点是首尾两点距离较远,那么通过计算两个端点欧式距离,并通过设定阈值来屏蔽掉一些飘逸轨迹。
其他的,如果观众想自行修改tracker,可参考该项目Kalman and Bayesian Filters in Python,把其中一些好的迁移过来。
笔者之前的博客中:自有数据集上,如何用keras最简单训练YOLOv3目标检测就是用keras-yolov3训练yolov3模型,该项目也是有预训练模型,但是分类有80分类,不仅仅是定位到人的。所以,简单的只挑出人物框,计算中心值给入tracker即可。 当然,这里其他物体框还是保留的,只是对图像中的人物进行多目标跟踪。
笔者自己的实验环境: keras - 2.1.5 tensorflow - 1.12.0 python - 3.6
笔者的项目链接:mattzheng/keras-yolov3-KF-objectTracking,重点可看:objectTracking_DEMO .ipynb文件。
那么笔者对keras-yolov3以及KF算法都进行一定修改。那么步骤变得简单一些:
- 加载keras yolov3 coco预训练模型
- 解析
# 加载keras yolov3 coco预训练模型
yolo_test_args = {
    "model_path": 'model_data/yolo.h5',
    "anchors_path": 'model_data/yolo_anchors.txt',
    "classes_path": 'model_data/coco_classes.txt',
    "score" : 0.3,
    "iou" : 0.45,
    "model_image_size" : (416, 416),
    "gpu_num" : 1,
}


yolo_test = YOLO(**yolo_test_args)
其中yolo.h5是预训练模型,可以由yolo_weights.h5 转化,笔者也提供一下转化之后的h5文件。
链接:https://pan.baidu.com/s/1ppQH_FEbYSHob2T7NQOVmg 提取码:e345
解析单帧图片为:
'''
    解析方式一: 从视频保存成的图像文件中进行解析
    先把视频-> 拆分成图像文件夹,在文件夹中逐帧解析
'''

tracker = Tracker(100, 8, 15, 100)
#for n in tqdm(range(100)):
image = Image.open('11.jpg')
r_image,out_boxes, out_scores, out_classes = yolo_test.detect_image(image)
centers,number = calc_center(out_boxes,out_classes,out_scores,score_limit = 0.5)
tracker,result = trackerDetection(tracker,r_image,centers,number,max_point_distance = 30,max_colors = 20,track_id_size = 2)
#misc.imsave('jpg2video/%s.jpg'%n, result)
plt.imshow(result)
可以看到,步骤为:
- 根据yolov3跑出结果
yolo_test.detect_image - 计算人物框的中心点
calc_center - 更新tracker,
trackerDetection
再来看看tracker里面的属性:
self.track_id = trackIdCount  # identification of each track object
self.KF = KalmanFilter()  # KF instance to track this object
self.prediction = np.asarray(prediction)  # predicted centroids (x,y)
self.skipped_frames = 0  # number of frames skipped undetected
self.trace = []  # trace path
track_id每个追踪物体的标识;prediction预测下一个点;trace轨迹点。
>>> tracker.tracks[0].trace
>>>[array([[116.],
        [491.]]), array([[135.],
        [570.]]), array([[142.],
        [597.]])]

>>>tracker.tracks[0].track_id
>>>100

>>>tracker.tracks[0].prediction
>>>array([[116.],
       [491.]])
#---------------------------------------------------------------------------
#---------------------------------------------------------------------------
A Keras implementation of YOLOv3 (Tensorflow backend) inspired by allanzelener/YAD2K.
- Download YOLOv3 weights from YOLO website.
- Convert the Darknet YOLO model to a Keras model.
- Run YOLO detection.
wget https://pjreddie.com/media/files/yolov3.weights
python convert.py yolov3.cfg yolov3.weights model_data/yolo.h5
python yolo_video.py [OPTIONS...] --image, for image detection mode, OR
python yolo_video.py [video_path] [output_path (optional)]
For Tiny YOLOv3, just do in a similar way, just specify model path and anchor path with --model model_file and --anchors anchor_file.
Use --help to see usage of yolo_video.py:
usage: yolo_video.py [-h] [--model MODEL] [--anchors ANCHORS]
                     [--classes CLASSES] [--gpu_num GPU_NUM] [--image]
                     [--input] [--output]

positional arguments:
  --input        Video input path
  --output       Video output path

optional arguments:
  -h, --help         show this help message and exit
  --model MODEL      path to model weight file, default model_data/yolo.h5
  --anchors ANCHORS  path to anchor definitions, default
                     model_data/yolo_anchors.txt
  --classes CLASSES  path to class definitions, default
                     model_data/coco_classes.txt
  --gpu_num GPU_NUM  Number of GPU to use, default 1
  --image            Image detection mode, will ignore all positional arguments
- MultiGPU usage: use
--gpu_num Nto use N GPUs. It is passed to the Keras multi_gpu_model().
-
Generate your own annotation file and class names file.
One row for one image;
Row format:image_file_path box1 box2 ... boxN;
Box format:x_min,y_min,x_max,y_max,class_id(no space).
For VOC dataset, trypython voc_annotation.py
Here is an example:path/to/img1.jpg 50,100,150,200,0 30,50,200,120,3 path/to/img2.jpg 120,300,250,600,2 ... -
Make sure you have run
python convert.py -w yolov3.cfg yolov3.weights model_data/yolo_weights.h5
The file model_data/yolo_weights.h5 is used to load pretrained weights. -
Modify train.py and start training.
python train.py
Use your trained weights or checkpoint weights with command line option--model model_filewhen using yolo_video.py Remember to modify class path or anchor path, with--classes class_fileand--anchors anchor_file.
If you want to use original pretrained weights for YOLOv3:
1. wget https://pjreddie.com/media/files/darknet53.conv.74
2. rename it as darknet53.weights
3. python convert.py -w darknet53.cfg darknet53.weights model_data/darknet53_weights.h5
4. use model_data/darknet53_weights.h5 in train.py
-
The test environment is
- Python 3.5.2
- Keras 2.1.5
- tensorflow 1.6.0
-
Default anchors are used. If you use your own anchors, probably some changes are needed.
-
The inference result is not totally the same as Darknet but the difference is small.
-
The speed is slower than Darknet. Replacing PIL with opencv may help a little.
-
Always load pretrained weights and freeze layers in the first stage of training. Or try Darknet training. It's OK if there is a mismatch warning.
-
The training strategy is for reference only. Adjust it according to your dataset and your goal. And add further strategy if needed.
-
For speeding up the training process with frozen layers train_bottleneck.py can be used. It will compute the bottleneck features of the frozen model first and then only trains the last layers. This makes training on CPU possible in a reasonable time. See this for more information on bottleneck features.

