Code and Documentation for the first place solution in 2023 Abdominal Trauma Detection Competition hosted by RSNA on Kaggle.
You can download the preprocessed theo data directly as instructed in the respective folders. Nevertheless, the steps for generating preprocessed datasets are as follows:
python Datasets/make_segmentation_data1.py
CUDA_VISIBLE_DEVICES=0,2,3 python -m torch.distributed.launch --nproc_per_node=3 TRAIN/train_segmentation_model.py
python Datasets/make_info_data.py
python Datasets/make_theo_data_volumes.py
python Datasets/make_our_data_volumes.py
Once, all the data has been collected, you will need to place them in the right directory. For that, you can follow instructions and paths specified in paths.py.
For training and replicating our final solution, we have added python scripts for each models (all organs and bowel+extravasation) in TRAIN folder. Here are the steps to reproduce the trained models:
CUDA_VISIBLE_DEVICES=0,2,3 python -m torch.distributed.launch --nproc_per_node=3 TRAIN/train_coatmed384fullseed.py --seed 969696
CUDA_VISIBLE_DEVICES=0,2,3 python -m torch.distributed.launch --nproc_per_node=3 TRAIN/train_coat_med_newseg_ourdata_4f.py --fold 1
CUDA_VISIBLE_DEVICES=0,2,3 python -m torch.distributed.launch --nproc_per_node=3 TRAIN/train_coatmed384ourdataseed.py --seed 100
CUDA_VISIBLE_DEVICES=0,2,3 python -m torch.distributed.launch --nproc_per_node=3 TRAIN/train_coatmed384ourdataseed.py --seed 6969
CUDA_VISIBLE_DEVICES=0,2,3 python -m torch.distributed.launch --nproc_per_node=3 TRAIN/train_v2s_try5_v10_fulldata.py --seed 3407
CUDA_VISIBLE_DEVICES=0,2,3 python -m torch.distributed.launch --nproc_per_node=3 TRAIN/train_v2s_try5_v10_fulldata.py --seed 123
CUDA_VISIBLE_DEVICES=0,2,3 python -m torch.distributed.launch --nproc_per_node=3 TRAIN/train_v2s_try5_v10_fulldata.py --seed 123123
CUDA_VISIBLE_DEVICES=0,2,3 python -m torch.distributed.launch --nproc_per_node=3 TRAIN/train_v2s_try5_v10_fulldata.py --seed 123123123
CUDA_VISIBLE_DEVICES=0,2,3 python -m torch.distributed.launch --nproc_per_node=3 TRAIN/train_coat_lite_medium_bs2_lr_seed.py --seed 7 --lr 9e-5
CUDA_VISIBLE_DEVICES=0,2,3 python -m torch.distributed.launch --nproc_per_node=3 TRAIN/train_coat_lite_medium_bs2_lr_seed.py --seed 7777 --lr 10e-5
CUDA_VISIBLE_DEVICES=0,2,3 python -m torch.distributed.launch --nproc_per_node=3 TRAIN/train_coat_lite_medium_bs2_lr_seed.py --seed 7777777 --lr 11e-5
CUDA_VISIBLE_DEVICES=0,2,3 python -m torch.distributed.launch --nproc_per_node=3 TRAIN/train_coat_lite_medium_bs2_lr125e6.py
CUDA_VISIBLE_DEVICES=0,2,3 python -m torch.distributed.launch --nproc_per_node=3 TRAIN/train_coat_lite_medium_unet_bs1_lr10e5_seed7777.py
CUDA_VISIBLE_DEVICES=0,2,3 python -m torch.distributed.launch --nproc_per_node=3 TRAIN/train_try11_tf_efficientnetv2_s_in21ft1k_v1_fulldata.py --seed 3407
CUDA_VISIBLE_DEVICES=0,2,3 python -m torch.distributed.launch --nproc_per_node=3 TRAIN/train_try11_tf_efficientnetv2_s_in21ft1k_v1_fulldata.py --seed 42
CUDA_VISIBLE_DEVICES=0,2,3 python -m torch.distributed.launch --nproc_per_node=3 TRAIN/train_try11_tf_efficientnetv2_s_in21ft1k_v1_fulldata.py --seed 69
CUDA_VISIBLE_DEVICES=0,2,3 python -m torch.distributed.launch --nproc_per_node=3 TRAIN/train_try11_tf_efficientnetv2_s_in21ft1k_v1_fulldata.py --seed 17716124
CUDA_VISIBLE_DEVICES=0,2,3 python -m torch.distributed.launch --nproc_per_node=3 TRAIN/train_coatsmall384extravast4funet.py --fold 1
CUDA_VISIBLE_DEVICES=0,2,3 python -m torch.distributed.launch --nproc_per_node=3 TRAIN/train_coatsmall384extravast4funet.py --fold 3
CUDA_VISIBLE_DEVICES=0,2,3 python -m torch.distributed.launch --nproc_per_node=3 TRAIN/train_fullextracoatsmall384.py --seed 2024
CUDA_VISIBLE_DEVICES=0,2,3 python -m torch.distributed.launch --nproc_per_node=3 TRAIN/train_fullextracoatsmall384.py --seed 2717
CUDA_VISIBLE_DEVICES=0,2,3 python -m torch.distributed.launch --nproc_per_node=3 TRAIN/train_try11_v8_extrav.py --fold 1
CUDA_VISIBLE_DEVICES=0,2,3 python -m torch.distributed.launch --nproc_per_node=3 TRAIN/train_try11_v8_extrav.py --fold 2
CUDA_VISIBLE_DEVICES=0,2,3 python -m torch.distributed.launch --nproc_per_node=3 TRAIN/train_try11_v8_extrav.py --fold 3
CUDA_VISIBLE_DEVICES=0,2,3 python -m torch.distributed.launch --nproc_per_node=3 TRAIN/train_coatmedium384extravast.py --fold 0
For inference notebooks and model weights, you may visit our final submission notebook
All of our single models were trained using multiple 3090(local) or 3X A6000 instances with GPU enabled to run all data preprocessing, model training, and inference were done with Kaggle notebooks.
https://www.kaggle.com/docs/notebooks
We used Kaggle GPU notebooks to run all our inference scripts.
Below are the packages used in addition to the ones included in the default train scripts provided. All packages were installed via uploaded kaggle dataset.
| Package Name | Repository | Kaggle Dataset |
|---|---|---|
| pytorch 2.0.1 | https://github.com/pytorch/pytorch | |
| pretrained models 0.7.4 | https://pypi.org/project/pretrainedmodels/ | https://www.kaggle.com/datasets/harshitsheoran/contrails-libraries |
| segmentation_models_pytorch 0.3.3 | https://github.com/qubvel/segmentation_models.pytorch | https://www.kaggle.com/datasets/harshitsheoran/contrails-libraries |
| efficientnet_pytorch 0.7.1 | https://github.com/lukemelas/EfficientNet-PyTorch | https://www.kaggle.com/datasets/harshitsheoran/contrails-libraries |
| albumentations | https://github.com/albumentations-team/albumentations | |
| timm 0.9.7 | https://github.com/rwightman/pytorch-image-models | |
| dicomsdl 0.109.2 | https://github.com/tsangel/dicomsdl | https://www.kaggle.com/datasets/zacstewart/dicomsdl--0-109-2 |
| pytorch-toolbelt | https://github.com/BloodAxe/pytorch-toolbelt | https://www.kaggle.com/bloodaxe/pytorch-toolbelt |
| transformers 4.31.0 | https://github.com/huggingface/transformers |
Here is the inference code you may refer: link
Part 1: 3D segmentation for generating masks / crops [Stage 1] Part 2: 2D CNN + RNN based approach for Kidney, Liver, Spleen & Bowel [Stage 2] Part 3: 2D CNN + RNN based approach for Bowel + Extravasation [Stage 2]
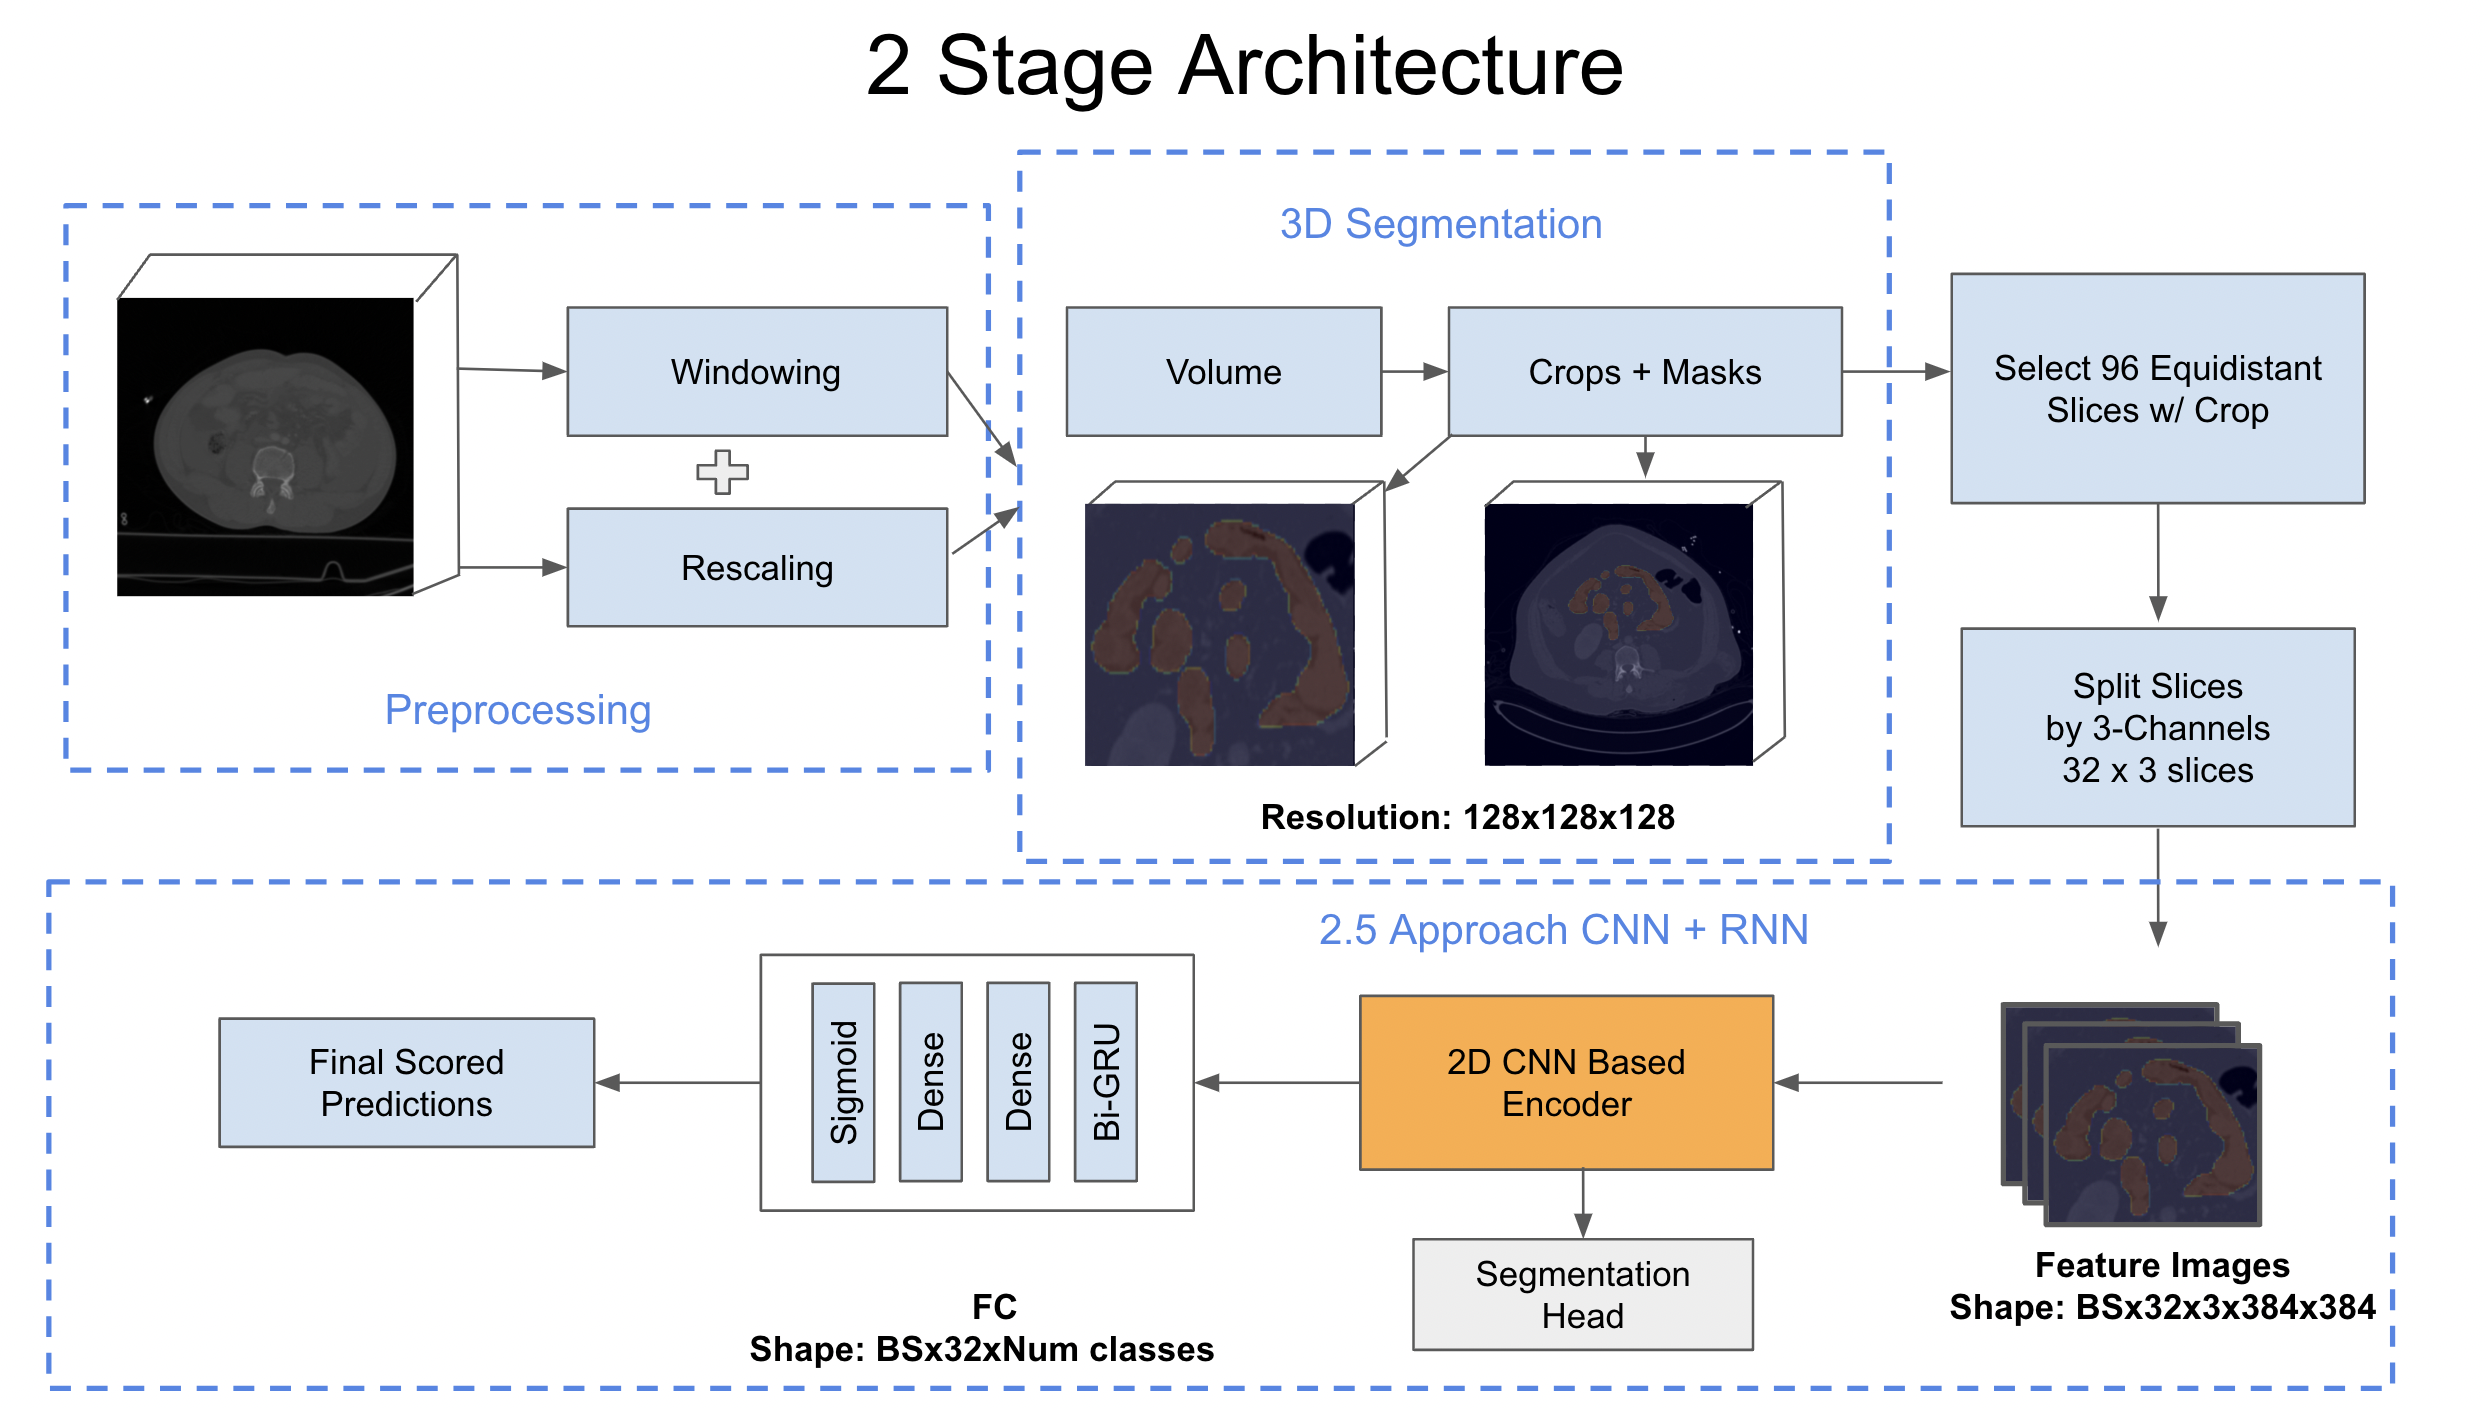
Here comes the key part of our solution, we will describe it later in more depth. Note: All models were trained on image size 384 x 384. We use datasets preprocessing from @TheoVeol and our data which we made rescale dicoms and applying soft-tissue windowing.
We take a patient/study, we run a 3d segmentation model on it, it outputs masks for each slice, we make a study-level crop here based on boundaries of organs - liver, spleen, kidney & liver.
Next, we make volumes from the patient, each volume extracted with equi-distant 96 slices for a study which is then reshaped to (32, 3, image_size, image_size) in a 2.5D manner for training CNN based models.
3 channels are formed by using the adjacent slices.
All our model takes in input in shape (2, 32, 3, height, width) and outputs it as (2, 32, n_classes) as the targets are also kept in shape (2, 32, n_classes).
To make the targets, we need 2 things, patient-level target of each organ and how much the organ is visible compared to its maximum visibility, this data is available after normalizing segmentation model masks in 0-1 based on number of positive pixels
Then we multiply targets * patient-level target for each middle slice of the sequence and that is our label
For example if a patient has label 0 for liver-injury and the liver visibility is as follows in the slice sequence
[0., 0., 0., 0.01, 0.05, 0.1, 0.23, 0.5, 0.7, 0.95, 0.99, 1., 0.95, 0.8, 0.4 …. 0. ,0., 0.]
We multiply it with label which is currently 0 results in an all zeros list as output, but if target label for liver-injury was 1, then we use the list mentioned above as our soft labels.
In stage 2, we trained our models using the volumes either based on our windowing or theo's preprocessing approach and the masks/crops generated from 3D segmentation approach. Each model is trained for multiple tasks (segmentation + classification). For all 32 sequences, we predicted slice level masks and sigmoid predictions. Further, simple maximum aggregation is applied on sigmoid predictions to fetch study level prediction used in submissions.
For training our models, some common settings were:
- Learning rate: (1e-4 to 4e-4) range
- Optimizer: AdamW
- Scheduler: Cosine Annealing w/ Warmup
- Loss: BCE Loss for Classification, Dice Loss for segmentation
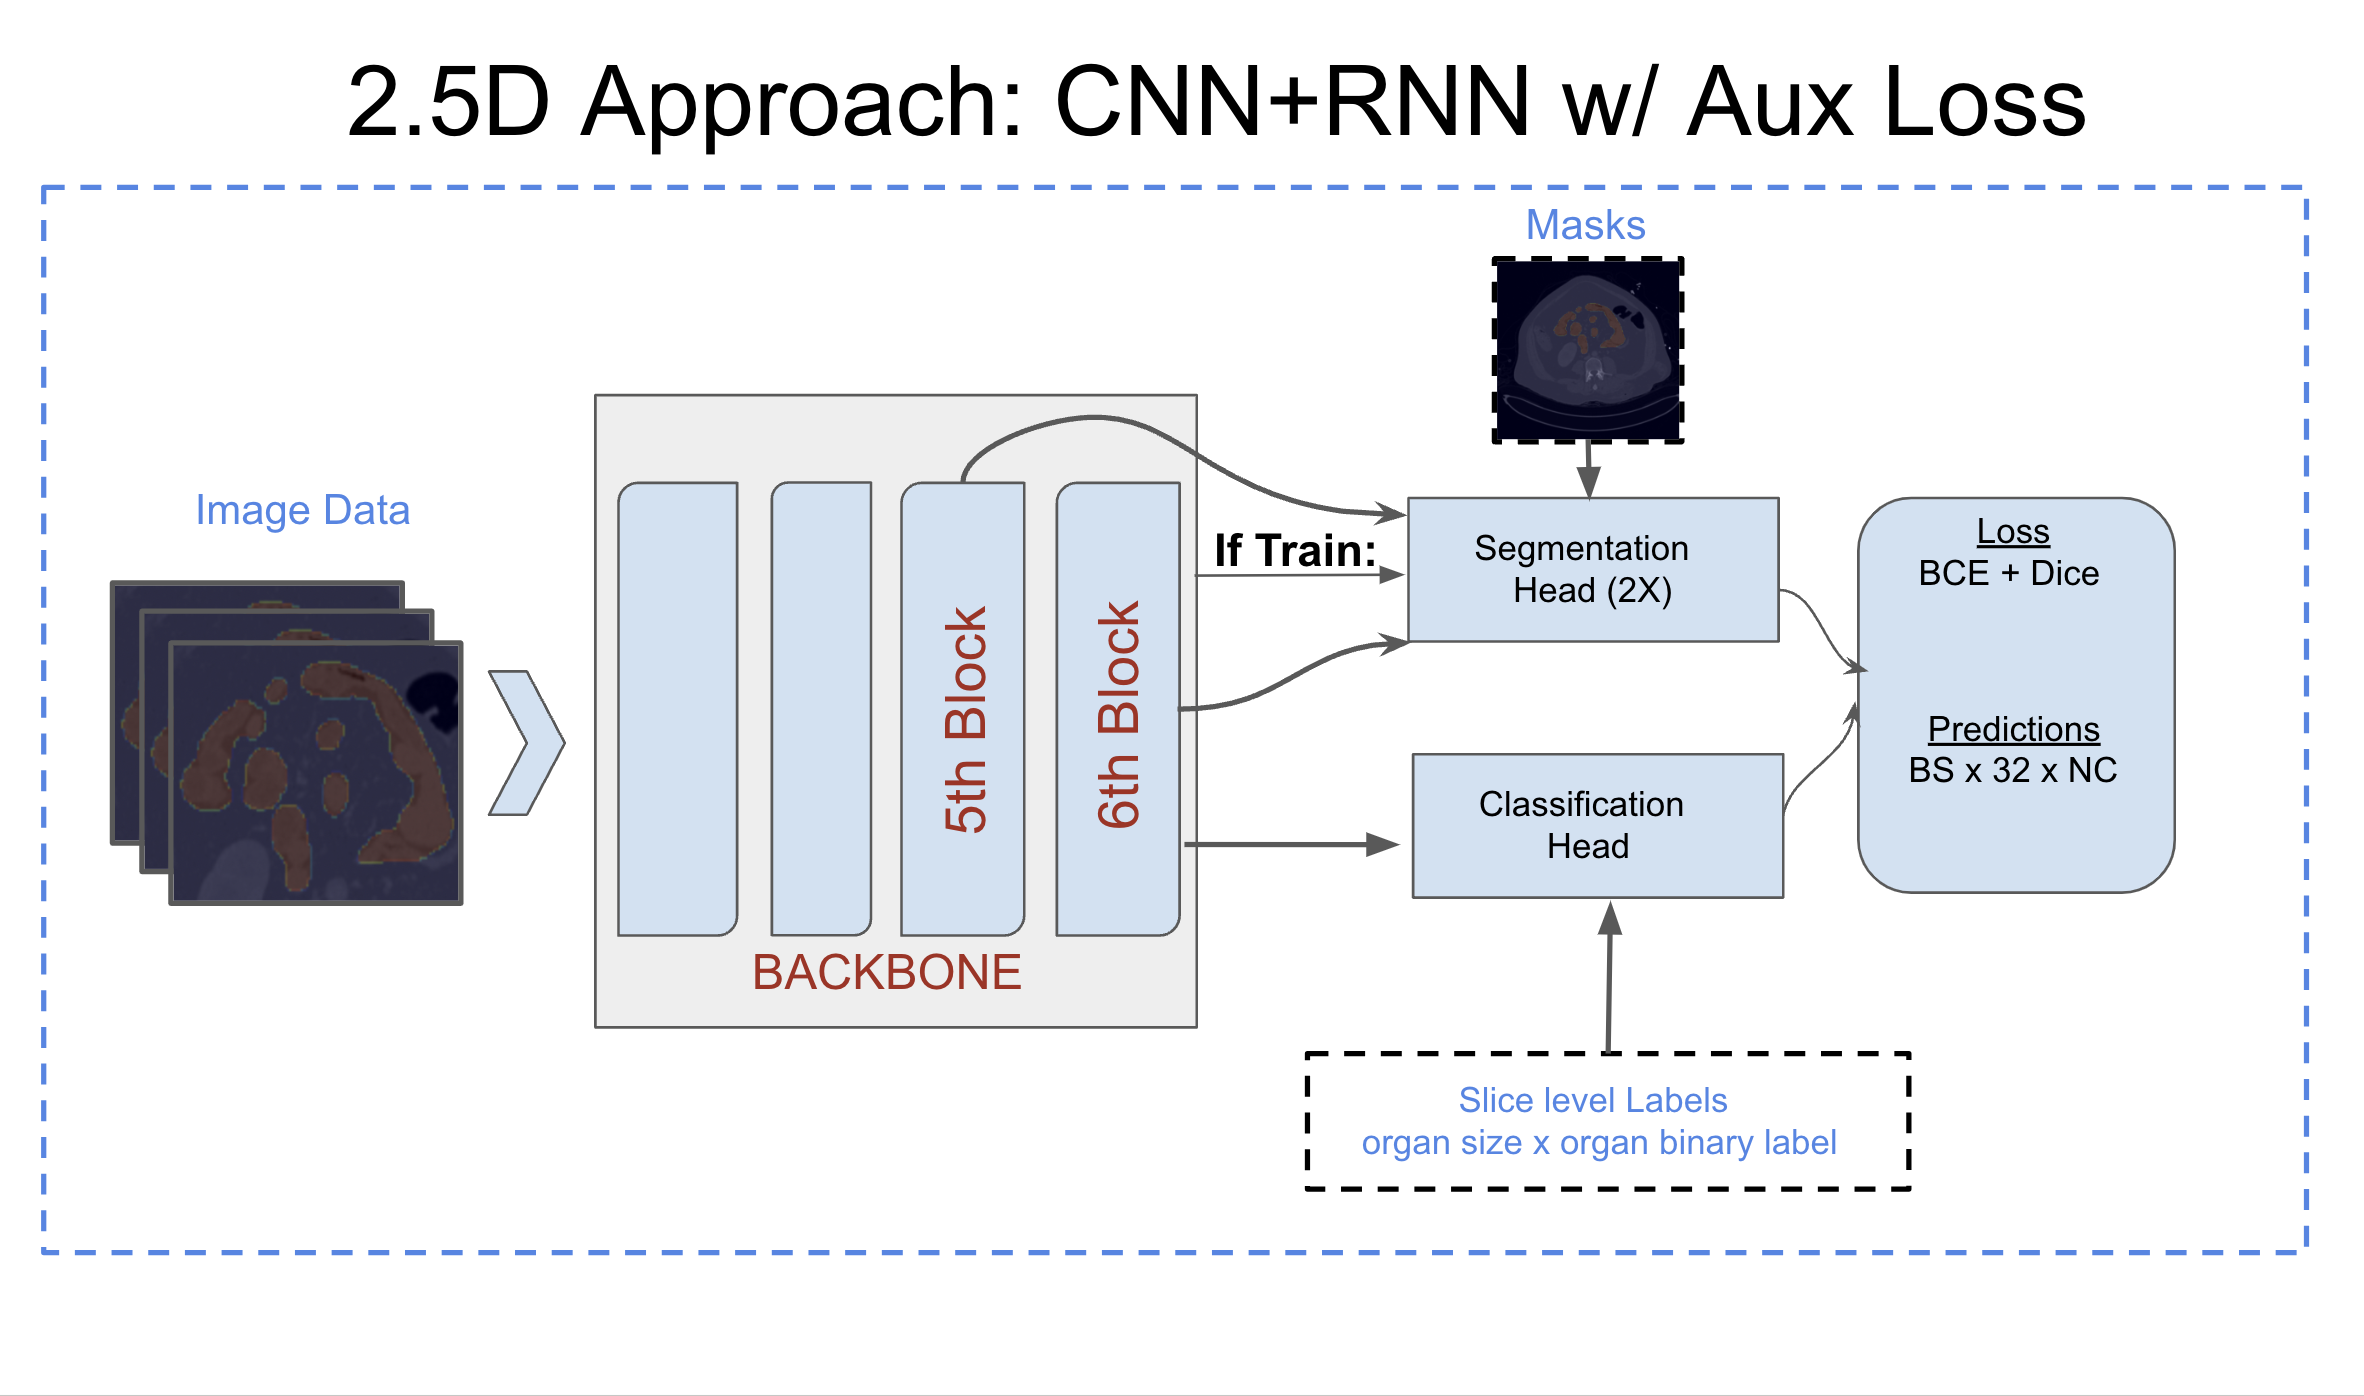
###Auxiliary Segmentation Loss: One of the key things which made our training much more stable and helped in improving scores was using auxiliary losses based on segmentation.
Encoder was kept same for both classification & segmentation decoders, we used two types of segmentation head:
- Unet based decoder for generating masks
- 2D-CNN based head
nn.Sequential(
            nn.Conv2d(nb_ft, 128, kernel_size=3, padding=1),
            nn.BatchNorm2d(128),
            nn.ReLU(inplace=True),
            nn.Conv2d(128, 128, kernel_size=3, padding=1),
            nn.BatchNorm2d(128),
            nn.ReLU(inplace=True),
            nn.Conv2d(128, 4, kernel_size=1, padding=0),
        )
        self.mask_head_3 = self.get_mask_head(true_encoder.feature_info[-2]['num_chs'])
        self.mask_head_4 = self.get_mask_head(true_encoder.feature_info[-1]['num_chs'])
We used the feature maps generated mainly from last and 2nd last blocks of the backbones & apply dice loss on the predicted masks & true masks. This trick gave us around +0.01 to +0.03 boost in our models. We used similar technique in Covid 19 detection competition held few years back, you can also refer my solution for more detailed use of auxiliary loss & code snippets. link of discussion
Here is an example code for applying aux loss:
class CustomLoss(nn.Module):
    def __init__(self):
        super(CustomLoss, self).__init__()
        #self.bce = nn.BCEWithLogitsLoss(pos_weight=torch.as_tensor([2.318]).cuda()).cuda()
        self.bce = nn.BCEWithLogitsLoss()
        self.dice = smp.losses.DiceLoss(smp.losses.MULTILABEL_MODE, from_logits=True)

    def forward(self, outputs, targets, masks_outputs, masks_outputs2, masks_targets):
        loss1 = self.bce(outputs, targets.float())

        masks_outputs = masks_outputs.float()
        masks_outputs2 = masks_outputs2.float()

        masks_targets = masks_targets.float().flatten(0, 1)

        loss2 = self.dice(masks_outputs, masks_targets) + self.dice(masks_outputs2, masks_targets)


        loss = loss1 + (loss2 * 0.125)

        return loss
- Coat Lite Medium w/ GRU - original source code
- Coat Lite Small w/ GRU!
- Efficientnet v2s w/ GRU [Timm]
We couldn't come up with several augmentations to use, but these were the ones which we used in our training.
        A.Perspective(p=0.5),
        A.HorizontalFlip(p=0.5),
        A.VerticalFlip(p=0.5),
        A.Rotate(p=0.5, limit=(-25, 25)),
Final ensemble for all organs model includes multiple Coat medium and V2s based models trained on either 4 Folds or Full data.
For extravasation, We mainly used Coat Small and v2s in ensemble. No major postprocessing was applied except for tuning scaling factors based on CV scores. To get the predictions, we aggregated the model outputs at slice level and simply took the maximum value for each patient.
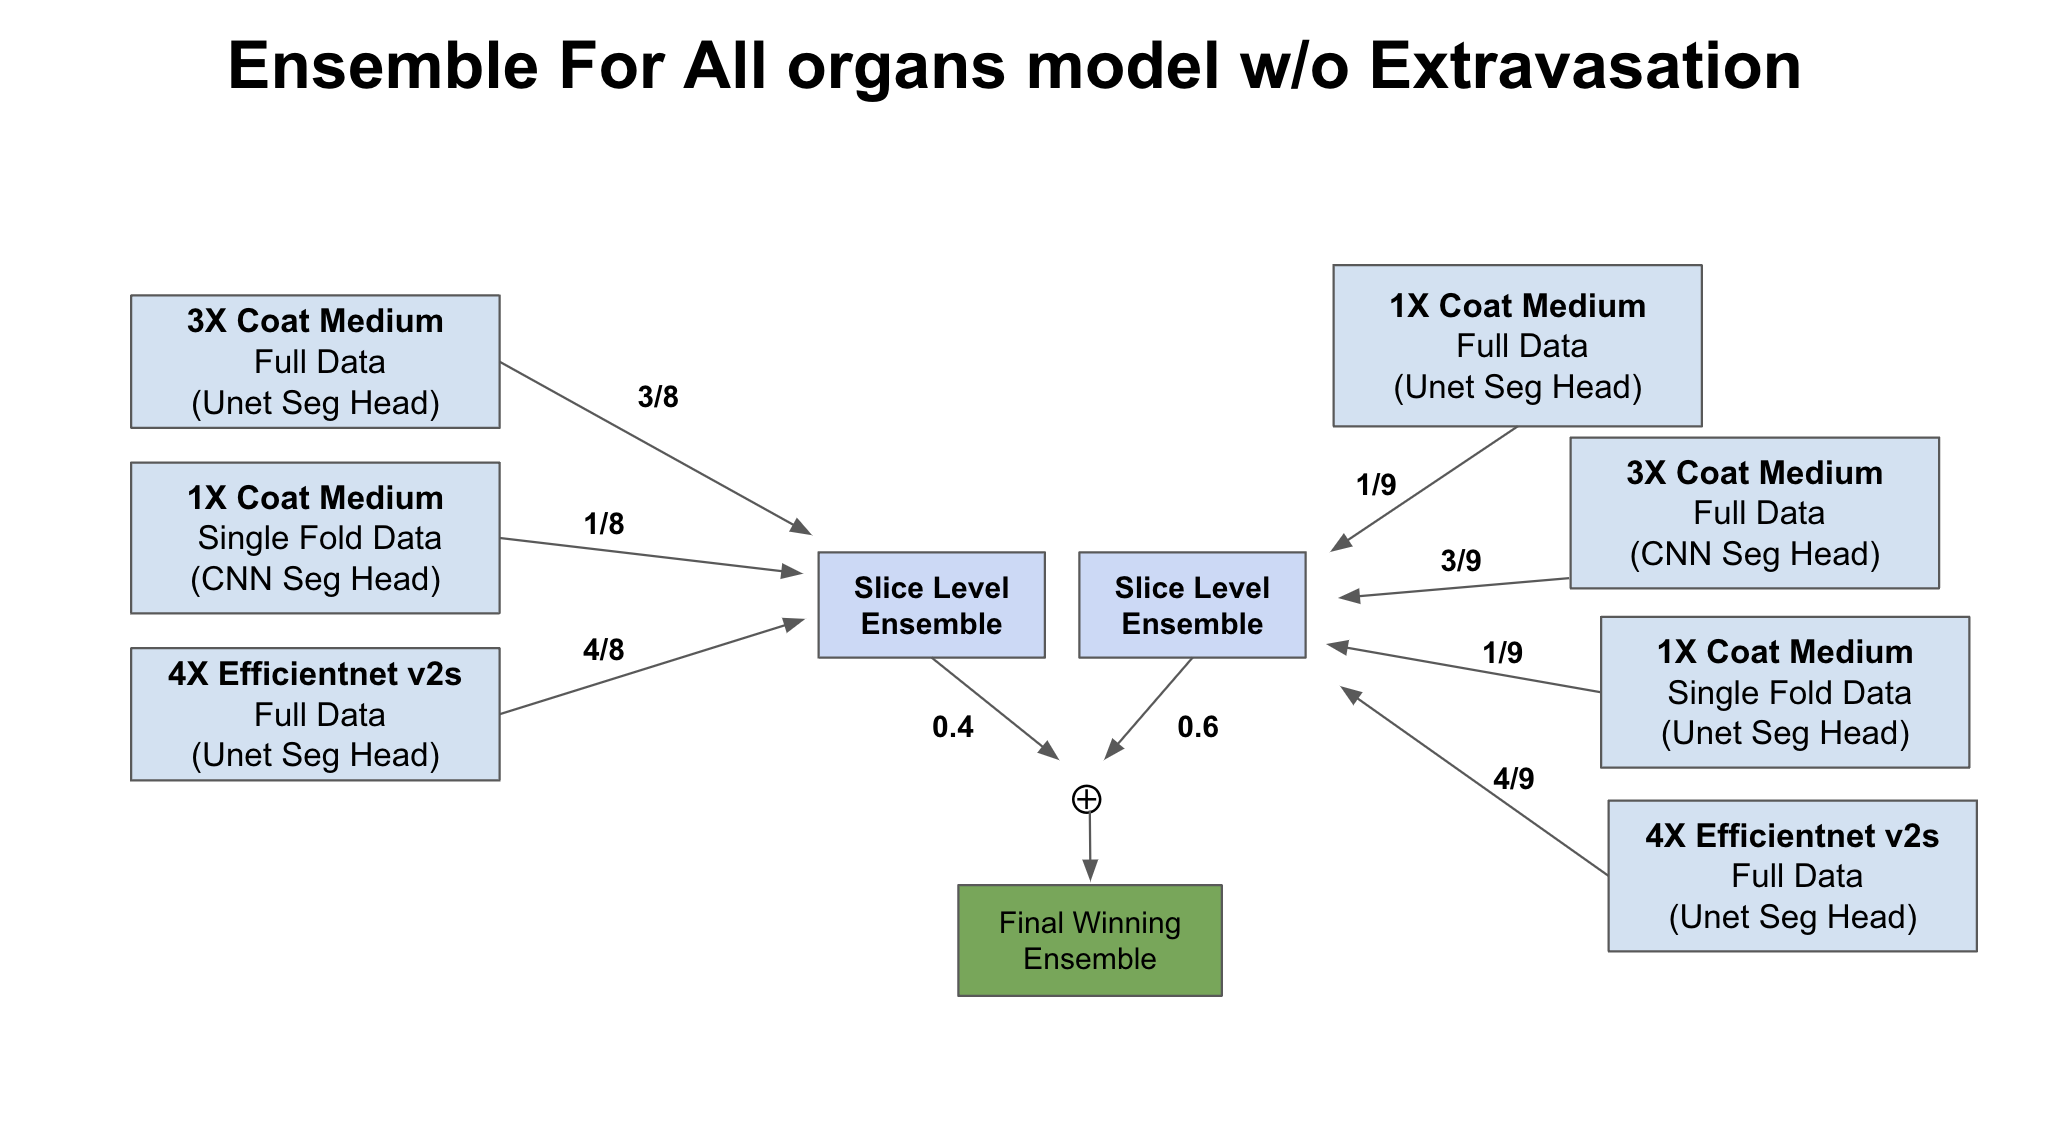

Within folds of each models, we are doing slice level ensemble. For different architectures & cross data models (theo/ours), we did ensemble after the max aggregation.
Organ level OOF for single model looks like this:
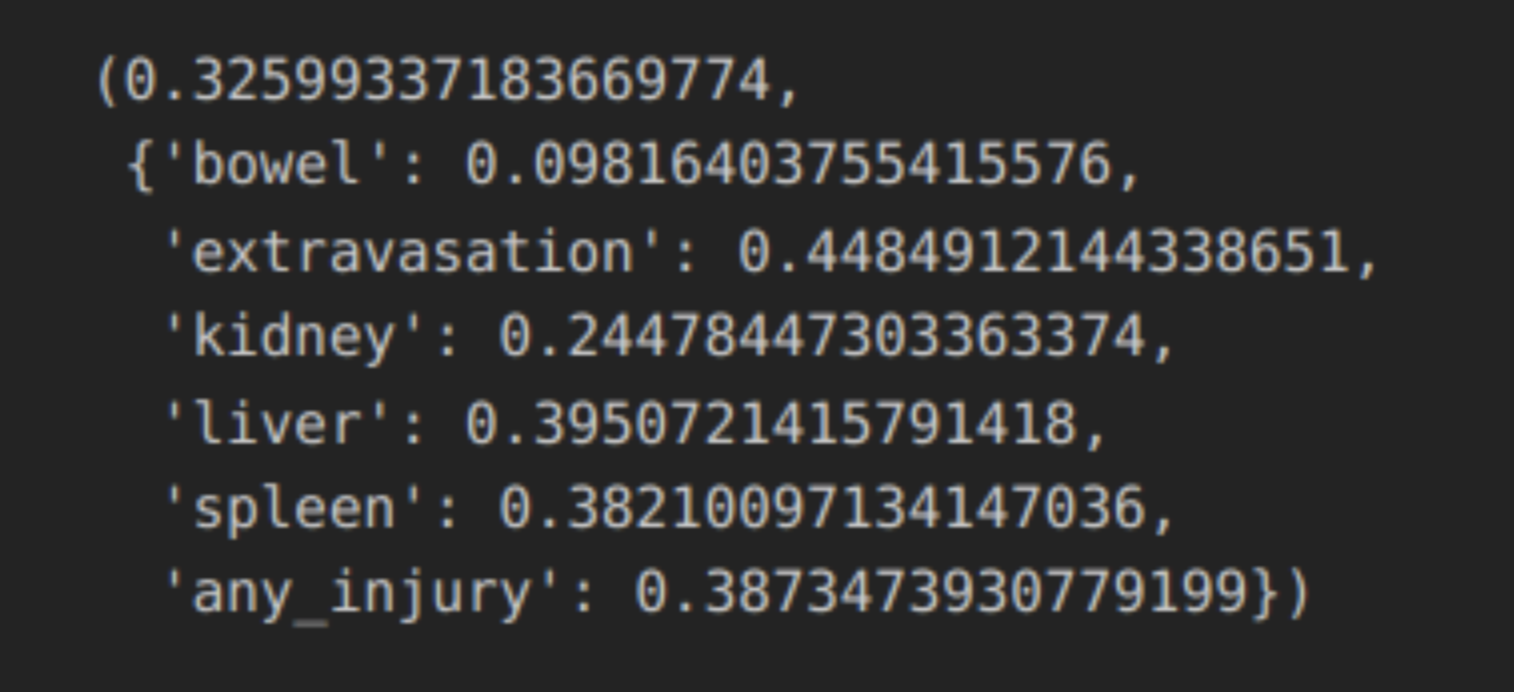
Thank you.
3D segmentation code: notebook link

