You have just powered on your system. The boot process consists of the following main stages:
Note This section assumes an Intel x86-based PC.
Todo This section assumes a BIOS-based boot. Extend it to cover UEFI-based boot.
-
Motherboard: An embedded microcontroller on the motherboard (Baseboard Management Controller) may start, and initialize motherboard components even before the CPU has started. Examples include Fault Resilient Booting and the Intel Management Engine.
-
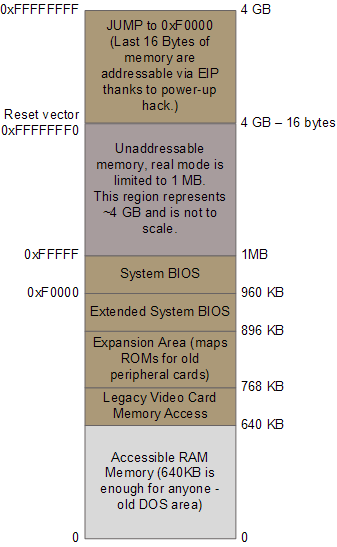
CPU Reset: The CPU receives power, and initializes itself to a specific Reset state. Where is the Instruction Pointer? It points to a specific "Reset Vector". For Intel processors in general, this is 16 bytes below the last physical address; In the case of the i386, this is
0xFFFFFFF0. More on this later on. -
BIOS: The motherboard maps the reset vector into BIOS ROM. This means the first instruction the CPU executes belongs to BIOS code. The BIOS jumps immediately into a lower address in ROM, initializes components on the motherboard/chipset, e.g., memory controller, RAM, interrupt controller, timer, and performs Power On Self Test (POST). It also looks for Option ROMs on the ISA/PCI bus, and passes control to them, one by one. One of the first ROMs which the BIOS jumps to contains the VGA BIOS, which initializes the display. Finally, the BIOS loads the first 512-byte sector of the chosen boot device (let's assume a hard disk) into a specific location in memory (
0000:07C00in 8086 real mode), and jumps to it directly. -
MBR (Stage 1): The first 512-byte sector of a block device is the "Master Boot Record", or MBR. Here is a typical MBR:
The MBR contains the MBR partition table and 446 bytes of 8086 code. This 446-byte long bootloader is often called the Stage 1 boot loader, following GRUB Legacy terminology. It can only use the BIOS for access to the rest of the data on disk.
A Windows MBR looks for a partition marked as "active", loads its first sector, and jumps to it [chain-loading].
Linux bootloaders include GRUB 2, GRUB legacy, SYSLINUX, LILO (obsolete).
GRUB 2 calls its MBR / Stage 1
boot.img. -
GRUB 2 (Stage 1.5 /
core.img): Stage 1 doesn't have enough space to know how to access a filesystem, so it can only load a list of predefined sectors, a "block list". This list encodes the list of sectors where Stage 1.5 lives.GRUB Legacy used a hack where it stored Stage 1.5 in the gap between the MBR and the start of the first partition, which for historic reasons must be >= sector 63. This leaves 31K for Stage 1.5.
Similarly GRUB 2 stores
core.imgin the gap between the MBR and the start of the first partition, and it can't be more than 31K.Stage 1.5 switches the processor to protected mode, and loads Stage 2. It needs to have enough code to access the disk(s) and interpret the actual filesystem of the partition where Stage 2 resides, e.g.,
ext4.In GRUB 2,
core.imgcan load any number of modules from/boot/grubdynamically. This set of modules constitutes the equivalent of Stage 2.LILO used a hardcoded block list inside the MBR to load the kernel directly. Similarly, GRUB uses a hardcoded list of consecutive sectors after sector
0to load Stage 1.5.Why is GRUB 's method more resilient as users upgrade their systems / install new kernels?
-
GRUB 2 (Stage 2 / dynamic modules): GRUB 2 is now a mini-OS in its own right. It can load more dynamic modules, detect disks, assemble RAID arrays, decrypt encrypted partitions, access filesystems, as necessary. It interprets filesystem structures to load the kernel, e.g.,
/boot/vmlinuz-5.10.0-13-amd64and initramfs, e.g.,/boot/initrd.img-5.10.0-13-amd64into memory. -
Linux kernel: Finally, GRUB jumps to the kernel. The kernel has full control of the machine, it re-initializes the hardware it has embedded drivers for, and unpacks the initial filesystem [initramfs] in memory. The kernel mounts this initial filesystem as its root filesystem, and
execve()s/bin/init.Todo Add more information on the switch to protected mode -->
start_kernel()-->rest_init()-->kernel_thread(kernel_init, ...)-->execve("/bin/initwhile in parallel -->schedule_preempt_disabled()-->schedule()which enters the idle loop.Todo Inspect with sequence with QEMU + KVM + gdb.
-
Initramfs: Load more drivers, access disks / resources on the network. Decrypt devices as necessary. Mount the final root filesystem, and pivot to it.
Todo Document
pivot_root(2),switch_root(8).


Here is a visualization of the boot process:

Interesting resources:
- How computers boot up
- Inside the Linux boot process
- GRUB 2 Images
- GRUB 2 on Wikipedia
- Kernel booting process
Let's assemble and boot a simple 512-byte boot sector using the BIOS.
File boot/floppy0.raw.asm defines a boot sector like this, adapted from
here.
$ cd boot
$ nasm -f bin floppy0.raw.asm -o floppy0.raw.bin
$ qemu-system-i386 -drive if=floppy,index=0,format=raw,file=floppy0.raw.bin -display curses
To quit the VM:
[Move to the QEMU monitor prompt with Alt-2]
(qemu) quit
Interesting resources:
Let's combine QEMU with
gdb so we can look at the
boot process instruction by instruction. QEMU supports a gdb "stub"; it becomes
a remote debugging target for the GNU debugger, gdb, so we can use gdb to
inspect and manipulate VM state. This is the equivalent of using a hardware
debugger to inspect and manipulate the machine directly.
-
Start QEMU, but have it wait for a connection from gdb at
localhost:1234[option-s], without starting the emulated CPU at all [option-S]:$ qemu-system-i386 -drive if=floppy,index=0,format=raw,file=floppy0.raw.bin -display curses -s -S -
In a different terminal, start
gdband ask it to use QEMU as the remote target. Due to a bug in the way QEMU interacts with gdb, duplicate here, you have to do some extra configuration on the gdb side to debug 16-bit x86 code in real mode.$ gdb (gdb) target remote localhost:1234 (gdb) set tdesc filename i8086.xml (gdb) set architecture i8086Note
-
Inspect the state of the VM. This is the state of the VM at reset, more on this below.
(gdb) info registers
Note The workaround to make QEMU work with gdb for 16-bit code in real mode is to define your own target description for gdb inside a new 'target.xml' file and then instruct gdb to use the
i8086architecture. I used this target description for this.You must use
qemu-system-i386throughout this section, otherwise gdb will fail withRemote 'g' packet reply is too long (expected 308 bytes, got 536 bytes):See this GitHub comment for a more detailed explanation: https://gist.github.com/MatanShahar/1441433e19637cf1bb46b1aa38a90815?permalink_comment_id=3315921#gistcomment-3315921
Interesting resources:
-
Intel System Debugger, a hardware debugger.
-
QEMU support for GDB for more details on how QEMU works with GDB.
-
qemu-system-i386manual page for all the different options QEMU accepts at the command line.
Todo Define a simple gdb startup script to simplify working with 16-bit code in real-mode, with Intel syntax.
Use QEMU to inspect the current state of the VM, right after reset:
-
Press
Alt-2to move to the QEMU monitor, and use theinfo registerscommand:(qemu) info registers EAX=00000000 EBX=00000000 ECX=00000000 EDX=00000663 ESI=00000000 EDI=00000000 EBP=00000000 ESP=00000000 EIP=0000fff0 EFL=00000002 [-------] CPL=0 II=0 A20=1 SMM=0 HLT=0 ES =0000 00000000 0000ffff 00009300 CS =f000 ffff0000 0000ffff 00009b00Note the CS descriptor base is waaaay over 1MB (essentially, Unreal mode)
Note The
vncandcursesdisplay modes of QEMU don't seem to support scrolling in the QEMU monitor. Try running with no display, or with-display vnc=0:0instead, to allow the QEMU monitor to run directly on your terminal,-monitor stdio.qemu-system-i386 -drive if=floppy,index=0,format=raw,file=floppy0.raw.bin -display none -monitor stdio -s -S -
Note how the first command is a
JMP FARcommand:(qemu) x/i 0xfffffff0 -
Note how it jumps back into the ISA BIOS region, where QEMU has already mapped SeaBIOS.
(qemu) info mtree
Use gdb to inspect the current state of the VM:
-
Disassemble 10 instructions:
(gdb) x/10i 0xffff0 -
Show 10 bytes in hexadecimal:
(gdb) x/10xb 0xffffffff0 -
Show 10 bytes in hexadecimal:
(gdb) x/10xb 0xffff0Note Breakpoints must be 32-bit EIP addresses, see here for some more context.
-
Inspect CPU registers:
(gdb) info registers
Note The legacy 8086 used
FFFF:0000-->0xFFFF0as its reset vector, see section System Reset. Note howCS:IPin QEMU's emulated i386 points to F000:FFF0 --> 0xFFFF0, at exactly the same location, right below 1MB of memory. This allows for backwards compatibility with the 8086.
Interesting resources:
-
Intel 64 and IA-32 Architectures Developer's Manual: Vol. 3A, the authoritative documentation on low-level programming in Assembly on the Intel x86 architecture.
-
Legacy iAPX 86,88 User's Manual, a much older, much simpler manual by Intel for the 8086/88. Contains simple descriptions of how interrupts, ports, exceptions work. Ignore some really obsolete sections [PL/M?]
-
Software initialization code at 0xFFFFFFF0H, a discussion about the i386 reset vector, referencing Coreboot documentation.
We can improve our debugging experience by helping gdb associate memory addresses with lines of source code.
Gdb uses extra information called "debug symbols". Executables have special sections which contain debug symbols. But our simple boot sectors are flat 512-byte files, meant to execute as absolute code, directly on the machine, in 16-bit mode.
We can help gdb by producing intermediate ELF executables, which we will not run on the actual machine, but we can use with gdb while debugging.
Here is an interesting tutorial:
-
Assemble into ELF32 and include debugging information in DWARF format:
$ nasm -f elf32 -g -F dwarf floppy0.dbg.asm -o floppy.dbg.oNote the file doesn't include any information on the start address,
0000:7c00, we use the linker for this. -
Link the object which now contains debug symbols into an ELF i386 executable, and set
0x7c00as its start address, so the actual code is correct:$ ld -Ttext=0x7c00 -melf_i386 floppy0.dbg.o -o floppy0.dbg.elf ld: warning: cannot find entry symbol _start; defaulting to 0000000000007c00 -
Dump the code into a flat binary, so we can extract our 512-byte boot sector
$ objcopy -O binary floppy0.dbg.elf floppy0.dbg.dump -
Finally, extract the first 512 bytes of this file, which is the usable code we need:
$ dd if=floppy0.dbg.dump of=floppy0.dbg.bin bs=512 count=1Todo Why does
objcopyproduce a file this big? Limit the size of the.textsegment? -
Confirm the final 512-byte binary matches our original binary, bit for bit:
$ md5sum floppy0.{raw,dbg}.bin
Note the repository contains a simple Makefile, which you can use to build all artifacts directly:
$ make clean
rm -f *.bin *.dump *.elf *.o
$ make
nasm -f bin floppy1.raw.asm -o floppy1.raw.bin
nasm -f bin floppy2.raw.asm -o floppy2.raw.bin
nasm -f bin floppy3.raw.asm -o floppy3.raw.bin
nasm -f bin floppy4.raw.asm -o floppy4.raw.bin
nasm -f elf32 -g -F dwarf floppy0.dbg.asm -o floppy0.dbg.o
ld -Ttext=0x7c00 -melf_i386 floppy0.dbg.o -o floppy0.dbg.elf
[...]
$ make clean && make
The BIOS (Basic Input/Output System) is the firmware in IBM PC compatible systems which provides basic runtime services during system initialization and boot up. Older Operating Systems, like MS-DOS, used it for I/O exclusively, newer Operating Systems almost never call into the BIOS after starting up.
The BIOS provides services via interrupt handlers, similarly to how an OS provides system calls to userspace process.
Interesting resources:
- Ralf Brown's Interrupt List, the authoritative source for BIOS / DOS calls and programming in x86 Assembly.
- Ralf Brown's Interrupt List - HTML Version, an HTML index of the same list.
SeaBIOS is an open source BIOS implementation. QEMU uses SeaBIOS as its canonical BIOS.
TODO Add instructions about how to download and build SeaBIOS and SeaVGABIOS with debug symbols. Use these artifacts with QEMU + gdb.
After building SeaBIOS, make the new binaries appear exactly as QEMU on Debian expects them, and start the VM:
$ cd $SB/out
$ ln -s vgabios.bin vgabios-stdvga.bin
$ ln -s bios.bin bios-256k.bin
$ objcopy --adjust-vma 0xf0000 out/rom16.o rom16offset.o
$ objcopy --adjust-vma 0xc0000 out/vgarom.o vgaromoffset.o
$ qemu-system-i386 -drive if=floppy,index=0,format=raw,file=floppy1.raw.bin -display curses -L $SB/out
Connect with gdb:
(gdb) source qemu-i8086.gdb
(gdb) source seabios.gdb
Inspect internal SeaBIOS state:
---------------------------[ CODE ]----
   0xfe05b:     cmp    DWORD PTR cs:0x61c8,0x0
   0xfe062:     jne    0xfd0b3 <entry_resume>
   0xfe066:     xor    dx,dx
   0xfe068:     mov    ss,dx
   0xfe06a:     mov    esp,0x7000
   0xfe070:     mov    edx,0xf0f5e
   0xfe076:     jmp    0xfcf2a <transition32>
   0xfe079 <fill_edd>:  push   ebp
   0xfe07b <fill_edd+2>:        push   edi
   0xfe07d <fill_edd+4>:        push   esi
?? () at src/romlayout.S:595
595             cmpl $0, %cs:HaveRunPost                // Check for resume/reboot
Let's see Programmable I/O in action; PIO means we run CPU instructions to perform I/O. Port-mapped I/O means we access a special "port" address space, which the processor handles separately from the physical memory space.
We will write a small boot sector to output messages to the first parallel port

Code on the CPU controls the first parallel port on the IBM PC via a series of I/O ports starting at 378h.
-
Run
floppy2.raw.asm. -
Use the debugger to inspect the state of the CPU while controlling the port directly.
-
Compare with using the BIOS.
Question Which approach is simpler, using the BIOS, or programming the ports directly?
Question Controlling the parallel port requires delays. How can one implement these delays in software, what are the trade-offs? See an older comp.os.msdos.programmer post
Interesting resources
Let's see Programmable I/O with Memory-mapped I/O in action; PIO means we run CPU instructions to perform I/O. Memory-mapped I/O means we access standard memory ranges in the physical address space, but reads and writes to these ranges have side-effects in the physical world.
We will use the VGA console as an example.
Traditionally, the system maps the framebuffer of the VGA card at
real-mode address B800:0000, physical address 0xB8000.
-
Run
floppy3.raw.asm -
Use the debugger to inspect the state of the CPU while writing to the Memory-mapped framebuffer directly.
-
Compare with using BIOS
int 10hcalls.
Note Compare with
floppy3.raw.asmwith the equivalent C code invgafb.c. Ask the C compiler to produce the intermediate Assembly:gcc -S -o vgafb.s vgafb.cExperiment with different optimization levels:
gcc -O3 -S -o vgafb.s vgafb.c
Note 16-bit code doesn't support scaling when computing effecting addresses.
Interesting resources:
Deploy Debian, boot Debian with debootstrap:
WARNING You will be manipulating partitions directly, as root. BE CAREFUL, make sure you are always manipulating the virtual hard disk, you don't want to inadvertently re-partition the hard drive on your physical host.
NOTE This section assumes a Debian-like host, e.g., a recent version of Debian or Ubuntu deployment. These instructions have been verified to work on Debian buster distribution on WSL 2.
PRs with fixes/improvements/contributions are always welcome!
-
Create a big file which will become our hard disk image, 1GB in size, name it
hd0.raw.$ dd if=/dev/zero of=hd0.raw bs=1M count=1024Question Why is this a
.rawfile? Are there are hard disk image types for VMs, and how do they differ? -
Make it appear as a block device, so you can manipulate it
# losetup /dev/loop0 hd0.raw -
Create new partition table, single Linux partition:
FIXME The output doesn't correspond to a 1GB block device
# fdisk /dev/loop0 Welcome to fdisk (util-linux 2.33.1). Changes will remain in memory only, until you decide to write them. [...] Device does not contain a recognized partition table. Created a new DOS disklabel with disk identifier 0x6eee97b0. Command (m for help): p Disk /dev/loop0: 512 MiB, 536870912 bytes, 1048576 sectors Units: sectors of 1 * 512 = 512 bytes Sector size (logical/physical): 512 bytes / 512 bytes I/O size (minimum/optimal): 512 bytes / 512 bytes Disklabel type: dos Disk identifier: 0x6eee97b0 Command (m for help): n Partition type p primary (0 primary, 0 extended, 4 free) e extended (container for logical partitions) Select (default p): p Partition number (1-4, default 1): First sector (2048-1048575, default 2048): Last sector, +/-sectors or +/-size{K,M,G,T,P} (2048-1048575, default 1048575): Created a new partition 1 of type 'Linux' and of size 511 MiB. Command (m for help): p Disk /dev/loop0: 1 GiB, 1073741824 bytes, 2097152 sectors Units: sectors of 1 * 512 = 512 bytes Sector size (logical/physical): 512 bytes / 512 bytes I/O size (minimum/optimal): 512 bytes / 512 bytes Disklabel type: dos Disk identifier: 0xcdbe24d5 Device Boot Start End Sectors Size Id Type /dev/loop0p1 2048 2097151 2095104 1023M 83 Linux Command (m for help): w The partition table has been altered. Calling ioctl() to re-read partition table. Re-reading the partition table failed.: Invalid argument -
Re-configure the virtual block device, so the kernel knows it contains distinct partitions now:
# losetup -d /dev/loop0 # losetup -P /dev/loop0 hd0.raw # ls /dev/loop0<TAB> loop0# loop0p1# -
Create an ext4 filesystem to hold Debian's root filesystem,
/:# mkfs.ext4 /dev/loop0p1 mke2fs 1.44.5 (15-Dec-2018) ext2fs_check_if_mount: Can't check if filesystem is mounted due to missing mtab file while determining whether /dev/loop0p1 is mounted. Discarding device blocks: done Creating filesystem with 261888 4k blocks and 65536 inodes Filesystem UUID: 5a4808b5-cbd0-4e45-bf8f-74e180a16e1c Superblock backups stored on blocks: 32768, 98304, 163840, 229376 Allocating group tables: done Writing inode tables: done Creating journal (4096 blocks): done Writing superblocks and filesystem accounting information: done -
Actually confirm we have created an ext4 filesystem, by examining the first few sectors of the whole (virtual) disk, and the partition:
# dd if=/dev/loop0 bs=512 count=1|file - [...] /dev/stdin: DOS/MBR boot sector; partition 1 : ID=0x83, start-CHS (0x0,32,33), end-CHS (0x41,69,4), startsector 2048, 1046528 sectors, extended partition table (last) # dd if=/dev/loop0 bs=512 count=10 skip=2048|file - [...] /dev/stdin: Linux rev 1.0 ext4 filesystem data, UUID=a60d5690-f9ff-4440-ba1d-1906607dda9c (extents) (64bit) (large files) (huge files) -
Use Debian's
debootstraptool to create a Debian root for bullseye:# mkdir /srv/debian # mount /dev/loop0p1 /srv/debian/ # debootstrap bullseye /srv/debian http://deb.debian.org/debian I: Target architecture can be executed I: Retrieving InRelease I: Checking Release signature I: Valid Release signature (key id A4285295FC7B1A81600062A9605C66F00D6C9793) I: Retrieving Packages [...] I: Configuring libc-bin... I: Base system installed successfully. -
Mount the
/procand/sysspecial filesystems and switch root into the new deployment. This way, we can use the deployment as if we have booted it directly, and install a few extra packages in the next step.host:/# cd /srv/debian host:/srv/debian# mount proc proc -t proc host:/srv/debian# mount sys sys -t sysfs host:/srv/debian# echo utopia >etc/hostname host:/srv/debian# chroot . chroot:/#WARNING Pay attention to the prompts, make sure you know when you are running something in the new Debian chroot, or on your own host:
host:/srv/debian# # This command runs on the host chroot:/# # This command runs in the chroot -
Now that you are inside the chroot, install extra packages for the GRUB 2 bootloader and the Linux kernel. We will use them later on, when booting the virtual hard disk on the QEMU VM.
chroot:/# apt-get install linux-image-amd64 [...] /etc/kernel/postinst.d/initramfs-tools: update-initramfs: Generating /boot/initrd.img-5.10.0-13-amd64 Setting up linux-image-amd64 (5.10.106-1) ... Processing triggers for initramfs-tools (0.140) ... update-initramfs: Generating /boot/initrd.img-5.10.0-13-amd64 chroot:/# apt-get install grub2 -
Finally, exit the chroot:
chroot:/# exit
host:/srv/debian#
At this point you are ready to Install the GRUB boot loader directly into the whole device. Here is a [useful blog post] (https://www.shinypile.com/p/how-to-install-grub-to-a-loopback-device/).
-
First, confirm there is a
/bootdirectory containing a Linux kernel and an initramfs inside your partition:/srv/debian# ls -la boot [...] -rw-r--r-- 1 root root 6840768 Mar 17 17:40 vmlinuz-5.10.0-13-amd64 -
Install
grub2on your host computer, if it's not already installed on your host: [WSL 2 distributions don't include it normally]host:/# dpkg -l | grep grub2 host:/# apt-get install grub2
-
Install
grub2 directly into the hard disk image, and ask it to use/bootunder the already mounted/srv/debian` directory to hold its configuration files:host:/# grub-install --target=i386-pc --recheck --boot-directory=/srv/debian/boot /dev/loop0At this point GRUB 2 will overwrite the MBR of
/dev/loop0, will write its Stage 1.5core.imginto the unallocated sectors between the MBR and the start of the first partition [sector2048, see the output offdisk -labove], and will place its modules [Stage 2] under/boot/grubinside the mounted partition.Note This is the step most likely to fail. If it does, go over all of the commands you have run so far, keep a log of them and their output, and open a new issue in this repository.
-
Finally, unmount everything, so you are ready to boot your new hard disk image with QEMU.
WARNING You must unmount everything. Otherwise, two distinct Linux kernels, the kernel on the host and the kernel inside the VM will be accessing the same filesystem concurrently, without any synchronization, and you will probably lose data.
host:/srv/debian# cd /
host:/# umount /srv/debian/proc
host:/# umount /srv/debian/sys
host:/# umount /srv/debian

> **Note** Errors like this means someone is still using the mount point
> you are attempting to unmount. Could it be you're still working inside it?
> Use `cd` to move out of it.
>    ```
>    host:/srv/debian# umount /srv/debian
>    umount: /srv/debian: target is busy.
You are now ready to boot your new hard disk image with QEMU.
-
Expand your QEMU command line to define an extra SCSI controller of type MegaRAID SAS, and attach your new hard disk image to it as a SCSI hard disk. Optionally wait for gdb:
$ qemu-system-i386 -drive if=floppy,index=0,format=raw,file=floppy0.raw.bin -display curses -device megasas,id=scsi -drive file=hd0.raw,id=shd0,if=none,format=raw,cache=none -device scsi-hd,drive=shd0 -
Notice how SeaBIOS boots from the hard disk. if all goes well, you should see the GRUB prompt!
TODO Add a screenshot here.
-
Inspect GRUB. Note it switches to protected mode and
gdbcannot decode instructions as 8086 anymore. Switch back to the defaulti386architecture when this happens:(gdb) set architecture i386 (gdb) define hook-stop x/20i *$eip end
At this point GRUB doesn't have any default configuration.
Let's try to boot our kernel manually, and then install a default
configuration under /boot/grub/grub.cfg:
-
Inspect devices and try to boot our kernel manually:
grub> ls (hd0,msdos1)/boot/<TAB>
grub> linux (hd0,msdos1)/boot/vmlinuz-5.10.0-13-amd64
grub> initrd (hd0,msdos1)/boot/initrd.img-5.10.0-13-amd64
grub> boot
Note this appears to hang. Note
gdbshows the kernel being stuck in a tight loop. What is happening?Note We are trying to boot a kernel targeting x86-64 inside a QEMU VM emulating a 32-bit i386...
-
Switch to
qemu-system-x86_64. Note the kernel now boots! But it fails to mount its root device. Why does it fail to mount initramfs?Note The kernel emits a ton of logs. Redirect its console to the virtual serial port, and ask QEMU to redirect the first serial console to the terminal, so you can inspect kernel output directly. You also have the option of logging into files, see the QEMU manpage.
$ qemu-system-x86_64 -drive if=floppy,index=0,format=raw,file=floppy0.raw.bin -device megasas,id=scsi -drive file=hd0.raw,id=shd0,if=none,format=raw,cache=none -device scsi-hd,drive=shd0 -display vnc=0:0 -serial stdio -L $SB/out -
Add a kernel command-line argument, so it uses the serial console:
grub> linux (hd0,msdos1)/boot/vmlinuz-5.10.0-13-amd64 console=ttyS0,115200Inspect the kernel log. Why is the kernel failing?
Note It runs out of memory...
[ 1.003840] Trying to unpack rootfs image as initramfs... [ 1.362067] Initramfs unpacking failed: write error -
Augment your QEMU command line with
-m 1024. It actually boots into the initramfs.[ 4.822967] input: ImExPS/2 Generic Explorer Mouse as /devices/platform/i8042/serio1/input/input2 [ 5.084458] e1000 0000:00:03.0 eth0: (PCI:33MHz:32-bit) 52:54:00:12:34:56 [ 5.084844] e1000 0000:00:03.0 eth0: Intel(R) PRO/1000 Network Connection [ 5.141062] sd 2:2:0:0: [sda] 2097152 512-byte logical blocks: (1.07 GB/1.00 GiB) [ 5.141457] sd 2:2:0:0: [sda] Write Protect is off [ 5.141846] sd 2:2:0:0: [sda] Write cache: enabled, read cache: enabled, doesn't support DPO or FUA [ 5.154005] e1000 0000:00:03.0 ens3: renamed from eth0 [ 5.163751] sda: sda1 [ 5.184192] sd 2:2:0:0: [sda] Attached SCSI disk Begin: Loading essential drivers ... done. Begin: Running /scripts/init-premount ... done. Begin: Mounting root file system ... Begin: Running /scripts/local-top ... done. Begin: Running /scripts/local-premount ... done. No root device specified. Boot arguments must include a root= parameter. BusyBox v1.30.1 (Debian 1:1.30.1-6+b3) built-in shell (ash) Enter 'help' for a list of built-in commands. (initramfs) -
Confirm you can mount the root device manually:
(initramfs) mount /dev/sda1 /mnt mount: mounting /dev/sda1 on /mnt failed: No such file or directory (initramfs) modprobe ext4 (initramfs) mount /dev/sda1 /mnt -
Try again, with an explicit
root=command-line argument to the kernel:grub> linux (hd0,msdos1)/boot/vmlinuz-5.10.0-13-amd64 console=ttyS0,115200 root=/dev/sda1It boots! But you probably don't have the root password, and can't log in to the system.
Finally, hack into your new system by using /bin/bash as a small init,
and bypass the password prompts.
Question Does this mean Linux/UNIX password prompts are useless? How can you protect your system against this kind of attack?
-
Use
/bin/bashas a custominit, to bypass all authentication:grub> linux (hd0,msdos1)/boot/vmlinuz-5.10.0-13-amd64 init=/bin/bash console=ttyS0,115200 root=/dev/sda1 -
Create a new configuration file for grub, so you no longer need to boot manually:
root@(none):/# update-grub /sbin/grub-mkconfig: 257: cannot create /boot/grub/grub.cfg.new: Read-only file system -
The kernel mounts the root firesystem in read-only mode by default. So, let's remount it, and move on:
root@(none):/# mount / -o remount,rw root@(none):/# update-grub -
Create
/etc/fstab, so systemd will remount the root filesystem rw after boot:# echo '/dev/disk/by-uuid/<TAB> / ext4 rw,relatime,errors=remount-ro 0 0 >/etc/fstab -
Edit
/etc/default/grub, remove the "quiet" part, so we see kernel logs when booting. -
Finally, change your root password:
root@(none):/# grep root /etc/shadow root:*:19148:0:99999:7::: root@(none):/# passwd New password: Retype new password: passwd: password updated successfully -
Make sure to remount as read-only, and reboot:
root@(none):/# sync
root@(none):/# mount / -o remount,ro
root@(none):/# echo b >/proc/sysrq-trigger
Note is running
syncreally necessary, since we are remounting the filesystem read-only?
Interesting resources:
Interesting resources
- OSDev Wiki, a collection of articles on OS Development.
- The little book about OS development, a very interesting book on writing your own OS.
