Hacktober fest is a celebration open to everyone in the global community. It is held from October 1st to October 31st worldwide. It is a great oppurtunity/platform for people from beginner stage to professional developer to learn more about open source and contribute effectively for the same.IT is a month-long celebration of open source software run by DigitalOcean in partnership with GitHub and Twilio.
Make sure you have a GitHub account. In case you don't have one, you can create your account by visiting https://github.com/ and clicking on Sign up option at the top right corner.
Link to register: https://hacktoberfest.digitalocean.com/login
Click on "Start Hacking" and sign in with your GitHub account.

GitHub repository URLs will reference both the username associated with the owner of the repository, as well as the repository name. For example, acmbvp is the owner of the Hacktoberfest repository, so the GitHub URL for this project is:
https://github.com/wir-coders/Hacktoberfest


When you’re on the main page of a repository, you’ll see a button to "Star" and “Fork” the repository on the upper right-hand side of the page, underneath your user icon.
To make your own local copy of the repository you would like to contribute to, let’s first open up a terminal window.
We’ll use the git clone command along with the URL that points to your fork of the repository.
This URL will be similar to the URL above, except now it will end with .git. In the cloud_haiku example above, the URL will look like this:
https://github.com/your-username/Hacktoberfest.git
You can alternatively copy the URL by using the green “Clone or download” button from your repository page that you just forked from the original repository page. Once you click the button, you’ll be able to copy the URL by clicking the binder button next to the URL:

Once we have the URL, we’re ready to clone the repository. To do this, we’ll combine the git clone command with the repository URL from the command line in a terminal window:
git clone https://github.com/your-username/Hacktoberfest.git
To create your branch, from your terminal window, change your directory so that you are working in the directory of the repository. Be sure to use the actual name of the repository (i.e. Hacktoberfest) to switch into that directory.
Now, we’ll create our new branch with the git branch command. Make sure you name it descriptively so that others working on the project understand what you are working on.

Now that our new branch is created, we can switch to make sure that we are working on that branch by using the git checkout command:
Once you enter the git checkout command, you will receive the following output:

At this point, you can now modify existing files or add new files to the project on your own branch.
Once you have modified existing files or added new files to the project, you can add them to your local repository, which you can do with the git add command. Let’s add the -A flag to add all changes that we have made:

Next, we’ll want to record the changes that we made to the repository with the git commit command.
The commit message is an important aspect of your code contribution; it helps the other contributors fully understand the change you have made, why you made it, and how significant it is. Additionally, commit messages provide a historical record of the changes for the project at large, helping future contributors along the way.

If you have a very short message, you can record that with the -m flag and the message in quotes:

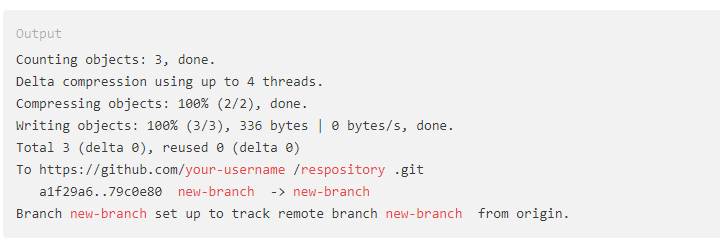
At this point you can use the git push command to push the changes to the current branch of your forked repository:
While working on a project alongside other contributors, it is important for you to keep your local repository up-to-date with the project as you don’t want to make a pull request for code that will cause conflicts. To keep your local copy of the code base updated, you’ll need to sync changes.
We’ll first go over configuring a remote for the fork, then syncing the fork.
Next up, you’ll have to specify a new remote upstream repository for us to sync with the fork. This will be the original repository that you forked from. you’ll have to do this with the git remote add command.
In this example, // upstream // is the shortname we have supplied for the remote repository since in terms of Git, “upstream” refers to the repository that you cloned from. If you want to add a remote pointer to the repository of a collaborator, you may want to provide that collaborator’s username or a shortened nickname for the shortname.
Once you have configured a remote that references the upstream and original repository on GitHub, you are ready to sync your fork of the repository to keep it up-to-date. To sync your fork, from the directory of your local repository in a terminal window, you’ll have to use the // git fetch // command to fetch the branches along with their respective commits from the upstream repository. Since you used the shortname “upstream” to refer to the upstream repository, you’ll have to pass that to the command:
Switch to the local master branch of our repository:
Now merge any changes that were made in the original repository’s master branch, that you will access through your local upstream/master branch, with your local master branch:
At this point, you are ready to make a pull request to the original repository.
Navigate to your forked repository, and press the “New pull request” button on your left-hand side of your Repo page.