This is the development version of the code for the following paper:
Bugra Tekin, Sudipta N. Sinha and Pascal Fua, "Real-Time Seamless Single Shot 6D Object Pose Prediction", CVPR 2018.
The original repository for the codebase for the above paper can be found in the following link.
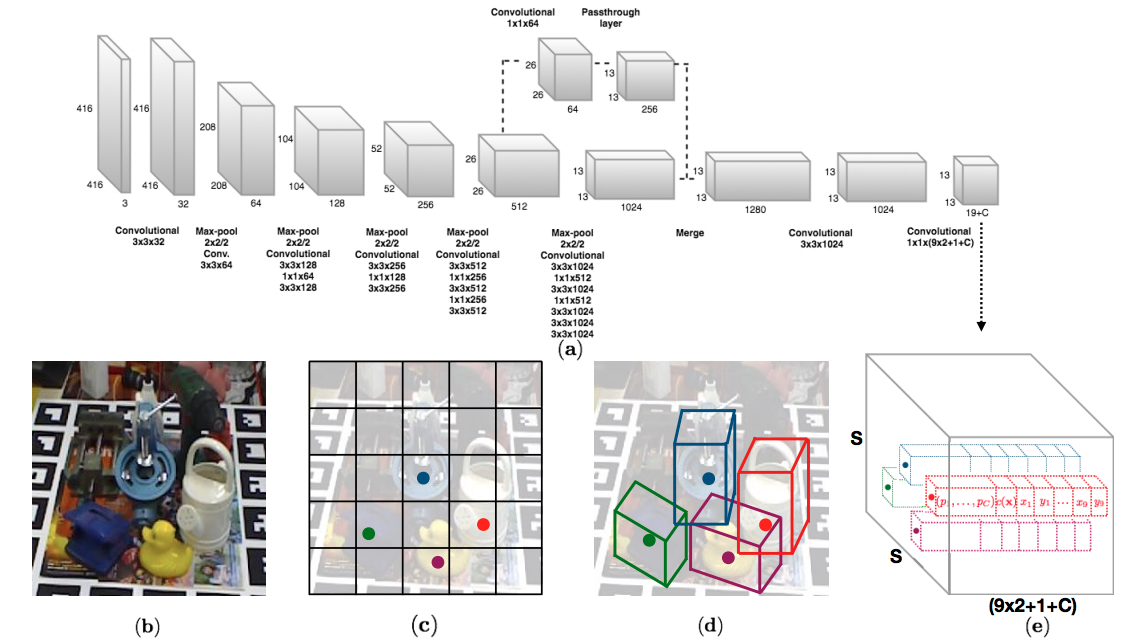
We propose a single-shot approach for simultaneously detecting an object in an RGB image and predicting its 6D pose without requiring multiple stages or having to examine multiple hypotheses. The key component of our method is a new CNN architecture inspired by the YOLO network design that directly predicts the 2D image locations of the projected vertices of the object's 3D bounding box. The object's 6D pose is then estimated using a PnP algorithm. Paper, arXiv
If you use this code, please cite the following
@inproceedings{tekin18,
TITLE = {{Real-Time Seamless Single Shot 6D Object Pose Prediction}}, AUTHOR = {Tekin, Bugra and Sinha, Sudipta N. and Fua, Pascal},
BOOKTITLE = {CVPR},
YEAR = {2018}
}
SingleShotPose is released under the MIT License (refer to the LICENSE file for details).
The code is tested on Windows with CUDA v8 and cudNN v5.1. The implementation is based on PyTorch 0.4.1 and tested on Python3.6. The code requires the following dependencies that could be installed with conda or pip: numpy, scipy, PIL, opencv-python. For an earlier version that is compatible with PyTorch 0.3.1 and tested on Python2.7, please see py2 folder.
Inside the main code directory, run the following to download and extract (1) the preprocessed LINEMOD dataset, (2) trained models for the LINEMOD dataset, (3) the trained model for the OCCLUSION dataset, (4) background images from the VOC2012 dataset respectively.
wget -O LINEMOD.tar --no-check-certificate "https://onedrive.live.com/download?cid=05750EBEE1537631&resid=5750EBEE1537631%21135&authkey=AJRHFmZbcjXxTmI"
wget -O backup.tar --no-check-certificate "https://onedrive.live.com/download?cid=0C78B7DE6C569D7B&resid=C78B7DE6C569D7B%21191&authkey=AP183o4PlczZR78"
wget -O multi_obj_pose_estimation/backup_multi.tar --no-check-certificate  "https://onedrive.live.com/download?cid=05750EBEE1537631&resid=5750EBEE1537631%21136&authkey=AFQv01OSbvhGnoM"
wget https://pjreddie.com/media/files/VOCtrainval_11-May-2012.tar
wget https://pjreddie.com/media/files/darknet19_448.conv.23 -P cfg/
tar xf LINEMOD.tar
tar xf backup.tar
tar xf multi_obj_pose_estimation/backup_multi.tar -C multi_obj_pose_estimation/
tar xf VOCtrainval_11-May-2012.tar
Alternatively, you can directly go to the links above and manually download and extract the files at the corresponding directories. The whole download process might take a long while (~60 minutes). Please also be aware that access to OneDrive in some countries might be limited.
To train the model run,
python train.py --datacfg [path_to_data_config_file] --modelcfg [path_to_model_config_file] --initweightfile [path_to_initialization_weights] --pretrain_num_epochs [number_of_epochs to pretrain]
e.g.
python train.py --datacfg cfg/ape.data --modelcfg cfg/yolo-pose.cfg --initweightfile cfg/darknet19_448.conv.23 --pretrain_num_epochs 15
if you would like to start from ImageNet initialized weights, or
python train.py --datacfg cfg/ape.data --modelcfg cfg/yolo-pose.cfg --initweightfile backup/duck/init.weights
if you would like to start with an already pretrained model on LINEMOD, for faster convergence.
[datacfg] contains information about the training/test splits, 3D object models and camera parameters
[modelcfg] contains information about the network structure
[initweightfile] contains initialization weights. <<darknet19_448.conv.23>> contains the network weights pretrained on ImageNet. The weights "backup/[OBJECT_NAME]/init.weights" are pretrained on LINEMOD for faster convergence. We found it effective to pretrain the model without confidence estimation first and fine-tune the network later on with confidence estimation as well. "init.weights" contain the weights of these pretrained networks. However, you can also still train the network from a more crude initialization (with weights trained on ImageNet). This usually results in a slower and sometimes slightly worse convergence. You can find in cfg/ folder the file <<darknet19_448.conv.23>> that includes the network weights pretrained on ImageNet.
At the start of the training you will see an output like this:
layer     filters    size              input                output
    0 conv     32  3 x 3 / 1   416 x 416 x   3   ->   416 x 416 x  32
    1 max          2 x 2 / 2   416 x 416 x  32   ->   208 x 208 x  32
    2 conv     64  3 x 3 / 1   208 x 208 x  32   ->   208 x 208 x  64
    3 max          2 x 2 / 2   208 x 208 x  64   ->   104 x 104 x  64
    ...
   30 conv     20  1 x 1 / 1    13 x  13 x1024   ->    13 x  13 x  20
   31 detection
This defines the network structure. During training, the best network model is saved into the "model.weights" file. To train networks for other objects, just change the object name while calling the train function, e.g., "python train.py --datacfg cfg/duck.data --modelcfg cfg/yolo-pose.cfg --initweightfile backup/duck/init.weights". If you come across GPU memory errors while training, you could try lowering the batch size, to for example 16 or 8, to fit into the memory. The open source version of the code has undergone strong refactoring and furthermore some models had to be retrained. The retrained models that we provide do not change much from the initial results that we provide (sometimes slight worse and sometimes slightly better).
To test the model run
python valid.py --datacfg [path_to_data_config_file] --modelcfg [path_to_model_config_file] --weightfile [path_to_trained_model_weights]
e.g.
python valid.py --datacfg cfg/ape.data --modelcfg cfg/yolo-pose.cfg --weightfile backup/ape/model_backup.weights
You could also use valid.ipynb to test the model and visualize the results.
Inside multi_obj_pose_estimation/ folder
Testing:
python valid_multi.py cfgfile weightfile
e.g.
python valid_multi.py cfg/yolo-pose-multi.cfg backup_multi/model_backup.weights
Training:
python train_multi.py datafile cfgfile weightfile
e.g.,
python train_multi.py cfg/occlusion.data cfg/yolo-pose-multi.cfg backup_multi/init.weights
Our label files consist of 21 ground-truth values. We predict 9 points corresponding to the centroid and corners of the 3D object model. Additionally we predict the class in each cell. That makes 9x2+1 = 19 points. In multi-object training, during training, we assign whichever anchor box has the most similar size to the current object as the responsible one to predict the 2D coordinates for that object. To encode the size of the objects, we have additional 2 numbers for the range in x dimension and y dimension. Therefore, we have 9x2+1+2 = 21 numbers.
Respectively, 21 numbers correspond to the following: 1st number: class label, 2nd number: x0 (x-coordinate of the centroid), 3rd number: y0 (y-coordinate of the centroid), 4th number: x1 (x-coordinate of the first corner), 5th number: y1 (y-coordinate of the first corner), ..., 18th number: x8 (x-coordinate of the eighth corner), 19th number: y8 (y-coordinate of the eighth corner), 20th number: x range, 21st number: y range.
The coordinates are normalized by the image width and height: x / image_width and y / image_height. This is useful to have similar output ranges for the coordinate regression and object classification tasks.
We train and test our models on the LINEMOD dataset using the same train/test splits with the BB8 method to validate our approach. If you would like to train a model on your own dataset, you could create the same folder structure with the provided LINEMOD dataset and adjust the paths in cfg/[OBJECT].data, [DATASET]/[OBJECT]/train.txt and [DATASET]/[OBJECT]/test.txt files. The folder for each object should contain the following:
(1) a folder containing image files,
(2) a folder containing label files (Please refer to this link for a detailed explanation on how to create labels. You could also find third-party ObjectDatasetTools toolbox useful to create ground-truth labels for 6D object pose estimation),
(3) a text file containing the filenames for training images (train.txt),
(4) a text file containing the filenames for test images (test.txt),
(5) a .ply file containing the 3D object model (The unit of the object model is given in meters),
(6) optionally, a folder containing segmentation masks (If you want to change the background of your training images to be more robust to diverse backgrounds, this would be essential for a better generalization ability),
Please also make sure to adjust the following values in the data and model configuration files according to your needs:
- You should change the "
diam" value in the data configuration file with the diameter of the object model at hand. - Depending on the size and variability of your training data, the learning rate schedule (steps, scales, max_epochs parameters in the
yolo-pose.cfgfile) and some data augmentation parameters (jitter, hue, saturation, exposure parameters indataset.py) might also need to be adjusted for a better convergence on your dataset. - For multiple object pose estimation, you should also pre-compute anchor values using the procedure described in Section 3.2 of the paper and specify it in the model configuration file (
yolo-pose-multi.cfg). Please also make sure to use correct number of classes and specify it inyolo-pose-multi.cfg. - You should further change the image size and camera parameters (
fx,fy,u0,v0,width,height) in the data configuration files with the ones specific to your dataset.
While creating a training dataset, sampling a large number of viewpoints/distances and modeling a large variability of illumination/occlusion/background settings would be important in increasing the generalization ability of the approach on your dataset. If you would like to adjust some model & loss parameters (e.g. weighthing factor for different loss terms) for your own purposes, you could do so in the model configuration file (yolo-pose.cfg).
The code is written by Bugra Tekin and is built on the YOLOv2 implementation of the github user @marvis
For any questions or bug reports, please contact Bugra Tekin


![microsoft-github-policy-service[bot] avatar](https://avatars.githubusercontent.com/in/95686?v=4 "microsoft-github-policy-service[bot]")
