-
🌱 I’m currently learning Rust
-
💻 Current focus on the tools base on Swagger OpenAPI Specification
-
💬 Ask me about React, Vue, Js
-
📫 How to reach me [email protected]
-
📄 Know about my experiences [email protected]
![]()
![]()
![]()
![]()
![]()
![]()
![]()
![]()
![]()
![]()
![]()
My blog, detail is in the issues list
🌱 I’m currently learning Rust
💻 Current focus on the tools base on Swagger OpenAPI Specification
💬 Ask me about React, Vue, Js
📫 How to reach me [email protected]
📄 Know about my experiences [email protected]
![]()
![]()
![]()
![]()
![]()
![]()
![]()
![]()
![]()
![]()
![]()


git rm --cache <file_path>
删除缓存区已提交的跟踪,主要用于.gitignore的文件未正确生效的文件
event loop指的是js的事件运行机制,不同环境node和浏览器对这个的事件循环实现略有出入。
关于event loop就不得不说几个概念: 宏任务和微任务
宏任务macrotask,也叫task,包含以下事件:
微任务microtask,包含一下事件:
new Promise和async await中的同步代码(起始相当于一个大的宏任务)测试代码输出?便于我们加深理解
const log = (e) => console.log(e)
log('event start')
setTimeout(() => {
  log('setTimeout event 1')
  setTimeout(() => {
    log('setTimeout event 2')

  }, 0)
asy('set asycn 2', 'async event 2')
}, 0);
new Promise(resolve => {
  log('set promise')
  resolve()
}).then(() => {
  log('promise evnet')
  setTimeout(() => {
    log('setTimeout event promise')
  }, 0)
  asy('set async promise', 'promise async')
})
async function asy(e = 'set asycn 1', f = 'async event') {
  log(e)
  await 1
  log(f)
}
asy()
运行这段代码在浏览器中会有如下输出:
event start
set promise
set asycn 1
promise evnet
set async promise
async event
promise async
setTimeout event 1
set asycn 2
async event 2
setTimeout event promise
setTimeout event 2
如果跟你想象的输出一模一样,你已经了解整个event loop执行机制了。当然你也可以往下看看看本文是否有惊喜的地方。
event startsetTimeout,这时候的宏任务队列相当于这样的数组[setTimeout],setTimeout宏任务中生成一个单独的宏任务执行栈new Promise,这时候这里面传入函数为同步代码,输出set promiseasync await执行环境这里log是同步代码,输出set async 1,await后的为微任务,微任务推入 awaitAsy,这时候微任务队列[ Promise, awaitAsy],宏任务[setTimeout]promise输出promise event,这时候微任务队列[awaitAsy],遇到宏任务setTimeoutPromise推入宏任务队列,宏任务队列[setTimeout, setTimeoutPromise]Promise微任务环境栈的全局代码 asy,输出set async promise, 将微任务中新的微任务await后部分promiseAsy推入末尾,此时微任务队列为[awaitAsy, promiseAys],宏任务[setTimeout,setTimeoutPromise]awaitAsy,输出async event, 微任务队列为[promiseAys],宏任务[setTimeou,setTimeoutPromiset]promiseAys,输出promise async,微任务队列为空,执行第一个宏任务setTimeout,执行宏任务环境栈的全局代码,输出setTimeout event 1,宏任务队列[]setTimeout2,推入,宏任务队列[setTimeoutPromise,setTimeout2,]asy的同步代码输出set asycn 2,将 await 部分微任务setTimeoutAsy推入微任务,微任务[setTimeoutAsy],宏任务队列[setTimeoutPromise,setTimeout2]setTimeoutAsy输出async event 2,然后执行setTimeoutPromise,setTimeout event promise,最后执行最后的宏任务setTimeout2event loop先执行js的全局代码。遇到宏任务先推入宏任务队列,微任务推入微任务队列,微任务执行中遇到微任务,将微任务推入当前微任务队列末尾,宏任务则推入宏任务队列末尾,new Promise中的入参和async await的await前部分是同步代码,执行完所有微任务会执行第一个宏任务,按上述执行完这个宏任务的所有微任务,进入下一个宏任务
面试互联网相关职位,http和https总是绕不过的话题,虽然平时工作暴露在这一层的工作量并不多,但是这也是编程行业的基础吧。
http也就是我们常说的超文本传输协议,英文术语Hyper Text Transfer Protocol,用于从万维网(WWW:World Wide Web )服务器传输超文本到本地浏览器的传送协议。同时说的http也不得不提到tcp会话级协议,它们的关系可以用一句话解释:HTTP是一个基于TCP/IP通信协议来传递数据(HTML 文件, 图片文件, 查询结果等)。
TCP: Transmission Control Protocol 传输控制协议
IP : Internet Protocol 网际协议。
cookie和session就是一种状态mine-type支持,客户端和服务端知道以何种方式处理GET:
1、请求参数将出现在URL体上,浏览器对URL的字节长度有限制(不是http协议)
2、GET是无害的,一般只做一种取的动作
3、GET数据类型只允许 ASCII 字符
4、GET会被缓存(会出现在浏览器的历史纪录中),可被浏览器收藏
POST:
1、POST一般是表单类提交,会进行一种注册的更改
2、数据长度没有限制
3、请求数据体一般不出现在URL中
GET/POST传参都是可以看到的,这个区分安全性是不正确的1** 信息,服务器收到请求,需要请求者继续执行操作
2** 成功,操作被成功接收并处理
3** 重定向,资源的移动
4** 客户端错误,请求包含语法错误或无法完成请求
5** 服务器错误,服务器在处理请求的过程中发生了错误
常用返回码:
301 Moved Permanently---资源永久移动
302 Found---资源临时移动
304 Not Modified---未修改。所请求的资源未修改,服务器返回此状态码时,不会返回任何资源。客户端通常会缓存访问过的资源,通过提供一个头信息指出客户端希望只返回在指定日期之后修改的资源(如何理解304状态)
400 Bad Request---客户端请求的语法错误,服务器无法理解
404 Not Found---服务器无法根据客户端的请求找到资源(网页)。通过此代码,网站设计人员可设置"您所请求的资源无法找到"的个性页面
405 Method Not Allowed---客户端请求中的方法被禁止
500 Internal Server Error---服务器内部错误,无法完成请求
502 Bad Gateway---作为网关或者代理工作的服务器尝试执行请求时,从远程服务器接收到了一个无效的响应
https是在http协议和tcp协议上加了一层加密协议SSL和TLS协议,关系如图所示

TLS/SSL的功能实现主要依赖于三类基本算法:散列函数 Hash、对称加密和非对称加密,其利用非对称加密实现身份认证和密钥协商,对称加密算法采用协商的密钥对数据加密,基于散列函数验证信息的完整性。
下图是https的请求过程和加密详情

关于为什么要采用这种方式进行加密,掘金上有一篇文章从窃听、伪造、否认三个角度讲解https加密和链接过程(完全图解 HTTPS)
url浏览器首先进行DNS域名解析,在DNS缓存中寻找是否有改域名, 否的话,一级一级上寻TCP三次握手建立http连接报错信息只简单的描述了几个关键字ssh、time out,语义上理解为ssh链接git超时,先尝试正对当前git项目ssh是否还有效,命令行执行如下命令:
$ ssh -T [email protected]
# Attempts to ssh to GitHub
文章: Testing your SSH connection
success
Hi xxx! You've successfully authenticated, but GitHub does not # provide shell access.
fail
ssh: connect to host github.com port 22: Operation timed out
更改remote url 为http
$ git remote -v
# Verify new remote URL
> origin  https://github.com/USERNAME/REPOSITORY.git (fetch)
> origin  https://github.com/USERNAME/REPOSITORY.git (push)

// set remote from http to ssh
git remote set-url origin [email protected]:USERNAME/REPOSITORY.git
本issuse收集算法分析的均值、最大值、最小值、中值、平均数、方差、标准差、峰度、偏度等公式,
基础的加减乘除开方等作为基础公式
在构造函数中this指向构造函数的实例
作为面试高频面试题,一直通过博客去了解这个概念总是似懂非懂。我们知道的缓存有本地缓存浏览器缓存,浏览器缓存其实有两种方式,常用的http1缓存还有service worker策略缓存,本文主要介绍http缓存
什么是缓存?
缓存是一种保存资源副本并在下次请求时直接使用该副本的技术
什么是http cache
通过复用以前获取的资源,可以显着提高网站和应用程序的性能。Web 缓存减少了等待时间和网络流量,因此减少了显示资源表示形式所需的时间。通过使用 HTTP缓存,变得更加响应性。当 web 缓存发现请求的资源已经被存储,它会拦截请求,返回该资源的
拷贝,而不会去源服务器重新下载。这样带来的好处有:缓解服务器端压力,提升性能(获取资源的耗时更短了)。对于网站来说,缓存是达到高性能的重要组成部分
http cache通过web cache内置对象对Request、Response进行缓存,更多关于Cache对象的内容,值得一提的是Cache也可以作为Service Worker生命周期的一部分。
MDN中将缓存大致分为两大类,私有缓存和共享缓存,你肯定联想到了cache-control的两个策略,这个我们稍后也会聊到这一点。其他缓存类型你也一定不会陌生,CDN缓存、网关缓存、反向代理缓存等。
缓存虽然不是必须的,但是重用缓存对于前端的交互提升还是巨大的。
缓存一般作用于GET请求,对其他请求一般无能为力,在service worker中这条可以忽略
cache-control是http1.1控制缓存机制的一个重要header头,有以下几种形式:
1、 no-store 不使用缓存机制,客户端每次都会重新请求服务器资源
2、no-cache使用缓存,每次需要跟服务器确认是否需要,具体是否是用缓存根据客户端和服务端协议决定,也是通常所说的协商缓存,往往需要搭配其他header头使用ETag、Last-Modified等
3、public 指令表示该响应可以被任何中间人(比如cdn,网关)缓存
4、private 则表示该响应是专用于某单个用户的,中间人不能缓存此响应,该响应只能应用于浏览器私有缓存中
过期时间
过期时间有两种设置方式,两种方式代表的过期时间计算模式也完全不一致。
max-age代表从上次更新到下次需要更新的最大缓存时间
expires是根据指定http-date判断是否是用缓存
下图是第一次请求后响应设置expires后,第二次请求内容显示from disk即来自cache

### deno Drash
// max-age
this.response.headers.set('cache-control', 'max-age=31536000')
// expires
this.response.headers.set('expires', new Date(Date.now() + 60000).toUTCString())

// http cache get method
fetch('http://localhost:8080/user/1')
fetch('http://localhost:8080/user/2') not cache
不同get请求将不会缓存,这也是 revving (不频繁更新的文件会使用特定的命名方式:在URL后面(通常是文件名后面)会加上版本号。)来更新资源的实现。改方案也常用于现代打包工具。
Pragma头
Pragma 是HTTP/1.0标准中定义的一个header属性,请求中包含Pragma的效果跟在头信息中定义Cache-Control: no-cache相同,但是HTTP的响应头没有明确定义这个属性,所以它不能拿来完全替代HTTP/1.1中定义的Cache-control头。通常定义Pragma以向后兼容基于HTTP/1.0的客户端。
ETag和LastModified客户端将响应中的这两个的值转为请求中If-None-Match和If-Modified-Since两个值,并传给服务器,没有优先级之分
---> 1、 Req
---> 2、Res Headers{ ETag: 'a', LastModified: 'b'}
---> 3、Req Headers { `If-None-Match`: 'a', `If-Modified-Since`: b}
---> 4、Server compare race
              If-None-Match === ETag
              If-Modified-Since >= LastModified
----> 5、得到一个结果将不输出另一个(ETag match ---》 res 304)
ETag code这段代码在Drash中可能不生效issuse--304 ETag Support
if(this.request.getHeaderParam('if-none-match') == "33a64df551425fcc55e4d42a148795d9f25f89d4"){
      this.response.status_code = 304
    } else {
      this.response.headers.set('ETag', "33a64df551425fcc55e4d42a148795d9f25f89d4")
    }
以下是同时代码片段出现较多的情况
<!--bad -->
const params = {
    orderId: order ? order.id : undefined
    prodcutId: order ? (order.product ? order.product.id : undefined) :  undefined : undefined
}这里另一个选项是undefined,所以改写:
const params = {
    orderId: order && order.id,
   prodcutId: order && order.product && order.product.id
}
// notice  if obj = null
const obj = null
const a = obj && obj.id // null

// aslo number or boolean
const a = 0
a && a.a //0
const c = false
c && c.a = false
https://juejin.im/post/591aa14f570c35006961acac
setTimeout(() =>
 console.log('task 100ms')
},100)
setTimeout(() =>
 console.log('task 10ms')
},10)

// output
// 1、task 100ms
// 2、task 10mstimer算是同步任务,setimeout(fn,delay)中的fn为回调的宏任务,整个事件机制的执行更像是这样
---get timer 100ms
---get timer 10ms
--- mic Task [timer10Fn]
--- mic Task[timer100Fn]
原文(自备梯子):PPTP VPN ON MAC OS X SIERRA, HIGH SIERRA AND MOJAVE FOR FREE
主要有三种方式:
1、PPTP-VPN(傻瓜式操作)
2、Shimo--国内资源和教程
3、DIY
pptp vpn:以下代码皆在命令行中执行:
## step 1: create a serve file
sudo touch /etc/ppp/peers/vpn.yourserver.com

## step2: edit the file ,copy the content
sudo nano /etc/ppp/peers/vpn.yourserver.com

plugin PPTP.ppp
noauth
remoteaddress "------vpn.yourserver.com------"
user "------USERNAME------"
password "------PASSWORD------"
redialcount 1
redialtimer 5
idle 1800
# mru 1368
# mtu 1368
receive-all
novj 0:0
ipcp-accept-local
ipcp-accept-remote
refuse-eap
refuse-pap
refuse-chap-md5
hide-password
mppe-stateless
mppe-128
# require-mppe-128
looplocal
nodetach
ms-dns 8.8.8.8
usepeerdns
# ipparam gwvpn
defaultroute
debug

## step3: exec the command
sudo pppd call vpn.yourserver.com
detail :
layout 里面 有个foot 元素
我想在new.vue 的组件内操作layout组件内的foot组件是否展示,
现在不知道怎么操作啊
wait to update
事件冒泡和事件捕获是因为不同浏览器实现事件流的方式不一样衍生的两个概念
               | |
---------------| |-----------------
| element1     | |                |
|   -----------| |-----------     |
|   |element2  \ /          |     |
|   -------------------------     |
|        Event CAPTURING          |
----------------------------------- / \
---------------| |-----------------
| element1 | | |
| -----------| |----------- |
| |element2 | | | |
| ------------------------- |
| Event BUBBLING |
-----------------------------------
有关事件流的解释
1、event flow
2、Javascript event order
将指定的监听器注册到 EventTarget 上,当该对象触发指定的事件时,指定的回调函数就会被执行。
// api
target.addEventListener(type, listener, options);
target.addEventListener(type, listener, useCapture);
target.addEventListener(type, listener, useCapture, wantsUntrusted ); // Gecko/Mozilla only这里的useCapture就是是否开启event flow捕获行为,默认为false。
ul        // addEventListener   click
    li
span我们这边以ul标签为例,进行事件注册,对是用不同useCapture的事件顺序进行解释
   const ulEl = document.querySelector('ul')
    const liEl = document.querySelector('li')
    ulEl.addEventListener('click', e => {
      console.log('ul element click')
    }, true)
    liEl.addEventListener('click', e =>{
      console.log('li element click')
    })
/**
* output
* ul element click
* li element click
* update useCapture to default false
* li element click
* ul element click
*/
指的是浏览器一些标签具有默认的事件行为,如a链接的href,input的focus和input,button的click事件,还有video标签play等等
有些情况在我们没有覆盖默认事件的时候,往往希望浏览器对事件不执行默认响应
// 阻止默认行为
event.preventDefault()
// or return falsemixins可以理解在使用的地方进行Vue Options合并,有点类似装饰器decoration,这里提供几种mixins**。
mixin其实就是一个vue options object
mixins// 可以用于不同入参返回不同方法,执行不同函数体
const mixins = (default = true) => default ? mixin1 : mixin2
// in component a
const mixinA = mixins()
// in component b
const mixinB = mixins(false)
这里利用mixins做了一层的处理,根据不同传参返回不同mixins,适用于两个简洁的mixins
提供一个baseMixins,返回一个新mixins
const highMixins = (baseMixin, param) => {
   if (params) {
       return a new mixins
   }
   return other mixins
}
第二种高阶mixins提供一个provider,注入到当前mixins
// 这种做法适合生命周期和method的分离,增强函数的适配性,比如某个页面你需要初始调用,但是页面B则不需要的情况
const highMixins = provider => Object.assign({}, baseMixins, provider)
我实际项目中很多审核的流程是这样的,先拿到发起者的邮箱,打开审核弹窗,获取审核状态和审核原因内容,最后完成审核状态
// verson 1.0.0
// audit mixins

export default {
     methods: {
         getUserMail() {
             /** some code **/
            this.auditHandler()
          },
         pass() {
             this.getUserMail()
         },
         auditHandler() {
              /** some code **/
          }
    }
}
然后我另一个页面又有差不多的流程,但是部分参数或者逻辑不一样
const baseAudit = (params) => {
     /** some code **/
    return auditMixins
}
抽取base部分利用函数生成一个新的mixin
如果接口规范足够完美,可以讲请求列表接口抽成mixins
methods: {
    // 根据api进行每个页面的请求不同进行处理
    getList(api) {

    }
 }
// router container
<transition name="fade-transform" mode="out-in" class="content">
   <router-view/>
</transition>

// page has fixed footer
<page-container>
   <page-content/>
   <!--position: fixed-->
   <page-footer/>
</page-container>
如代码所示,从另一个页面进入page has fixed footer 会有闪烁,布局不会像预期一样展示。
vue-router issuse
Un-fixing Fixed Elements with CSS Transforms
文章中指出transformed element会为所有子元素创建一个containing block,一个在这个containing block下fixed的元素也是一个transformed element,如果这种transformed element在正常文档流中,它会跟着文档滚动,fixed position子元素会跟着transformed element滚动
...where things got really troublesome for me: a transformed element creates a containing block even for descendants that have been set to position: fixed. In other words, the containing block for a fixed-position descendant of a transformed element is the transformed element, not the viewport. Furthermore, if the transformed element is in the normal flow, it will scroll with the document and the fixed-position descendants will scroll with it.
issuse作者在评论中留下了一种结局方案,但是我这边内嵌了两三层transition,改动代价太大,换了一个种布局结构
// position absolute
<page-container>
   <page-content/>
   // position absolute
   <page-footer/>
</page-container>
基本上一天把项目上需要用到的webpack手撸了一遍。涉及splitChunks、preload、workbox
webpack 相关文档:webpack splitChunks
vue-cli 相关文档: vue-cli
webpack-chain文档: webpack-chain
webpack chunk它内置的代码分割策略是这样的:
新的 chunk 是否被共享或者是来自 node_modules 的模块
新的 chunk 体积在压缩之前是否大于 30kb
按需加载 chunk 的并发请求数量小于等于 5 个
页面初始加载时的并发请求数量小于等于 3 个
我们实际开发中处理chunk往往是一些不容易发生变更的文件、引用次数较多:node_modules、全局公用组件、一些函数等
// vue-config.js
chainWebpack: config => {
// split chunks
      config.
        when(process.env.NODE_ENV !== 'development', config => {
          config
            .optimization.splitChunks({ // https://webpack.js.org/plugins/split-chunks-plugin/#splitchunkschunks
              chunks: 'all', //  Providing all can be particularly powerful, because it means that chunks can be shared even between async and non-async chunks
              cacheGroups: {
                libs: {
                  name: 'chunk-libs',
                  test: /[\\/]node_modules[\\/]/,
                  priority: 10,
                  chunks: 'initial' // only package third parties that are initially dependent
                },
                elementUI: {
                  name: 'chunk-elementUI', // split elementUI into a single package
                  priority: 20, // the weight needs to be larger than libs and app or it will be packaged into libs or app
                  test: /[\\/]node_modules[\\/]_?element-ui(.*)/ // in order to adapt to cnpm
                },
                commons: {
                  name: 'chunk-commons',
                  test: /[\\/]src[\\/]components[\\/]Base[A-Z]\w+\.(vue|js)$/, // only base components
                  minChunks: 3, //  minimum common number
                  priority: 5,
                  reuseExistingChunk: true // If the current chunk contains modules already split out from the main bundle, it will be reused instead of a new one being generated. This can impact the resulting file name of the chunk.
                },
                date: {
                  name: 'chunk-date',
                  test: resolve('src/lib'), // date picker lib
                  priority: 4,
                  reuseExistingChunk: true
                }
              }
            })
        })
}
preload是一种 resource hint,用来指定页面加载后很快会被用到的资源,所以在页面加载的过程中,我们希望在浏览器开始主体渲染之前尽早 preload。
prefetch是一种 resource hint,用来告诉浏览器在页面加载完成后,利用空闲时间提前获取用户未来可能会访问的内容。
单页面应用中当页面数量较多是需要async import和这两个策略是冲突的,一开始尽可能的缓存更多资源,页面需要加载更多请求,非常容易出现首屏时间过长等问题,当然最粗暴的方法就是
删除这两个配置
   // vue.config.js
    config.plugins.delete('preload')
    config.plugins.delete('prefetch')
官网上还提供了一个配置项include,它可以是一个字符串(all所有、initial初始)or数组(chunk名)
preload all chunks (vendor, async, normal chunks) using include: 'all',preload all chunks (vendor, async, normal chunks) using include: 'all', or only preload initial chunks with include: 'initial':
In case you work with named chunks, you can explicitly specify which ones to include by passing an array:
另一个解决方案代码:
// @rewrite webpack setting
  chainWebpack: config => {
    // preload the chunks split by u self
    config.plugins('preload')
      .tap(options => {
        // for import() lazy routes use initial https://github.com/vuejs/preload-webpack-plugin
        options.include = 'initial'
        // or split chunks at the bottom
        // options.include = ['chunk-libs', 'chunk-elementUI', 'chunk-commons', 'chunk-date']
        return options
      })
    // remove the prefetch plugin
    config.plugins.delete('prefetch')
}
这个是service woker的一个插件,具体用法查看官方文档也可以查阅pwa相关资料
  configureWebpack: {
    plugin: [
      // for workbox service worker
      new GenerateSW({
        swDest: './sw.js',
        // importWorkboxFrom: 'local',
        skipWaiting: true,
        clientsClaim: true,
        runtimeCaching: [{
          // Match any same-origin request that contains 'api'.
          urlPattern: /api/,
          // Apply a network-first strategy.
          handler: 'networkFirst',
          options: {
            // Fall back to the cache after 10 seconds.
            networkTimeoutSeconds: 10,
            // Use a custom cache name for this route.
            cacheName: 'my-api-cache',
            // Configure custom cache expiration.
            expiration: {
              maxEntries: 5,
              maxAgeSeconds: 60,
            },
            // Configure which responses are considered cacheable.
            cacheableResponse: {
              statuses: [0, 200],
              headers: {'x-test': 'true'},
            },
            // Configure the broadcast cache update plugin.
            broadcastUpdate: {
              channelName: 'my-update-channel',
            },
            // Add in any additional plugin logic you need.
            // plugins: [
            //   {cacheDidUpdate: () => /* custom plugin code */}
            // ],
          },
        }]
      })
    ]
  },
HTTP1对于同一个域名,浏览器最多只能同时创建 6-8 个 TCP 连接 (不同浏览器不一样)。为了解决数量限制,出现了 域名分片 技术,其实就是资源分域,将资源放在不同域名下 (比如二级子域名下),这样就可以针对不同域名创建连接并请求,以一种讨巧的方式突破限制,但是滥用此技术也会造成很多问题,比如每个 TCP 连接本身需要经过 DNS 查询、三步握手、慢启动等,还占用额外的 CPU 和内存,对于服务器来说过多连接也容易造成网络拥挤、交通阻塞等,对于移动端来说问题更明显.。
HTTP2在一个 TCP 连接上,我们可以向对方不断发送帧,每帧的 stream identifier 的标明这一帧属于哪个流,然后在对方接收时,根据 stream identifier 拼接每个流的所有帧组成一整块数据。
把 HTTP/1.1 每个请求都当作一个流,那么多个请求变成多个流,请求响应数据分成多个帧,不同流中的帧交错地发送给对方,这就是 HTTP/2 中的多路复用。
流的概念实现了单连接上多请求 - 响应并行,解决了线头阻塞的问题,减少了 TCP 连接数量和 TCP 连接慢启动造成的问题
所以 http2 对于同一域名只需要创建一个连接,而不是像 http/1.1 那样创建 6~8 个连接
更多资料:
http2详解
水印是图片经常用到的一种工具处理,本次项目开发中刚好涉及,一下代码记录下实现。
/**
     * 水印
     * @param {*} ctx canvas paint
     * @param {*} w
     * @param {*} maxW canvas width
     */
    waterMark(ctx, w, maxW) {
      while (w < maxW) {
        const REPEAT_NUM = 3; //  取巧重复x方向
        const text = `潜水党专用    `; // 水印文本 空格用于x间隙
        const waterMarkText = text.repeat(REPEAT_NUM);
        ctx.translate(w, 200);
        ctx.globalAlpha = 0.3;
        ctx.fillStyle = '#fff';
        ctx.font = '32px Josefin Slab';
        ctx.rotate(-45 * Math.PI / 180);
        ctx.fillText(waterMarkText, 0, 0);
        ctx.rotate(45 * Math.PI / 180); // 画笔角度恢复
        w = w + 20;
      }
    }
TODO
TODO
TODO
wait to update
vue3 composition api 出来已经有很长一段时间,而且vue-next@beta也可以面世一阵时间了
[composition api 传送们](https://composition-api.vuejs.org/api.html#setup)
TODO: setup comment
// case 1
function Person(name) {
    this.name = name
}
const a = new Person('dylan')
Person.prototype = {
     age: 10
}
console.log(a.age)

// case 2
function Person(name) {
     this.name = name
}
const a = new Person('dylan')
Person.prototype.age = 10
console.log(a.age)依次输出undefined和10
// stack progress

a {
name: "dylan"
__proto__:
constructor: ƒ Person()
__proto__:
constructor: ƒ Object()
hasOwnProperty: ƒ hasOwnProperty()
isPrototypeOf: ƒ isPrototypeOf()
propertyIsEnumerable: ƒ propertyIsEnumerable()
toLocaleString: ƒ toLocaleString()
toString: ƒ toString()
valueOf: ƒ valueOf()
__defineGetter__: ƒ __defineGetter__()
__defineSetter__: ƒ __defineSetter__()
__lookupGetter__: ƒ __lookupGetter__()
__lookupSetter__: ƒ __lookupSetter__()
get __proto__: ƒ __proto__()
set __proto__: ƒ __proto__()
}

Person.prototype = {}
// 将整个prototype斩断 a保持原有的原型,后续新的Person具有新的原型
// 可以这样理解,构造函数本质是函数, const a = new Person('dylan')
// 执行构造函数,赋值原型得到a, a的原型为一个引用地址
// Person.prototype = 赋值,可以理解为函数内部更改了整个原型赋值引用
// 而Person.prototype.age是在原引用上增加属性所以可以访问
理解了整个流程我们mock验证一下
let prot = {}
    function consTest (name) {
      this.name = name
      this.prot = prot
    }
    const c = new consTest('dylan')
    prot = { age: 10}
    const d = new consTest('d')
    console.log(c, d)

其实这题侧重的还是引用类型和函数执行的理解
1、下面代码输出了啥
function A(a) {
  this.a = a
  return { a: 2}
}
const a = new A(1)
console.log(a)
output:
{ a: 2}
这道基础题考验的new关键字到底做了啥,简单的说有三步:
prototype一步一步验证这简单的说法是否正确:
function A(a) {
  this.a = a
  return { a: 2}
}
A.prototype.word = 'none'
const a = new A(2)
console.log(a)
可以得到下图的输出结果:

_proto_上并没有word属性,这里涉及到constructor的理解,构造函数默认会返回当前对象,即构造函数内部的this,当然也可以更改返回的对象,如果返回的对象不是this将不继承类的原型
,具体可以参考阮一峰ES6 class constructor 讲解
验证一下这段理解:
function B(a) {
 this.a = a
}
B.prototype.word = 'b'
const b = new B(1)
console.log(b)
打印出下图的对象
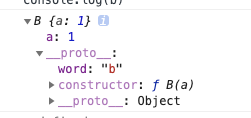
出现了word属性正面是ok的
new更改this指向,prototype继承, 返回一个实例
function newFn(fn, param) {
   const obj = {}
  fn.call(obj,params)
  obj.prototype = Object.create(fn.prototype)
  return obj
}
function C(a) {
   this.a = a
}
C.prototype.c = 'c'
const c = newFn(C, 2)
c输出如下图:

如何理解原型链,以及理解原型链的链式调用,我个人理解为一个向上递归的链式查找,每个实例都有一个<prototype>指针指向继承的父类,单链表结构,每个指针内判断是否存在该属性,否则向上插座直至没有这个指针返回undefined
function findPrototype(object, prop) {
         if (object[prop]) return object[prop]
        // __proto__不是标准,是chrome的完成
         if(!object.__proto__) return undefined
        findPrototype(object.__proto__, prop)
}
网上有这样的解决方案 https://blog.csdn.net/CuiCui_web/article/details/97920926
感觉不是很好,有什么好的建议,我的想法是延迟dom渲染等 接口返回再去渲染,网上好像没有找到
实现一个vscode插件右击新增组件和页面能达到微信开发工具的效果
见仓库:
vs-wx-command
data-* 全局属性 是一类被称为自定义数据属性的属性,它赋予我们在所有 HTML 元素上嵌入自定义数据属性的能力,并可以通过脚本在 HTML 与 DOM 表现之间进行专有数据的交换。
根据mdn中的定义,data-*给开发人员提供了在html元素中写入自定义数据属性的能力,暴露给到JS脚步数据交换的能力,
比如通过data-column改变具有自定义数据column的表现方式
HTMLElement.datasetjs脚步可以通过HTMLElement.dataset来返回节点的自定义数据,值得一提的是它返回的是一个DOMStringMap
中划线的能容会默认转成驼峰
// element
<div data-tiltle-big />
// js
divEl.dataset.titleBigpublic/index.html 经 html-webpack-plugin处理成为了一个模板像esj、jade一样的存在,
支持的语法如下:
<%= VALUE %> for unescaped interpolation; 常规变量 <%- VALUE %> for HTML-escaped interpolation; html文本、节点 <% expression %> for JavaScript control flows. js表达式
变量主要来源:html-webpack-plugin暴露的变量,客户端的环境变量
<!-- exmaple for env from vue-cli website -->
<link rel="icon" href="<%= BASE_URL %>favicon.ico">
关于使用html-webpack-plugin插件的用法,我们这边举一个跟CDN相关的列子:
<!--vue.config.js-->
 // external: a way of excluding dependencies from the output bundles [https://webpack.js.org/configuration/externals/#root]
  // mostly if u want use cdn, here is examples
  externals: {
    'element-ui': 'ELEMENT'
  }
// const u cdn list
const cdn = {
  css: [
    // element-ui css
    'https://unpkg.com/element-ui/lib/theme-chalk/index.css'
  ],
  js: [
     // element-ui js
    'https://unpkg.com/element-ui/lib/index.js'
  ]
}
// config html-webpack-plugin
config.plugin('html').tap(args => {
  args[0].cdn = cdn
  return args
})
index.htmltemplate写入以下代码,elemetn cdn 一定要在引入的vue后面,有相互依赖关系
<head>
  <!-- 引入样式 -->
  <% for(var css of htmlWebpackPlugin.options.cdn.css) { %>
    <link rel="stylesheet" href="<%=css%>">
  <% } %>
</head>

<!-- 引入JS -->
<% for(var js of htmlWebpackPlugin.options.cdn.js) { %>
  <script src="<%=js%>"></script>
<% } %>
本issuse用于手写一些前端常用算法
Cookie是一个请求头部,一般是服务器在返回Headers中set-cookie后,客户端的后续的请求都会默认带上cookie 这个请求头。
response.setCookie(key, value)

request.header.cookie = value1、保持会话状态, 因为http请求是无状态的,cookie的出现使我们可以保持用户的登录状态、购物车状态等其他信息我们应用应该保存的状态
2、个性化服务,`cookie`常用于代表千人千面的登录标识,而我们可以通过这个千人千面的特性提供个性化服务
3、追踪和分析用户行为,根据`cookie`的标识追踪分析不同用户行为
一个cookie通常含有一下属性domain<string>、expirationDate< number >(optional)、firstPartyDomain<string>、hostOnly<boolean>、httpOnly< boolean>、 name<string、 path <string>、 secure<boolean> 、session<boolean>、sameSite<enumString> 、storeId<string>、 value<string>
目前普遍有形式,一种是会话期Cookie另一种是持久性cookie
会话期cookie在仅存在浏览器会话期间,关闭浏览器会自动删除。
持久性cookie需要指定一个失效时间,即我们常说的Expires和Max-Age
// api
// newCookie是一个键值对形式的字符串。需要注意的是,用这个方法一次只能对一个cookie进行设置或更新。
document.cookie = encodeURIComponent(<key>)=encodeURIComponent(<value>);
max-age=<max-age-in-seconds>;
expires=<date-in-GMTString-format>; // js date.toUTCString()
path=<path>;
domain=<domain>;
secure=<Boolean>安全型有两个策略属性Secure和httpOnly
标记为 Secure 的Cookie只应通过被HTTPS协议加密过的请求发送给服务端。但即便设置了 Secure 标记,敏感信息也不应该通过Cookie传输,因为Cookie有其固有的不安全性,Secure 标记也无法提供确实的安全保障。从 Chrome 52 和 Firefox 52 开始,不安全的站点(http:)无法使用Cookie的 Secure 标记
而标记httpOnly之后客户端没有办法通过js脚步访问cookie,比如像document.cookie等api,这是有效避免XSS脚本攻击的做法之一
// server action
Set-Cookie: id=a3fWa; Expires=Wed, 21 Oct 2015 07:28:00 GMT; Secure; HttpOnlyDomain属性将标记cookie的所属域,不属于该域名的属性将无法访问cookie。值得注意的是子域名可以访问该cookie,
域名的阅读是从右到左
Path 标识指定了主机下的哪些路径可以接受Cookie(该URL路径必须存在于请求URL中)。以字符 %x2F ("/") 作为路径分隔符,子路径也会被匹配
<Domain>developer.mozilla.org
org---TLD顶级域名,地区顶级域名us,sh,政府机关顶级域名gov,机构组织顶级域名org,edu
[mozilla, developer] ---label标签
          ----mozilla--->SLD二级域名,紧跟TLD的为二级域名
         ----developer --->三级域名

Domain=mozilla.org
includes subDomain<developer.mozilla.org>
SameSite属性作为cookie的属性之一,允许您声明是否应将Cookie限制为第一方或同一站点上下文
`Lax`: <default>
 Cookies允许与顶级一起发送,并将与第三方网站发起的GET请求一起发送。这是浏览器中的默认值
 exmaple link:
      https://developer.mozilla.org/en-US/docs/Mozilla/Add-ons/WebExtensions/API/cookies#First-party_isolation

  ----in `a.com`, img src `b.com`(get request set `b.com<domain>` cookie)
    send `b.com`cookie is allowed

`Strict`
Cookie只会在第一方上下文中发送,不会与第三方网站发起的请求一起发送

`None`
Cookie将在所有上下文中发送,即允许跨域发送
更多sameSite资料查阅: SameSite
相关资料
http-cookie
domain-name
cookie
gzip是GNUzip的缩写,它是一个GNU自由软件的文件压缩程序。在gzip官网中我们还能看到这么一句话,指gzip是一个单文件/流的无损压缩,当然你也可以指定如何压缩。
gzip is a single-file/stream lossless data compression utility, where the resulting compressed file generally has the suffix .gz.
gzip also refers to the associated compressed data format used by the utility.
gzip可以将文件体积压缩,减少占用资源和http请求的时间,这两点也是gzip压缩技术能出现在前端视野的重要原因。
.gz文件只要浏览器支持Content-Encoding: gzip就可以,基本现代浏览器都支持
response.setHeader("Content-Encoding", "gzip");
gz文件我们这里主要使用vue-cli 3.x来进行本文的功能验证,对应的webpack插件为compression-webpack-plugin,首先我们安装依赖:
npm install compression-webpack-plugin --save-dev
然后我们根据CLI官方推荐新建一个vue.config.js使用webpackChain链式添加相关的plugin配置(相关配置文档):
'use strict'
// compressWebpackPlugin
const compressWebpackPlugin = require('compression-webpack-plugin')
const isPrd = process.env.NODE_ENV === 'production'

// webpack config
module.exports = {
    chainWebpack(config) {
       config.
        when(isPrd, config => {
          // gzip
          config
            .plugin('compress')
            .use(compressWebpackPlugin, [{
              // only for .css adn .js
              test: /\.(js|css)$/
            }])
         })
    }
}
配置好了后,我们npm run build生成dist目录,在控制台中可以清楚的看到两种打包文件体积大小的对比:

我们打开本地目录查看一下打包的文件,可以看到css文件都生成了一个.gz副本,相应的js也一样,这里我们的压缩是生效的

接着我们使用CLI自带的serve命令进行本地预览(相关文档),如果你没有安装,你需要按照文档简单安装一下:
// permission
sudo npm install -g serve
# -s flag means serve it in Single-Page Application mode
# which deals with the routing problem below
serve -s dist
这里支持gzip浏览器会默认请求.gz文件,不支持的返回未压缩的对应的文件类型,然后打开浏览器network,对.gz文件请求进行验证,这里选取elementUi的chunk进行验证:

这里可以看到大小为gz文件,打开请求详情可以看到请求头

预备工作
我们需要科隆的对象可能有Array,Object,Date, Reg,因此我们需要判断四类对象,常用的判断对象方法有三种 typeof, instanceof,toString
首先我们测试typeof,顺带复习下原知识
typeof new Date() // 'object'
typeof /1/    // 'object'
typeof []     // 'object'
typeof {}      // 'object'
typeof null    // 'object'
typeof 1 //  'number'
typeof '1' // 'string'
typeof undefined // 'undefined'因为无法区分RegExp,Date,Array数据格式,所以typeof的方法不可取
instanceof 运算符用于检测构造函数的 prototype 属性是否出现在某个实例对象的原型链上
通俗的理解可以认为检测A是否为B的实例
1 instance Number // false
new Number(1) instanceof Number // true
Number(1) instanceof Number // false
'1' instanceof String // false
new String(1) instanceof String // true
String(1) instanceof String // false
[] instanceof Array   // true
[] instanceof Object // true
/3/ instanceof RegExp // true
/3/ instanceof Object // true
{} instanceof Object // SyntaxError
const a = {}
a instanceof Object // true
new Date() instanceof Date // true
new Date() instanceof Object // true因为Date和RegExp等本质也是对象所以无法区分,该方法也不适用
toStirng的判断方法主要还是利用Object.prototype.toString.call(this)的方法,该方法返回 "[object type]"
const getType =  obj => Object.prototype.toString.call(obj)
getType(1)  // "[object Number]"
getType('1')  // "[object String]"
getType(undefined)  // "[object Undefined]"
getType(null) // "[object Null]"
getType([]) // "[object Array]"
getType(/1/) // "[object RegExp]"
getType(new Date()) // "[object Date]"
getType({}) // "[object Object]"
getType(true) // "[object Boolean]"toString的表现堪称完美。
如果不考虑原型按照我们上面的测试代码应该是这样的
const types = {
  OBJECT: '[object Object]',
  ARRAY: '[object Array]',
  DATE: '[object Date]',
  REGEXP: '[object RegExp]'
}

const toStr = obj => Object.prototype.toString.call(obj)

const isType = (obj, typeName) => toStr(obj) === types[typeName]

function deepClone(obj) {
  if (isType(obj, 'OBJECT')) {
    const objCopy = {}
    Object
      .keys(obj)
      .forEach(key => {
        objCopy[key] = deepClone(obj[key])
      })
    return objCopy
  }
  if (isType(obj, 'ARRAY')) {
    return obj.map(key => deepClone(key))
  }
  if (isType(obj, 'Date')) {
    return new Date(date.getTime())
  }
  if (isType(obj, 'REGEXP')) {
    return new RegExp(obj)
  }
  return obj   // 其他类型直接赋值即可
}为什么要clone原型?因为对象很可能是一个实例,我们举一个列子
class Person {
 constructor() {
   this.name = 'dylan'
 }
 say() {
     console.log('hello world')
 }
}deepClone实例后你可能发现下图所示的现象

其实解决起来也相当简单,进行原型赋值,就跟继承一样
const types = {
  OBJECT: '[object Object]',
  ARRAY: '[object Array]',
  DATE: '[object Date]',
  REGEXP: '[object RegExp]'
}

const isOriginObject = obj => obj.__proto__.constructor === Object

const toStr = obj => Object.prototype.toString.call(obj)

const isType = (obj, typeName) => toStr(obj) === types[typeName]

function deepClone(obj) {
  if (isType(obj, 'OBJECT')) {
    let objCopy
    if (!isOriginObject(obj)) {
      objCopy = Object.create(null)
      objCopy.__proto__ = Object.create(obj.__proto__.constructor.prototype)
    } else {
      objCopy = {}
    }
    Object
      .keys(obj)
      .forEach(key => {
        objCopy[key] = deepClone(obj[key])
      })
    return objCopy
  }
  if (isType(obj, 'ARRAY')) {
    return obj.map(key => deepClone(key))
  }
  if (isType(obj, 'Date')) {
    return new Date(date.getTime())
  }
  if (isType(obj, 'REGEXP')) {
    return new RegExp(obj)
  }
  return obj
}A declarative, efficient, and flexible JavaScript library for building user interfaces.
🖖 Vue.js is a progressive, incrementally-adoptable JavaScript framework for building UI on the web.
TypeScript is a superset of JavaScript that compiles to clean JavaScript output.
An Open Source Machine Learning Framework for Everyone
The Web framework for perfectionists with deadlines.
A PHP framework for web artisans
Bring data to life with SVG, Canvas and HTML. 📊📈🎉
JavaScript (JS) is a lightweight interpreted programming language with first-class functions.
Some thing interesting about web. New door for the world.
A server is a program made to process requests and deliver data to clients.
Machine learning is a way of modeling and interpreting data that allows a piece of software to respond intelligently.
Some thing interesting about visualization, use data art
Some thing interesting about game, make everyone happy.
We are working to build community through open source technology. NB: members must have two-factor auth.
Open source projects and samples from Microsoft.
Google ❤️ Open Source for everyone.
Alibaba Open Source for everyone
Data-Driven Documents codes.
China tencent open source team.