
This exercise allows you to practice and apply the concepts and techniques taught in class.
Upon completion of this exercise, you will be able to:
-
Create a React application that contains multiple pages using React Router.
-
Perform side effects in a component with the
useEffecthook. -
Use the
useEffecthook to get data from an API and save it in the component's state. -
Use React Router
useParamshook to access URL parameters. -
Create a page component that dynamically renders content based on URL parameter values.
-
Use a CSS framework to style a React application.
After browsing the internet for interesting finds, you stumbled upon the Countries API - an API that provides a wealth of data about every country in the world. With your knowledge of React and this amazing API at your fingertips, you decided to create your very own Wikipedia of countries! 🌏

- Fork this repo
- Clone this repo
- Open the LAB and start:
cd lab-wiki-countries
npm install
npm run dev-
Upon completion, run the following commands:
git add .
git commit -m "done"
git push origin master
-
Create a Pull Request and submit your assignment.
This lab is equipped with unit tests to provide automated feedback on your progress and help you understand whether your code is working as expected. If you want to check the tests, they are located in the src/test folder.
During an iteration, if your code seems to work as expected but some tests don't pass, feel free to move on to the next iteration. Once you've completed all the mandatory iterations, you can go back and resolve any remaining failed test
- To execute the tests, run the following command in the terminal:
npm run test-
The above command will execute the tests and open the
@vitest/uiTest Reporter in the browser. -
To see the test results, open http://127.0.0.1:51204/__vitest__ in your browser.
The application you will create in this exercise will use Bootstrap for styling and React Router for setting up multiple pages and handling navigation.
To begin, install the Bootstrap and React Router packages:
npm install react-router-dom bootstrapTo make the Bootstrap styles available in the entire app, import the Bootstrap stylesheet at the top of the src/main.jsx file:
// src/main.jsx
import "bootstrap/dist/css/bootstrap.css";The Countries API you will use in this exercise provides two endpoints listed in the table below. You can refer to this section any time during the exercise for information about the API endpoints and their usage.
Base URL: https://ih-countries-api.herokuapp.com
| Method | Endpoint | Description |
|---|---|---|
GET |
/countries |
Get a list of all countries |
GET |
/countries/:alpha3Code |
Get details for a specific country by its alpha3Code |
In this iteration, we will focus on the general layout by creating components. Inside the src folder, we have two separate folders named components and pages, one used for storing all the individual components and the other for storing the complete pages.
Create the following components in their respective folders:
Components Folder:
src/components/Navbar.jsx: TheNavbarcomponent should display anavelement with the text "WikiCountries".
Pages Folder:
-
src/pages/HomePage.jsx: TheHomePagecomponent should initially display a headline with the text "WikiCountries: Your Guide to the World". -
src/pages/CountryDetailsPage.jsx: TheCountryDetailsPagecomponent should initially display a headline with the text "Country Details".
Layout and Styling
We have included examples of each page in the examples. The example code uses Bootstrap classes for layout and styling.
If you decide to copy the code provided in the examples folder, keep the following in mind:
-
In React, the HTML attribute
classis written asclassName -
For inline CSS, use a JavaScript object and name each CSS property in camelCase (more details here). For example, if you have a
pelement with thestyleattribute:<p style="font-size: 20px; font-weight: bold">Example</p>
In React and JSX, you would write it as:
<p style={{ fontSize: "20px", fontWeight: "bold" }}>Example</p>
See Expected Result
HomePage:
CountryDetailsPage: (Structure and content copied from the examples folder)
After creating the components, it is time to take the next step and set up React Router to handle navigation and create multiple pages in your app.
- Set up React Router in your
src/main.jsxfile:
// src/main.jsx
import "bootstrap/dist/css/bootstrap.css";
import ReactDOM from "react-dom/client";
import "./index.css";
import App from "./App";

import { BrowserRouter as Router } from "react-router-dom";

const root = ReactDOM.createRoot(document.getElementById("root"));

root.render(
  <Router>
    <App />
  </Router>
);- In your
App.jsxset up two routes that render the following pages:
- Route
/, which renders theHomePagecomponent - Route
/:countryId, which renders theCountryDetailsPagecomponent
Once you set up the routes, your app should render two pages as shown in the expected result below.
See Expected Result
In this iteration, you will work on the HomePage component to retrieve the countries data from the Countries API and render it as a list.
To do this, you must use React hooks, specifically:
useStateto create a state variable to store the countries data retrieved from the APIuseEffectto set an effect that will make aGETrequest to the API for the countries data
The endpoint https://ih-countries-api.herokuapp.com/countries returns a JSON response in the form of an array containing the data of all the countries in the world. You should use axios to make a GET request to the endpoint. Once you retrieve the response data, store it in a state and then render it as a list of country names.
Tip: You should console.log the response data to help you visualize the structure of the country objects and how the data is structured.
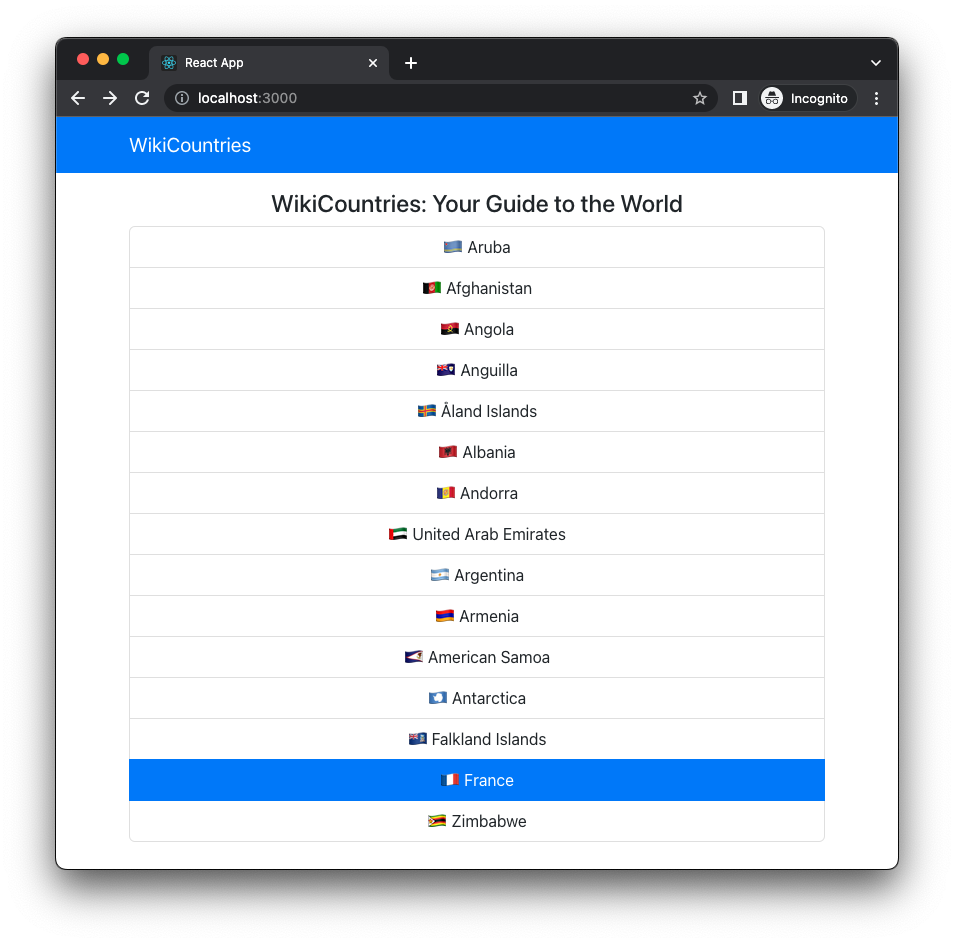
The rendered list of countries should show the country names.
See Expected Result
In this iteration, you will make the list of countries you rendered in the previous iteration dynamic by adding clickable Links for each country. Clicking on a Link should navigate the user to the country details page.
To do this, update the list of countries and make each list item a React Router Link. Each list item should show the country name and the flag. For the small picture of the flag, you can use the lowercase alpha2Code and embed it in the URL as shown below:
- France: https://flagpedia.net/data/flags/icon/72x54/fr.png
- Germany: https://flagpedia.net/data/flags/icon/72x54/de.png
- Brazil: https://flagpedia.net/data/flags/icon/72x54/br.png
- etc.
To allow users to navigate to a specific country's details page, embed the country's alpha3Code in the URL for each Link. When any of the country links on the HomePage are clicked, the alpha3Code should show up in the URL, and the user should be navigated to the country details page (CountryDetailsPage).
See Expected Result
In this iteration, you will work on the CountryDetailsPage component to display the information of a specific country.
The Countries API provides access to country-specific data through the endpoint /countries/:alpha3Code. The endpoint takes the country's alpha3Code and returns a JSON response containing the country info.
Here are a few examples of how to construct the request URL using the country's alpha3Code:
- United States: https://ih-countries-api.herokuapp.com/countries/USA
- Japan: https://ih-countries-api.herokuapp.com/countries/JPN
- India: https://ih-countries-api.herokuapp.com/countries/IND
When any of the country links on the HomePage are clicked, the user should be navigated to the CountryDetailsPage. The alpha3Code of the country will be available through the URL parameters. To retrieve the data for a specific country from the API, you should make a GET request to the API using the alpha3Code, as explained above.
To access the URL parameters from the browser's URL bar, use the React Router hook useParams.
Check this example if you need a reminder on how to set up the useParams hook and access the URL parameters.
In the CountryDetailsPage component, set up an effect using the useEffect hook.
Using axios inside of the effect, make a GET request to the Countries API to retrieve the country data. Once you receive the response, save the data in a state variable.
The effect should run after the initial render and each time that the URL parameter with the alpha3Code changes.
If you try to access and render a value from a state variable that is null or undefined, you will get an error. This can happen when data is not yet saved in the state variable, and the state variable still has the initial value of null or undefined.
Before rendering the country data in the CountryDetailsPage, you should first check if it is available. To do this, add a conditional statement that checks if the state variable holding country data is null or undefined.
If the state variable is null or undefined the component should display a message saying "Loading" to indicate that the data is being fetched/loaded.
See Expected Result
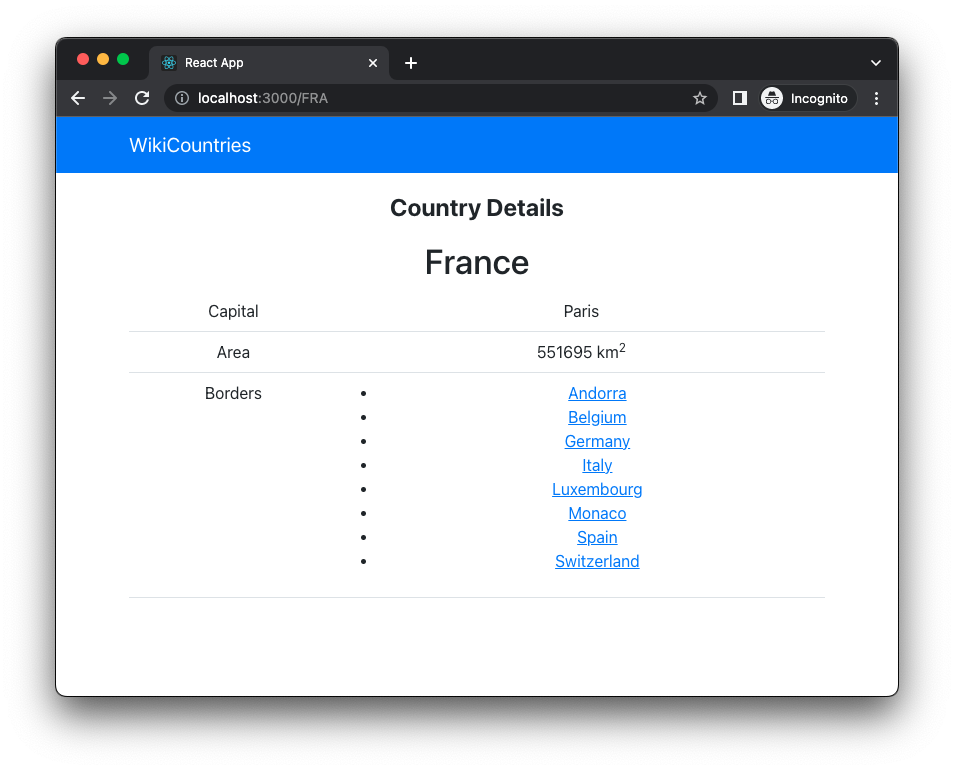
Once the country data is retrieved from the Countries API and saved in the state, render the country name, capital, area, and borders.
Each border should be a clickable Link. To allow users to navigate to a bordering country's details page, embed the alpha3Code of each bordering country in the URL of the Link.
See Expected Result

Happy coding! ❤️
I am stuck and don't know how to solve the problem or where to start. What should I do?
If you are stuck in your code and don't know how to solve the problem or where to start, you should take a step back and try to form a clear question about the specific issue you are facing. This will help you narrow down the problem and come up with potential solutions.
For example, is it a concept that you don't understand, or are you receiving an error message that you don't know how to fix? It is usually helpful to try to state the problem as clearly as possible, including any error messages you are receiving. This can help you communicate the issue to others and potentially get help from classmates or online resources.
Once you have a clear understanding of the problem, you will be able to start working toward the solution.
How do I update a state variable in my React component? How do I use the useState hook in my React component?
To update a state variable in a React component, you should use the useState hook. This hook returns an array with two elements: the current value of the state variable and a function to update it. Here is an example of how to use useState to update the count state variable:
import { useState } from "react";

function MyComponent() {
  const [count, setCount] = useState(0);

  const handleClick = () => {
    setCount(count + 1);
  };

  return (
    <div>
      <button onClick={handleClick}> Increment </button>
      <p>Count: {count}</p>
    </div>
  );
}
In the above example, the handleClick function is called when the button is clicked, and it updates the count state variable by calling the setCount function with the new value: setCount(count + 1).
The component will re-render every time a state variable gets updated.
How do I use the useEffect hook in my React component?
The useEffect hook (also called the Effect hook) allows you to run your side effects. Data fetching, setting up a subscription, starting a timer, and manually changing the DOM in React components are all examples of common actions (aka side effects) that you may want to set up in your components.
The useEffect hook allows you to run side effects during all three lifecycle phases:
-
Mounting phase
-
Update phase
-
Unmounting phase
The syntax of the useEffect is the following:
// Actual syntax
useEffect(() => {}, []);
As you can see useEffect takes two arguments:
// Pseudo code:
useEffect(didUpdate, dependencyArray);-
didUpdate- a function containing the code (side effect) we want to run. -
dependencyArray- the array of values that the effect depends on. React watches this array for any change and when a value in this array changes, the effect will run.
We can set the useEffect to run code in the mounting phase, only once right after the component is rendered for the first time.
To do so, we use the useEffect hook with the following syntax:
// Run the effect only once
// during the mounting phase

useEffect(() => {
  // Do something ...
}, []);
The empty array [] means that “this effect doesn’t depend on anything”, and will therefore run only once, after the initial render.
Often, effects create resources that need to be cleaned up before the component leaves the screen, such as a subscription or a timer, like in the previous example. Before the component unmounts, we should cancel all remaining processes to prevent memory leaks.
To do this, the function passed to useEffect may return a cleanup function. Example:
useEffect(() => {
  // Do something ...

  // Returned function is known as a "cleanup function",
  // which React will automatically run
  // right before the component is removed from the DOM
  return () => {
    // Perform clean up actions here
  };
}, []);The useEffect hook can also be used to run code during the Update phase, whenever there is an update of state or props.
As you may have noticed, useEffect takes a second argument [] the dependency array. A dependency array is used to specify the values that the effect depends on. Additionally, React keeps track of this array to know if it should re-run the effect. Example:
useEffect(() => {
  // Do something ...
  // Effect will run again if either `a` or `b` change or are updated
}, [a, b]);Important: Whenever a value specified in the dependency array updates, React re-runs the effect.
For a detailed explanation, check the following documentation pages:
I am getting an error: "not defined". How do I fix it?
The "ReferenceError: variable is not defined" error in JavaScript occurs when you try to access a variable or a function that has not been defined yet or is out of scope.
To fix the issue, check that you have defined the variable or function that you are trying to use and double-check the spelling to make sure you are using the correct name.
In case the variable or a function is defined in another file, make sure that the file has been imported or loaded correctly.
I am unable to push changes to the repository. What should I do?
There are a couple of possible reasons why you may be unable to push changes to a Git repository:
-
You have not committed your changes: Before you can push your changes to the repository, you need to commit them using the
git commitcommand. Make sure you have committed your changes and try pushing again. To do this, run the following terminal commands from the project folder:git add . git commit -m "Your commit message" git push
-
You do not have permission to push to the repository: If you have cloned the repository directly from the main Ironhack repository without making a Fork first, you do not have write access to the repository. To check which remote repository you have cloned, run the following terminal command from the project folder:
git remote -v
If the link shown is the same as the main Ironhack repository, you will need to fork the repository to your GitHub account first, and then clone your fork to your local machine to be able to push the changes.
Note: You may want to make a copy of the code you have locally, to avoid losing it in the process.


