GithubHelp home page GithubHelp logo

emilianavt / openseeface Goto Github PK

View Code? Open in Web Editor NEW
1.3K 22.0 145.0 217.14 MB

Robust realtime face and facial landmark tracking on CPU with Unity integration

License: BSD 2-Clause "Simplified" License

C# 33.85% Python 42.27% Batchfile 0.31% C++ 22.51% C 0.87% Shell 0.19%
face-tracking face-landmarks depth-estimation unity unity3d python csharp udp onnx onnxruntime

openseeface's Introduction

OSF.png

Overview

Note: This is a tracking library, not a stand-alone avatar puppeteering program. I'm also working on VSeeFace, which allows animating VRM and VSFAvatar 3D models by using OpenSeeFace tracking. VTube Studio uses OpenSeeFace for webcam based tracking to animate Live2D models. A renderer for the Godot engine can be found here.

This project implements a facial landmark detection model based on MobileNetV3.

As Pytorch 1.3 CPU inference speed on Windows is very low, the model was converted to ONNX format. Using onnxruntime it can run at 30 - 60 fps tracking a single face. There are four models, with different speed to tracking quality trade-offs.

If anyone is curious, the name is a silly pun on the open seas and seeing faces. There's no deeper meaning.

An up to date sample video can be found here, showing the default tracking model's performance under different noise and light levels.

Tracking quality

Since the landmarks used by OpenSeeFace are a bit different from those used by other approaches (they are close to iBUG 68, with two less points in the mouth corners and quasi-3D face contours instead of face contours that follow the visible outline) it is hard to numerically compare its accuracy to that of other approaches found commonly in scientific literature. The tracking performance is also more optimized for making landmarks that are useful for animating an avatar than for exactly fitting the face image. For example, as long as the eye landmarks show whether the eyes are opened or closed, even if their location is somewhat off, they can still be useful for this purpose.

From general observation, OpenSeeFace performs well in adverse conditions (low light, high noise, low resolution) and keeps tracking faces through a very wide range of head poses with relatively high stability of landmark positions. Compared to MediaPipe, OpenSeeFace landmarks remain more stable in challenging conditions and it accurately represents a wider range of mouth poses. However, tracking of the eye region can be less accurate.

I ran OpenSeeFace on a sample clip from the video presentation for 3D Face Reconstruction with Dense Landmarks by Wood et al. to compare it to MediaPipe and their approach. You can watch the result here.

Usage

A sample Unity project for VRM based avatar animation can be found here.

The face tracking itself is done by the facetracker.py Python 3.7 script. It is a commandline program, so you should start it manually from cmd or write a batch file to start it. If you downloaded a release and are on Windows, you can run the facetracker.exe inside the Binary folder without having Python installed. You can also use the run.bat inside the Binary folder for a basic demonstration of the tracker.

The script will perform the tracking on webcam input or video file and send the tracking data over UDP. This design also allows tracking to be done on a separate PC from the one who uses the tracking information. This can be useful to enhance performance and to avoid accidentially revealing camera footage.

The provided OpenSee Unity component can receive these UDP packets and provides the received information through a public field called trackingData. The OpenSeeShowPoints component can visualize the landmark points of a detected face. It also serves as an example. Please look at it to see how to properly make use of the OpenSee component. Further examples are included in the Examples folder. The UDP packets are received in a separate thread, so any components using the trackingData field of the OpenSee component should first copy the field and access this copy, because otherwise the information may get overwritten during processing. This design also means that the field will keep updating, even if the OpenSee component is disabled.

Run the python script with --help to learn about the possible options you can set.

python facetracker.py --help

A simple demonstration can be achieved by creating a new scene in Unity, adding an empty game object and both the OpenSee and OpenSeeShowPoints components to it. While the scene is playing, run the face tracker on a video file:

python facetracker.py --visualize 3 --pnp-points 1 --max-threads 4 -c video.mp4

Note: If dependencies were installed using poetry, the commands have to be executed from a poetry shell or have to be prefixed with poetry run.

This way the tracking script will output its own tracking visualization while also demonstrating the transmission of tracking data to Unity.

The included OpenSeeLauncher component allows starting the face tracker program from Unity. It is designed to work with the pyinstaller created executable distributed in the binary release bundles. It provides three public API functions:

  • public string[] ListCameras() returns the names of available cameras. The index of the camera in the array corresponds to its ID for the cameraIndex field. Setting the cameraIndex to -1 will disable webcam capturing.
  • public bool StartTracker() will start the tracker. If it is already running, it will shut down the running instance and start a new one with the current settings.
  • public void StopTracker() will stop the tracker. The tracker is stopped automatically when the application is terminated or the OpenSeeLauncher object is destroyed.

The OpenSeeLauncher component uses WinAPI job objects to ensure that the tracker child process is terminated if the application crashes or closes without terminating the tracker process first.

Additional custom commandline arguments should be added one by one into elements of commandlineArguments array. For example -v 1 should be added as two elements, one element containing -v and one containing 1, not a single one containing both parts.

The included OpenSeeIKTarget component can be used in conjunction with FinalIK or other IK solutions to animate head motion.

Expression detection

The OpenSeeExpression component can be added to the same component as the OpenSeeFace component to detect specific facial expressions. It has to be calibrated on a per-user basis. It can be controlled either through the checkboxes in the Unity Editor or through the equivalent public methods that can be found in its source code.

To calibrate this system, you have to gather example data for each expression. If the capture process is going too fast, you can use the recordingSkip option to slow it down.

The general process is as follows:

  • Type in a name for the expression you want to calibrate.
  • Make the expression and hold it, then tick the recording box.
  • Keep holding the expression and move your head around and turn it in various directions.
  • After a short while, start talking while doing so if the expression should be compatible with talking.
  • After doing this for a while, untick the recording box and work on capturing another expression.
  • Tick the train box and see if the expressions you gathered data for are detected accurately.
  • You should also get some statistics in the lower part of the component.
  • If there are issues with any expression being detected, keep adding data to it.

To delete the captured data for an expression, type in its name and tick the "Clear" box.

To save both the trained model and the captured training data, type in a filename including its full path in the "Filename" field and tick the "Save" box. To load it, enter the filename and tick the "Load" box.

Hints

  • A reasonable number of expressions is six, including the neutral one.
  • Before starting to capture expressions, make some faces and wiggle your eyebrows around, to warm up the feature detection part of the tracker.
  • Once you have a detection model that works decently, when using it take a moment to check all the expressions work as intended and add a little data if not.

General notes

  • The tracking seems to be quite robust even with partial occlusion of the face, glasses or bad lighting conditions.
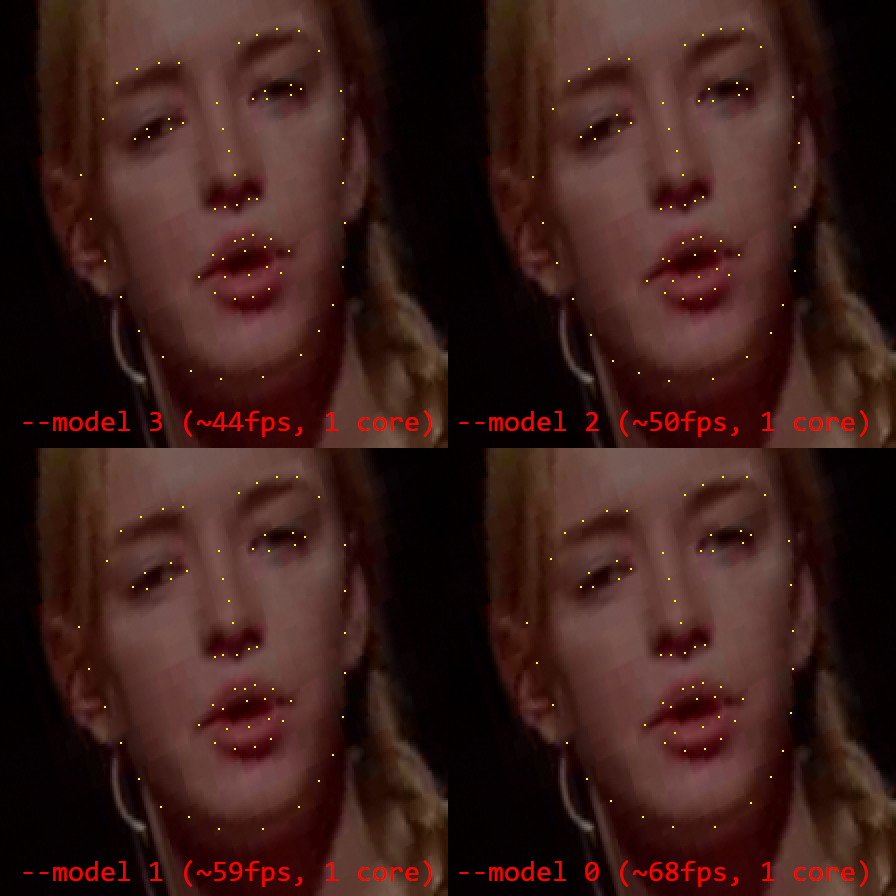
  • The highest quality model is selected with --model 3, the fastest model with the lowest tracking quality is --model 0.
  • Lower tracking quality mainly means more rigid tracking, making it harder to detect blinking and eyebrow motion.
  • Depending on the frame rate, face tracking can easily use up a whole CPU core. At 30fps for a single face, it should still use less than 100% of one core on a decent CPU. If tracking uses too much CPU, try lowering the frame rate. A frame rate of 20 is probably fine and anything above 30 should rarely be necessary.
  • When setting the number of faces to track to a higher number than the number of faces actually in view, the face detection model will run every --scan-every frames. This can slow things down, so try to set --faces no higher than the actual number of faces you are tracking.

Models

Four pretrained face landmark models are included. Using the --model switch, it is possible to select them for tracking. The given fps values are for running the model on a single face video on a single CPU core. Lowering the frame rate would reduce CPU usage by a corresponding degree.

  • Model -1: This model is for running on toasters, so it's a very very fast and very low accuracy model. (213fps without gaze tracking)
  • Model 0: This is a very fast, low accuracy model. (68fps)
  • Model 1: This is a slightly slower model with better accuracy. (59fps)
  • Model 2: This is a slower model with good accuracy. (50fps)
  • Model 3 (default): This is the slowest and highest accuracy model. (44fps)

FPS measurements are from running on one core of my CPU.

Pytorch weights for use with model.py can be found here. Some unoptimized ONNX models can be found here.

Results

Landmarks

Results1.png

Results2.png

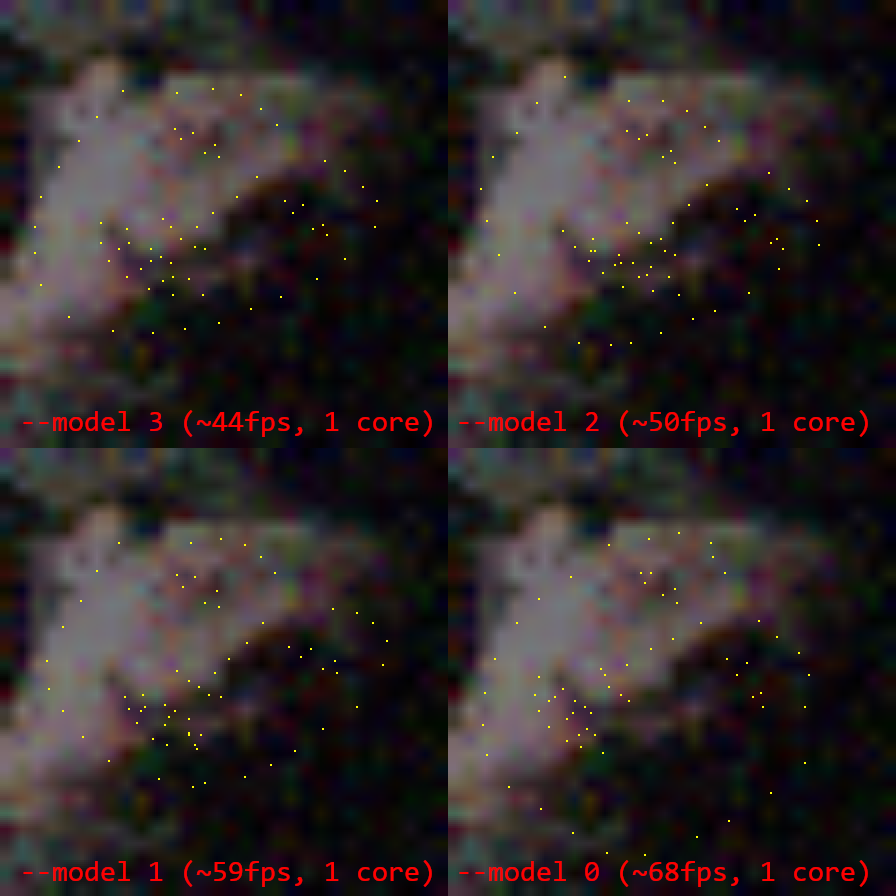
More samples: Results3.png, Results4.png

Face detection

The landmark model is quite robust with respect to the size and orientation of the faces, so the custom face detection model gets away with rougher bounding boxes than other approaches. It has a favorable speed to accuracy ratio for the purposes of this project.

EmiFace.png

Release builds

The builds in the release section of this repository contain a facetracker.exe inside a Binary folder that was built using pyinstaller and contains all required dependencies.

To run it, at least the models folder has to be placed in the same folder as facetracker.exe. Placing it in a common parent folder should work too.

When distributing it, you should also distribute the Licenses folder along with it to make sure you conform to requirements set forth by some of the third party libraries. Unused models can be removed from redistributed packages without issue.

The release builds contain a custom build of ONNX Runtime without telemetry.

Dependencies (Python 3.6 - 3.9)

  • ONNX Runtime
  • OpenCV
  • Pillow
  • Numpy

The required libraries can be installed using pip:

 pip install onnxruntime opencv-python pillow numpy

Alternatively poetry can be used to install all dependencies for this project in a separate virtual env:

 poetry install

Dependencies

  • onnxruntime
  • OpenCV
  • Pillow
  • Numpy

The required libraries can be installed using pip:

pip install onnxruntime opencv-python pillow numpy

References

Training dataset

The model was trained on a 66 point version of the LS3D-W dataset.

@inproceedings{bulat2017far,
  title={How far are we from solving the 2D \& 3D Face Alignment problem? (and a dataset of 230,000 3D facial landmarks)},
  author={Bulat, Adrian and Tzimiropoulos, Georgios},
  booktitle={International Conference on Computer Vision},
  year={2017}
}

Additional training has been done on the WFLW dataset after reducing it to 66 points and replacing the contour points and tip of the nose with points predicted by the model trained up to this point. This additional training is done to improve fitting to eyes and eyebrows.

@inproceedings{wayne2018lab,
  author = {Wu, Wayne and Qian, Chen and Yang, Shuo and Wang, Quan and Cai, Yici and Zhou, Qiang},
  title = {Look at Boundary: A Boundary-Aware Face Alignment Algorithm},
  booktitle = {CVPR},
  month = June,
  year = {2018}
}

For the training the gaze and blink detection model, the MPIIGaze dataset was used. Additionally, around 125000 synthetic eyes generated with UnityEyes were used during training.

It should be noted that additional custom data was also used during the training process and that the reference landmarks from the original datasets have been modified in certain ways to address various issues. It is likely not possible to reproduce these models with just the original LS3D-W and WFLW datasets, however the additional data is not redistributable.

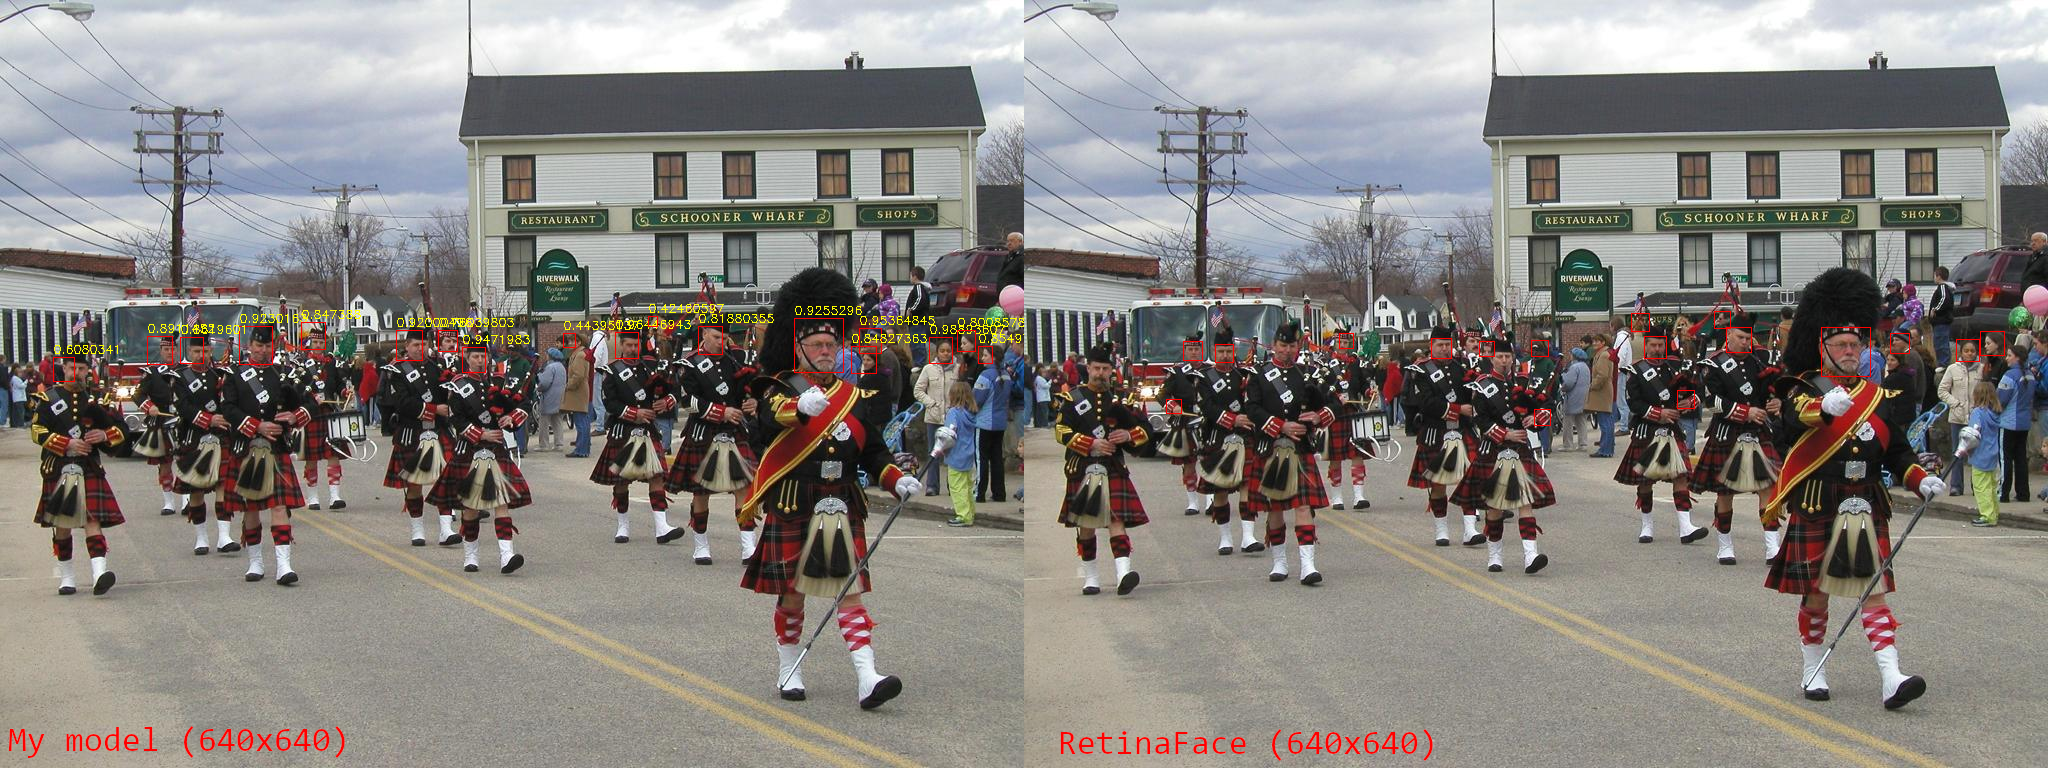
The heatmap regression based face detection model was trained on random 224x224 crops from the WIDER FACE dataset.

@inproceedings{yang2016wider,
  Author = {Yang, Shuo and Luo, Ping and Loy, Chen Change and Tang, Xiaoou},
  Booktitle = {IEEE Conference on Computer Vision and Pattern Recognition (CVPR)},
  Title = {WIDER FACE: A Face Detection Benchmark},
  Year = {2016}
}

Algorithm

The algorithm is inspired by:

The MobileNetV3 code was taken from here.

For all training a modified version of Adaptive Wing Loss was used.

For expression detection, LIBSVM is used.

Face detection is done using a custom heatmap regression based face detection model or RetinaFace.

@inproceedings{deng2019retinaface,
  title={RetinaFace: Single-stage Dense Face Localisation in the Wild},
  author={Deng, Jiankang and Guo, Jia and Yuxiang, Zhou and Jinke Yu and Irene Kotsia and Zafeiriou, Stefanos},
  booktitle={arxiv},
  year={2019}
}

RetinaFace detection is based on this implementation. The pretrained model was modified to remove unnecessary landmark detection and converted to ONNX format for a resolution of 640x640.

Thanks!

Many thanks to everyone who helped me test things!

License

The code and models are distributed under the BSD 2-clause license.

You can find licenses of third party libraries used for binary builds in the Licenses folder.

openseeface's People

Contributors

adrianiainlam avatar autumn-puffin avatar emilianavt avatar emilianavt2 avatar expiredpopsicle avatar glitchphoenix98 avatar johngebbie avatar justbobinaround avatar rez-spb avatar yamichan420 avatar you-win avatar zutatensuppe avatar

Stargazers

 avatar  avatar  avatar  avatar  avatar  avatar  avatar  avatar  avatar  avatar  avatar  avatar  avatar  avatar  avatar  avatar  avatar  avatar  avatar  avatar  avatar  avatar  avatar  avatar  avatar  avatar  avatar  avatar  avatar  avatar  avatar  avatar  avatar  avatar  avatar  avatar  avatar  avatar  avatar  avatar  avatar  avatar  avatar  avatar  avatar  avatar  avatar  avatar  avatar  avatar  avatar  avatar  avatar  avatar  avatar  avatar  avatar  avatar  avatar  avatar  avatar  avatar  avatar  avatar  avatar  avatar  avatar  avatar  avatar  avatar  avatar  avatar  avatar  avatar  avatar  avatar  avatar  avatar  avatar  avatar  avatar  avatar  avatar  avatar  avatar  avatar  avatar  avatar  avatar  avatar  avatar  avatar  avatar  avatar  avatar  avatar  avatar  avatar  avatar  avatar

Watchers

 avatar  avatar  avatar  avatar  avatar  avatar  avatar  avatar  avatar  avatar  avatar  avatar  avatar  avatar  avatar  avatar  avatar  avatar  avatar  avatar  avatar  avatar

openseeface's Issues

[SUGGESTION] officially support OpenSeeFace as a flatpak

I am currently in the process of writing a Flatpak for OpenSeeFace, and have already gotten vpuppr (formerly openseefacegd) to work as a flatpak.
I think it would be beneficial for OpenSeeFace to officially support being ran as a flatpak, as it allows for one command to install (literally just flatpak install) and it wouldn't break on system python upgrades.
This would probably only be beneficial to Linux, and maybe any other UNIX-like OSes.

randomly black out when ir tracking (lenovo 500)

I tried many arguments and rebuild few times, but it didn't solved.
When I turn on ir in obs that works correctly (not blacked out, exactly it repeatly blinked like incandescent light)
on OSF, not blinked at all and blacked out randomly.
idk what parts having trouble, but different of obs and osf can tell somehing I think.

under txt file is short log of excuting (no arguments applied without -c (grabbing ir cam))

lenovo500irlog.txt

License of *.onnx files?

Hi! I am creating a rust crate for face alignment and was thinking if I could integrate this as one of the backends. I was wondering of the license terms of the models and if I could integrate them (with credit, of course).

single in get_eye_state

What does the single in get_eye_state mean?

def get_eye_state(self, frame, lms, single=False):

I guess it's for detecting multiple people's eyes? Anyway, when num_crops == 1 (ie only 1 person), I think this argument needs to be set to true here:

eye_state = self.get_eye_state(frame, lms)

Otherwise, it consumes too much cpu! Initially I found this because the built VSeeFace.exe consumes only ~10% cpu, but using this python script with lower fps consumes up to 20% cpu, so I was wondering what makes the difference. After setting single=True inside that code, now the cpu usage is about the same (10%).

gaze estimation output format

Hey there,

First of all thanks for the awesome work!

I`m trying to grab the gaze estimation results but do not understand the format of the data.
I concluded that the second and third (indices 1 and 2) entries of the eye_state variable show the current gaze, but what exactly do the numbers mean?
Is the gaze relative to the head position or the camera?
Also what is the immediate output of the gaze model?

Can you maybe give me some clarification?

Thank you and all the best!

NumPy 1.24 breaks pupil/gaze tracking

NumPy 1.24 appears to break pupil/gaze tracking, when running python facetracker.py --model 4 -c models/benchmark.bin --repeat-video 1 -v 1 there is no point in or near the pupil, but after downgrading to NumPy 1.23 the dot tracking the pupil appears again.

Below is the output with NumPy 1.23 and 1.24 for comparison:
numpy123
numpy124

I am using Python 3.10.10 on Arch Linux, and the specific NumPy versions I tried are 1.23.5 and 1.24.2.

Output of pip freeze in the virtual environment excluding numpy:

coloredlogs==15.0.1
flatbuffers==23.3.3
humanfriendly==10.0
mpmath==1.3.0
onnxruntime==1.14.1
opencv-python==4.7.0.72
packaging==23.0
Pillow==9.4.0
protobuf==4.22.1
sympy==1.11.1

P.S. onnxruntime works for Python 3.10 now so no need to use the nightly version.

Camera space origin is not at screen center

When a face is centered on camera the reported translation X and Y coordinates are not zeros. A possible reason for this is that the camera intrinsic matrix has offsets computed for the wrong axis when doing the position solving.

The camera matrix is

self.camera = np.array([[width, 0, width/2], [0, width, height/2], [0, 0, 1]], np.float32)

so that means c_x = width/2 and c_y = height/2 but then later image_pts that is passed to solvePnP() is a vector of (y,x) points so self.camera translates the Y coordinates with width/2 and vice-versa for the point X coordinates.

I'd submit a patch to fix this but the code is somewhat tricky so I'm not sure I'd get it right.

I type this into the terminal python facetracker.py -c 0 -W 1280 -H 720 --discard-after 0 --scan-every 0 --no-3d-adapt 1 --max-feature-updates 900

and get this error
[ WARN:0] global /tmp/pip-req-build-99ib2vsi/opencv/modules/videoio/src/cap_v4l.cpp (893) open VIDEOIO(V4L2:/dev/video0): can't open camera by index
There was no valid input.
this command python facetracker.py --visualize 3 --pnp-points 1 --max-threads 4 -c video.mp4
There was no valid input
it was working earlier a few days ago but it is not working anymore
also

landmark losss problem

nice work, I dont comprehend heatmap offset format. such as x_offset= 223 * log(p/(1-p)) / 16.
can you provide some explanation? thank you.

[FR] VMC support

How about to add VMC Assistant support to OpenSeeFace?

I have read the docu of the protocol.

Currently iam writing an python pip package for vmc.
But i have some questions about bone transform:

/VMC/Ext/Bone/Pos <boneName> <p.x> <p.y> <p.z> <q.x> <q.y> <q.z> <q.w>

After running an OSC sniffer with VSeeFace in "transmitter mode" and covered webcam i get for each bone the T-Pose values of my model.
That's clear.
Now the question: How do you apply the tracking data to these T-Pose to get the correct position and quaternion?

In short:
So if i want to add VMC support to OpenSeeFace, then how to apply the tracking data from the webcam to the initial T-Pose of the model bones?

Packets on 369 of facetracker.py fail with VPN enabled

Hello!
After digging a bit with the program a little bit, it seems the "sock.sendto(packet, (target_ip, target_port))" line on 369 in facetracker.py simply doesn't function through a VPN connection
Attached underneath is the error code produced

debug

Extra info that may be useful for reproducing error and to find fix:
Windows 11 (64 bit, AMD CPU)
NordVPN Connection -> default protocol
Python 3.9 installed
Doesn't work with test using unbranded "USB Camera" as webcam, additionally with it processed through NVIDIA Broadcast's Virtual camera wouldn't work either

any interest in supporting oak-d/oak-d-lite camera?

as stated above do you have any interest in supporting the oak-d line of spatial 3d cameras?, as with the kickstarter that is going around they are now at the same price as the leap controller though that price will rise. the products use a open python sdk called depthai.

Unable to fulfill dependencies

Literally cant install this thing cause dependencies are hard to install, are outdated or are just an inconvenience to install.and cant find a proper guide for arch linux.

Detection model without onnxruntime

Hi @emilianavt,
I'm just using opencv without onnxruntime and got the landmarking working using the unoptimized models you shared in #48, which is great.

I just tried the optimized detection model (mnv3_detection_opt.onnx) but not that surprisingly got the same layer error as with the optimized landmarking models.

It'd be fab if you could share the unoptimized detection model too.

could you help me how I could retrieve the eye's ratios correctly?

Hi.I'm trying to retrieve the eye ratio.I uncommented this line of tracker.py and did it this way and it worked perfectly:

        f = np.clip((np.mean([f_pts[0,1], f_pts[1,1]]) - np.mean([f_pts[2,1], f_pts[3,1]])) / norm_distance_y, 0, None)
        #features["eye_r"] = self.eye_r.update(f, now)

        features["eye_r"] = f

I tested so many times using a live webcam but testing it on frames gotten from a mobile camera dose not work correctly.for example it used to detect a ratio of 0.15 when eyes are closed but for some of the frames it detects the ratio of 0.38 even though eyes are closed.I also saved the image with landmarks projected on it to see if it detects the landmarks correctly and it does.
what do you think the problem might be?
do you think I sould some sort of preprocessing or change the way I'm calculating the ratios?
I also tested it with f.eye_blink and it detected the eyes as open.returning 1 instead of 0
thank you
sorry for bothering you :)

minor typing problem, or it's just me

I would have put up a PR, but I wanted to run this by you real quick because I'm not super familiar with C# and there is a really good chance I just don't have something setup correctly.

OpenSeeVRMDriver.cs seems to have a typing issue, lines below. nowT is a double, but the InterpolatedMap takes a float in that param. I'm more familiar with python, seems like this SHOULD implicitly cast, but Unity and Visual Studio both throw an error. If I cast it as a float inline, Unity seems happy like that.

public void SetPerfectSync(string name, float weight, double nowT, float factor) {
perfectSyncMap.Store(name.ToUpper(), Mathf.Clamp(weight * factor, 0f, 1f), nowT);
}

Does this sound like an actual thing, or am I missing something dumb like upgrading some .net stuff?

why detect time always show 0.00ms?

Hello,dear anchor.Iโ€˜m testing your project,and now have a problem.That is why detect time always show 0.00ms,test picture is following:
image
Next I found that parameter duration_fd mainly saved the detection time.and it's true.picture is following:
image
How should I modify to display the correct detection time?
Thanks you watching!

non-object-oriented code

Hi.excellent work.Thank you so much for making this amazing project available for others to use.
I'm trying to use the mouth_open and eye blink components separately and build two flask API out of it.one for mouth_open detection and one for eye_blink detection but I read the code so many times everything is so connected I can't seem to use only the parts I want.I want to load the model once and then only do prediction with every API request.how can I do that?
I'm afraid if I edit the code I may do something wrong.do you have any separate source code or anything?

[Compatibility request] Unity Barracuda ML solution support for the .onnx models in project

Hi emilianavt! Really impressed by the work done in the project. I was trying to use the project in a standalone mobile way, with Unity's Barracuda AI solution.

With importing the .onnx models you generated though, I believe it does not support some of the transform functions you used to create the .onnx model, the following and many similiar errors are thrown

...
Asset import failed, "Assets/models/lm_modelV_opt.onnx" > OnnxImportException: Unknown type FusedConv encountered while parsing layer 361.
...

Here are the transforms supported by Barracuda. Was wondering if you'd consider making the onnx model compatible with Barracuda! It would make it more usable by many Unity developers and bring more attention to it!

Disclosure-- I'm building an open-source SDK, native Unity for face-tracking to Avatars and I'd like to use the tech you've developed!

Pytorch model problems

Hello! Thanks for your work!
I have some problem when running model.py file
Screenshot 2021-03-17 at 18 04 59
And what means "geffnet.mobilenetv3._gen_mobilenet_v3 needs to be patched to return the parameters instead of instantiating the network" ?

The Lazy Eye

When using wink-optimized model, if a person winks, it causes the open eye to veer off to the side in gaze tracking. This results in a lazy eye effect.
This is in using version 1.20.4 under Ubuntu 23.10 in conjunction with VSeeFace. I verified that I was not squinting my open eye at the time and that it occurs with only my left eye open. It also appears to forward as having both eyes closed with my right eye is open regardless of tracking as winking in the terminal output. I have verified that VSeeFace can track my face properly via webcam, but that also brings about a separate issue that was to be resolved via external tracking. This is really one of the only options that I have for my system at the moment, otherwise I would be using other methods. But gaming is and has been shifting to the Linux platform for a little bit now and with good reason, so I'm hoping that I can it along.

Screenshot from 2024-01-28 22-41-58

Rescale the network

Thanks for your contribution! And I will include your license and your repo link correctly.
I also have a question, estimate facial landmarks from 224x224 image is not neccassary sometime since my input image is near 100x100, is that possible to rescale the network?
I will also try this by my own.

model loading error

Thanks for this awesome repo. i had a difficuilty in loading the model in unity. it is giving some kind or few layer aren't supported.

Documenting UDP protocol

I was writing a 3D model puppeteering program based on OpenSeeFace. It seems that the documentation of the UDP protocol is somewhat missing. I made my personal "summary" according to multiple code snippets I've found.

I've been thinking about opening a pull request for creating such a documentation.

random resuls of landmark model (-1)

Trying the new landmark model, It seems that I get random landmarks. You mention that accuracy is very low, but I wonder if I'm doing some mistake! could you share some sample results of the new landmark model as well? thanks.

Also I think the reshaping in here

t_off_x = x[30:60].reshape((60, 7*7)).gather(1, indices).squeeze(1)

t_off_y = x[60:90].reshape((60, 7*7)).gather(1, indices).squeeze(1)

should be (30, 7*7).

Reset tracking state

Hello emilianavt !!

Thank you very much for keeping up this great job! I have some doubts.

1 - Are facial marks obtained through an average during the video? LmX = (Lm1 + Lm2 + Lm3 ... LmN) / 2?

2 - When a transition between faces occurs, does the new detection have residual values of the old face?

3 - It is possible to reset the tracking status whenever a new person appears.

I would like to obtain landmarks as current as possible and without any trace of the old face.

Thank you very much.

onnxruntime-gpu (CUDA/TensorRT) support

Hi, I'm trying to run models with onnxruntime-gpu with TensorRT/Cude executors, and it looks like they do not have FusedConv operator. Can you provide with lesser operator set? Also INT32 model would be nice to have. Thanks.

2021-12-31 23:40:05.374626878 [W:onnxruntime:Default, tensorrt_execution_provider.h:53 log] [2021-12-31 20:40:05 WARNING] /onnxruntime_src/cmake/external/onnx-tensorrt/onnx2trt_utils.cpp:362: Your ONNX model has been generated with INT64 weights, while TensorRT does not natively support INT64. Attempting to cast down to INT32.
2021-12-31 23:40:05.374878637 [E:onnxruntime:Default, tensorrt_execution_provider.h:51 log] [2021-12-31 20:40:05   ERROR] 3: getPluginCreator could not find plugin: FusedConv version: 1
/onnxruntime_src/cmake/external/onnx-tensorrt/onnx2trt_utils.cpp:362: Your ONNX model has been generated with INT64 weights, while TensorRT does not natively support INT64. Attempting to cast down to INT32.

Head and eye gaze estimation

Hi, your project is very great !

I'm now working on head and eye estimation such as up-down, left-right directions problem. I've read your tracker.py file and I think you already have figured out this problem. Could you please guide which features or attributes I should use to solve this problem ?

Using the project for API

Hi. Very nice work for this project!
I`m try to make an API with django and I have 2 question.

  1. Could we use video file instead of webcam? if yes, how?

  2. Is there any feature that extract (save) detected faces?

thank you.

Openseeface runs but vseeface cannot communicate with it.

Application appears to be running as expected however VSeeface is unable to communicate with it.

I ran netstat -atulpn but do not see any ports associated with the application. What am I missing?

Any help would be appreciated.

Just to be clear, I am attempting to use Os on one machine Vs on another, if this is not possible please let me know.

Model architecture

Hello. Probably, my question is quite stupid, but nvm:
Ur model should work in a detector fashion (fully convolutional). But ur model (at least the large one) requires a precise image shape (224x224). Can you briefly describe the architecture?

landmark model without detection model

Hi.thanks for answering the last issue I posted and thanks again for this great repo. I almost figured the code out and tried to customize it for my own purpose of use the only problem here is that the frames I want to use are frames of faces and I don't want to use the detection model . I tested this approach and it decreased the model accuracy.now my question is:
could you please tell me exactly what kind of preprocessing has to be done on detected faces frames before feeding it to the landmark detector?or what could possibly be the reason for this decrease in model accuracy after deleting the detection part.

` def predict(self, frame, additional_faces=[]):
self.frame_count += 1
start = time.perf_counter()
im = frame

    duration_fd = 0.0
    duration_pp = 0.0
    duration_model = 0.0
    duration_pnp = 0.0

    #new_faces = []
    #new_faces.extend(self.faces)
    bonus_cutoff = len(self.faces)
    #new_faces.extend(additional_faces)
    #self.wait_count += 1
    #if self.detected == 0:
    #    start_fd = time.perf_counter()
    #    if self.use_retinaface > 0:
    #        retinaface_detections = self.retinaface.detect_retina(frame)
    #        new_faces.extend(retinaface_detections)
    #    else:
    #        new_faces.extend(self.detect_faces(frame))
    #    duration_fd = 1000 * (time.perf_counter() - start_fd)
    #    self.wait_count = 0
    #elif self.detected < self.max_faces:
    #    if self.use_retinaface > 0:
    #        new_faces.extend(self.retinaface_scan.get_results())
    #    if self.wait_count >= self.scan_every:
    #        if self.use_retinaface > 0:
    #            self.retinaface_scan.background_detect(frame)
    #        else:
    #            start_fd = time.perf_counter()
    #            new_faces.extend(self.detect_faces(frame))
    #            duration_fd = 1000 * (time.perf_counter() - start_fd)
    #            self.wait_count = 0
    #else:
    #    self.wait_count = 0

    #if len(new_faces) < 1:
    #    duration = (time.perf_counter() - start) * 1000
    #    if not self.silent:
    #        print(f"Took {duration:.2f}ms")
    #    return []

    crops = []
    crop_info = []
    num_crops = 1
    #for j, (x,y,w,h) in enumerate((0,0,self.width,self.height)):
    #SET THIS TO THIS BOUNDING BOX BEACUSE IT'S ALREADY A FRAME OF FACE
    (x,y,w,h) = (0,0,self.width,self.height)
    #(crop_x1,crop_y1,crop_x2,crop_y2) = (0,0,self.width,self.height)
    crop_x1 = x - int(w * 0.1)
    crop_y1 = y - int(h * 0.125)
    crop_x2 = x + w + int(w * 0.1)
    crop_y2 = y + h + int(h * 0.125)


    crop_x1, crop_y1 = clamp_to_im((crop_x1, crop_y1), self.width, self.height)
    crop_x2, crop_y2 = clamp_to_im((crop_x2, crop_y2), self.width, self.height)
    
    scale_x = float(crop_x2 - crop_x1) / self.res
    scale_y = float(crop_y2 - crop_y1) / self.res


    start_pp = time.perf_counter()
    cv2.imwrite('marzi'+str(start_pp)+'.jpg',im[crop_y1:crop_y2, crop_x1:crop_x2])
    #bounding_box = (0,0,self.width,self.height)
    crop = self.preprocess(im, (crop_x1, crop_y1, crop_x2,crop_y2))
    #crop = self.preprocess(im, bounding_box)
    duration_pp += 1000 * (time.perf_counter() - start_pp)
    crops.append(crop)
    #crop_info.append((crop_x1, crop_y1, scale_x, scale_y, 0.0 if j >= bonus_cutoff 0.1))
    crop_info.append((crop_x1, crop_y1, scale_x, scale_y,1))

    start_model = time.perf_counter()
    outputs = {}
    if num_crops == 1:
        output = self.session.run([], {self.input_name: crops[0]})[0]
        conf, lms = self.landmarks(output[0], crop_info[0])
        print(conf)
        if conf > self.threshold:
            try:
                eye_state = self.get_eye_state(frame, lms)
            except:
                eye_state = [(1.0, 0.0, 0.0, 0.0), (1.0, 0.0, 0.0, 0.0)]
            outputs[crop_info[0]] = (conf, (lms, eye_state), 0)
    else:
        started = 0
        results = queue.Queue()
        for i in range(min(num_crops, self.max_workers)):
            thread = threading.Thread(target=worker_thread, args=(self.sessions[started], frame, crops[started], crop_info[started], results, self.input_name, started, self))
            started += 1
            thread.start()
        returned = 0
        while returned < num_crops:
            result = results.get(True)
            if len(result) != 1:
                session, conf, lms, sample_crop_info, idx = result
                outputs[sample_crop_info] = (conf, lms, idx)
            else:
                session = result[0]
            returned += 1
            if started < num_crops:
                thread = threading.Thread(target=worker_thread, args=(session, frame, crops[started], crop_info[started], results, self.input_name, started, self))
                started += 1
                thread.start()

    actual_faces = []
    good_crops = []
    for crop in crop_info:
        if crop not in outputs:
            continue
        conf, lms, i = outputs[crop]
        x1, y1, _ = lms[0].min(0)
        x2, y2, _ = lms[0].max(0)
        bb = (x1, y1, x2 - x1, y2 - y1)
        outputs[crop] = (conf, lms, i, bb)
        actual_faces.append(bb)
        good_crops.append(crop)
    groups = group_rects(actual_faces)

    best_results = {}
    for crop in good_crops:
        conf, lms, i, bb = outputs[crop]
        if conf < self.threshold:
            continue;
        group_id = groups[str(bb)][0]
        if not group_id in best_results:
            best_results[group_id] = [-1, [], 0]
        if conf > self.threshold and best_results[group_id][0] < conf + crop[4]:
            best_results[group_id][0] = conf + crop[4]
            best_results[group_id][1] = lms
            best_results[group_id][2] = crop[4]

    sorted_results = sorted(best_results.values(), key=lambda x: x[0], reverse=True)[:self.max_faces]
    self.assign_face_info(sorted_results)
    duration_model = 1000 * (time.perf_counter() - start_model)

    results = []
    detected = []
    start_pnp = time.perf_counter()
    for face_info in self.face_info:
        if face_info.alive and face_info.conf > self.threshold:
            face_info.success, face_info.quaternion, face_info.euler, face_info.pnp_error, face_info.pts_3d, face_info.lms = self.estimate_depth(face_info)
            face_info.adjust_3d()
            lms = face_info.lms[:, 0:2]
            x1, y1 = tuple(lms[0:66].min(0))
            x2, y2 = tuple(lms[0:66].max(0))
            bbox = (y1, x1, y2 - y1, x2 - x1)
            face_info.bbox = bbox
            detected.append(bbox)
            results.append(face_info)
    duration_pnp += 1000 * (time.perf_counter() - start_pnp)

    if len(detected) > 0:
        self.detected = len(detected)
        self.faces = detected
        self.discard = 0
    else:
        self.detected = 0
        self.discard += 1
        if self.discard > self.discard_after:
            self.faces = []
        else:
            if self.bbox_growth > 0:
                faces = []
                for (x,y,w,h) in self.faces:
                    x -= w * self.bbox_growth
                    y -= h * self.bbox_growth
                    w += 2 * w * self.bbox_growth
                    h += 2 * h * self.bbox_growth
                    faces.append((x,y,w,h))
                self.faces = faces
    self.faces = [x for x in self.faces if not np.isnan(np.array(x)).any()]
    self.detected = len(self.faces)

    duration = (time.perf_counter() - start) * 1000
    if not self.silent:
        print(f"Took {duration:.2f}ms (detect: {duration_fd:.2f}ms, crop: {duration_pp:.2f}, track: {duration_model:.2f}ms, 3D points: {duration_pnp:.2f}ms)")

    results = sorted(results, key=lambda x: x.id)

    return results`

Thank you :)

Training codes

Great work. is the code in model.py used for training the onnx inference models? any chance to release the training codes?

About generating landmark heatmap offset groud truth label

Hello Emiliana emilianavt:
Very nice work for this project! And i have some problems about landmark heatmap offset label for training:
1. How to generate groud truth?
2. What is the loss function for landmark heatmap offset?
I am looking forward to your reply.Thank you very much!

socket.io support

I would like to serve the tracking data using a socket.io server so that it's easy to access the data from a browser. I'm already working an a prototype but I would like to know if that is something that you would be interested in. If you are, I'd give it the appropriate polish and make a pull request.

Vseeface

I tried to download your program and it says Failed-forbidden and I tried everything so it must be on your side.

Bugfix #57 (np.int / np.float deprecation) not yet released

About 10 months ago, pull request #57 fixed a deprecation issue in model.py and tracker.py. Running facetracker.py works fine when using master, however if you try to run the latest release you still get an error:

AttributeError: module 'numpy' has no attribute 'float'.
`np.float` was a deprecated alias for the builtin `float`. To avoid this error in existing code, use `float` by itself. Doing this will not modify any behavior and is safe. If you specifically wanted the numpy scalar type, use `np.float64` here.
The aliases was originally deprecated in NumPy 1.20; for more details and guidance see the original release note at:
    https://numpy.org/devdocs/release/1.20.0-notes.html#deprecations
Traceback (most r....

Creating a new release with the latest code should fix the issue ๐Ÿ˜„

AttributeError: 'Namespace' object has no attribute 'fps'

When trying to log the data with the --log-data parameter, I get the complaint AttributeError: 'Namespace' object has no attribute 'fps', and it refers to line 296 in facetracker.py, where args.fps is used instead of fps. Changing this to fps seems to fix the problem. I don't know how to actually contribute this change so I'm creating this issue instead.

docstrings

comments are present often it seems; however, you're busy and could probs use a hand.
todo: update comment

[Help Request] Opens exe, then it quickly closes?

Hi sorry if this isn't where I ask for help, I'm new to this.

When opening facetracker.exe , it shows this text, then closes after a second.

image

Any reason why this might be happening? I might be doing something wrong.

Sorry if this is vague, really dunno anything

EDIT:
sometimes it writes "No frame" briefly before closing. As closing is called before "No frame" shows, and it just depends on how long it takes to close

Worse performance of released pytorch models

Hello emilianavt, I'm trying to utilize the provided pytorch models (model.py) and weights to detect facial landmarks. However, I found its performance is worse than onnx version. An example is shown below (lm_model3 for both).

comp

Do you have any suggestion? In my practice, I modify the model.py according to this issue, and I adapt the tracker.py by replacing the onnx models (self.session and self.detection) with pytorch models (OpenSeeFaceLandmarks and OpenSeeFaceDetect). I follow the image preprocessing codes and postprocessing codes in the original tracker.py. I'm wondering if you could provide a demo tracking code for pytorch models. Any advice is appreciated!

[Question] Camera opened by dshowcapture has changed?

The new dshowcapture DLLs in commit 89e1040 will open a different camera than the old DLLs in commit 92717a6.

For example, here's my camera list:
image

With --capture 1, the old DLLs open VTubeStudioCam:

Trying to open camera 1
Trying to open camera 1 with DShowCapture
Camera configuration: 640x360 333333 101
Final camera configuration: 640x360 30
Format: 0 Internal format: 101
Camera: "VTubeStudioCam" Capability ID: None Resolution: 640x360 Frame rate: 30 Colorspace: 101 Internal: 101 Flipped: False
Got frame
Got frame
Got frame
Got frame
Got frame
Got frame

With the new DLLs, 'WarudoCam' is opened instead:

Trying to open camera 1
Trying to open camera 1 with DShowCapture
Camera configuration: 640x360 333333 101
Final camera configuration: 640x360 30
Format: 0 Internal format: 101
Camera: "WarudoCam" Capability ID: None Resolution: 640x360 Frame rate: 30 Colorspace: 101 Internal: 101 Flipped: False
Got frame
Got frame
Got frame
Got frame
Got frame
Got frame

Is this because the new VTubeStudioCam has been blacklisted in the new dshowcapture DLLs, so that the IDs are off-by-one? Is it possible to blacklist the vcams without affecting their ID?

Thank you for this awesome library!

Tracker taking long time after some frames

Hi @emilianavt
Thanks for the nice repo . While running the code , the tracker takes a long time after some frames , I have attached the screenshot here , can you please tell what may be the possible reason ? You can see that in the attached screenshot that , after 22 ms , the tracker takes a longer time upto 2398 ms which is almost 100 times more .
Thanks
Trilok

image

Extracting face with quaternion points

Hi.
I'm trying to crop faces from original frame with quaternion points.
but there is a problem. The cropped image does not include the face and is only slightly smaller.
I think these points are not correct for cropping.
Do I using right point for cropping?
Do you have any idea for cropping frame and extract (save) face?

Real time face tracking

Thank you for sharing such a great project. Yet I am working on some project with real time face tracking where I am using dlib 68_face_landmarks.dat but its not stable and accurate somehow I found this project, I saw some links and examples and guess what its amazing.

So how can I use this module in unity for real time face tracking. Or can you guide me which file should I use for real time face tracking. Or is there any chance we can create tracking module as .dat file formats.

Recommend Projects

  • React photo React

    A declarative, efficient, and flexible JavaScript library for building user interfaces.

  • Vue.js photo Vue.js

    ๐Ÿ–– Vue.js is a progressive, incrementally-adoptable JavaScript framework for building UI on the web.

  • Typescript photo Typescript

    TypeScript is a superset of JavaScript that compiles to clean JavaScript output.

  • TensorFlow photo TensorFlow

    An Open Source Machine Learning Framework for Everyone

  • Django photo Django

    The Web framework for perfectionists with deadlines.

  • D3 photo D3

    Bring data to life with SVG, Canvas and HTML. ๐Ÿ“Š๐Ÿ“ˆ๐ŸŽ‰

Recommend Topics

  • javascript

    JavaScript (JS) is a lightweight interpreted programming language with first-class functions.

  • web

    Some thing interesting about web. New door for the world.

  • server

    A server is a program made to process requests and deliver data to clients.

  • Machine learning

    Machine learning is a way of modeling and interpreting data that allows a piece of software to respond intelligently.

  • Game

    Some thing interesting about game, make everyone happy.

Recommend Org

  • Facebook photo Facebook

    We are working to build community through open source technology. NB: members must have two-factor auth.

  • Microsoft photo Microsoft

    Open source projects and samples from Microsoft.

  • Google photo Google

    Google โค๏ธ Open Source for everyone.

  • D3 photo D3

    Data-Driven Documents codes.