Source code for my blog: https://flyyang.me
- Install deps
npm install
- Run server
# This step is optional
hexo server
- Write post
hexo new post "your-post-name"
- Deploy to github
npm run deploy
source code of my blog
Home Page: https://flyyang.me
Source code for my blog: https://flyyang.me
npm install
# This step is optional
hexo server
hexo new post "your-post-name"
npm run deploy
![dependabot[bot] avatar](https://avatars.githubusercontent.com/in/29110?v=4 "dependabot[bot]")


mixin, 中文意思为混入。
比如去买冰激凌,我先要一点奶油的,再来点香草的。我就可以吃一个奶油香草的冰激凌。如果再加点草莓,我可以同时吃三个口味的冰激凌。
假设把你已有的奶油味的称为 base,把要添加的味道称为 mixins。用 js 伪代码可以这么来写:
const base = {
  hasCreamFlavor() {
    return true;
  }
}
const mixins = {
  hasVanillaFlavor() {
    return true;
  },
  hasStrawberryFlavor() {
    return true;
 }
}

function mergeStrategies(base, mixins) {
  return Object.assign({}, base, mixins);
}
// newBase 就拥有了三种口味。
const newBase = mergeStrategies(base, mixins);
注意一下这个 mergeStrategies。
合并策略可以你想要的形式,也就是说你可以自定义自己的策略,这是其一。另外要解决冲突的问题。上面是通过 Object.assign 来实现的,那么 mixins 内的方法会覆盖base 内的内容。如果这不是你期望的结果,可以调换 mixin 和 base 的位置。
想象一下上面的例子用继承如何实现?由于 js 是单继承语言,只能一层层继承。写起来很繁琐。这里就体现了 mixin 的好处。符合组合大于继承的原则。
mixin 内通常是提取了公用功能的代码。而不是每一个地方都写一遍。符合 DRY 原则。
vue mixin 是针对组件间功能共享来做的。可以对组件的任意部分(生命周期, data等)进行mixin,但不同的 mixin 之后的合并策略不同。在源码分析部分会介绍细节。
假设两个功能组件 model 和 tooltip ,他们都有一个显示和关闭的 toggle 动作:
//modal
const Modal = {
  template: '#modal',
  data() {
    return {
      isShowing: false
    }
  },
  methods: {
    toggleShow() {
      this.isShowing = !this.isShowing;
    }
  }
}

//tooltip
const Tooltip = {
  template: '#tooltip',
  data() {
    return {
      isShowing: false
    }
  },
  methods: {
    toggleShow() {
      this.isShowing = !this.isShowing;
    }
  }
}
可以用 mixin 这么写:
const toggleMixin = {
  data() {
    return {
      isShowing: false
    }
  },
  methods: {
    toggleShow() {
      this.isShowing = !this.isShowing;
    }
  }
}

const Modal = {
  template: '#modal',
  mixins: [toggleMixin]
};

const Tooltip = {
  template: '#tooltip',
  mixins: [toggleMixin],
};
全局 mixin 会作用到每一个 vue 实例上。所以使用的时候要慎重。通常会用 plugin 来显示的声明用到了那些 mixin。
比如 vuex。我们都知道它在每一个实例上扩展了一个 $store, 在任意一个组件内可以调用 this.$store。那么他是如何实现的呢?
在 src/mixin.js 内
export default function (Vue) {
  const version = Number(Vue.version.split('.')[0])

  if (version >= 2) {
    Vue.mixin({ beforeCreate: vuexInit })
  } else {
    // override init and inject vuex init procedure
    // for 1.x backwards compatibility.
    const _init = Vue.prototype._init
    Vue.prototype._init = function (options = {}) {
      options.init = options.init
        ? [vuexInit].concat(options.init)
        : vuexInit
      _init.call(this, options)
    }
  }
  /**
   * Vuex init hook, injected into each instances init hooks list.
   */

  function vuexInit () {
    const options = this.$options
    // store injection
    if (options.store) {
      this.$store = typeof options.store === 'function'
        ? options.store()
        : options.store
    } else if (options.parent && options.parent.$store) {
      this.$store = options.parent.$store
    }
  }
}
我们看到 在 Vue 2.0 以上版本,通过 Vue.mixin({ beforeCreate: vuexInit })实现了在每一个实例的 beforeCreate 生命周期调用vuexInit 方法。
而 vuexInit 方法则是:在跟节点我们会直接把store 注入,在其他节点则拿父级节点的 store,这样this.$store 永远是你在根节点注入的那个store。
在 Vuex 的例子中,我们通过 Vue.mixin({ beforeCreate: vuexInit }) 实现对实例的 $store 扩展。
我们先看一下 mixin 是如何挂载到原型上的。
在 src/core/index.js 中:
import Vue from './instance/index'
import { initGlobalAPI } from './global-api/index'

initGlobalAPI(Vue)

export default Vue
我们发现有一个 initGlobalAPI。在 src/global-api/index 中:
/* @flow */

import config from '../config'
import { initUse } from './use'
import { initMixin } from './mixin'
import { initExtend } from './extend'
import { initAssetRegisters } from './assets'
import { set, del } from '../observer/index'
import { ASSET_TYPES } from 'shared/constants'
import builtInComponents from '../components/index'

import {
  warn,
  extend,
  nextTick,
  mergeOptions,
  defineReactive
} from '../util/index'

export function initGlobalAPI (Vue: GlobalAPI) {
  // config
  const configDef = {}
  configDef.get = () => config
  if (process.env.NODE_ENV !== 'production') {
    configDef.set = () => {
      warn(
        'Do not replace the Vue.config object, set individual fields instead.'
      )
    }
  }
  Object.defineProperty(Vue, 'config', configDef)

  // exposed util methods.
  // NOTE: these are not considered part of the public API - avoid relying on
  // them unless you are aware of the risk.
  Vue.util = {
    warn,
    extend,
    mergeOptions,
    defineReactive
  }

  Vue.set = set
  Vue.delete = del
  Vue.nextTick = nextTick

  Vue.options = Object.create(null)
  ASSET_TYPES.forEach(type => {
    Vue.options[type + 's'] = Object.create(null)
  })

  // this is used to identify the "base" constructor to extend all plain-object
  // components with in Weex's multi-instance scenarios.
  Vue.options._base = Vue

  extend(Vue.options.components, builtInComponents)

  initUse(Vue)
  initMixin(Vue)
  initExtend(Vue)
  initAssetRegisters(Vue)
}
所有全局的方法都在这里注册。我们关注 initMixin 方法,定义在 src/core/global-api/mixin.js:
import { mergeOptions } from '../util/index'

export function initMixin (Vue: GlobalAPI) {
  Vue.mixin = function (mixin: Object) {
    this.options = mergeOptions(this.options, mixin)
    return this
  }
}
至此我们发现了 Vue 如何挂载全局 mixin。
vuex 通过 beforeCreate Hook 实现为所有 vm 添加 $store 实例。 让我们先把 hook 的事情放一边。看一看 beforeCreate 如何实现。
在 src/core/instance/init.js 中:
export function initMixin (Vue: Class<Component>) {
  Vue.prototype._init = function (options?: Object) {
    // remove unrelated code
    initLifecycle(vm)
    initEvents(vm)
    initRender(vm)
    callHook(vm, 'beforeCreate')
    initInjections(vm) // resolve injections before data/props
    initState(vm)
    initProvide(vm) // resolve provide after data/props
    callHook(vm, 'created')

    // remove unrelated code
    if (vm.$options.el) {
      vm.$mount(vm.$options.el)
    }
  }
}
我们可以看到在 initRender 完成后,会调用 callHook(vm, 'beforeCreate')。而 init 实在 vue 实例化会执行的。
在 src/core/instance/lifecycle.js 中:
export function callHook (vm: Component, hook: string) {
  // #7573 disable dep collection when invoking lifecycle hooks
  pushTarget()
  const handlers = vm.$options[hook]
  if (handlers) {
    for (let i = 0, j = handlers.length; i < j; i++) {
      try {
        handlers[i].call(vm)
      } catch (e) {
        handleError(e, vm, `${hook} hook`)
      }
    }
  }
  if (vm._hasHookEvent) {
    vm.$emit('hook:' + hook)
  }
  popTarget()
}
在对 beforeCreate 执行 callHook 过程中,会先从 vue 实例的 options 中取出所有挂载的 handlers。
然后循环调用 call 方法执行所有的 hook:
handlers[i].call(vm)
由此我们可以了解到全局的 hook mixin 会和要 mixin 的组件合并 hook,最后生成一个数组。
回头再看:
import { mergeOptions } from '../util/index'

export function initMixin (Vue: GlobalAPI) {
  Vue.mixin = function (mixin: Object) {
    this.options = mergeOptions(this.options, mixin)
    return this
  }
}
this.options 默认是 vue 内置的一些 option:

mixin 就是你要混入的对象。我们来看一看 mergeOptions。定义在 src/core/util/options.js:
export function mergeOptions (
  parent: Object,
  child: Object,
  vm?: Component
): Object {
  if (process.env.NODE_ENV !== 'production') {
    checkComponents(child)
  }

  if (typeof child === 'function') {
    child = child.options
  }

  normalizeProps(child, vm)
  normalizeInject(child, vm)
  normalizeDirectives(child)
  const extendsFrom = child.extends
  if (extendsFrom) {
    parent = mergeOptions(parent, extendsFrom, vm)
  }
  if (child.mixins) {
    for (let i = 0, l = child.mixins.length; i < l; i++) {
      parent = mergeOptions(parent, child.mixins[i], vm)
    }
  }
  const options = {}
  let key
  for (key in parent) {
    mergeField(key)
  }
  for (key in child) {
    if (!hasOwn(parent, key)) {
      mergeField(key)
    }
  }
  function mergeField (key) {
    const strat = strats[key] || defaultStrat
    options[key] = strat(parent[key], child[key], vm, key)
  }
  return options
}
忽略不相干代码我们直接跳到:
  for (key in child) {
    if (!hasOwn(parent, key)) {
      mergeField(key)
    }
  }
  function mergeField (key) {
    const strat = strats[key] || defaultStrat
    options[key] = strat(parent[key], child[key], vm, key)
  }
此时 child 为 { beforeCreate: vuexInit }。走入到 mergeField 流程。mergeField 先取合并策略。
const strat = strats[key] || defaultStrat,相当于取 strats['beforeCreate'] 的合并策略。定义在通文件的上方:
/**
 * Hooks and props are merged as arrays.
 */
function mergeHook (
  parentVal: ?Array<Function>,
  childVal: ?Function | ?Array<Function>
): ?Array<Function> {
  return childVal
    ? parentVal
      ? parentVal.concat(childVal)
      : Array.isArray(childVal)
        ? childVal
        : [childVal]
    : parentVal
}

LIFECYCLE_HOOKS.forEach(hook => {
  strats[hook] = mergeHook
})

// src/shared/constants.js

export const LIFECYCLE_HOOKS = [
  'beforeCreate',
  'created',
  'beforeMount',
  'mounted',
  'beforeUpdate',
  'updated',
  'beforeDestroy',
  'destroyed',
  'activated',
  'deactivated',
  'errorCaptured'
]
在 mergeHook 中的合并策略是把所有的 hook 生成一个函数数组。其他相关策略可以在options 文件中查找(如果是对象,组件本身的会覆盖上层,data 会执行结果,返回再merge,hook则生成数组)。
mergeOptions 会多次调用,正如其注释说描述的那样:
/**
 * Merge two option objects into a new one.
 * Core utility used in both instantiation and inheritance.
 */
上面介绍了全局 mixin 的流程,我们来看下 实例化部分的流程。在 src/core/instance/init.js 中:
export function initMixin (Vue: Class<Component>) {
  Vue.prototype._init = function (options?: Object) {
    if (options && options._isComponent) {
      // optimize internal component instantiation
      // since dynamic options merging is pretty slow, and none of the
      // internal component options needs special treatment.
      initInternalComponent(vm, options)
    } else {
      vm.$options = mergeOptions(
        resolveConstructorOptions(vm.constructor),
        options || {},
        vm
      )
    }
    // expose real self
    vm._self = vm
    initLifecycle(vm)
    initEvents(vm)
    initRender(vm)
    callHook(vm, 'beforeCreate')
    initInjections(vm) // resolve injections before data/props
    initState(vm)
    initProvide(vm) // resolve provide after data/props
    callHook(vm, 'created')
    if (vm.$options.el) {
      vm.$mount(vm.$options.el)
    }
  }
}
由于 全局 mixin 通常放在最上方。所以一个 vue 实例,通常是内置的 options + 全局 mixin 的 options +用户自定义options,加上合并策略生成最终的 options.
那么对于 hook 来说是[mixinHook, userHook]。mixin 的hook 函数优先于用户自定义的 hook 执行。
在 组件中书写 mixin 过程中:
const Tooltip = {
  template: '#tooltip',
  mixins: [toggleMixin],
};
在 mergeOptions 的过程中有下面一段代码:
  if (child.mixins) {
    for (let i = 0, l = child.mixins.length; i < l; i++) {
      parent = mergeOptions(parent, child.mixins[i], vm)
    }
  }
当 tooltip 实例化时,会将对应的参数 merge 到实例中。
Vue.config.optionMergeStrategies.myOption = function (toVal, fromVal) {
  // return mergedVal
}
以上。
es module(简称 esm) 是 js 语言首次内置的模块语法。一个 esm 是一个文件。esm 有以下几个特点。
//------ lib.js ------
// 导出一个变量
export const sqrt = Math.sqrt;

// 导出一个函数
export function square(x) {
    return x * x;
}
export function diag(x, y) {
    return sqrt(square(x) + square(y));
}

//------ main.js ------
// 解构引用
import { square, diag } from 'lib';
// 利用 as 声明别名
import { square as sq, diag } from 'lib';
// 导出所有到一个变量
import * as lib from 'lib';
// 导出函数
export default function foo() {}
// 导出匿名函数
export default function () {}
// 导出 class
export default class Bar {}
// 导出匿名 class
// export default class {}

// import 导入

import foo from './foo.js'
default 导出不支持导出变量名。
举例:
// 语法错误,无法判定哪个默认导出
export default const a, b, c;
// 若 a 的值 为1,直接默认导出即可
export default 1;
不推荐混合两种导出模式。
// 执行模块内的代码,但不导出任何内容。
// 下面是以打包工具导入 less 文件的例子, 注意不要用 import('index.less')
import 'index.less'
esm 的静态分析特性导致我们不能按照运行时加载文件。但是这种需求有时又是必须的。所以有了新的提案引入了dynamic import。
if (cod === true) {
  // dynamic import 导出返回一个 promise, then 回调接受模块本身。
  import('./foo.js').then(foo => {
   // use foo do your work
 })
}
dynamic import 是 wepback 代码拆分的基础。
同事新上线了一个日志 sdk。运行一段时间后导致线上服务器打开太多文件而拒绝服务。
原因很简单每一个日志实例化,都持有了一个写文件的流,写完没有关闭。
随着业务运行导致服务器崩溃。
我们先来介绍一下 fd,一个进程所有打开的文件可以通过 fd 查询。
举例来说,当一个程序(进程)要写文件时,会像操作系统申请权限。操作系统会授予一个标记(通常是数字)来指向所描述的文件。这个标记就是 fd。
在 centos 中,一个进程的所有打开的 fd 在 /proc/进程id/fd 下。
比如一个 node 服务, 我们先找一下他的进程 id
ps aux | grep node

第二列就是进程 id。有了进程 id 就可以查一下具体的 fd
sudo ls -l /proc/29027/fd

当打开文件数量过多时,可以通过命令查看打开连接的总数:
sudo ls -l /proc/29027/fd | wc -l
从现象定位问题是比较简单的。上面写了一些排查还有测试过程。这里在描述一下解决方案:
在 nodejs 中,流是一个非常重要的概念。在日志这个场景中。我们打开一个流,日志直接往内部写就可以了。在进程退出或者日志路径切换过程中销毁并新建即可。而不需要每次都新建一个流。
所以用全局的流来写日志是一个不错的方案。即便是多进程,以及按等级分不同的流,它的复杂度也是 O(n)。高效并且可控。
类似 appendFile 这种 buffer 形式写文件,每次写入都需要打开关闭,不适合来做日志。
由深入浅出 Vue 响应式 (一) 和 (二) 的介绍,我们可以画一个大的代码结构图:

我们已经分析了 initState 中的 initData(图右上部分) ,它会将我们的 data 属性转换为 getter / setter。也分析了 mount 的流程,它会编译你的模板到 render 函数,并且创建一个渲染 watcher 来做响应更新。
computed 属性初始化(绿框部分)处于 initState 的流程,晚于 initData ,但早于 mount 的流程,总的来看是从 new Vue 到 dom 的大流程内。
我再次故意强调这个流程的重要性,因为从 Vue 响应式的角度来看,绕来绕去仍然是两个大流程:从 new Vue 到 dom 的初始化, 数据变化时如何响应(只不过computed 的变化是其依赖的变化,而不是 computed 属性本身)。拆分这两个阶段使得我们更好理解 Vue computed 属性的工作原理。
本文以下面的例子来讲解整个流程:
new Vue({
  template: '<div>wellcome {{fullName}}</div>',
  el: '#app',
  data() {
    return {
      firstName: 'fly',
      lastName: 'yang',
    };
  },
  computed: {
    fullName() {
      return this.firstName + this.lastName;
    },
  },
}); if (opts.computed) initComputed(vm, opts.computed)我们直接看 initComputed, 位于 src/core/instance/state.js:
const computedWatcherOptions = { lazy: true }
function initComputed (vm: Component, computed: Object) {
// $flow-disable-line
const watchers = vm._computedWatchers = Object.create(null)
// computed properties are just getters during SSR
const isSSR = isServerRendering()
for (const key in computed) {
const userDef = computed[key]
const getter = typeof userDef === 'function' ? userDef : userDef.get
if (process.env.NODE_ENV !== 'production' && getter == null) {
warn(
`Getter is missing for computed property "${key}".`,
vm
)
}
if (!isSSR) {
// create internal watcher for the computed property.
watchers[key] = new Watcher(
vm,
getter || noop,
noop,
computedWatcherOptions
)
}
// component-defined computed properties are already defined on the
// component prototype. We only need to define computed properties defined
// at instantiation here.
if (!(key in vm)) {
defineComputed(vm, key, userDef)
} else if (process.env.NODE_ENV !== 'production') {
if (key in vm.$data) {
warn(`The computed property "${key}" is already defined in data.`, vm)
} else if (vm.$options.props && key in vm.$options.props) {
warn(`The computed property "${key}" is already defined as a prop.`, vm)
}
}
}
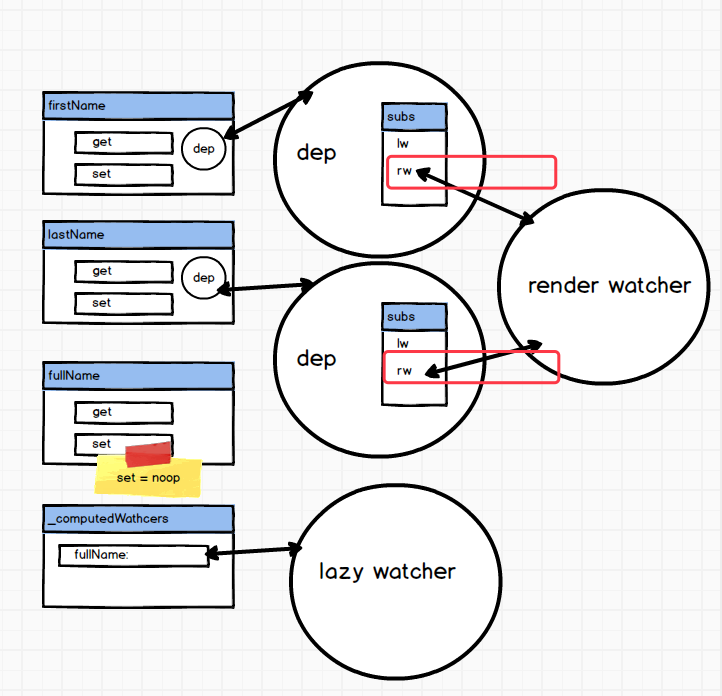
}首先给 vm 定义一个内部属性 _computedWatchers。然后对每一个 computed 属性新建一个 watcher。
由于我们只有一个计算属性,那么生成的结果如下:

我们知道在 mount 的流程里,会生成一个渲染 watcher。它和 computed watcher 是不同的,不同点是 computed watcher 是一个 lazy watcher,是不会立即求值的。我们来看代码部分是如何工作的。先简化一下上面的代码:
const computedWatcherOptions = { lazy: true }
function initComputed (vm: Component, computed: Object) {
  for (const key in computed) {
    if (!isSSR) {
      // create internal watcher for the computed property.
      watchers[key] = new Watcher(
        vm,
        getter || noop,
        noop,
        computedWatcherOptions
      )
    }
  }
}
我们在新建 watcher 时传入了 { lazy: true }。我们再来看下 watcher 部分的构造函数:
    if (options) {
      this.deep = !!options.deep
      this.user = !!options.user
      this.lazy = !!options.lazy
      this.sync = !!options.sync
      this.before = options.before
    } else {
      this.deep = this.user = this.lazy = this.sync = false
    }
   if (typeof expOrFn === 'function') {
      this.getter = expOrFn
    } else {
    }
    this.dirty = this.lazy // for lazy watchers
    this.value = this.lazy
      ? undefined
      : this.get()
首先将计算属性的函数赋值给 getter, 然后将 dirty 设置为true 。lazy watcher 和 普通的 watcher 的最大的区别在于,并不会直接求值(调用 this.get 方法),而是直接将 value 先设置为 undefined。
对计算属性设置好 lazy watcher 后,回到我们的流程里:
    if (!(key in vm)) {
      defineComputed(vm, key, userDef)
    } else if (process.env.NODE_ENV !== 'production') {
      if (key in vm.$data) {
        warn(`The computed property "${key}" is already defined in data.`, vm)
      } else if (vm.$options.props && key in vm.$options.props) {
        warn(`The computed property "${key}" is already defined as a prop.`, vm)
      }
    }
如果计算属性不在 vm 上调用 defineComputed。如果 vm 已经有,比如计算属性和 data、 prop 重复,开发环境会报一个 warning。
export function defineComputed (
  target: any,
  key: string,
  userDef: Object | Function
) {
  const shouldCache = !isServerRendering()
  if (typeof userDef === 'function') {
    sharedPropertyDefinition.get = shouldCache
      ? createComputedGetter(key)
      : createGetterInvoker(userDef)
    sharedPropertyDefinition.set = noop
  }
  // ...
  Object.defineProperty(target, key, sharedPropertyDefinition)
}

function createComputedGetter (key) {
  return function computedGetter () {
    const watcher = this._computedWatchers && this._computedWatchers[key]
    if (watcher) {
      if (watcher.dirty) {
        watcher.evaluate()
      }
      if (Dep.target) {
        watcher.depend()
      }
      return watcher.value
    }
  }
}

function createGetterInvoker(fn) {
  return function computedGetter () {
    return fn.call(this, this)
  }
}
defineComputed 逻辑比较简单,shouldCache 在非服务端渲染的情况下为 true。那么对'fullName' 来说,它的 getter 就是 createComputedGetter(key) 生成的 函数。函数的 getter 目前是不执行的,后续我们来了解下它的执行过程。
然后通过 Object.defineProperty(target, key, sharedPropertyDefinition) 直接在 vm上定义一个 fullName。虽然和 data 的proxy 流程不太一样,但是我们同样也可以在 vm 上访问计算属性了。
computed 的初始化流程到此就结束了。
由深入浅出 Vue 响应式 (一)可知:首先我们的模板会被编译成 render 函数:
ƒ anonymous(
) {
with(this){return _c('div',[_v("wellcome "+_s(fullName))])}
}
  var updateComponent;
  /* istanbul ignore if */
  if (config.performance && mark) {
    updateComponent = function () {
      var name = vm._name;
      var id = vm._uid;
      var startTag = "vue-perf-start:" + id;
      var endTag = "vue-perf-end:" + id;

      mark(startTag);
      var vnode = vm._render();
      mark(endTag);
      measure(("vue " + name + " render"), startTag, endTag);

      mark(startTag);
      vm._update(vnode, hydrating);
      mark(endTag);
      measure(("vue " + name + " patch"), startTag, endTag);
    };
  } else {
    updateComponent = function () {
      vm._update(vm._render(), hydrating);
    };
  }

  // we set this to vm._watcher inside the watcher's constructor
  // since the watcher's initial patch may call $forceUpdate (e.g. inside child
  // component's mounted hook), which relies on vm._watcher being already defined
  new Watcher(vm, updateComponent, noop, {
    before: function before () {
      if (vm._isMounted && !vm._isDestroyed) {
        callHook(vm, 'beforeUpdate');
      }
    }
  }, true /* isRenderWatcher */);
然后我们会执行一个渲染 watcher。渲染watcher 会立即求值,调用 其getter 方法。也就是会执行 updateComponent 方法。在 vm._render() 过程中,会执行我们编译出的 render 函数。这样就会调用我们的 fullName 的 get 访问器:
function computedGetter () {
    const watcher = this._computedWatchers && this._computedWatchers[key]
    if (watcher) {
      if (watcher.dirty) {
        watcher.evaluate()
      }
      if (Dep.target) {
        watcher.depend()
      }
      return watcher.value
    }
  }
由上述流程可知,我们定义了一个 lazy watcher , 那么 watcher 有值,并且 watcher.dirty === true。
然后调用watcher.evaluate 方法。evaluate方法本质上就是调用 get 方法进行求值。求值完成后会将 dirty 重置为 false。
这里我们也看到了 lazy 的概念,只有在访问到的时候才去求值。
  get () {
    pushTarget(this)
    let value
    const vm = this.vm
    try {
      value = this.getter.call(vm, vm)
    } catch (e) {
      if (this.user) {
        handleError(e, vm, `getter for watcher "${this.expression}"`)
      } else {
        throw e
      }
    } finally {
      // "touch" every property so they are all tracked as
      // dependencies for deep watching
      if (this.deep) {
        traverse(value)
      }
      popTarget()
      this.cleanupDeps()
    }
    return value
  }

  evaluate () {
    this.value = this.get()
    this.dirty = false
  }
我们看下 Watcher 的 get 方法,首先会 pushTarget(this)。将当前 lazy watcher 设置为 Dep.target。
然后调用 this.getter.call(vm,vm)。this.getter 就是我们的 函数
    fullName() {
      return this.firstName + this.lastName;
    },
此时会访问 this.firstName 和 this.lastName。走到他们的访问器属性:
    get: function reactiveGetter () {
      const value = getter ? getter.call(obj) : val
      if (Dep.target) {
        dep.depend()
        if (childOb) {
          childOb.dep.depend()
          if (Array.isArray(value)) {
            dependArray(value)
          }
        }
      }
      return value
    },
这时 firstName 和 lastName 便把计算属性的 lazy watcher 添加到自己的依赖收集 dep 里了。

然后执行 popTarget:
export function popTarget () {
  targetStack.pop()
  Dep.target = targetStack[targetStack.length - 1]
}
把 dep.Target 重置为渲染 watcher。
      if (Dep.target) {
        watcher.depend()
      }
depend () {
let i = this.deps.length
while (i--) {
this.deps[i].depend()
}
}Dep.prototype.depend = function depend () {
if (Dep.target) {
Dep.target.addDep(this);
}
};然后调用 watcher.depend 方法。将渲染watcher 添加到 firstName 和 lastName 的依赖收集 dep 内。
至此,从new Vue 到 dom过程, 依赖收集便做完了。
当我们将 firstName 改成 'li' 的时候:
vm.firstName = 'li'会走入 firstName 的 setter 内:
set: function reactiveSetter (newVal) {
var value = getter ? getter.call(obj) : val;
/* eslint-disable no-self-compare */
if (newVal === value || (newVal !== newVal && value !== value)) {
return
}
/* eslint-enable no-self-compare */
if (customSetter) {
customSetter();
}
// #7981: for accessor properties without setter
if (getter && !setter) { return }
if (setter) {
setter.call(obj, newVal);
} else {
val = newVal;
}
childOb = !shallow && observe(newVal);
dep.notify();
}setter 最终调用 dep.notify 方法。
notify () {
// stabilize the subscriber list first
const subs = this.subs.slice()
if (process.env.NODE_ENV !== 'production' && !config.async) {
// subs aren't sorted in scheduler if not running async
// we need to sort them now to make sure they fire in correct
// order
subs.sort((a, b) => a.id - b.id)
}
for (let i = 0, l = subs.length; i < l; i++) {
subs[i].update()
}
}notify 会按顺序调用所收集依赖的 update 方法。我们来看下 update 方法的代码:
update () {
/* istanbul ignore else */
if (this.lazy) {
this.dirty = true
} else if (this.sync) {
this.run()
} else {
queueWatcher(this)
}
}update 方法,如果遇到 lazy watcher,只会将 dirty 设置为 true。然后就没了。
如上面的流程可知,我们会有两个 watcher, 一个是 lazy watcher ,一个是渲染 watcher。只有渲染 watcher会进入到 watcher 的队列中。
computed 缓存通常是相对于 method 来说的。computed 只会依赖于其相关 data,而 method 每次都要调用生成。
package.json 不能够保证每次安装的依赖的唯一性。 举例来说:
A 模块:
{
"name": "A",
"version": "0.1.0",
"dependencies": {
"B": "<0.1.0"
}
}
依赖版本号小于 0.1.0 的 B 模块。
{
"name": "B",
"version": "0.0.1",
"dependencies": {
"C": "<0.1.0"
}
}
我们在开发的时候 B 模块时 0.0.1。下一次执行 npm install 的 B 模块发布了 0.0.2 版本。此时安装到的版本时 B 的 0.02 版。出现了不一致情况。
npm 推荐 sermer 的规则来管理自己的版本发布:
- MAJOR version when you make incompatible API changes,
- MINOR version when you add functionality in a backwards-compatible manner, and
- PATCH version when you make backwards-compatible bug fixes.
sermer 的目的是让代码升级到最新的 bug fix。但是,通常一个项目依赖成百上千个模块,你并不能确定哪一个模块会出问题。
一定要选择靠谱的开源模块 并不能解决你的忧虑。
相信别人,还是相信自己?从可控性角度来说,当然是相信自己。我们需要的是一个 single of truth 的依赖树。
npm 的 对待此问题的行动迟缓 (君不见 nodejs、io-js), facebook 开发出了 yarn 来解决npm 的 lock 和 cache 等问题。

版本锁定 与 install 等操作同步,保证了 node_modules 的一致性。实现了我们想要的 single of truth 的依赖树。
有竞争就有改进的动力。 npm 5 发布,默认支持 package-lock.json。
package-lock.json is automatically generated for any operations where npm modifies either the node_modules tree, or package.json. It describes the exact tree that was generated, such that subsequent installs are able to generate identical trees, regardless of intermediate dependency updates.
一个简单的例子:
{
"name": "mobi-pandaren-front-web",
"version": "0.0.0",
"lockfileVersion": 1,
"requires": true,
"dependencies": {
"align-text": {
"version": "0.1.4",
"resolved": "http://npm.pandatv.com/align-text/-/align-text-0.1.4.tgz",
"integrity": "sha1-DNkKVhCT810KmSVsIrcGlDP60Rc=",
"requires": {
"kind-of": "3.2.2",
"longest": "1.0.1",
"repeat-string": "1.6.1"
}
},
"amdefine": {
"version": "1.0.1",
"resolved": "http://npm.pandatv.com/amdefine/-/amdefine-1.0.1.tgz",
"integrity": "sha1-SlKCrBZHKek2Gbz9OtFR+BfOkfU="
},
"asap": {
"version": "2.0.6",
"resolved": "http://npm.pandatv.com/asap/-/asap-2.0.6.tgz",
"integrity": "sha1-5QNHYR1+aQlDIIu9r+vLwvuGbUY="
},
...
package-lock 描述了所有相关依赖的具体版本,并且会随着 npm install 变化而变化。弥补了 package.json 的不足。
npm-shrinkwrap.json 和 package-lock.json 内容是相同的。不同之处在于:
要使得避免“我这里是好的”这种情况。npm 5 是不错的选择。低版本推荐用 yarn 替代。
数据驱动开发是 Vue 的一大特征。
那么什么是数据驱动呢?在 Vue 的概念下,我们可以通过 data 来初始化页面;后续可以通过操作data 的值,来改变页面。整个过程都是围绕 data 来变化,所以称之为数据驱动,其中操作数据更新页面又常被称为响应式。
在 深入浅出 Vue 数据驱动 (一) 中,我们已经介绍了初始化的部分,本节主要介绍响应式是如何实现的。

由上图可知,我们改变了 message 的值,对应的 ui 就会发生变化。
App.message = 'Some one say hello to Vue!';
而在正常情况下,给属性赋值就是赋值,没有任何特别之处:
const a = { b: 1}
a.b = 2;
a.b // 输出 2
在 Vue 里面却变成 ui 变更,跟我们赋值操作做的看起来不是一件事儿。这说明 Vue 在把自己挂载到dom之前,做了一些工作。我们知道在 es5 中,可以通过 Object.defineProperty 来实现赋值 set 添加其他功能。

在 Vue 的源码分析过程中,一个重要的点就是 找到 Object.defineProperty 的定义。
另外 message 可以形成 getter 、computed 等,相互之间的依赖关系会越来越复杂。Vue 通过一个 Pub / Sub 模型来管理这些依赖。
总结一下上面的流程:
在挂载到 Dom 前, Vue 需要完成两件事:
虽然这部分也属于 new Vue 到 dom, 但是为了减小复杂度,我们在 深入浅出 Vue 数据驱动 (一) 中,故意省略了这部分。
在挂载到 dom 后:
以一个最简单的例子开始:
new Vue({
template: '<div>{{message}}</div>',
el: '#app',
data: {
message: 'Flyyang say hello to Vue!',
},
});下面分两个部分来分析源码。
我们直接从 Vue.prototype._init 开始(参考前一篇文章)
Vue.prototype._init__ = function( options ) {
//...
initLifecycle(vm);
initEvents(vm);
initRender(vm);
callHook(vm, 'beforeCreate');
initInjections(vm); // resolve injections before data/props
initState(vm);
initProvide(vm); // resolve provide after data/props
callHook(vm, 'created');
// ...
if (vm.$options.el) {
vm.$mount(vm.$options.el);
}
}找到 initState:
function initState (vm) {
debugger;
vm._watchers = [];
var opts = vm.$options;
if (opts.props) { initProps(vm, opts.props); }
if (opts.methods) { initMethods(vm, opts.methods); }
if (opts.data) {
initData(vm);
} else {
observe(vm._data = {}, true /* asRootData */);
}
if (opts.computed) { initComputed(vm, opts.computed); }
if (opts.watch && opts.watch !== nativeWatch) {
initWatch(vm, opts.watch);
}
}忽略不相干的代码,直接看 initData:
function initData (vm) {
var data = vm.$options.data;
data = vm._data = typeof data === 'function'
? getData(data, vm)
: data || {};
// ...
if (props && hasOwn(props, key)) {
warn(
"The data property \"" + key + "\" is already declared as a prop. " +
"Use prop default value instead.",
vm
);
} else if (!isReserved(key)) {
proxy(vm, "_data", key);
}
}
// observe data
observe(data, true /* asRootData */);
}initData 做了许多事情,我们主要关注三点:1. vm._data 2. proxy 3. observe。
vm._data 是 data 的内部表示。所以 proxy(vm, "_data", key); 是对 data 的访问代理。
function proxy (target, sourceKey, key) {
sharedPropertyDefinition.get = function proxyGetter () {
return this[sourceKey][key]
};
sharedPropertyDefinition.set = function proxySetter (val) {
this[sourceKey][key] = val;
};
Object.defineProperty(target, key, sharedPropertyDefinition);
}针对我们上面的例子,vm.message 访问代理到 vm._data.message。
在开始分析 observe 之前,我们先梳理一下到此为止的整个流程,如图所示:

可以看出我们在逐步细化这个流程,比如在第二步,不仅有 initData, 还有initProps。我们故意忽略了这个细节,方便我们整体去把控流程。
function observe (value, asRootData) {
if (!isObject(value) || value instanceof VNode) {
return
}
if (hasOwn(value, '__ob__') && value.__ob__ instanceof Observer) {
ob = value.__ob__;
} else if (
shouldObserve &&
!isServerRendering() &&
(Array.isArray(value) || isPlainObject(value)) &&
Object.isExtensible(value) &&
!value._isVue
) {
ob = new Observer(value);
}
if (asRootData && ob) {
ob.vmCount++;
}
return ob
}同样的忽略所有相关细节, observe 函数主要作用是建立一个 Observer 类。如果传给 observe 的不是一个对象的话,返回 undefined,否则返回一个 Observer 实例(后续会利用这个特性做深度响应式处理)。
export class Observer {
value: any;
dep: Dep;
vmCount: number; // number of vms that have this object as root $data
constructor (value: any) {
this.value = value
this.dep = new Dep()
this.vmCount = 0
def(value, '__ob__', this)
if (Array.isArray(value)) {
if (hasProto) {
protoAugment(value, arrayMethods)
} else {
copyAugment(value, arrayMethods, arrayKeys)
}
this.observeArray(value)
} else {
this.walk(value)
}
}
}此时传给 observer 的 value 为:{ message: 'Flyyang say hello to Vue '}。
将会走到 this.walk(value):
/**
* Walk through all properties and convert them into
* getter/setters. This method should only be called when
* value type is Object.
*/
walk (obj: Object) {
const keys = Object.keys(obj)
for (let i = 0; i < keys.length; i++) {
defineReactive(obj, keys[i])
}
}walk 的作用是循环所有的对象属性,转换为 geter/setter。转换操作在 defineReactive 里:
function defineReactive (
obj,
key,
val,
customSetter,
shallow
) {
var dep = new Dep();
var childOb = !shallow && observe(val);
Object.defineProperty(obj, key, {
enumerable: true,
configurable: true,
get: function reactiveGetter () {
var value = getter ? getter.call(obj) : val;
if (Dep.target) {
dep.depend();
if (childOb) {
childOb.dep.depend();
if (Array.isArray(value)) {
dependArray(value);
}
}
}
return value
},
set: function reactiveSetter (newVal) {
var value = getter ? getter.call(obj) : val;
/* eslint-disable no-self-compare */
if (newVal === value || (newVal !== newVal && value !== value)) {
return
}
/* eslint-enable no-self-compare */
if (customSetter) {
customSetter();
}
// #7981: for accessor properties without setter
if (getter && !setter) { return }
if (setter) {
setter.call(obj, newVal);
} else {
val = newVal;
}
childOb = !shallow && observe(newVal);
dep.notify();
}
});
}饶了这么一大圈,终于看到了 Object.defineProperty 的庐山真面目。我们将我们的参数代入进去:
首先新建了一个 dep,我们先理解为依赖管理器。然后定义一个 childOb, 也就是 子的 Obsever。
由上面 observe 函数可知,当传入的 value 不是对象时,返回 undefind。所以 childOb 应为 false。
如果我们定义的 data 包含对象时,会递归调用 observe ,重走上面的流程知道 value 非 object。对这一块的理解非常重要。
由于这里只是定义 getter setter,我们先将分析到此为止。回忆一下我们的 init 方法:

我们在 initState 阶段对数据做了响应式处理。然后走入 mount 的流程。由上一节可知,在 mount 的流程里
会新建一个 Watcher:
new Watcher(vm, updateComponent, noop, {
before: function before () {
if (vm._isMounted && !vm._isDestroyed) {
callHook(vm, 'beforeUpdate');
}
}
}, true /* isRenderWatcher */);/**
* A watcher parses an expression, collects dependencies,
* and fires callback when the expression value changes.
* This is used for both the $watch() api and directives.
*/
export default class Watcher {
constructor (
vm: Component,
expOrFn: string | Function,
cb: Function,
options?: ?Object,
isRenderWatcher?: boolean
) {
// parse expression for getter
if (typeof expOrFn === 'function') {
this.getter = expOrFn
} else {
this.getter = parsePath(expOrFn)
if (!this.getter) {
this.getter = noop
process.env.NODE_ENV !== 'production' && warn(
`Failed watching path: "${expOrFn}" ` +
'Watcher only accepts simple dot-delimited paths. ' +
'For full control, use a function instead.',
vm
)
}
}
this.value = this.lazy
? undefined
: this.get()
}
/**
* Evaluate the getter, and re-collect dependencies.
*/
get () {
pushTarget(this)
// ...
value = this.getter.call(vm, vm)
// ...
}我们来回忆一下上一节中的流程,新建一个 wathcer, 然后构造函数中将 updateComponent 付给 watcher 的 getter。最后 在赋值 this.value 中调用 get 方法,同时执行 pushTarget 和 updateComponent。
我们先来看 pushTarget
// The current target watcher being evaluated.
// This is globally unique because only one watcher
// can be evaluated at a time.
Dep.target = null
const targetStack = []
export function pushTarget (target: ?Watcher) {
targetStack.push(target)
Dep.target = target
}
export function popTarget () {
targetStack.pop()
Dep.target = targetStack[targetStack.length - 1]
}pushTarget(this) 将当前执行的 Watcher 实例 当做 Dep 对象的静态属性。这种黑科技相当于我在一个对象上面挂了一个全局变量。
然后我们看下 updateComponent 部分。根据上篇文章介绍,在生成 dom 的过程中,会先将模板变异成 render 函数,并执行render 函数:
在 /src/core/instance/render.js 中:
Vue.prototype._render = function (): VNode {
const vm: Component = this
const { render, _parentVnode } = vm.$options
// ...
vnode = render.call(vm._renderProxy, vm.$createElement)
// ...
return vnode
}
}
vm._renderProxy 其实就是 vm 本身(或者proxy 过得 vm)。那么我们上面示例模板会编出什么代码呢?

如上图所示,render 函数中访问了 message 属性。我们知道它是被代理过得,并且也转换了 getter /setter。
访问意味着会走到其get 访问器。
function defineReactive (
obj,
key,
val,
customSetter,
shallow
) {
var dep = new Dep();
var childOb = !shallow && observe(val);
Object.defineProperty(obj, key, {
enumerable: true,
configurable: true,
get: function reactiveGetter () {
var value = getter ? getter.call(obj) : val;
if (Dep.target) {
dep.depend();
if (childOb) {
childOb.dep.depend();
if (Array.isArray(value)) {
dependArray(value);
}
}
}
return value
},
}我们看 Dep.target ,在新建 Watcher 的时候,我们把当前 Watcher 赋值给了 Dep 对象的静态属性 target,那么此时 Dep.target 是有值的。
我们只有一个 属性 message 并且其值不是对象也不是 Array。那么只会执行 dep.depend()方法:
Dep.prototype.depend = function depend () {
  if (Dep.target) {
    Dep.target.addDep(this);
  }
};
其作用是把 dep 实例 添加到 watcher 上。
// watcher.js
addDep (dep: Dep) {
const id = dep.id
if (!this.newDepIds.has(id)) {
this.newDepIds.add(id)
this.newDeps.push(dep)
if (!this.depIds.has(id)) {
dep.addSub(this)
}
}
} // dep
addSub (sub: Watcher) {
this.subs.push(sub)
}同时又将 watcher 添加到添加到 dep.subs 内。至此依赖收集已经做完了。当前几个对象的关系用图片来表示为:

我们这里只描述了一个属性对应的 dep 。当你初始化的属性越多,包含嵌套对象和数组越多,那么生成的 dep 实例也就越多。
关于将会有多少个 watcher,我们后续章节再讨论。
接下来分析当我们修改 App.message 时会发生什么:
App.message = 'Some one say hello to Vue'由上面的分析可知 App.message 时代理过后的属性,最终会走到属性的 setter:
function defineReactive (
obj,
key,
val,
customSetter,
shallow
) {
var dep = new Dep();
var childOb = !shallow && observe(val);
Object.defineProperty(obj, key, {
enumerable: true,
configurable: true,
    set: function reactiveSetter (newVal) {
      var value = getter ? getter.call(obj) : val;
      /* eslint-disable no-self-compare */
      if (newVal === value || (newVal !== newVal && value !== value)) {
        return
      }
      /* eslint-enable no-self-compare */
      if (customSetter) {
        customSetter();
      }
      // #7981: for accessor properties without setter
      if (getter && !setter) { return }
      if (setter) {
        setter.call(obj, newVal);
      } else {
        val = newVal;
      }
      childOb = !shallow && observe(newVal);
      dep.notify();
    }
});
}我们关注两个细节:
childOb = !shallow && observe(newVal);当你 set 一个新值时,同样也会判断是否为对象数组等,仍然会走一遍 observe 的流程。
最后调用 dep.notify()。
// dep.js
  notify () {
    // stabilize the subscriber list first
    const subs = this.subs.slice()
    if (process.env.NODE_ENV !== 'production' && !config.async) {
      // subs aren't sorted in scheduler if not running async
      // we need to sort them now to make sure they fire in correct
      // order
      subs.sort((a, b) => a.id - b.id)
    }
    for (let i = 0, l = subs.length; i < l; i++) {
      subs[i].update()
    }
}由依赖分析小节可知, sub 内存放的是 watcher 实例。notify 的作用是按顺序触发所有 watcher。
// watcher.js
  update () {
    /* istanbul ignore else */
    if (this.lazy) {
      this.dirty = true
    } else if (this.sync) {
      this.run()
    } else {
      queueWatcher(this)
    }
}忽略特殊选项,将会执行到 queueWatcher。 在 scheduler.js 中
/**
 * Push a watcher into the watcher queue.
 * Jobs with duplicate IDs will be skipped unless it's
 * pushed when the queue is being flushed.
 */
export function queueWatcher (watcher: Watcher) {
  const id = watcher.id
  if (has[id] == null) {
    has[id] = true
    if (!flushing) {
      queue.push(watcher)
    } else {
      // if already flushing, splice the watcher based on its id
      // if already past its id, it will be run next immediately.
      let i = queue.length - 1
      while (i > index && queue[i].id > watcher.id) {
        i--
      }
      queue.splice(i + 1, 0, watcher)
    }
    // queue the flush
    if (!waiting) {
      waiting = true

      if (process.env.NODE_ENV !== 'production' && !config.async) {
        flushSchedulerQueue()
        return
      }
      nextTick(flushSchedulerQueue)
    }
  }
}
queueWatcher 作用是,如果当前没有在 flushing 的状态,那么就进入队列排队。如果在的话,在 nextTick 阶段则 flush 队列。
  // core/util/next-tick.js

export function nextTick (cb?: Function, ctx?: Object) {
  let _resolve
  callbacks.push(() => {
    if (cb) {
      try {
        cb.call(ctx)
      } catch (e) {
        handleError(e, ctx, 'nextTick')
      }
    } else if (_resolve) {
      _resolve(ctx)
    }
  })
  if (!pending) {
    pending = true
    timerFunc()
  }
  // $flow-disable-line
  if (!cb && typeof Promise !== 'undefined') {
    return new Promise(resolve => {
      _resolve = resolve
    })
  }
}
我们不对 nextTick 做过多分析。以一个最简单的例子来说明,假设nextTick 是 new 了一个 Promise,那么他的回调会在下一个 event loop 过程中执行。也就是说要走一遍 js 的 event loop 流程。
依赖变化并不会直接更新 dom ,而是先入队做处理。在 nextTick 更新。
接下来看一下 nextTick 的 cb 函数: flushSchedulerQueue。
// scheduler.js

function flushSchedulerQueue () {
  // ...
  for (index = 0; index < queue.length; index++) {
    watcher = queue[index]
    if (watcher.before) {
      watcher.before()
    }
    id = watcher.id
    has[id] = null
    watcher.run()
    // in dev build, check and stop circular updates.
    if (process.env.NODE_ENV !== 'production' && has[id] != null) {
      circular[id] = (circular[id] || 0) + 1
      if (circular[id] > MAX_UPDATE_COUNT) {
        warn(
          'You may have an infinite update loop ' + (
            watcher.user
              ? `in watcher with expression "${watcher.expression}"`
              : `in a component render function.`
          ),
          watcher.vm
        )
        break
      }
    }
  }

  // call component updated and activated hooks
  callActivatedHooks(activatedQueue)
  callUpdatedHooks(updatedQueue)
}
flush 的过程中会调用 watcher 的 run 方法:
// watcher.js

  run () {
    if (this.active) {
      const value = this.get()
    // ...
  }
run 方法会调用 this.get() 。其实就是我们的 updateComponent 函数。这样就回到了我们上一章中的流程。
唯一不同的是我们的 message 变了。此时生成的 vnode 也就变了:

剩下的就是做 dom diff 和 patch,最后更新页面。
以上。
由深入浅出 Vue 构建流程可知,当我们使用:
import Vue from 'Vue'时,默认查找的文件是 dist/vue.runtime.esm.js。而构建出这个文件的入口文件是:src/platforms/web/entry-runtime.js。
runtime 版本是不包含 compiler 的,也就是没有编译 Vue 模板的过程。通常编译的工作交给 vue-loader,也就是 webpack 来代劳。但是从分析源码的角度来看,我们还是有必要要了解一下编译过程。所以我们从带 compiler 的入口开始:
// 源码分析从此开始
src/platforms/web/entry-runtime-with-compiler.js在 Vue 里,一个简单的 Hello World 程序如下:
<div id="app">
  {{ message }}
</div>
var app = new Vue({
el: '#app',
data: {
message: 'Hello Vue!'
}
})我们可以注意到一个通常的 Vue 应用程序,是通过 new Vue 开始的。我们来看看 Vue 到底是什么。

由上图的调用流程可知 Vue 的构造函数位于 src/core/instance/index.js:
import { initMixin } from './init'
import { stateMixin } from './state'
import { renderMixin } from './render'
import { eventsMixin } from './events'
import { lifecycleMixin } from './lifecycle'
import { warn } from '../util/index'

function Vue (options) {
  if (process.env.NODE_ENV !== 'production' &&
    !(this instanceof Vue)
  ) {
    warn('Vue is a constructor and should be called with the `new` keyword')
  }
  this._init(options)
}

initMixin(Vue)
stateMixin(Vue)
eventsMixin(Vue)
lifecycleMixin(Vue)
renderMixin(Vue)

export default Vue
我们绕了这么一大圈(如下图),终于找到了Vue 的原型。这样写有什么好处呢?

这样写最大的好处是功能拆分,可以按功能模块来划分,逐步扩展 Vue 的功能。
比如在 core/index.js 中,我们扩展了 Global API, 在 instance/index.js 中 对 Vue做了很多 mixin。
Vue 的源码生成的整个过程中,有一个非常重要的点是,将各种工具函数,实例方法等挂载在 Vue 中。
挂载的形式主要有三种
比如 Vue.use 用来初始化插件,Vue.config 用来配置 Vue 的特性。基本上可以对应 api 文档中的 Global API.
// src/core/gloal-api/use.js

  Vue.use = function (plugin: Function | Object) {
    //
    return this
}比如 $on, $off, $nextTick, $watch, $set, $delete 等。通用功能放在原型是一个时间换空间的做法。
项目越大,业务越负杂,内存越节省,而原型查找的效率损失可以忽略不计。
如 vm.$slots等。Vue 在实现过程中还使用了很多内部属性,在整个编码过程中使用。

第二种和第三种挂载形式对应于文档实例属性方法等章节。
以上。
很多同学看源码分析,一般直接从 src 看起。像 Vuejs 这种项目,目录繁杂,入口都很难找到。不从中拎出几个线头来,很难从全局把握源码的流程。
理解源码是如何构建的,能帮助我们梳理这个过程。
package.json 开始我们关注三个字段:
默认 require('vue') , import('vue') 会读取的文件。格式为 commonjs。
webpack 2 以上会默认读 module 字段指定的文件。esm 模块方便做 tree shaking。
现在很多的包使用 npm scripts 来做构建流程脚本。我们可以看到 vue 内部有许多研发流程脚本在 scripts字段内, 我们关注 build 部分代码:
    "build": "node scripts/build.js",
    "build:ssr": "npm run build -- web-runtime-cjs,web-server-renderer",
    "build:weex": "npm run build -- weex",
会发现所有构建相关的逻辑都在 scripts/build.js 内。
在分析 scripts/build.js 脚本之前,我们先来简单介绍一下 rollup。
业界有一种说法:webpack 适合打包应用程序,而 rollup 适合打包应用库。rollup 是一个以 利用 es 模块特性,treeshaking 起家的库,相比webpack ,可以打包出各种模式(cmd, umd, es)的类库。
而 vue 的源码就是用 es 模块编写的,它的构建脚本整个都是围绕如何组合 rollup 的配置。
打包工具的通常关注的配置是,入口是什么,输出文件放哪里,输出什么格式,用什么插件,不同的环境怎么处理。vue 的构建脚本并不例外。
如上所诉,vue 的构建脚本就是围绕 rollup ,做一些自定义配置。相关代码在:
scripts/build.js 主构建流程scripts/alias.js 文件路径 aliasscripts/config.js 生成 rollup 配置我们简要分析一下这几个文件。在 scripts/build.js 中:
function buildEntry (config) {
  const output = config.output
  const { file, banner } = output
  const isProd = /(min|prod)\.js$/.test(file)
  return rollup.rollup(config)
    .then(bundle => bundle.generate(output))
    .then(({ output: [{ code }] }) => {
      if (isProd) {
        const minified = (banner ? banner + '\n' : '') + terser.minify(code, {
          toplevel: true,
          output: {
            ascii_only: true
          },
          compress: {
            pure_funcs: ['makeMap']
          }
        }).code
        return write(file, minified, true)
      } else {
        return write(file, code)
      }
    })
}
buildEntry 方法暴露了 vue 的构建流程是依赖 rollup 的。
在 scripts/config.js 中:
const resolve = p => {
  const base = p.split('/')[0]
  if (aliases[base]) {
    return path.resolve(aliases[base], p.slice(base.length + 1))
  } else {
    return path.resolve(__dirname, '../', p)
  }
}
const builds = {
  // Runtime only ES modules build (for bundlers)
  'web-runtime-esm': {
    entry: resolve('web/entry-runtime.js'),
    dest: resolve('dist/vue.runtime.esm.js'),
    format: 'es',
    banner
  },
}
以生成的 es 模块为例,他的入口文件为 resolve('web/entry-runtime.js')。
config 的 resolve 遇到在 alias 中的文件会特殊处理。alias 定义在 scripts/alias.js。
const resolve = p => path.resolve(__dirname, '../', p)

module.exports = {
  vue: resolve('src/platforms/web/entry-runtime-with-compiler'),
  compiler: resolve('src/compiler'),
  core: resolve('src/core'),
  shared: resolve('src/shared'),
  web: resolve('src/platforms/web'),
  weex: resolve('src/platforms/weex'),
  server: resolve('src/server'),
  sfc: resolve('src/sfc')
}
这些alias 会贯穿整个 vue 源码中。resolve(web/entry-runtime.js) 最终地址位于 src/platforms/web/entry-runtime.js。
Vue 的 入口 都在 plaforms 的 web 、 weex、sever 下。具体参考 scripts/config.js。
出口位于 dist 和 packages 内,其中 packages 为独立发布的包。下图标注了 web 和 weex 部分的入口。

找到这个入口文件之后,我们就拿到了分析源码的一条绳。从此文件开始,便可以分析 Vue 的源码是如何工作的。
Vue nextTick 是 Vue 内部非常重要的机制。本文假设你已经了解 microtask 和 macrotask 的区别,将从以下三个角度来介绍 nextTick:
Vue.nextTick 定义于 src/core/global-api/index.js:
export function initGlobalAPI (Vue: GlobalAPI) {
  // ...
  Vue.set = set
  Vue.delete = del
  Vue.nextTick = nextTick
  // ...
}
我们很少在全局中使用 nextTick 处理业务,但要知道 Vue 在初始化 globalApi 的时候暴露了这个方法。
由深入浅出 Vue 实例化 一节中可知,最终的构造函数位于 src/core/instance/index.js:
import { renderMixin } from './render'

function Vue (options) {
  if (process.env.NODE_ENV !== 'production' &&
    !(this instanceof Vue)
  ) {
    warn('Vue is a constructor and should be called with the `new` keyword')
  }
  this._init(options)
}

initMixin(Vue)
stateMixin(Vue)
eventsMixin(Vue)
lifecycleMixin(Vue)
renderMixin(Vue)
在 renderMixin(Vue) 中定义了实例方法:
export function renderMixin (Vue: Class<Component>) {
  // install runtime convenience helpers
  installRenderHelpers(Vue.prototype)

  Vue.prototype.$nextTick = function (fn: Function) {
    return nextTick(fn, this)
  }
  // ...
}
实例方法在我们的业务代码中相对常见。用来解决在数据变更后,“立即”获取 dom 更新后的结果。
注意这里面为 callback 传入了上下文 this,也就是 Vue 实例。
所以在下面的例子中可以直接访问 Vue 实例内容。
new Vue({
  // ...
  methods: {
    // ...
    example: function () {
      // modify data
      this.message = 'changed'
      // DOM is not updated yet
      this.$nextTick(function () {
        // DOM is now updated
        // `this` is bound to the current instance
        this.doSomethingElse()
      })
    }
  }
})
nextTick 源码位于 src/core/util/next-tick.js, 在2.6.10 的版本中,代码如下:
import { noop } from 'shared/util'
import { handleError } from './error'
import { isIE, isIOS, isNative } from './env'

export let isUsingMicroTask = false

const callbacks = []
let pending = false

function flushCallbacks () {
  pending = false
  const copies = callbacks.slice(0)
  callbacks.length = 0
  for (let i = 0; i < copies.length; i++) {
    copies[i]()
  }
}

let timerFunc

// The nextTick behavior leverages the microtask queue, which can be accessed
// via either native Promise.then or MutationObserver.
// MutationObserver has wider support, however it is seriously bugged in
// UIWebView in iOS >= 9.3.3 when triggered in touch event handlers. It
// completely stops working after triggering a few times... so, if native
// Promise is available, we will use it:
/* istanbul ignore next, $flow-disable-line */
if (typeof Promise !== 'undefined' && isNative(Promise)) {
  const p = Promise.resolve()
  timerFunc = () => {
    p.then(flushCallbacks)
    // In problematic UIWebViews, Promise.then doesn't completely break, but
    // it can get stuck in a weird state where callbacks are pushed into the
    // microtask queue but the queue isn't being flushed, until the browser
    // needs to do some other work, e.g. handle a timer. Therefore we can
    // "force" the microtask queue to be flushed by adding an empty timer.
    if (isIOS) setTimeout(noop)
  }
  isUsingMicroTask = true
} else if (!isIE && typeof MutationObserver !== 'undefined' && (
  isNative(MutationObserver) ||
  // PhantomJS and iOS 7.x
  MutationObserver.toString() === '[object MutationObserverConstructor]'
)) {
  // Use MutationObserver where native Promise is not available,
  // e.g. PhantomJS, iOS7, Android 4.4
  // (#6466 MutationObserver is unreliable in IE11)
  let counter = 1
  const observer = new MutationObserver(flushCallbacks)
  const textNode = document.createTextNode(String(counter))
  observer.observe(textNode, {
    characterData: true
  })
  timerFunc = () => {
    counter = (counter + 1) % 2
    textNode.data = String(counter)
  }
  isUsingMicroTask = true
} else if (typeof setImmediate !== 'undefined' && isNative(setImmediate)) {
  // Fallback to setImmediate.
  // Techinically it leverages the (macro) task queue,
  // but it is still a better choice than setTimeout.
  timerFunc = () => {
    setImmediate(flushCallbacks)
  }
} else {
  // Fallback to setTimeout.
  timerFunc = () => {
    setTimeout(flushCallbacks, 0)
  }
}

export function nextTick (cb?: Function, ctx?: Object) {
  let _resolve
  callbacks.push(() => {
    if (cb) {
      try {
        cb.call(ctx)
      } catch (e) {
        handleError(e, ctx, 'nextTick')
      }
    } else if (_resolve) {
      _resolve(ctx)
    }
  })
  if (!pending) {
    pending = true
    timerFunc()
  }
  // $flow-disable-line
  if (!cb && typeof Promise !== 'undefined') {
    return new Promise(resolve => {
      _resolve = resolve
    })
  }
}
我们忽略变量定义和函数定义部分。那么 nextTick 主要由两部分组成。一个是选择 microtask 还是 macrotask:
我们以 4 为例子,最终将生成一个函数 timerFunc:
  timerFunc = () => {
    setTimeout(flushCallbacks, 0)
  }
另外就是 nextTick 函数的定义。
nextTick 接收两个参数,cb 和上下文参数。首先将 cb 包装成一个匿名函数,push 到 callbacks 数组里。
如果当前 nextTick 在执行的话,就表示处于 pending 状态。如果非 pending 状态,则执行我们的 timerFunc。而 timeFunc 则会调用 flushCallbacks,执行所有的 callback 函数。
了解了 nextTick 行为后,我们来回顾一下深入浅出 Vue 数据驱动 (二),中 nextTick 在派发更新的流程中,是如何调用的。
/**
 * Push a watcher into the watcher queue.
 * Jobs with duplicate IDs will be skipped unless it's
 * pushed when the queue is being flushed.
 */
export function queueWatcher (watcher: Watcher) {
  const id = watcher.id
  if (has[id] == null) {
    has[id] = true
    if (!flushing) {
      queue.push(watcher)
    } else {
      // if already flushing, splice the watcher based on its id
      // if already past its id, it will be run next immediately.
      let i = queue.length - 1
      while (i > index && queue[i].id > watcher.id) {
        i--
      }
      queue.splice(i + 1, 0, watcher)
    }
    // queue the flush
    if (!waiting) {
      waiting = true

      if (process.env.NODE_ENV !== 'production' && !config.async) {
        flushSchedulerQueue()
        return
      }
      nextTick(flushSchedulerQueue)
    }
  }
}
当我们改变了数据时,watcher 并不会立即出发,而是会放到队列里。以防重复触发一个 watcher,造成的不必要的 dom 更新。并且当前 tick 的变更会在 nextTick 去响应,在 nextTick 的流程里更新 dom。
除了在数据变化时会调用 nextTick,另外一种场景是手动调用 nextTick。我们仍以上面的例子为例:
new Vue({
  // ...
  methods: {
    // ...
    example: function () {
      // modify data
      this.message = 'changed'
      // DOM is not updated yet
      this.$nextTick(function () {
        // DOM is now updated
        // `this` is bound to the current instance
        this.doSomethingElse()
      })
    }
  }
})
当我们改变了 this.message 时,会调用 nextTick,最终更新 dom。如果以同步访问的形式是拿不到变更后的 dom 的。所以新开一个 nextTick 来做 dom 更新之后的操作。
npm set registry https://r.npm.taobao.org # 注册模块镜像
npm set disturl https://npm.taobao.org/dist # node-gyp 编译依赖的 node 源码镜像

#以下选择添加
npm set sass_binary_site https://npm.taobao.org/mirrors/node-sass # node-sass 二进制包镜像
npm set electron_mirror https://npm.taobao.org/mirrors/electron/ # electron 二进制包镜像
npm set puppeteer_download_host https://npm.taobao.org/mirrors # puppeteer 二进制包镜像
npm set chromedriver_cdnurl https://npm.taobao.org/mirrors/chromedriver # chromedriver 二进制包镜像
npm set operadriver_cdnurl https://npm.taobao.org/mirrors/operadriver # operadriver 二进制包镜像
npm set phantomjs_cdnurl https://npm.taobao.org/mirrors/phantomjs # phantomjs 二进制包镜像
npm set selenium_cdnurl https://npm.taobao.org/mirrors/selenium # selenium 二进制包镜像
npm set node_inspector_cdnurl https://npm.taobao.org/mirrors/node-inspector # node-inspector 二进制包镜像
npm set selenium_cdnurl=http://npm.taobao.org/mirrors/selenium
npm set node_inspector_cdnurl=https://npm.taobao.org/mirrors/node-inspector
npm cache clean --force # 清空缓存数据驱动开发,与传统的 jQuery 开发相比,有很多优势。最明显的两点是:
在做UI 编程时,通常有两个流程需要考虑:
这是一个动态的时间序的考量。对应在 Vue 的流程中:

本节主要分析从 new Vue 到最终 dom 的过程。
我们以最简单的 Hello world 示例:
import Vue from 'vue/dist/vue.esm';

new Vue({
  template: '<div>{{message}}</div>',
  el: `#app`,
  data: {
    message: 'Flyyang say hello to Vue.js!',
  },
});
由深入浅出 Vue 实例化 可知,构造函数 Vue 位于 src/core/instance/index.js:
import { initMixin } from './init'

function Vue (options) {
  if (process.env.NODE_ENV !== 'production' &&
    !(this instanceof Vue)
  ) {
    warn('Vue is a constructor and should be called with the `new` keyword')
  }
  this._init(options)
}

initMixin(Vue)

export default Vue
当我们调用 new Vue 的时候,会使用内部方法 _init 。定义在 initMixin 内。注意由于 js 是动态语言,我们可以先使用,后定义。在 src/core/instance/init.js
export function initMixin (Vue: Class<Component>) {
  Vue.prototype._init = function (options?: Object) {
    // expose real self
    vm._self = vm
    initLifecycle(vm)
    initEvents(vm)
    initRender(vm)
    callHook(vm, 'beforeCreate')
    initInjections(vm) // resolve injections before data/props
    initState(vm)
    initProvide(vm) // resolve provide after data/props
    callHook(vm, 'created')

    if (vm.$options.el) {
      vm.$mount(vm.$options.el)
    }
  }
}
initMixin 定义了一个原型方法。做了一些初始化操作,然后调用 $mount 方法。
$mount 方法是一个平台无关的方法。无论是 weex 运行时,还是 web 的运行时,都需要有 $mount 方法。相当于一个运行时接口。
我们研究 entry-runtime-with-compiler.js 时,发现有如下代码:
import Vue from './runtime/index'

const mount = Vue.prototype.$mount
Vue.prototype.$mount = function (
  el?: string | Element,
  hydrating?: boolean
): Component {
  el = el && query(el)
 if (template) {
      const { render, staticRenderFns } = compileToFunctions(template, {
        outputSourceRange: process.env.NODE_ENV !== 'production',
        shouldDecodeNewlines,
        shouldDecodeNewlinesForHref,
        delimiters: options.delimiters,
        comments: options.comments
      }, this)
  }
  return mount.call(this, el, hydrating)
}
在 import Vue from './runtime/index' 时,已经定义了 $mount 方法,为什么在这里要缓存并重写呢?
entry-runtime.js 。compileToFunctions 会将模板 <div>{{message}}</div> 编译成 render function。 Vue2.0 之后都会变成 render fucntion。细节在后续章节详述。

由上图可知,$mount 会调用 mountComponent 方法。找到 mountComponent 其实就已经找到终点了。
什么?这么简单?也不是,还有一些细节需要补充。
export function mountComponent (
  vm: Component,
  el: ?Element,
  hydrating?: boolean
): Component {
  let updateComponent
    updateComponent = () => {
      vm._update(vm._render(), hydrating)
    }

  // we set this to vm._watcher inside the watcher's constructor
  // since the watcher's initial patch may call $forceUpdate (e.g. inside child
  // component's mounted hook), which relies on vm._watcher being already defined
  new Watcher(vm, updateComponent, noop, {
    before () {
      if (vm._isMounted && !vm._isDestroyed) {
        callHook(vm, 'beforeUpdate')
      }
    }
  }, true /* isRenderWatcher */)

  return vm
}
mountComponent 定义了一个 updateComponent 方法,然后新建了一个 Watcher 实例。
export default class Watcher {
  constructor (
    vm: Component,
    expOrFn: string | Function,
    cb: Function,
    options?: ?Object,
    isRenderWatcher?: boolean
  ) {

    if (typeof expOrFn === 'function') {
      this.getter = expOrFn
    }
    this.value = this.lazy
      ? undefined
      : this.get()
  }

  /**
   * Evaluate the getter, and re-collect dependencies.
   */
  get () {
    value = this.getter.call(vm, vm)
    return value
  }

}
Watcher 的 构造函数将第二个参数 updateComponent 赋值给 getter。然后有调用其 get 方法,触发 getter。执行了 updateComponent 方法。
    updateComponent = () => {
      vm._update(vm._render(), hydrating)
    }
vm._render 定义在 src/core/instance/render.js:
export function renderMixin (Vue: Class<Component>) {
  Vue.prototype._render = function (): VNode {
    const { render, _parentVnode } = vm.$options
      // There's no need to maintain a stack becaues all render fns are called
      // separately from one another. Nested component's render fns are called
      // when parent component is patched.
      currentRenderingInstance = vm
      vnode = render.call(vm._renderProxy, vm.$createElement)

    return vnode
  }
}
我们关注其核心部分。 _render 函数调用编译阶段生成的 render 函数。执行生成,vnode。最后返回 vnode。
update 方法定义于 src/core/instance/lifecycle.js。
export function lifecycleMixin (Vue: Class<Component>) {
  Vue.prototype._update = function (vnode: VNode, hydrating?: boolean) {
    const vm: Component = this
    const prevEl = vm.$el
    const prevVnode = vm._vnode
    const restoreActiveInstance = setActiveInstance(vm)
    vm._vnode = vnode
    // Vue.prototype.__patch__ is injected in entry points
    // based on the rendering backend used.
    if (!prevVnode) {
      // initial render
      vm.$el = vm.__patch__(vm.$el, vnode, hydrating, false /* removeOnly */)
    } else {
      // updates
      vm.$el = vm.__patch__(prevVnode, vnode)
    }
    restoreActiveInstance()
    // update __vue__ reference
    if (prevEl) {
      prevEl.__vue__ = null
    }
    if (vm.$el) {
      vm.$el.__vue__ = vm
    }
    // if parent is an HOC, update its $el as well
    if (vm.$vnode && vm.$parent && vm.$vnode === vm.$parent._vnode) {
      vm.$parent.$el = vm.$el
    }
    // updated hook is called by the scheduler to ensure that children are
    // updated in a parent's updated hook.
  }
}
update 第一个参数接受 vnode。第二个参数是服务端渲染标记,暂不考虑。由上面可知,vm._render 返回的就是 vnode。而 update 内部又调用了 patch 方法。
_patch_ 是一个平台无关的方法。和 $mount 一样,每个平台有不同的 _patch_ 方法,定义在 src/platforms/(web/weex)/runtime/index.js内。我们只看 web 部分:
import { patch } from './patch'
// install platform patch function
Vue.prototype.__patch__ = inBrowser ? patch : noop
// patch.js
import * as nodeOps from 'web/runtime/node-ops'
import { createPatchFunction } from 'core/vdom/patch'
import baseModules from 'core/vdom/modules/index'
import platformModules from 'web/runtime/modules/index'
// the directive module should be applied last, after all
// built-in modules have been applied.
const modules = platformModules.concat(baseModules)
export const patch: Function = createPatchFunction({ nodeOps, modules }nodeOps 定义了平台相关的节点操作方法。modules 定义了一些平台相关的属性事件操作。

我们注意到虽然平台相关,但是对外仍是接口的形式。不同平台需要实现相同的方法。

export function createPatchFunction (backend) {
    return function patch (oldVnode, vnode, hydrating, removeOnly) {
    ....
   }
}
createPatchFunction 是一个高阶函数。通过传入不同的 node_ops 和 modules,生成不同的 patch function。这里用到了一个函数柯里化的技巧,通过 createPatchFunction 把差异化参数提前固化,这样不用每次调用 patch 的时候都传递 nodeOps 和 modules 了。
在 返回的 patch 函数中:
// create new node
createElm(
  vnode,
  insertedVnodeQueue,
  // extremely rare edge case: do not insert if old element is in a
  // leaving transition. Only happens when combining transition +
  // keep-alive + HOCs. (#4590)
  oldElm._leaveCb ? null : parentElm,
  nodeOps.nextSibling(oldElm)
)
将会实际创建 dom。至此,我们就看到了从 new Vue 到 dom 的整个过程。
v8 是一个 JIT(Just in time) 编译器。与传统的解释器一行一行执行不同的是,JIT 会在执行脚本前,对源码先解析(parsing)、再编译(compiling),速度相比前者提升了不少。但解析和编译仍然消耗时间。能否将中间结果缓存起来呢?
所以 v8 在 4.2(node > 5.7.0) 时,就支持了 code caching 的功能。减少二次执行的构建时间,加快脚本的整体执行速度。
要使用中间文件,需要先生成中间文件。v8 提供了以下几个方法:
v8::ScriptCompiler::kProduceCodeCache 是否生成 code cachev8::ScriptCompiler::Source::GetCachedData 获取生成的 code cachev8::ScriptCompiler::kConsumeCodeCache 消费生成的 cachev8 是 c++ 代码,在 node 中有对应的 vm.Script 与上面的功能相对应。我们需要对生成的 code cache 设计一套持久化机制,来方便二次消费。
以上解决了code cache 生成和消费的问题,但是源码从哪里来呢?
我们知道 node.js 通过 require 来连接代码,那么对所有 require 的 module 进行编译并缓存结果是不是就可以了?当然。
v8-compile-cache 便是这样一个仓库- 对编译中间过程持久化,加快整体执行时间。
v8-compile-cache 的使用很简单:
require('v8-compile-cache')
没有赋值,也没有实例化。我们去源码中看看这段引用究竟执行了什么。
一个 npm 包的入口文件,在 package.json 的 main 字段:v8-compile-cache.js。
require('v8-compile-cache') 就相当于执行了这段脚本。
抛开最上层的定义,在 module.exports 前发现这样一段代码:
if (!process.env.DISABLE_V8_COMPILE_CACHE && supportsCachedData()) {
  const cacheDir = getCacheDir();
  const prefix = getParentName();
  const blobStore = new FileSystemBlobStore(cacheDir, prefix);

  const nativeCompileCache = new NativeCompileCache();
  nativeCompileCache.setCacheStore(blobStore);
  nativeCompileCache.install();

  process.once('exit', code => {
    if (blobStore.isDirty()) {
      blobStore.save();
    }
    nativeCompileCache.uninstall();
  });
}
首先检测用户是否通过环境变量 DISABLE_V8_COMPILE_CACHE 禁用了此功能。由于没有实例化的过程。用户可以通过配置此变量来决定是否开启 code caching。
接下来我们看一下 supportsCachedData 方法:
function supportsCachedData() {
  const script = new vm.Script('""', {produceCachedData: true});
  // chakracore, as of v1.7.1.0, returns `false`.
  return script.cachedDataProduced === true;
}
这里其实是一段对 chakracore 的兼容。这里比较巧妙的是,通过一段空的代码,来验证是否支持 code caching。
在做持久化(其实就是写硬盘)之前,我们需要决定写在哪里。
const cacheDir = getCacheDir();
function getCacheDir() {
  // Avoid cache ownership issues on POSIX systems.
  const dirname = typeof process.getuid === 'function'
    ? 'v8-compile-cache-' + process.getuid()
    : 'v8-compile-cache';
  const version = typeof process.versions.v8 === 'string'
    ? process.versions.v8
    : typeof process.versions.chakracore === 'string'
      ? 'chakracore-' + process.versions.chakracore
      : 'node-' + process.version;
  const cacheDir = path.join(os.tmpdir(), dirname, version);
  return cacheDir;
}
我们忽略 chakracore 兼容的情况下,getCacheDir 返回一个类似于 /tmp/v8-compile-cache-0/6.2.414.54 地址。其中后一段数字是 v8 的版本,防止不同版本的中间文件不一致导致运行问题。
mac os 多用户的 tmp 地址为 :`/var/folders/x8/pxgnmcp53gjf3llf69jqb4gh0000gq/T/`
默认中间文件会生成到这个地址。
有了这个写入地址后,我们需要一个类来管理写入:
  const prefix = getParentName();
  const blobStore = new FileSystemBlobStore(cacheDir, prefix);
我们先来看一下 prefix 是什么。
function getParentName() {
  // `module.parent.filename` is undefined or null when:
  //    * node -e 'require("v8-compile-cache")'
  //    * node -r 'v8-compile-cache'
  //    * Or, requiring from the REPL.
  const parentName = module.parent && typeof module.parent.filename === 'string'
    ? module.parent.filename
    : process.cwd();
  return parentName;
}
module.parent.filename 返回调用者地址绝对路径或者当前路径。作为 prefix 传递给 FileSystemBlobStore。
class FileSystemBlobStore {
  constructor(directory, prefix) {
    const name = prefix ? slashEscape(prefix + '.') : '';
    this._blobFilename = path.join(directory, name + 'BLOB');
    this._mapFilename = path.join(directory, name + 'MAP');
    this._lockFilename = path.join(directory, name + 'LOCK');
    this._directory = directory;
    this._load();
  }

  _load() {
    try {
      this._storedBlob = fs.readFileSync(this._blobFilename);
      this._storedMap = JSON.parse(fs.readFileSync(this._mapFilename));
    } catch (e) {
      this._storedBlob = Buffer.alloc(0);
      this._storedMap = {};
    }
    this._dirty = false;
    this._memoryBlobs = {};
    this._invalidationKeys = {};
  }
}


function slashEscape(str) {
  const ESCAPE_LOOKUP = {
    '\\': 'zB',
    ':': 'zC',
    '/': 'zS',
    '\x00': 'z0',
    'z': 'zZ',
  };
  return str.replace(/[\\:\/\x00z]/g, match => (ESCAPE_LOOKUP[match]));
}
在 new FileSystemBlobStore(cacheDir, prefix) 时,会先把 prefix 通过 slashEscape 转换成一个标准的名字,作为文件名。this._blobFilename 存储生成的二进制 code caching。this._mapFilename 存储脚本到二进制文件的映射。然后 _load 到这些中间文件到内存中。
如果本地没有中间文件, this._storedBlob 则是一个 0 长度的 buffer, this._storedMap 则是一个空对象。
再上一个过程中,我们建立了一个 blobStore。它会把已经编译(如果有)的中间文件缓存到内存中。并通过 map 来定位文件和 blob 二进制的映射。接下来我们看
  const nativeCompileCache = new NativeCompileCache();
  nativeCompileCache.setCacheStore(blobStore);
  nativeCompileCache.install();
class NativeCompileCache {
  constructor() {
    this._cacheStore = null;
    this._previousModuleCompile = null;
  }

  setCacheStore(cacheStore) {
    this._cacheStore = cacheStore;
  }

  install() {
    const self = this;
    this._previousModuleCompile = Module.prototype._compile;
    Module.prototype._compile = function(content, filename) {
      const mod = this;
      function require(id) {
        return mod.require(id);
      }
      require.resolve = function(request, options) {
        return Module._resolveFilename(request, mod, false, options);
      };
      require.main = process.mainModule;

      // Enable support to add extra extension types
      require.extensions = Module._extensions;
      require.cache = Module._cache;

      const dirname = path.dirname(filename);

      const compiledWrapper = self._moduleCompile(filename, content);

      // We skip the debugger setup because by the time we run, node has already
      // done that itself.

      const args = [mod.exports, require, mod, filename, dirname, process, global];
      return compiledWrapper.apply(mod.exports, args);
    };
  }
}
我们先看 install 部分。install 重写了原生模块的 _compile 方法。并提供了一个新的 require 方法。为什么重写 require 呢?因为原生的模块内部也维护了一个 require 方法,既然重写了 _compile ,自然要提供一个 require 给后续使用。
const compiledWrapper = self._moduleCompile(filename, content);
重写 require 部分的代码比较容易理解。_compile 内部又调用了类的 _moduleCompile 方法:
 _moduleCompile(filename, content) {
    // https://github.com/nodejs/node/blob/v7.5.0/lib/module.js#L511
    // Remove shebang
    var contLen = content.length;
    if (contLen >= 2) {
      if (content.charCodeAt(0) === 35/*#*/ &&
          content.charCodeAt(1) === 33/*!*/) {
        if (contLen === 2) {
          // Exact match
          content = '';
        } else {
          // Find end of shebang line and slice it off
          var i = 2;
          for (; i < contLen; ++i) {
            var code = content.charCodeAt(i);
            if (code === 10/*\n*/ || code === 13/*\r*/) break;
          }
          if (i === contLen) {
            content = '';
          } else {
            // Note that this actually includes the newline character(s) in the
            // new output. This duplicates the behavior of the regular
            // expression that was previously used to replace the shebang line
            content = content.slice(i);
          }
        }
      }
    }

    // create wrapper function
    var wrapper = Module.wrap(content);

    var invalidationKey = crypto
      .createHash('sha1')
      .update(content, 'utf8')
      .digest('hex');

    var buffer = this._cacheStore.get(filename, invalidationKey);

    var script = new vm.Script(wrapper, {
      filename: filename,
      lineOffset: 0,
      displayErrors: true,
      cachedData: buffer,
      produceCachedData: true,
    });

    if (script.cachedDataProduced) {
      this._cacheStore.set(filename, invalidationKey, script.cachedData);
    } else if (script.cachedDataRejected) {
      this._cacheStore.delete(filename);
    }

    var compiledWrapper = script.runInThisContext({
      filename: filename,
      lineOffset: 0,
      columnOffset: 0,
      displayErrors: true,
    });

    return compiledWrapper;
  }
忽略 shebang 部分代码。 先创建一个 wrapper function。
(function(exports, require, module, __filename, __dirname) {
// Module code actually lives in here
});
给 vm.Script 去执行。
然后对文件内容生成散列。invalidationKey 如: cc0579eda025ac6d18f3914d42ba60abe2b1a8e。
接着从内存中取已经生成 code cache。this._cacheStore.get(filename, invalidationKey) 。
  var script = new vm.Script(wrapper, {
    filename: filename,
    lineOffset: 0,
    displayErrors: true,
    cachedData: buffer,
    produceCachedData: true,
  });
vm.Script 第一个参数是 code string。 也就是我们包装过的代码 warapper。第二个参数是 options。其中
cachedData 是编译好的 code cache, 如果没有提供 cacheData 的话,produceCachedData 指示是否输出 code cache。
vm.Script 并不会运行脚本,只负责编译。
  if (script.cachedDataProduced) {
    this._cacheStore.set(filename, invalidationKey, script.cachedData);
  } else if (script.cachedDataRejected) {
    this._cacheStore.delete(filename);
  }
如果生成了 code cache ,则写入到内存缓存中, 有问题则删掉缓存。
  var compiledWrapper = script.runInThisContext({
    filename: filename,
    lineOffset: 0,
    columnOffset: 0,
    displayErrors: true,
  });
接下来运行其中的代码。返回一个 compiledWraper。最后包装到 module.exports:
  const compiledWrapper = self._moduleCompile(filename, content);

  // We skip the debugger setup because by the time we run, node has already
  // done that itself.

  const args = [mod.exports, require, mod, filename, dirname, process, global];
  return compiledWrapper.apply(mod.exports, args);
compiledWrapper 返回结果其实就是一个封装好的函数, 如:
function(exports, require, module, __filename, __dirname) {
    const {
        b
    } = require('./b.js')
    module.exports = {
        a() {
            console.log('a')
        },
        b,
    }

}
在执行 compiledWrapper.apply(mod.exports, args)时, 对 mod 重新赋值,应用了新的 require 生成了新的 module.exports。
最后 return 的结果就是 module.exports 的内容。
而 Module.prototype._load 会将 Module.prototype._compile 返回的结果给用户, 两者的调用机制,可以参考这篇文章。
这样就完成了hook require,并取缓存中 code cache 的流程。
上面只是简略的过了一下持久化的过程。下面进行详细分析。
我们看一下持久化是如何存储的, 在 code cache 生成的过程中,如果满足条件, 先写入到 _cacheStroe 内存中:
  if (script.cachedDataProduced) {
    this._cacheStore.set(filename, invalidationKey, script.cachedData);
  } else if (script.cachedDataRejected) {
    this._cacheStore.delete(filename);
  }
  set(key, invalidationKey, buffer) {
    this._invalidationKeys[key] = invalidationKey;
    this._memoryBlobs[key] = buffer;
    this._dirty = true;
  }
cacheStore 会将 code cache 写入到 _memoryBlobs 中。并标记 _dirty 为 true, 表示内存中有更新。
到这个时候,所有的变更都在内存中,我们需要写入到硬盘。在什么时机呢?
  process.once('exit', code => {
    if (blobStore.isDirty()) {
      blobStore.save();
    }
    nativeCompileCache.uninstall();
  });
当进程退出时,如果内存中有更新,就写入到文件中。
  save() {
    const dump = this._getDump();
    const blobToStore = Buffer.concat(dump[0]);
    const mapToStore = JSON.stringify(dump[1]);

    try {
      mkdirpSync(this._directory);
      fs.writeFileSync(this._lockFilename, 'LOCK', {flag: 'wx'});
    } catch (error) {
      // Swallow the exception if we fail to acquire the lock.
      return false;
    }

    try {
      fs.writeFileSync(this._blobFilename, blobToStore);
      fs.writeFileSync(this._mapFilename, mapToStore);
    } catch (error) {
      throw error;
    } finally {
      fs.unlinkSync(this._lockFilename);
    }

    return true;
  }

   _getDump() {
    const buffers = [];
    const newMap = {};
    let offset = 0;

    function push(key, invalidationKey, buffer) {
      buffers.push(buffer);
      newMap[key] = [invalidationKey, offset, offset + buffer.length];
      offset += buffer.length;
    }

    for (const key of Object.keys(this._memoryBlobs)) {
      const buffer = this._memoryBlobs[key];
      const invalidationKey = this._invalidationKeys[key];
      push(key, invalidationKey, buffer);
    }

    for (const key of Object.keys(this._storedMap)) {
      if (hasOwnProperty.call(newMap, key)) continue;
      const mapping = this._storedMap[key];
      const buffer = this._storedBlob.slice(mapping[1], mapping[2]);
      push(key, mapping[0], buffer);
    }

    return [buffers, newMap];
在 save 方法中,先调用了 _getDump 方法,内部细节不在赘述。最终写入到机器的 MAP 文件类似如下:
{"/Users/flyyang/devspace/test-v8-file-size/b.js":["ba9069dd2de36ca9d7a51fb6f6d2d00c8d4b11a8",0,1064],"/Users/fl
yyang/devspace/test-v8-file-size/a.js":["cc0579eda025ac6d18f3914d42ba60abe2b1a8e7",1064,2168]}
以文件名为 key, 对应 invalidationKey, 在 buffer 文件中的起始位,和结束位。
而 buffer 文件,则存储的是所有 code cache 的二进制文件。
以上。
假如要写一个文件解析器。针对不同的文件类型调用不同的方法。如果用一个函数来表达,可能会写出如下代码:
function fileParser(fileType) {
  if (fileType === 'js') jsParser();
  if (fileType === 'txt') txtParser();
  // ....
}
每增加一种类型,我们需要修改我们的 fileParser 函数,增加一个条件判断。这样不够优雅。
nodejs 的 require 函数也会遇到上面的情况,它需要针对三种不同的类型 —— js、json、node 分别做处理。我们来看看它是如何实现的:
// Native extension for .js
Module._extensions['.js'] = function(module, filename) {
  var content = fs.readFileSync(filename, 'utf8');
  module._compile(stripBOM(content), filename);
};


// Native extension for .json
Module._extensions['.json'] = function(module, filename) {
  const content = fs.readFileSync(filename, 'utf8');

  if (manifest) {
    const moduleURL = pathToFileURL(filename);
    manifest.assertIntegrity(moduleURL, content);
  }

  try {
    module.exports = JSON.parse(stripBOM(content));
  } catch (err) {
    err.message = filename + ': ' + err.message;
    throw err;
  }
};


// Native extension for .node
Module._extensions['.node'] = function(module, filename) {
  if (manifest) {
    const content = fs.readFileSync(filename);
    const moduleURL = pathToFileURL(filename);
    manifest.assertIntegrity(moduleURL, content);
  }
  // Be aware this doesn't use `content`
  return process.dlopen(module, path.toNamespacedPath(filename));
};
这些函数在 Module.prototype.load 过程中调用。
Module.prototype.load = function(filename) {

  Module._extensions[extension](this, filename);
  // ...
}
我们看到这个过程没有了条件判断的流程。而且对多类型支持也非常方便,只需要扩展类型方法即可,不需要修改所谓的 fileParser 方法(符合 open / close 原则)。
策略模式便是在运行时选择算法,并且消除了判断流程的一种模式。
简而言之。辅助浏览器用来做资源优化的 指令。
为什么需要这些 指令 呢?
浏览器已经长大成人了,已经懂得如何做优化了。但是具体到每个应用,各有不同,要具体方案具体分析。
这就是指令的目的。
一些常见的指令:
这些指令通常写在 head 标签的 meta 里, 形式如下:
<link rel="xxx" href="yyy">
但也会有些不同。下面做详细介绍。
先介绍 dns-prefetch 和 preconnect。在介绍这两者之前, 先看一下这张图:

dns-prefetch 是用来解决 DNS Lookup 的问题。dns-preconnect 解决 DNS Lookup + Initial connection + SSL 问题。

dns-prefech 支持很广泛。从 ie9 到现代浏览器,都支持此特性。由于支持比较早,使用方法也比较多:
X-DNS-Prefetch-Control<a href="http://a.com"> A) Default HTTPS: No prefetching </a>
<meta http-equiv="x-dns-prefetch-control" content="on">
<a href="http://b.com"> B) Manual opt-in: Prefetch domain resolution. </a>
<meta http-equiv="x-dns-prefetch-control" content="off">
<a href="http://c.com"> C) Manual opt-out: Don't prefetch domain resolution </a>
<meta http-equiv="x-dns-prefetch-control" content="on">
<a href="http://d.com"> D) Already opted out: Don't prefetch domain resolution. </a>
<link rel="dns-prefetch" href="hostname">
注意, chrome 71 似乎不再支持 dns-prefetch 。测试用例见 dns-prefetch 测试用例。

preconnect 的作用已经介绍。使用方法也比较简单:
<link rel="preconnect" href="//example.com">
在解决了网络的问题之后, 我们再来看加载的问题:
重要资源越早加载越好。

通常浏览器加载时散列状的,或者说是一块一块并发的。

preload 却可以形成如下的效果:

什么是重要资源呢,在可控范围内,我认为所有用到的资源都可以是重要资源。当然也可以按优先级来区分。要具体问题具体分析。
更多参考 w3c preload。
preload 并不属于 w3c 的 resource hint,但是目标确是一致的。所以拿到了这里统一分析。
接下来可能会用到的资源偷偷加载。
 。
。
需要特别说明的是,webpack 支持了 preload 和 prefetch 功能。
比如我们需要在点击的时候异步加载一个组件:
$('#test').click(() => {
  (name) =>  import(/* webpackPrefetch: true */'src/component/${name}')
})
以往的异步加载是点击时,拉取对应的资源。而通过该指令可以在浏览器空闲时偷偷拉取资源。
干脆偷偷加载一个新页面得了。

使用方法:
<link rel="prerender" src="some-url">
chrome 的 prerender 并不会直接渲染页面。在各个浏览器测试功能都比较鸡肋。参考Intent to Deprecate and Remove: Prerender。
由于浏览器的同源策略,跨域请求需要做额外的配置才能工作。
CORS 是一个通用的解决方案,唯一缺点是低版本浏览器(< IE 9)不支持。低版本 IE 支持一个私有的 XDomainRequest,是个鸡肋 —— 如不能带 cookie。

如果需要兼容 IE 9 以下, 需要另外一种方案来实现跨域请求。xdomian 便是其中一种。
xodomain 本质是利用 iframe 和 postMessage 技术来实现跨域请求的。
以一个请求为例。localhost:8000 请求 localhost:58000 的 api。
// localhost:8000 的 index.html
<html>

<head>

</head>

<body>
  <script src="./xdomain.js"></script>
  <script src="https://cdn.bootcss.com/jquery/3.3.1/jquery.min.js"></script>
  <script>
    xdomain.slaves({
      "http://localhost:58000": "/proxy.html"
    })
    // xdomain.debug = true;
    $.get('http://localhost:58000/api/test').then(function (data) { debugger; console.log(data) });

    window.addEventListener('message', data => console.log(data.data, 'slave to master'));
  </script>
</body>

</html>
localhost:58000 proxy.html:
<!doctype html>
<html>

<head>

</head>

<body>
  <script src="./xdomain.js"></script>
  <script>
    xdomain.masters({
      "http://localhost:8000": "*"
    })
    window.addEventListener('message', (data) => { console.log(data.data, 'master to slave') })
  </script>
</body>

</html>
完整测试用例在这里。
xdomain 的思路是:
1. 在 localhost:8000 建立一个 `**iframe**`, 指向 localhost:58000 的一个页面,通常是 proxy.html。
2. 当 a 向 b 发起请求时,将请求转给 localhost:58000/proxy.html 来真正发起,避免跨域问题。
3. 最后结果从 /proxy.html 传递给 localhost:8000。
4. 通过 xhook,将返回最终传递给 a 的请求。
这里涉及到的消息传递通过 **postMessage*(兼容 IE8) 来实现。
如果将 localhost:8000 称为 master, localhost:58000称为 slave。那么通常一个经过代理的请求消息传递如下:

0. master 和 slave 各建立一个 socket。
1. localhost:8000 iframe 加载完毕后,从slave 发一条 XDPING_V1 消息给 master。 告知 master 我已加载完毕。
2. master 发一条 XD_CHECK 给 slave。 检查slave 状态。
3. slave 发给 master 一条 ready 信息。告知 master已准备好。
4. slave 发给 master 一条 XD_CHECK 信息。检查 master 状态。
5. master 发给 slave 一条 ready 信息。告知 master已准备好。并将请求的信息给slave。如请求的地址,是否带cookie 等信息。
6. slave 告知 master 开始 request。
7. 中间触发一系列的 xhr-event。从 slave 到 master。
8. slave 触发 response 告知已经请求完毕,并带上请求的数据。至此,master 已经拿到了数据。
9. master 告知 slave 关闭 socket。
10. slave 告知 master 关闭 socket。
注意在第7条中, xhr-event 是 proxy.html 发 ajax 触发一系列请求过程的消息转发。通过 xhook 控制 master 的 beforeXHR 将数据最终放到 master 的 请求 response 里。
xdomian 实现了一套自己的通信协议。并且主从代码打在了一起。从设计到实现都很精妙。
xdomain 作者不推荐 CORS,理由 有点站不住脚。通常只需要在 IE 9 以下 做兼容。
<!--[if lte IE 9]>
    <script  src="xdomain.js"></script>
<![endif]-->
按照 wiki 的解释:插件是一个用来向现有系统添加新功能的组件。当你的程序支持插件时,我们称此程序可定制。
一个插件系统的设计通常如下图所示:

我们将上面三点放在 Vue 的环境来说:
Vue.use(plugin, options)。细节在代码分析部分介绍。
Vue 插件官方并没具体的定义。只是描述作为全局功能的扩展,可以放到插件内实现。
我们当然可以通过在实例化前,自己定义这些全局扩展。放在插件内的好处是:
其他情况请放到源码中,进行全局扩展。
插件的使用场景如下:
MyPlugin.install = function (Vue, options) {
  // 1. add global method or property
  Vue.myGlobalMethod = function () {
    // some logic ...
  }

  // 2. add a global asset
  Vue.directive('my-directive', {
    bind (el, binding, vnode, oldVnode) {
      // some logic ...
    }
    ...
  })

  // 3. inject some component options
  Vue.mixin({
    created: function () {
      // some logic ...
    }
    ...
  })

  // 4. add an instance method
  Vue.prototype.$myMethod = function (methodOptions) {
    // some logic ...
  }
}我们以 vuex 为例:
import Vue from 'vue';
import Vuex from 'vuex'

// 注册 vuex
Vue.use(Vuex);
我们先来看 Vuex 是什么,以 dist/vuex.esm.js 为例,在最末尾:
export { Store, install, mapState, mapMutations, mapGetters, mapActions, createNamespacedHelpers };我们注意到 Vuex 是一个对象。其包含了一个 install 方法。 实现细节后续分析。
再来看一下 Vue.use 的实现,其定义在 src/core/global-api/use.js:
import { toArray } from '../util/index'

export function initUse (Vue: GlobalAPI) {
  Vue.use = function (plugin: Function | Object) {
    const installedPlugins = (this._installedPlugins || (this._installedPlugins = []))
    if (installedPlugins.indexOf(plugin) > -1) {
      return this
    }

    // additional parameters
    const args = toArray(arguments, 1)
    args.unshift(this)
    if (typeof plugin.install === 'function') {
      plugin.install.apply(plugin, args)
    } else if (typeof plugin === 'function') {
      plugin.apply(null, args)
    }
    installedPlugins.push(plugin)
    return this
  }
}
我们注意下 Vue.use 在定义时接收一个参数,plugin。
然后初始化 Vue._installedPlugins。这个 this 在调用时就是 Vue 本身。如果同一个 plugin 被多次 use,那么第二次会直接返回。
返回 this 意味着我们可以链式注册。
Vue.use(plugin1).use(plugin2);通常我们需要给插件一些定制传参。如:
Vue.use(plugin1, { showLog: false }),但是我们的 Vue.use 方法定义时只提供了一个参数,那么 Vue 是怎么实现的呢? arguments。
  const args = toArray(arguments, 1)
  args.unshift(this)
这两段代码表示,把 arguments 转换成 array, 并移除第一个 plugin 参数,保留后续参数。将 Vue 作为第一个参数,放到数组内。
    if (typeof plugin.install === 'function') {
      plugin.install.apply(plugin, args)
    } else if (typeof plugin === 'function') {
      plugin.apply(null, args)
    }
如果存在 plugin.install, 调用 plugin install 的方法。并将 Vue作为第一个参数传递给插件。
如果不存在 plugin.install 并且 plugin 本身是一个函数的话,执行 plugin 函数。
由此我们得到,plugin 是一个函数也可以在 Vue 里工作。
剩下的代码就比较简单,存储已安装的 plugin,并返回 this,供链式调用。
我们仍然以 Vuex 为例, 其install 方法位于 src/store.js
let Vue // bind on install

// remove unrelated code

export function install (_Vue) {
  if (Vue && _Vue === Vue) {
    if (process.env.NODE_ENV !== 'production') {
      console.error(
        '[vuex] already installed. Vue.use(Vuex) should be called only once.'
      )
    }
    return
  }
  Vue = _Vue
  applyMixin(Vue)
}
从上面分析可以得到,install 方法的第一个参数是 Vue 本身。Vuex 不需要额外参数。另外我们注意到 install 方法定义了一个 _Vue, 有什么用呢?防止多次调用。
第一次注册此插件时,我们将 _Vue 缓存起来,放到模块的变量 Vue 内。下次来了一对比,如果一样,则说名被多次调用。
applyMixin(Vue) 功能是为所有组件添加一个 this.$store。具体分析见深入浅出 Vue mixin。
以上。
A declarative, efficient, and flexible JavaScript library for building user interfaces.
🖖 Vue.js is a progressive, incrementally-adoptable JavaScript framework for building UI on the web.
TypeScript is a superset of JavaScript that compiles to clean JavaScript output.
An Open Source Machine Learning Framework for Everyone
The Web framework for perfectionists with deadlines.
A PHP framework for web artisans
Bring data to life with SVG, Canvas and HTML. 📊📈🎉
JavaScript (JS) is a lightweight interpreted programming language with first-class functions.
Some thing interesting about web. New door for the world.
A server is a program made to process requests and deliver data to clients.
Machine learning is a way of modeling and interpreting data that allows a piece of software to respond intelligently.
Some thing interesting about visualization, use data art
Some thing interesting about game, make everyone happy.
We are working to build community through open source technology. NB: members must have two-factor auth.
Open source projects and samples from Microsoft.
Google ❤️ Open Source for everyone.
Alibaba Open Source for everyone
Data-Driven Documents codes.
China tencent open source team.