GithubHelp home page GithubHelp logo

fmstrat / diy-ipmi Goto Github PK

View Code? Open in Web Editor NEW
891.0 56.0 99.0 2.61 MB

A DIY IPMI / IP KVM system utilizing the Raspberry Pi

Shell 11.49% Python 1.03% CSS 41.16% PHP 16.85% JavaScript 1.37% C 28.10%
ipmi raspberrypi raspberry-pi

diy-ipmi's Introduction

A DIY IPMI / IP KVM system utilizing the Raspberry Pi

A web-accessable IPMI / IP KVM system that provides full keyboard control, monitor view, and and the ability to reboot computers with standard motherboards remotely as if you were sitting in front of them with a keyboard and monitor.

Screenshot

Requirements

A full wishlist totaling under $120 at the time of this writing can be found at http://a.co/36FK9T8

Before assembling

On the Pi3, flash http://downloads.raspberrypi.org/raspbian_lite/images/raspbian_lite-2017-09-08/. As of this writing you may use the latest Stretch version, however this was the version used successfully.

On the Pi0, flash http://downloads.raspberrypi.org/raspbian_lite/images/raspbian_lite-2017-03-03/. You must use this version for this to work. There aren't really security implications since the Pi0 can only be accessed from a serial session on the Pi3.

Before putting the SD into the Pi0, add this to the end of /boot/config.txt:

dtoverlay=dwc2
enable_uart=1

Before putting the SD into the Pi3, create a blank file called SSH on the boot drive to enable SSH.

Also, if you will be connecting via Wifi, create a file in boot called wpa_supplicant.conf that uses unix based line feeds. To ensure that is the case, use Notepad++ or another editor that allows you to change line feed types (bottom right), or copy the config.txt file and rename it. Include the following:

ctrl_interface=DIR=/var/run/wpa_supplicant GROUP=netdev
update_config=1
country=US

network={
    ssid="NETWORKNAME"
    psk="PASSWORD"
    key_mgmt=WPA-PSK
}

Setting up the hardware

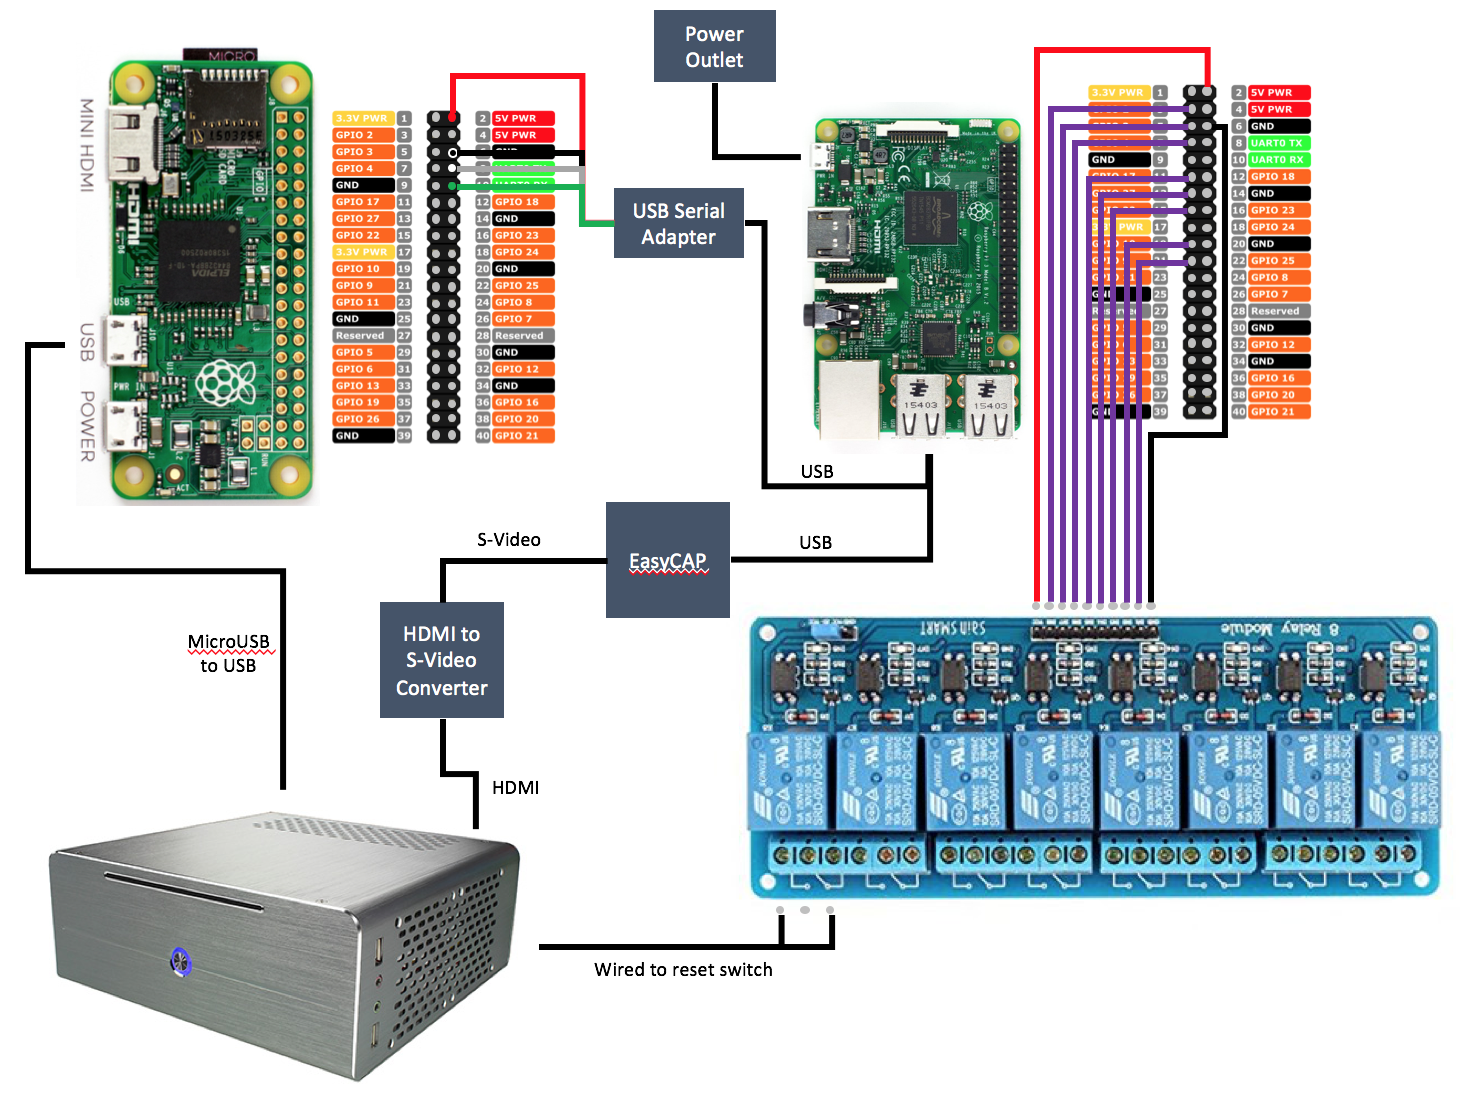
Here is a diagram of how you connect all of the pieces:

Diagram

View the high resolution version

The detailed process is to:

Quick Install

The quick method of installation is to simply run the install script on the Pi3 as the pi user:

wget https://raw.githubusercontent.com/Fmstrat/diy-ipmi/master/install.sh
chmod +x install.sh
./install.sh

Everything will be done on the Pi3 and Pi0 automatically with the video input defaulting to s-video.

If you would like to manage multiple servers with one IPMI system, please see the Managing multiple servers section below.

Be sure to check the bottom of this README for Tips and Troubleshooting!

The long way

If you would like to do things step by step to understand how things work, the following instructions can be used.

Setting up the Pi 3

First, let's get all the software we need:

sudo apt-get update
sudo apt-get -y install libav-tools screen lighttpd php php-cgi git
cd /opt
sudo git clone https://github.com/Fmstrat/diy-ipmi
sudo chown pi diy-ipmi -R
chmod +x /opt/diy-ipmi/Pi3/*.py
chmod +x /opt/diy-ipmi/Pi3/*.sh

To test the ability to reboot the computer via the relay board, run:

/opt/diy-ipmi/Pi3/rebootServer.py

Test this script to see if it resets the computer. If you are interested, look in the python script to see the numbers associated with which of the 8 relays you could use for multiple computers.

Next, set up the HTTP server.


read -s -p "Password for web IPMI console (user 'ipmi'): " IPMIPASS
echo ""
echo "ipmi:${IPMIPASS}" | sudo tee --append /var/www/ipmipasswd

sudo lighty-enable-mod fastcgi-php
echo '' | sudo tee --append /etc/lighttpd/lighttpd.conf
sudo adduser www-data gpio
echo 'server.modules += ( "mod_auth" )' | sudo tee --append /etc/lighttpd/lighttpd.conf
echo 'auth.debug = 2' | sudo tee --append /etc/lighttpd/lighttpd.conf
echo 'auth.backend = "plain"' | sudo tee --append /etc/lighttpd/lighttpd.conf
echo 'auth.backend.plain.userfile = "/var/www/ipmipasswd"' | sudo tee --append /etc/lighttpd/lighttpd.conf
echo 'auth.require = ( "/" =>' | sudo tee --append /etc/lighttpd/lighttpd.conf
echo '        (' | sudo tee --append /etc/lighttpd/lighttpd.conf
echo '                "method" => "basic",' | sudo tee --append /etc/lighttpd/lighttpd.conf
echo '                "realm" => "Password protected area",' | sudo tee --append /etc/lighttpd/lighttpd.conf
echo '                "require" => "user=ipmi"' | sudo tee --append /etc/lighttpd/lighttpd.conf
echo '        )' | sudo tee --append /etc/lighttpd/lighttpd.conf
echo ')' | sudo tee --append /etc/lighttpd/lighttpd.conf

cd /var/www/
sudo mv /var/www/html /var/www/html.orig
sudo ln -s /opt/diy-ipmi/Pi3/html /var/www/html

echo '[Server 1]' | sudo tee --append /etc/ipmi.conf
echo 'TTY=/dev/ttyUSB0' | sudo tee --append /etc/ipmi.conf
echo 'VID=/dev/video0' | sudo tee --append /etc/ipmi.conf
echo 'INP=1' | sudo tee --append /etc/ipmi.conf
echo 'PIN=2' | sudo tee --append /etc/ipmi.conf

sudo service lighttpd force-reload
sudo systemctl restart lighttpd
sudo systemctl enable lighttpd

Lastly, get everything running right by completing some tasks and updating /etc/rc.local to ensure they happen at boot:

sudo chmod a+rw /dev/video0
sudo mkdir -p /mnt/ramdisk
sudo mount -t tmpfs -o size=3m tmps /mnt/ramdisk
sudo chown www-data /mnt/ramdisk
sudo v4l2-ctl -d /dev/video0 --set-input=1
sudo chmod a+rw /dev/ttyUSB0

sudo sed -i 's/exit 0//g' /etc/rc.local
echo "chmod a+rw /dev/video0" | sudo tee --append /etc/rc.local
echo "mkdir -p /mnt/ramdisk" | sudo tee --append /etc/rc.local
echo "mount -t tmpfs -o size=3m tmps /mnt/ramdisk" | sudo tee --append /etc/rc.local
echo "chown www-data /mnt/ramdisk" | sudo tee --append /etc/rc.local
echo "v4l2-ctl -d /dev/video0 --set-input=1" | sudo tee --append /etc/rc.local
echo "chmod a+rw /dev/ttyUSB0" | sudo tee --append /etc/rc.local
echo "exit 0" | sudo tee --append /etc/rc.local

Setting up the Pi 0

Make sure you can access the Pi0 from the Pi3 by running:

screen /dev/ttyUSB0 115200

Press enter until you see a login prompt. Do not login. Instead, exit the session by hitting Control-A then typing :quit and pressing enter.

On the Pi3, run:

/opt/diy-ipmi/Pi3/checkPi0Login.sh

echo "sudo systemctl enable [email protected]" >> /dev/ttyUSB0
echo "sudo cp /lib/systemd/system/[email protected] /etc/systemd/system/[email protected]" >> /dev/ttyUSB0
echo "sudo sed -i 's/agetty --keep-baud 115200/agetty -a pi --keep-baud 115200/g' /etc/systemd/system/[email protected]" >> /dev/ttyUSB0
echo "sudo systemctl daemon-reload" >> /dev/ttyUSB0

echo "sudo systemctl disable networking" >> /dev/ttyUSB0
echo "sudo apt-get -y remove dhcpcd5 isc-dhcp-client isc-dhcp-common" >> /dev/ttyUSB0
sleep 60

echo "rm -f /tmp/B64" >> /dev/ttyUSB0
for LINE in $(base64 /opt/diy-ipmi/Pi0/enableHID.sh); do echo "echo $LINE >> /tmp/B64" >> /dev/ttyUSB0; done
echo "base64 -d /tmp/B64 > /home/pi/enableHID.sh" >> /dev/ttyUSB0
echo "chmod +x /home/pi/enableHID.sh" >> /dev/ttyUSB0

echo "rm -f /tmp/B64" >> /dev/ttyUSB0
for LINE in $(base64 /opt/diy-ipmi/Pi0/sendkeys.c); do echo "echo $LINE >> /tmp/B64" >> /dev/ttyUSB0; done
echo "base64 -d /tmp/B64 > /home/pi/sendkeys.c" >> /dev/ttyUSB0
echo "gcc -o /home/pi/sendkeys /home/pi/sendkeys.c" >> /dev/ttyUSB0

sudo apt-get -y install libusb-dev
cd /opt/diy-ipmi/Pi0/
gcc -o hub-ctrl hub-ctrl.c -lusb
for LINE in $(base64 hub-ctrl); do echo "echo $LINE >> /tmp/B64" >> /dev/ttyUSB0; done
echo "base64 -d /tmp/B64 > /home/pi/hub-ctrl" >> /dev/ttyUSB0
echo "chmod +x /home/pi/hub-ctrl" >> /dev/ttyUSB0
cd -

echo "sudo /home/pi/enableHID.sh" >> /dev/ttyUSB0
echo "sudo sed -i 's/exit 0//g' /etc/rc.local" >> /dev/ttyUSB0
echo "echo /home/pi/enableHID.sh | sudo tee --append /etc/rc.local" >> /dev/ttyUSB0
echo "echo exit 0 | sudo tee --append /etc/rc.local" >> /dev/ttyUSB0

Access the IPMI

You should now be able to access the IPMI console at http://<RaspberryPi3IP>/. From here you can set up SSL and port forwarding to the device as your situation requires.

Managing multiple servers

Multiple servers can be managed by using multile USB capture devices (one per server), multiple USB-to-Serial adapters each with their own Pi0 (one per server), and using one of the 8 relays on the relay board as the reset button. Once installed, edit /etc/ipmi.conf. The format should be:

[My first server]
TTY=/dev/ttyUSB0
VID=/dev/video0
INP=1
PIN=2

[My second server]
TTY=/dev/ttyUSB1
VID=/dev/video1
INP=1
PIN=3
  • When hooking up multiple TV tuners and USB-to-Serial devices to Pi0s, it is recommended to use a powered USB hub.
  • The INP field is 1 for s-video or 0 for composite. You can actually use one capture device for two servers by using both inputs.
  • The PIN value is the pin on the relay board. The valid values are 2, 3, 4, 17, 27, 22, 10, 9.

Tips

If you're using this on a Linux headless machine that's not running X11, it's easier to read the console if things are nice and big. Disabling the video driver is an easy way to accomplish this as it will just default to a generic NTSC or PAL signal. For instance, with an nVidia card, you could follow these directoins: https://askubuntu.com/questions/481414/install-nvidia-driver-instead-of-nouveau

To enable SSL, you need a combined PEM file which can be created by:

cat myserver.key mycert.crt myca.ca-bundle > mypem.pem

Then add this into the /etc/lighttpd/lighttpd.conf file (editing as required):

$SERVER["socket"] == ":443" {
	ssl.engine = "enable"
	ssl.pemfile = "/opt/certs/mypem.pem"
	server.name = "host.domain.com"
	server.document-root = "/var/www/html"
	ssl.use-sslv2 = "disable"
	ssl.use-sslv3 = "disable"
	ssl.use-compression = "disable"
	ssl.honor-cipher-order = "enable"
	ssl.cipher-list = "ECDHE-ECDSA-AES256-GCM-SHA384:ECDHE-RSA-AES256-GCM-SHA384:ECDHE-ECDSA-AES256-SHA384:ECDHE-RSA-AES256-SHA384:ECDHE-ECDSA-AES128-GCM-SHA256:ECDHE-RSA-AES128-GCM-SHA256:ECDHE-ECDSA-AES128-SHA256:ECDHE-RSA-AES128-SHA256:ECDHE-ECDSA-RC4-SHA:ECDHE-RSA-RC4-SHA:ECDH-ECDSA-RC4-SHA:ECDH-RSA-RC4-SHA:ECDHE-RSA-AES256-SHA:RC4-SHA"
	server.errorlog = "/var/log/lighttpd/serror.log"
	accesslog.filename = "/var/log/lighttpd/saccess.log"
}

Troubleshooting

If you're not getting video, here are some troubleshooting methods:

First make sure the INP field in /etc/ipmi.conf is set to the right input. Input 0 is usually Composite, and Input 1 is usually S-Video.

Connect a source and test to see if it's working.

apt-get install mencoder
mencoder tv:// -tv driver=v4l2:norm=NTSC:device=/dev/video0:input=1:fps=5 -nosound -ovc copy -o test.avi
v4l2-ctl -d /dev/video0 --set-input=1
avconv -f video4linux2 -i /dev/video0 -vframes 1 -s 720x480 test.jpg

Control-C that, and sftp the files to a host for viewing and playback:

sftp test.avi root@hostname:/folder/test.avi
sftp test.avi root@hostname:/folder/test.jpg

You can test keyboard control from the Pi0 with commands like:

/home/pi/sendkeys /dev/hidg0 keyboard

You will need to type things like "a" and press ENTER to send the "a." Other ways to send keys include things like:

echo 'a' | /home/pi/sendkeys /dev/hidg0 keyboard
echo 'return' | /home/pi/sendkeys /dev/hidg0 keyboard
echo 'shift a' | /home/pi/sendkeys /dev/hidg0 keyboard
echo 'left-meta space' | /home/pi/sendkeys /dev/hidg0 keyboard

To reset the keyboard controller run this on the Pi3:

/opt/diy-ipmi/Pi3/resetPi0HID.sh

If you get wierd USB errors, make sure your power brick is strong enough and that you're not trying to power the HDMI to S-Video converter via the Pi3.

diy-ipmi's People

Contributors

dan-g avatar fmstrat avatar sammcj avatar

Stargazers

 avatar  avatar  avatar  avatar  avatar  avatar  avatar  avatar  avatar  avatar  avatar  avatar  avatar  avatar  avatar  avatar  avatar  avatar  avatar  avatar  avatar  avatar  avatar  avatar  avatar  avatar  avatar  avatar  avatar  avatar  avatar  avatar  avatar  avatar  avatar  avatar  avatar  avatar  avatar  avatar  avatar  avatar  avatar  avatar  avatar  avatar  avatar  avatar  avatar  avatar  avatar  avatar  avatar  avatar  avatar  avatar  avatar  avatar  avatar  avatar  avatar  avatar  avatar  avatar  avatar  avatar  avatar  avatar  avatar  avatar  avatar  avatar  avatar  avatar  avatar  avatar  avatar  avatar  avatar  avatar  avatar  avatar  avatar  avatar  avatar  avatar  avatar  avatar  avatar  avatar  avatar  avatar  avatar  avatar  avatar  avatar  avatar  avatar  avatar  avatar

Watchers

 avatar  avatar  avatar  avatar  avatar  avatar  avatar  avatar  avatar  avatar  avatar  avatar  avatar  avatar  avatar  avatar  avatar  avatar  avatar  avatar  avatar  avatar  avatar  avatar  avatar  avatar  avatar  avatar  avatar  avatar  avatar  avatar  avatar  avatar  avatar  avatar  avatar  avatar  avatar  avatar  avatar  avatar  avatar  avatar  avatar  avatar  avatar  avatar  avatar  avatar  avatar  avatar  avatar  avatar  avatar  avatar

diy-ipmi's Issues

ipmi-simulator

Hi All, I wanted to point out this GitHub project named ipmi-simulator because I think it would be possible to emulate real IPMI features by combining the projects and I raised this issue over therewith my reasons. What do you think?

try to turn inputstick into KVM over IP

Hello,

I suggest to add a very interesting feature for the inputstick

inputstick reminder

https://play.google.com/store/apps/details?id=com.inputstick.apps.inputstickutility&hl=en

https://play.google.com/store/apps/details?id=com.inputstick.apps.kp2aplugin

with a small evolution of functionalities, we can use the inputstick to carry out a KVM over IP

indeed, for the image return, all you need is an hdmi / vga encoder which broadcasts in IP stream, https://bit.ly/2XE0n8s

however for ease of use with the inputstick, the ideal would be to be able to use a physical mouse and keyboard, several possibilities:

  • solution 1: the "USB REMOTE" software must therefore be able to send the signals from a mouse and a keyboard connected to the smartphone (Bluetooth or wired), because currently the "USB REMOTE" software does not allow this

  • solution 2: or else the "USB REMOTE" software must be able to connect, via local IP, to a portable computer (windows), and the user therefore uses the keyboard and the mouse of his portable computer (windows) , then "USB REMOTE" collects by IP and transfers by bluetooth the signals for the inputstick

Is it possible to get to the Bios with this fake keyboard?

Hi,

I have noticed that this "fake keyboard" is not working when the computer is rebooting and I press "F2".

pi@raspberrypi:~$ echo "left-ctrl left-alt delete" | /home/pi/sendkeys /dev/hidg0 keyboard
recv report: 00
recv report: 01
pi@raspberrypi:~$ echo 'f2' | /home/pi/sendkeys /dev/hidg0 keyboard
pi@keyboardrypi:~$ echo 'f2' | /home/pi/sendkeys /dev/hidg0 keyboard 
^C
pi@raspberrypi:~$ echo 'f2' | /home/pi/sendkeys /dev/hidg0 keyboard
^C
pi@raspberrypi:~$ echo 'f2' | /home/pi/sendkeys /dev/hidg0 keyboard
^C
pi@raspberrypi:~$ echo 'f2' | /home/pi/sendkeys /dev/hidg0 keyboard
^C
pi@raspberrypi:~$ echo 'f2' | /home/pi/sendkeys /dev/hidg0 keyboard
^C
pi@raspberrypi:~$ echo 'f2' | /home/pi/sendkeys /dev/hidg0 keyboard
recv report: 00
^C
pi@raspberrypi:~$ 
pi@raspberrypi:~$ echo 'f2' | /home/pi/sendkeys /dev/hidg0 keyboard
recv report: 01
^C
pi@raspberrypi:~$ echo 'f2' | /home/pi/sendkeys /dev/hidg0 keyboard
^C
pi@raspberrypi:~$ echo 'f2' | /home/pi/sendkeys /dev/hidg0 keyboard
recv report: 01

If I press "F2" with normal keyboard, then after a moment this "fake keyboard" becomes available.

So Raspberry Pi0 is not able to get to the BIOS, but able to manage it later if someone pressed "F2". This is a bit disappointing that it needs just one step to get there.

Do you guys can confirm that BIOS worked for you? Maybe this related with Raspberry Pi0 powering? (so Pi0 power is interrupted by the computer during reset moment)

It will be really helpful at least to know whether this issue is specific to my hardware/case so you can get to BIOS or similar base remotely.

Cannot connect to webserver

Hi All,

The install seems to have gone well, but I cannot access the web site, seemingly due to a problem with lighttpd.

A screen grab of systemctl status lighttpd.service:

status

Can you please help me proceed/troubleshoot?

Thanks!
Justin

Suppor tfor generic HDMI capturers from Aliexpress?

These: https://www.aliexpress.com/item/1005001880861192.html?spm=a2g0o.productlist.0.0.58ec3289KNoVSz&algo_pvid=f3f3dbfc-0b0b-4e68-81d3-b050fec5c931&algo_exp_id=f3f3dbfc-0b0b-4e68-81d3-b050fec5c931-1&pdp_ext_f=%7B%22sku_id%22%3A%2212000018002094767%22%7D work with Linux.

Is there a way to support them?

Also, this looks like something intended for controlling servers, so no mouse support. Is there a way to get mouse + keyboard, and instead of the web view, use VNC?

Or is there another project that focus on this?

Browser Screen and keyborad no responce

Hello
Browser Screen and keyboard no response. The screen starts off white and then goes black. When I press any keys on mu laptop they show on the Browser. The power button too has no response, But when I tested the relay using script /opt/diy-ipmi/Pi3/rebootServer.py it works and the realy light comes on and goes off successfully.

Can someone please guide me how to get the Browser to respond?

HTTP Server not working

After running install.sh script, the HTTP server does not work and I am unable to connect to the RPi3. I can connect to services on other ports though. Firewall is disabled.

Issue with displaying on monitor

Hello everyone, After setting everything according to the diagram and codes i have encounter the issue when i access Raspberry pi IP i can see everything working the same as the image except for displaying the login

8, 4 and 2 relay

When only one PC is managed, can I also use the 4 or 2 relay board?

[Suggestion] Monitor current power state

Related to #29 - monitor the current power state of the managed systems, This could be done by adding a loop to the power LED of the systems and hooking up to the Pi0 GPIO, for example.

[Suggestion] Ease up deployment with some Containerization

Ease the deployment with a Docker image? I can see it being non-trivial due to the various interconnected services and whatnot, so it bears some thought on what the approach might be. I'm interested in taking a stab at this, with some opinions shared on implementation.

Every project on GH has a Dockerfile these days :)

I also wondered about Snappy packaging. This is a much more involved process but if done right can make deployment management trivially simple. I've dabbled a little in this, and it's wonderful in my experience.

Comments using a KVM switch?

Hi,

Someone has used it (without the relay) with a regular KVM switch (with a HDMI video connection, not with the ancient VGA)?

Move rc.local scripts to systemd unit

Low priority, but to clean things up I think that the rc.local boot scripts should be moved to a properly systemd unit.

I'm happy to do this, won't take me long.

Keyboard and reset button not working

I have a desktop on-screen in the browser
kvm
when I press keys on the keyboard I can see them selected in the browser too, but they are not passed to the remote system and reset button doesn't do anything.

Multiple Server Config Broke Frontend

I've added a second Pi0 and configured it in my ipmi.conf thusly:

[Rombus]
TTY=/dev/ttyUSB0
VID=/dev/video0
INP=1
PIN=2


[Celery]
TTY=/dev/ttyUSB1
VID=/dev/video0
INP=1
PIN=3

My frontend now has a whole bunch of function names etc in the combo box for server selection:
https://i.imgur.com/HNYJKoB.png
And Video output stopped working.
In Chromium dev-tools I see the following error:
https://i.imgur.com/FukTolm.png
Do I somehow need to format the ipmi.conf differently so the server settings get a CR between them?

HDMI to S-Video glitches with mencoder

Hi,

I have tested

  • two different converters:

https://www.ebay.co.uk/itm/Mini-Portable-USB-2-0-Port-HD-1-Way-HDMI-1080P-Video-Capture-Card-For-PC-Laptop/142907175902?ssPageName=STRK%3AMEBIDX%3AIT&_trksid=p2057872.m2749.l2649

and

https://www.ebay.co.uk/itm/TV-DVD-VHS-RCA-S-Video-Video-Audio-AV-EasyCAP-Grabber-Capture-USB-2-0-Adapter/183096373306?ssPageName=STRK%3AMEBIDX%3AIT&_trksid=p2057872.m2749.l2649
+
https://www.ebay.co.uk/itm/HDMI-to-3RCA-AV-CVBS-Composite-S-Video-R-L-Audio-Converter-Adapter-Upscaler/262370360688?epid=1140068747&hash=item3d167dfd70:g:gZYAAOSwCpRbEhZ7

  • two different HDMI cables
  • two different computers to output HDMI (PC with GTX1070 and Macbook Pro 2014)
  • Raspberry Pi3 B+ with latest Raspbian Stretch 9 (Linux raspberrypi 4.14.50-v7+ #1122 SMP Tue Jun 19 12:26:26 BST 2018 armv7l GNU/Linux)

I've got the same result by using any of these converters and cables.

I'm using mencoder command to record test.avi and the output is almost not visible because of many green lines and glitches:

40517727_2246338448931231_4390862817524187136_n

This is a mencoder command which prints some drops (14 frames successfully processed, -10 frames dropped):

pi@raspberrypi:~ $ mencoder tv:// -tv driver=v4l2:norm=NTSC:device=/dev/video0:input=1:fps=5 -nosound -ovc copy -o test.avi
MEncoder 1.3.0 (Debian), built with gcc-6.2.1 (C) 2000-2016 MPlayer Team
success: format: 9  data: 0x0 - 0x0
TV file format detected.
Selected driver: v4l2
 name: Video 4 Linux 2 input
 author: Martin Olschewski <[email protected]>
 comment: first try, more to come ;-)
Selected device: usbtv
 Capabilities:  video capture  read/write  streaming
 supported norms: 0 = NTSC; 1 = NTSC-M; 2 = NTSC-M-JP; 3 = NTSC-M-KR; 4 = NTSC-443; 5 = PAL; 6 = PAL-BG; 7 = PAL-H; 8 = PAL-I; 9 = PAL-DK; 10 = PAL-M; 11 = PAL-60;
 inputs: 0 = Composite; 1 = S-Video;
 Current input: 0
 Current format: YUYV
Selected input hasn't got a tuner!
v4l2: ioctl set mute failed: Invalid argument
[V] filefmt:9  fourcc:0x32595559  size:720x480  fps:5.000  ftime:=0.2000
videocodec: framecopy (720x480 24bpp fourcc=32595559)
Forcing audio preload to 0, max pts correction to 0.
v4l2: select timeout

Skipping frame!
Pos:   0.0s      1f ( 0%)  0.95fps Trem:   0min   0mb  A-V:0.000 [0:0]

Skipping frame!
Pos:   0.0s      2f ( 0%)  1.27fps Trem:   0min   0mb  A-V:0.000 [0:0]
v4l2: select timeout

Skipping frame!
Pos:   0.0s      3f ( 0%)  1.43fps Trem:   0min   0mb  A-V:0.000 [0:0]

Skipping frame!
Pos:   0.0s      4f ( 0%)  1.53fps Trem:   0min   0mb  A-V:0.000 [0:0]
v4l2: select timeout

Skipping frame!
Pos:   0.0s      5f ( 0%)  1.59fps Trem:   0min   0mb  A-V:0.000 [0:0]

Skipping frame!
Pos:   0.0s      6f ( 0%)  1.85fps Trem:   0min   0mb  A-V:0.000 [0:0]
Writing header...
ODML: Aspect information not (yet?) available or unspecified, not writing vprp header.
Writing header...
ODML: Aspect information not (yet?) available or unspecified, not writing vprp header.
Pos:   0.0s      7f ( 0%)  2.13fps Trem:   0min   0mb  A-V:0.000 [0:0]

Skipping frame!
Pos:   0.2s      8f ( 0%)  2.40fps Trem:   0min   0mb  A-V:0.000 [0:0]

Skipping frame!
Pos:   0.2s      9f ( 0%)  2.67fps Trem:   0min   0mb  A-V:0.000 [0:0]

Skipping frame!
Pos:   0.2s     10f ( 0%)  2.93fps Trem:   0min   0mb  A-V:0.000 [0:0]

Skipping frame!
Pos:   0.2s     12f ( 0%)  3.43fps Trem:   0min   0mb  A-V:0.000 [0:0]

Skipping frame!
Pos:   0.4s     13f ( 0%)  3.68fps Trem:   0min   0mb  A-V:0.000 [0:0]

Skipping frame!
Pos:   0.4s     14f ( 0%)  3.92fps Trem:   0min   0mb  A-V:0.000 [0:0]

Skipping frame!
Pos:   0.4s     15f ( 0%)  4.15fps Trem:   0min   0mb  A-V:0.000 [0:0]

Skipping frame!
Pos:   0.4s     17f ( 0%)  4.61fps Trem:   0min   0mb  A-V:0.000 [0:0]

Skipping frame!
Pos:   0.6s     18f ( 0%)  4.82fps Trem:   0min   0mb  A-V:0.000 [0:0]

Skipping frame!
Pos:   0.6s     19f ( 0%)  5.03fps Trem:   0min   0mb  A-V:0.000 [0:0]

Invalid frame duration value (0.520/0.000 => -0.520). Defaulting to 0.040 sec.

Skipping frame!
Pos:   0.6s     20f ( 0%)  4.65fps Trem:   0min   0mb  A-V:0.000 [0:0]
v4l2: select timeout

Skipping frame!
Pos:   0.6s     21f ( 0%)  4.35fps Trem:   0min   0mb  A-V:0.000 [0:0]

Skipping frame!
Pos:   0.6s     22f ( 0%)  4.11fps Trem:   0min   0mb  A-V:0.000 [0:0]
v4l2: select timeout

Skipping frame!
Pos:   0.6s     23f ( 0%)  3.92fps Trem:   0min   0mb  A-V:0.000 [0:0]

Skipping frame!
Pos:   0.6s     24f ( 0%)  3.75fps Trem:   0min   0mb  A-V:0.000 [0:0]
v4l2: select timeout

Skipping frame!
^Cs:   0.6s     25f ( 0%)  3.61fps Trem:   0min   0mb  A-V:0.000 [0:0]

Skipping frame!
Pos:   0.6s     26f ( 0%)  3.50fps Trem:   0min   0mb  A-V:0.000 [0:0]
Writing index...
Writing header...
ODML: Aspect information not (yet?) available or unspecified, not writing vprp header.

Video stream: 27648.000 kbit/s  (3456000 B/s)  size: 2073600 bytes  0.600 secs  26 frames
v4l2: select timeout
v4l2: ioctl set mute failed: Invalid argument
v4l2: 14 frames successfully processed, -10 frames dropped.
pi@raspberrypi:~ $

Another attempt. This time 26 frames successfully processed, 31 frames dropped.:

pi@raspberrypi:/tmp $ mencoder tv:// -tv driver=v4l2:norm=NTSC:device=/dev/video0:input=1:fps=5 -nosound -ovc copy -o test.avi
MEncoder 1.3.0 (Debian), built with gcc-6.2.1 (C) 2000-2016 MPlayer Team
success: format: 9  data: 0x0 - 0x0
TV file format detected.
Selected driver: v4l2
 name: Video 4 Linux 2 input
 author: Martin Olschewski <[email protected]>
 comment: first try, more to come ;-)
Selected device: usbtv
 Capabilities:  video capture  read/write  streaming
 supported norms: 0 = NTSC; 1 = NTSC-M; 2 = NTSC-M-JP; 3 = NTSC-M-KR; 4 = NTSC-443; 5 = PAL; 6 = PAL-BG; 7 = PAL-H; 8 = PAL-I; 9 = PAL-DK; 10 = PAL-M; 11 = PAL-60;
 inputs: 0 = Composite; 1 = S-Video;
 Current input: 1
 Current format: YUYV
Selected input hasn't got a tuner!
v4l2: ioctl set mute failed: Invalid argument
[V] filefmt:9  fourcc:0x32595559  size:720x480  fps:5.000  ftime:=0.2000
videocodec: framecopy (720x480 24bpp fourcc=32595559)
Forcing audio preload to 0, max pts correction to 0.
Writing header...
ODML: Aspect information not (yet?) available or unspecified, not writing vprp header.
Writing header...
ODML: Aspect information not (yet?) available or unspecified, not writing vprp header.
Pos:   0.0s      1f ( 0%)  0.00fps Trem:   0min   0mb  A-V:0.000 [0:0]

Skipping frame!
Pos:   0.2s      2f ( 0%)  0.00fps Trem:   0min   0mb  A-V:0.000 [0:0]

Skipping frame!
Pos:   0.2s      3f ( 0%)  0.00fps Trem:   0min   0mb  A-V:0.000 [0:0]

Invalid frame duration value (0.120/0.000 => -0.120). Defaulting to 0.040 sec.

Skipping frame!
Pos:   0.2s      4f ( 0%)  3.96fps Trem:   0min   0mb  A-V:0.000 [0:0]
v4l2: select timeout

Skipping frame!
Pos:   0.2s      5f ( 0%)  3.26fps Trem:   0min   0mb  A-V:0.000 [0:0]

Skipping frame!
Pos:   0.2s      6f ( 0%)  2.91fps Trem:   0min   0mb  A-V:0.000 [0:0]

7 duplicate frame(s)!
Pos:   0.2s      7f ( 0%)  3.25fps Trem:   0min   0mb  A-V:0.000 [0:0]

Invalid frame duration value (1.800/0.000 => -1.800). Defaulting to 1.800 sec.

8 duplicate frame(s)!
Pos:   1.8s      8f ( 0%)  2.98fps Trem:   0min   0mb  A-V:0.000 [9216:0]

11 duplicate frame(s)!
Pos:   6.2s     11f ( 0%)  3.82fps Trem:   0min   0mb  A-V:0.000 [5351:0]

Skipping frame!
Pos:   6.4s     12f ( 0%)  4.11fps Trem:   0min   0mb  A-V:0.000 [5184:0]

Skipping frame!
Pos:   6.4s     13f ( 0%)  4.39fps Trem:   0min   0mb  A-V:0.000 [5184:0]

Invalid frame duration value (2.599/0.000 => -2.599). Defaulting to 0.040 sec.

Skipping frame!
Pos:   6.4s     14f ( 0%)  4.01fps Trem:   0min   0mb  A-V:0.000 [5184:0]
v4l2: select timeout

Skipping frame!
Pos:   6.4s     15f ( 0%)  3.73fps Trem:   0min   0mb  A-V:0.000 [5184:0]

Skipping frame!
Pos:   6.4s     16f ( 0%)  3.52fps Trem:   0min   0mb  A-V:0.000 [5184:0]

20 duplicate frame(s)!
Pos:   6.4s     17f ( 0%)  3.70fps Trem:   0min   0mb  A-V:0.000 [6048:0]

Invalid frame duration value (4.239/0.000 => -4.239). Defaulting to 4.239 sec.

20 duplicate frame(s)!
Pos:  10.6s     18f ( 0%)  3.51fps Trem:   0min   0mb  A-V:0.000 [4173:0]

23 duplicate frame(s)!
Pos:  19.8s     21f ( 0%)  3.92fps Trem:   0min   0mb  A-V:0.000 [3072:0]

Skipping frame!
Pos:  20.0s     22f ( 0%)  4.07fps Trem:   0min   0mb  A-V:0.000 [3041:0]

Invalid frame duration value (5.039/0.000 => -5.039). Defaulting to 0.040 sec.

Skipping frame!
Pos:  20.0s     23f ( 0%)  3.88fps Trem:   0min   0mb  A-V:0.000 [3041:0]
v4l2: select timeout

Skipping frame!
Pos:  20.0s     24f ( 0%)  3.72fps Trem:   0min   0mb  A-V:0.000 [3041:0]

Skipping frame!
Pos:  20.0s     25f ( 0%)  3.58fps Trem:   0min   0mb  A-V:0.000 [3041:0]

32 duplicate frame(s)!
Pos:  20.0s     26f ( 0%)  3.67fps Trem:   0min   0mb  A-V:0.000 [3317:0]

Invalid frame duration value (6.718/0.000 => -6.718). Defaulting to 6.718 sec.

32 duplicate frame(s)!
Pos:  26.6s     27f ( 0%)  3.55fps Trem:   0min   0mb  A-V:0.000 [2702:0]

36 duplicate frame(s)!
Pos:  40.8s     30f ( 0%)  3.85fps Trem:   0min   0mb  A-V:0.000 [2168:0]

Skipping frame!
Pos:  41.0s     31f ( 0%)  3.96fps Trem:   0min   0mb  A-V:0.000 [2157:0]

Invalid frame duration value (7.478/0.000 => -7.478). Defaulting to 0.040 sec.

Skipping frame!
Pos:  41.0s     32f ( 0%)  3.83fps Trem:   0min   0mb  A-V:0.000 [2157:0]
v4l2: select timeout

Skipping frame!
Pos:  41.0s     33f ( 0%)  3.71fps Trem:   0min   0mb  A-V:0.000 [2157:0]

Skipping frame!
Pos:  41.0s     34f ( 0%)  3.61fps Trem:   0min   0mb  A-V:0.000 [2157:0]

44 duplicate frame(s)!
Pos:  41.0s     35f ( 0%)  3.67fps Trem:   0min   0mb  A-V:0.000 [2292:0]

Invalid frame duration value (9.158/0.000 => -9.158). Defaulting to 9.158 sec.

45 duplicate frame(s)!
Pos:  50.0s     36f ( 0%)  3.58fps Trem:   0min   0mb  A-V:0.000 [1990:0]

48 duplicate frame(s)!
Pos:  69.0s     38f ( 0%)  3.73fps Trem:   0min   0mb  A-V:0.000 [1602:0]

Skipping frame!
Pos:  69.2s     39f ( 0%)  3.81fps Trem:   0min   0mb  A-V:0.000 [1598:0]

Skipping frame!
Pos:  69.2s     40f ( 0%)  3.89fps Trem:   0min   0mb  A-V:0.000 [1598:0]

Invalid frame duration value (9.918/0.000 => -9.918). Defaulting to 0.040 sec.

Skipping frame!
^Cs:  69.2s     41f ( 0%)  3.80fps Trem:   0min   0mb  A-V:0.000 [1598:0]
v4l2: select timeout

Skipping frame!
Pos:  69.2s     42f ( 0%)  3.71fps Trem:   0min   0mb  A-V:0.000 [1598:0]
Writing index...
Writing header...
ODML: Aspect information not (yet?) available or unspecified, not writing vprp header.

Video stream: 1598.150 kbit/s  (199768 B/s)  size: 13824000 bytes  69.200 secs  42 frames
v4l2: ioctl set mute failed: Invalid argument
v4l2: 26 frames successfully processed, 31 frames dropped.
pi@raspberrypi:/tmp $ 

dmesg information when I connect this HDMI->USB converter:

[ 2132.394435] usb 1-1.3: new high-speed USB device number 7 using dwc2
[ 2132.527882] usb 1-1.3: config 1 interface 0 altsetting 1 bulk endpoint 0x83 has invalid maxpacket 256
[ 2132.530876] usb 1-1.3: New USB device found, idVendor=1b71, idProduct=3002
[ 2132.530898] usb 1-1.3: New USB device strings: Mfr=3, Product=4, SerialNumber=2
[ 2132.530906] usb 1-1.3: Product: usbtv007
[ 2132.530915] usb 1-1.3: Manufacturer: fushicai
[ 2132.530923] usb 1-1.3: SerialNumber: 300000000002
[ 2132.532973] usbtv 1-1.3:1.0: Fushicai USBTV007 Audio-Video Grabber

mencoder version:

pi@raspberrypi:/tmp $ mencoder -v
MEncoder 1.3.0 (Debian), built with gcc-6.2.1 (C) 2000-2016 MPlayer Team

Can you see guys causes for an issue or do you need more details? I really appreciate any comment on that - thanks!

screen recording issue

I folllowed your guide, and copied hardware setting
https://www.amazon.com/dp/B012MDMWLM
https://www.amazon.com/dp/B0126O0RDC

I want to use this to connect to my ubuntu desktop machine ( 1080ti + intel 8700 core video chip)
but I always get black screen, when I do test via following command:

mencoder tv:// -tv driver=v4l2:norm=NTSC:device=/dev/video0:input=1:fps=5 -nosound -ovc copy -o test.avi
avconv -f video4linux2 -i /dev/video0 -vframes 1 -s 720x480 test.jpg

and also, I get alot frame skiping message, please help. thanks a lot.

--------------------------------env info-------------------------
pi@raspberrypi:~ $ mencoder -v
MEncoder 1.3.0 (Debian), built with gcc-6.2.1 (C) 2000-2016 MPlayer Team

pi@raspberrypi:~ $ mencoder tv:// -tv driver=v4l2:norm=NTSC:device=/dev/video0:input=1:fps=5 -nosound -ovc copy -o test.avi
MEncoder 1.3.0 (Debian), built with gcc-6.2.1 (C) 2000-2016 MPlayer Team
success: format: 9 data: 0x0 - 0x0
TV file format detected.
Selected driver: v4l2
name: Video 4 Linux 2 input
author: Martin Olschewski [email protected]
comment: first try, more to come ;-)
Selected device: usbtv
Capabilities: video capture read/write streaming
supported norms: 0 = NTSC; 1 = NTSC-M; 2 = NTSC-M-JP; 3 = NTSC-M-KR; 4 = NTSC-443; 5 = PAL; 6 = PAL-BG; 7 = PAL-H; 8 = PAL-I; 9 = PAL-DK; 10 = PAL-M; 11 = PAL-60;
inputs: 0 = Composite; 1 = S-Video;
Current input: 1
Current format: YUYV
Selected input hasn't got a tuner!
v4l2: ioctl set mute failed: Invalid argument
[V] filefmt:9 fourcc:0x32595559 size:720x480 fps:5.000 ftime:=0.2000
videocodec: framecopy (720x480 24bpp fourcc=32595559)
Forcing audio preload to 0, max pts correction to 0.
Writing header...
ODML: Aspect information not (yet?) available or unspecified, not writing vprp header.
Writing header...
ODML: Aspect information not (yet?) available or unspecified, not writing vprp header.
Pos: 0.0s 1f ( 0%) 0.00fps Trem: 0min 0mb A-V:0.000 [0:0]

Skipping frame!
Pos: 0.2s 2f ( 0%) 0.00fps Trem: 0min 0mb A-V:0.000 [0:0]

Skipping frame!
Pos: 0.2s 3f ( 0%) 0.00fps Trem: 0min 0mb A-V:0.000 [0:0]
.....

Serial-2-USB required?

Hi,

In reference to the issue #16 about to replace the HID USB module with other alternatives, I have one question:

  • As the Pi zero has UART ports in the GPIO pins, but the Pi3 has them too... why not interconnect them and remove the Serial-2-USB adapter?

Perhaps is an stupid question, but I really like to know why.
Please! 👼

What are the hard dependencies on Raspbian for the Pi3?

In your install guide you state the versions of OS to install on each device, and that a newer version of Raspbian Stretch will probably work on the Pi3 - what are the dependencies here for the Pi3, (and also the Pi0, out of curiosity?),

KVM with only Pi Zero W

Hi,

I don't know if you are intending to update this but I am currently looking at getting this running on a single pi zero w. You can now get a CSI to HDMI adaptor so that everything can just run off 1 pi.

I was wondering if you could help me get this working if you have some spare time.

Kind Regards

Keyboard input not working - possible compilation problem with hub-ctrl?

I'm getting no keyboard commands to my target machine. I can successfully attach to the Pi0 via screen from the Pi3, but issuing sendkeys commands just hang there, If I run hub-ctrl with no arguments on the Pi0 I get this output:

pi@raspberrypi:~$ ./hub-ctrl
./hub-ctrl: line 1: /bin: Is a directory
./hub-ctrl: line 15: struct: command not found
./hub-ctrl: line 16: const: command not found
./hub-ctrl: line 17: unsigned: command not found
./hub-ctrl: line 18: syntax error near unexpected token `}'
./hub-ctrl: line 18: `};'

Whereas running hub-ctrl on the Pi3 gives this output:

pi@mincepi:/opt/diy-ipmi/Pi0 $ ./hub-ctrl
Hub #0 at 001:000
 INFO: ganged switching.
 WARN: Port indicators are NOT supported.
Hub #1 at 001:000
 INFO: ganged switching.
 WARN: Port indicators are NOT supported.

Perhaps a compilation issue? I'll try compiling it on a Pi0 instead, and see if that helps.

No reboot needed - can i skip the relay board?

Hi,

Similar to others on here, I am looking at this for remote support for users who are present, so am not worried about remote reboot. Does this mean i can leave the relay board out completely, and therefore the GPIO pins and cables?

Thanks for a great project!
Justin

[Question] PXE support?

Thanks for your efforts to maintain this project. Absolutely useful.

I could not find PXE part and wonder it's possible to do.

Thanks

[Suggestion] Add IPMI API Endpoints?

Mentioned in #17 and something I've been considering for a while and casually researched. Adding some IPMI endpoints and bindings so external software can automate control of the systems being power managed. Possibly a big job!

USB Gadget Problems

I'm unable to use the keyboard functionality of diy-ipmi. After poking around a bunch I'm no clearer on what the issue is. I can see in the process list that if I've tried sending a key the sendkey process is sat there indefinitely. I also see that there are 3 agetty processes (might be fine?) and one of them is sucking up almost 100% CPU:

x410_rlgqfkx4qx

Ansible playbook does not provision VM in vCenter

I am having a issue with Ansible playbook, all task complete successfully the folder is created in the vCenter but not the VM.

Ansible version: ansible [core 2.13.3]
Redhat version: Red Hat Enterprise Linux release 8.7 (Ootpa)
Linux kernel: 4.18.0-425.3.1.el8.x86_64

$ ansible-playbook -i inventory create_vm.yml -v
Using /home/[email protected]/ansible-playground/vmware/ansible.cfg as config file

PLAY [create vm] ******************************************************************************

TASK [include_vars] ***************************************************************************
ok: [localhost] => {"ansible_facts": {"vcenter_cluster": "ml-prod", "vcenter_datacenter": "ml", "vcenter_destination_folder": "test-dex", "vcenter_hostname": "ml-vc1p.latrobe.biz", "vcenter_password": "@Da31121962", "vcenter_username": "[email protected]", "vcenter_validate_certs": false, "vm_disk_datastore": "ml_napesx2p_ds6", "vm_disk_gb": 16, "vm_disk_type": "thin", "vm_guestid": "relhat9", "vm_hw_cpu_n": 1, "vm_hw_ram_mb": 2048, "vm_hw_scsi": "paravirtual", "vm_name": "test-dex", "vm_net_name": "VMware VMXNET3", "vm_net_type": "VMXNET 3", "vm_state": "shutdownguest"}, "ansible_included_var_files": ["/home/[email protected]/ansible-playground/vmware/vars/vars_create.yml"], "changed": false}

TASK [create folder] **************************************************************************
ok: [localhost] => {"changed": false, "result": {"msg": "Folder test-dex already exists", "path": "/ml/vm/test-dex"}}

TASK [create VM] ******************************************************************************
ok: [localhost] => {"changed": false}

PLAY RECAP ************************************************************************************
localhost : ok=3 changed=0 unreachable=0 failed=0 skipped=0 rescued=0 ignored=0

HDMI extender as capture device

Hi,

This is a great project!

Regarding the current video capture method: one HDMI to TV Composed Video converter + one USB TV capture USB device. I suggest to replace both with a direct HDMI-to-Network Stream:

https://github.com/AdamLaurie/hdmi-rip
https://github.com/benjojo/de-ip-hdmi

The current solution cost around $50, that's more than the HDMI extender. Futhermore, the HDMI extender can work with all generic HDMI resolutions: 1080, 720 and SD. So it improves the flexibility if the PC to control has a common HDMI/DVI port.

Even cheaper KVM with only Pi Zero W

Hallo Fmstrat,

thanks for providing this full featured KVM solution.
I didn't find any contact E-Mail so I use this issue section.

Have you ever thought about making this KVM even a lot cheaper? With a raspberry PI Zero W and the Raspi Camera you only need those 2 devices (and a monitor of course). The kamera just records the screen, sends it and you can also interact. No need for a RPi 3, Videograbber and stuff like that.
Of course your code is opensource, everyone can adopt your code. However you know your code, you probably would to it in a tenth of the time someone would need who never had to do with your code before.

Can you create an additional project with KVM based solo on a raspbery PI Zero? Together with TP-Link HS110 you can even switch the PC on and off https://github.com/softScheck/tplink-smartplug

Thanks in advance.

Diagram has incorrect wire to relay

No idea if this repo is still active but it's a cool project and I bought the parts and am building out a newer version with a current version of Raspbian. I did use the suggested relay and found that to get the power to work it was actually slots one and two on the relay:

image

Possible Alternative SBC to lower cost

Thanks for creating this project! I haven't dipped my toe in the water yet (excited that the rpi B+ is out!)

I noticed that there are two SBC's that feature HDMI-in and cost ~$100:

RockChip Based (not sure if supports OTG):
http://www.orangepi.org/Orange%20Pi%20RK3399/

Qualcom Based:
https://www.inforcecomputing.com/products/application-ready-platforms/qualcomm-snapdragon-600-inforce-6420t

The questions:

  1. Given that these handle encoding, would these present a simpler platform?

  2. Would USB OTG solve the need for a USB-to-Serial adapter + Pi0? (If I understand what's happening here, the RPi0 is emulating a USB device?

  3. Any thoughts on implementing? (I'd pitch in, but I barely know su from sudo ... linux development is a bit beyond me.)

Can't connect to RPI0

For some reason, the script fails on connecting to PI0.
When I try screen /dev/ttyUSB0 115200 after a few seconds I can see login and password quickly passing through the screen. Any idea what is wrong with it?

Error is:
-=- Logging into the Pi0 -=- Error logging into Pi0 on try 1.. Retrying in 10s /opt/diy-ipmi/Pi3/checkPi0Login.sh: line 6: 1793 Terminated cat 0<&3 > /mnt/ramdisk/ttyDump.dat Error logging into Pi0 on try 2.. Retrying in 10s /opt/diy-ipmi/Pi3/checkPi0Login.sh: line 6: 1833 Terminated cat 0<&3 > /mnt/ramdisk/ttyDump.dat Error logging into Pi0 on try 3.. Retrying in 10s /opt/diy-ipmi/Pi3/checkPi0Login.sh: line 6: 1839 Terminated cat 0<&3 > /mnt/ramdisk/ttyDump.dat Error logging into Pi0 on try 4.. Retrying in 10s /opt/diy-ipmi/Pi3/checkPi0Login.sh: line 6: 1843 Terminated cat 0<&3 > /mnt/ramdisk/ttyDump.dat Error.. Giving up -=- Logging into the Pi0 as 'pi' with password 'raspberry' has failed -=- Open another terminal session and use 'screen /dev/ttyUSB0 115200' to login to the Pi0 Once logged in, hit 'Ctrl-A' then type ':quit' to exit the screen session Lastly, return here and press 'Enter' to continue or 'Ctrl-C' to give up. -=-

Can't access Pi0 via Serial

You can get the details of my issue here:

https://raspberrypi.stackexchange.com/questions/82911/cant-login-to-pi0-console-from-pi3-b-via-uart-serial-usb-tty-adapter?noredirect=1#comment131471_82911

I do get a blank screen via screen /dev/ttyUSB0 115200 but no matter how many times I press enter, a blank screen is all I see. Not sure if it is a driver related issue or what but I can't seem to figure it out.

Do I need to be passing a parameter?:

Name:   dwc2
Info:   Selects the dwc2 USB controller driver
Load:   dtoverlay=dwc2,<param>=<val>
Params: dr_mode                 Dual role mode: "host", "peripheral" or "otg"

        g-rx-fifo-size          Size of rx fifo size in gadget mode

        g-np-tx-fifo-size       Size of non-periodic tx fifo size in gadget
                                mode

        g-tx-fifo-size          Size of periodic tx fifo per endpoint
                                (except ep0) in gadget mode

Recommend Projects

  • React photo React

    A declarative, efficient, and flexible JavaScript library for building user interfaces.

  • Vue.js photo Vue.js

    🖖 Vue.js is a progressive, incrementally-adoptable JavaScript framework for building UI on the web.

  • Typescript photo Typescript

    TypeScript is a superset of JavaScript that compiles to clean JavaScript output.

  • TensorFlow photo TensorFlow

    An Open Source Machine Learning Framework for Everyone

  • Django photo Django

    The Web framework for perfectionists with deadlines.

  • D3 photo D3

    Bring data to life with SVG, Canvas and HTML. 📊📈🎉

Recommend Topics

  • javascript

    JavaScript (JS) is a lightweight interpreted programming language with first-class functions.

  • web

    Some thing interesting about web. New door for the world.

  • server

    A server is a program made to process requests and deliver data to clients.

  • Machine learning

    Machine learning is a way of modeling and interpreting data that allows a piece of software to respond intelligently.

  • Game

    Some thing interesting about game, make everyone happy.

Recommend Org

  • Facebook photo Facebook

    We are working to build community through open source technology. NB: members must have two-factor auth.

  • Microsoft photo Microsoft

    Open source projects and samples from Microsoft.

  • Google photo Google

    Google ❤️ Open Source for everyone.

  • D3 photo D3

    Data-Driven Documents codes.