 Change-log & Version Release Features
-
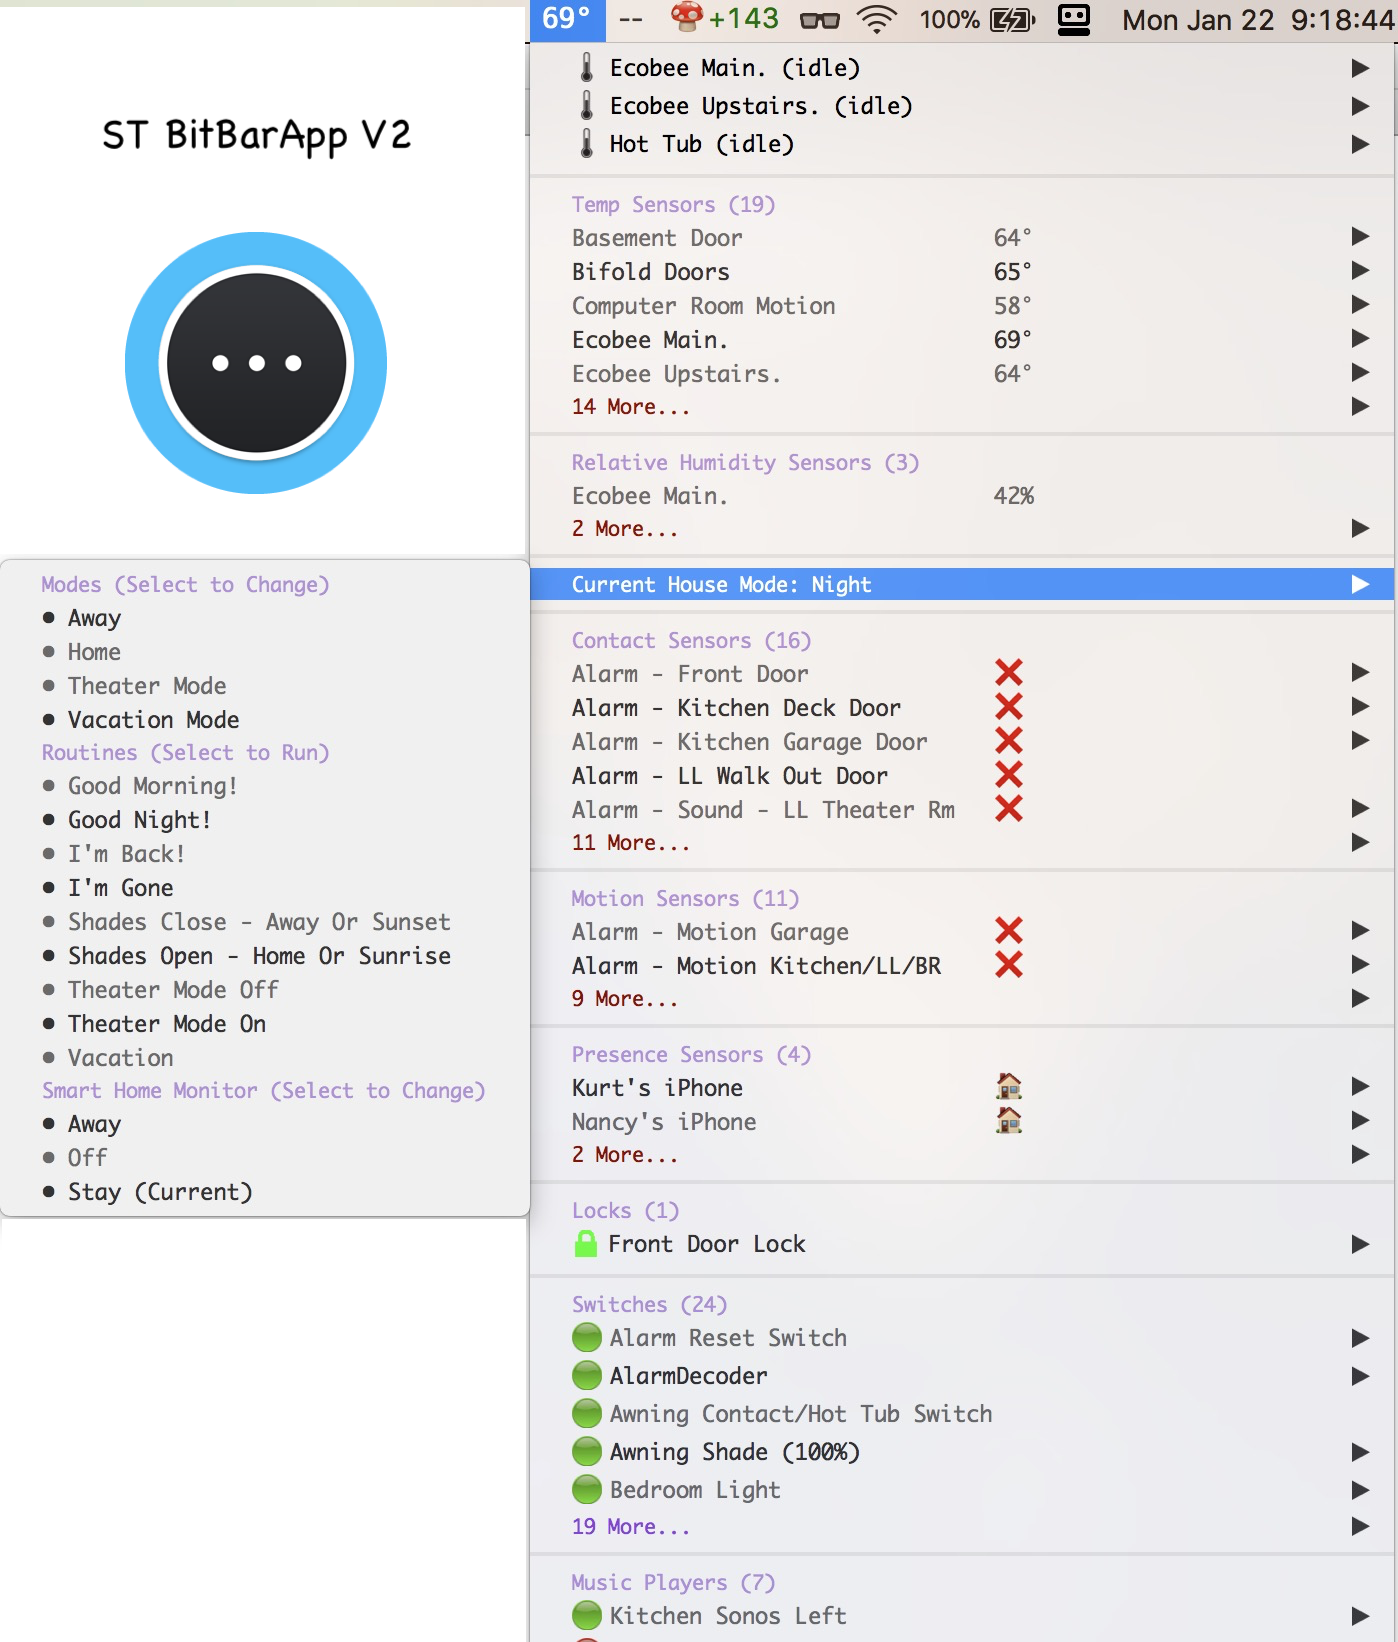
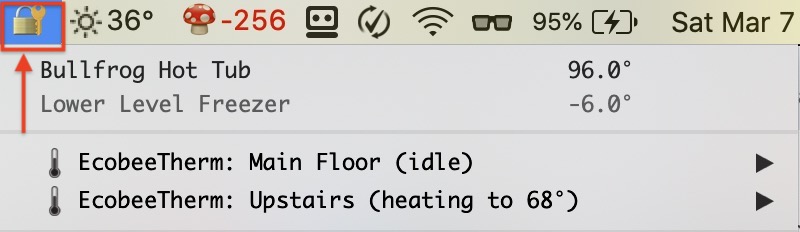
Allow one SmartThings device of either a lock, contact, switch, or temperature sensor to be designated in the BitBar Top Menu Bar. Red & green circle emoji's will be shown in the top Mac menu bar for the selected device status for a contact sensor (Open/Close) or switch sensor (On/Off). An integer value with degree symbol will be displayed when a temperature sensor is designated. The top menu bar sensor choice settings is set in the ST BitBar Output SmartApp under 'Select devices'.
Example Lock emoji in Top Menu Bar when a 'Lock' is designated
-
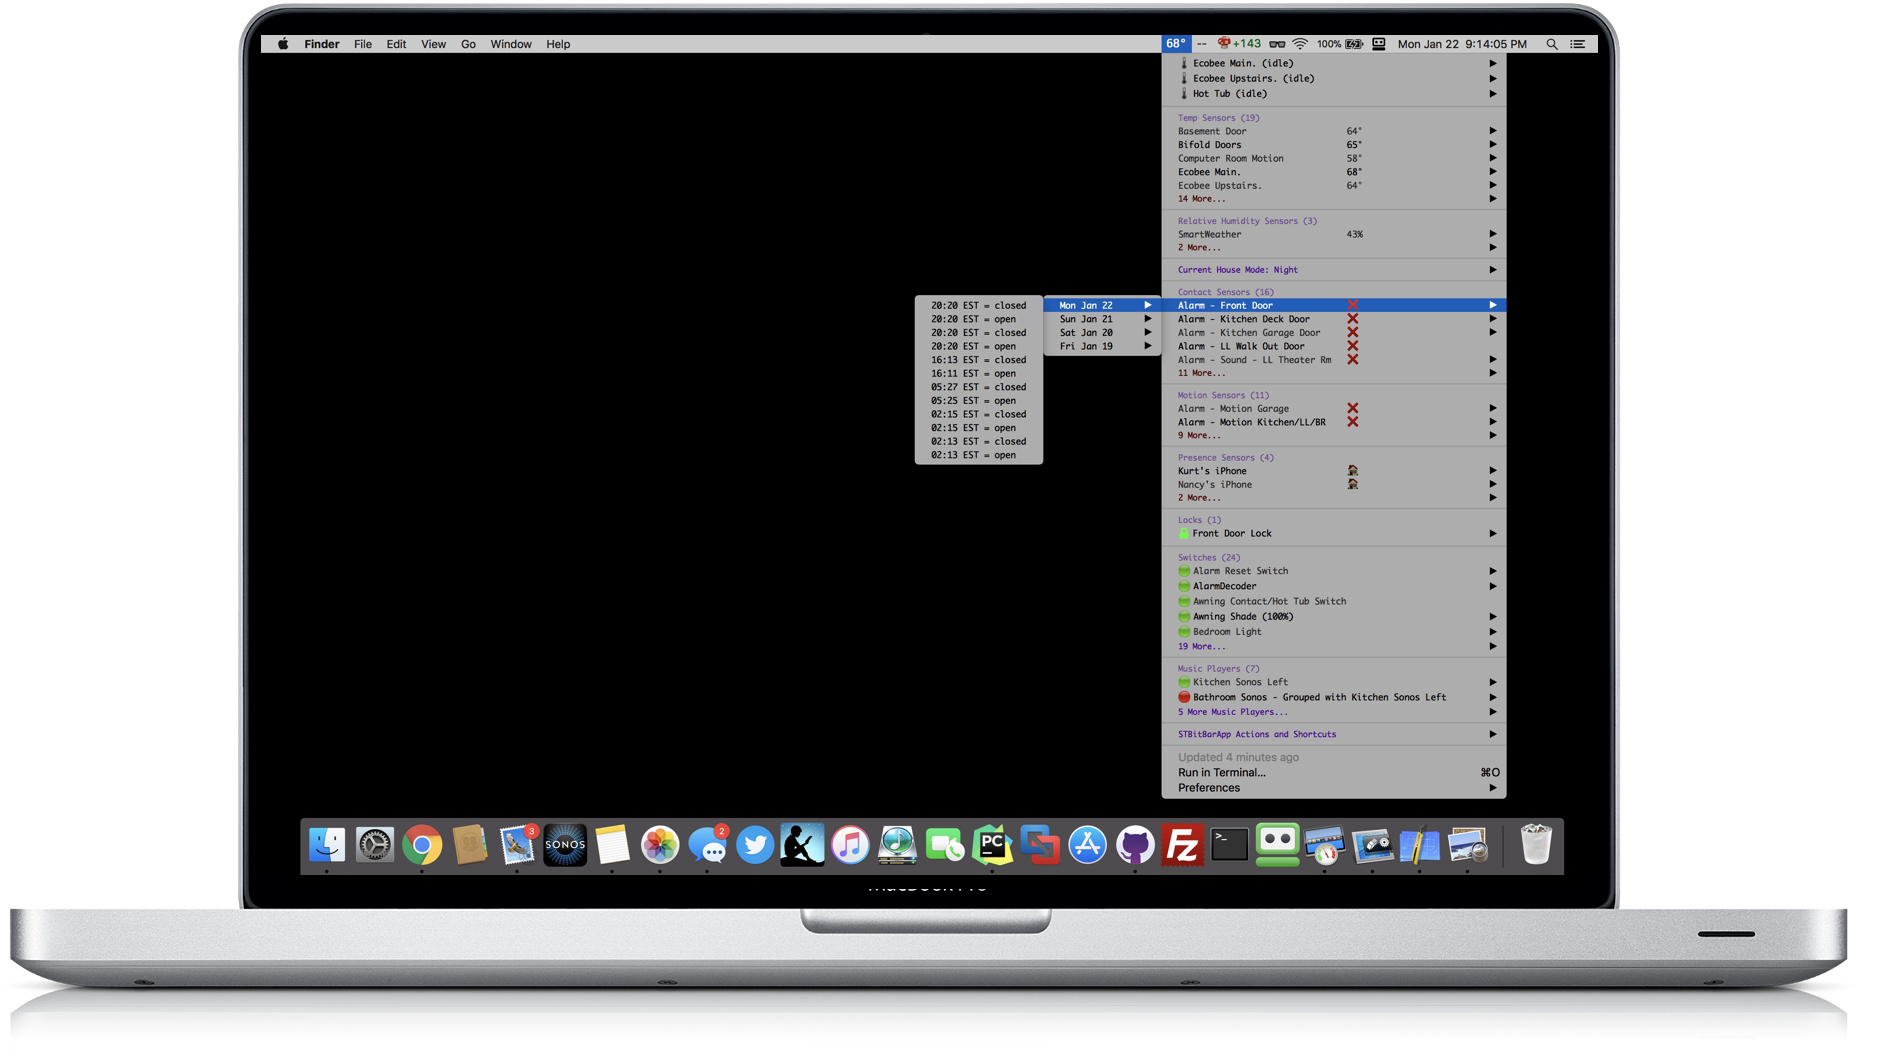
Provides for a MacOS right sidebar notification when:
-
Confirms a device change from the BitBar Menu Bar
-
Shows the timed device status refresh

-
-
The ST.1m.sh script allow a user to set a shell variable to suppress/turn On|Off MacOS sidebar notifications
-
Provides for a user defined automatic device refresh time set in the ST.1m.sh file after a ST device change from Mac Top Menu Bar. The default is 5 sec after device change which allows time for the device to report status to ST Cloud API.
-
The ST BitBar SmartApp now provides one to send the secret API strings ad SMS delivered (unencrypted) to a USA mobile phone number from the ST BitBar SmartApp 'API Setup' page.
-
Added the following information to be displayed in the mobile ST BitBar Output SmartApp main menu for:
- ST BitBar Output SmartApp version
- ST_Python_Logic.py version
- ST.xm.sh version (where 'x' is an integer number (default is now 1 for version 4.x.x) reflecting the number of minutes for normal polling of SmartThings devices defined to ST BitBar Output App. Please do not change this value (x) to less than 1m which polls excessively and will impact Mac performance and the SmartThings API cloud. If you would like a slower polling rate or your Mac is not capable of completing a poll within the time period, I recommend '3m' or '5m' for 'x' in ST.xm.sh file (Example: rename ST.1m.sh to ST.5m.sh)
- BitBar Plugin Folder Location on Mac
-
A new Install/Upgrade command script for ease of setting up or maintaining the BitBar Plugin Folder (See Installation below). The install script can either create a new ST BitBar folder structure and download local files, or be used in an existing install to 'refresh/download' new local files.
- The ST_Python_logic.cfg will not be overwritten if it exists in the BitBar plugin folder. You must manually add your ST BitBar Output API strings for a new installation using a text editor on the Mac, like Textedit.
-
Added a 'Download ST BitBar Installation/Upgrade script to your 'Downloads' directory' to the 'STBitBarApp Actions and Shortcuts' choice on the BitBar Menu (located at the bottom of the screen). This choice will download the command file to your Downloads folder so you can double click in Finder to execute.
-
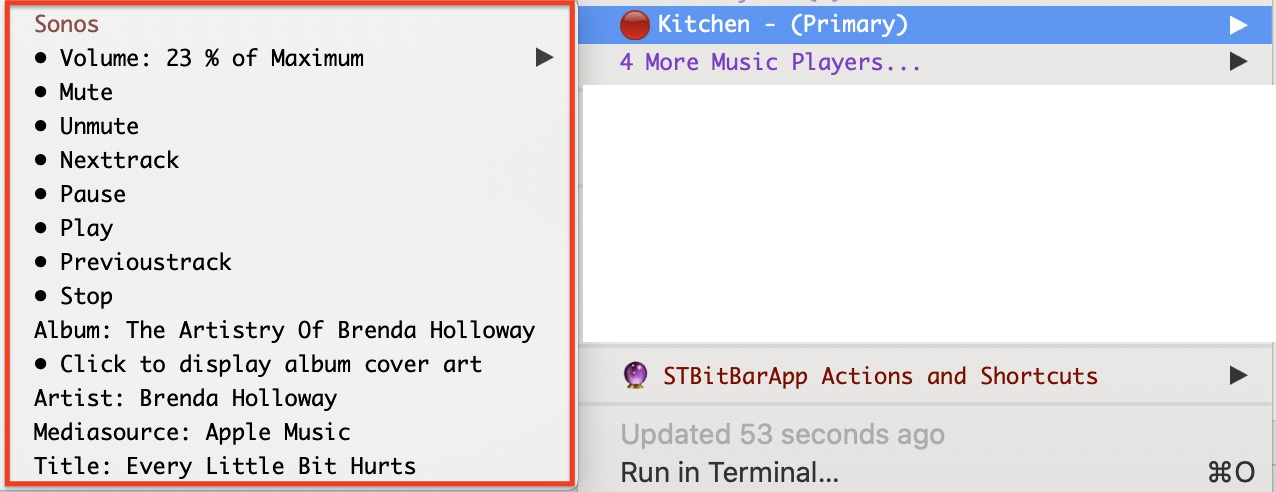
Enhanced the Media Playback Functions
- The new capabilities for Media Playback has been expanded and these new functions will be sent to the device with 'best effort' for action. Not all media playback devices can accomodate these commands.
- Album artwork can be displayed via a new browser tab by clicking the choice or rendered in a nested submenu depending on the preferences set in the BitBar SmartApp display options.
- Volume level is represented as a percentage of the devices maximum capability.
- Multi-device group playback is displayed on capable media playback devices with either a 'Primary' or 'Auxiliary' label which is provided by SmartThings API. This label designation assists one in sending a change command to the 'Primary' group controller which should scope the whole group of Media Playback devices.
-
Application version upgrade awareness will detect when local and/or ST cloud files require upgrades. These upgrade notifications will be displayed in the BitBar submenu. Please follow the instructions in these choices to keep current with the latest production release. If you need to manually run this Terminal script, please copy/paste the string below into your Terminal.app window as well as perform an 'Update from Repo' from the ST IDE SmartApps view.
curl -s -O -J -L "https://raw.githubusercontent.com/KurtSanders/STBitBarApp-V2/master/installation/STBitBarInstall.command" && sh ./STBitBarInstall.command -
Local python runtime statistics are now collected and presented in the BitBar's 'STBitBar Actions and Shortcuts' menu choice at the bottom of the BitBar submenu. This wall clock time will help users with slower Mac's optimize the frequency of polling (See #6 above)
Monitor and control SmartThings devices, sensors, Smart Home Monitor, Modes & Routines from the Apple MacOS Menu Bar. This application is controlled via the SmartThings Mobile Client named BitBar Output App. Selected program scripts and configuration files are installed locally on the Apple Mac in the BitBar plugin folder.
The STBitBarApp-V2 application works with the MacOS BitBar application as a custom BitBar Plugin and is controlled via the SmartThings BitBar Output SmartApp. STBitBarApp-V2 displays SmartThings thermostat information, temperature, relative humidity, event-log statistics, contacts, music players, presence devices, locks, lights, and motion sensors. It can also control color control (RGB) device levels, switch/dimmer level devices, locks and also thermostat control via the MacOS menubar. The Mac menubar icon can be a thermostat reading, contact sensor, lock sensor or switch sensor and upon clicking the displayed state icon, renders more detailed information on all the SmartThings selected in the SmartApp GUI.
One can click on any controllable SmartThings device, mode or routine in the Mac's BitBar display to invoke the default action for that device, mode or routine. Non-controllable devices (eg. presence sensors, motion sensors, temperature sensors) can show their event history.
Sensor battery levels can be displayed for devices that have a battery capability by depressing the Apple {option} key as the BitBar menu is activated {being displayed}.
- Apple macOS 10.x with Python 2.7
- BitBar Software Installed and Preferences set as 'Open at Login' and BitBar plugin folder designted *Freeware*
- SmartThings Hub & Devices
- Knowledge of installing and configuring software on macOS and SmartThings IDE
- Member of SmartThings Community for support and new releases
-
Download and Install BitBar Core Software *Freeware*
- Download BitBar-v1.9.2.zip to your Downloads folder.
- Launch Finder and navigate to your Downloads folder
- Double click the BitBar-v1.9.2.zip file to unzip the file contents.
- Drag/Move the BitBar.app into your Mac's Applications folder
- Launch BitBar.app from your Mac's Application folder
- Locate the BitBar icon displayed in the Mac's Top Menu Bar. Click the BitBar icon to display preferences dialogue menu.
- In the Mac Menu Bar, click the BitBar Icon and set BitBar preferences to:
- √ Open at Login
- Select the 'Plugin Folder' on the Mac (.ie
/Users/smith/BitBar)
-
Launch the Terminal.app from the Mac Applications 'Utility' SubFolder
-
In the terminal console window, enter the following:
cd ~\Downloads -
Press Return
-
Select, copy and paste the following entire string into the Mac's Terminal Console Window.
curl -s -O -J -L "https://raw.githubusercontent.com/KurtSanders/STBitBarApp-V2/master/installation/STBitBarInstall.command" && sh ./STBitBarInstall.command -
Press Return
-
Read install/upgrade messages from the script.
-
Your ST BitBar Plugin's directory has been created or upgraded to the latest ST BitBar-V2 release.
The recommended approach for ST BitBar SmartThings installation on the Mac is to use the integration of your SmartThings IDE and GitHub so that updates to the BitBar Output SmartApp are visual and easier.
A new Install or Version Updates to the shell scripts and Python source code located on your MacOS is either by STBitBarInstall.command script or a manual method by downloading the source code from the Github repository. This manual will not go into detail about setting up your SmartThings IDE with GitHub as that is documented in the SmartThings GitHub Documentation.
-
Setup the SmartApp: Find your SmartThings IDE Link
-
Find the My SmartApps link on the top of the page.
-
Find the Settings button at the upper-right corner of your SmartThings IDE page (this will only appear after you have configured with GitHub).
-
Clicking this button will open the GitHub Repository Integration page. To find the StBitBarApp SmartApp code, enter the information below:
Name Value Owner kurtsanders Name: STBitBarApp-V2 Branch master -
Close the GitHub Repository Integration page by clicking the Save button.
-
Click the Update from Repo button at the upper-right corner of your SmartThings IDE and select STBitBarApp-V2 (master) from the list.
-
In the right-hand column you will see smartapps/kurtsanders/stbitbar.src/stbitbar.groovy, select this using the checkbox.
-
At the bottom-right corner of the Update from Repo page, select Publish using the checkbox and then click Execute Update.
-
When done syncing, the new SmartApp should now appear in your IDE.
-
If they ever change color, that indicates a new version is available.
-
Enable OAuth: Back at the My SmartApps page, click the little edit icon for the BitBar Output App, then click OAuth section, then click Enable OAuth in SmartApp.
-
Skip to Section 2 below
- Setup the SmartApp: Find your SmartThings IDE Link
- Click My SmartApps > then New SmartApp (top-right green button)
- Click the From Code tab and paste the SmartApp code from GitHub then click Create.
- Enable OAuth: Back at the My SmartApps page, click the little edit icon for the BitBar Output App, then click OAuth section, then click Enable OAuth in SmartApp.
- Now for actually installing the SmartApp: On your mobile device in the SmartThings app > tap Automation > SmartApps > + Add a SmartApp (at the bottom). Go down to My Apps > select BitBar Output App.
- Open the IDE in a separate browser tab.
- In the mobile client, tap to Enable the API then tap Done.
- Your secret URL and API secret is displayed in the Live Logging screen tab when you exit the ST BitBar SmartApp on the mobile phone.
- :New: One can also select 'Send API to a Mobile Device' in the 'API Setup'. This will send the two secret strings to a mobile phone as SMS message. Indicate a USA mobile phone number and select send to mobile phone.
- Copy/Save these two lines to input in the ST_Python_Logic.cfg in the step ahead. Use Textedit.app to edit the ST_Python_Logic.cfg on the Mac. Input the two secret strings exactly as the template shows, using double quotes.
- Launch the ST BitBar Output SmartApp in mobile SmartThings client and you should now see local file version information if your local Mac setup is completed correctly. You may complete/customize your BitBar Top menu by:
- Selecting Devices: choose the devices you want to display/control then tap Done.
- Selecting Display Options: select the display options for the MacOS menu. Please note that some option values are required.
In Version V4, these manual steps below are now automated in Section 1 Installation. If you prefer the manual install method, follow the steps below.

-
Required: You must download and install the core BitBar app on your Mac. This program is required to allow ST BitBar SmartApp to access the top menubar on the Mac.
-
After downloading and installing the BitBar App & moving the BitBar App file to your applications folder, launch the BitBar App so that you can set the path for your Plugin directory.
IMPORTANT: When selecting a plugin directory where the plugins will reside, make sure you create one that does not contain spaces. There were issues in an older release of BitBar if the path contained spaces, but supposedly it’s fixed, but I still had issues in some cases. If there were no spaces, it always worked.
-
In the BitBar application menu, the last option is labeled 'Preferences', make sure you select 'Open at Login' and specify the Plugin directory where you will place the plugin files from this Github in the next step.
-
Download the ST plugin from GitHub. Copy ONLY the ST.5m.sh file to the plugin directory you specified along with the ST subfolder containing the Python script and the ST_Python_Logic.cfg (make sure these two files stay in the folder named ST). These files should be the only files in the plugins directory and the ST subfolder.
-
Launch the SmartThings BitBar Output App on your mobile device. Select API Setup and Activate. Follow the screen instructions and record the SmartThings URL and secret strings. One can view the ST IDE Live Logging screen to copy the strings when launching and exiting the BitBar Output App on your mobile screen.
- Note: You can also choose to have your API strings send unencrypted to a mobile device with a USA phone number. This will allow one to copy and paste these into your ST_Python_Logic.py file from the Mac messaging app.
-
Add your URL and secret to the ST_Python_Logic.cfg file without any quotes: Open the ST_Python_Logic.cfg with a text editor of your choice (eg. textedit). Put the URL that was displayed in step 5 in the smartAppURL variable and Secret in the secret variable without any quotes.
-
Save the ST_Python_Logic.cfg file in the ST subfolder.
-
Ensure execution rights for the plugins:
- Launch the MacOS Terminal Application
- Navigate to your BitBar Plugins directory (eg. cd)
- Issue the admin commands on the following files:
- chmod +x ST.1m.sh
- chmod +x ST_Python_Logic.py
- Exit the MacOS Terminal
-
Start the BitBar app and you should see your SmartThings devices and status’ in the MacOS menubar!
- Dimmer and Color Controls in BitBar Sub-Menus
![]()
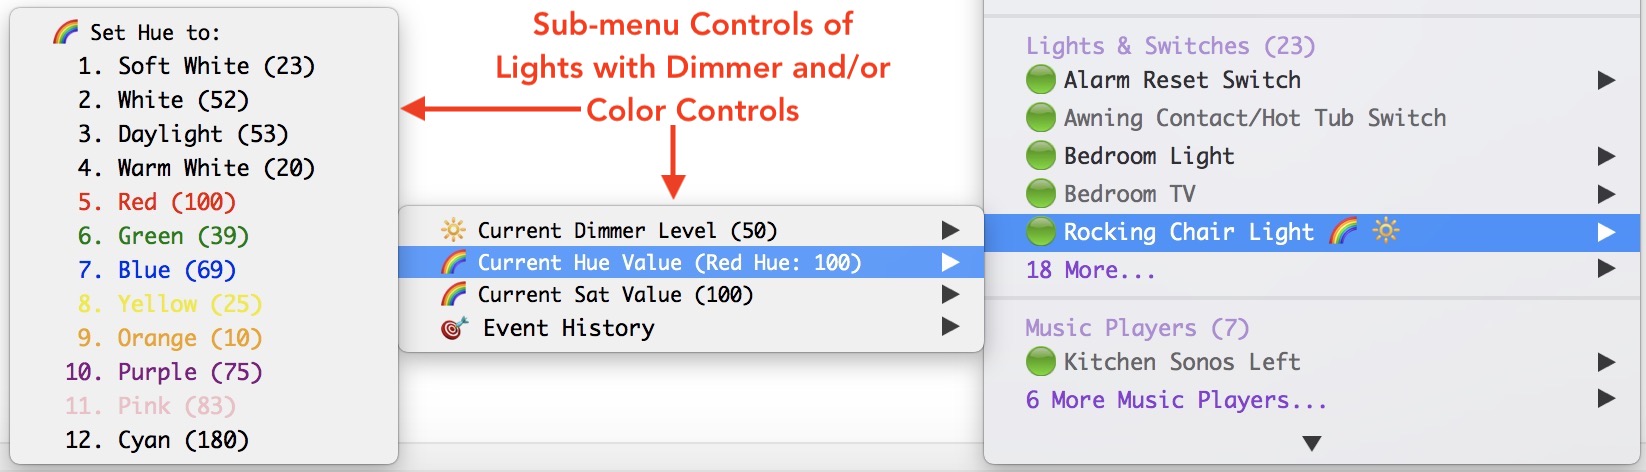
- The BitBar App is capable of cycling through multiple status bar items. However, this ST BitBar Plugin is designed to only display a ** temperature sensor, contact sensor, lock status, or switch sensor** at the top with the rest of the sensors displayed in the dropdown.
- The ST BitBar app only allows a selection of one temp, lock, contact or switch sensor or a default 'ST BitBar' title. It is not recommended to use the full sensor name since menubar real estate is top dollar.
- There is no hortizontal alignment supported by BitBar so it’s all done by character spacing, which means using Apple system monospace fonts for data content. Menlo is the default font, but feel free to change it in the ST BitBar App in the mobile client Display Options.
- Selection of a proportional spaced font, pitch and color can be used for all other text areas of the display, like the ST Categories and the ...more... sections. Be aware that some fonts, colors and sizes may cause the menu to become illegible. Blank field defaults in the options fields will return the display to normal.
- Most areas of the menu will accomodate extended ascii character sets, but there might be areas that not. If so, please rename these devices with US ascii characters and send a PM to me on the SmartThings Community Forum.
 Be mindful of the # of devices selected, event history days/number settings as the SmartThings Computing Cloud has implemented strict SmartApp rate runtime limits that will prevent the BitBar Output App SmartApp from execution. When a client application exceeds the rate limits for a given SmartThings API, the SmartThings API responds with the standard HTTP 429 (Too Many Requests) error code.
- Hold the Option key while the BitBar menu is open to display battery information for devices that can report battery level status.
- The max items per sensor category can be set in BitBar Output SmartApp Menu Options (if you want to save space but still have access to the sensors)
- Use Command-R while viewing the STBitBarApp-V2 menu to Refresh the devices, otherwise it will automatically refresh every 5 minutes.
- You can download the latest version of the Python code at the bottom of the STBitBarApp Menu under STBitBarApp Action & Shortcuts
- Emoji short-names are special graphical icons that can be displayed for custom device status. Please note that these short naming convention is ':xxxxx:' and the name must be entered exactly as they are named on the Emoji Website Valid Names List
- Many other display options are provided and activated in the STBitBarApp SmartApp and are either optional or required.
