
支持:vless,vmess,shadowsocks,hysteria2
更多说明请移步:wiki
AirGo, front and rear end separation, multi user, multi protocol proxy service management system, simple and easy to use.
support: vless,vmess,shadowsocks,hysteria2
- AirGo 前后端分离,多用户,多协议代理服务管理系统,简单易用
- 面板部分功能展示
- 一、部署
- 二、对接节点
- TG频道:https://t.me/Air_Go
- TG群组:https://t.me/AirGo_Group * 文档上次更新日期:2024.4.7
Display of panel functions

| 
| 
|

| 
| 
|

|
- 安装方式分为:直接安装(支持前后端分离)、使用docker安装
- 使用Ubuntu、Debian、Centos等Linux系统,执行以下命令,然后根据提示安装
bash <(curl -Ls https://raw.githubusercontent.com/ppoonk/AirGo/main/server/scripts/install.sh)
- 安装完成后 请参考配置文件说明 修改配置文件
- 管理脚本命令:
AirGo
- 在合适的目录新建配置文件,例如:/$PWD/air/config.yaml,配置文件内容如下:
system:
  admin-email: [email protected]
  admin-password: adminadmin
  http-port: 80
  https-port: 443
  db-type: sqlite
mysql:
  address: mysql.sql.com
  port: 3306
  config: charset=utf8mb4&parseTime=True&loc=Local
  db-name: imdemo
  username: imdemo
  password: xxxxxx
  max-idle-conns: 10
  max-open-conns: 100
sqlite:
  path: ./air.db
- 根据自己的需求,修改配置文件(关于配置文件 请见配置文件说明)
- 启动docker命令参考如下:
docker run -tid \
  -v $PWD/air/config.yaml:/air/config.yaml \
  -p 80:80 \
  -p 443:443 \
  --name airgo \
  --restart always \
  --privileged=true \
  ppoiuty/airgo:latest
docker compose参考如下:
version: '3'

services:
  airgo:
    container_name: airgo
    image: ppoiuty/airgo:latest
    ports:
      - "80:80"
      - "443:443"
    restart: "always"
    privileged: true
    volumes:
      - ./config.yaml:/air/config.yaml
- 为了网站的传输中的安全,可选择申请ssl证书
- 可通过管理脚本中acme.sh申请脚本进行证书申请(通过DNS TXT记录手动模式申请,无80和443端口也可申请证书
- 如果您已经拥有证书,只需要复制在安装目录(/usr/local/AirGo/)下,将其重命名为
air.cer,air.key即可
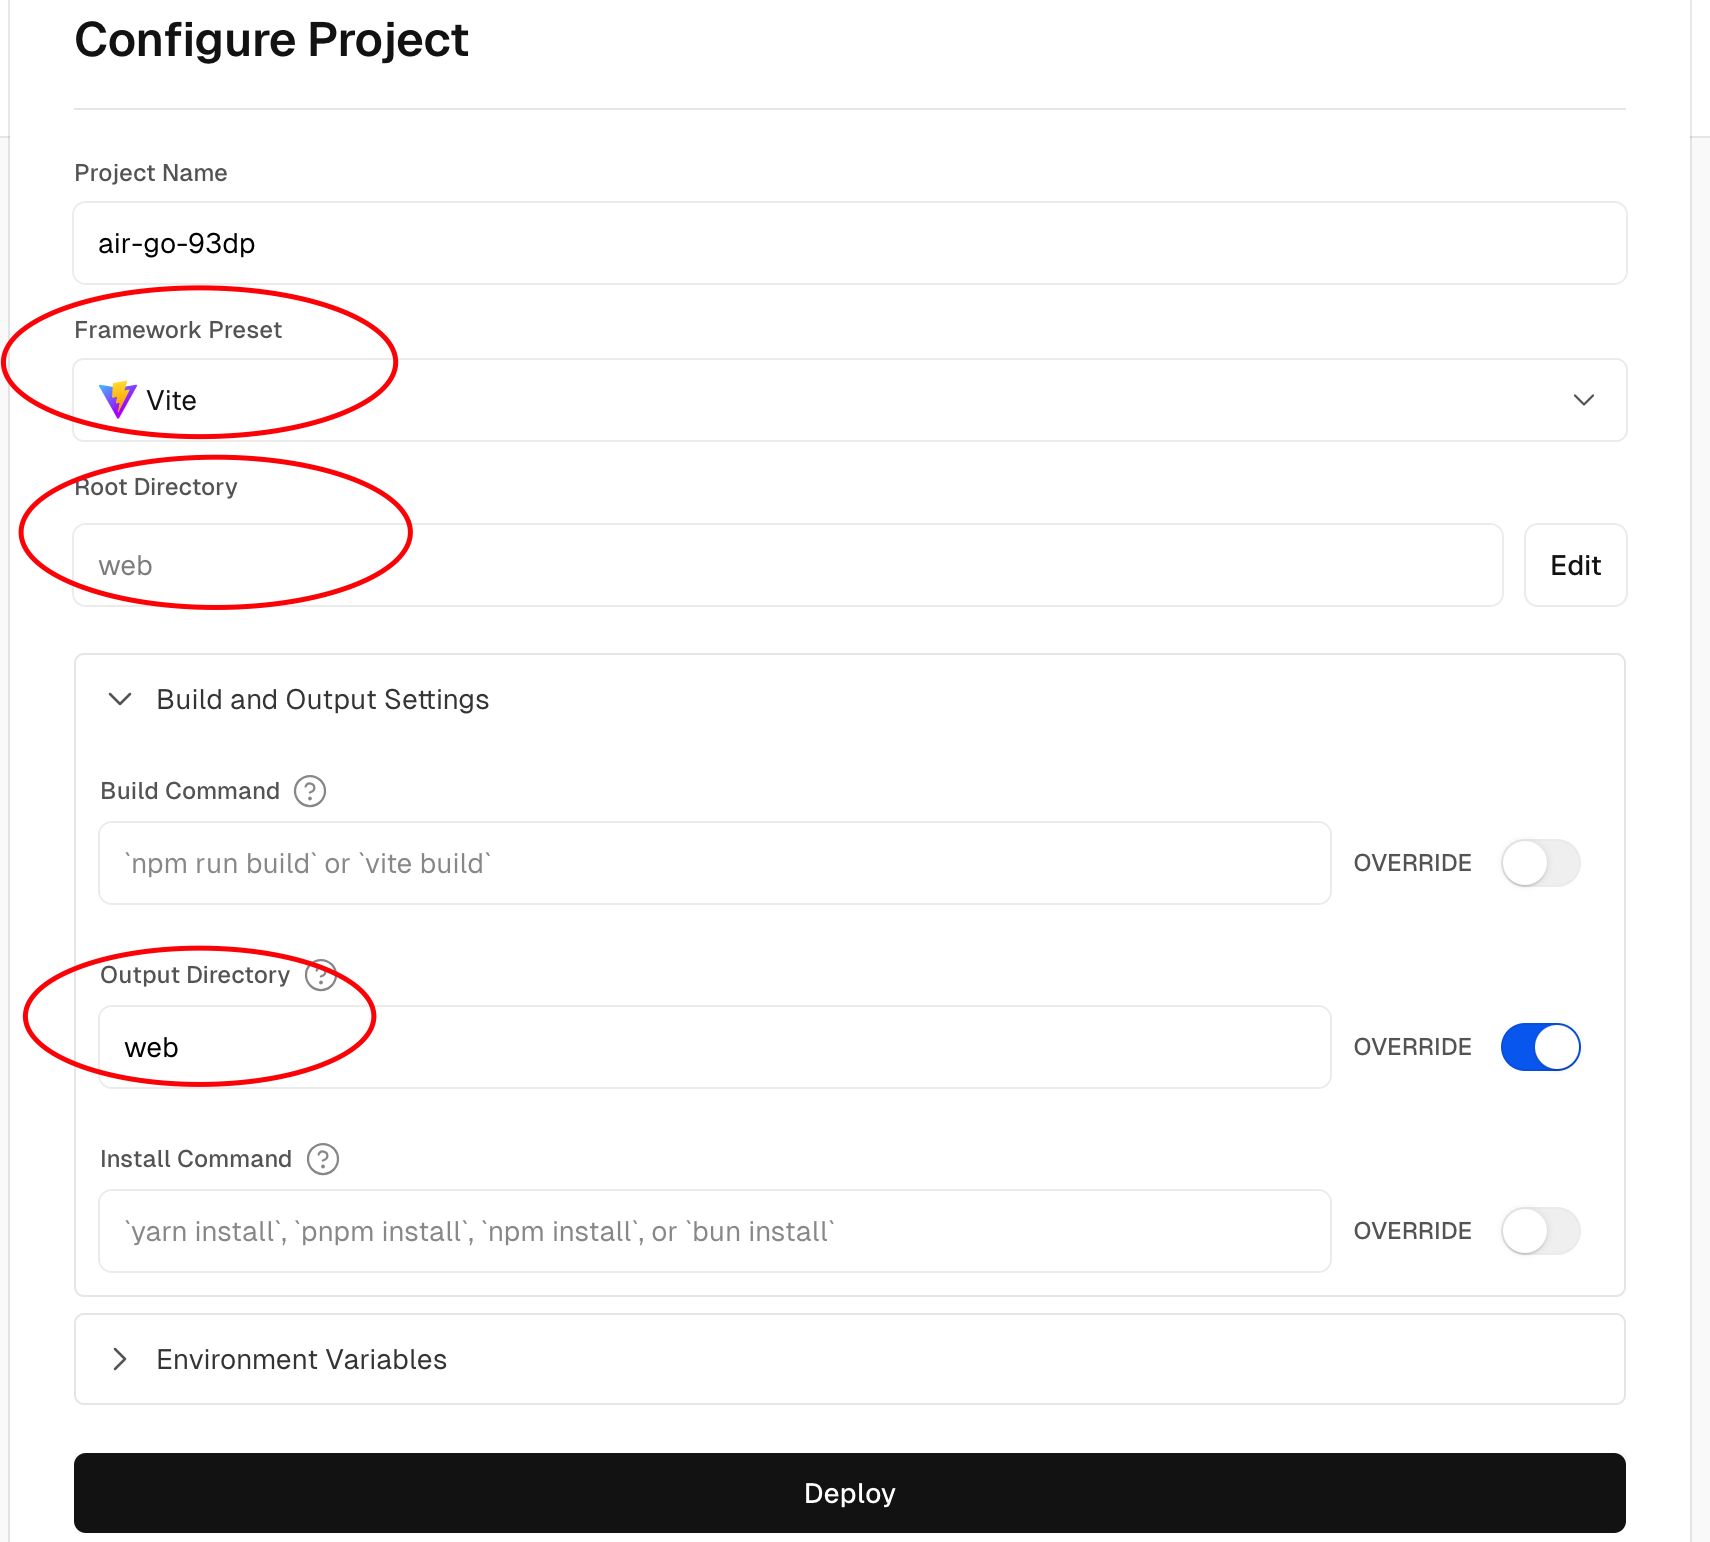
- 支持部署到Vercel、Nginx、Caddy等
- fork本项目,修改
./web/.env的VITE_API_URL字段为自己的后端地址(由于vercel的限制,请填https接口地址) - 登录Vercel,Add New Project,参考下图配置,注意红圈内的设置!
- 部署成功后,自定义域名即可(域名解析到76.76.21.21)
推荐使用 github codespaces编译,这不会在您电脑上安装额外的依赖
- fork本项目,修改
./web/.env的VITE_API_URL字段为自己的后端地址 - 在 项目/web/ 下,执行
npm i && npm run build - 打包后的静态资源文件夹为 web,将web文件夹上传到服务器合适位置。新建网站(纯静态),网站位置选择该web文件夹
system:
  admin-email: [email protected]  //管理员账号,初始化之前需要修改!
  admin-password: adminadmin   //管理员密码,初始化之前需要修改!
  http-port: 8899              //核心监听端口
  https-port: 443              //核心监听端口
  db-type: sqlite              //数据库类型,可选值:mysql,mariadb,sqlite
mysql:
  address: xxx.com             //mysql数据库地址
  port: 3306                   //mysql数据库端口
  config: charset=utf8mb4&parseTime=True&loc=Local //保持默认即可
  db-name: xxx                 //mysql数据库名称
  username: xxx                //mysql数据库用户名
  password: xxx                //mysql数据库密码
  max-idle-conns: 10
  max-open-conns: 100
sqlite:
  path: ./air.db               //sqlite数据库文件名
注意!如果首次安装,启动核心时,会根据配置文件config.yaml自动初始化数据。务必修改配置文件!
- 直接安装可使用管理脚本
AirGo启动核心,也可以使用systemctl start AirGo启动核心 - Docker请使用Docker的方式启动
需注意:
- 关于网站访问地址:
- 前后端不分离:网站访问地址的端口和配置文件 config.yaml 中的端口保持一致。例如config.yaml中端口为8888,则浏览器需要访问 http(s)://example.com:8888
- 前后端分离:网站访问地址为Vercel或者Nginx(Caddy)设置的地址
- 请务必注意:如需设置CDN,非特殊情况请勿打开CDN的缓存选项,可能会导致CDN缓存并展现给不符合用户权限的网页!
现支持V2bx、XrayR、Hysteria2的对接,暂不支持官方版本,请使用下面的版本:
项目地址:https://github.com/ppoonk/V2bX
- 直接安装
bash <(curl -Ls https://raw.githubusercontent.com/ppoonk/V2bX/main/scripts/install.sh)
- 启动docker命令参考如下:
docker run -tid \
  -v $PWD/av/config.json:/etc/V2bX/config.json \
  --name airgo \
  --restart always \
  --net=host \
  --privileged=true \
  ppoiuty/av:latest
- docker compose参考如下:
version: '3'
services:
  AV:
    container_name: AV
    image: ppoiuty/av:latest
    network_mode: "host"
    restart: "always"
    privileged: true
    volumes:
      - ./config.json:/etc/V2bX/config.json
- 安装:
bash <(curl -Ls https://raw.githubusercontent.com/ppoonk/XrayR-for-AirGo/main/scripts/manage.sh)
- 安装完成后请根据需要在
/usr/local/XrayR/config.yml中修改配置文件 - 启动:使用管理脚本
XrayR或直接systemctl start XrayR - docker仓库:https://hub.docker.com/repository/docker/ppoiuty/xrayr
- 安装:
bash <(curl -Ls https://raw.githubusercontent.com/ppoonk/shy/main/scripts/install.sh)
- 安装完成后请根据需要在
/usr/local/shy/config.yml中修改配置文件 - 启动:使用管理脚本
shy或直接systemctl start shy


