- Use an external library Flask-SQLAlchemy to simplify tasks from earlier ORM lessons.
- Manage database tables and schemas without writing SQL.
- Use the Flask Shell with Flask-SQLAlchemy to create, read, update and delete records in a SQL database.
- Schema: The blueprint of a database. Describes how data relates to other data in tables, columns, and relationships between them.
- SQLAlchemy: An open-source SQL library and object-relational mapper (ORM) for the Python programming language.
- Flask-SQLAlchemy: A Flask extension that makes it easier to use SQLAlchemy.
- Flask Shell: A Python interactive shell to run commands in the context of a Flask application.
- Database Session: An object that manages persistence operations for ORM-mapped objects.
- Database Transaction: A sequence of SQL statements that are processed as an atomic unit. All SQL statements in the transaction are either applied ( committed) or undone (rolled back) together.
We've see how to create a database that is linked to our Flask application. In
this lesson, we'll use Flask-SQLAlchemy functions to insert, update, delete,
and query rows in a table, all without writing any SQL!
This lesson is a code-along, so fork and clone the repo.
Run pipenv install to install the dependencies and pipenv shell to enter
your virtual environment before running your code.
$ pipenv install
$ pipenv shell
The server directory contains the same app.py and models.py from the
previous lesson.
.
├── CONTRIBUTING.md
├── LICENSE.md
├── Pipfile
├── Pipfile.lock
├── README.md
└── server
    ├── __init__.py
    ├── app.py
    └── models.py
Change into the server directory and configure the FLASK_APP and
FLASK_RUN_PORT environment variables:
$ cd server
$ export FLASK_APP=app.py
$ export FLASK_RUN_PORT=5555
Let's repeat through the process of creating the database app.db containing a
pets table. Enter the following commands:
$ flask db init$ flask db migrate -m "Initial migration."$ flask db upgrade headUse a VS Code extension such as SQLite Viewer to open the database file app.db
and confirm the empty pets table:

NOTE: At any time during the lesson, you can delete the instance and
migrations folders and re-execute the three flask db commands (init,
migrate, upgrade) to recreate the initial version of the database.
Let's see how to persist data about a pet. Recall from the previous lessons about ORM that we don't actually save a Python object to the database. Instead, we save the object's attributes as a new row in a table.
We can interact with our code in the Python shell or an ipdb session, but
working with a web framework presents a bit of a conundrum: the application
isn't running! Thankfully, Flask comes equipped with an interactive shell that
runs a development version of an application. Inside this shell, we can interact
with models, views, contexts, and the database.
If you're not there already, navigate to the server directory, then enter the
command flask shell:
$ flask shell
>>>
You will type commands after the >>> prompt.
First, let's import the necessary db database object and the Pet model:
>>> from models import db, PetLet's add a row to the pets table for a dog named "Fido". The steps to add a
row are as follows:
- Create a new instance of the model class
Pet. - Add the
Petinstance to the current database session. - Commit the transaction and apply the changes to the database.
The first step is creating the Pet instance. Type the following Python
assignment statement in the Flask shell:
>>> pet1 = Pet(name = "Fido", species = "Dog")An instance of Pet is created, however, the object has not been persisted to
the database.
Let's confirm the name and species attributes have been assigned values, but
id does not yet have a value:
>>> pet1.name
'Fido'
>>> pet1.species
'Dog'
>>> pet1.id
>>>
The string representation returned by the implicit call to the __repr__
function shows the id as None, confirming no value has been assigned:
>>> pet1
<Pet None, Fido, Dog>
NOTE: The id won't be assigned until the Pet instance has been added to the
database.
Persisting an object to the database requires a database session, which is an object that manages database transactions. A transaction is a sequence of SQL statements that are processed as an atomic unit. This means that either all SQL statements in the transaction are either applied (committed) or they are all undone (rolled back) together.
This is especially important if statements that occur in a sequence depend on previous statements executing properly. The workflow for a transaction is illustrated in the image below:

If any of the SQL statements in a transaction fail to execute properly, the database will be rolled back to the state recorded at the beginning of the transaction and the process will end, returning an error message. A committed transaction ensures all statements were executed in sequence and to completion.
Flask-SQLAlchemy provides the db.session object through which we can manage
changes to the database such as table row insertions, updates, and deletions.
Let's add the pet object to the database session using the db.session.add()
method. Type the following in the Flask shell:
>>> db.session.add(pet1)This method call will issue an SQL INSERT statement, but the id attribute of
the Pet instance in the Python application is still undefined because we have
not yet committed the current transaction. We need to call the
db.session.commit() method to commit the transaction and ensure the new row
was inserted in the database table.
>>> db.session.commit()Check the pets table to confirm a new row was added. If you are using SQLite
Viewer, you may need to press the refresh button to see the new row:

When the transaction is committed and the row is inserted in the pets table,
the id of the local Pet instance is assigned the primary key value from the
new row:
>>> pet1.id
1
>>>
Let's add another pet to the database. Type each Python statement one at a time at the Flask shell prompt:
>>> pet2 = Pet(name = "Whiskers", species = "Cat")
>>> db.session.add(pet2)
>>> db.session.commit()
Refresh the view in the SQLite Viewer to confirm a new row was inserted in the
pets table for the cat named "Whiskers":

In the Flask shell, we can confirm the id attribute is assigned for the newly
persisted object:
>>> pet2.name
'Whiskers'
>>> pet2.species
'Cat'
>>> pet2.id
2
>>> pet2
<Pet 2, Whiskers, Cat>We can query all the rows in the table associated with the Pet model as shown:
>>> Pet.query.all()
[<Pet 1, Fido, Dog>, <Pet 2, Whiskers, Cat>]
How did the Pet class get a query attribute? Pet inherits it from
db.Model! The all() function says to return every row from the query result.
If we just want just the first row returned from a query, use the first()
function:
>>> Pet.query.first()
<Pet 1, Fido, Dog>We can filter rows using the filter function. The function takes a boolean
expression as an argument that is evaluated against each model instance returned
from the query. For example, if we want to filter each pet by species:
>>> Pet.query.filter(Pet.species == 'Cat').all()
[<Pet 2, Whiskers, Cat>]
If we want pets whose name starts with the letter 'F':
>>> Pet.query.filter(Pet.name.startswith('F')).all()
[<Pet 1, Fido, Dog>]The filter function is powerful in that you can pass any boolean expression to
test on a model instance. However, we often want to just look for rows having a
particular value in a column. The filter_by function is useful for that. The
criteria passed as a function argument takes a single equal sign. For example,
to get all cats:
>>> Pet.query.filter_by(species = 'Cat').all()
[<Pet 2, Whiskers, Cat>]
We can filter by the primary key id to get a specific row:
>>> Pet.query.filter_by(id = 1).first()
<Pet 1, Fido, Dog>If you want to access a certain row by its primary key, use
db.session.get(Model, id). It will return the row with the given primary key,
or None if it doesn't exist. The main advantage is caching: SQLAlchemy's
session maintains an identity map, so if the object with the specified ID is
already in the session, it will return that instance without hitting the
database again.
>>> pet = db.session.get(Pet,1)
>>> pet
<Pet 1, Fido, Dog>
>>> pet is None
False
>>> pet = db.session.get(Pet,20)
>>> pet
>>> pet is None
True
>>>By default, results from any database query are ordered by their primary key.
The order_by() method allows us to sort by any column. To sort in ascending
order of species:
>>> Pet.query.order_by('species').all()
[<Pet 2, Whiskers, Cat>, <Pet 1, Fido, Dog>]Importing func from sqlalchemy gives us access to common SQL operations
through functions like sum() and count().
>>>from sqlalchemy import funcAs these operations act upon columns, we carry them out through wrapping a
Column object passed to the query() method. Note we are invoking the query
function on the session, rather than accessing the query attribute inherited
from db.Model:
>>> db.session.query(func.count(Pet.id)).first()
(2,)
It is best practice to call these functions as func.operation() rather than
their name alone because many of these functions have name conflicts with
functions in the Python standard library, such as sum().
When we assign a new attribute value to a Python object that has been persisted to the database, the associated table row does not automatically get updated.
We need to perform the following steps to update a row in the pets table:
- Update one or more attribute values of a
Petinstance. - Commit the transaction to apply the changes to the database.
>>> pet1
<Pet 1, Fido, Dog>
>>> pet1.name = "Fido the mighty" # this does not update the table row
>>> pet1
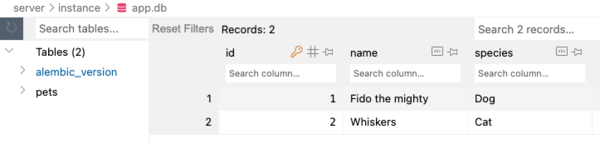
<Pet 1, Fido the mighty, Dog>
>>> db.session.commit() # commit the UPDATE statementWe can see the table row is updated once the transaction is committed:
The db.session.delete() function is used to delete the row associated with an
object:
>>> db.session.delete(pet1)
>>> db.session.commit()
Query the Pet model to confirm the row was deleted:
>>> Pet.query.all()
[<Pet 2, Whiskers, Cat>]
We can also check the table using the SQLite Viewer:

If you want to delete all table rows, call the function Pet.query.delete().
The function returns the number of rows deleted. Make sure you commit the
transaction to persist the deleted row.
>>> Pet.query.delete()
1
>>> db.session.commit()
We can use the Flask shell to confirm there are no pets in the table:
>>> Pet.query.all()
[]
The SQLite Viewer also shows the empty table:
You can exit the Flask shell and return to the command line prompt using
CTRL + D or the exit() function:
>>> exit()

$flask shell is a great tool for simple debugging and adding or updating a few
records. We want our app to handle many records though, which would take too
long to do by hand in the Flask shell. In subsequent lessons, we'll see how to
add routes to a Flask app to support full CRUD operations.


