در این مقاله به شما آموزش میدهیم چگونه یک فیلترشکن اختصاصی مالتی پروتوکل در پورت 443 ایجاد کنید. موارد پشتیبانی شده:
Telegram MTProxy Proxy
پروکسی ایجاد شده یک پروکسی faketls هست که در صورتی که کلاینت غیر تلگرام به آن متصل شود سایت گوگل را نشان میدهد.
(faketls domain=mail.google.com)
Shadowsocks+obfs
پروکسی شدوساکس مشابه پروکسی تلگرام فوق، از faketls استفاده میکند تا ترافیک شدوساکس را پنهان کند.
faketls domain=www.google.com
Shadowsocks+v2ray (cdn support)
این پروکسی، از v2ray استفاده میکند و یک زیرمسیر از سایت که با tls و http2 فعال است استفاده میکند
vmess (cdn support)
Same as v2ray
DNS over HTTPS (cdn support)
برای استفاده از DNS over HTTPS کافی است در مرورگر از dns زیر استفاده کنید:
https://yourdomain.com/yoursecret/dns/dns-query{?dns}
Redirector (cdn support)
نکته این امر آن است که برای مثال وقتی میخواهید پروکسی تلگرام یا پروکسی شدوساکس را از طریق برنامه های دیگر به اشتراک بگذارید امکان آن فراهم می شود. برای مثال اگر کانفیگ شدوساکس را به جای fullURL آن قرار دهید باعث میشود با کلیک بر روی این لینک، نرم افزار شدوساکس باز شده و پروکسی بر روی آن فعال شود.
https://yourdomain.com/yoursecret/redirect/fullURL
به عنوان مثال:
https://yourdomain.com/yoursecret/redirect/ss://secret/
پروکسی هوشمند برای سایت های غیر ایرانی و فیلترشده
با استفاده از کلاینت کلش و کانفیگی که درست کردیم میتوانید در 3 مود به اینترنت وصل بشید.
1- روش اول فقط سایت فیلترشده را از فیلترشکن عبور دهد.
2- فقط سایت های ایرانی بدون فیلترشکن باز شود (پیشنهادی)
3- تمام سایت ها از فیلترشکن عبور کنند
مقاوم در برابر کشف توسط فیلترچی
سعی شده جلوی حملات معمول به سرور گرفته شود و امکان شناسایی حداقل باشد با این وجود فراموش نکنید که سایر پورت ها به جز 22، 80 و 443 را غیر فعال کنید
Open Source
کلیه سورس کدها در گیت هاب
- یک vps آماده با ubuntu 20.04 و آی پی مثلا
1.1.1.1 - یک دامنه یا زیردامنه (برای مثال:
myservice.antyfilter.com) که رکورد A ی آن به آی پی شما وصل باشد.
اگر زیر دامنه ندارید، مراحل زیر را انجام دهید
1- وارد این سایت و یک یوزر بسازید (لازم نیست که اطلاعاتتان واقعی باشد فقط ایمیل باید درست باشد)
2- ایمیلی که به شما ارسال شده را اکتیو کنید
3- روی این لینک کلیک کنید و آی پی سرور را خود و نام مورد نظر را در آن قرار دهید.
4- زیر دامنه ایجاد شده را کپی کنید.
دستور زیر را در ترمینال کپی کنید و اجرا کنید
sudo bash -c "$(URL=https://raw.githubusercontent.com/Antyfilter/AntyProxy/main; curl -Lfo- $URL/config.env $URL/common/download_install.sh)"
Optional: Advanced Setup (اختیاری: نصب پیشرفته)
این قسمت برای افراد آشنا با کامپیوتر آماده شده است. میتوانید از آن صرفه نظر کنید.
cd /opt/
git clone https://github.com/Antyfilter/AntyProxy-config
cd AntyProxy
change the varibales in config.env then run
sudo bash install.sh
Optional: CDN Support
برای سرعت بالاتر و گذر از اینترانت کافی است که یک دامنه خریداری کنید (برای مثال از اینجا به قیمت 1 دلار یا اینجا رایگان
- قبل از خرید دامنه ابتدا دامنه را چک کنید که در ابرآروان مورد پذیرش قرار دهد
- سپس یک اکانت در ابرآروان ایجاد کنید میتوانید با یک شماره خارجی اینکار را انجام دهید
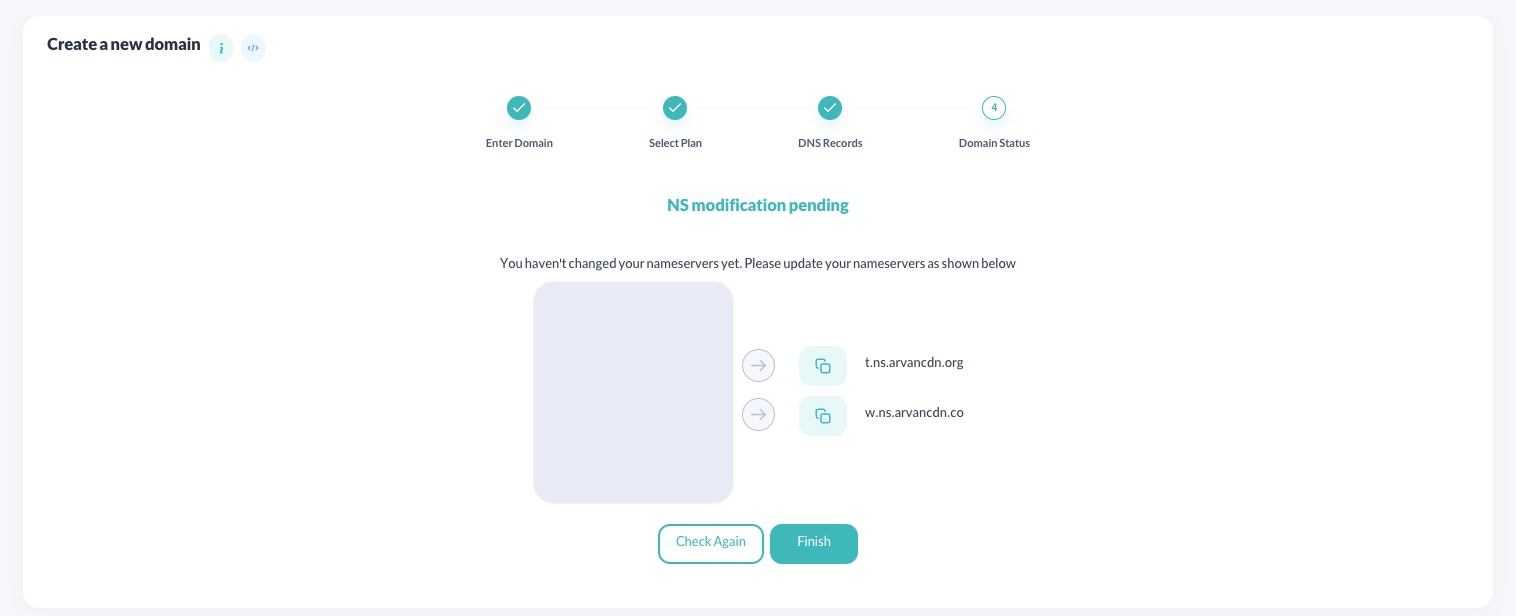
- سپس nameserver بر روی دامنه ای که خریداری کرده اید را مطابق اعلامی ابرآروان پر کنید
- سپس روی زیر دامنه دلخواه، آی پی سرور را تنظیم کنید و تیک کلود سرویس را تنظیم کنید و سپس به جای
myservice.antyfilter.comزیردامنه جدید خود را تنظیم کنید. لازم است این زیر دامنه با دامنه ای که در بالا انتخاب کرده اید متفاوت باشد. - سپس لینک زیر را با تغییر در نامه دامنه در مرورگر جهت مشاهده تنظیمات باز کنید.
در زیر توضیحات با تصویر نشان داده شده است.
- Log in to the Arvancloud account and add your domain.
Domain List > Add new domains
Then:
- Enter your domain name
- Select Free plan
- Skip DNS Records
- Note the nameservers presented on the last step
- Go to your domain registrar (the website where you bought your domain, e.g. Godaddy, Namecheap, ...)
- Update the nameservers to the one you got in Arvancloud (after adding the domain).
After your domain nameservers changed successfully (depending on the registrar, it can take a few hours, but it's usually quite fast), your domain is now using Arvancloud DNS.
-
Connect your domain to your server's IP address using
Arecords. Make sure theCloud Serviceoption is enabled for each record.
-
Go to
HTTPS settingson the navbar, selectIssue certificate. It will take around 30 minutes for the certificate to be ready. -
After the certificate is issued, enable the
Activate HTTPSoption.
توضیحات بخش CDN برگرفته از دوستان
FreeInternet
Visit here for instruction in Persian | برای راهنمای نصب به فارسی به این صفحه مراجعه کنید
Using AntyProxy, you can setup a VPN server using several protocols with running only one script.
The servers currently included are:
- Telegram Proxy
- Shadowsocks + OBFS
Protocols with CDN Support:
- Shadowsocks + V2Ray
- VMESS
- DNS over HTTPS (DoH)
- Redirector
There are two methods to install AntyProxy.
- If you want to install it in any VPS server, use Method 1.
- If you have credits on Microsoft Azure, you can use Method 2 to install AntyProxy with 1-click.
Moreover, after the setup is finished, you will enjoy the following features:
- Special clash configuration that suits Iranian Internet Circumvention methods.
- Your server will be hard to be detected. We recommend closing all ports except:
443, 80, 22 - Easy to use Installation guide will be available on your server. You can share this link to the users who need free internet access to follow the guide and connect to your server.
You can install AntyProxy to your server using the following guide:
- An
ubuntu 20.04Server, bought from a VPS or a Cloud provider. - A domain name
- A CDN provider, such as Cloudflare or ArvanCloud to connect your domain to your server's IP address.
If you need help with the above, create an Issue. We will update this tutorial with further guides.
Make sure to change the <secret> and <domain> to your own values.
secret: will be part of your server's tutorial URL. To generate a random secret, use this command in your terminal:date | sha256sum | base64 | head -c 32; echodomain: is your full domain name, and the subdomain (if you want to setup the VPN under a subdomain, e.g.vpn.antyfilter.com)
bash <(curl -sL https://raw.githubusercontent.com/Antyfilter/AntyProxy/main/install.sh) <secret> <domain> all <domain>An example script would look like:
bash <(curl -sL https://raw.githubusercontent.com/Antyfilter/AntyProxy/main/install.sh) ac7a17aadsddwd03e3ca8ad9673e055ee9 vpn.antyfilter.life all vpn.antyfilter.life


