The Spring Cloud Alibaba project, consisting of Alibaba’s open-source components and several Alibaba Cloud products, aims to implement and expose well known Spring Framework patterns and abstractions to bring the benefits of Spring Boot and Spring Cloud to Java developers using Alibaba products.
Spring Cloud for Alibaba,它是由一些阿里巴巴的开源组件和云产品组成的。这个项目的目的是为了让大家所熟知的 Spring 框架,其优秀的设计模式和抽象理念,以给使用阿里巴巴产品的 Java 开发者带来使用 Spring Boot 和 Spring Cloud 的更多便利。
Spring Cloud Alibaba 致力于提供微服务开发的一站式解决方案。此项目包含开发分布式应用微服务的必需组件,方便开发者通过 Spring Cloud 编程模型轻松使用这些组件来开发分布式应用服务。
依托 Spring Cloud Alibaba,您只需要添加一些注解和少量配置,就可以将 Spring Cloud 应用接入阿里微服务解决方案,通过阿里中间件来迅速搭建分布式应用系统。
- 服务限流降级:默认支持 Servlet、Feign、RestTemplate、Dubbo 和 RocketMQ 限流降级功能的接入,可以在运行时通过控制台实时修改限流降级规则,还支持查看限流降级 Metrics 监控。
- 服务注册与发现:适配 Spring Cloud 服务注册与发现标准,默认集成了 Ribbon 的支持。
- 分布式配置管理:支持分布式系统中的外部化配置,配置更改时自动刷新。
- 消息驱动能力:基于 Spring Cloud Stream 为微服务应用构建消息驱动能力。
- 阿里云对象存储:阿里云提供的海量、安全、低成本、高可靠的云存储服务。支持在任何应用、任何时间、任何地点存储和访问任意类型的数据。
- 分布式任务调度:提供秒级、精准、高可靠、高可用的定时(基于 Cron 表达式)任务调度服务。同时提供分布式的任务执行模型,如网格任务。网格任务支持海量子任务均匀分配到所有 Worker(schedulerx-client)上执行。
- Sentinel:把流量作为切入点,从流量控制、熔断降级、系统负载保护等多个维度保护服务的稳定性。
- Nacos:一个更易于构建云原生应用的动态服务发现、配置管理和服务管理平台。
- RocketMQ:一款开源的分布式消息系统,基于高可用分布式集群技术,提供低延时的、高可靠的消息发布与订阅服务。
- Alibaba Cloud ACM:一款在分布式架构环境中对应用配置进行集中管理和推送的应用配置中心产品。
- Alibaba Cloud OSS: 阿里云对象存储服务(Object Storage Service,简称 OSS),是阿里云提供的海量、安全、低成本、高可靠的云存储服务。您可以在任何应用、任何时间、任何地点存储和访问任意类型的数据。
- Alibaba Cloud SchedulerX: 阿里中间件团队开发的一款分布式任务调度产品,提供秒级、精准、高可靠、高可用的定时(基于 Cron 表达式)任务调度服务。
2020/3/23更新,升级
spring-cloud-alibaba-dependencies和spring-cloud-dependencies版本
- parent:继承了 Spring Boot 的 Parent,表示我们是一个 Spring Boot 工程
- package:
pom,表示该项目仅当做依赖项目,没有具体的实现代码 spring-cloud-alibaba-dependencies:升级为2.2.0.RELEASEspring-cloud-dependencies:升级为Hoxton.RELEASE- build:配置了项目所需的各种插件
- repositories:配置项目下载依赖时的第三方库
在 Spring Cloud Netflix 阶段我们采用 Eureka 做作为我们的服务注册与发现服务器,现利用 Spring Cloud Alibaba 提供的 Nacos 组件替代该方案。
Nacos 致力于帮助您发现、配置和管理微服务。Nacos 提供了一组简单易用的特性集,帮助您快速实现动态服务发现、服务配置、服务元数据及流量管理。
Nacos 帮助您更敏捷和容易地构建、交付和管理微服务平台。 Nacos 是构建以“服务”为中心的现代应用架构 (例如微服务范式、云原生范式) 的服务基础设施。

服务是指一个或一组软件功能(例如特定信息的检索或一组操作的执行),其目的是不同的客户端可以为不同的目的重用(例如通过跨进程的网络调用)。Nacos 支持主流的服务生态,如 Kubernetes Service、gRPC|Dubbo RPC Service 或者 Spring Cloud RESTful Service.
服务注册中心,它是服务,其实例及元数据的数据库。服务实例在启动时注册到服务注册表,并在关闭时注销。服务和路由器的客户端查询服务注册表以查找服务的可用实例。服务注册中心可能会调用服务实例的健康检查 API 来验证它是否能够处理请求。
服务元数据是指包括服务端点(endpoints)、服务标签、服务版本号、服务实例权重、路由规则、安全策略等描述服务的数据
是指提供可复用和可调用服务的应用方
是指会发起对某个服务调用的应用方
在系统开发过程中通常会将一些需要变更的参数、变量等从代码中分离出来独立管理,以独立的配置文件的形式存在。目的是让静态的系统工件或者交付物(如 WAR,JAR 包等)更好地和实际的物理运行环境进行适配。配置管理一般包含在系统部署的过程中,由系统管理员或者运维人员完成这个步骤。配置变更是调整系统运行时的行为的有效手段之一。
在数据中心中,系统中所有配置的编辑、存储、分发、变更管理、历史版本管理、变更审计等所有与配置相关的活动统称为配置管理。
提供分布式系统中所有对象(Object)、实体(Entity)的“名字”到关联的元数据之间的映射管理服务,例如 ServiceName -> Endpoints Info, Distributed Lock Name -> Lock Owner/Status Info, DNS Domain Name -> IP List, 服务发现和 DNS 就是名字服务的2大场景。
在服务或者应用运行过程中,提供动态配置或者元数据以及配置管理的服务提供者。
Nacos 依赖 Java 环境来运行。如果您是从代码开始构建并运行 Nacos,还需要为此配置 Maven 环境,请确保是在以下版本环境中安装使用:
- 64 bit OS,支持 Linux/Unix/Mac/Windows,推荐选用 Linux/Unix/Mac。
- 64 bit JDK 1.8+
- Maven 3.2.x+
version: "2"
services:
  nacos:
    image: nacos/nacos-server
    container_name: nacos
    environment:
      MODE: standalone
      PREFER_HOST_MODE: ip
      SPRING_DATASOURCE_PLATFORM: mysql
      MYSQL_SERVICE_HOST: 你的数据库地址
      MYSQL_SERVICE_DB_NAME: nacos_config(创建一个数据库,执行下面的数据库脚本添加数据库表)
      MYSQL_SERVICE_PORT: 3306
      MYSQL_SERVICE_USER: root
      MYSQL_SERVICE_PASSWORD: 你的数据库密码
      JVM_XMS: 256m
      JVM_XMX: 256m
    volumes:
      - ./logs/:/home/nacos/logs
    ports:
      - 18828:8848
    restart: always
-- ----------------------------
-- Table structure for config_info
-- ----------------------------
DROP TABLE IF EXISTS `config_info`;
CREATE TABLE `config_info`  (
  `id` bigint(20) NOT NULL AUTO_INCREMENT COMMENT 'id',
  `data_id` varchar(255) CHARACTER SET utf8 COLLATE utf8_bin NOT NULL COMMENT 'data_id',
  `group_id` varchar(255) CHARACTER SET utf8 COLLATE utf8_bin NULL DEFAULT NULL,
  `content` longtext CHARACTER SET utf8 COLLATE utf8_bin NOT NULL COMMENT 'content',
  `md5` varchar(32) CHARACTER SET utf8 COLLATE utf8_bin NULL DEFAULT NULL COMMENT 'md5',
  `gmt_create` datetime(0) NOT NULL DEFAULT CURRENT_TIMESTAMP(0) COMMENT '创建时间',
  `gmt_modified` datetime(0) NOT NULL DEFAULT CURRENT_TIMESTAMP(0) COMMENT '修改时间',
  `src_user` text CHARACTER SET utf8 COLLATE utf8_bin NULL COMMENT 'source user',
  `src_ip` varchar(20) CHARACTER SET utf8 COLLATE utf8_bin NULL DEFAULT NULL COMMENT 'source ip',
  `app_name` varchar(128) CHARACTER SET utf8 COLLATE utf8_bin NULL DEFAULT NULL,
  `tenant_id` varchar(128) CHARACTER SET utf8 COLLATE utf8_bin NULL DEFAULT '' COMMENT '租户字段',
  `c_desc` varchar(256) CHARACTER SET utf8 COLLATE utf8_bin NULL DEFAULT NULL,
  `c_use` varchar(64) CHARACTER SET utf8 COLLATE utf8_bin NULL DEFAULT NULL,
  `effect` varchar(64) CHARACTER SET utf8 COLLATE utf8_bin NULL DEFAULT NULL,
  `type` varchar(64) CHARACTER SET utf8 COLLATE utf8_bin NULL DEFAULT NULL,
  `c_schema` text CHARACTER SET utf8 COLLATE utf8_bin NULL,
  PRIMARY KEY (`id`) USING BTREE,
  UNIQUE INDEX `uk_configinfo_datagrouptenant`(`data_id`, `group_id`, `tenant_id`) USING BTREE
) ENGINE = InnoDB AUTO_INCREMENT = 93 CHARACTER SET = utf8 COLLATE = utf8_bin COMMENT = 'config_info' ROW_FORMAT = Compact;

-- ----------------------------
-- Table structure for config_info_aggr
-- ----------------------------
DROP TABLE IF EXISTS `config_info_aggr`;
CREATE TABLE `config_info_aggr`  (
  `id` bigint(20) NOT NULL AUTO_INCREMENT COMMENT 'id',
  `data_id` varchar(255) CHARACTER SET utf8 COLLATE utf8_bin NOT NULL COMMENT 'data_id',
  `group_id` varchar(255) CHARACTER SET utf8 COLLATE utf8_bin NOT NULL COMMENT 'group_id',
  `datum_id` varchar(255) CHARACTER SET utf8 COLLATE utf8_bin NOT NULL COMMENT 'datum_id',
  `content` longtext CHARACTER SET utf8 COLLATE utf8_bin NOT NULL COMMENT '内容',
  `gmt_modified` datetime(0) NOT NULL COMMENT '修改时间',
  `app_name` varchar(128) CHARACTER SET utf8 COLLATE utf8_bin NULL DEFAULT NULL,
  `tenant_id` varchar(128) CHARACTER SET utf8 COLLATE utf8_bin NULL DEFAULT '' COMMENT '租户字段',
  PRIMARY KEY (`id`) USING BTREE,
  UNIQUE INDEX `uk_configinfoaggr_datagrouptenantdatum`(`data_id`, `group_id`, `tenant_id`, `datum_id`) USING BTREE
) ENGINE = InnoDB AUTO_INCREMENT = 1 CHARACTER SET = utf8 COLLATE = utf8_bin COMMENT = '增加租户字段' ROW_FORMAT = Compact;

-- ----------------------------
-- Table structure for config_info_beta
-- ----------------------------
DROP TABLE IF EXISTS `config_info_beta`;
CREATE TABLE `config_info_beta`  (
  `id` bigint(20) NOT NULL AUTO_INCREMENT COMMENT 'id',
  `data_id` varchar(255) CHARACTER SET utf8 COLLATE utf8_bin NOT NULL COMMENT 'data_id',
  `group_id` varchar(128) CHARACTER SET utf8 COLLATE utf8_bin NOT NULL COMMENT 'group_id',
  `app_name` varchar(128) CHARACTER SET utf8 COLLATE utf8_bin NULL DEFAULT NULL COMMENT 'app_name',
  `content` longtext CHARACTER SET utf8 COLLATE utf8_bin NOT NULL COMMENT 'content',
  `beta_ips` varchar(1024) CHARACTER SET utf8 COLLATE utf8_bin NULL DEFAULT NULL COMMENT 'betaIps',
  `md5` varchar(32) CHARACTER SET utf8 COLLATE utf8_bin NULL DEFAULT NULL COMMENT 'md5',
  `gmt_create` datetime(0) NOT NULL DEFAULT CURRENT_TIMESTAMP(0) COMMENT '创建时间',
  `gmt_modified` datetime(0) NOT NULL DEFAULT CURRENT_TIMESTAMP(0) COMMENT '修改时间',
  `src_user` text CHARACTER SET utf8 COLLATE utf8_bin NULL COMMENT 'source user',
  `src_ip` varchar(20) CHARACTER SET utf8 COLLATE utf8_bin NULL DEFAULT NULL COMMENT 'source ip',
  `tenant_id` varchar(128) CHARACTER SET utf8 COLLATE utf8_bin NULL DEFAULT '' COMMENT '租户字段',
  PRIMARY KEY (`id`) USING BTREE,
  UNIQUE INDEX `uk_configinfobeta_datagrouptenant`(`data_id`, `group_id`, `tenant_id`) USING BTREE
) ENGINE = InnoDB AUTO_INCREMENT = 1 CHARACTER SET = utf8 COLLATE = utf8_bin COMMENT = 'config_info_beta' ROW_FORMAT = Compact;

-- ----------------------------
-- Table structure for config_info_tag
-- ----------------------------
DROP TABLE IF EXISTS `config_info_tag`;
CREATE TABLE `config_info_tag`  (
  `id` bigint(20) NOT NULL AUTO_INCREMENT COMMENT 'id',
  `data_id` varchar(255) CHARACTER SET utf8 COLLATE utf8_bin NOT NULL COMMENT 'data_id',
  `group_id` varchar(128) CHARACTER SET utf8 COLLATE utf8_bin NOT NULL COMMENT 'group_id',
  `tenant_id` varchar(128) CHARACTER SET utf8 COLLATE utf8_bin NULL DEFAULT '' COMMENT 'tenant_id',
  `tag_id` varchar(128) CHARACTER SET utf8 COLLATE utf8_bin NOT NULL COMMENT 'tag_id',
  `app_name` varchar(128) CHARACTER SET utf8 COLLATE utf8_bin NULL DEFAULT NULL COMMENT 'app_name',
  `content` longtext CHARACTER SET utf8 COLLATE utf8_bin NOT NULL COMMENT 'content',
  `md5` varchar(32) CHARACTER SET utf8 COLLATE utf8_bin NULL DEFAULT NULL COMMENT 'md5',
  `gmt_create` datetime(0) NOT NULL DEFAULT CURRENT_TIMESTAMP(0) COMMENT '创建时间',
  `gmt_modified` datetime(0) NOT NULL DEFAULT CURRENT_TIMESTAMP(0) COMMENT '修改时间',
  `src_user` text CHARACTER SET utf8 COLLATE utf8_bin NULL COMMENT 'source user',
  `src_ip` varchar(20) CHARACTER SET utf8 COLLATE utf8_bin NULL DEFAULT NULL COMMENT 'source ip',
  PRIMARY KEY (`id`) USING BTREE,
  UNIQUE INDEX `uk_configinfotag_datagrouptenanttag`(`data_id`, `group_id`, `tenant_id`, `tag_id`) USING BTREE
) ENGINE = InnoDB AUTO_INCREMENT = 1 CHARACTER SET = utf8 COLLATE = utf8_bin COMMENT = 'config_info_tag' ROW_FORMAT = Compact;

-- ----------------------------
-- Table structure for config_tags_relation
-- ----------------------------
DROP TABLE IF EXISTS `config_tags_relation`;
CREATE TABLE `config_tags_relation`  (
  `id` bigint(20) NOT NULL COMMENT 'id',
  `tag_name` varchar(128) CHARACTER SET utf8 COLLATE utf8_bin NOT NULL COMMENT 'tag_name',
  `tag_type` varchar(64) CHARACTER SET utf8 COLLATE utf8_bin NULL DEFAULT NULL COMMENT 'tag_type',
  `data_id` varchar(255) CHARACTER SET utf8 COLLATE utf8_bin NOT NULL COMMENT 'data_id',
  `group_id` varchar(128) CHARACTER SET utf8 COLLATE utf8_bin NOT NULL COMMENT 'group_id',
  `tenant_id` varchar(128) CHARACTER SET utf8 COLLATE utf8_bin NULL DEFAULT '' COMMENT 'tenant_id',
  `nid` bigint(20) NOT NULL AUTO_INCREMENT,
  PRIMARY KEY (`nid`) USING BTREE,
  UNIQUE INDEX `uk_configtagrelation_configidtag`(`id`, `tag_name`, `tag_type`) USING BTREE,
  INDEX `idx_tenant_id`(`tenant_id`) USING BTREE
) ENGINE = InnoDB AUTO_INCREMENT = 1 CHARACTER SET = utf8 COLLATE = utf8_bin COMMENT = 'config_tag_relation' ROW_FORMAT = Compact;

-- ----------------------------
-- Table structure for group_capacity
-- ----------------------------
DROP TABLE IF EXISTS `group_capacity`;
CREATE TABLE `group_capacity`  (
  `id` bigint(20) UNSIGNED NOT NULL AUTO_INCREMENT COMMENT '主键ID',
  `group_id` varchar(128) CHARACTER SET utf8 COLLATE utf8_bin NOT NULL DEFAULT '' COMMENT 'Group ID,空字符表示整个集群',
  `quota` int(10) UNSIGNED NOT NULL DEFAULT 0 COMMENT '配额,0表示使用默认值',
  `usage` int(10) UNSIGNED NOT NULL DEFAULT 0 COMMENT '使用量',
  `max_size` int(10) UNSIGNED NOT NULL DEFAULT 0 COMMENT '单个配置大小上限,单位为字节,0表示使用默认值',
  `max_aggr_count` int(10) UNSIGNED NOT NULL DEFAULT 0 COMMENT '聚合子配置最大个数,,0表示使用默认值',
  `max_aggr_size` int(10) UNSIGNED NOT NULL DEFAULT 0 COMMENT '单个聚合数据的子配置大小上限,单位为字节,0表示使用默认值',
  `max_history_count` int(10) UNSIGNED NOT NULL DEFAULT 0 COMMENT '最大变更历史数量',
  `gmt_create` datetime(0) NOT NULL DEFAULT CURRENT_TIMESTAMP(0) COMMENT '创建时间',
  `gmt_modified` datetime(0) NOT NULL DEFAULT CURRENT_TIMESTAMP(0) COMMENT '修改时间',
  PRIMARY KEY (`id`) USING BTREE,
  UNIQUE INDEX `uk_group_id`(`group_id`) USING BTREE
) ENGINE = InnoDB AUTO_INCREMENT = 1 CHARACTER SET = utf8 COLLATE = utf8_bin COMMENT = '集群、各Group容量信息表' ROW_FORMAT = Compact;

-- ----------------------------
-- Table structure for his_config_info
-- ----------------------------
DROP TABLE IF EXISTS `his_config_info`;
CREATE TABLE `his_config_info`  (
  `id` bigint(64) UNSIGNED NOT NULL,
  `nid` bigint(20) UNSIGNED NOT NULL AUTO_INCREMENT,
  `data_id` varchar(255) CHARACTER SET utf8 COLLATE utf8_bin NOT NULL,
  `group_id` varchar(128) CHARACTER SET utf8 COLLATE utf8_bin NOT NULL,
  `app_name` varchar(128) CHARACTER SET utf8 COLLATE utf8_bin NULL DEFAULT NULL COMMENT 'app_name',
  `content` longtext CHARACTER SET utf8 COLLATE utf8_bin NOT NULL,
  `md5` varchar(32) CHARACTER SET utf8 COLLATE utf8_bin NULL DEFAULT NULL,
  `gmt_create` datetime(0) NOT NULL DEFAULT CURRENT_TIMESTAMP(0),
  `gmt_modified` datetime(0) NOT NULL DEFAULT CURRENT_TIMESTAMP(0),
  `src_user` text CHARACTER SET utf8 COLLATE utf8_bin NULL,
  `src_ip` varchar(20) CHARACTER SET utf8 COLLATE utf8_bin NULL DEFAULT NULL,
  `op_type` char(10) CHARACTER SET utf8 COLLATE utf8_bin NULL DEFAULT NULL,
  `tenant_id` varchar(128) CHARACTER SET utf8 COLLATE utf8_bin NULL DEFAULT '' COMMENT '租户字段',
  PRIMARY KEY (`nid`) USING BTREE,
  INDEX `idx_gmt_create`(`gmt_create`) USING BTREE,
  INDEX `idx_gmt_modified`(`gmt_modified`) USING BTREE,
  INDEX `idx_did`(`data_id`) USING BTREE
) ENGINE = InnoDB AUTO_INCREMENT = 107 CHARACTER SET = utf8 COLLATE = utf8_bin COMMENT = '多租户改造' ROW_FORMAT = Compact;

-- ----------------------------
-- Table structure for permissions
-- ----------------------------
DROP TABLE IF EXISTS `permissions`;
CREATE TABLE `permissions`  (
  `role` varchar(50) CHARACTER SET utf8mb4 COLLATE utf8mb4_general_ci NOT NULL,
  `resource` varchar(64) CHARACTER SET utf8mb4 COLLATE utf8mb4_general_ci NOT NULL,
  `action` varchar(8) CHARACTER SET utf8mb4 COLLATE utf8mb4_general_ci NOT NULL,
  UNIQUE INDEX `uk_role_permission`(`role`, `resource`, `action`) USING BTREE
) ENGINE = InnoDB CHARACTER SET = utf8mb4 COLLATE = utf8mb4_general_ci ROW_FORMAT = Compact;

-- ----------------------------
-- Table structure for roles
-- ----------------------------
DROP TABLE IF EXISTS `roles`;
CREATE TABLE `roles`  (
  `username` varchar(50) CHARACTER SET utf8mb4 COLLATE utf8mb4_general_ci NOT NULL,
  `role` varchar(50) CHARACTER SET utf8mb4 COLLATE utf8mb4_general_ci NOT NULL,
  UNIQUE INDEX `idx_user_role`(`username`, `role`) USING BTREE
) ENGINE = InnoDB CHARACTER SET = utf8mb4 COLLATE = utf8mb4_general_ci ROW_FORMAT = Compact;

-- ----------------------------
-- Table structure for tenant_capacity
-- ----------------------------
DROP TABLE IF EXISTS `tenant_capacity`;
CREATE TABLE `tenant_capacity`  (
  `id` bigint(20) UNSIGNED NOT NULL AUTO_INCREMENT COMMENT '主键ID',
  `tenant_id` varchar(128) CHARACTER SET utf8 COLLATE utf8_bin NOT NULL DEFAULT '' COMMENT 'Tenant ID',
  `quota` int(10) UNSIGNED NOT NULL DEFAULT 0 COMMENT '配额,0表示使用默认值',
  `usage` int(10) UNSIGNED NOT NULL DEFAULT 0 COMMENT '使用量',
  `max_size` int(10) UNSIGNED NOT NULL DEFAULT 0 COMMENT '单个配置大小上限,单位为字节,0表示使用默认值',
  `max_aggr_count` int(10) UNSIGNED NOT NULL DEFAULT 0 COMMENT '聚合子配置最大个数',
  `max_aggr_size` int(10) UNSIGNED NOT NULL DEFAULT 0 COMMENT '单个聚合数据的子配置大小上限,单位为字节,0表示使用默认值',
  `max_history_count` int(10) UNSIGNED NOT NULL DEFAULT 0 COMMENT '最大变更历史数量',
  `gmt_create` datetime(0) NOT NULL DEFAULT CURRENT_TIMESTAMP(0) COMMENT '创建时间',
  `gmt_modified` datetime(0) NOT NULL DEFAULT CURRENT_TIMESTAMP(0) COMMENT '修改时间',
  PRIMARY KEY (`id`) USING BTREE,
  UNIQUE INDEX `uk_tenant_id`(`tenant_id`) USING BTREE
) ENGINE = InnoDB AUTO_INCREMENT = 1 CHARACTER SET = utf8 COLLATE = utf8_bin COMMENT = '租户容量信息表' ROW_FORMAT = Compact;

-- ----------------------------
-- Table structure for tenant_info
-- ----------------------------
DROP TABLE IF EXISTS `tenant_info`;
CREATE TABLE `tenant_info`  (
  `id` bigint(20) NOT NULL AUTO_INCREMENT COMMENT 'id',
  `kp` varchar(128) CHARACTER SET utf8 COLLATE utf8_bin NOT NULL COMMENT 'kp',
  `tenant_id` varchar(128) CHARACTER SET utf8 COLLATE utf8_bin NULL DEFAULT '' COMMENT 'tenant_id',
  `tenant_name` varchar(128) CHARACTER SET utf8 COLLATE utf8_bin NULL DEFAULT '' COMMENT 'tenant_name',
  `tenant_desc` varchar(256) CHARACTER SET utf8 COLLATE utf8_bin NULL DEFAULT NULL COMMENT 'tenant_desc',
  `create_source` varchar(32) CHARACTER SET utf8 COLLATE utf8_bin NULL DEFAULT NULL COMMENT 'create_source',
  `gmt_create` bigint(20) NOT NULL COMMENT '创建时间',
  `gmt_modified` bigint(20) NOT NULL COMMENT '修改时间',
  PRIMARY KEY (`id`) USING BTREE,
  UNIQUE INDEX `uk_tenant_info_kptenantid`(`kp`, `tenant_id`) USING BTREE,
  INDEX `idx_tenant_id`(`tenant_id`) USING BTREE
) ENGINE = InnoDB AUTO_INCREMENT = 4 CHARACTER SET = utf8 COLLATE = utf8_bin COMMENT = 'tenant_info' ROW_FORMAT = Compact;

-- ----------------------------
-- Table structure for users
-- ----------------------------
DROP TABLE IF EXISTS `users`;
CREATE TABLE `users`  (
  `username` varchar(50) CHARACTER SET utf8mb4 COLLATE utf8mb4_general_ci NOT NULL,
  `password` varchar(500) CHARACTER SET utf8mb4 COLLATE utf8mb4_general_ci NOT NULL,
  `enabled` tinyint(1) NOT NULL,
  PRIMARY KEY (`username`) USING BTREE
) ENGINE = InnoDB CHARACTER SET = utf8mb4 COLLATE = utf8mb4_general_ci ROW_FORMAT = Compact;

SET FOREIGN_KEY_CHECKS = 1;
# 下载源码
git clone https://github.com/alibaba/nacos.git

# 安装到本地仓库
cd nacos/
mvn -Prelease-nacos clean install -U
注:下载依赖时间较长,请耐心等待...
cd distribution/target/nacos-server-0.7.0/nacos/bin

# Linux
./startup.sh -m standalone

# Windows
startup.cmd
打开浏览器访问:http://127.0.0.1:8848/nacos

通过一个简单的示例来感受一下如何将服务注册到 Nacos。
通过浏览器访问 http://localhost:8848/nacos,即 Nacos Server 网址

你会发现一个服务已经注册在服务中了,服务名为 nacos-provider
这时打开 http://localhost:8081/echo/hi ,你会在浏览器上看到:
Hello Nacos Discovery hispring-cloud-starter-alibaba-nacos-discovery 在实现的时候提供了一个 EndPoint, EndPoint 的访问地址为 http://ip:port/actuator/nacos-discovery。 EndPoint 的信息主要提供了两类:
1、subscribe: 显示了当前有哪些服务订阅者
2、NacosDiscoveryProperties: 显示了当前服务实例关于 Nacos 的基础配置
访问 http://localhost:8081/actuator/nacos-discovery 你会看到:

| 配置项 | Key | 默认值 | 说明 |
|---|---|---|---|
| 服务端地址 | spring.cloud.nacos.discovery.server-addr | 无 | Nacos Server 启动监听的ip地址和端口 |
| 服务名 | spring.cloud.nacos.discovery.service | ${spring.application.name} | 给当前的服务命名 |
| 权重 | spring.cloud.nacos.discovery.weight | 1 | 取值范围 1 到 100,数值越大,权重越大 |
| 网卡名 | spring.cloud.nacos.discovery.network-interface | 无 | 当IP未配置时,注册的IP为此网卡所对应的IP地址,如果此项也未配置,则默认取第一块网卡的地址 |
| 注册的IP地址 | spring.cloud.nacos.discovery.ip | 无 | 优先级最高 |
| 注册的端口 | spring.cloud.nacos.discovery.port | -1 | 默认情况下不用配置,会自动探测 |
| 命名空间 | spring.cloud.nacos.discovery.namespace | 无 | 常用场景之一是不同环境的注册的区分隔离,例如开发测试环境和生产环境的资源(如配置、服务)隔离等。 |
| AccessKey | spring.cloud.nacos.discovery.access-key | 无 | 当要上阿里云时,阿里云上面的一个云账号名 |
| SecretKey | spring.cloud.nacos.discovery.secret-key | 无 | 当要上阿里云时,阿里云上面的一个云账号密码 |
| Metadata | spring.cloud.nacos.discovery.metadata | 无 | 使用 Map 格式配置,用户可以根据自己的需要自定义一些和服务相关的元数据信息 |
| 日志文件名 | spring.cloud.nacos.discovery.log-name | 无 | |
| 接入点 | spring.cloud.nacos.discovery.enpoint | UTF-8 | 地域的某个服务的入口域名,通过此域名可以动态地拿到服务端地址 |
| 是否集成 Ribbon | ribbon.nacos.enabled | true | 一般都设置成 true 即可 |
服务消费者的创建与服务提供者大同小异,这里采用最原始的一种方式,即显示的使用 LoadBalanceClient 和 RestTemplate 结合的方式来访问。
创建一个名为 ConsumerConfiguration 的 Java 配置类,主要作用是为了注入 RestTemplate
package cn.mirrorming.spring.cloud.alibaba.consumer.config;

import org.springframework.context.annotation.Bean;
import org.springframework.context.annotation.Configuration;
import org.springframework.web.client.RestTemplate;

@Configuration
public class ConsumerConfiguration {
    @Bean
    public RestTemplate restTemplate() {
        return new RestTemplate();
    }
}通过浏览器访问 http://localhost:8848/nacos,即 Nacos Server 网址

你会发现多了一个名为 nacos-consumer 的服务
这时打开 http://localhost:9091/echo/app/name ,你会在浏览器上看到:
Hello Nacos Discovery consumer通过浏览器访问 http://localhost:9091/actuator/nacos-discovery 你会在浏览器上看到:

Feign 是一个声明式的伪 Http 客户端,它使得写 Http 客户端变得更简单。使用 Feign,只需要创建一个接口并注解。它具有可插拔的注解特性,可使用 Feign 注解和 JAX-RS 注解。Feign 支持可插拔的编码器和解码器。Feign 默认集成了 Ribbon,Nacos 也很好的兼容了 Feign,默认实现了负载均衡的效果
- Feign 采用的是基于接口的注解
- Feign 整合了 ribbon
主要增加了
org.springframework.cloud:spring-cloud-starter-openfeign依赖
通过
@EnableFeignClients注解开启 Feign 功能
通过 @FeignClient("服务名") 注解来指定调用哪个服务。代码如下:
package cn.mirrorming.spring.cloud.alibaba.consumer.feign.service;

import org.springframework.cloud.openfeign.FeignClient;
import org.springframework.web.bind.annotation.GetMapping;
import org.springframework.web.bind.annotation.PathVariable;

@FeignClient(value = "provider")
public interface ProviderService {

    @GetMapping(value = "/echo/{message}")
    String echo(@PathVariable String message);
}这时打开 http://localhost:9092/echo ,你会在浏览器上看到:
Hello Nacos Discovery Hi Feign- IDEA设置

-
启动多个
consumer-provider实例 -
在浏览器上多次访问
http://localhost:9092/echo/,浏览器交替显示:
Hello Nacos Discovery Feign Client , From port :8081
Hello Nacos Discovery Feign Client , From port :8082在微服务架构中,根据业务来拆分成一个个的服务,服务与服务之间可以通过 RPC 相互调用,在 Spring Cloud 中可以用 RestTemplate + LoadBalanceClient 和 Feign 来调用。为了保证其高可用,单个服务通常会集群部署。由于网络原因或者自身的原因,服务并不能保证 100% 可用,如果单个服务出现问题,调用这个服务就会出现线程阻塞,此时若有大量的请求涌入,Servlet 容器的线程资源会被消耗完毕,导致服务瘫痪。服务与服务之间的依赖性,故障会传播,会对整个微服务系统造成灾难性的严重后果,这就是服务故障的 “雪崩” 效应。
为了解决这个问题,业界提出了熔断器模型。
阿里巴巴开源了 Sentinel 组件,实现了熔断器模式,Spring Cloud 对这一组件进行了整合。在微服务架构中,一个请求需要调用多个服务是非常常见的,较底层的服务如果出现故障,会导致连锁故障。当对特定的服务的调用的不可用达到一个阀值熔断器将会被打开。
熔断器打开后,为了避免连锁故障,通过 fallback 方法可以直接返回一个固定值。
随着微服务的流行,服务和服务之间的稳定性变得越来越重要。 Sentinel 以流量为切入点,从流量控制、熔断降级、系统负载保护等多个维度保护服务的稳定性。
- 丰富的应用场景: Sentinel 承接了阿里巴巴近 10 年的 双十一大促流量 的核心场景,例如秒杀(即突发流量控制在系统容量可以承受的范围)、消息削峰填谷、实时熔断下游不可用应用等。
- 完备的实时监控: Sentinel 同时提供实时的监控功能。您可以在控制台中看到接入应用的单台机器秒级数据,甚至 500 台以下规模的集群的汇总运行情况。
- 广泛的开源生态: Sentinel 提供开箱即用的与其它开源框架/库的整合模块,例如与 Spring Cloud、Dubbo、gRPC 的整合。您只需要引入相应的依赖并进行简单的配置即可快速地接入 Sentinel。
- 完善的 SPI 扩展点: Sentinel 提供简单易用、完善的 SPI 扩展点。您可以通过实现扩展点,快速的定制逻辑。例如定制规则管理、适配数据源等。
如果要在您的项目中引入 Sentinel,使用 group ID 为 org.springframework.cloud 和 artifact ID 为 spring-cloud-starter-alibaba-sentinel 的 starter。
<dependency>
    <groupId>org.springframework.cloud</groupId>
    <artifactId>spring-cloud-starter-alibaba-sentinel</artifactId>
</dependency>
Sentinel 适配了 Feign 组件。但默认是关闭的。需要在配置文件中配置打开它,在配置文件增加以下代码:
feign:
  sentinel:
enabled: truepackage cn.mirrorming.spring.cloud.alibaba.consumer.feign.service;
import cn.mirrorming.spring.cloud.alibaba.consumer.feign.service.fallback.ProviderServiceFallback;
import org.springframework.cloud.openfeign.FeignClient;
import org.springframework.web.bind.annotation.GetMapping;
import org.springframework.web.bind.annotation.PathVariable;
/**
* @author mirror
*/
@FeignClient(value = "provider", fallback = ProviderServiceFallback.class)
public interface ProviderService {
@GetMapping(value = "/echo/{message}")
String echo(@PathVariable String message);
}package cn.mirrorming.spring.cloud.alibaba.consumer.feign.service.fallback;
import cn.mirrorming.spring.cloud.alibaba.consumer.feign.service.ProviderService;
import org.springframework.stereotype.Component;
@Component
public class ProviderServiceFallback implements ProviderService {
@Override
public String echo(String message) {
return "sentinel fallback";
}
}此时我们关闭服务提供者,再次请求 http://localhost:9092/echo/ 浏览器会显示:
sentinel fallbackSentinel 控制台提供一个轻量级的控制台,它提供机器发现、单机资源实时监控、集群资源汇总,以及规则管理的功能。您只需要对应用进行简单的配置,就可以使用这些功能。
注意: 集群资源汇总仅支持 500 台以下的应用集群,有大概 1 - 2 秒的延时。
# 下载源码
git clone https://github.com/alibaba/Sentinel.git

# 编译打包
mvn clean package
注:下载依赖时间较长,请耐心等待...
Sentinel 控制台是一个标准的 SpringBoot 应用,以 SpringBoot 的方式运行 jar 包即可。
cd sentinel-dashboard\targetjava -Dserver.port=8080 -Dcsp.sentinel.dashboard.server=localhost:8080 -Dproject.name=sentinel-dashboard -jar sentinel-dashboard.jar其中 -Dserver.port=8080 用于指定 Sentinel 控制台端口为 8080。
从 Sentinel 1.6.0 起,Sentinel 控制台引入基本的登录功能,默认用户名和密码都是 sentinel。可以参考 鉴权模块文档 配置用户名和密码。
从 Sentinel 1.5.0 开始,控制台提供通用的鉴权接口 AuthService,用户可根据需求自行实现。
从 Sentinel 1.6.0 起,Sentinel 控制台引入基本的登录功能,默认用户名和密码都是 sentinel。

用户可以通过如下参数进行配置:
-Dsentinel.dashboard.auth.username=sentinel用于指定控制台的登录用户名为sentinel;-Dsentinel.dashboard.auth.password=123456用于指定控制台的登录密码为123456;如果省略这两个参数,默认用户和密码均为sentinel;-Dserver.servlet.session.timeout=7200用于指定 Spring Boot 服务端 session 的过期时间,如7200表示 7200 秒;60m表示 60 分钟,默认为 30 分钟;
同样也可以直接在 Spring properties 文件中进行配置。
打开浏览器访问:http://localhost:8080/
登录账号和密码都是sentinel
application.yml 配置文件中增加如下配置:
spring:
  cloud:
    sentinel:
      transport:
        # 当前应用被sentinel监控的端口
        port: 8719
        # sentinel的dashboard
        dashboard: 127.0.0.1:8081
这里的 spring.cloud.sentinel.transport.port 端口配置会在应用对应的机器上启动一个 Http Server,该 Server 会与 Sentinel 控制台做交互。比如 Sentinel 控制台添加了 1 个限流规则,会把规则数据 push 给这个 Http Server 接收,Http Server 再将规则注册到 Sentinel 中。
使用之前的 Feign 客户端,application.yml 完整配置如下:
spring:
  application:
    name: consumer-feign
  cloud:
    nacos:
      discovery:
        server-addr: 127.0.0.1:8848
    sentinel:
      transport:
        dashboard: 127.0.0.1:8081
        # 当前应用被sentinel监控的端口
        port: 8719

server:
  port: 9092

management:
  endpoints:
    web:
      exposure:
        include: "*"

#sentinel
feign:
  sentinel:
enabled: true注:port: 8719这里的配置,端口冲突也能注册,会自动帮你在端口号上 + 1;
打开浏览器访问:http://127.0.0.1:8080
触发熔断后,此时会多一个名为 consumer-feign 的服务

Spring Cloud Gateway 是 Spring 官方基于 Spring 5.0,Spring Boot 2.0 和 Project Reactor 等技术开发的网关,Spring Cloud Gateway 旨在为微服务架构提供一种简单而有效的统一的 API 路由管理方式。Spring Cloud Gateway 作为 Spring Cloud 生态系中的网关,目标是替代 Netflix ZUUL,其不仅提供统一的路由方式,并且基于 Filter 链的方式提供了网关基本的功能,例如:安全,监控/埋点,和限流等。

- 基于 Spring Framework 5,Project Reactor 和 Spring Boot 2.0
- 动态路由
- Predicates 和 Filters 作用于特定路由
- 集成 Hystrix 断路器
- 集成 Spring Cloud DiscoveryClient
- 易于编写的 Predicates 和 Filters
- 限流
- 路径重写
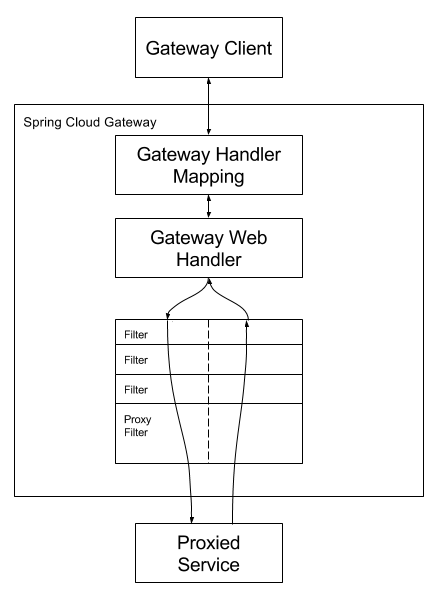
客户端向 Spring Cloud Gateway 发出请求。然后在 Gateway Handler Mapping 中找到与请求相匹配的路由,将其发送到 Gateway Web Handler。Handler 再通过指定的过滤器链来将请求发送到我们实际的服务执行业务逻辑,然后返回。
过滤器之间用虚线分开是因为过滤器可能会在发送代理请求之前(pre)或之后(post)执行业务逻辑。
主要增加了
org.springframework.cloud:spring-cloud-starter-gateway依赖
- Spring Cloud Gateway 不使用 Web 作为服务器,而是 使用 WebFlux 作为服务器,Gateway 项目已经依赖了
starter-webflux,所以这里 不要依赖 starter-web - 由于过滤器等功能依然需要 Servlet 支持,故这里还需要依赖
javax.servlet:javax.servlet-api
package cn.mirrorming.spring.cloud.gateway;

import org.springframework.boot.SpringApplication;
import org.springframework.boot.autoconfigure.SpringBootApplication;
import org.springframework.cloud.client.discovery.EnableDiscoveryClient;
import org.springframework.cloud.openfeign.EnableFeignClients;

@SpringBootApplication
@EnableDiscoveryClient
@EnableFeignClients
public class GatewayApplication {
    public static void main(String[] args) {
        SpringApplication.run(GatewayApplication.class, args);
    }
}spring:
application:
# 应用名称
name: spring-gateway
cloud:
# 使用 Naoos 作为服务注册发现
nacos:
discovery:
server-addr: 127.0.0.1:8848
# 使用 Sentinel 作为熔断器
sentinel:
transport:
port: 8721
dashboard: 127.0.0.1:8081
# 路由网关配置
gateway:
# 设置与服务注册发现组件结合,这样可以采用服务名的路由策略
discovery:
locator:
enabled: true
# 配置路由规则
routes:
# 采用自定义路由 ID(有固定用法,不同的 id 有不同的功能,详见:https://cloud.spring.io/spring-cloud-gateway/2.0.x/single/spring-cloud-gateway.html#gateway-route-filters)
- id: NACOS-CONSUMER
# 采用 LoadBalanceClient 方式请求,以 lb:// 开头,后面的是注册在 Nacos 上的服务名
uri: lb://nacos-consumer
# Predicate 翻译过来是“谓词”的意思,必须,主要作用是匹配用户的请求,有很多种用法
predicates:
# Method 方法谓词,这里是匹配 GET 和 POST 请求
- Method=GET,POST
- id: NACOS-CONSUMER-FEIGN
uri: lb://nacos-consumer-feign
predicates:
- Method=GET,POST
server:
port: 9000
# 配置日志级别,方别调试
logging:
level:
org.springframework.cloud.gateway: debug注意:请阅读注释
依次运行 Nacos 服务、ProviderApplication、ConsumerApplication、ConsumerFeignApplication、GatewayApplication
打开浏览器访问:http://localhost:9000/consumer/echo/app/name 浏览器显示
Hello Nacos Discovery consumer , From port :8081打开浏览器访问:http://localhost:9000/consumer-feign/echo 浏览器显示
Hello Nacos Discovery Feign Client , From port :8081注意:请求方式是 http://路由网关IP:路由网关Port/服务名/\**
至此说明 Spring Cloud Gateway 的路由功能配置成功
全局过滤器作用于所有的路由,不需要单独配置,我们可以用它来实现很多统一化处理的业务需求,比如权限认证,IP 访问限制等等。
详见:Spring Cloud Gateway Documentation

Spring Cloud Gateway 基于 Project Reactor 和 WebFlux,采用响应式编程风格,打开它的 Filter 的接口 GlobalFilter 你会发现它只有一个方法 filter。
实现 GlobalFilter, Ordered 接口并在类上增加 @Component 注解就可以使用过滤功能了,非常简单方便
package cn.mirrorming.spring.cloud.gateway.filter;

import com.fasterxml.jackson.core.JsonProcessingException;
import com.fasterxml.jackson.databind.ObjectMapper;
import com.google.common.collect.Maps;
import lombok.extern.slf4j.Slf4j;
import org.springframework.cloud.gateway.filter.GatewayFilterChain;
import org.springframework.cloud.gateway.filter.GlobalFilter;
import org.springframework.core.Ordered;
import org.springframework.core.io.buffer.DataBuffer;
import org.springframework.http.HttpStatus;
import org.springframework.http.server.reactive.ServerHttpResponse;
import org.springframework.stereotype.Component;
import org.springframework.web.server.ServerWebExchange;
import reactor.core.publisher.Mono;

import java.util.Map;

/**
 * @author mirror
 */
@Slf4j
@Component
public class AuthFilter implements GlobalFilter, Ordered {
    @Override
    public Mono<Void> filter(ServerWebExchange exchange, GatewayFilterChain chain) {
        String token = exchange.getRequest().getQueryParams().getFirst("token");

        if (token == null || token.isEmpty()) {
            ServerHttpResponse response = exchange.getResponse();

            // 封装错误信息
            Map<String, Object> responseData = Maps.newHashMap();
            responseData.put("code", 401);
            responseData.put("message", "非法请求");
            responseData.put("cause", "Token is empty");

            try {
                // 将信息转换为 JSON
                ObjectMapper objectMapper = new ObjectMapper();
                byte[] data = objectMapper.writeValueAsBytes(responseData);

                // 输出错误信息到页面
                DataBuffer buffer = response.bufferFactory().wrap(data);
                response.setStatusCode(HttpStatus.UNAUTHORIZED);
                response.getHeaders().add("Content-Type", "application/json;charset=UTF-8");
                return response.writeWith(Mono.just(buffer));
            } catch (JsonProcessingException e) {
                log.error("{}", e);
            }
        }

        return chain.filter(exchange);
    }

    @Override
    public int getOrder() {
        //顺序,多个filter的时候使用
        return 0;
    }
}浏览器访问:http://localhost:9000/consumer-feign/echo 网页显示
{"code":401,"cause":"Token is empty","message":"非法请求"}浏览器访问:http://localhost:9000/consumer-feign/echo?token=233 网页显示
Hello Nacos Discovery Feign Client , From port :8081Spring 官方人员提供的网关基准测试报告 GitHub
| Proxy | Avg Latency | Avg Req/Sec/Thread |
|---|---|---|
| gateway | 6.61ms | 3.24k |
| linkered | 7.62ms | 2.82k |
| zuul | 12.56ms | 2.09k |
| none | 2.09ms | 11.77k |
- 这里的 Zuul 为 1.x 版本,是一个基于阻塞 IO 的 API Gateway
- Zuul 已经发布了 Zuul 2.x,基于 Netty,非阻塞的,支持长连接,但 Spring Cloud 暂时还没有整合计划
- Linkerd 基于 Scala 实现的、目前市面上仅有的生产级别的 Service Mesh(其他诸如 Istio、Conduit 暂时还不能用于生产)。
在分布式系统中,由于服务数量巨多,为了方便服务配置文件统一管理,实时更新,所以需要分布式配置中心组件。
Nacos 提供用于存储配置和其他元数据的 key/value 存储,为分布式系统中的外部化配置提供服务器端和客户端支持。使用 Spring Cloud Alibaba Nacos Config,您可以在 Nacos Server 集中管理你 Spring Cloud 应用的外部属性配置。
Spring Cloud Alibaba Nacos Config 是 Spring Cloud Config Server 和 Client 的替代方案,客户端和服务器上的概念与 Spring Environment 和 PropertySource 有着一致的抽象,在特殊的 bootstrap 阶段,配置被加载到 Spring 环境中。当应用程序通过部署管道从开发到测试再到生产时,您可以管理这些环境之间的配置,并确保应用程序具有迁移时需要运行的所有内容。
需要在 Nacos Server 中创建配置文件,我们依然采用 YAML 的方式部署配置文件,操作流程如下:
-
浏览器打开 http://localhost:8848/nacos ,访问 Nacos Server
-
新建配置文件,此处以 服务消费者Feign项目为例


注意:Data ID 的默认扩展名为 .properties ,希望使用 YAML 配置,此处必须指明是 .yaml
- 发布成功后在 “配置列表” 一栏即可看到刚才创建的配置项
此处以服务提供者项目为例
在 pom.xml 中增加 org.springframework.cloud:spring-cloud-starter-alibaba-nacos-config 依赖
<dependency>
    <groupId>com.alibaba.cloud</groupId>
    <artifactId>spring-cloud-starter-alibaba-nacos-config</artifactId>
</dependency>创建名为 bootstrap.properties 的配置文件并删除之前创建的 application.yml 配置文件
# 这里的应用名对应 Nacos Config 中的 Data ID,实际应用名称以配置中心的配置为准
spring.application.name=provider-config
# 指定查找名为 nacos-provider-config.yaml 的配置文件
spring.cloud.nacos.config.file-extension=yaml
# Nacos Server 的地址
spring.cloud.nacos.config.server-addr=127.0.0.1:8848
注意:Spring Boot 配置文件的加载顺序,依次为 bootstrap.properties -> bootstrap.yml -> application.properties -> application.yml ,其中 bootstrap.properties 配置为最高优先级
启动应用后我们可以通过日志看到,已经成功加载到了配置文件
INFO 676 --- [ main] o.s.c.a.n.c.NacosPropertySourceBuilder : Loading nacos data, dataId: 'provider-config.yaml', group: 'DEFAULT_GROUP'
Nacos Config 也支持配置的动态更新,操作流程如下:
-
修改服务端配置,增加一个
user.name的属性 -
在Controller中测试配置更新效果
@RestController
public class TestNacosConfigController {
    /**
     * 注入配置文件上下文
     */
    @Autowired
    private ConfigurableApplicationContext applicationContext;
    /**
     * 从上下文中读取配置
     */
    @GetMapping(value = "/hi")
    public String getNameFromNacosConfig() {
        return "Hello " + applicationContext.getEnvironment().getProperty("user.name");
    }
}- 通过浏览器访问该接口,浏览器显示
Hello mirror- 修改服务端配置文件
此时观察控制台日志,你会发现我们已经成功刷新了配置

- 刷新浏览器,浏览器显示
Hello mirrorming注:可以使用 spring.cloud.nacos.config.refresh.enabled=false 来关闭动态刷新
做项目开发的时候,生产环境和测试环境的一些配置可能会不一样,有时候一些功能也可能会不一样,所以可能会在上线的时候手工修改这些配置信息。但是 Spring 中为我们提供了 Profile 这个功能。我们只需要在启动的时候添加一个虚拟机参数,激活自己环境所要用的 Profile 就可以了。
操作起来很简单,只需要为不同的环境编写专门的配置文件,如:application-dev.yml、application-prod.yml, 启动项目时只需要增加一个命令参数 --spring.profiles.active=环境配置 即可,启动命令如下:
java -jar hello-spring-cloud-alibaba-nacos-provider-1.0.0-SNAPSHOT.jar --spring.profiles.active=prodspring-cloud-starter-alibaba-nacos-config 在加载配置的时候,不仅仅加载了以 dataid 为 ${spring.application.name}.${file-extension:properties} 为前缀的基础配置,还加载了 dataid 为 ${spring.application.name}-${profile}.${file-extension:properties} 的基础配置。在日常开发中如果遇到多套环境下的不同配置,可以通过 Spring 提供的 ${spring.profiles.active} 这个配置项来配置。
以服务提供者 项目为例
增加一个名为 provider-config-prod.yaml 的配置
增加一个名为 bootstrap-prod.properties 的配置文件,内容如下:
spring.profiles.active=prod
spring.application.name=nacos-provider-config
spring.cloud.nacos.config.file-extension=yaml
spring.cloud.nacos.config.server-addr=127.0.0.1:8848
主要增加了 spring.profiles.active=prod 配置,用于指定访问 Nacos Server 中的 nacos-provider-config-prod.yaml 配置
此时我们有两个配置文件,分别为 bootstrap.properties 和 bootstrap-prod.properties ,我们需要指定启动时加载哪一个配置文件,操作流程如下:
-
Run->Edit Configurations..->Active profile内容改成prod -
观察日志,判断是否成功加载配置
微服务架构是通过业务来划分服务的,使用 REST 调用。对外暴露的一个接口,可能需要很多个服务协同才能完成这个接口功能,如果链路上任何一个服务出现问题或者网络超时,都会形成导致接口调用失败。随着业务的不断扩张,服务之间互相调用会越来越复杂。

随着服务的越来越多,对调用链的分析会越来越复杂。它们之间的调用关系也许如下:

面对以上情况,我们就需要一些可以帮助理解系统行为、用于分析性能问题的工具,以便发生故障的时候,能够快速定位和解决问题,这就是所谓的 APM(应用性能管理)。
目前主要的一些 APM 工具有: Cat、Zipkin、Pinpoint、SkyWalking;Apache SkyWalking 是观察性分析平台和应用性能管理系统。提供分布式追踪、服务网格遥测分析、度量聚合和可视化一体化解决方案。

- Skywalking Agent: 使用 JavaAgent 做字节码植入,无侵入式的收集,并通过 HTTP 或者 gRPC 方式发送数据到 SkyWalking Collector。
- SkyWalking Collector: 链路数据收集器,对 agent 传过来的数据进行整合分析处理并落入相关的数据存储中。
- Storage: SkyWalking 的存储,时间更迭,SW 已经开发迭代到了 6.x 版本,在 6.x 版本中支持以 ElasticSearch(支持 6.x)、Mysql、TiDB、H2、作为存储介质进行数据存储。
- UI: Web 可视化平台,用来展示落地的数据。
- 多种监控手段,语言探针和服务网格(Service Mesh)
- 多语言自动探针,Java,.NET Core 和 Node.JS
- 轻量高效,不需要大数据
- 模块化,UI、存储、集群管理多种机制可选
- 支持告警
- 优秀的可视化方案
SkyWalking 存储方案有多种,官方推荐的方案是 ElasticSearch ,所以我们需要先安装 ElasticSearch。
version: '3.3'
services:
  elasticsearch:
    image: wutang/elasticsearch-shanghai-zone:6.3.2
    container_name: elasticsearch
    restart: always
    ports:
      - 9200:9200
      - 9300:9300
    environment:
cluster.name: elasticsearch其中,9200 端口号为 SkyWalking 配置 ElasticSearch 所需端口号,cluster.name 为 SkyWalking 配置 ElasticSearch 集群的名称
浏览器访问 http://elasticsearchIP:9200/ ,浏览器返回如下信息即表示成功启动
{
  "name": "DMSLbHh",
  "cluster_name": "elasticsearch",
  "cluster_uuid": "tUAjQlK0S76RlEraVvkj5A",
  "version": {
    "number": "6.3.2",
    "build_flavor": "default",
    "build_type": "tar",
    "build_hash": "053779d",
    "build_date": "2018-07-20T05:20:23.451332Z",
    "build_snapshot": false,
    "lucene_version": "7.3.1",
    "minimum_wire_compatibility_version": "5.6.0",
    "minimum_index_compatibility_version": "5.0.0"
  },
  "tagline": "You Know, for Search"
}
官方已经为我们准备好了编译过的服务端版本,下载地址为 http://skywalking.apache.org/downloads/,这里我下载 6.1 版本
下载完成后解压缩,进入 apache-skywalking-apm-incubating/config 目录并修改 application.yml 配置文件
...

storage:
  elasticsearch:
    nameSpace: ${SW_NAMESPACE:""}
    clusterNodes: ${SW_STORAGE_ES_CLUSTER_NODES:192.168.2.119:9200}
    user: ${SW_ES_USER:""}
    password: ${SW_ES_PASSWORD:""}
    indexShardsNumber: ${SW_STORAGE_ES_INDEX_SHARDS_NUMBER:2}
    indexReplicasNumber: ${SW_STORAGE_ES_INDEX_REPLICAS_NUMBER:0}
    bulkActions: ${SW_STORAGE_ES_BULK_ACTIONS:2000}
    bulkSize: ${SW_STORAGE_ES_BULK_SIZE:20}
    flushInterval: ${SW_STORAGE_ES_FLUSH_INTERVAL:10}
    concurrentRequests: ${SW_STORAGE_ES_CONCURRENT_REQUESTS:2}
    metadataQueryMaxSize: ${SW_STORAGE_ES_QUERY_MAX_SIZE:5000}
    segmentQueryMaxSize: ${SW_STORAGE_ES_QUERY_SEGMENT_SIZE:200}
  # h2:
  #   driver: ${SW_STORAGE_H2_DRIVER:org.h2.jdbcx.JdbcDataSource}
  #   url: ${SW_STORAGE_H2_URL:jdbc:h2:mem:skywalking-oap-db}
  #   user: ${SW_STORAGE_H2_USER:sa}
  #   metadataQueryMaxSize: ${SW_STORAGE_H2_QUERY_MAX_SIZE:5000}

...
这里需要做三件事:
- 注释 H2 存储方案
- 启用 ElasticSearch 存储方案
- 修改 ElasticSearch 服务器地址
修改完配置后,进入 apache-skywalking-apm-incubating\bin 目录,运行 startup.bat 启动服务端,看到Spring即启动完毕
通过浏览器访问 http://localhost:8080 出现如下界面即表示启动成功

默认的用户名密码为:admin/admin,登录成功后,效果如下图

参考官网给出的帮助 Setup java agent,我们需要使用官方提供的探针为我们达到监控的目的,按照实际情况我们需要实现三种部署方式
- IDEA 部署探针
- Java 启动方式部署探针(我们是 Spring Boot 应用程序,需要使用
java -jar的方式启动应用) - Docker 启动方式部署探针(需要做到一次构建到处运行的持续集成效果,本章节暂不提供解决方案,到后面的实战环节再实现)
探针文件在 apache-skywalking-apm-incubating/agent 目录下
创建一个名为 hello-spring-cloud-external-skywalking 的目录,并将 agent 整个目录拷贝进来
修改项目的 JVM 运行参数,点击菜单栏中的 Run -> EditConfigurations...,此处我们以 provider 项目为例,修改参数如下
-javaagent:D:\Mirror\Coding\hello-spring-cloud-alibaba\hello-spring-cloud-external-skywalking\agent\skywalking-agent.jar
-Dskywalking.agent.service_name=provider
-Dskywalking.collector.backend_service=localhost:11800-javaagent:用于指定探针路径(IDEA右键skywalking-agent.jar,copy path)-Dskywalking.agent.service_name:用于重写agent/config/agent.config配置文件中的服务名-Dskywalking.collector.backend_service:用于重写agent/config/agent.config配置文件中的服务地址
java -javaagent:/path/to/skywalking-agent/skywalking-agent.jar -Dskywalking.agent.service_name=provider -Dskywalking.collector.backend_service=localhost:11800 -jar yourApp.jar启动 provider 项目,通过观察日志可以发现,已经成功加载探针
DEBUG 2019-08-04 20:03:49:046 main AgentPackagePath :  The beacon class location
INFO 2019-08-04 20:03:49:051 main SnifferConfigInitializer :  Config file found i
20:03:53.713 [SkywalkingAgent-1-GRPCChannelManager-0] DEBUG org.apache.skywalking
20:03:53.718 [SkywalkingAgent-1-GRPCChannelManager-0] DEBUG org.apache.skywalking
20:03:53.751 [SkywalkingAgent-1-GRPCChannelManager-0] DEBUG org.apache.skywalking
20:03:53.751 [SkywalkingAgent-1-GRPCChannelManager-0] DEBUG org.apache.skywalking
20:03:53.758 [SkywalkingAgent-1-GRPCChannelManager-0] DEBUG org.apache.skywalking
20:03:53.760 [SkywalkingAgent-1-GRPCChannelManager-0] DEBUG org.apache.skywalking
20:03:53.760 [SkywalkingAgent-1-GRPCChannelManager-0] DEBUG org.apache.skywalking
20:03:53.762 [SkywalkingAgent-1-GRPCChannelManager-0] DEBUG org.apache.skywalking
20:03:53.763 [SkywalkingAgent-1-GRPCChannelManager-0] DEBUG org.apache.skywalking
20:03:53.764 [SkywalkingAgent-1-GRPCChannelManager-0] DEBUG org.apache.skywalking
20:03:53.765 [SkywalkingAgent-1-GRPCChannelManager-0] DEBUG org.apache.skywalking...
启动服务,访问接口再刷新 SkyWalking Web UI,你会发现 Service 与 Endpoint 已经成功检测到了

至此,表示 SkyWalking 链路追踪配置成功
SkyWalking 通过业务调用监控进行依赖分析,提供给我们了服务之间的服务调用拓扑关系、以及针对每个 Endpoint 的 Trace 记录。
点击 Trace 菜单,进入追踪页

点击 Trace ID 展开详细信息


- Avg SLA: 服务可用性(主要是通过请求成功与失败次数来计算)
- CPM: 每分钟调用次数
- Avg Response Time: 平均响应时间
上图中展示了服务在一定时间范围内的相关数据,包括:
- 服务可用性指标 SLA
- 每分钟平均响应数
- 平均响应时间
- 服务进程 PID
- 服务所在物理机的 IP、Host、OS
- 运行时 CPU 使用率
- 运行时堆内存使用率
- 运行时非堆内存使用率
- GC 情况
Assembly 插件目的是提供一个把工程依赖元素、模块、网站文档等其他文件存放到单个归档文件里。
- zip
- tar.gz
- tar.bz2
- jar
- dir
- war
此处以将 SkyWalking 探针打包为 tar.gz 为例,为后期持续集成时构建 Docker 镜像做好准备
在 hello-spring-cloud-external-skywalking项目中增加pom.xml ,只要插件配置
<?xml version="1.0" encoding="UTF-8"?>
<project xmlns="http://maven.apache.org/POM/4.0.0" xmlns:xsi="http://www.w3.org/2001/XMLSchema-instance"
         xsi:schemaLocation="http://maven.apache.org/POM/4.0.0 http://maven.apache.org/xsd/maven-4.0.0.xsd">
    <modelVersion>4.0.0</modelVersion>

    <parent>
        <groupId>cn.mirrorming</groupId>
        <artifactId>hello-spring-cloud-alibaba-dependencies</artifactId>
        <version>1.0.0-SNAPSHOT</version>
        <relativePath>../hello-spring-cloud-alibaba-dependencies/pom.xml</relativePath>
    </parent>

    <artifactId>hello-spring-cloud-external-skywalking</artifactId>
    <packaging>jar</packaging>

    <name>hello-spring-cloud-external-skywalking</name>
    <url>http://www.mirrorming.cn</url>
    <inceptionYear>2019-Now</inceptionYear>

    <build>
        <plugins>
            <plugin>
                <groupId>org.apache.maven.plugins</groupId>
                <artifactId>maven-assembly-plugin</artifactId>
                <executions>
                    <!-- 配置执行器 -->
                    <execution>
                        <id>make-assembly</id>
                        <!-- 绑定到 package 生命周期阶段上 -->
                        <phase>package</phase>
                        <goals>
                            <!-- 只运行一次 -->
                            <goal>single</goal>
                        </goals>
                        <configuration>
                            <finalName>skywalking</finalName>
                            <descriptors>
                                <!-- 配置描述文件路径 -->
                                <descriptor>src/main/resources/assembly.xml</descriptor>
                            </descriptors>
                        </configuration>
                    </execution>
                </executions>
            </plugin>
        </plugins>
    </build>
</project>创建 src/main/resources/assembly.xml 配置文件
<assembly>
    <id>6.1.0</id>
    <formats>
        <!-- 打包的文件格式,支持 zip、tar.gz、tar.bz2、jar、dir、war -->
        <format>tar.gz</format>
    </formats>
    <!-- tar.gz 压缩包下是否生成和项目名相同的根目录,有需要请设置成 true -->
    <includeBaseDirectory>false</includeBaseDirectory>
    <dependencySets>
        <dependencySet>
            <!-- 是否把本项目添加到依赖文件夹下,有需要请设置成 true -->
            <useProjectArtifact>false</useProjectArtifact>
            <outputDirectory>lib</outputDirectory>
            <!-- 将 scope 为 runtime 的依赖包打包 -->
            <scope>runtime</scope>
        </dependencySet>
    </dependencySets>
    <fileSets>
        <fileSet>
            <!-- 设置需要打包的文件路径 -->
            <directory>agent</directory>
            <!-- 打包后的输出路径 -->
            <outputDirectory></outputDirectory>
        </fileSet>
    </fileSets>
</assembly>mvn clean package
mvn clean install- package:会在 target 目录下创建名为
skywalking-6.1.0.tar.gz的压缩包 - install:会在本地仓库目录下创建名为
hello-spring-cloud-external-skywalking-1.0.0-SNAPSHOT-6.1.0.tar.gz的压缩包
消息队列作为高并发系统的核心组件之一,能够帮助业务系统解构提升开发效率和系统稳定性。主要具有以下优势:
- 削峰填谷: 主要解决瞬时写压力大于应用服务能力导致消息丢失、系统奔溃等问题
- 系统解耦: 解决不同重要程度、不同能力级别系统之间依赖导致一死全死
- 提升性能: 当存在一对多调用时,可以发一条消息给消息系统,让消息系统通知相关系统
- 蓄流压测: 线上有些链路不好压测,可以通过堆积一定量消息再放开来压测
Apache Alibaba RocketMQ 是一个消息中间件。消息中间件中有两个角色:消息生产者和消息消费者。RocketMQ 里同样有这两个概念,消息生产者负责创建消息并发送到 RocketMQ 服务器,RocketMQ 服务器会将消息持久化到磁盘,消息消费者从 RocketMQ 服务器拉取消息并提交给应用消费。
RocketMQ 是一款分布式、队列模型的消息中间件,具有以下特点:
- 支持严格的消息顺序
- 支持 Topic 与 Queue 两种模式
- 亿级消息堆积能力
- 比较友好的分布式特性
- 同时支持 Push 与 Pull 方式消费消息
- 历经多次天猫双十一海量消息考验
目前主流的 MQ 主要是 RocketMQ、kafka、RabbitMQ,其主要优势有:
- 支持事务型消息(消息发送和 DB 操作保持两方的最终一致性,RabbitMQ 和 Kafka 不支持)
- 支持结合 RocketMQ 的多个系统之间数据最终一致性(多方事务,二方事务是前提)
- 支持 18 个级别的延迟消息(RabbitMQ 和 Kafka 不支持)
- 支持指定次数和时间间隔的失败消息重发(Kafka 不支持,RabbitMQ 需要手动确认)
- 支持 Consumer 端 Tag 过滤,减少不必要的网络传输(RabbitMQ 和 Kafka 不支持)
- 支持重复消费(RabbitMQ 不支持,Kafka 支持)
注意:启动 RocketMQ Server + Broker + Console 至少需要 2G 内存
version: '3.5'
services:
  rmqnamesrv:
    image: foxiswho/rocketmq:server
    container_name: rmqnamesrv
    ports:
      - 9876:9876
    volumes:
      - ./data/logs:/opt/logs
      - ./data/store:/opt/store
    networks:
        rmq:
          aliases:
            - rmqnamesrv

  rmqbroker:
    image: foxiswho/rocketmq:broker
    container_name: rmqbroker
    ports:
      - 10909:10909
      - 10911:10911
    volumes:
      - ./data/logs:/opt/logs
      - ./data/store:/opt/store
      - ./data/brokerconf/broker.conf:/etc/rocketmq/broker.conf
    environment:
        NAMESRV_ADDR: "rmqnamesrv:9876"
        JAVA_OPTS: " -Duser.home=/opt"
        JAVA_OPT_EXT: "-server -Xms128m -Xmx128m -Xmn128m"
    command: mqbroker -c /etc/rocketmq/broker.conf
    depends_on:
      - rmqnamesrv
    networks:
      rmq:
        aliases:
          - rmqbroker

  rmqconsole:
    image: styletang/rocketmq-console-ng
    container_name: rmqconsole
    ports:
      - 8080:8080
    environment:
        JAVA_OPTS: "-Drocketmq.namesrv.addr=rmqnamesrv:9876 -Dcom.rocketmq.sendMessageWithVIPChannel=false"
    depends_on:
      - rmqnamesrv
    networks:
      rmq:
        aliases:
          - rmqconsole

networks:
  rmq:
    name: rmq
driver: bridgeRocketMQ Broker 需要一个配置文件,按照上面的 Compose 配置,我们需要在 ./data/brokerconf/ 目录下创建一个名为 broker.conf 的配置文件,内容如下:
# 所属集群名字
brokerClusterName=DefaultCluster

# broker 名字,注意此处不同的配置文件填写的不一样,如果在 broker-a.properties 使用: broker-a,
# 在 broker-b.properties 使用: broker-b
brokerName=broker-a

# 0 表示 Master,> 0 表示 Slave
brokerId=0

# nameServer地址,分号分割
# namesrvAddr=rocketmq-nameserver1:9876;rocketmq-nameserver2:9876

# 启动IP,如果 docker 报 com.alibaba.rocketmq.remoting.exception.RemotingConnectException: connect to <192.168.0.120:10909> failed
# 解决方式1 加上一句 producer.setVipChannelEnabled(false);,解决方式2 brokerIP1 设置宿主机IP,不要使用docker 内部IP
brokerIP1=192.168.xx.xx  #注意!!!此处要设置宿主机IP

# 在发送消息时,自动创建服务器不存在的topic,默认创建的队列数
defaultTopicQueueNums=4

# 是否允许 Broker 自动创建 Topic,建议线下开启,线上关闭 !!!这里仔细看是 false,false,false
autoCreateTopicEnable=true

# 是否允许 Broker 自动创建订阅组,建议线下开启,线上关闭
autoCreateSubscriptionGroup=true

# Broker 对外服务的监听端口
listenPort=10911

# 删除文件时间点,默认凌晨4点
deleteWhen=04

# 文件保留时间,默认48小时
fileReservedTime=120

# commitLog 每个文件的大小默认1G
mapedFileSizeCommitLog=1073741824

# ConsumeQueue 每个文件默认存 30W 条,根据业务情况调整
mapedFileSizeConsumeQueue=300000

# destroyMapedFileIntervalForcibly=120000
# redeleteHangedFileInterval=120000
# 检测物理文件磁盘空间
diskMaxUsedSpaceRatio=88
# 存储路径
# storePathRootDir=/home/ztztdata/rocketmq-all-4.1.0-incubating/store
# commitLog 存储路径
# storePathCommitLog=/home/ztztdata/rocketmq-all-4.1.0-incubating/store/commitlog
# 消费队列存储
# storePathConsumeQueue=/home/ztztdata/rocketmq-all-4.1.0-incubating/store/consumequeue
# 消息索引存储路径
# storePathIndex=/home/ztztdata/rocketmq-all-4.1.0-incubating/store/index
# checkpoint 文件存储路径
# storeCheckpoint=/home/ztztdata/rocketmq-all-4.1.0-incubating/store/checkpoint
# abort 文件存储路径
# abortFile=/home/ztztdata/rocketmq-all-4.1.0-incubating/store/abort
# 限制的消息大小
maxMessageSize=65536

# flushCommitLogLeastPages=4
# flushConsumeQueueLeastPages=2
# flushCommitLogThoroughInterval=10000
# flushConsumeQueueThoroughInterval=60000

# Broker 的角色
# - ASYNC_MASTER 异步复制Master
# - SYNC_MASTER 同步双写Master
# - SLAVE
brokerRole=ASYNC_MASTER

# 刷盘方式
# - ASYNC_FLUSH 异步刷盘
# - SYNC_FLUSH 同步刷盘
flushDiskType=ASYNC_FLUSH

# 发消息线程池数量
# sendMessageThreadPoolNums=128
# 拉消息线程池数量
# pullMessageThreadPoolNums=128
访问 http://IP:8080 登入控制台
RocketMQ 是一款开源的分布式消息系统,基于高可用分布式集群技术,提供低延时的、高可靠的消息发布与订阅服务。
由于本教程整个案例基于 Spring Cloud,故我们采用 Spring Cloud Stream 完成一次发布和订阅
Spring Cloud Stream 是一个用于构建基于消息的微服务应用框架。它基于 Spring Boot 来创建具有生产级别的单机 Spring 应用,并且使用 Spring Integration 与 Broker 进行连接。
Spring Cloud Stream 提供了消息中间件配置的统一抽象,推出了 publish-subscribe、consumer groups、partition 这些统一的概念。
Spring Cloud Stream 内部有两个概念:
- Binder: 跟外部消息中间件集成的组件,用来创建 Binding,各消息中间件都有自己的 Binder 实现。
- Binding: 包括 Input Binding 和 Output Binding。
Binding 在消息中间件与应用程序提供的 Provider 和 Consumer 之间提供了一个桥梁,实现了开发者只需使用应用程序的 Provider 或 Consumer 生产或消费数据即可,屏蔽了开发者与底层消息中间件的接触。
package cn.mirrorming.spring.cloud.alibaba.rocketmq.provider.service;

import org.springframework.beans.factory.annotation.Autowired;
import org.springframework.messaging.MessageChannel;
import org.springframework.messaging.support.MessageBuilder;
import org.springframework.stereotype.Service;

/**
 * @author mirror
 */
@Service
public class ProviderService {
    @Autowired
    private MessageChannel output;

    public void send(String message) {
        output.send(MessageBuilder.withPayload(message).build());
    }
}
package cn.mirrorming.spring.cloud.alibaba.rocketmq.provider.controller;
import cn.mirrorming.spring.cloud.alibaba.rocketmq.provider.service.ProviderService;
import org.springframework.beans.factory.annotation.Autowired;
import org.springframework.web.bind.annotation.GetMapping;
import org.springframework.web.bind.annotation.RestController;
/**
* @author mirror
*/
@RestController
public class TestController {
@Autowired
private ProviderService providerService;
@GetMapping("/test")
public String run() {
providerService.send("Hello RocketMQ");
return "ok";
}
}配置 Output(Source.class) 的 Binding 信息并配合 @EnableBinding 注解使其生效
package cn.mirrorming.spring.cloud.alibaba.rocketmq.provider;

import org.springframework.boot.SpringApplication;
import org.springframework.boot.autoconfigure.SpringBootApplication;
import org.springframework.cloud.stream.annotation.EnableBinding;
import org.springframework.cloud.stream.messaging.Source;

/**
 * @author mirror
 */
@SpringBootApplication
@EnableBinding({Source.class})
public class RocketMQProviderApplication {
    public static void main(String[] args) {
        SpringApplication.run(RocketMQProviderApplication.class, args);
    }
}spring:
application:
name: rocketmq-provider
cloud:
stream:
rocketmq:
binder:
# RocketMQ 服务器地址
namesrv-addr: 192.168.2.116:9876
bindings:
# 这里是个 Map 类型参数,{} 为 YAML 中 Map 的行内写法
output: {destination: test-topic1, content-type: application/json}
server:
port: 9093
management:
endpoints:
web:
exposure:
include: '*'运行成功后即可在 RocketMQ 控制台的 消息 列表中选择 test-topic 主题即可看到发送的消息
主要增加了 org.springframework.cloud:spring-cloud-starter-stream-rocketmq 依赖
<?xml version="1.0" encoding="UTF-8"?>
<project xmlns="http://maven.apache.org/POM/4.0.0" xmlns:xsi="http://www.w3.org/2001/XMLSchema-instance"
         xsi:schemaLocation="http://maven.apache.org/POM/4.0.0 http://maven.apache.org/xsd/maven-4.0.0.xsd">
    <modelVersion>4.0.0</modelVersion>

    <parent>
        <groupId>cn.mirrorming</groupId>
        <artifactId>hello-spring-cloud-alibaba-dependencies</artifactId>
        <version>1.0.0-SNAPSHOT</version>
        <relativePath>../hello-spring-cloud-alibaba-dependencies/pom.xml</relativePath>
    </parent>

    <artifactId>hello-spring-cloud-alibaba-rocketmq-consumer</artifactId>
    <packaging>jar</packaging>

    <name>hello-spring-cloud-alibaba-rocketmq-consumer</name>
    <url>http://mirrorming.cn</url>
    <inceptionYear>2019-Now</inceptionYear>

    <dependencies>
        <!-- Spring Boot Begin -->
        <dependency>
            <groupId>org.springframework.boot</groupId>
            <artifactId>spring-boot-starter-web</artifactId>
        </dependency>
        <dependency>
            <groupId>org.springframework.boot</groupId>
            <artifactId>spring-boot-starter-actuator</artifactId>
        </dependency>
        <dependency>
            <groupId>org.springframework.boot</groupId>
            <artifactId>spring-boot-starter-test</artifactId>
            <scope>test</scope>
        </dependency>
        <!-- Spring Boot End -->

        <!-- Spring Cloud Begin -->
        <dependency>
            <groupId>org.springframework.cloud</groupId>
            <artifactId>spring-cloud-starter-stream-rocketmq</artifactId>
        </dependency>
        <!-- Spring Cloud End -->
    </dependencies>

    <build>
        <plugins>
            <plugin>
                <groupId>org.springframework.boot</groupId>
                <artifactId>spring-boot-maven-plugin</artifactId>
                <configuration>
                    <mainClass>cn.mirrorming.spring.cloud.alibaba.rocketmq.consumer.RocketMQConsumerApplication</mainClass>
                </configuration>
            </plugin>
        </plugins>
    </build>
</project>主要使用 @StreamListener("input") 注解来订阅从名为 input 的 Binding 中接收的消息
package cn.mirrorming.spring.cloud.alibaba.rocketmq.consumer.service;

import org.springframework.cloud.stream.annotation.StreamListener;
import org.springframework.stereotype.Service;

/**
 * @author mirror
 */
@Service
public class ConsumerReceive {

    @StreamListener("input")
    public void receiveInput(String message) {
        System.out.println("Receive input: " + message);
    }
}配置 Input(Sink.class) 的 Binding 信息并配合 @EnableBinding 注解使其生效
package cn.mirrorming.spring.cloud.alibaba.rocketmq.consumer;

import org.springframework.boot.SpringApplication;
import org.springframework.boot.autoconfigure.SpringBootApplication;
import org.springframework.cloud.stream.annotation.EnableBinding;
import org.springframework.cloud.stream.messaging.Sink;

/**
 * @author mirror
 */
@SpringBootApplication
@EnableBinding({Sink.class})
public class RocketMQConsumerApplication {
    public static void main(String[] args) {
        SpringApplication.run(RocketMQConsumerApplication.class, args);
    }
}spring:
application:
name: rocketmq-consumer
cloud:
stream:
rocketmq:
binder:
namesrv-addr: 192.168.2.116:9876
bindings:
input: {consumer.orderly: true}
bindings:
input: {destination: test-topic1, content-type: text/plain, group: test-group, consumer.maxAttempts: 1}
server:
port: 9094
management:
endpoints:
web:
exposure:
include: '*'运行成功后即可在控制台接收到消息:Receive input: Hello RocketMQ