In this project we worked together as a team.
| Team member | GitHub repo | |
|---|---|---|
| Thomas Henckel (lead) | [email protected] | https://github.com/ThomasHenckel/CarND-Capstone |
| Andre Strobel | [email protected] | https://github.com/CyberAMS/CarND-Capstone |
| Matt Spinola | [email protected] | |
| Ignacio López-Francos | [email protected] | https://github.com/ilopezfr/CarND-Capstone |
The goal of this project is to program the Udacity Carla vehicle so it can detect and respect traffic lights in real time when driving in a simulator environment and a real environment.
The Udacity Carla vehicle provides a ROS interface and uses the ADAS kit dbw_mkz_ros from Dataspeed Inc.
The connection of the different ROS nodes follows the descriptions provided in the Udacity Self-Driving Car Nanodegree. The basic logic of the traffic light classification uses Convolutional Neutral Networks (CNN) and follows Mathias Köhnke's solution. A high level overview of TensorFlow’s Object Detection API is provided by Daniel Stang. Additional traffic light images were gathered from LISA and Bosch Small Traffic Light Dataset.
The following table shows an overview of the most important files:
| File | Description |
|---|---|
| README.md | This file |
| data/ | Folder containing waypoint information (maps), camera calibration data as well as training and test images |
| ros/launch/styx.launch | Launch script for simulator environment |
| ros/launch/site.launch | Launch script for real environment |
| src/styx/ | Folder containing scripts to connect ROS to the simulator by providing input/output ROS topics |
| src/tl_detector/tl_detector.py | Traffic light detection script (uses src/tl_detector/light_classification/tl_classifier.py) |
| src/tl_detector/light_classification/tl_classifier.py | Traffic light classification script (leverages TensorFlow CNN model) |
| src/tl_detector/light_classification/model/frozen_inference_graph.pb | TensorFlow CNN model to classify traffic lights in images |
| src/twist_controller/dbw_node.py | Drive-by-wire node that handles all related ROS topics |
| src/twist_controller/dbw_test.py | Script that records drive-by-wire data |
| src/twist_controller/twist_controller.py | Script that determines throttle and braking |
| src/twist_controller/yaw_controller.py | Script that determines steering |
| src/waypoint_follower/ | Folder containing scripts to determine drive-by-wire signals to follow the desired waypoints |
| src/waypoint_loader/ | Folder containing scripts to load the necessary waypoints (map) |
| src/waypoint_updater/waypoint_updater.py | Waypoint node that listens to the traffic light ROS topic and determines the desired speed at each waypoint ahead |
| Traffic_Light_Detection/ | Subrepo containing all files to construct the traffic light detector and classifier with TensorFlow API |
- 1. Tool chain setup
-
- Considerations for the best simulation and test environment
-
- Ubuntu, ROS and necessary packages
-
- Udacity Simulator
-
- 2. ROS nodes and topics
-
- Communication overview
-
- ROS node waypoint_updater.py
-
- ROS node twist_controller.py
-
- ROS node tl_detector.py
-
- TLClassifier object
-
- 3. Traffic light detection
- 4. Execution
-
- Commands to start the simulation
-
- Simulation results
-
- Commands to test the code in the real environment
-
- Test results
-
- 5. Discussion
- 6. Known issues and possible improvements
- 7. Changes after first project submission
- 8. Potential future improvements
The following hardware and software was available during the development.
| Description |
|---|
| Intel i7-8700K Coffee Lake (6-Core, 12-Thread, 3.7 GHz, 12MB Cache, 95W, CPU Benchmark 16822) |
| Asus ROG Strix Z370G |
| 64GB Corsair DDR4 3000 CL15 |
| Gigabyte Quiet GTX 1060 6GB - 1280 CUDA Cores |
| 2x Samsung 960 EVO 1TB M.2 NVMe PCIe 3 x 4 SSD (3200/1900 MBps R/W) |
| 20TB Synology NAS with 2x 1 GB/s Ethernet |
| Windows 10 and Ubuntu 16.04 dual boot |
| VMware Workstation 15 Pro (with own Ubuntu virtual machine) |
| VirtualBox 6.0 (with Udacity provided Lubuntu virtual machine) |
| Udacity Workspace |
This project requires a host for the Udacity Simulator and a host for the Udacity Carla ROS environment. The following options have been tested in conjunction with each other.
| Number | Udacity Simulator | Findings |
|---|---|---|
| 1 | Udacity Workspace VNC | Runs slow when camera sends images |
| 2 | Windows with GPU | Runs slow when camera sends images to virtualized ROS environment |
| 3 | Windows / VMware | Runs very slow when camera sends images |
| 4 | Windows / VirtualBox | Runs extremely slow when camera sends images |
| 5 | Ubuntu w/o GPU | Runs slow when camera sends images |
| 6 | Ubuntu with GPU | Runs perfect |
| Udacity Carla ROS environment | Combinations | Findings |
|---|---|---|
| Udacity Workspace Terminal | 1 | Some effort to install all packages correctly. Runs too slow due to Udacity Simulator in Udacity Workspace VNC. |
| Windows / VMware | 2, 3 | Very difficult to install all packages correctly. Runs too slow due to slow simulator options. |
| Windows / VMware / Docker | 2, 3 | Some effort to install all packages correctly. Runs too slow due to slow simulator options. |
| Windows / VirtualBox | 2, 4 | Difficult to install all packages correctly. Runs too slow due to slow simulator options. |
| Windows / VirtualBox / Docker | 2, 4 | Some effort to install all packages correctly. Runs too slow due to slow simulator options. |
| Ubuntu with CPU | 5, 6 | Very difficult to install all packages correctly. Runs too slow with option 5 and runs perfect with option 6. |
| Ubuntu with CPU / Docker | 5, 6 | Was not tested as it wasn't needed. |
| Ubuntu with CUDA | 5, 6 | Could not test due to incompatibility of Ubuntu 16.04 with CUDA 8.0 and NVIDIA GTX 1060. |
| Ubuntu with CUDA / Docker | 5, 6 | Could not test due to incompatibility of Ubuntu 16.04 with CUDA 8.0 and NVIDIA GTX 1060. |
The above evaluations led to the only viable solution of running everything native on a dual boot Ubuntu installation - using Ubuntu with GPU for the Udacity Simulator and Ubuntu with CPU for the Udacity Carla ROS environment. This setup is also very close to the actual setup in the Udacity Carla vehicle.
To follow this project exactly you first need to install Ubuntu 16.04 Xenial Xerus. Next you have to install ROS Kinetic.
sudo sh -c 'echo "deb http://packages.ros.org/ros/ubuntu $(lsb_release -sc) main" > /etc/apt/sources.list.d/ros-latest.list'
sudo apt-key adv --keyserver hkp://ha.pool.sks-keyservers.net:80 --recv-key 421C365BD9FF1F717815A3895523BAEEB01FA116
sudo apt-get update
sudo apt-get install ros-kinetic-desktop-full
sudo rosdep init
rosdep update
echo "source /opt/ros/kinetic/setup.bash" >> ~/.bashrc
sudo apt install python-rosinstall python-rosinstall-generator python-wstool build-essential
Then you need to install the Dataspeed ADAS drive-by-wire kit One Line SDK Install (binary).
sudo apt-get update
sudo apt-get install -y ros-kinetic-dbw-mkz-msgs
<make sure you are in the ros subdirectory of this repository>
rosdep install --from-paths src --ignore-src --rosdistro=kinetic -y
After downloading this repository you need to make sure that you have all the necessary packages installed.
git pull https://github.com/CyberAMS/CarND-Capstone
pip install -r requirements.txt
sudo apt-get install python-termcolorFinally, you need to download the Udacity Simulator.
The Udacity Carla ROS environment for this project uses the following nodes and topics.

The /waypoint_loader reads the map or trajectory information and publishes a list of waypoints that the vehicle can follow safely. The /tl_detector node takes this information and the camera image from the vehicle - either simulation or real - and publishes the state of the traffic light ahead (GREEN, YELLOW, RED or UNKNOWN). It also publishes the topic /debug/bounding_box_img (not shown) in which the most relevant detected traffic light is marked up with a bounding box. The above diagram shows the case for the simulated environment in which the /styx_server node publishes all the relevant vehicle state and sensor information as well as receives the necessary control signals for steering (not shown), throttle (not shown) and braking. The /waypoint_updater node determines the desired speed for the waypoints ahead. The /pure_pursuit node calculates the drive-by-wire commands for the dbw_node node based on the information about the waypoints ahead.
The /waypoint_updater node constantly looks for the next LOOKAHEAD_WPS = 100 waypoints. If the next traffic light is either GREEN or UNKNOWN (self.stopline_wp_idx == -1), it will not change the desired speed at the waypoints ahead. If the next traffic light is either RED or YELLOW, it will use decelerating speed for the waypoints ahead. It is important to mention that the vehicle might detect a RED or YELLOW traffic light, but will only react to it if the stop line of this traffic light is within distance of the next LOOKAHEAD_WPS waypoints.
def generate_lane(self):
	lane = Lane()
	closest_idx = self.get_closest_waypoint_id()
	farthest_idx = closest_idx + LOOKAHEAD_WPS
	base_waypoints = self.base_lane.waypoints[closest_idx:farthest_idx]
	if (self.stopline_wp_idx == -1) or (self.stopline_wp_idx >= farthest_idx):
		lane.waypoints = base_waypoints
	else:
		lane.waypoints = self.decelerate_waypoints(base_waypoints, closest_idx)
	return lane
The decelerated speed is calculated as a minimum of the desired speed at the waypoints ahead and a square root function with a given MAX_DECEL deceleration that starts backwards with zero speed at the stop line of the traffic light ahead.
def decelerate_waypoints(self, waypoints, closest_idx):
	temp = []
	for i, wp in enumerate(waypoints):
		p = Waypoint()
		p.pose = wp.pose
		stop_idx = max(self.stopline_wp_idx - closest_idx - 2, 0) # the waypoints are meassured from center so substract 2 to have the front of the car stop at the light
		dist = self.distance(waypoints, i, stop_idx)
		vel = math.sqrt(2 * MAX_DECEL * dist)
		if vel < 1.0:
			vel = 0.0
		p.twist.twist.linear.x = min(vel, wp.twist.twist.linear.x)
		temp.append(p)
return tempThe /twist_controller node uses a yaw controller and throttle controller to determine steering, throttle and braking to keep the desired direction and speed. If the speed gets close to zero, the throttle is set to zero and the brake is engaged to hold the vehicle in place (brake = 700 Nm is enough for the real Udacity Carla vehicle).
The throttle controller is implemented as PID controller. In order to steer smoothly back when returning from manual driving mode to automatic driving mode, the parameter ki = 0.001 has been set to a really low value. The parameter mx = 0.3 defines the maximum throttle and hence indirectly also the maximum speed the vehicle can achieve.
The /tl_detector node constantly determines whether or not an incoming image needs to be processed. Only every LIGHT_PROCESS_THRESHOLD-th image will be processed. The detected traffic light state is only valid if it has been detected STATE_COUNT_THRESHOLD times in a row. The function either returns the waypoint index of the stop line when the traffic light is RED or YELLOW or it returns -1 if no traffic light stop state has been detected.
LIGHT_PROCESS_THRESHOLD = 4
STATE_COUNT_THRESHOLD = 3 / LIGHT_PROCESS_THRESHOLD # if we skip images we cannot wait until we see the same light state as often

def image_cb(self, msg):
	self.camera_image = msg
	if ((self.traffic_count % LIGHT_PROCESS_THRESHOLD) == 0):
		# traffic light must be processed
		light_wp, state = self.process_traffic_lights()
	else:
		light_wp = self.last_wp # use previous value
		state = self.last_state # use previous value
	self.traffic_count += 1
	if (self.state != state):
		self.state_count = 0
		self.state = state
	if (self.state_count >= STATE_COUNT_THRESHOLD):
		self.last_state = self.state
		light_wp = light_wp if ((state == TrafficLight.RED) or (state == TrafficLight.YELLOW)) else -1
		self.last_wp = light_wp
		self.upcoming_red_light_pub.publish(Int32(light_wp))
	else:
		self.upcoming_red_light_pub.publish(Int32(self.last_wp))
	self.state_count += 1
The following code is used to display debugging information about the actually correct and the detected traffic light states. It works very well if python-termcolor has been installed as mentioned in the above section.
classified_state = self.get_light_state(closest_light)
if bDEBUG and (classified_state != 4):
	print("----------------------------------------------------------------------")
	correct_state_str = self.state_to_string("Correct light state    ", closest_light.state)
	detected_state_str = self.state_to_string("Detected light state   ", classified_state)
	print("car_wp_idx: " + str(car_wp_idx) + " stop line position idx: " + str(line_wp_idx))
return line_wp_idx, classified_stateThe TLClassifier class in tl_classifier.py offers the method get_classification that calls TensorFlow to run the inference for a single image with the method run_inference_for_single_image. It determines the traffic light with the largest bounding box and uses it to detect the state. At the end it publishes the image with the marked up bounding box.
def get_classification(self, image):
	image_np = self.load_image_into_numpy_array(image)
	output_dict = self.run_inference_for_single_image(image_np, self.detection_graph)
	text_string = "Classified light (idx {0}) state : {1} with probability {2}"
	if (output_dict['detection_scores'][0] > 0.5):
		text_string += " > 0.5"
	else:
		text_string += " <= 0.5"
	max_box_idx = -1
	max_box_size = -1.0
	for i in range(output_dict['num_detections']/2):
		if (output_dict['detection_scores'][i] > 0.5):
			x = output_dict['detection_boxes'][i][3] - output_dict['detection_boxes'][i][1]
			y = output_dict['detection_boxes'][i][2] - output_dict['detection_boxes'][i][0]
			box_size = math.sqrt((x * x) + (y * y))
			print("i: " + str(i) + " score: " + str(output_dict['detection_scores'][i]) + " " + self.state_to_string(output_dict['detection_classes'][i]) + " box_size: " + str(box_size) + " " + str(output_dict['detection_boxes'][i]))
			if (box_size > max_box_size):
				max_box_idx = i
				max_box_size = box_size
	ret_val = TrafficLight.UNKNOWN
	if ((max_box_idx >= 0) and (output_dict['detection_scores'][max_box_idx] > 0.5)):
		print(text_string.format(max_box_idx, output_dict['detection_classes'][max_box_idx], output_dict['detection_scores'][max_box_idx]))
		image = self.add_bounding_box_to_image(image, output_dict['detection_boxes'][max_box_idx])
		if (output_dict['detection_classes'][max_box_idx] == 1 ):
			ret_val = TrafficLight.GREEN
		elif (output_dict['detection_classes'][max_box_idx] == 2 ):
			ret_val = TrafficLight.YELLOW
		elif (output_dict['detection_classes'][max_box_idx] == 3 ):
			ret_val = TrafficLight.RED
	img_msg = self.bridge.cv2_to_imgmsg(image, encoding="rgb8")
	self.bounding_box_img_pubs.publish(img_msg)
	return ret_val
def run_inference_for_single_image(self,image, graph):
with graph.as_default():
with tf.Session() as sess:
ops = tf.get_default_graph().get_operations()
all_tensor_names = {output.name for op in ops for output in op.outputs}
tensor_dict = {}
for key in ['num_detections', 'detection_boxes', 'detection_scores', 'detection_classes', 'detection_masks']:
tensor_name = key + ':0'
if tensor_name in all_tensor_names:
tensor_dict[key] = tf.get_default_graph().get_tensor_by_name(tensor_name)
image_tensor = tf.get_default_graph().get_tensor_by_name('image_tensor:0')
output_dict = sess.run(tensor_dict, feed_dict={image_tensor: np.expand_dims(image, 0)})
output_dict['num_detections'] = int(output_dict['num_detections'][0])
output_dict['detection_classes'] = output_dict['detection_classes'][0].astype(np.uint8)
output_dict['detection_boxes'] = output_dict['detection_boxes'][0]
output_dict['detection_scores'] = output_dict['detection_scores'][0]
return output_dictThe traffic light detection is using the TensorFlow Object Detection API. It is based on the SSD MobileNet model which has been pre-trained on the COCO dataset. Additional traffic light data has been used to fine-tune the model. The model is able to detect traffic lights and classify their color into GREEN, YELLOW and RED.
The additional traffic light data consists of a combination of three datasets from the Udacity Simulator and the Udacity Carla vehicle on the test site. The combination of these three datasets adds up to a total of 2613 images. The model achieves a good balance between accuracy and fast running time. The benefit of this approach is that the same model can be used for the simulator environment and the real environment.
The detailed description of the traffic light detection model is located in a separate folder.
<make sure you are in the ros subdirectory of this repository>
catkin_make
source devel/setup.sh
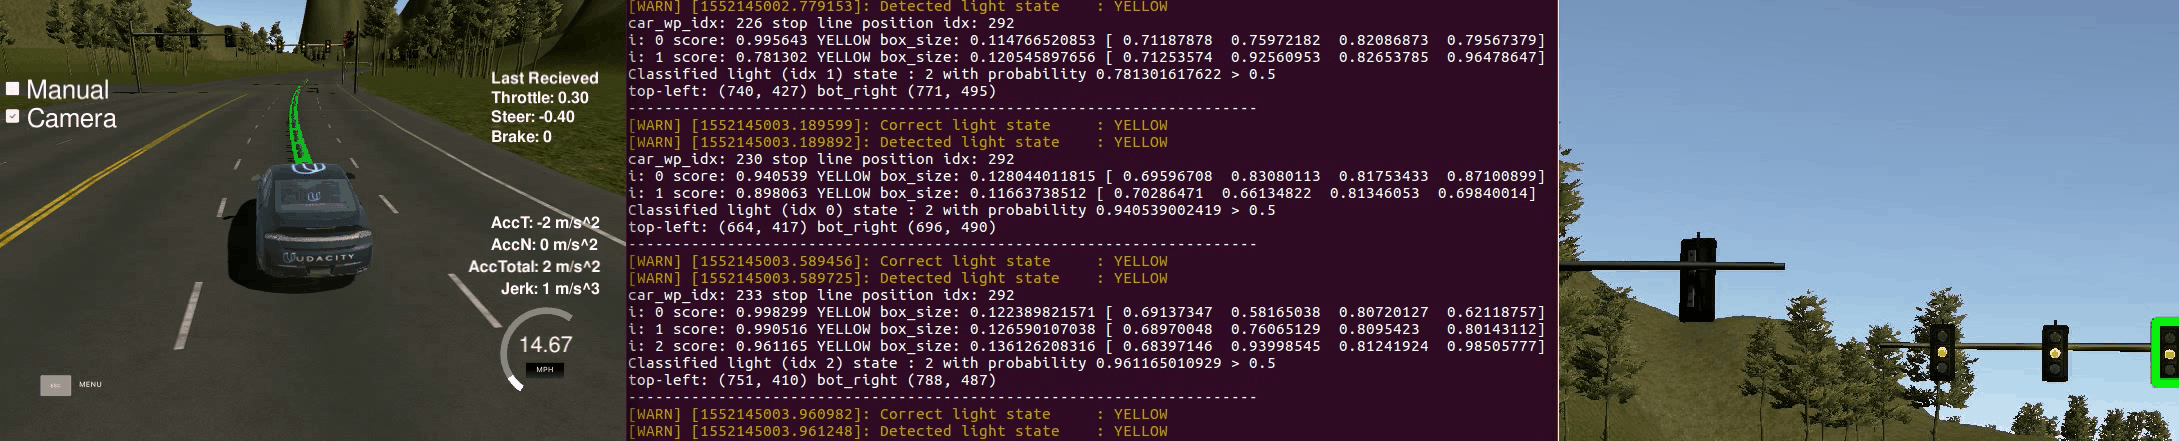
roslaunch launch/styx.launchStart the Udacity Simulator after the Udacity Carla ROS environment of this project is waiting. Then check Camera and uncheck Manual. The car will follow the center of the lane at the desired speed and stop at the stop line of upcoming traffic lights if the traffic light state is RED or YELLOW.
Here is an example of how the car accelerates and stops as required all by itself. On the right you see the debugging information and camera image. The traffic light which is used to determine RED, YELLOW or GREEN is marked up with a bounding box.
Download the training bag and test bags that were recorded on the Udacity Carla vehicle. Extract the contents.
unzip <your zipped bag files>.zipStart the Udacity Carla ROS environment of this project with the site.launch file.
<make sure you are in the ros subdirectory of this repository>
catkin_make
source devel/setup.sh
roslaunch launch/site.launch
Open another terminal and open an image viewer to see the camera image.
rosrun rqt_image_view rqt_image_view topic:=/debug/bounding_box_imgOpen another terminal and run the ROS bag.
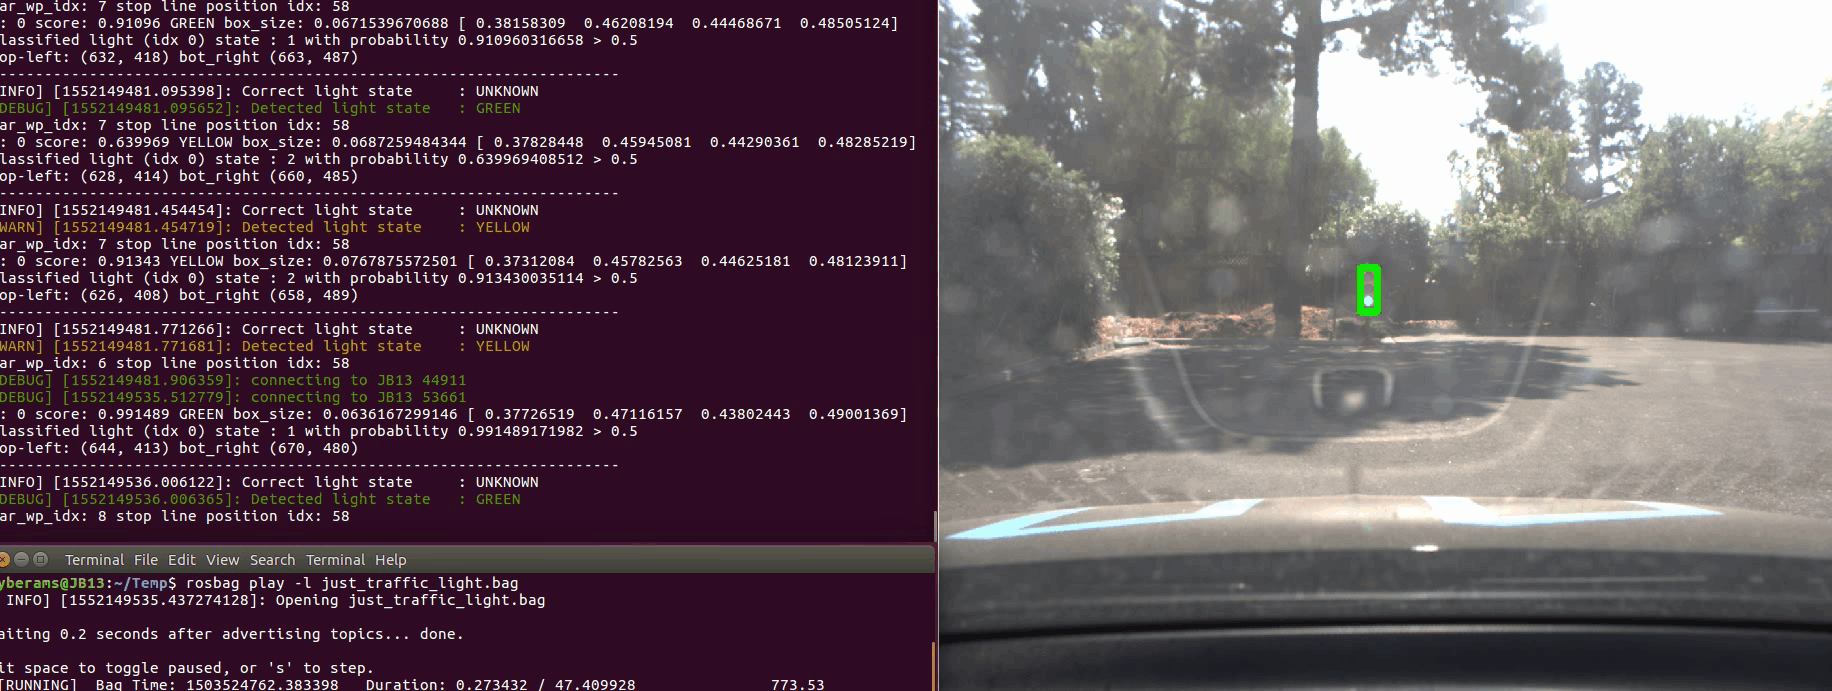
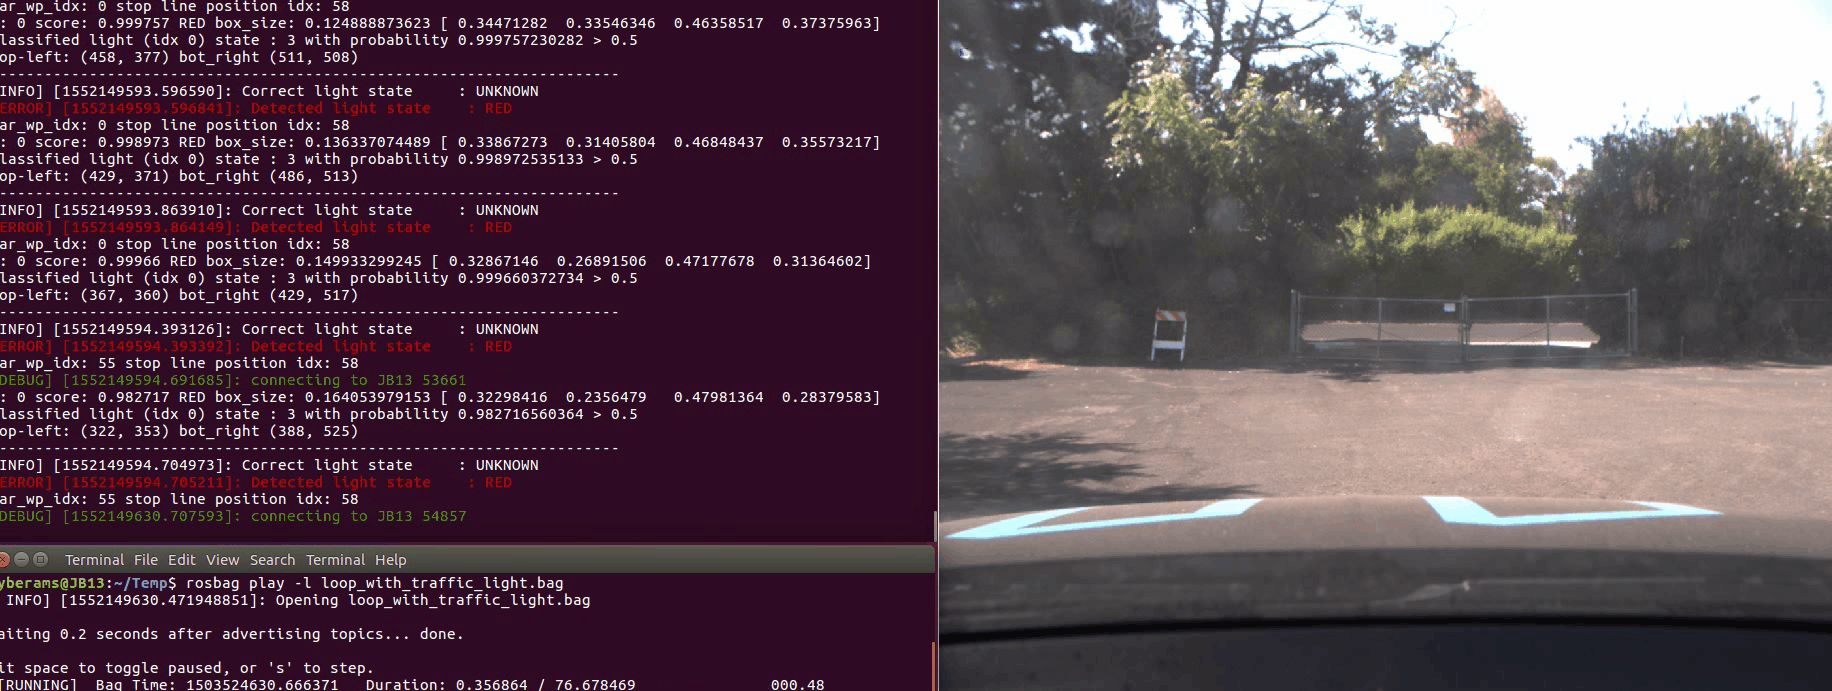
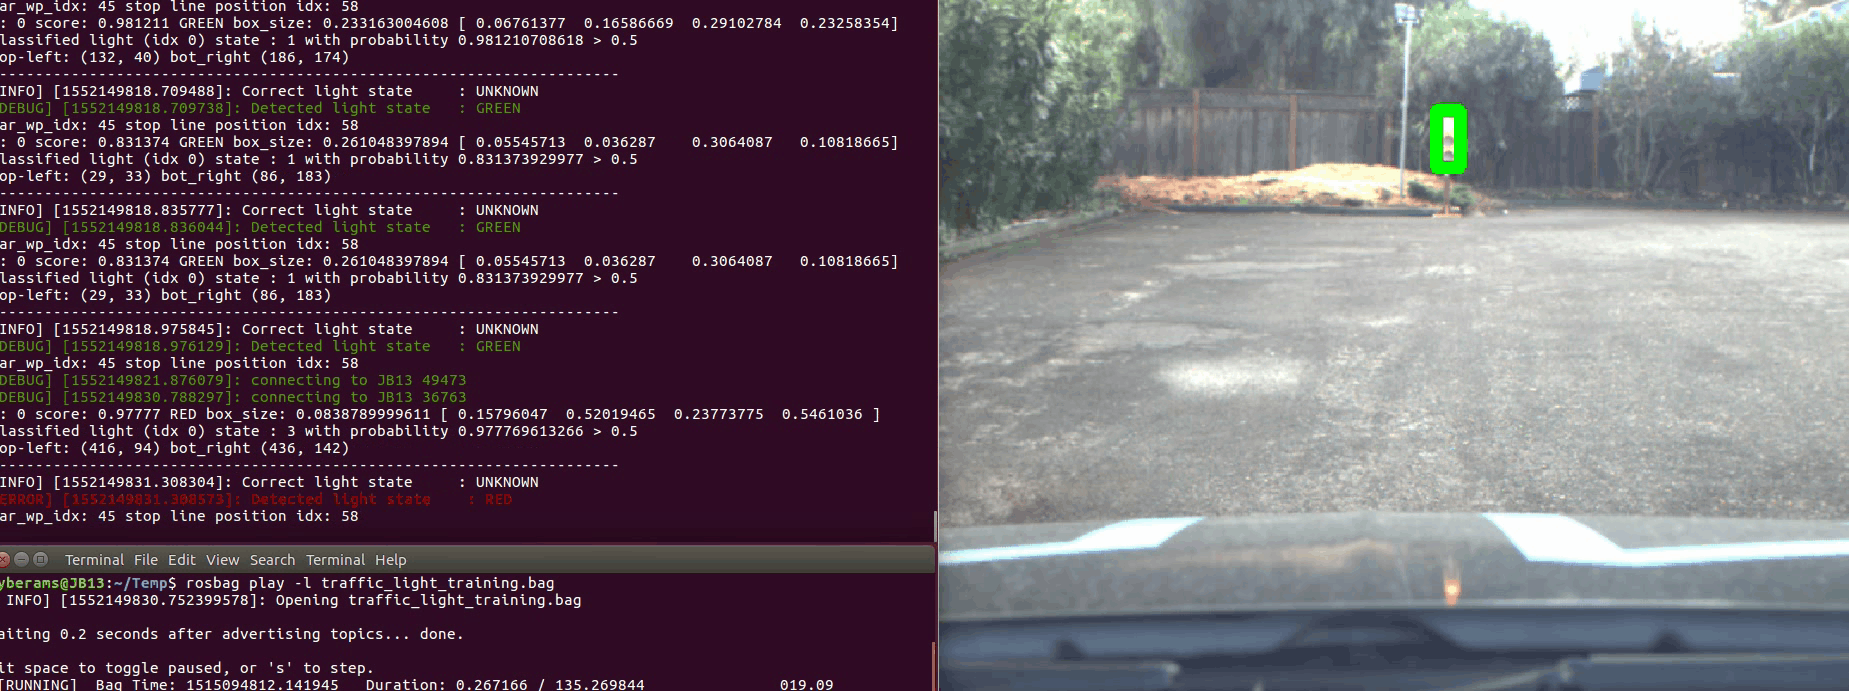
rosbag play -l <your bag file>.bagThe following ROS bags from the Udacity Carla vehicle have been tested with the implemented solution.
The first ROS bag contains a back and forth maneuver around the traffic light. The state of the traffic light is always classified correctly. There is only a short instance at the end when the car stops and the traffic light is GREEN. In this case no traffic light is detected with high probability at all. As we only react to RED and YELLOW traffic lights, this is not a big issue for the given task.
The second ROS bag contains several full loops around the test site. The state of the traffic light is always classified correctly. There is one repeatable false positive during the loop. A white wall is classified as GREEN traffic light. As we only react to RED and YELLOW traffic lights, this is not a big issue for the given task.
The third ROS bag contains several approaches on the traffic light. The state of the traffic light is mostly classified correctly. There are only a few instances where RED and YELLOW are mixed up for a very short amount of time. As we react to RED and YELLOW traffic lights in the same way, this is not a big issue for the given task. Also, when the traffic light is very close, it sometimes is not detected at all. As we stop further away from the traffic light, this is not a big issue for the given task.
The first challenge in this project is to set up a pipeline of hardware and software that fulfills the needs of the Udacity Simulator and is compatible with the setup in the Udacity Carla vehicle. The major bottle neck was the Udacity Simulator itself that absolutely requires correctly configured use of the GPU to send the camera images fluently.
The second challenge is to find an approach to detect traffic lights in front of the vehicle as well as their state with the available hardware and software in the most efficient way. We found a way to convert more recent TensorFlow models based on the TensorFlow Object Detection API back to TensorFlow 1.3. We also optimized how many images really need to be processed, i.e. we don't analyze the complete camera stream.
As the provided stop line coordinates for the traffic lights in the Udacity Simulator are not exact and additional inaccuracy is added by selecting a waypoint close to them, the vehicle sometimes overshoots the stop line.
The output to the log file is not necessarily purged in strict order of the individual ROS node calls on all systems.
- Changed the sequence of debugging and print statements to finish each
process_traffic_lightscall intl_detectorwith a series of dashes. - Changed the sequence of commands inside the
__init__method of thetl_detectornode to ensure all variables are defined and initialized before any callbacks to subscribed topics are called. - Added the
/tld_enabledtopic that is published after the__init__method of thetl_detectornode is finished and every timeprocess_traffic_lightsintl_detectoris finished. This topic is read by thedbw_nodenode and sets thetld_enabledflag fromFalsetoTrue. Thetld_enabledflag is forwarded to thecontrolmethod of thecontrollerobject inside thetwist_controllerfile. Thecontrollerdoes not apply throttle and fully applies the brake untiltld_enabledisTrue. - Retrained the traffic light classifier model with augmented images.
- Reduced the traffic light detection probability threshold in
tl_classifierfrom 0.5 to 0.35 and made it a parameterTL_PROB_THRESHOLD. - Added a semaphore
self.in_processtotl_detectorto prevent calling the traffic light classifier again before the previous call finished. - Changed
twist_controller.pyto apply full brake at speed below 0.5 (instead of 0.1). Also doubled normal brake torque and limited it to 700. - Changed
waypoint_updater.pyto only callpublish_waypointsif all variables are initialized - Increased offset distance from stop line from 2 to 3 meters in
decelerate_waypointsinwaypoint_updater.
- Reduce the
LIGHT_PROCESS_THRESHOLD(e.g. from 4 to 2) andSTATE_COUNT_THRESHOLD(from 3 to 1) parameters intl_detectorto account for improved hardware resources and process more camera images, i.e. more frequently. - Accelerate quicker to respond faster to traffic light state changes. Reset
kito zero intwist_controller.pywhen going from brake to throttle. Also use a higherkpvalue - maybe 0.5 - andmxvalue - maybe 0.5.