Laravel-Auth is a Complete Build of Laravel 5.4 with Email Registration Verification, Social Authentication, User Roles and Permissions, User Profiles, and Admin restricted user management system.


- About
- Features
- Installation Instructions
- Seeds
- Routes
- Socialite
- Other API keys
- Environment File
- Updates
- Screenshots
- Laravel Auth License
Laravel 5.4 with user authentication, registration with email confirmation, social media authentication, password recovery, and captcha protection. This also makes full use of Controllers for the routes, templates for the views, and makes use of middleware for routing. Project can be stood up in minutes.
| Laravel-Auth Features |
|---|
| Built on Laravel 5.4 |
| Uses MySQL Database |
| Uses Artisan to manage database migration, schema creations, and create/publish page controller templates |
| Dependencies are managed with COMPOSER |
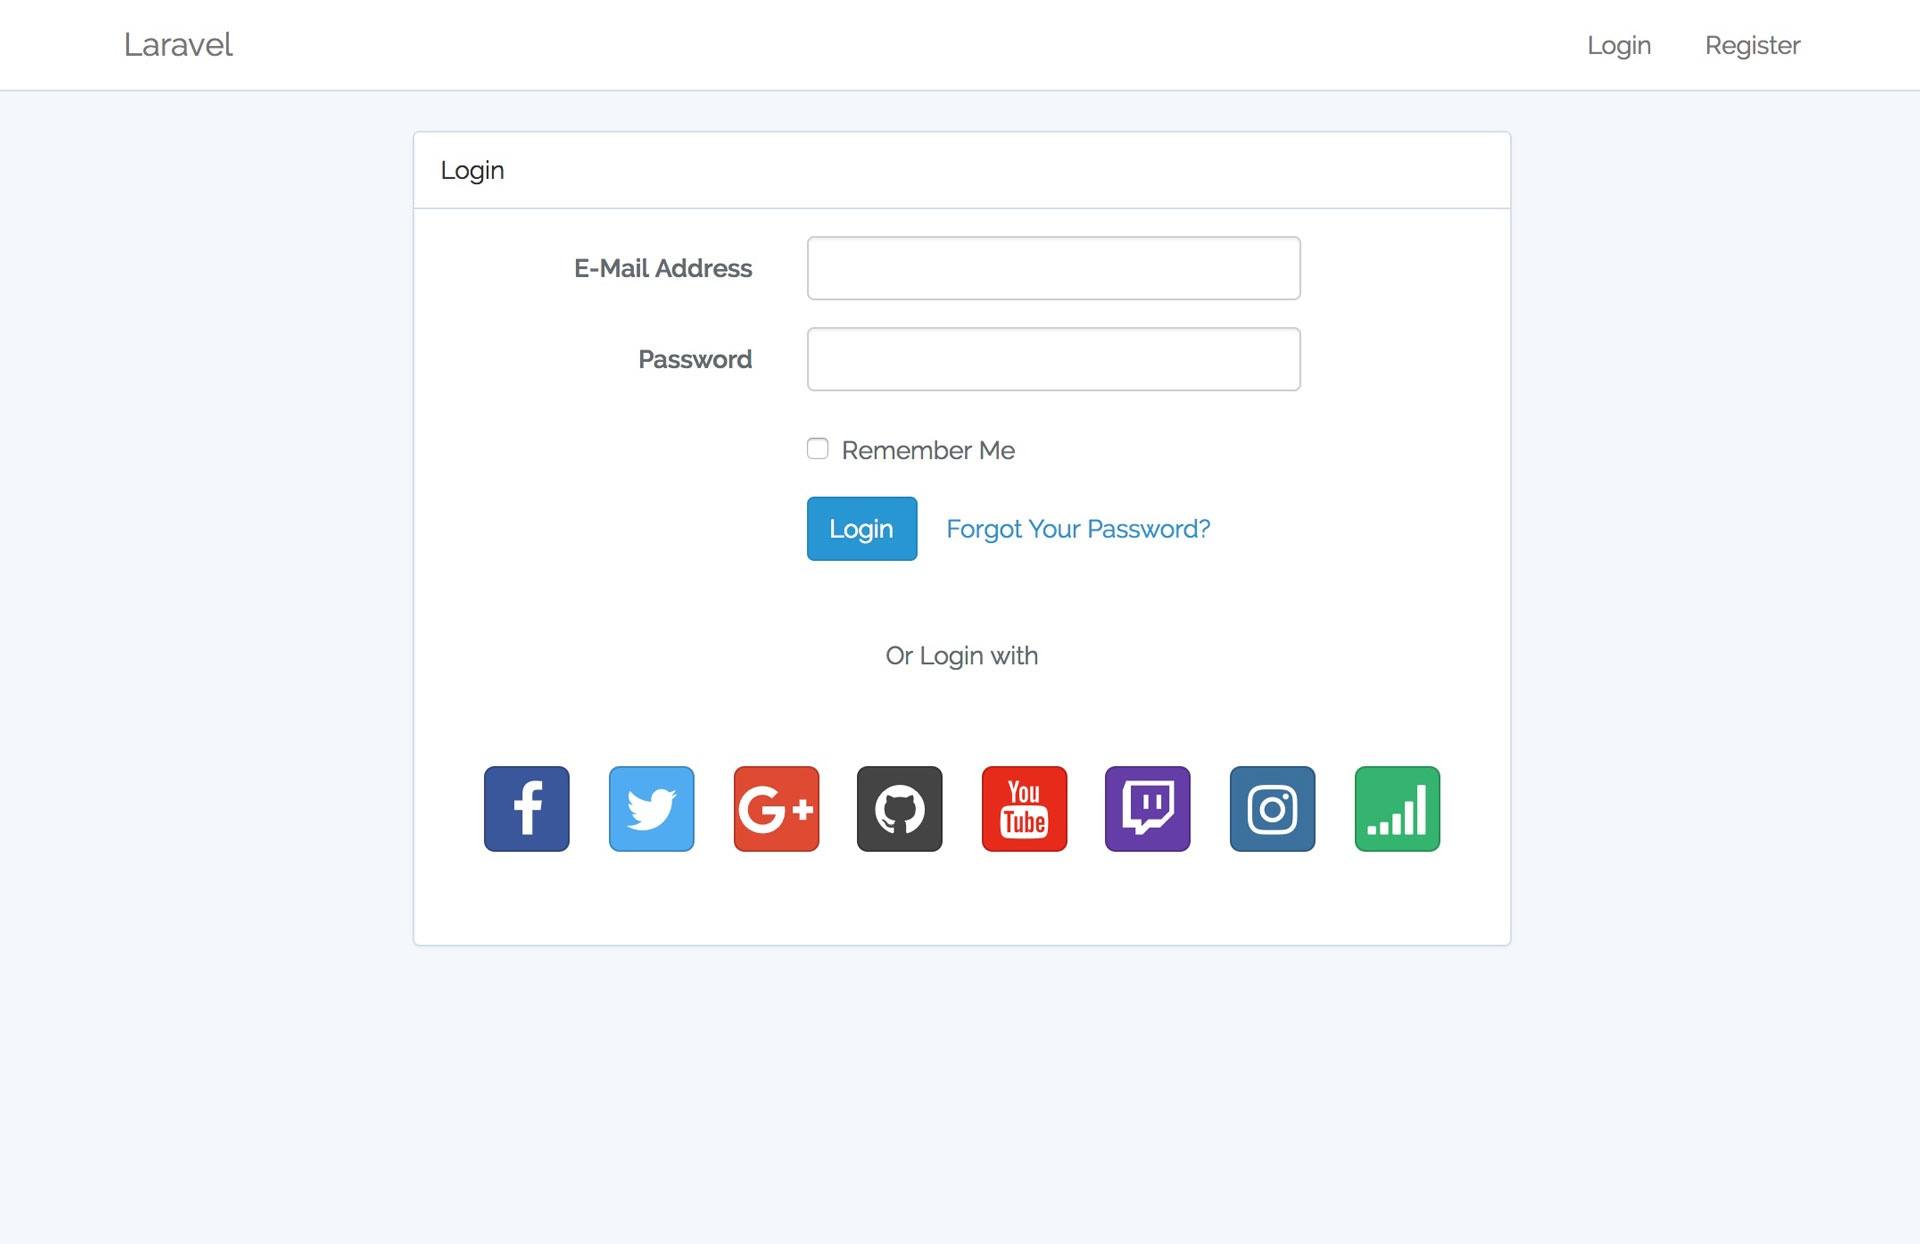
| Laravel Scaffolding User and Administrator Authentication. |
| User Socialite Logins ready to go - See API list used below |
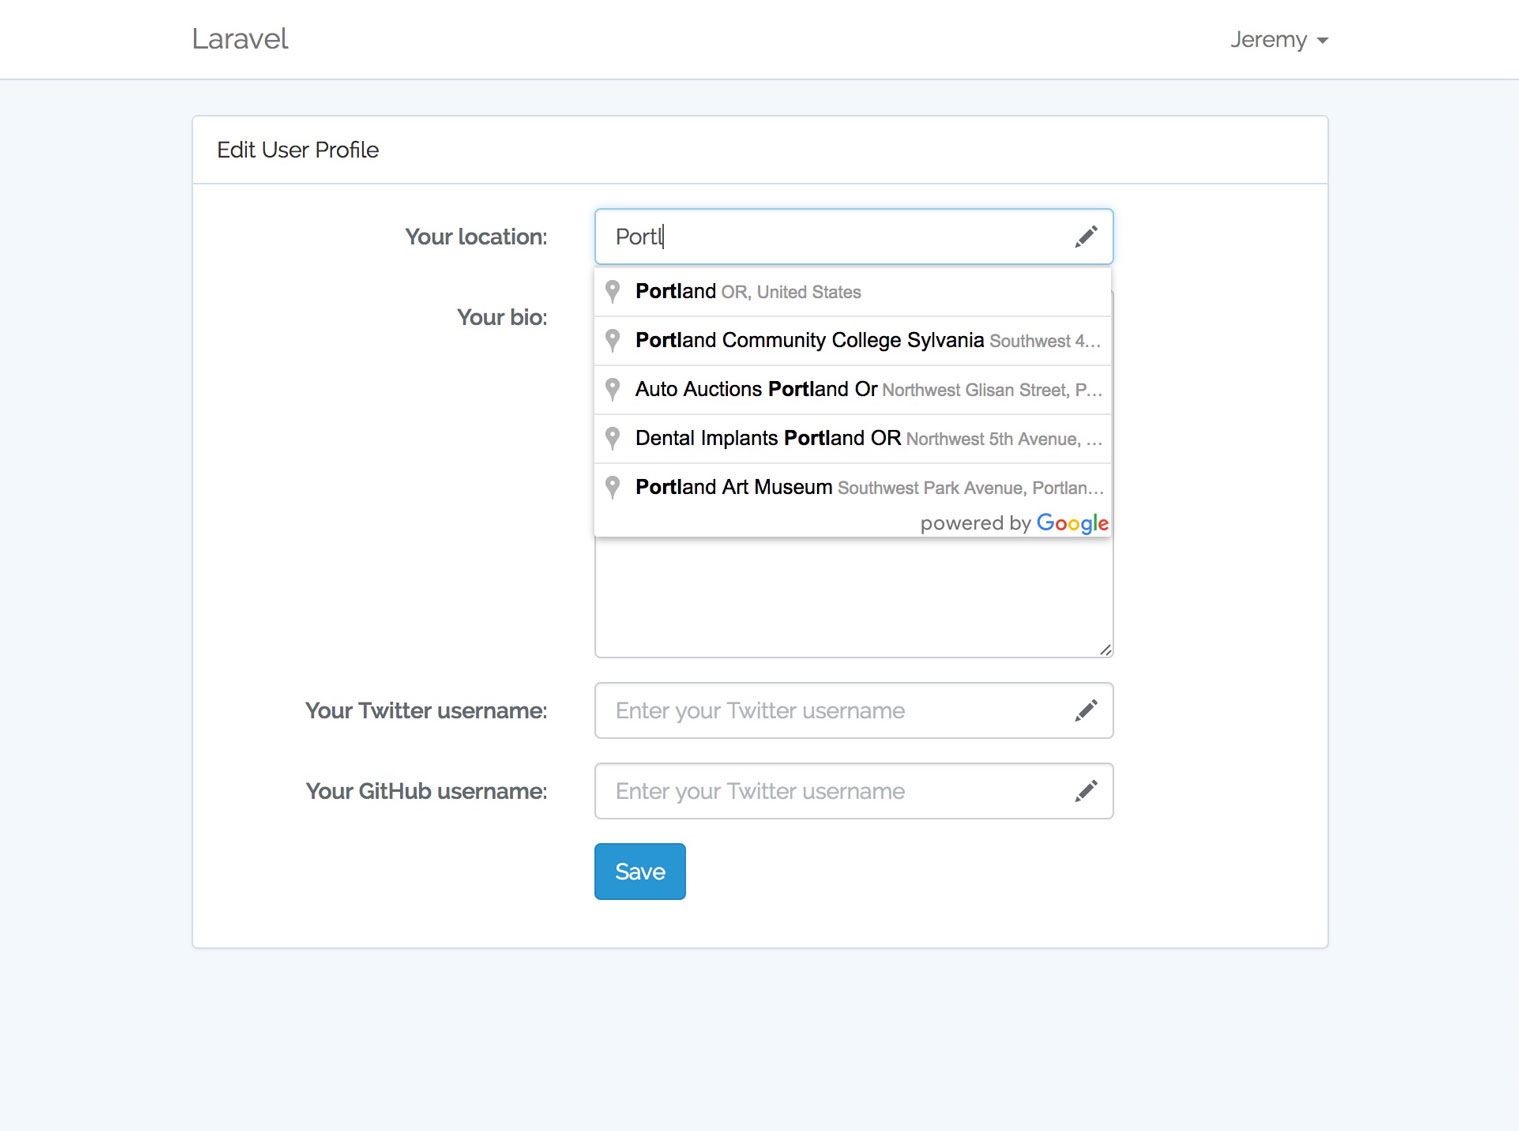
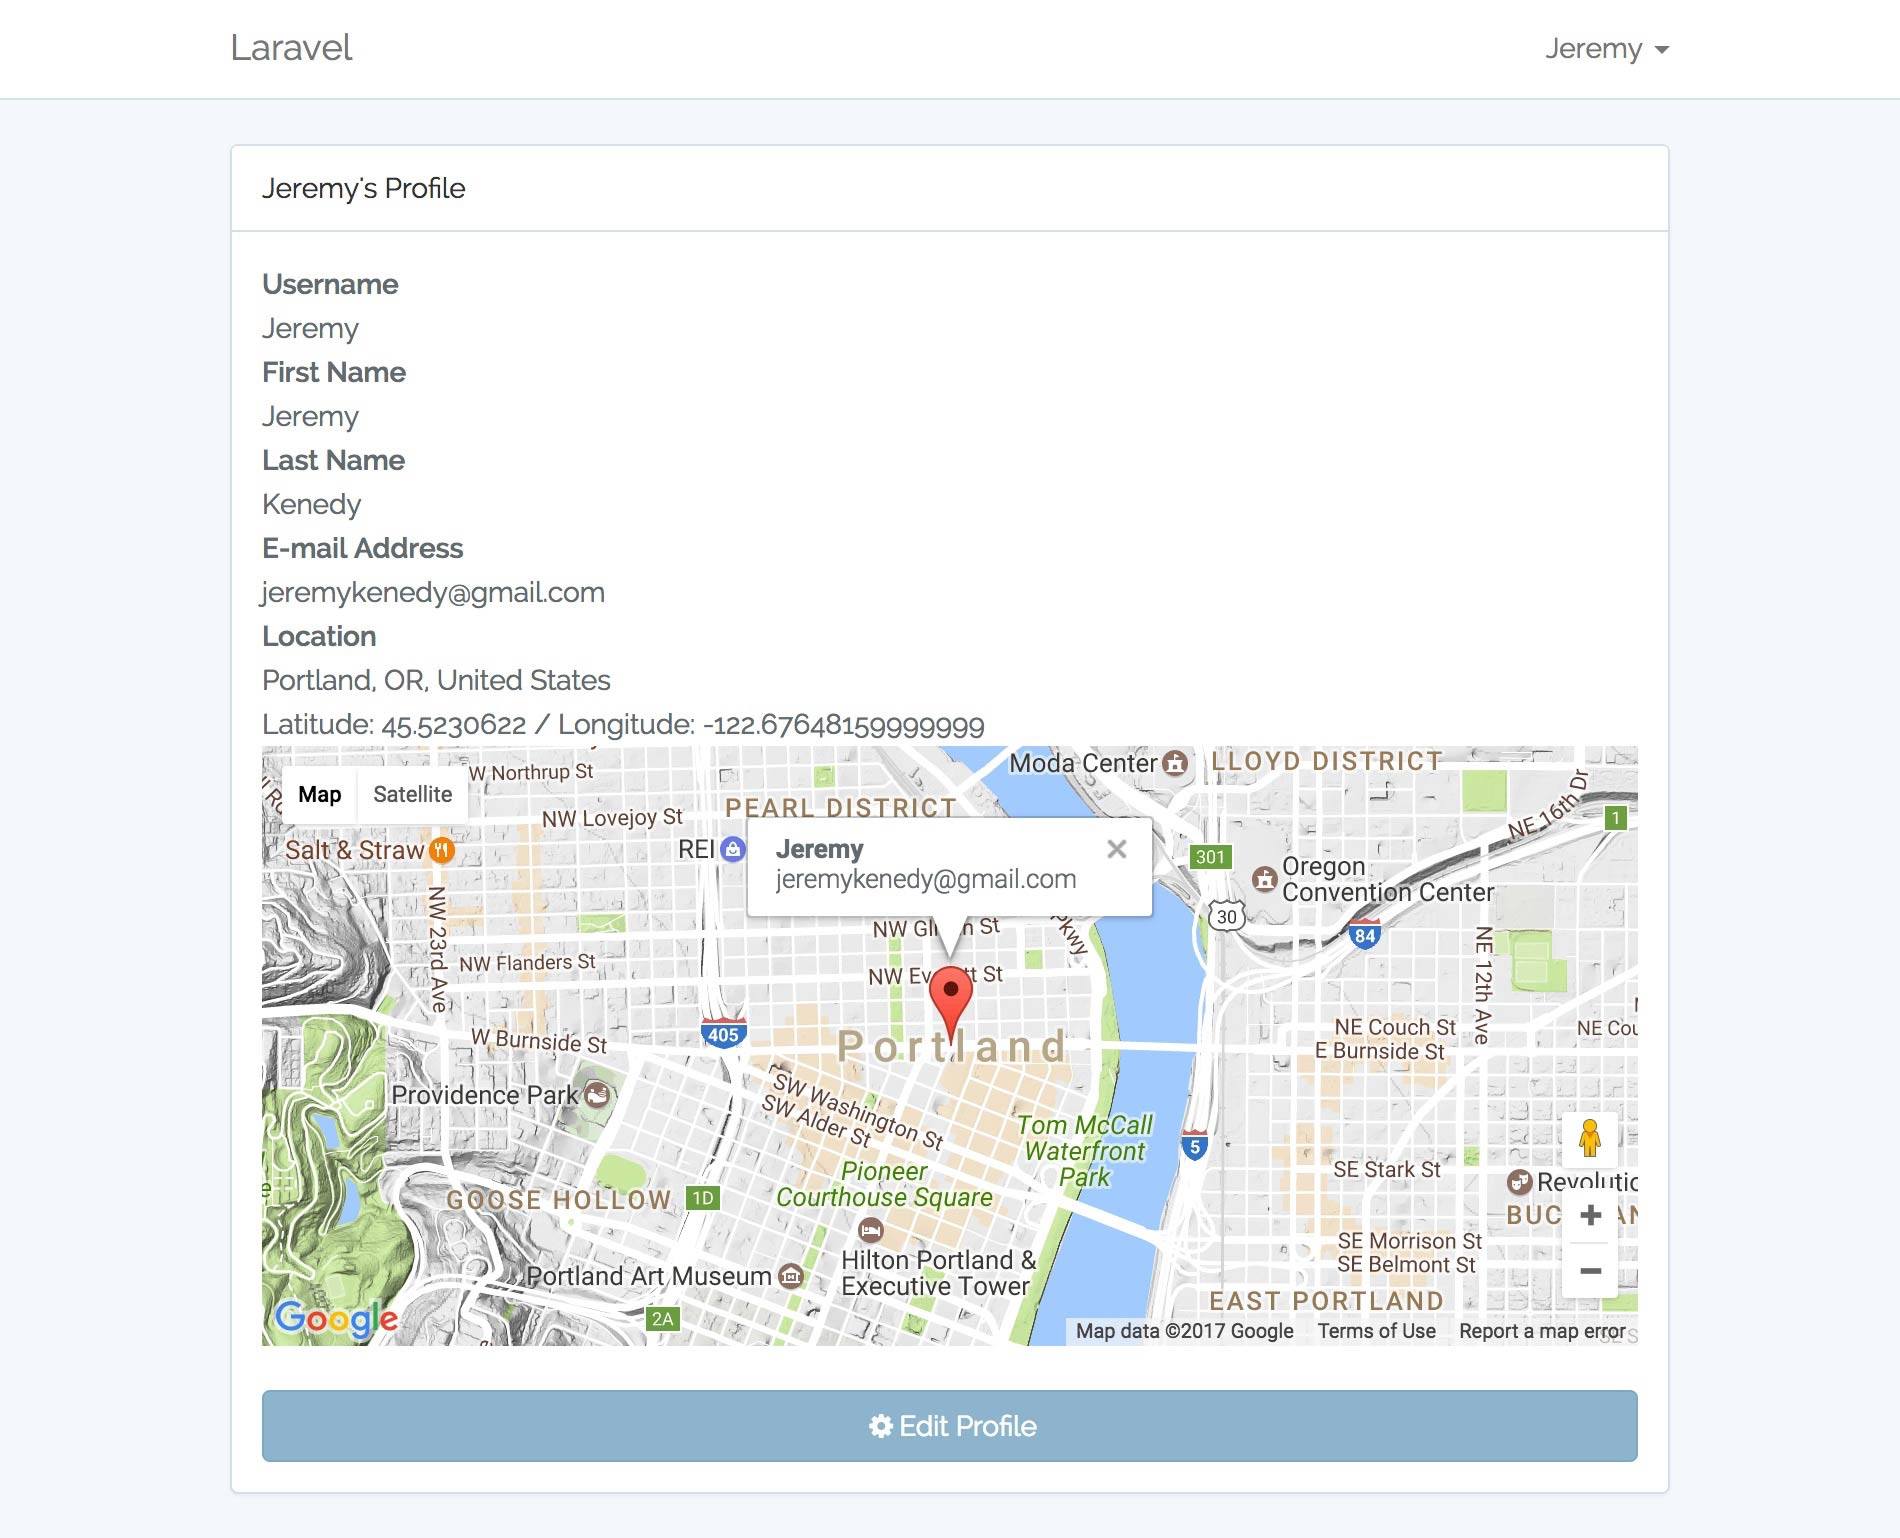
| Google Maps API v3 for User Location lookup and Geocoding |
| CRUD (Create, Read, Update, Delete) Themes Management |
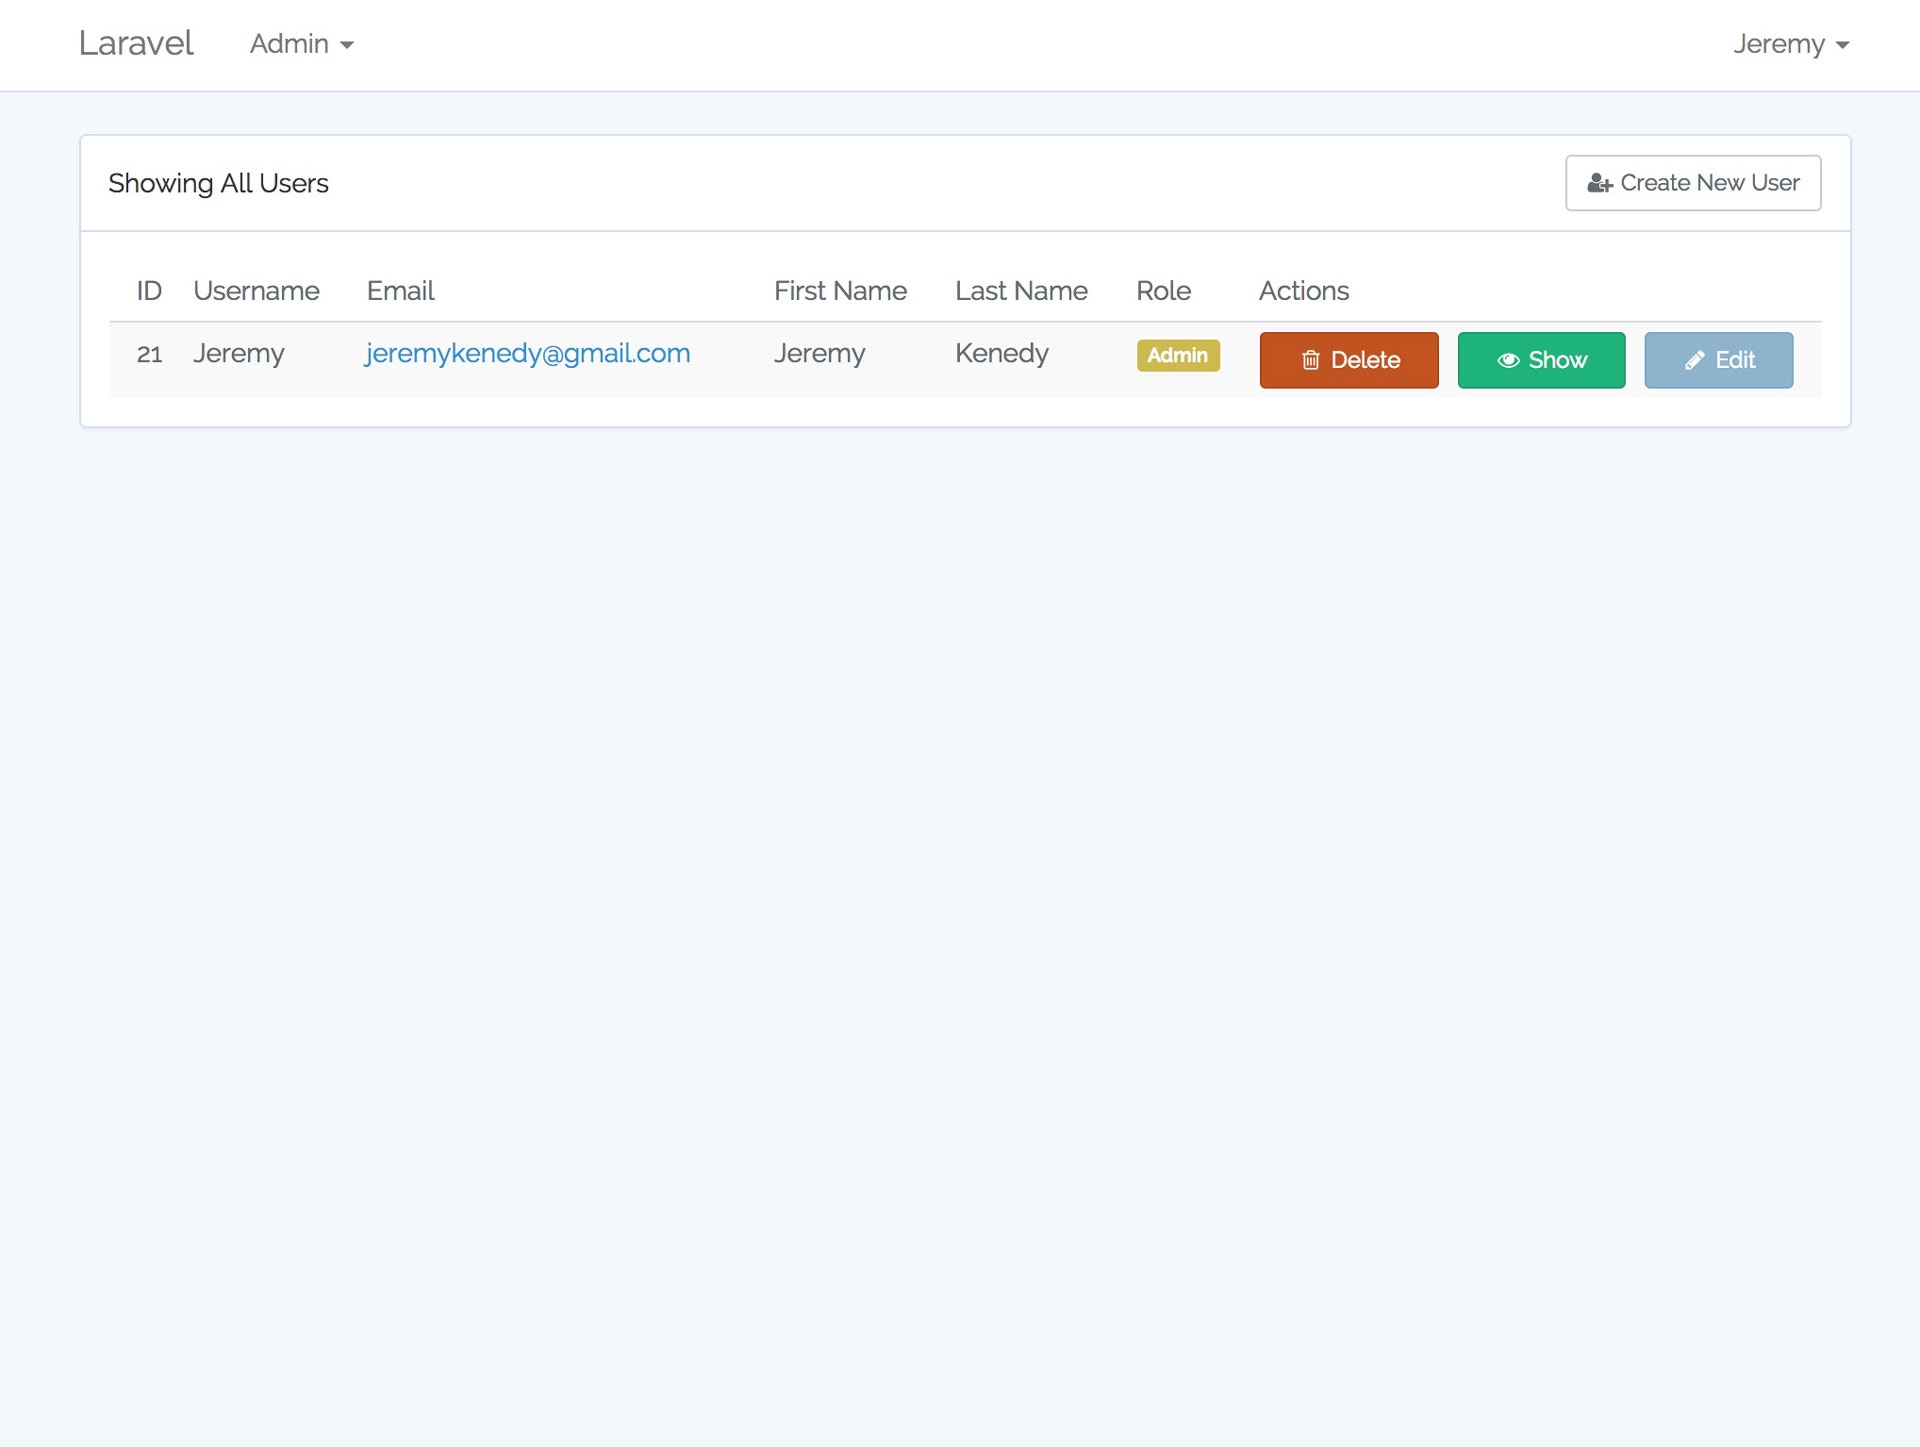
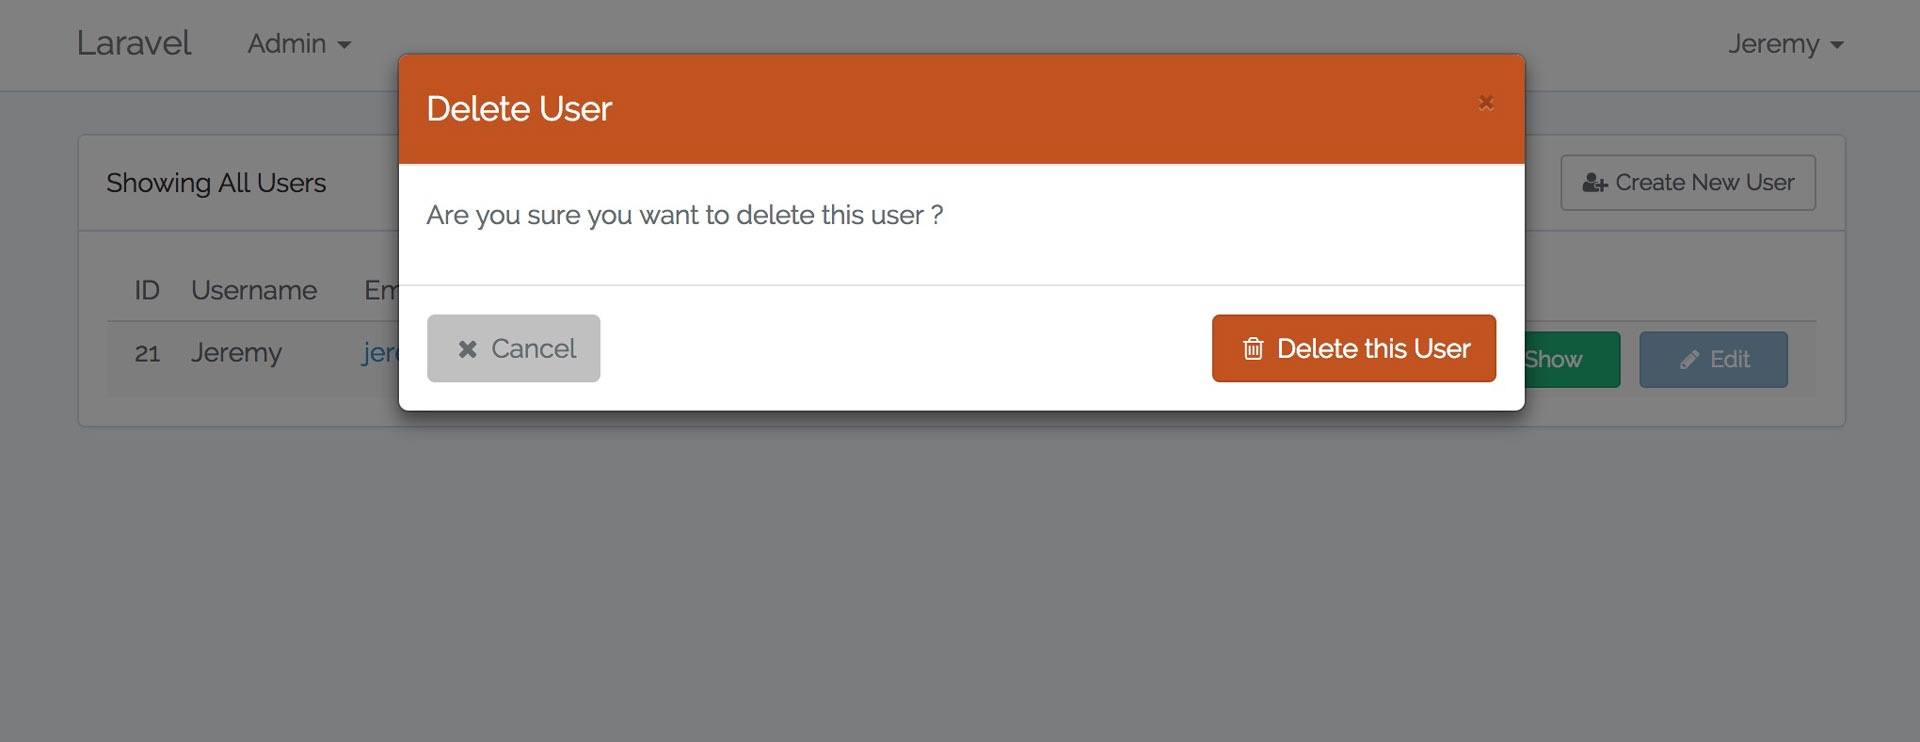
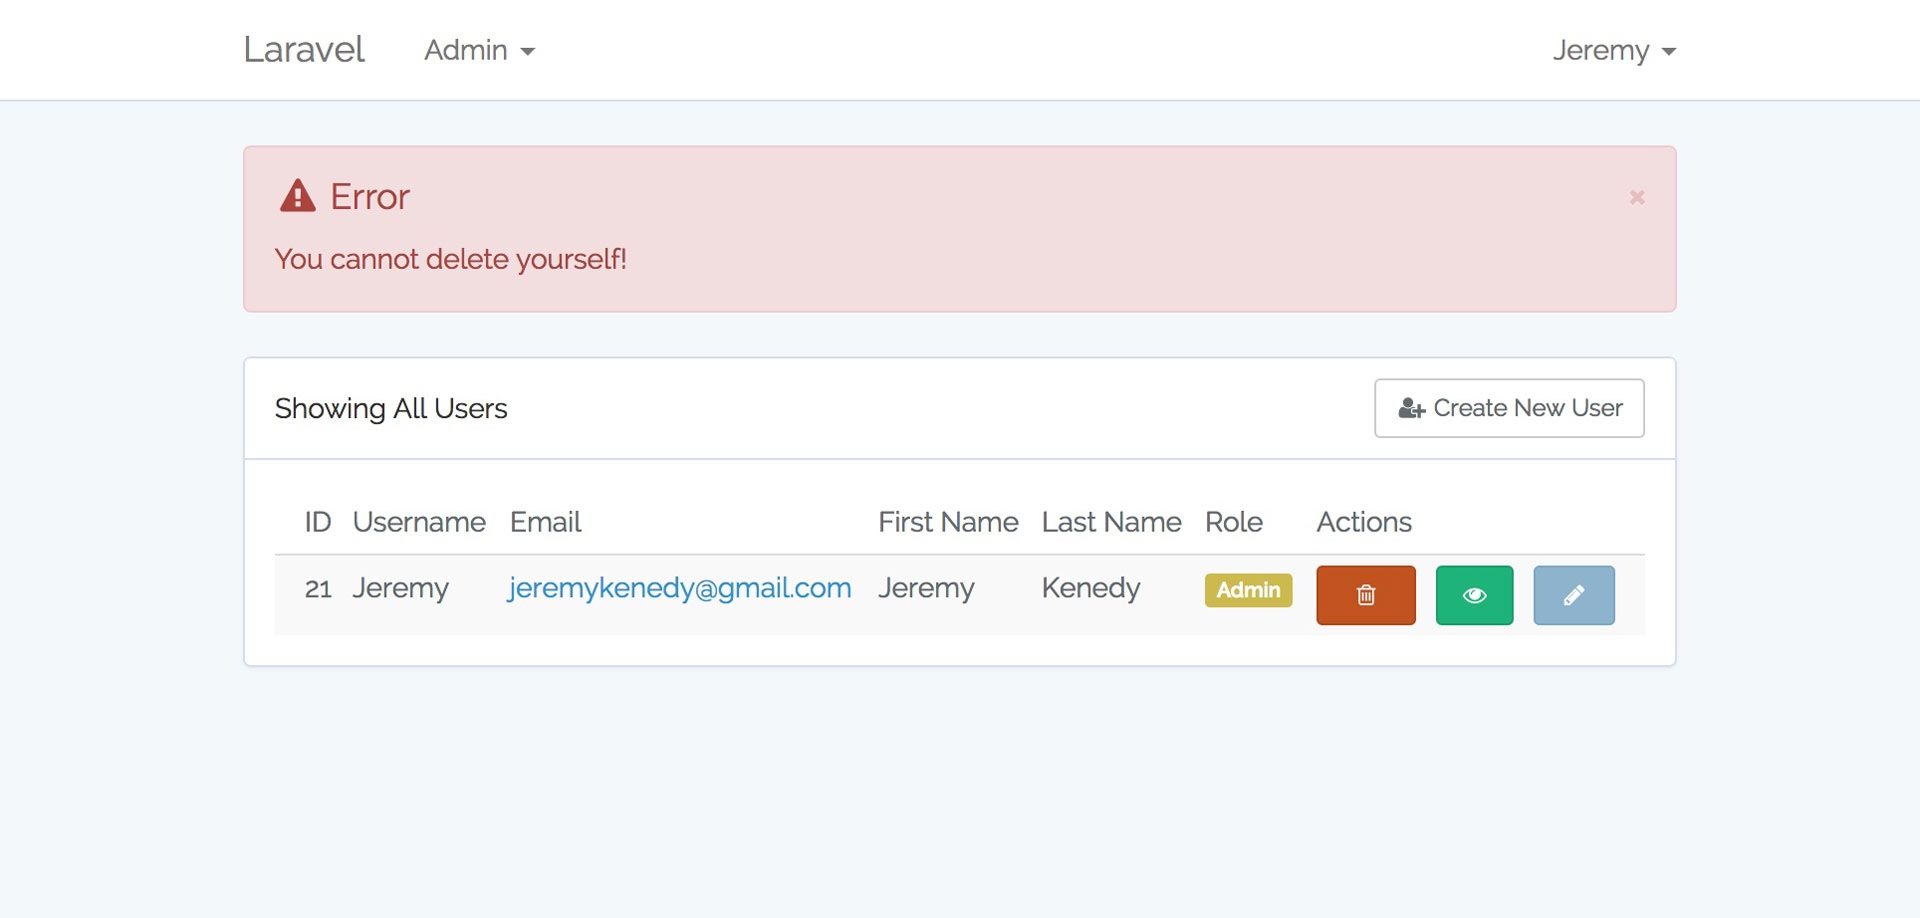
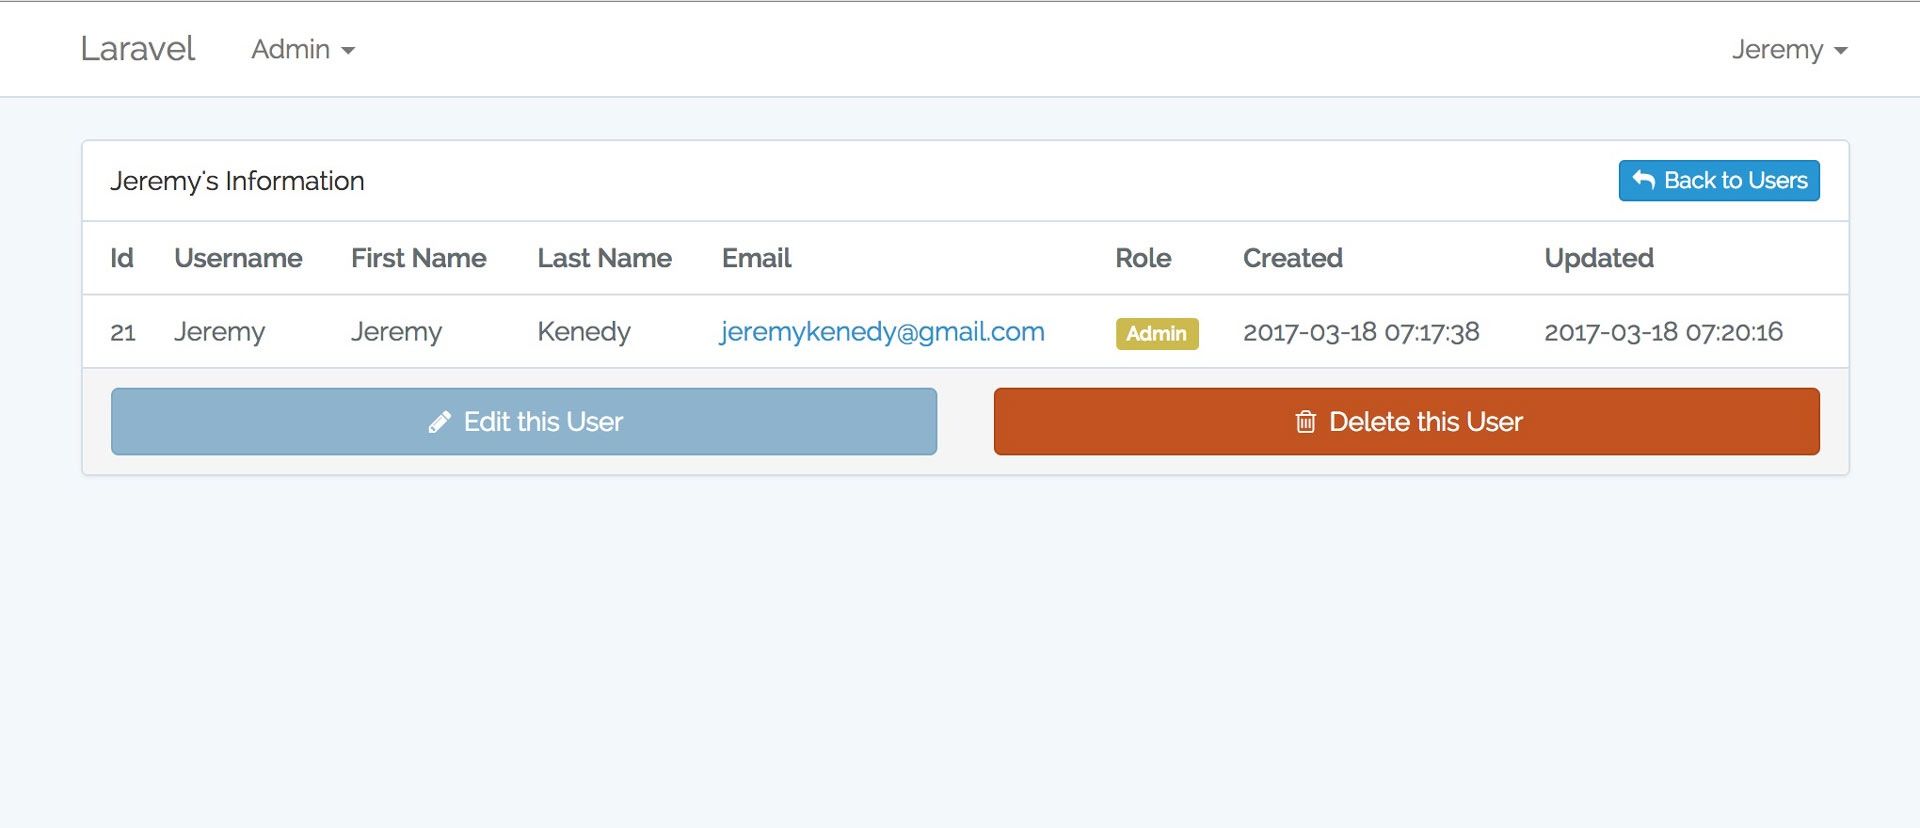
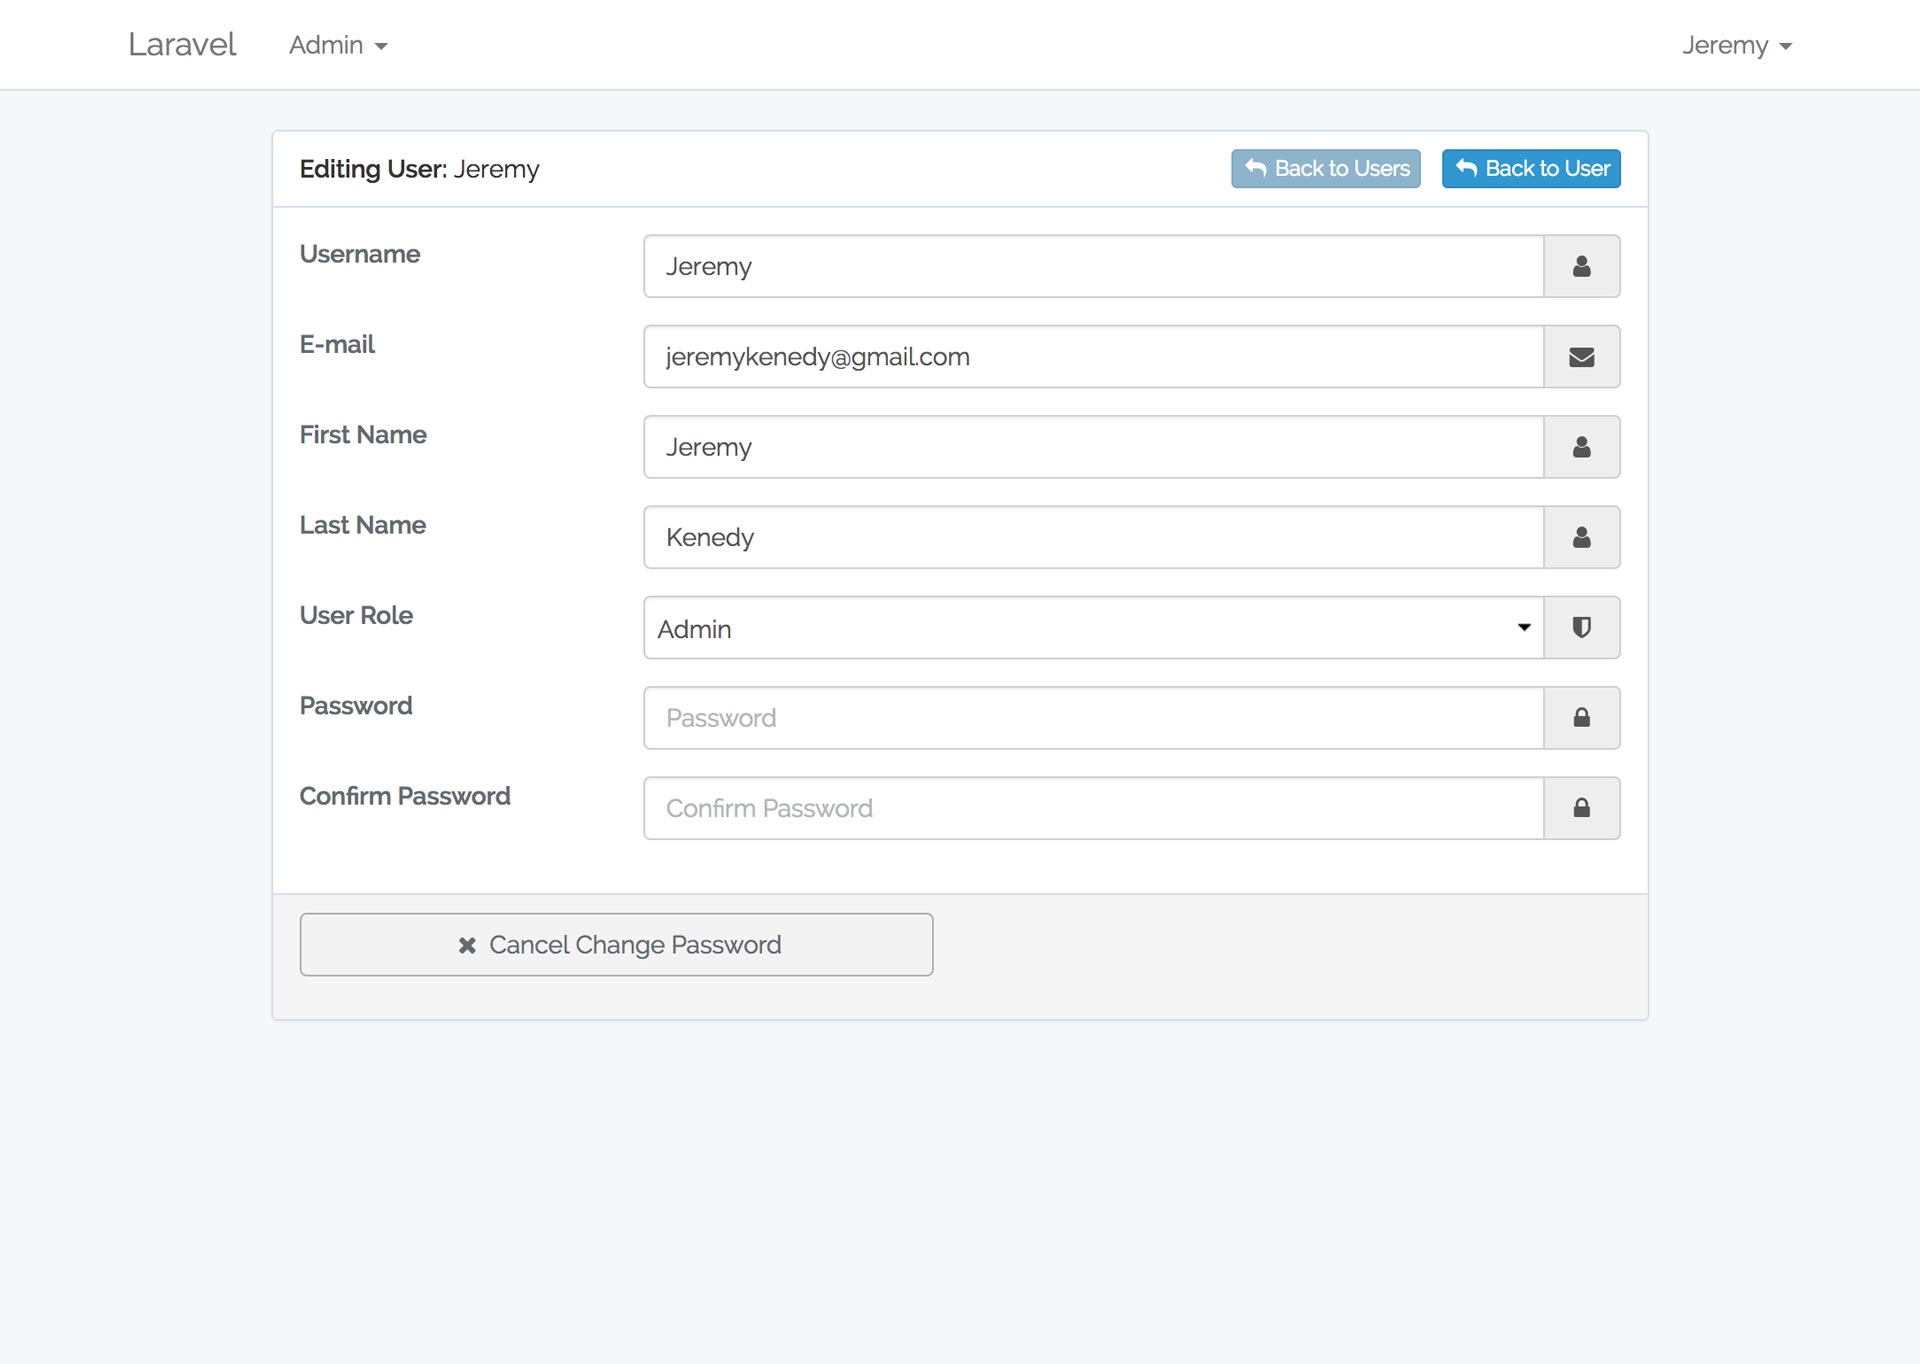
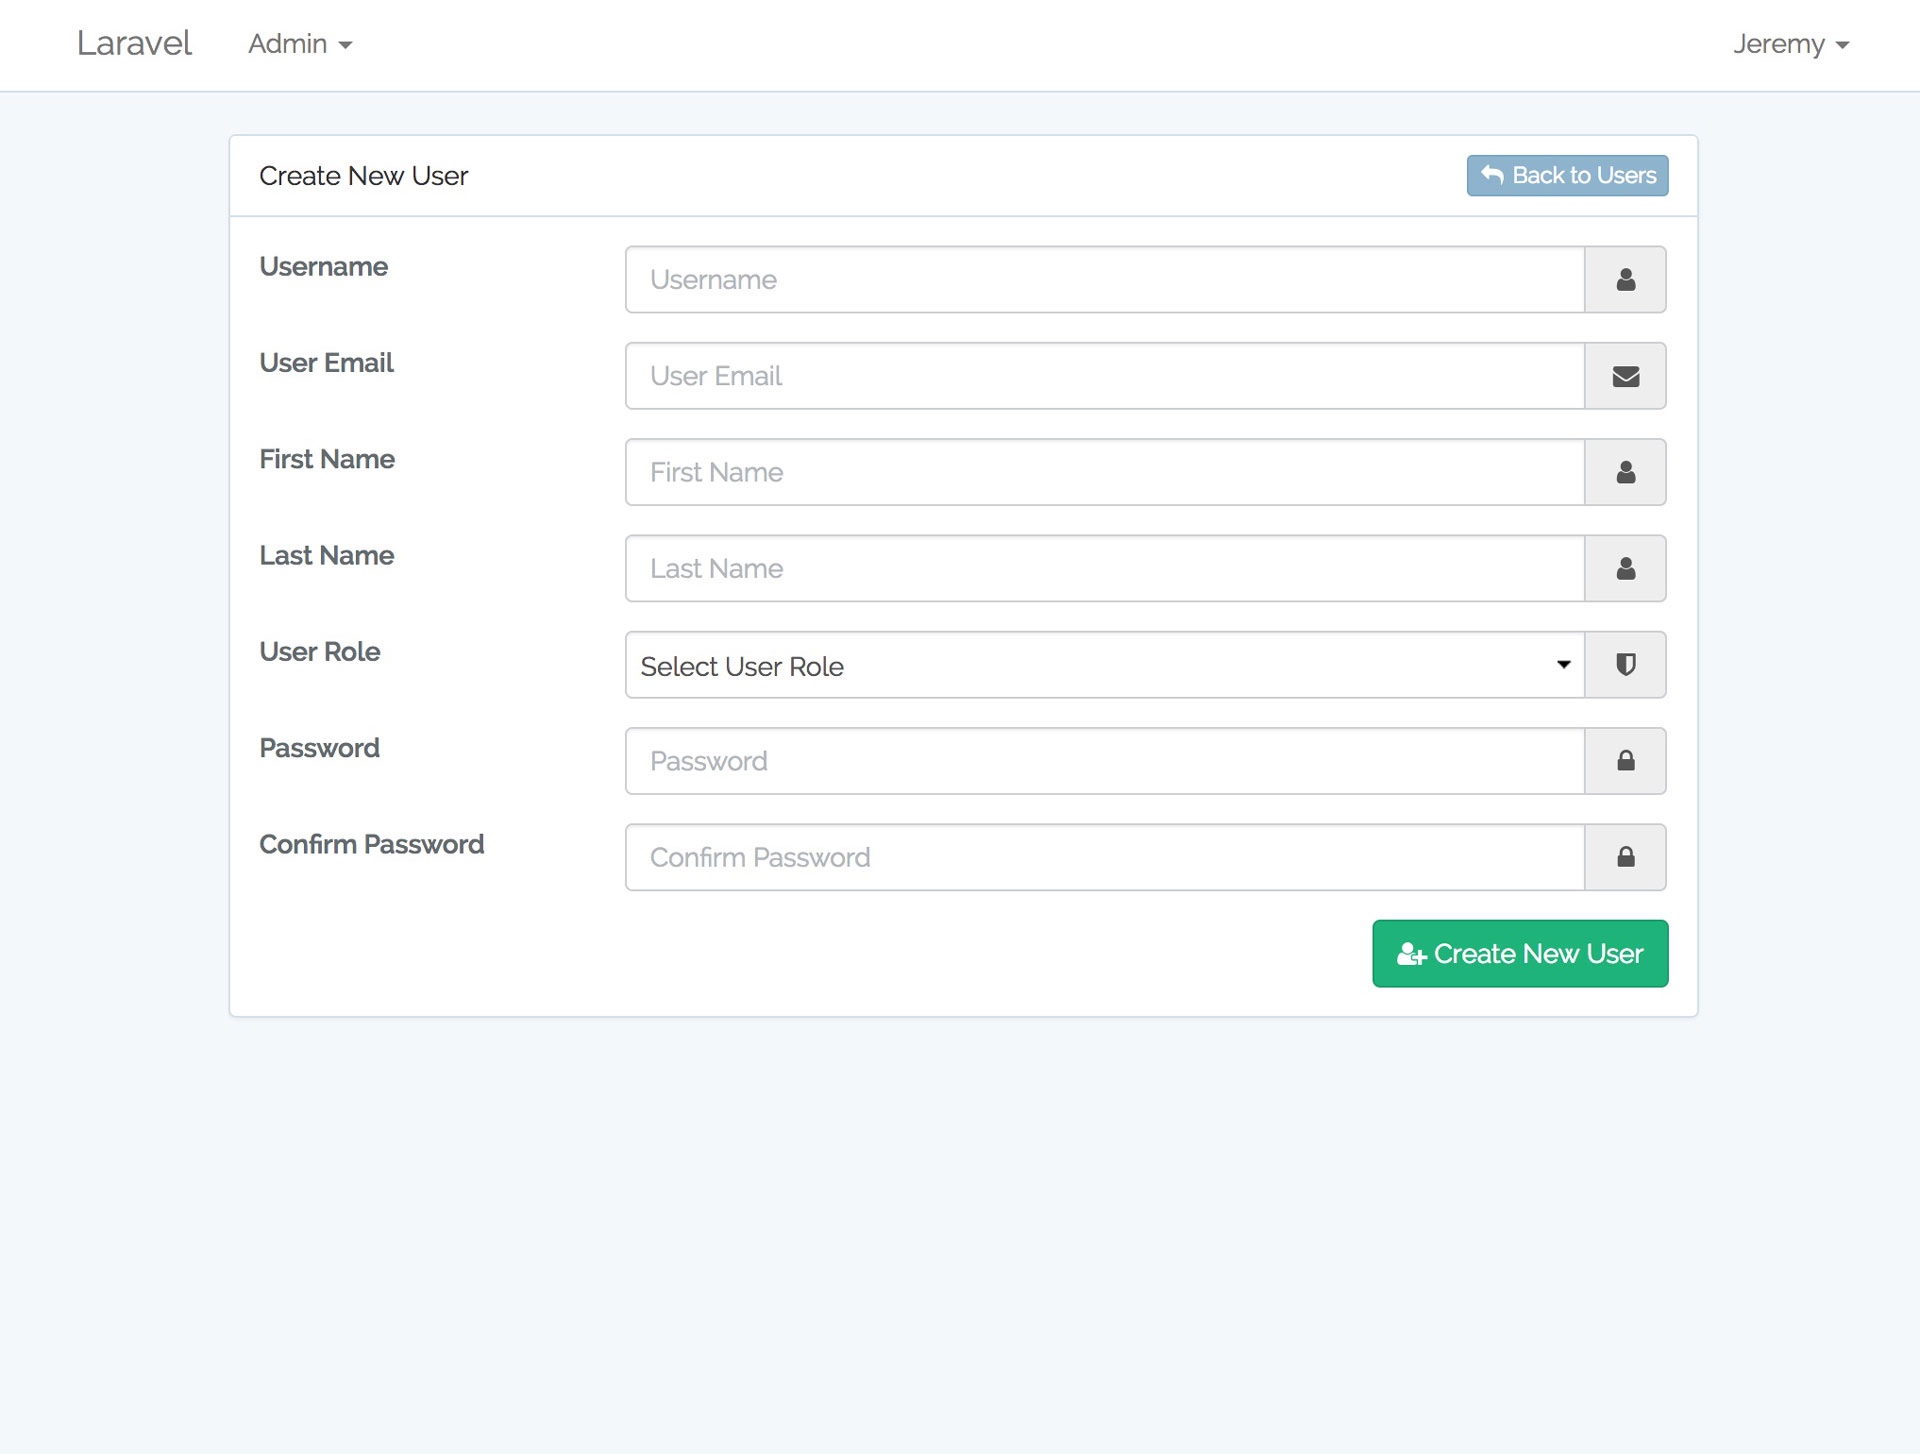
| CRUD (Create, Read, Update, Delete) User Management |
| Robust Laravel Logging with admin UI using MonoLog |
| Google reCaptcha Protection with Google API |
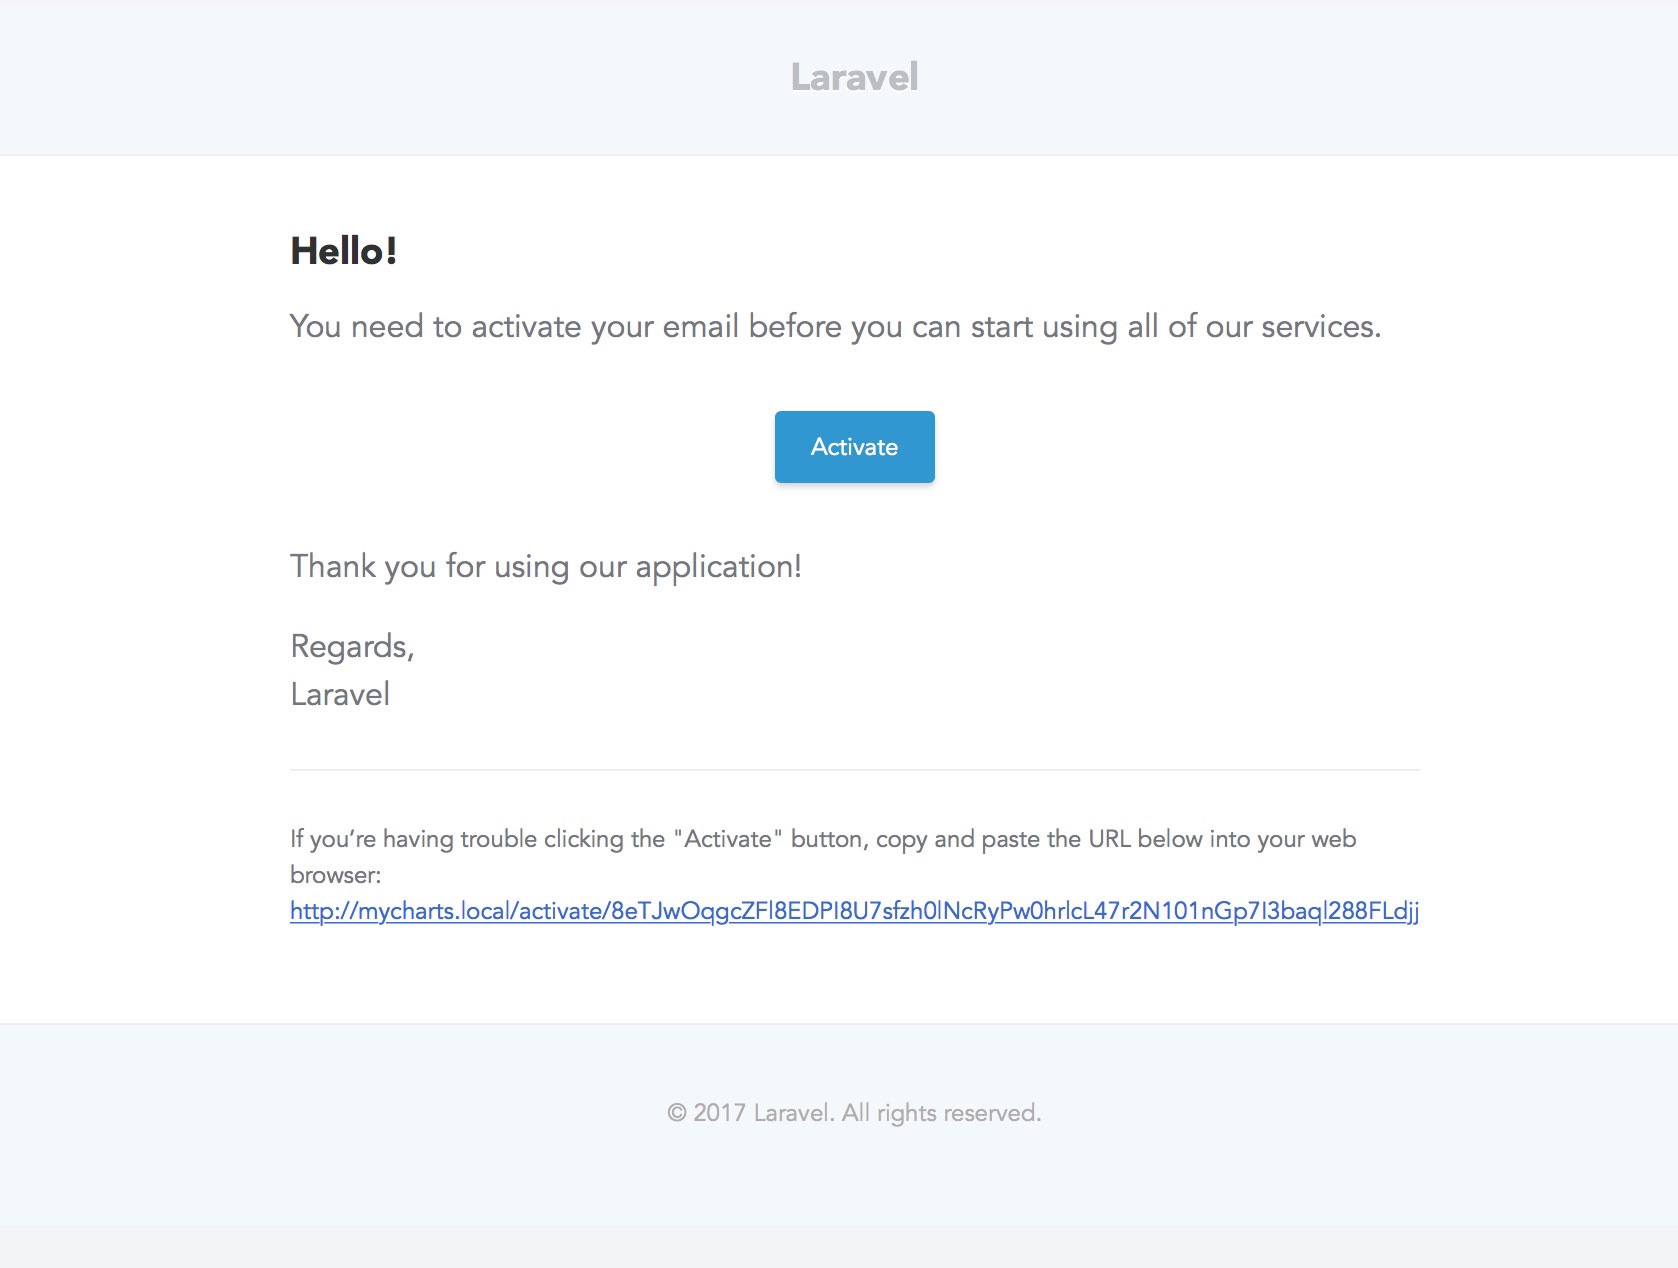
| User Registration with email verification |
| Makes us of Laravel Mix to compile assets |
| Makes use of Language Localization Files |
| Active Nav states using Laravel Requests |
| Restrict User Email Activation Attempts |
| Capture IP to users table upon signup |
| Uses Laravel Debugger for development |
| Makes us of Password Strength Meter |
| Makes use of hideShowPassword |
| User Avatar Image AJAX Upload with Dropzone.js |
| User Gravatar using Gravatar API |
| User Password Reset via Email Token |
| User Login with remember password |
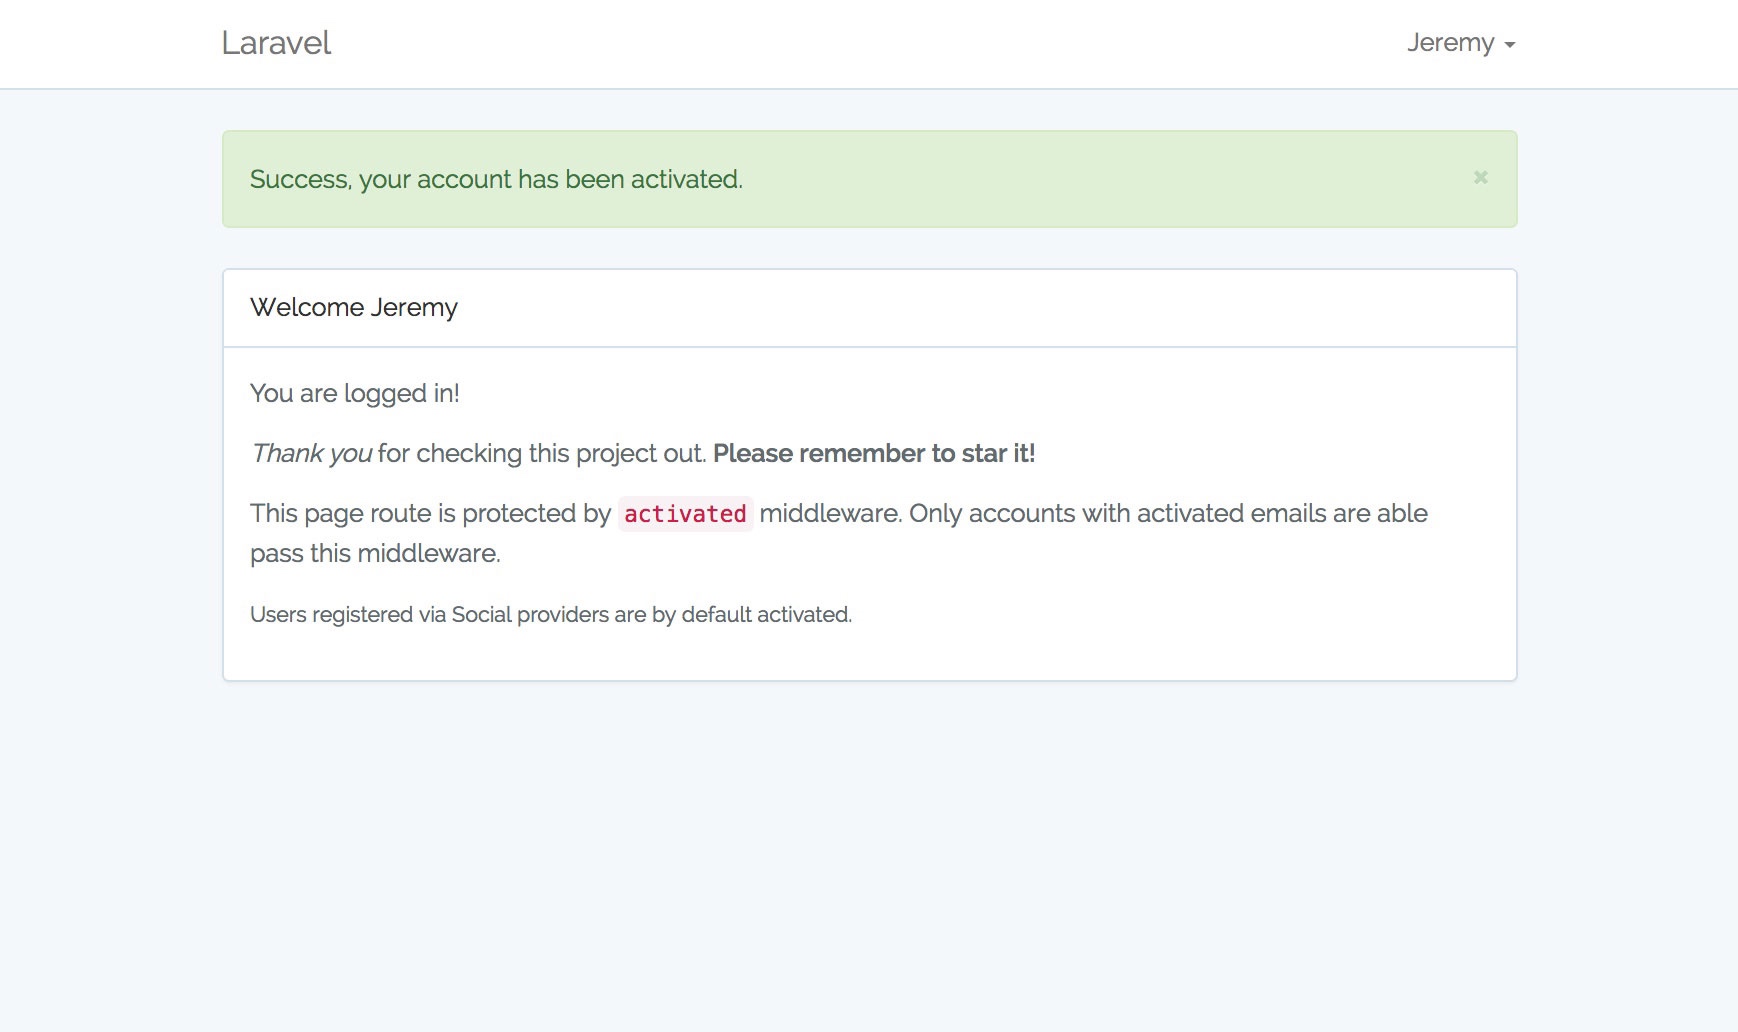
| User Roles/ACL Implementation |
| Makes of Laravel's Soft Delete Structure |
| Soft Deleted Users Management System |
| Permanently Delete Soft Deleted Users |
| User Delete Account with Goodbye email |
| User Restore Deleted Account Token |
| Restore Soft Deleted Users |
| View Soft Deleted Users |
| Captures Soft Delete Date |
| Captures Soft Delete IP |
| Admin Routing Details UI |
| Admin PHP Information UI |
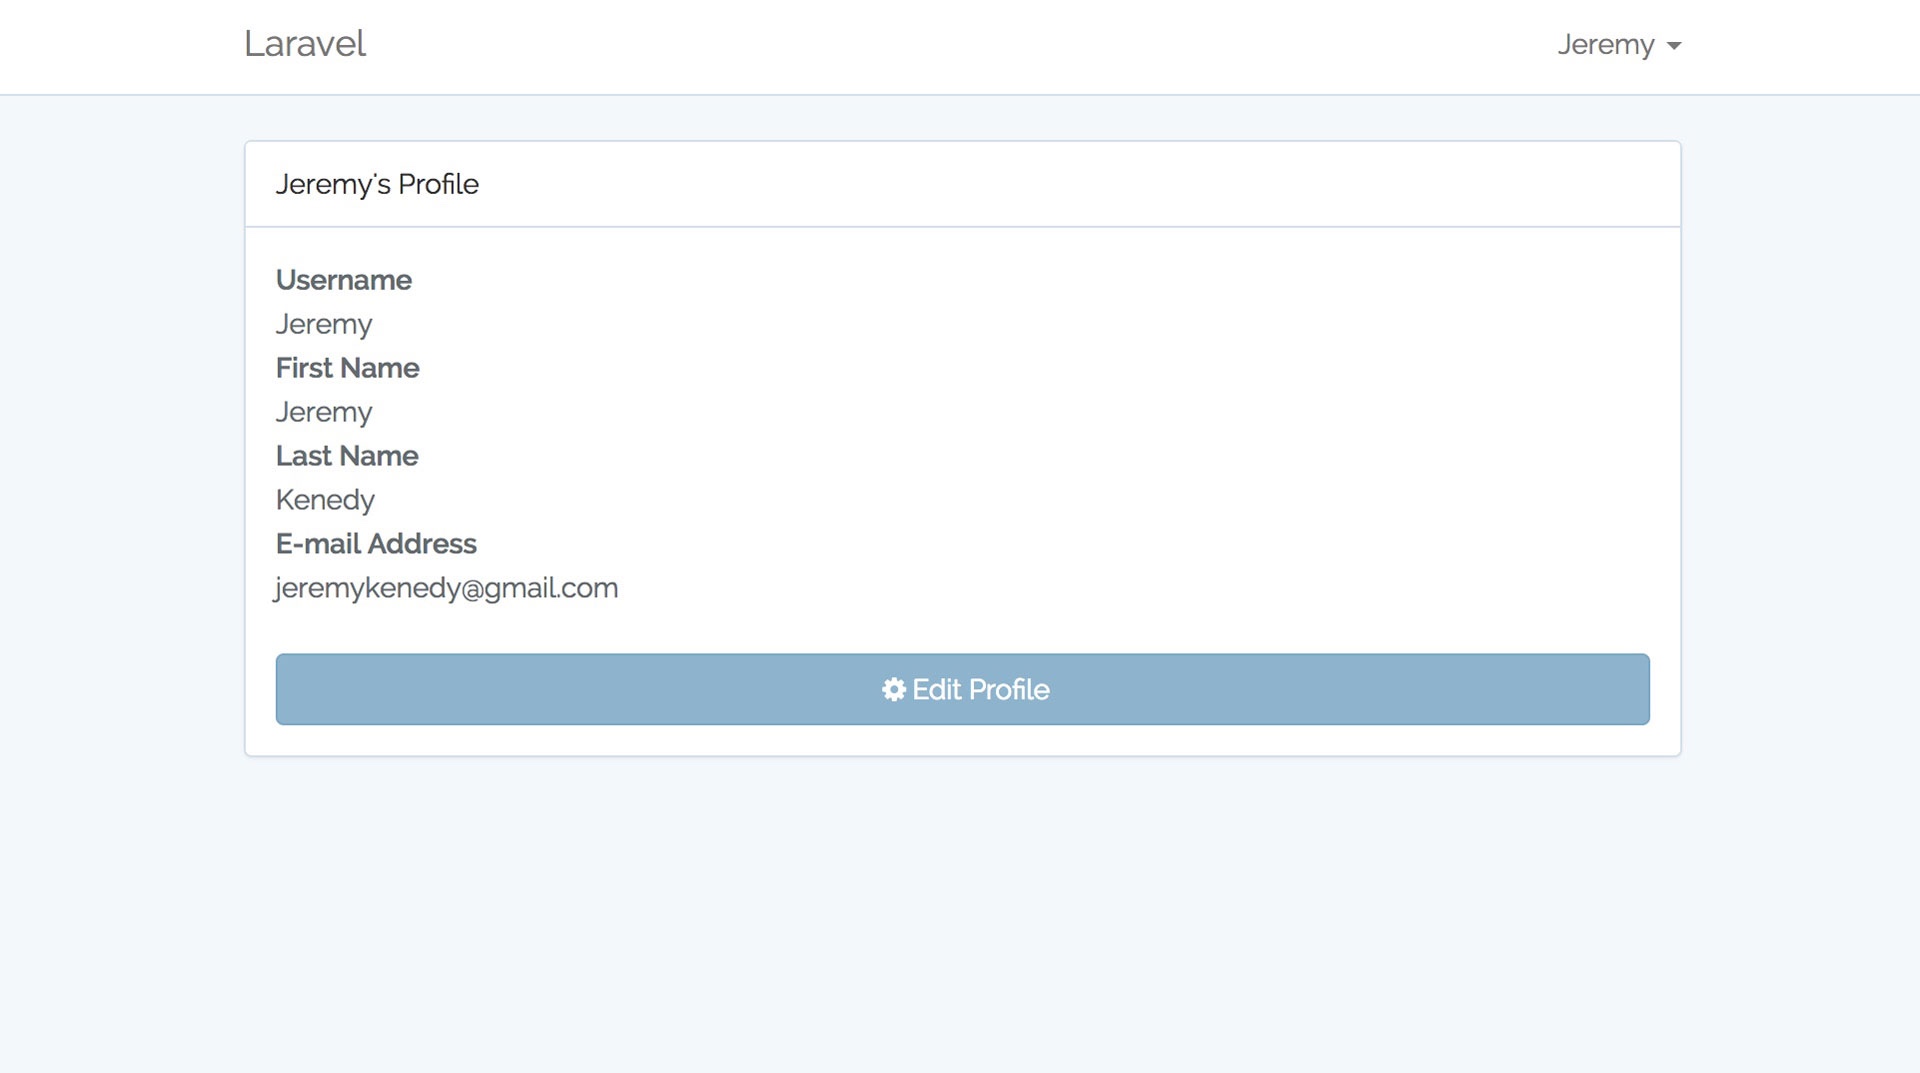
| Eloquent user profiles |
| User Themes |
| 404 Page |
| 403 Page |
| Configurable Email Notification via Laravel-Exception-Notifier |
| User Delete with Goodby email |
| User Restore Deleted Account |
- Run
sudo git clone https://github.com/jeremykenedy/laravel-auth.git laravel-auth - Create a MySQL database for the project
mysql -u root -p, if using Vagrant:mysql -u homestead -psecretcreate database laravelAuth;\q
- From the projects root run
cp .env.example .env - Configure your
.envfile // NOTE: Google API Key will prevent maps error - Run
sudo composer updatefrom the projects root folder - Run
php artisan vendor:publish --provider="jeremykenedy\LaravelRoles\RolesServiceProvider" --tag=config - Run
php artisan vendor:publish --provider="jeremykenedy\LaravelRoles\RolesServiceProvider" --tag=migrations - Run
php artisan vendor:publish --provider="jeremykenedy\LaravelRoles\RolesServiceProvider" --tag=seeds - From the projects root folder run
sudo chmod -R 755 ../laravel-auth - From the projects root folder run
php artisan key:generate - From the projects root folder run
php artisan migrate - From the projects root folder run
composer dump-autoload - From the projects root folder run
php artisan db:seed
** Note ** In order for Dropzone.js to work you will need to run
npm install
Rebuilding the front end of that project is OPTIONAL and can be done using Laravel Mix which is Elixers replacement.
- From the projects root folder run
npm install - From the projects root folder run
npm run devornpm run production
- You can watch assets with
npm run watch
- From the projects root folder run
sudo php artisan config:cache
And thats it with the caveat of setting up and configuring your development environment. I recommend Laravel Homestead
- Seeded Roles
- Unverified - Level 0
- User - Level 1
- Administrator - Level 5
- Seeded Permissions
- view.users
- create.users
- edit.users
- delete.users
- Seeded Users
| Password | Access | |
|---|---|---|
| [email protected] | password | User Access |
| [email protected] | password | Admin Access |
- Themes Seed List
/login/logout/register/password/email/password/reset/activate/activate/{token}/activation-required/re-activate/{token}
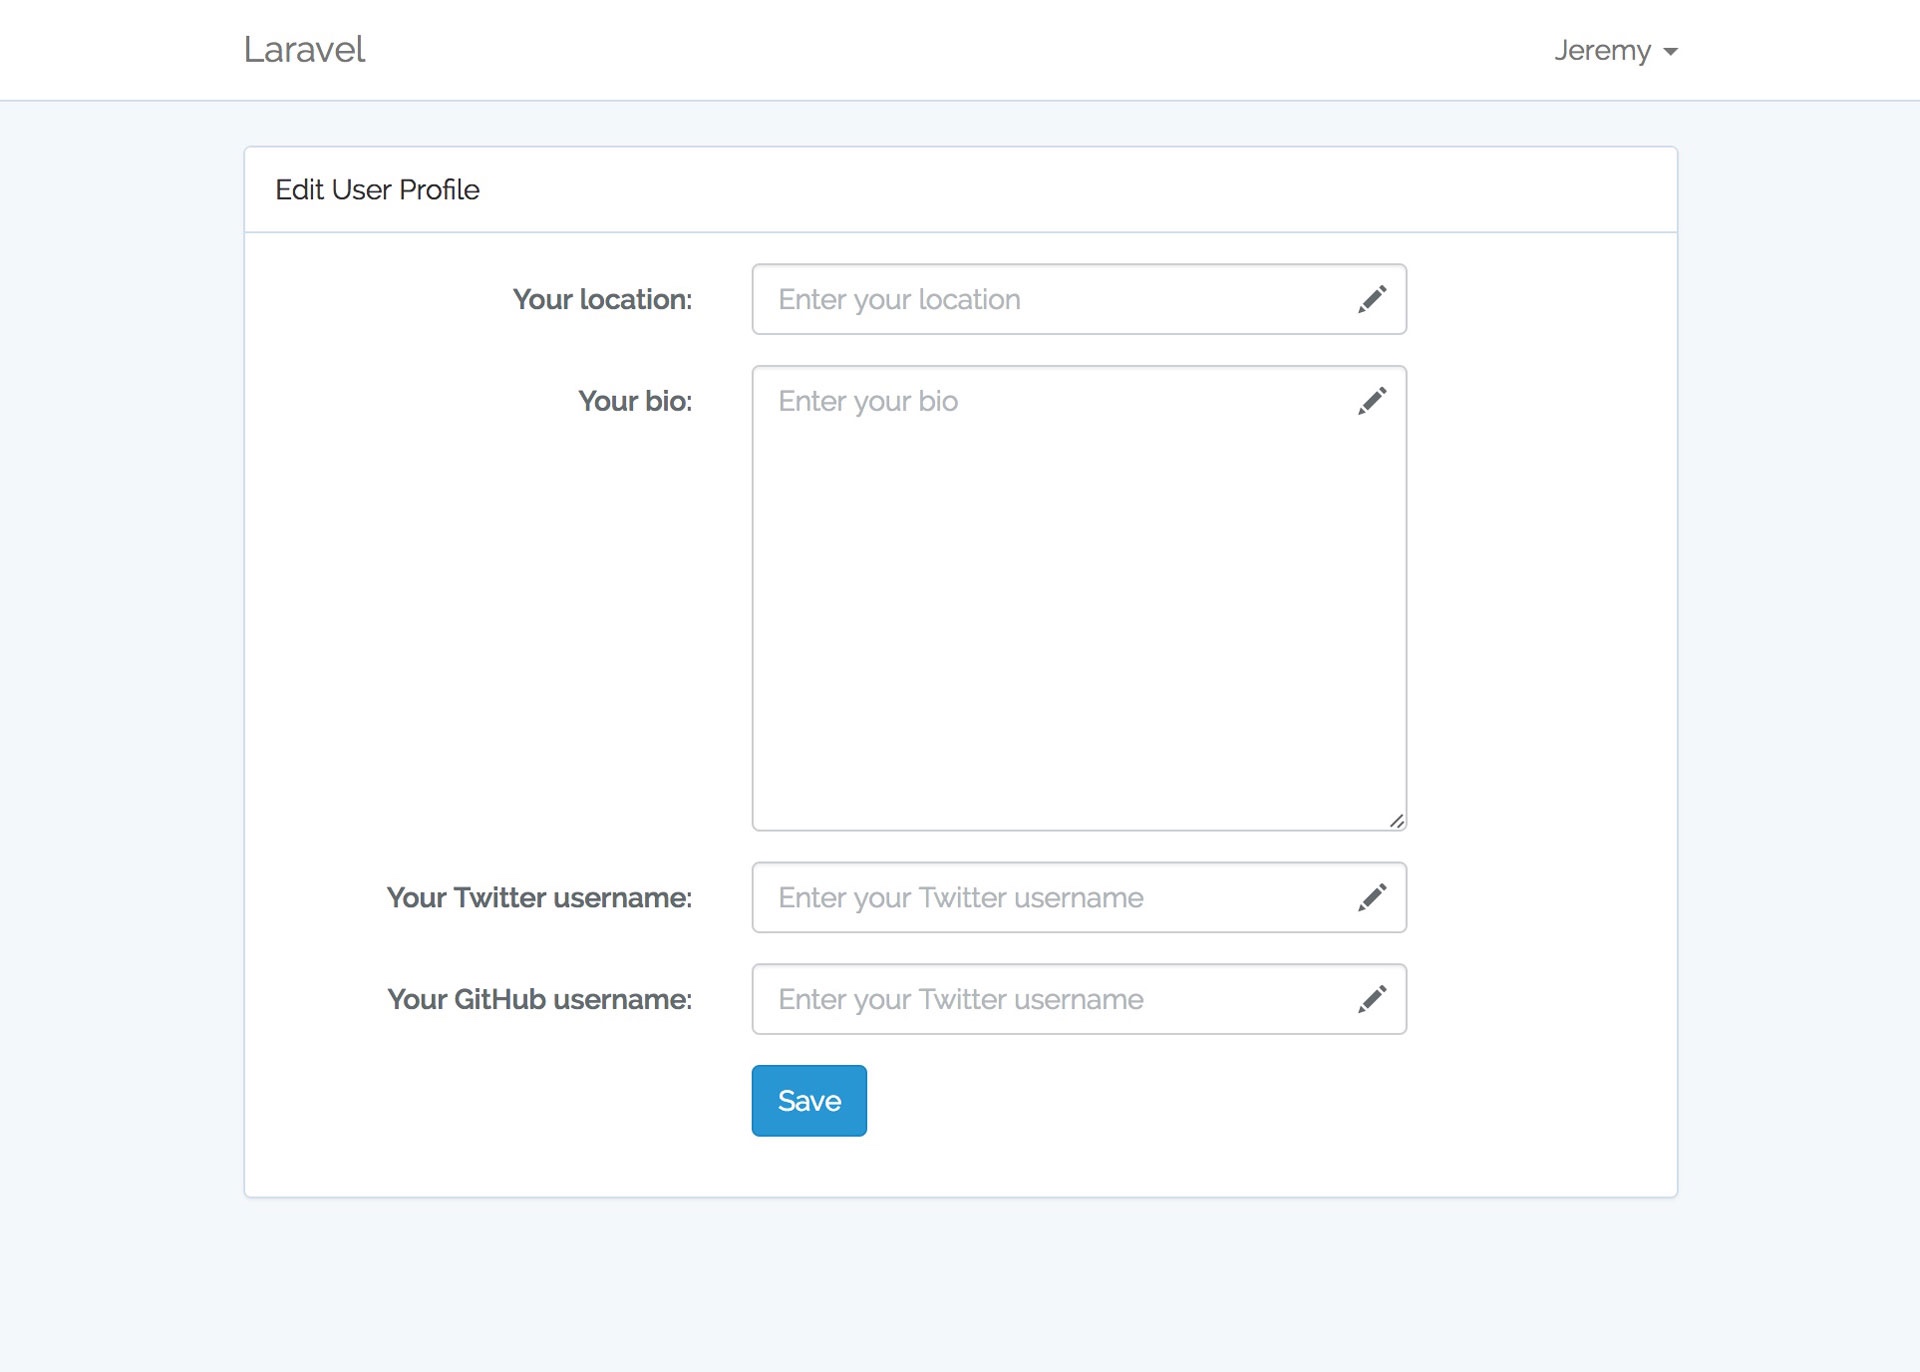
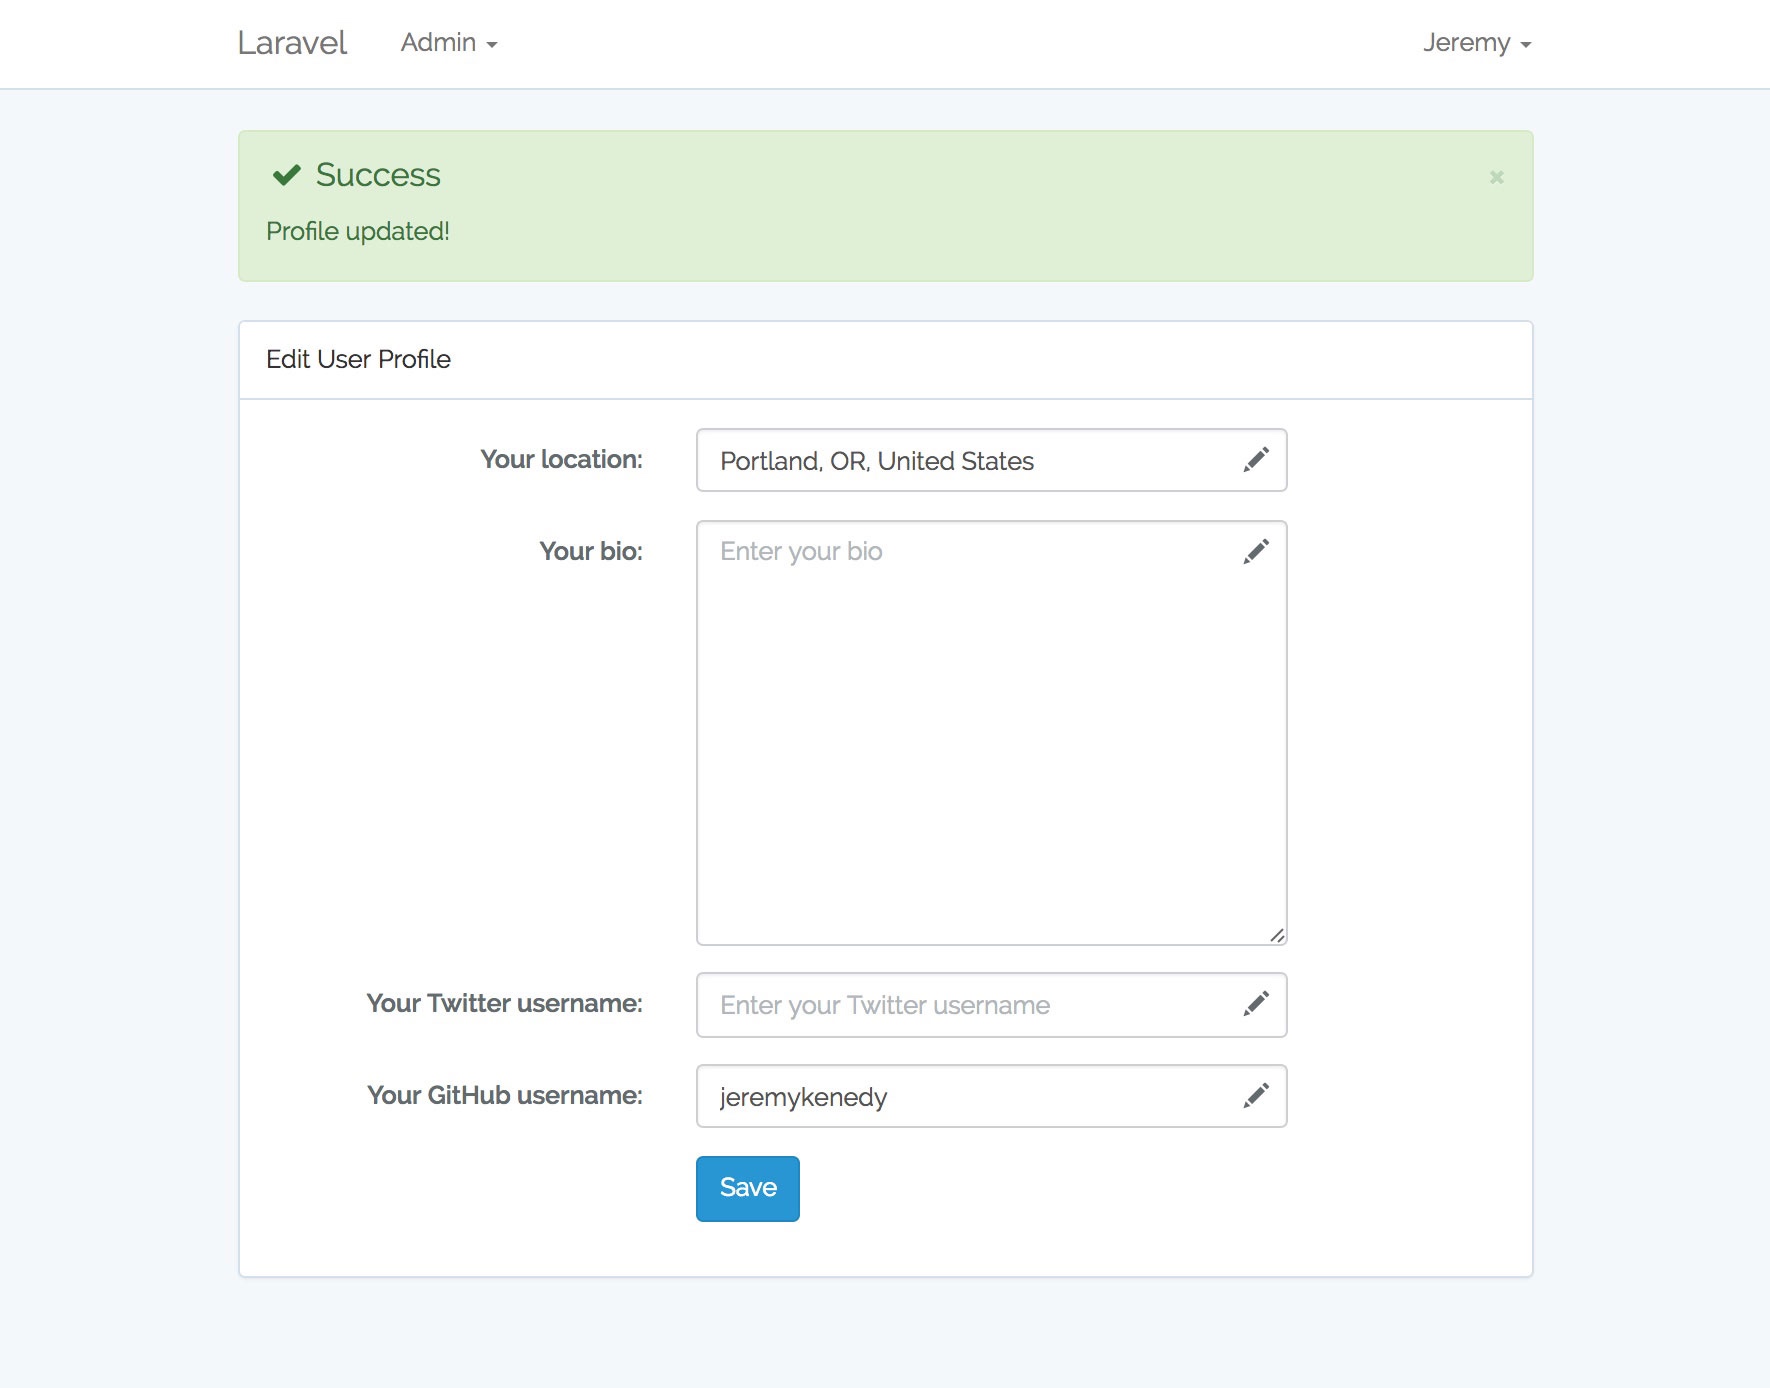
/profile/{username}/profile/{username}/edit<- Editing in this view is limited to current user only.
/users/users/create/users/{user_id}/users{user_id}/edit
/themes/themes/create/themes/{theme_id}/themes/{theme_id}/edit
/logs/php/routes
/users/deleted/users/deleted/{user_id}
- Google Captcha API
- Facebook API
- Twitter API
- Google + API
- GitHub API
- YouTube API
- Twitch TV API
- Instagram API
- 37 Signals API
- See full list of providers: http://socialiteproviders.github.io
-
Go to http://socialiteproviders.github.io and select the provider to be added.
-
From the projects root folder in terminal run composer command to get the needed package.
- Example:
composer require socialiteproviders/twitch -
From the projects root folder run
composer update -
Add the service provider to
/app/services.php- Example:
'twitch' => [ 'client_id' => env('TWITCH_KEY'), 'client_secret' => env('TWITCH_SECRET'), 'redirect' => env('TWITCH_REDIRECT_URI'), ], -
Add the API credentials to
/.env- Example:
TWITCH_KEY=YOURKEYHERE TWITCH_SECRET=YOURSECRETHERE TWITCH_REDIRECT_URI=http://YOURWEBSITEURL.COM/social/handle/twitch -
Add the social media login link:
- Example:
In file
/resources/views/auth/login.blade.phpadd ONE of the following:- Conventional HTML:
<a href="{{ route('social.redirect', ['provider' => 'twitch']) }}" class="btn btn-lg btn-primary btn-block twitch">Twitch</a>* Use Laravel HTML Facade with [Laravel Collective](https://laravelcollective.com/) (recommended){!! HTML::link(route('social.redirect', ['provider' => 'twitch']), 'Twitch', array('class' => 'btn btn-lg btn-primary btn-block twitch')) !!} - Example:
In file
Example .env file:
APP_ENV=local
APP_KEY=
APP_DEBUG=true
APP_LOG_LEVEL=debug
APP_URL=http://localhost

DB_CONNECTION=mysql
DB_HOST=127.0.0.1
DB_PORT=3306
DB_DATABASE=laravelAuth
DB_USERNAME=homestead
DB_PASSWORD=secret

BROADCAST_DRIVER=log
CACHE_DRIVER=file
SESSION_DRIVER=file
QUEUE_DRIVER=sync

REDIS_HOST=127.0.0.1
REDIS_PASSWORD=null
REDIS_PORT=6379

MAIL_DRIVER=smtp
MAIL_HOST=mailtrap.io
MAIL_PORT=2525
MAIL_USERNAME=null
MAIL_PASSWORD=null
MAIL_ENCRYPTION=null

MAIL_FROM_ADDRESS=
MAIL_FROM_NAME=''

EMAIL_EXCEPTION_ENABLED=false
EMAIL_EXCEPTION_FROM=email#email.com
EMAIL_EXCEPTION_TO='[email protected], [email protected]'
EMAIL_EXCEPTION_CC=''
EMAIL_EXCEPTION_BCC=''
EMAIL_EXCEPTION_SUBJECT=''

ACTIVATION=true
ACTIVATION_LIMIT_TIME_PERIOD=24
ACTIVATION_LIMIT_MAX_ATTEMPTS=3

NULL_IP_ADDRESS=0.0.0.0

DEBUG_BAR_ENVIRONMENT=local

USER_RESTORE_CUTOFF_DAYS=31
USER_RESTORE_ENCRYPTION_KEY=

DEFAULT_GRAVATAR_SIZE=80
DEFAULT_GRAVATAR_FALLBACK=http://c1940652.r52.cf0.rackcdn.com/51ce28d0fb4f442061000000/Screen-Shot-2013-06-28-at-5.22.23-PM.png
DEFAULT_GRAVATAR_SECURE=false
DEFAULT_GRAVATAR_MAX_RATING=g
DEFAULT_GRAVATAR_FORCE_DEFAULT=false
DEFAULT_GRAVATAR_FORCE_EXTENSION=jpg

PUSHER_APP_ID=
PUSHER_APP_KEY=
PUSHER_APP_SECRET=

// NOTE: YOU CAN REMOVE THE KEY CALL IN app.blade.php IF YOU GET A POP UP AND DO NOT WANT TO SETUP A KEY FOR DEV
# Google Maps API v3 Key - https://developers.google.com/maps/documentation/javascript/get-api-key#get-an-api-key
GOOGLEMAPS_API_KEY=YOURGOOGLEMAPSkeyHERE

# https://console.developers.google.com/ - NEED OAUTH CREDS
GOOGLE_ID=YOURGOOGLEPLUSidHERE
GOOGLE_SECRET=YOURGOOGLEPLUSsecretHERE
GOOGLE_REDIRECT=http://yourwebsiteURLhere.com/social/handle/google

# https://www.google.com/recaptcha/admin#list
ENABLE_RECAPTCHA=false
RE_CAP_SITE=YOURGOOGLECAPTCHAsitekeyHERE
RE_CAP_SECRET=YOURGOOGLECAPTCHAsecretHERE

# https://developers.facebook.com/
FB_ID=YOURFACEBOOKidHERE
FB_SECRET=YOURFACEBOOKsecretHERE
FB_REDIRECT=http://yourwebsiteURLhere.com/social/handle/facebook

# https://apps.twitter.com/
TW_ID=YOURTWITTERidHERE
TW_SECRET=YOURTWITTERkeyHERE
TW_REDIRECT=http://yourwebsiteURLhere.com/social/handle/twitter

# https://github.com/settings/applications/new
GITHUB_ID=YOURIDHERE
GITHUB_SECRET=YOURSECRETHERE
GITHUB_URL=https://larablog.io/social/handle/github

# https://developers.google.com/youtube/v3/getting-started
YOUTUBE_KEY=YOURKEYHERE
YOUTUBE_SECRET=YOURSECRETHERE
YOUTUBE_REDIRECT_URI=https://larablog.io/social/handle/youtube

# http://www.twitch.tv/kraken/oauth2/clients/new
TWITCH_KEY=YOURKEYHERE
TWITCH_SECRET=YOURSECRETHERE
TWITCH_REDIRECT_URI=http://laravel-auth.local/social/handle/twitch

# https://instagram.com/developer/register/
INSTAGRAM_KEY=YOURKEYHERE
INSTAGRAM_SECRET=YOURSECRETHERE
INSTAGRAM_REDIRECT_URI=http://laravel-auth.local/social/handle/instagram

# https://basecamp.com/
# https://github.com/basecamp/basecamp-classic-api
37SIGNALS_KEY=YOURKEYHERE
37SIGNALS_SECRET=YOURSECRETHERE
37SIGNALS_REDIRECT_URI=http://laravel-auth.local/social/handle/37signals
- http://laravel.com/docs/5.4/authentication
- http://laravel.com/docs/5.4/authorization
- http://laravel.com/docs/5.4/routing
- https://laravel.com/docs/5.4/migrations
- https://laravel.com/docs/5.4/queries
- https://laravel.com/docs/5.4/views
- https://laravel.com/docs/5.4/eloquent
- https://laravel.com/docs/5.4/eloquent-relationships
- https://laravel.com/docs/5.4/requests
- https://laravel.com/docs/5.4/errors
- Added User Delete with Goodbye email
- Added User Restore Deleted Account from email with secure token
- Added Soft Deletes and Soft Deletes Management panel
- Added User Account Settings to Profile Edit
- Added User Change Password to Profile Edit
- Added User Delete Account to Profile Edit
- Added Password Strength Meter
- Added hideShowPassword
- Added Admin Routing Details
- Admin PHP Information
- Added Robust Laravel Logging with admin UI using MonoLog
- Added Active Nav states using Laravel Requests
- Added Laravel Debugger with Service Provider to manage status in
.envfile. - Updated Capture IP not found IP address
- Added User Avatar Image AJAX Upload with Dropzone.js
- Added User Gravatar using Gravatar API
- Added Themes Management.
- Add user profiles with seeded list and global view
- Major overhaul on Laravel 5.4
- Update from Laravel 5.1 to 5.2
- Added eloquent editable user profile
- Added IP Capture
- Added Google Maps API v3 for User Location lookup
- Added Google Maps API v3 for User Location Input Geocoding
- Added Google Maps API v3 for User Location Map with Options
- Added CRUD(Create, Read, Update, Delete) User Management
- Added Configurable Email Notification using Laravel-Exception-Notifier


Laravel-auth is licensed under the MIT license. Enjoy!


Laravel is a web application framework with expressive, elegant syntax. We believe development must be an enjoyable, creative experience to be truly fulfilling. Laravel attempts to take the pain out of development by easing common tasks used in the majority of web projects, such as:
- Simple, fast routing engine.
- Powerful dependency injection container.
- Multiple back-ends for session and cache storage.
- Expressive, intuitive database ORM.
- Database agnostic schema migrations.
- Robust background job processing.
- Real-time event broadcasting.
Laravel is accessible, yet powerful, providing tools needed for large, robust applications. A superb combination of simplicity, elegance, and innovation give you tools you need to build any application with which you are tasked.
Laravel has the most extensive and thorough documentation and video tutorial library of any modern web application framework. The Laravel documentation is thorough, complete, and makes it a breeze to get started learning the framework.
If you're not in the mood to read, Laracasts contains over 900 video tutorials on a range of topics including Laravel, modern PHP, unit testing, JavaScript, and more. Boost the skill level of yourself and your entire team by digging into our comprehensive video library.
Thank you for considering contributing to the Laravel framework! The contribution guide can be found in the Laravel documentation.
If you discover a security vulnerability within Laravel, please send an e-mail to Taylor Otwell at [email protected]. All security vulnerabilities will be promptly addressed.
The Laravel framework is open-sourced software licensed under the MIT license.


Bootstrap is a sleek, intuitive, and powerful front-end framework for faster and easier web development, created by Mark Otto and Jacob Thornton, and maintained by the core team with the massive support and involvement of the community.
To get started, check out https://getbootstrap.com!
- Quick start
- Bugs and feature requests
- Documentation
- Contributing
- Community
- Versioning
- Creators
- Copyright and license
Several quick start options are available:
- Download the latest release.
- Clone the repo:
git clone https://github.com/twbs/bootstrap.git - Install with npm:
npm install [email protected] - Install with yarn:
yarn add [email protected] - Install with Composer:
composer require twbs/bootstrap:4.0.0-alpha.6 - Install with Bower:
bower install bootstrap#v4.0.0-alpha.6 - Install with NuGet: CSS:
Install-Package bootstrap -PreSass:Install-Package bootstrap.sass -Pre(-Preis only required until Bootstrap v4 has a stable release).
Read the Getting started page for information on the framework contents, templates and examples, and more.
Within the download you'll find the following directories and files, logically grouping common assets and providing both compiled and minified variations. You'll see something like this:
bootstrap/
├── css/
│   ├── bootstrap.css
│   ├── bootstrap.css.map
│   ├── bootstrap.min.css
│   └── bootstrap.min.css.map
└── js/
    ├── bootstrap.js
    └── bootstrap.min.js
We provide compiled CSS and JS (bootstrap.*), as well as compiled and minified CSS and JS (bootstrap.min.*). CSS source maps (bootstrap.*.map) are available for use with certain browsers' developer tools.
Have a bug or a feature request? Please first read the issue guidelines and search for existing and closed issues. If your problem or idea is not addressed yet, please open a new issue.
Bootstrap's documentation, included in this repo in the root directory, is built with Jekyll and publicly hosted on GitHub Pages at https://getbootstrap.com. The docs may also be run locally.
- Run through the tooling setup to install Jekyll (the site builder) and other Ruby dependencies with
bundle install. - Run
grunt(or a specific set of Grunt tasks) to rebuild distributed CSS and JavaScript files, as well as our docs assets. - From the root
/bootstrapdirectory, runbundle exec jekyll servein the command line. - Open http://localhost:9001 in your browser, and voilà.
Learn more about using Jekyll by reading its documentation.
Documentation for v2.3.2 has been made available for the time being at https://getbootstrap.com/2.3.2/ while folks transition to Bootstrap 3.
Previous releases and their documentation are also available for download.
Please read through our contributing guidelines. Included are directions for opening issues, coding standards, and notes on development.
Moreover, if your pull request contains JavaScript patches or features, you must include relevant unit tests. All HTML and CSS should conform to the Code Guide, maintained by Mark Otto.
Editor preferences are available in the editor config for easy use in common text editors. Read more and download plugins at http://editorconfig.org.
Get updates on Bootstrap's development and chat with the project maintainers and community members.
- Follow @getbootstrap on Twitter.
- Read and subscribe to The Official Bootstrap Blog.
- Join the official Slack room.
- Chat with fellow Bootstrappers in IRC. On the
irc.freenode.netserver, in the##bootstrapchannel. - Implementation help may be found at Stack Overflow (tagged
bootstrap-4). - Developers should use the keyword
bootstrapon packages which modify or add to the functionality of Bootstrap when distributing through npm or similar delivery mechanisms for maximum discoverability.
For transparency into our release cycle and in striving to maintain backward compatibility, Bootstrap is maintained under the Semantic Versioning guidelines. Sometimes we screw up, but we'll adhere to those rules whenever possible.
See the Releases section of our GitHub project for changelogs for each release version of Bootstrap. Release announcement posts on the official Bootstrap blog contain summaries of the most noteworthy changes made in each release.
Mark Otto
Jacob Thornton
Code and documentation copyright 2011-2017 the Bootstrap Authors and Twitter, Inc. Code released under the MIT License. Docs released under Creative Commons.
| Item | Value: |
|---|---|
| Hostname | homestead |
| IP Address | 192.168.10.10 |
| Username | vagrant |
| SU Password | vagrant |
| Database Host | 127.0.0.1 |
| Database Port | 33060 |
| Database Username | homestead |
| Database Password | secret |
| Command | Action |
|---|---|
vagrant up |
Start Vagrant VM |
vagrant up --provision |
Start Vagrant VM if vagrantfile updated |
vagrant halt |
Stop Vagrant VM |
| Command | Action |
|---|---|
sudo ssh [email protected] -p 222 |
Access Vagrant VM via SSH. Password is vagrant |
mysql -u homestead -psecret |
Access Vagrant VM MySQL. Password is vagrant |
If you do not have Bower, it can be installed using Node Package Manager (NPM). If you do not have NPM, it can be installed using NODE JS.
Mac GUI Installer, easiest way (Simply Download and Install)
brew install node
npm install -g bower
sudo npm install -g bower
npm install -g gulp
sudo curl -sS https://getcomposer.org/installer | php
sudo mv composer.phar /usr/local/bin/composer
sudo brew update
sudo brew tap homebrew/dupes
sudo brew tap homebrew/php
sudo brew install composer
You can edit/or create your systems (MAC OS X) alias file with the follwing command:
sudo vim ~/.bash_profile
To update TERMINAL CLI to be able to use the the added aliases run the following command:
. ~/.bash_profile
alias machost='sudo vim /etc/hosts'
alias edithost='sudo vim /etc/hosts'
alias sshlara='sudo ssh [email protected] -p 2222'
alias laraedit='vim ~/.homestead/Homestead.yaml '
alias aliaslara='vim ~/.homestead/aliases'
alias laraalias='vim ~/.homestead/aliases'
alias sql='mysql -u homestead -psecret'
alias larasql='mysql -u homestead -psecret'
alias updatecomposer='sudo composer self-update'
alias rollbackcomposer='sudo composer self-update --rollback'
A helpful bashfile alias function to start VAGRANT instance:
function laraup {
  _pwd=$(pwd)
  startVM(){
    vagrant up --provision
  }
  echo "=============================================================================="
  echo "****** STARTING LARAVEL VAGRANT INSTANCE "
  echo "=============================================================================="
  cd ~/Homestead/
  if startVM ; then
    echo "=============================================================================="
    echo "****** SUCCESS - LARAVEL VAGRANT STARTED :)~"
    echo "=============================================================================="
  else
    echo "=============================================================================="
    echo "****** ERROR - LARAVEL VAGRANT DID NOT START :("
    echo "=============================================================================="
  fi
  cd $_originalDir
}
A helpful bashfile alias function to shutdown/halt/stop VAGRANT instance:
function laradown {
  _pwd=$(pwd)
  stopVM(){
    vagrant halt
  }
  echo "=============================================================================="
  echo "****** STOPPING LARAVEL VAGRANT INSTANCE "
  echo "=============================================================================="
  cd ~/Homestead/
  if stopVM ; then
    echo "=============================================================================="
    echo "****** SUCCESS - LARAVEL VAGRANT SHUTDOWN :)~"
    echo "=============================================================================="
  else
    echo "=============================================================================="
    echo "****** ERROR - LARAVEL VAGRANT DID SHUTDOWN :("
    echo "=============================================================================="
  fi
  cd $_originalDir
}
A helpful bashfile alias function to remove VAGRANT instance:
function larakill {
  _pwd=$(pwd)
  killVM(){
    vagrant destroy
  }
  echo "=============================================================================="
  echo "****** DESTROYING LARAVEL VAGRANT INSTANCE "
  echo "=============================================================================="
  cd ~/Homestead/
  if killVM ; then
    echo "=============================================================================="
    echo "****** SUCCESS - LARAVEL VAGRANT DESTROYING :)~"
    echo "=============================================================================="
  else
    echo "=============================================================================="
    echo "****** ERROR - LARAVEL VAGRANT WAS NOT DESTROYING :("
    echo "=============================================================================="
  fi
  cd $_originalDir
}
A nice alias to list all the MAC and OSX filesystem booger:
alias cleanprint='
find . -name "*.DS_Store" -print;
find . -name "*.DS_Store" -print;
find . -name "*._DS_Store" -print;
find . -name "._.DS_Store" -print;
find . -name ".DS_Store" -print;
find . -name "Thumbs.db" -print;
find . -name "._.*" -print;
find . -name "._*" -print ;
'
A nice alias to delete all the MAC and OSX filesystem booger:
alias cleanrm='
find . -name "*.DS_Store" -delete;
find . -name "*.DS_Store" -delete;
find . -name "*._DS_Store" -delete;
find . -name "._.DS_Store" -delete;
find . -name ".DS_Store" -delete;
find . -name "Thumbs.db" -delete;
find . -name "._.*" -delete;
find . -name "._*" -delete ;
'
A nice alias to list and delete all the MAC and OSX filesystem boogers:
alias cleanboth='
find . -name "*.DS_Store" -print;
find . -name "*.DS_Store" -print;
find . -name "*._DS_Store" -print;
find . -name "._.DS_Store" -print;
find . -name ".DS_Store" -print;
find . -name "Thumbs.db" -print;
find . -name "._.*" -print;
find . -name "._*" -print ;
find . -name "*.DS_Store" -delete;
find . -name "*.DS_Store" -delete;
find . -name "*._DS_Store" -delete;
find . -name "._.DS_Store" -delete;
find . -name ".DS_Store" -delete;
find . -name "Thumbs.db" -delete;
find . -name "._.*" -delete;
find . -name "._*" -delete ;
'
Alias to show all hidden files on MAC OS X filesystem:
alias showfiles='defaults write com.apple.finder AppleShowAllFiles YES; killall Finder /System/Library/CoreServices/Finder.app'
Alias to hide all hidden files on MAC OS X filesystem:
alias hidefiles='defaults write com.apple.finder AppleShowAllFiles NO; killall Finder /System/Library/CoreServices/Finder.app'
function quickpush {
    _currentBranch=$(git branch | sed -n -e 's/^\* \(.*\)/\1/p')
    sudo git add -A
    sudo git commit -m "quick push"
    sudo git push $_currentBranch
}
function push {
    _currentBranch=$(git branch | sed -n -e 's/^\* \(.*\)/\1/p')
    sudo git add -A
    sudo git commit -m "quick push"
    sudo git push $_currentBranch
}
function quickpull {
    _currentBranch=$(git branch | sed -n -e 's/^\* \(.*\)/\1/p')
    sudo git pull $_currentBranch
}
function pull {
    _currentBranch=$(git branch | sed -n -e 's/^\* \(.*\)/\1/p')
    sudo git pull $_currentBranch
}
alias gut='git'
alias got='git'
alias car='cat'
alias commut='commit'
alias commmit='commit'
alias comit='commit'
alias commot='commit'
alias cl='clear'
alias la='ls -la'
alias ll='ls -la'
alias listalias='cat ~/.bash_profile'
alias aliaslist='cat ~/.bash_profile'
alias list='cat ~/.bash_profile'
alias text='cat ~/.bash_profile'
alias aliasshow='cat ~/.bash_profile'
alias aliasedit='sudo vim ~/.bash_profile'
alias editalias='sudo vim ~/.bash_profile'
alias aliasreset='. ~/.bash_profile'
alias aliasr='. ~/.bash_profile'
alias alr='. ~/.bash_profile'
alias alsr='. ~/.bash_profile'
alias aliasrestart='. ~/.bash_profile'
This webpage is not available
ERR_NAME_NOT_RESOLVED
vim ~/.homestead/Homestead.yaml or laraedit
Note: map: Is the path to the your files on your local machine to: Is the virtual file path to your projects that vagrant will create
folders:
  - map: /Users/yourLocalUserName/Sites/project1
    to: /home/vagrant/Sites/project1/public

  - map: /Users/yourLocalUserName/Sites/project2
    to: /home/vagrant/Sites/project2/public
map: Is the local URI of your project to: Is the virtual symlink to your projects virtual file path
sites:
  - map: project1.local
    to: /home/vagrant/Sites/project1/public

  - map: project2.app
  to: /home/vagrant/Sites/project2/public
Note: Instructions are for Mac OS X
sudo vim /etc/hosts or edithost
Note: Replace examples URI used in Vargrant/Homestead configuration file and use the IP address of your local Vargrant/Homestead virtual machine instance
##
# Host Database
#
# localhost is used to configure the loopback interface
# when the system is booting.  Do not change this entry.
##
127.0.0.1        localhost
255.255.255.255  broadcasthost
192.168.10.10    laravel-auth.local


