iq9891 / blog Goto Github PK
View Code? Open in Web Editor NEW技术博客
技术博客


| mac | win |
|---|---|
| command(cmd) | ctrl |
| control | alt |
| option+cmd+i | f12 (谷歌中查找元素) |
brew install git , 安装 git 软件| 命令 | 功能 |
|---|---|
| cmd + q | 关上整个软件(如 关上 atom),不在后台执行 |
| cmd + w | 关上整个软件(如 关上 atom),在后台执行 |
| cmd + tab + ] | 切换软件标签 向右 |
| cmd + tab + [ | 切换软件标签 向左 |
| cmd + tab | 切换当前软件运行窗口 |
iterm2 打开左侧的 ~ 是 用户 目录
| 命令 | 功能 |
|---|---|
ll |
查看当前目录的文件夹级别 |
ls |
查看当前目录的文件夹 |
open . |
打开命令行所在目录 |
rm -rf node_modules |
删除当前目录中的 node_modules 文件 |
mkdir test |
创建 test 文件夹 |
touch test.md |
创建 test.md 文件 |
mv test test1 |
讲 test 文件夹名字改成 test1 |
tig |
查看 commit 提交信息, 安装 tig |
pwd |
查看当前路径 |
| 命令 | 功能 |
|---|---|
cmd + d |
同标签内打开新建一个分栏 竖版 |
cmd + shift + d |
同标签内打开新建一个分栏 横版 |
cmd + t |
新建一个窗口切换用 |
cmd + shift + [( 或 ] ) |
切换不同窗口 |
cmd + [( 或 ] ) |
切换同标签内的不同分栏 (cmd + shift + d 之后) |
cmd + 数字 |
切换到数字窗口,如 cmd + 1 , 切换到 窗口 1 |
tab |
可以直接快速选择某一个文件,类似补全 |
cmd + + |
放大 |
cmd + - |
放小 |
control + a |
光标到最前面 |
control + e |
光标到最后面 |
| 命令 | 缩写 |
|---|---|
| git commit | gc |
| git add | ga |
| git push | gp |
| git fetch | gf |
| git merge | gm |
| git checkout | gco |
| git status | gst |
| git diff | gd |
| git remote | gr |
| 命令 | 缩写 |
|---|---|
: + x |
不保存退出 |
: + w + q |
保存退出 |
tldr sshj dir_nameag '\/#\/'fuck, 输出正确的。ll # 原样式查看
k # 美化样式查看
最近配置 webpack 4 的时候遇到有关 extract-text-webpack-plugin 的问题。
ERROR in ./src/assets/styles/views/home.scss
Module build failed: Error: "extract-text-webpack-plugin" loader is used without the corresponding plugin, refer to https://github.com/webpack/extract-text-webpack-plugin for the usage example
    at Object.pitch (/Users/lee/lee/vue-spa-template/tpltest3/node_modules/extract-text-webpack-plugin/dist/loader.js:59:11)
 @ ./src/main.js 2:0-39
 @ multi babel-polyfill ./src/main.js

ERROR in ./node_modules/em-fe/dist/css/emfe.css
Module build failed: Error: "extract-text-webpack-plugin" loader is used without the corresponding plugin, refer to https://github.com/webpack/extract-text-webpack-plugin for the usage example
    at Object.pitch (/Users/lee/lee/vue-spa-template/tpltest3/node_modules/extract-text-webpack-plugin/dist/loader.js:59:11)
 @ ./src/main.js 4:0-33
 @ multi babel-polyfill ./src/main.js
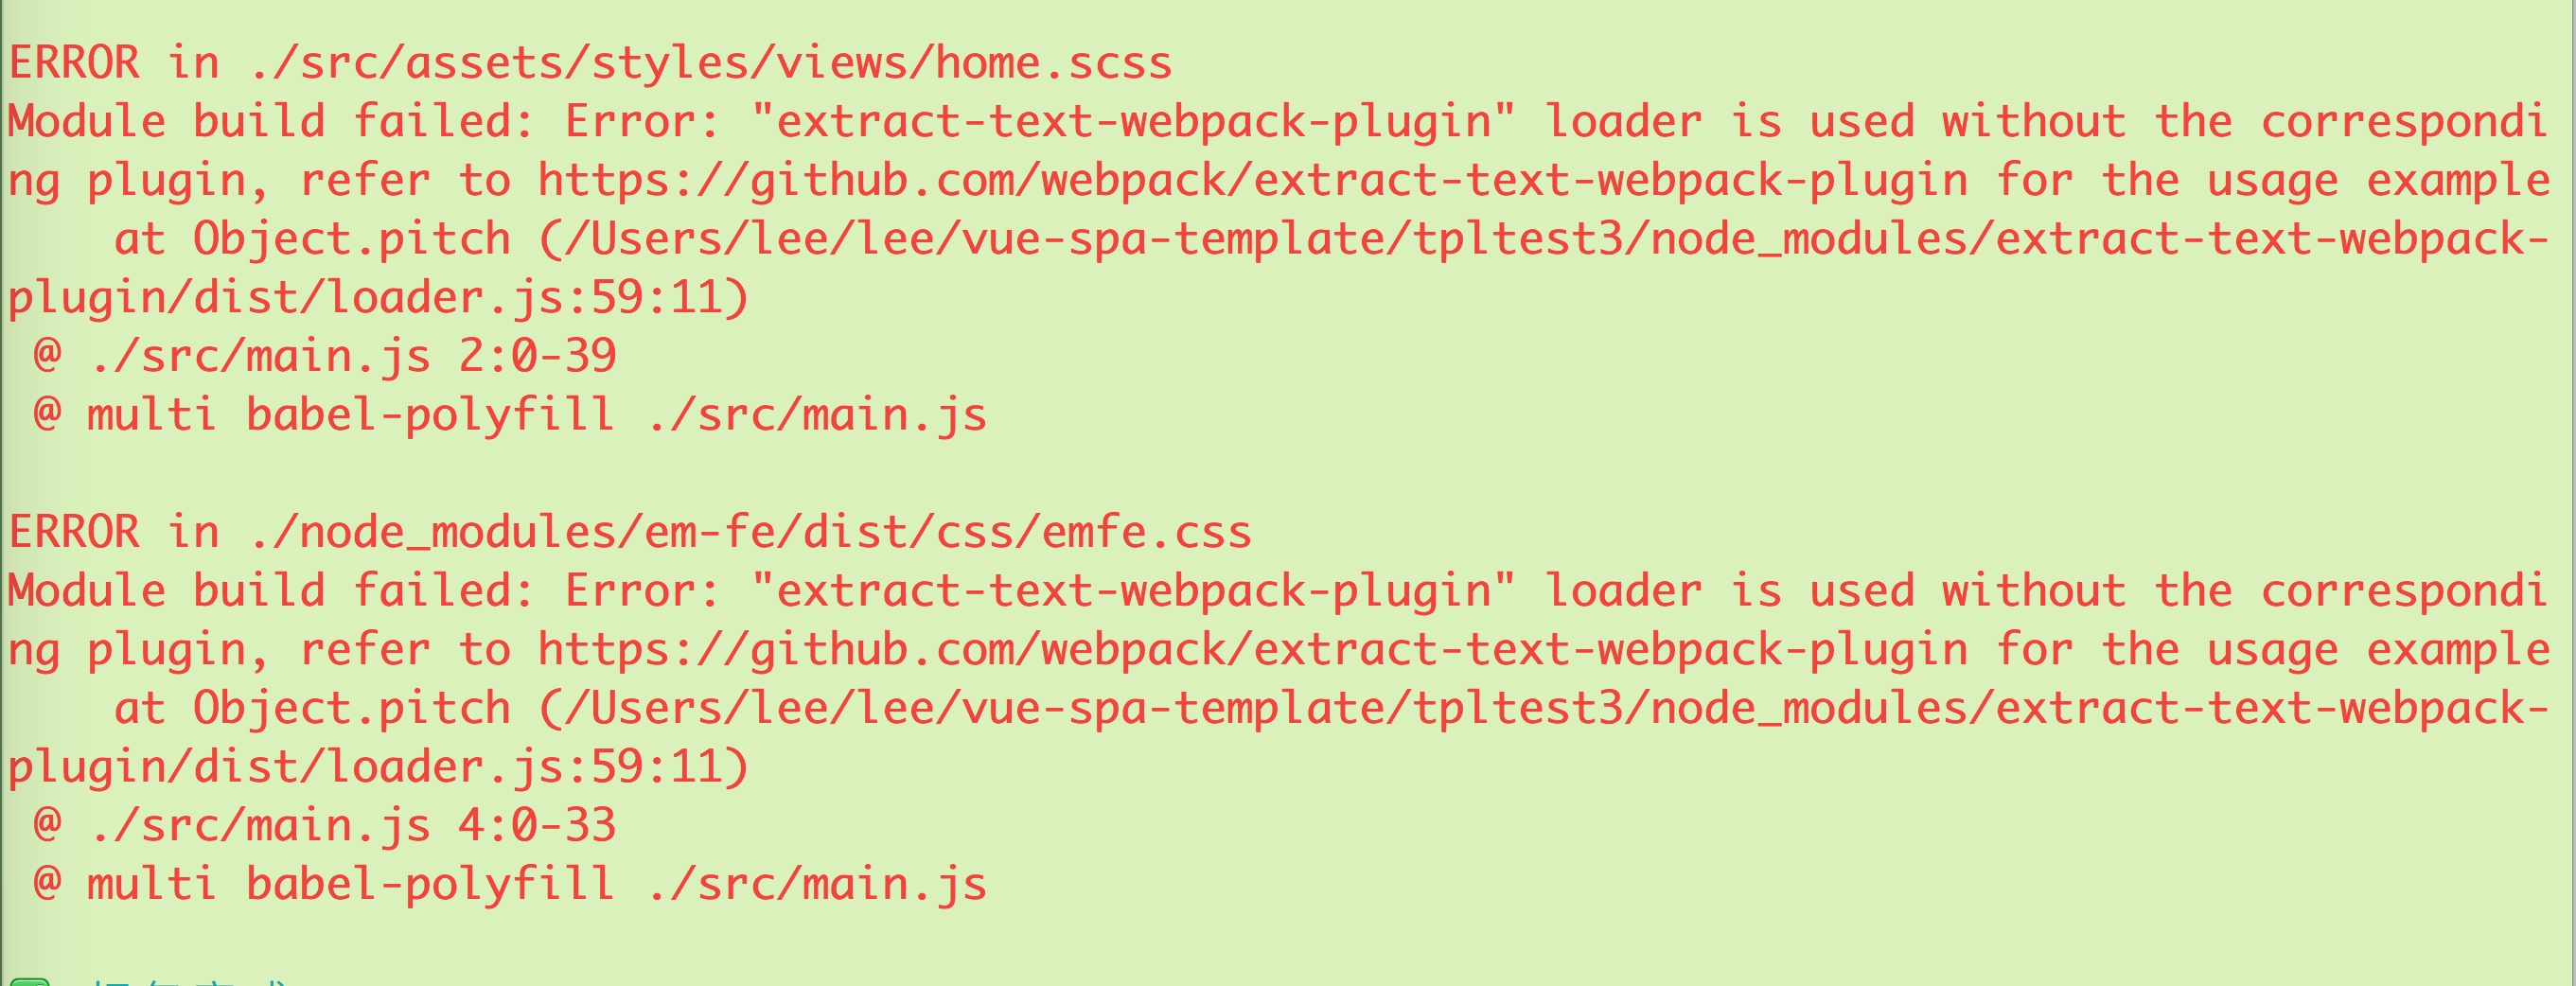
extract-text-webpack-plugin 并没有对 webpack 4 进行处理,所以替换成 mini-css-extract-plugin 即可。
更全的配置,请移步 176f224 。
jest 编写单元测之后,查看测试报告 File 中并没有包含测试的 vue 文件。
待测试文件 Icon.vue ,测试报告如下图
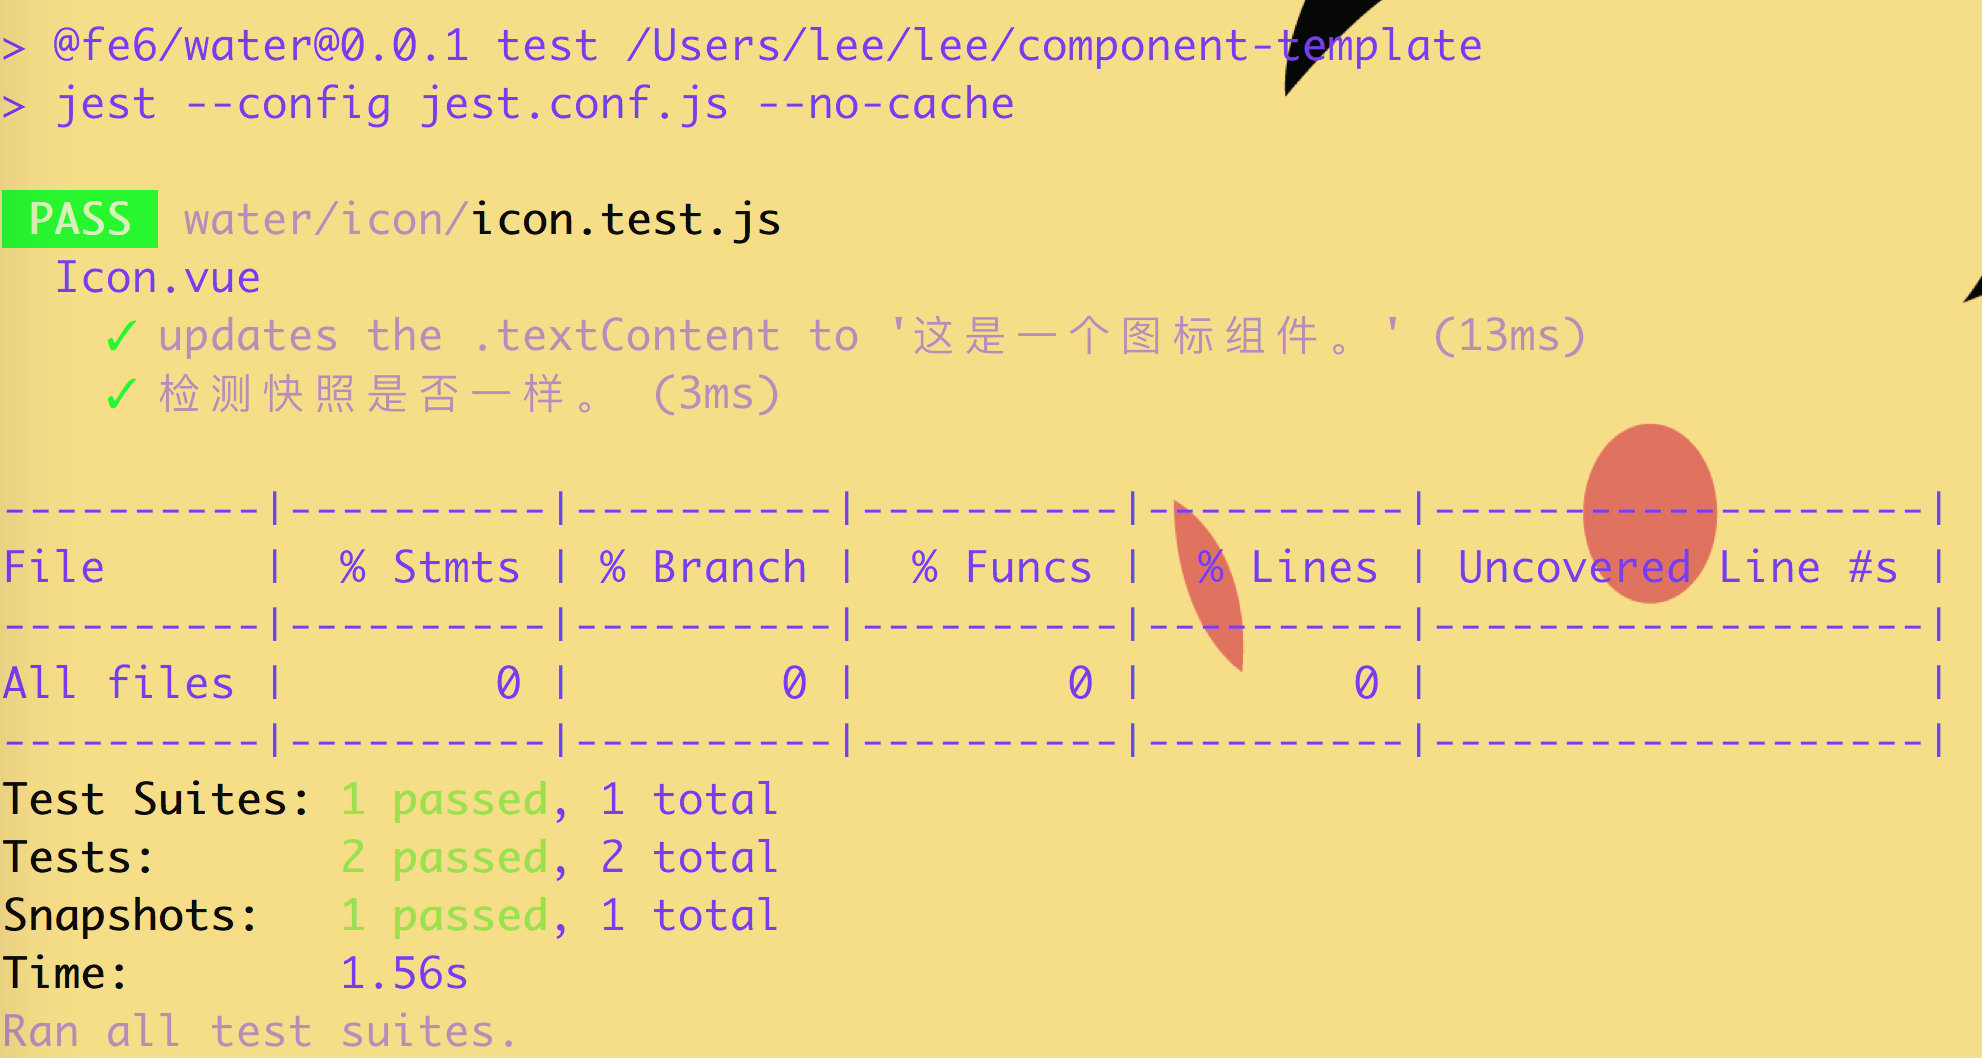
困扰我一天的问题,究竟出在哪里了,我查看了网上流传的各种 vue 的案例,都没啥问题。于是我仔细检查了一下我要测试 Icon.vue 文件。却发现了其中的奥妙所在。发现加上 data 这个方法之后,神奇般的就加入了这个文件
<template>
  <i>这是一个图标组件。</i>
</template>
<script>
export default {
  name: 'WIcon',
}
</script>
<template>
  <i>这是一个图标组件。</i>
</template>
<script>
export default {
  name: 'WIcon',
  data () {
    return {}
  }
}
</script>
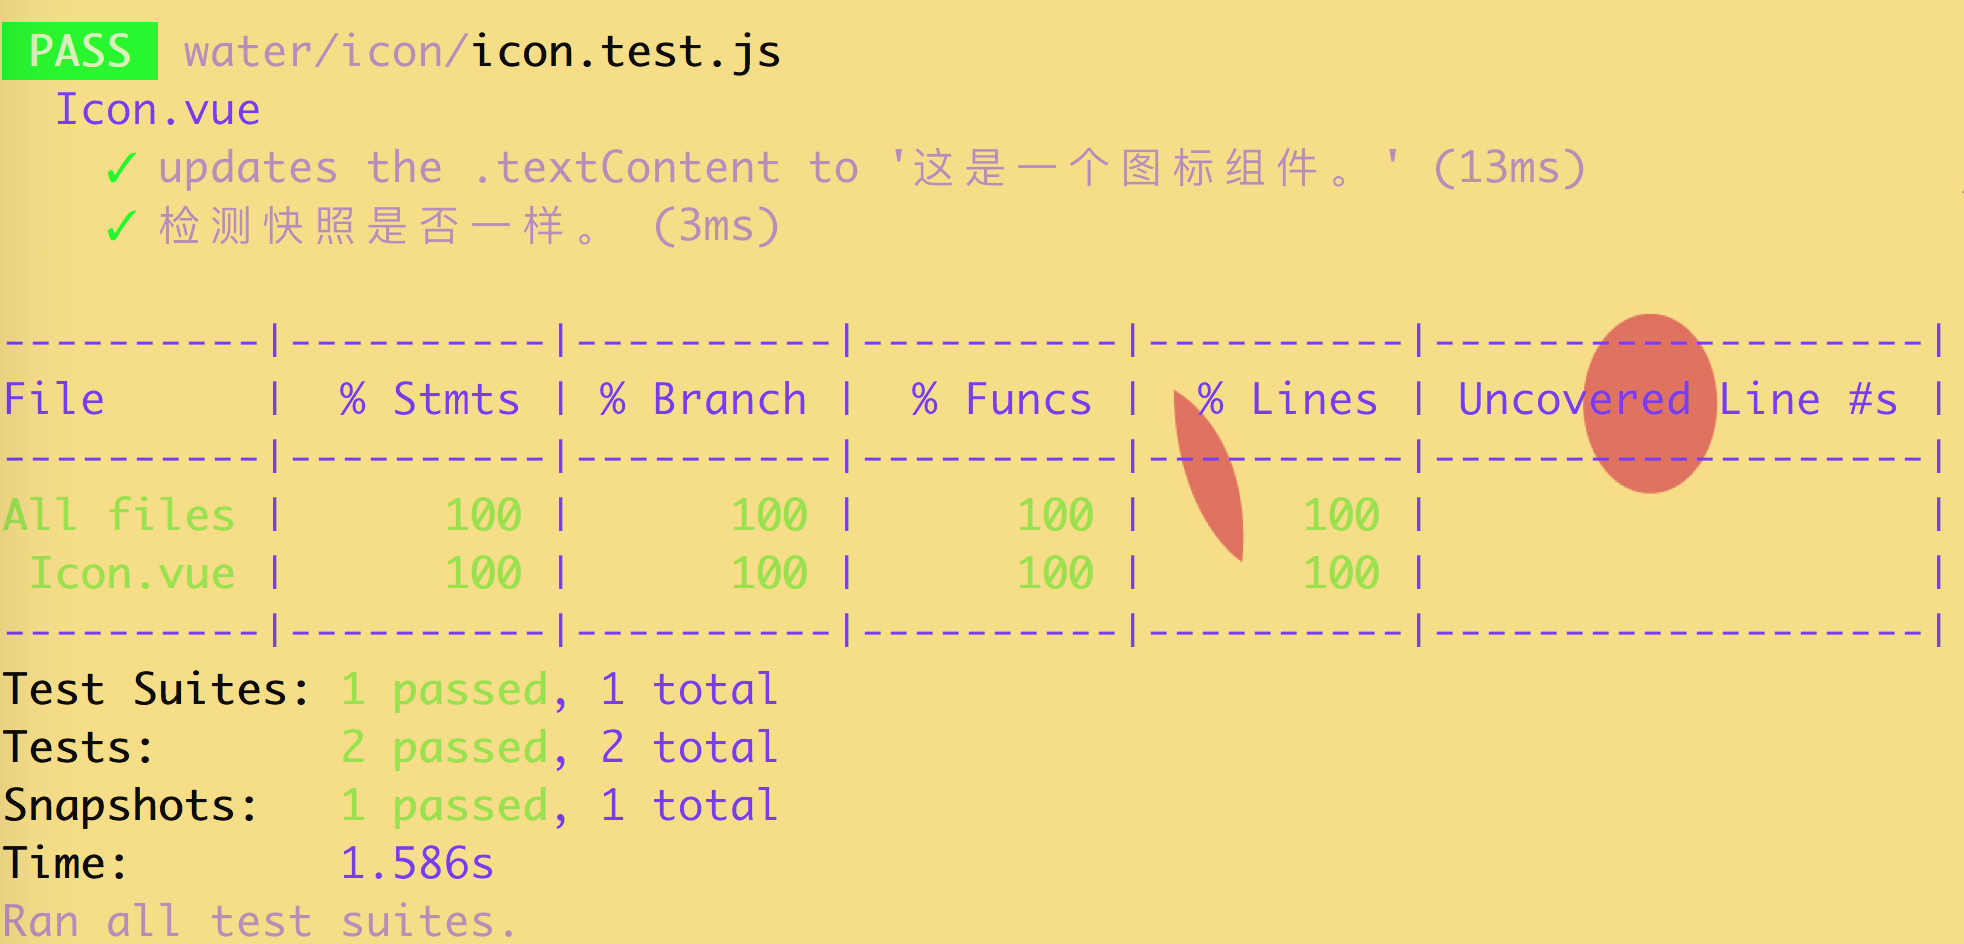
加入 data 参数之后,测试报告中神奇般的出现了 Icon.vue 文件。
更全的配置,请移步 component-template 。
环境
问题: 执行 yarn 安装依赖的时候抛出如下错误
gyp: No Xcode or CLT version detected!
gyp ERR! configure error
gyp ERR! stack Error: `gyp` failed with exit code: 1
gyp ERR! stack     at ChildProcess.onCpExit (/Users/lee/eventmosh/codelab/c-event/node_modules/node-gyp/lib/configure.js:345:16)
gyp ERR! stack     at ChildProcess.emit (events.js:180:13)
gyp ERR! stack     at Process.ChildProcess._handle.onexit (internal/child_process.js:209:12)
gyp ERR! System Darwin 18.2.0
gyp ERR! command "/Users/lee/.nvm/versions/node/v9.11.1/bin/node" "/Users/lee/eventmosh/codelab/c-event/node_modules/node-gyp/bin/node-gyp.js" "rebuild" "--verbose" "--libsass_ext=" "--libsass_cflags=" "--libsass_ldflags=" "--libsass_library="
gyp ERR! cwd /Users/lee/eventmosh/codelab/c-event/node_modules/node-sass
gyp ERR! node -v v9.11.1
gyp ERR! node-gyp -v v3.8.0
gyp ERR! not ok
Build failed with error code: 1
npm ERR! code ELIFECYCLE
npm ERR! errno 1
npm ERR! [email protected] postinstall: `node scripts/build.js`
npm ERR! Exit status 1
npm ERR!
npm ERR! Failed at the [email protected] postinstall script.
npm ERR! This is probably not a problem with npm. There is likely additional logging output above.

npm ERR! A complete log of this run can be found in:
npm ERR!     /Users/lee/.npm/_logs/2019-02-20T05_43_54_754Z-debug.log
xcode-select --installssh: Could not resolve hostname github.com: nodename nor servname provided, or not known
fatal: 无法读取远程仓库。
请确认您有正确的访问权限并且仓库存在。
问题分析: 网络出现了问题
解决方案: 重连网络,网络稳定之后再试。
{
  "builder": {
    "gc": {
      "defaultKeepStorage": "20GB",
      "enabled": true
    }
  },
  "registry-mirrors": [
    "https://1nj0zren.mirror.aliyuncs.com",
    "https://docker.mirrors.ustc.edu.cn",
    "http://f1361db2.m.daocloud.io",
    "https://registry.docker-cn.com"
  ]
}

配置 jest 进行单元测试的时候,如果 jest SyntaxError: Unexpected token import。那么肯定是 JavaScript 的语法没有降级处理。
> jest

FAIL  water/icon/icon.test.js
● Test suite failed to run

/Users/lee/lee/component-template/water/icon/icon.test.js:2
import { mount } from 'vue-test-utils';
^^^^^^

SyntaxError: Unexpected token import

at ScriptTransformer._transformAndBuildScript (node_modules/jest-runtime/build/script_transformer.js:316:17)
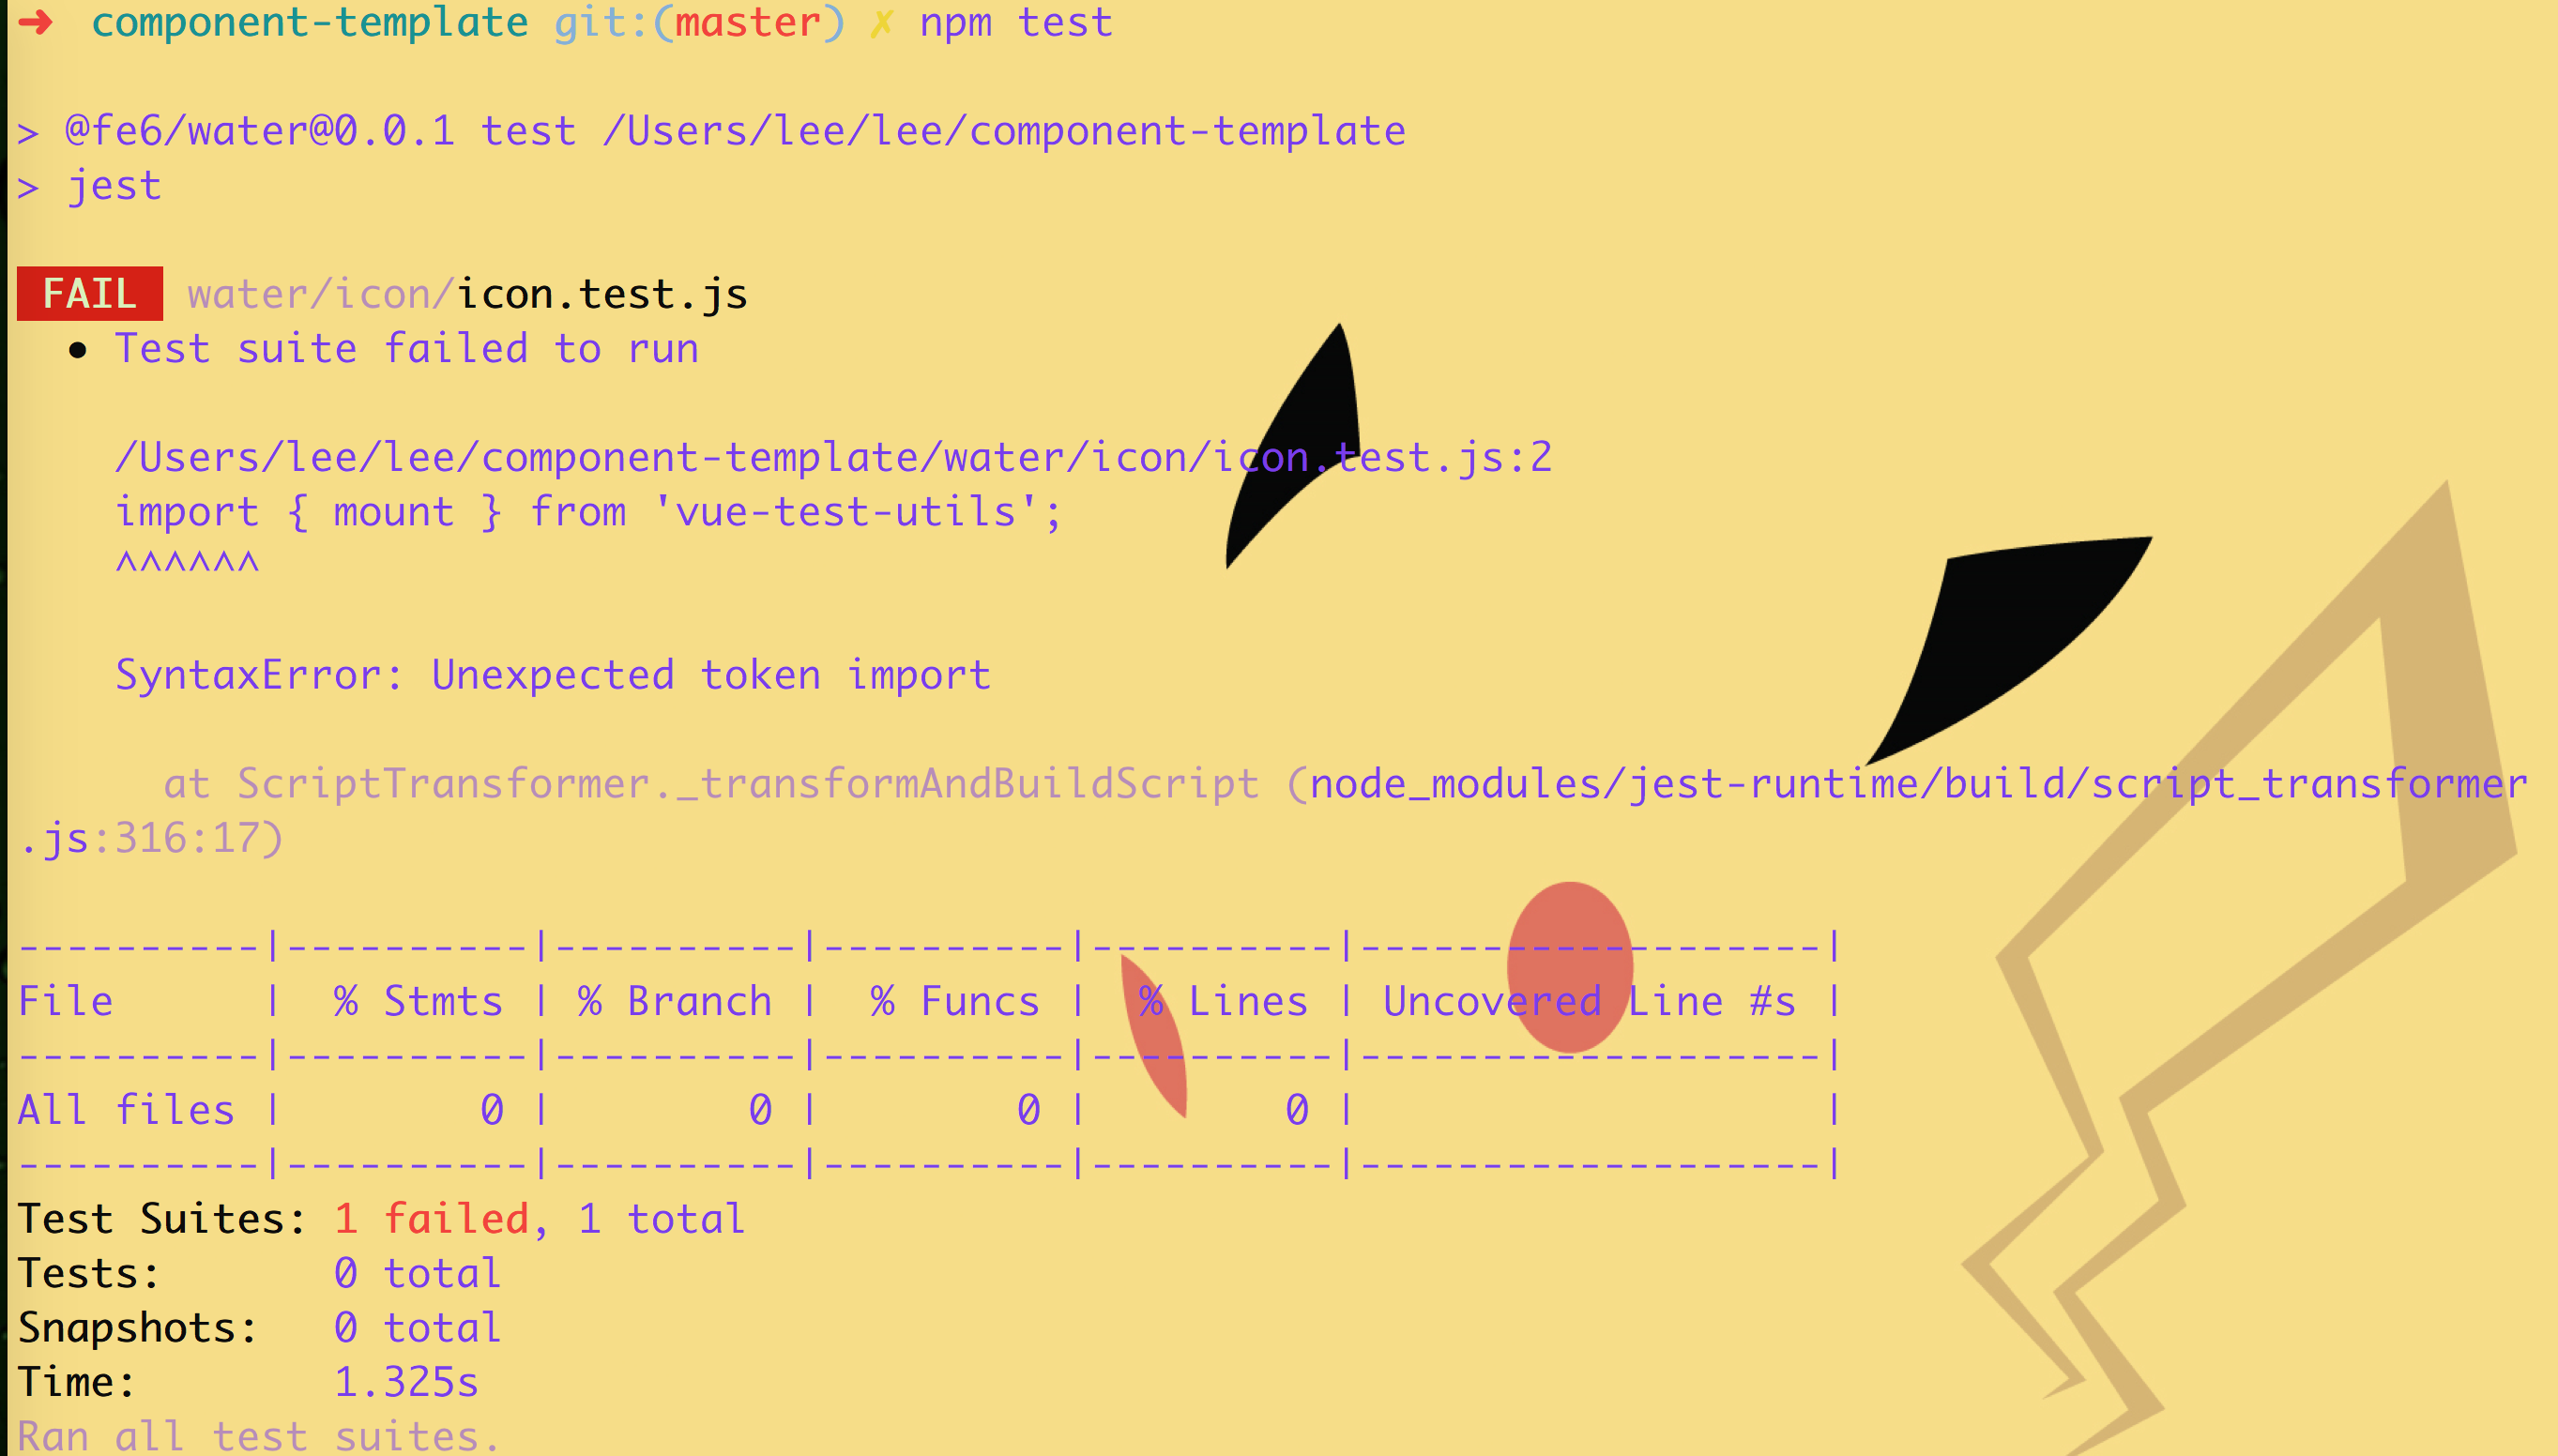
如果文件中有高级语法需要用 babel-jest 兼容处理,并且 babel 配置中不能有 modules 字段。
// package.json
"jest": {
  "transform": {
    ".*\\.(vue)$": "<rootDir>/node_modules/vue-jest"
  }
},
// .babelrc
{
  "presets": [
    ["env", {
      "modules": false,
      // other config
    }]
  ]
}
// package.json
"jest": {
  "transform": {
    ".*\\.(vue)$": "<rootDir>/node_modules/vue-jest",
    ".*\\.(js)$": "<rootDir>/node_modules/babel-jest"
  }
},
// .babelrc
{
  "presets": [
    ["env", {
      // other config
    }]
  ]
}
更全的配置,请移步 component-template 。
TS2322: Type 'string' is not assignable to type '"default" | "small" | "large"'

因为属性中有没有用的属性混合在一起,整理一下 paginationConfig 属性即可。
用axios发送请求获取reponse header中的数据,需要提前在后台添加设置过滤器头部配置、自定义头部属性、并打开过滤器。
然后就是前端发送请求,然后获取reponse headers里面的自定义属性。然后发现获取的永远是下面的几个属性:
Object {
  cache-control:"private, must-revalidate",
  content-type:"application/json"
}
查看 Network ,发现 ajax 请求中 header 头中确实有 Authorization 字段。如果想让浏览器能访问到其他的 响应头的话:需要在服务器上设置 Access-Control-Expose-Headers
Access-Control-Expose-Headers : 'Authorization'
结果:

Actions 是前几年 GitHub 新推出的一个功能,就像是一种工作流。 Actions 可以进行代码审查,可以测试代码,还以干更多的事情,很多大厂的开源项目中都配置了 Actions 。
现在,我们有一个项目。这个项目很简单。有一个 Flat 方法的 JavaScript 文件,还有一个简单的 Sass 文件。在 Package.json 中配置了语法检测和单元测试的 Scripts 。今天我们就一起配置一个能够代码检查,单元测试,发送单元测试报告的 Actions 。
点击仓库导航中的 Actions 按钮,就会出现如下页面。上面是要保存的文件名字,我们把它修改成 ci.yml 。下面分两栏,左边就是我们要编写的 Actions 脚本的地方,右面是 Actions 市场,里面有很多不错的 Actions 。

要写 Actions ,就要了解 Actions 中的关键词。
| 关键词 | 描述 |
|---|---|
| name | 当前 Actions 的名字 |
| on | 触发 Actions 的操作,如 push (本地提交代码) , pull_request (合并代码) |
| jobs | 工作流的名字,下面会分很多的工作流 |
| runs-on | 运行系统 |
| steps | 操作步骤 |
我们把语法检测命名为 lint 。修改 jobs 中的代码。代码如下:
name: CI

on: [push]

jobs:
  lint:
    runs-on: ubuntu-latest # 添加 ubuntu-latest 的运行系统
    steps:
      - uses: actions/checkout@v1 # 获取到最新代码
      - uses: actions/setup-node@v1 # 设置 Node 版本
        with: # 用
          node-version: '12.x' # Node 12.x 版本
      - uses: borales/[email protected] # 采用 yarn 安装依赖
        with:
          cmd: install # 将运行 `yarn install` 命令
      - name: Get yarn cache # 设置当前工作流名字
        id: yarn-cache # 缓存的 ID
        run: echo "::set-output name=dir::$(yarn cache dir)" # 运行命令

      - uses: actions/cache@v1
        with:
          path: ${{ steps.yarn-cache.outputs.dir }}
          key: ${{ runner.os }}-yarn-${{ hashFiles('**/yarn.lock') }}
          restore-keys: |
            ${{ runner.os }}-yarn-
      - uses: borales/[email protected]
        with:
cmd: lint # 将运行 `yarn lint` 命令在配置之前,我们现需要配置一下 secrets.CODECOV_TOKEN 。 secrets.CODECOV_TOKEN 是从 codecov 网站上获取的,需要加到项目中。具体步骤如下图所示:

我们把语法检测命名为 test 。修改 jobs 中的代码。代码如下:
jobs:
  test:
    runs-on: ubuntu-latest # 添加 ubuntu-latest 的运行系统
  steps:
    - uses: actions/checkout@v1 # 获取到最新代码
    - uses: actions/setup-node@v1 # 设置 Node 版本
      with: # 用
        node-version: '12.x' # Node 12.x 版本
    - uses: borales/[email protected] # 采用 yarn 安装依赖
      with:
        cmd: install # 将运行 `yarn install` 命令
    - name: Get yarn cache # 设置当前工作流名字
      id: yarn-cache # 缓存的 ID
      run: echo "::set-output name=dir::$(yarn cache dir)" # 运行命令

    - uses: actions/cache@v1
      with:
        path: ${{ steps.yarn-cache.outputs.dir }}
        key: ${{ runner.os }}-yarn-${{ hashFiles('**/yarn.lock') }}
        restore-keys: |
          ${{ runner.os }}-yarn-
    - uses: borales/[email protected]
      with:
        cmd: test # 将运行 `yarn test` 命令
    - name: Upload coverage to Codecov # 设置当前工作流名字
      id: coverage-codecov
      uses: codecov/[email protected]
      with:
        name: test-action # 上传报告的名字
        token: ${{ secrets.CODECOV_TOKEN }} # 秘钥
        file: ./coverage/clover.xml # 生成的单元测试
        flags:  unittests # 单元测试 标识
        yml: ./codecov.yml # codecov 的配置
fail_ci_if_error: true # 上传单元报告失败是否整个 Actions 失败GitHub 美丽的 Actions 就为大家介绍到这里。今天,我们一起认识了 Actions ,并且又尝试的配置了一些 Actions。文中的一些讲解只是我目前的简单理解,欢迎大家狂喷哟。
完!感谢!
ssh: Could not resolve hostname github.com: nodename nor servname provided, or not known
fatal: Could not read from remote repository.

Please make sure you have the correct access rights
and the repository exists.
fatal: unable to access 'https://github.com/iq9891/menu.git/': Could not resolve host: github.com
在 github 命令行操作的过程中,报上面的错误。
运行 ping github.com 报下面的错误
ping: cannot resolve github.com: Unknown host
解决方案是查看 本电脑 DNS 设置, 运行 networksetup -getdnsservers Wi-Fi , 删除没用的 DNS 即可。上述 github 问题是多了 8.8.8.8 的 DNS 配置,删除即可好用。
通讯录组件问题,为方便定位,请按以下模板提供详细要素:
问题描述:ww-open-data组件在 vue3 配合 vite 打包之后process为什么未定义?
config参数list:
{"config":{"corpid":"wwf83b477b023de641","agentid":"1000085","timestamp":"1615281812","nonceStr":"lr5RZogWds","signature":"e0bcb2a067da7405553b72441ed375d6f4ab19d7","jsApiList":["selectEnterpriseContact","openUserProfile","selectExternalContact","getCurExternalContact","getCurExternalChat","sendChatMessage","getContext","openEnterpriseChat","onMenuShareAppMessage","onMenuShareWechat","onMenuShareTimeline","shareAppMessage","shareWechatMessage","shareToExternalContact","shareToExternalChat","onHistoryBack","hideOptionMenu","showOptionMenu","hideMenuItems","showMenuItems","hideAllNonBaseMenuItem","showAllNonBaseMenuItem","closeWindow","openDefaultBrowser","onUserCaptureScreen","scanQRCode","chooseInvoice","enterpriseVerify","chooseImage","previewImage","uploadImage","downloadImage","getLocalImgData","startRecord","stopRecord","onVoiceRecordEnd","playVoice","pauseVoice","stopVoice","onVoicePlayEnd","uploadVoice","downloadVoice","translateVoice","previewFile","startWifi","stopWifi","connectWifi","getWifiList","onGetWifiList","onWifiConnected","getConnectedWifi","openBluetoothAdapter","closeBluetoothAdapter","getBluetoothAdapterState","onBluetoothAdapterStateChange","startBluetoothDevicesDiscovery","stopBluetoothDevicesDiscovery","getBluetoothDevices","onBluetoothDeviceFound","getConnectedBluetoothDevices","createBLEConnection","closeBLEConnection","onBLEConnectionStateChange","getBLEDeviceServices","getBLEDeviceCharacteristics","readBLECharacteristicValue","writeBLECharacteristicValue","notifyBLECharacteristicValueChange","onBLECharacteristicValueChange","startBeaconDiscovery","stopBeaconDiscovery","getBeacons","onBeaconUpdate","onBeaconServiceChange","setClipboardData","getNetworkType","onNetworkStatusChange","openLocation","getLocation","startAutoLBS","stopAutoLBS","onLocationChange"],"url":"http://center.dev.emplusys.com:8000/operate/contact"},"sid":"+vR4ora0Io59+3FlZbaDaeZydSX/QMsQ15srTLlXpH3KtlPV4KKQfgv10wW/kSRXKvBOapd8YyBAIwOCz6hjX5lD/JHIZ/ho6klwlZEjlbM1XpajaFbI0wFQETA5Ln9A3B5g6Tvqkx/oVayY/Bn2Dg=="}
测试者手机号:电脑设备
调用接口:https://open.work.weixin.qq.com/wwopen/openData/agentConfig?f=json
出现问题时间点(具体到月日时分):2021-03-09 17:25
平台(微信、企业微信、外部浏览器 & 什么系统):外部谷歌浏览器(谷歌无痕),mac 版谷歌
域名:http://center.dev.emplusys.com:8000
提供对应的值即(若 type=userName,此时 openid 对应 userid ;若 type=departmentName,此时 openid 对应 departmentid):
具体表现(对象不存在、调用报错、没反应)的截图:


因为谷歌浏览器的无痕模式,默认设置-隐私设置与安全性-Cookie及其他网站数据-常规设置中是在无痕模式下阻止第三方Cookie,所以在调用 方法之后在发起 https://open.work.weixin.qq.com/wwopen/openData/checkSession?f=json 的同时种 Cookie 的操作不管用,所以就报错了。设置成允许所有 Cookie 即可。
extract-text-webpack-plugin ,只支持 webpack 4 以下提取 CSS 文件,那么 webpack 4 怎么办呢?下面就为大家详细介绍 webpack 4 提取 CSS 文件的配置方法。
yarn add mini-css-extract-plugin
需要注意的是
MiniCssExtractPlugin.loader和style-loader由于某种原因不能共存。
// webpack.config.js

var MiniCssExtractPlugin = require("mini-css-extract-plugin");

module.exports = {
  // other options...
  module: {
    rules: [
    {
      test: /.scss$/,
      use: [
        MiniCssExtractPlugin.loader,
        'css', 'sass',
      ]
    },
    ]
  },
  plugins: [
    new MiniCssExtractPlugin({
      filename: 'style.css'
    })
  ]
}
这里只展示关于提取 CSS 的代码。
// build/webpack.prod.conf.js

var MiniCssExtractPlugin = require("mini-css-extract-plugin");

var webpackConfig = merge(baseWebpackConfig, {
  // other options...
  plugins: [
    // 提取
    new MiniCssExtractPlugin({
      filename: utils.assetsPath('css/[name].[contenthash].css')
    })
  ]
})
// build/utils.js

var MiniCssExtractPlugin = require("mini-css-extract-plugin");

// other options...
if (options.extract) {
  return [MiniCssExtractPlugin.loader].concat(loaders)
} else {
  return ['vue-style-loader'].concat(loaders)
}
更全的配置,请移步 176f224 。
正所谓一个好的前端必须手里有些好用的工具。我认为前端标配应该是顶配 MAC pro 15 寸电脑,苹果鼠标,机械键盘等。那么对于刚有实力从 Windows 过度到 Mac 的同学可能一时不知道怎么用 Mac 才是正确的高逼格的姿势,怎么配置一个面向前端的 Mac 电脑。下面就为大家揭晓从零开始一步一步让大家飞起来。

ERROR in ./components/upload-name/src/UploadName.vue?vue&type=template&id=aa469cec 2:2
Module parse failed: Unexpected token (2:2)
File was processed with these loaders:
 * ./node_modules/vue-loader/dist/index.js
You may need an additional loader to handle the result of these loaders.
|
>   <div :class="`${prefixClsNew}-wrapper`">
|     <div :class="prefixClsNew">
|       <a-upload
在 webpack 配置中检查是否引入并使用 require('vue-loader').VueLoaderPlugin;
const vueLoaderPlugin = require('vue-loader').VueLoaderPlugin;

const weboackConfig = {
    plugins: [
        // ... other config
       new vueLoaderPlugin(),
    ]
}
Vue.js 是目前比较流行的前端框架之一,那么开发一个基于 Vue.js 的组件是每个前端的心愿。在每次开发新的 Vue.js 组件的时候,都会做的事情有下面几项:
那么为什么不把这些工作有效的提炼出来,让他一键生成呢?目前一键生成的工具有很多,如 yeoman 等。yeoman 搭建项目需要提供 yeoman 的脚手架包 。 yeoman 的脚手架包本质上就是一个具备完整文件结构的项目样板,用户需要手动地把这些脚手架包下载到本地,然后 yeoman 就会根据这些脚手架包自动生成各种不同的项目。
yeoman 固然好用,但总是多了一步很是麻烦,还得下载脚手架包。市面上还流行 cli 技术,就是针对远程仓库的模板根据一些配置拉取到本地。显然 cli 的模式很好,不用下载就可以。我们依据这个原理自己搭建了一款叫做 fecli 的脚手架。
一张图说明整体的架构。
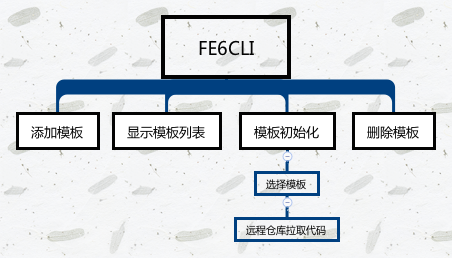
模板 就是未来拉取下来的东西。这个模板里往往会有一些环境的配置,语法检测的配置,单元测试的配置,持续集成的配置等。
模板的相关信息会存放在 templates.json 文件中。用户也可以通过一些命令操作 templates.json 中的内容。
.
├── bin/                     # 运行命令的入口文件
│   └── ...
├── lib/                      # 核心代码
│   ├── table.js              # 模板列表表格形式的封装
│   ├── tip.js                # 终端提示信息的封装
│   ├── cli/                  # 命令管理
│   │   └── ...
│   └── cmd/                  # 命令操作
│   │   └── ...
├── public/                   # 命令预览
│   └── ...
└── templates.json # 模板管理新建一个目录 mkdir fecli ,并进入 cd fecli 。然后 npm 初始化一下 npm init 。 为了可以全局使用,我们需要在 package.json 里面设置一下:
"bin": {
  "fe": "./bin/fe.js"
},
本地调试的时候,在项目根目录下执行: npm link 。
即可把 fecli 命令绑定到全局,以后就可以直接以 fe 作为命令开头。
在 package.json 里面写入依赖并执行 npm install 或者 yarn install:
"dependencies": {
  "chalk": "^2.3.2",
  "co": "^4.6.0",
  "co-prompt": "^1.0.0",
  "commander": "^2.15.1",
  "ora": "^2.0.0"
}
在根目录下建立 \bin 文件夹,在里面建立一个 fe.js 文件。这个 bin/fe.js 文件是整个脚手架的入口文件,所以我们首先对它进行编写。
首先是一些初始化的代码,很简单就是引用了一下命令管理的文件(lib/cli/index.js):
require('../lib/cli/');
首先是一些初始化的事情:
const program = require('commander');
const packageInfo = require('../../package.json');


program
    .version(packageInfo.version)
我们通过 commander 来设置不同的命令。 command 方法是设置命令的名字。 description 方法是设置描述。 alias 方法是设置简写。 action 方法是设置回调。
program
    .command('init') // fe init
    .description('生成一个项目')
    .alias('i') // 简写
    .action(() => {
      require('../cmd/init')();
    });

program
    .command('add') // fe add
    .description('添加新模板')
    .alias('a') // 简写
    .action(() => {
      require('../cmd/add')();
    });

program
    .command('list') // fe list
    .description('查看模板列表')
    .alias('l') // 简写
    .action(() => {
      require('../cmd/list')();
    });

program
    .command('delete') // fe delete
    .description('删除模板')
    .alias('d') // 简写
    .action(() => {
      require('../cmd/delete')();
    });
如果没有参数,运行帮助方法。接下来是解析 program.args 中的参数:
program.parse(process.argv);

if(!program.args.length){
  program.help()
}
运行 fe 之后的结果:
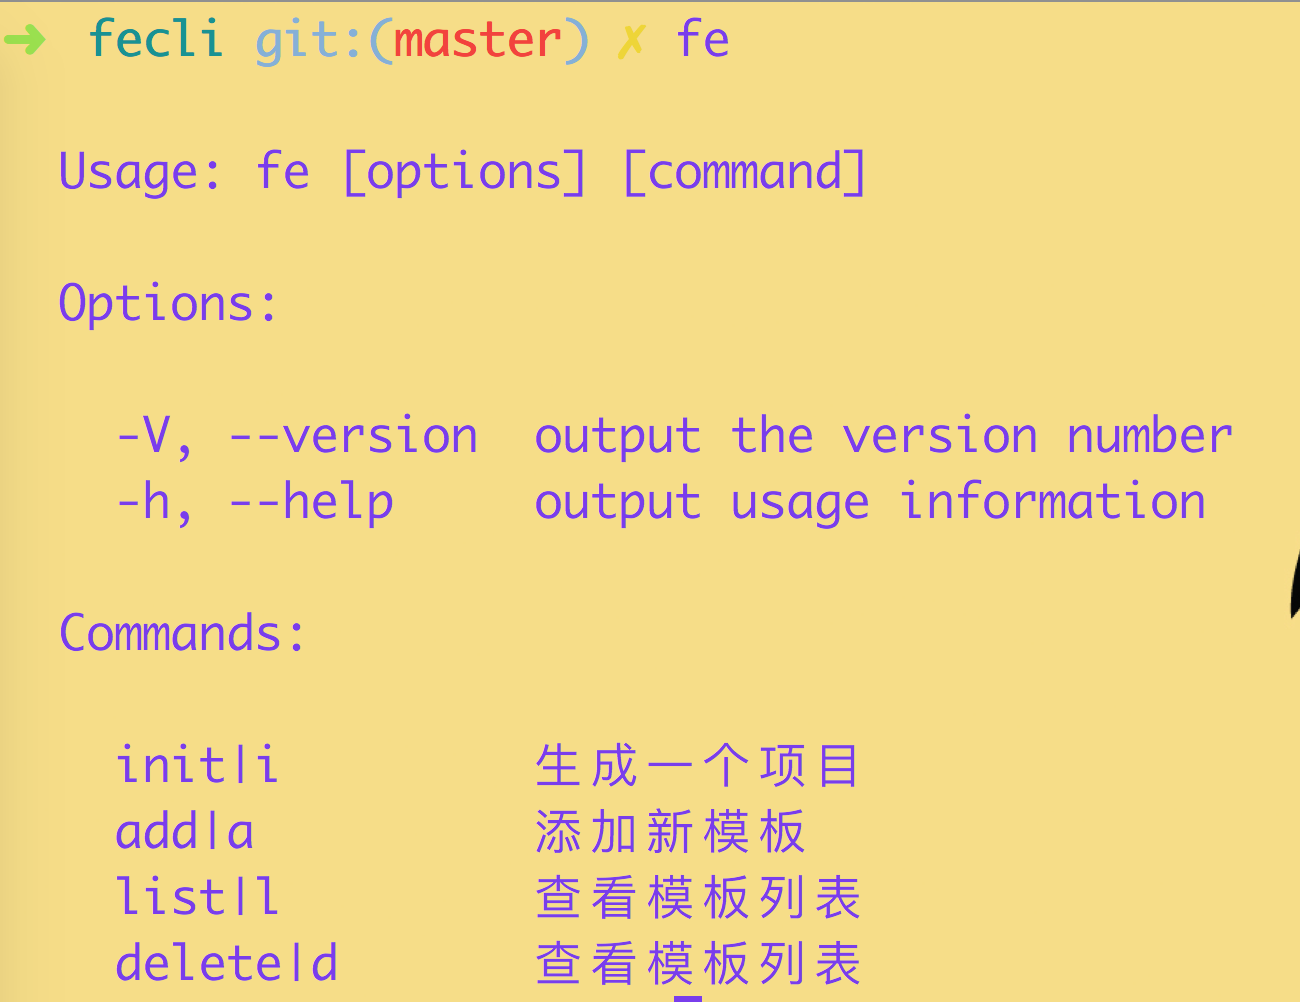
commander 的具体使用方法在这里就不展开了,可以直接到官网去看详细的文档。
在项目根目录下建立 /lib/cmd 文件夹,专门用来存放命令处理文件。
在根目录下建立 templates.json 文件并写入如下内容,用来存放模版信息:
{"tpl":{}}
fe add)进入 /lib/cmd 并新建 add.js 文件。
'use strict'
const co = require('co');
const prompt = require('co-prompt');
const fs = require('fs');

const table = require('../table');
const tip = require('../tip');
const tpls = require('../../templates');

const writeFile = (err) => {
  // 处理错误
  if (err) {
    console.log(err);
    tip.fail('请重新运行!');
    process.exit();
  }

  table(tpls);
  tip.suc('新模板添加成功!');
  process.exit();
};

const resolve = (result) => {
  const { tplName, gitUrl, branch, description, } = result;
  // 避免重复添加
  if (!tpls[tplName]) {
    tpls[tplName] = {};
    tpls[tplName]['url'] = gitUrl.replace(/[\u0000-\u0019]/g, ''); // 过滤unicode字符
    tpls[tplName]['branch'] = branch;
    tpls[tplName]['description'] = description;
  } else {
    tip.fail('模板已经存在!');
    process.exit();
  };

  // 把模板信息写入templates.json
  fs.writeFile(__dirname + '/../../templates.json', JSON.stringify(tpls), 'utf-8', writeFile);
};

module.exports = () => {
  co(function *() {
    // 分步接收用户输入的参数
    const tplName = yield prompt('模板名字: ');
    const gitUrl = yield prompt('Git https 链接: ');
    const branch = yield prompt('Git 分支: ');
    const description = yield prompt('模板描述: ');
    return new Promise((resolve, reject) => {
      resolve({
        tplName,
        gitUrl,
        branch,
        description,
      });
    });
  }).then(resolve);
};
fe delete)进入 /lib/cmd 并新建 delete.js 文件。
'use strict'
const co = require('co');
const prompt = require('co-prompt');
const fs = require('fs');

const table = require('../table');
const tip = require('../tip');
const tpls = require('../../templates');

const writeFile = (err) => {
  if (err) {
    console.log(err);
    tip.fail('请重新运行!');
    process.exit();
  }
  tip.suc('新模板删除成功!');

  if (JSON.stringify(tpls) !== '{}') {
    table(tpls);
  } else {
    tip.info('还未添加模板!');
  }

  process.exit();
};

const resolve = (tplName) => {
  // 删除对应的模板
  if (tpls[tplName]) {
    delete tpls[tplName];
  } else {
    tip.fail('模板不经存在!');
    process.exit();
  }

  // 写入template.json
  fs.writeFile(__dirname + '/../../templates.json', JSON.stringify(tpls), 'utf-8', writeFile);
};

module.exports = () => {
  co(function *() {
    // 分步接收用户输入的参数
    const tplName = yield prompt('模板名字: ');
    return new Promise((resolve, reject) => {
      resolve(tplName);
    });
  }).then(resolve);
};
fe init)进入 /lib/cmd 并新建 init.js 文件。
'use strict'
// 操作命令行
const exec = require('child_process').exec;
const co = require('co');
const ora = require('ora');
const prompt = require('co-prompt');

const tip = require('../tip');
const tpls = require('../../templates');

const spinner = ora('正在生成...');

const execRm = (err, projectName) => {
  spinner.stop();

  if (err) {
    console.log(err);
    tip.fail('请重新运行!');
    process.exit();
  }

  tip.suc('初始化完成!');
  tip.info(`cd ${projectName} && npm install`);
  process.exit();
};

const download = (err, projectName) => {
  if (err) {
    console.log(err);
    tip.fail('请重新运行!');
    process.exit();
  }
  // 删除 git 文件
  exec('cd ' + projectName + ' && rm -rf .git', (err, out) => {
    execRm(err, projectName);
  });
}

const resolve = (result) => {
  const { tplName, url, branch, projectName, } = result;
  // git命令,远程拉取项目并自定义项目名
  const cmdStr = `git clone ${url} ${projectName} && cd ${projectName} && git checkout ${branch}`;

  spinner.start();

  exec(cmdStr, (err) => {
    download(err, projectName);
  });
};

module.exports = () => {
 co(function *() {
    // 处理用户输入
    const tplName = yield prompt('模板名字: ');
    const projectName = yield prompt('项目名字: ');

    if (!tpls[tplName]) {
      tip.fail('模板不存在!');
      process.exit();
    }

    return new Promise((resolve, reject) => {
      resolve({
        tplName,
        projectName,
        ...tpls[tplName],
      });
    });
  }).then(resolve);
}
fe list)进入 /lib/cmd 并新建 list.js 文件。
'use strict'
const table = require('../table');

module.exports = () => {
  table(require('../../templates'));
  process.exit();
};
现在我们的 fecli 脚手架工具已经搭建好了,一起来尝试一下吧!
fe add 添加模板
fe delete 添加模板
fe list 添加模板
fe init 添加模板
更多源码信息请移步 fecli 。
封装一个图标组件,可以配置某一个图标,可以设置是否旋转,可以追加字体图标。特点简单实用,灵活可配。
封装一个图标组件首先从一个 vue 文件开始,其主要的结构就是一个 i 标签。最关键的就是这个 class 名的配置。有一个共有的 w-icon 类名负责自定义字体,这个字体就是从字体图标工具中下载的包括自定义字体图标的字体,还包括一些共有的样式。
光有一个共有的类名可不行,不同的字体图标是通过不同的 class 名配置的,我们得需要一个 prop 来设置显示的字体图标,我们把这个 prop 设定为 type ,类型为 String 。如果不传类型的时候,我们就不显示这个 icon 。
这里有一个高级功能那就是可配置的旋转动画。我们需要一个 prop 来设置是否需要旋转动画,我们把这个 prop 设定为 spin ,类型为 Boolean 。如果为 true ,那么我们就让它转起来。
w-icon 默认前缀为 w ,如果您需要扩展字体图标,或者需要自定义样式,我们为您提供了一个 prop 。专为此事而行,这个 prop 我们设定为 prefix ,类型为 String ,默认为 w 。
<template>
  <i
    v-if="type"
    :class="[`${prefix}-font`,`${prefix}-${type}`, {
      'w-spin': !!spin,
    }]"
  ></i>
</template>

<script>
export default {
  name: 'WIcon',
  props: {
    type: String,
    spin: Boolean,
    prefix: {
      type: String,
      default: 'w',
    },
  },
  data() {
    return {};
  },
};
</script>
我们已经有一个像样的 vue 文件,那么我们还需要让 vue 的 icon 组件美起来的样式文件。这里我们选择的预处理器为 SCSS 。在这个样式文件中,我们需要做三件事
w-spin这里我们利用 CSS3 的自定义字体的属性来完成这项使命。需要注意的是根据不同浏览器支持的字体后缀来做好适配。
声明好字体之后,就可以用了。用法和普通设置字体是一样的,名字就用之前咱们设置好的就可以了。除了设置字体之外,我们还需要做一些特殊处理。如居中等。设置 text-rendering 为 optimizeLegibility 。它使得对于某些字体(例如,Microsoft的Calibri,Candara,Constantia和Corbel或DejaVu字体系列),文本中的连字(ff,fi,fl等)小于20px。
这个就是根据导出的字体图标,在 before 伪元素中设置字体图标的内容即可。如果有共同特点,如 w-loading1 , w-loading2 等,可以实用 sass 中的循环来优化写法。
w-spin这里使用了 CSS3 中的 动画属性 (animation) 。让它执行 loadingCircle 动画,并且无线的匀速执行下去,每次动画时间为 1 秒。
利用 @keyframes 关键字声明一个动画,名为 loadingCircle 。在最开始的时候旋转基点定为图标中心点,并旋转角度为 0 度。在最结束的时候定义旋转基点定为图标中心点,并旋转角度为 1 圈( trun )。
$font-name: "iconfont";
$font-version: 1524475512080;
$font-prefix: 'w-';
$font-path: './icon/font/';

@font-face {
  font-family: $font-name;
  src: url('#{$font-path}iconfont.eot?t=#{$font-version}');
  src:
    url('#{$font-path}iconfont.eot?t=#{$font-version}#iefix') format('embedded-opentype'),
    url("#{$font-path}iconfont.woff?t=#{$font-version}") format("woff"),
    url('#{$font-path}iconfont.ttf?t=#{$font-version}') format('truetype'),
    url('#{$font-path}iconfont.svg?t=#{$font-version}#iconfont') format('svg');
}

.#{$font-prefix}font {
  font-family: $font-name !important;
  -webkit-font-smoothing: antialiased;
  -moz-osx-font-smoothing: grayscale;
  display: inline-block;
  font-style: normal;
  vertical-align: baseline;
  text-align: center;
  text-transform: none;
  line-height: 1;
  text-rendering: optimizeLegibility;
}

.#{$font-prefix}back::before { content: "\e934"; }

.#{$font-prefix}forward::before { content: "\e94d"; }

$font-list: "\e66a" "\e668" "\e669" "\e667";
// 循环 $font-list 并设置类名
// 其中 index 方法是获取索引
@each $font-item in $font-list {
  .#{$font-prefix}loading#{index($font-list, $font-item)}::before {
    content: $font-item;
  }
}

.#{$font-prefix}spin::before {
  display: inline-block;
  animation: loadingCircle 1s infinite linear;
}

@keyframes loadingCircle {
  0% {
    transform-origin: 50% 50%;
    transform: rotate(0deg);
  }

  to {
    transform-origin: 50% 50%;
    transform: rotate(1turn);
  }
}
要注册一个组件,必须这个组件中拥有 install 方法。有了这个方法,在其回调中的 Vue 参数中调用 component 方法,即可。方法如下
import WIcon from './Icon';

WIcon.install = (Vue) => {
  Vue.component(WIcon.name, WIcon);
};

export default WIcon;
单元测试一个图标组件,我们需要测试其属性是否真正用到了,是否与预期的一样。我们需要测试其快照的 UI 是否是我们想要的 UI 。我们不传 type 属性不显示的特殊处理是否真的生效。我们自定义前缀是否真的自定义了。
我们在一开始需要实例化组件,我们可以用 vue-test-utils 中的 mount 方法。当 DOM 更新之后, this 绑定到当前实例上之后( $nextTick ) 做一些事情。
具体测试代码
import { mount } from 'vue-test-utils';
import Icon from './Icon';

describe('Icon.vue', () => {
  let wrapper = null;
  let wrapperNo = null;
  let wrapperPrefix = null;
  let wrapperSpin = null;

  // 实例化
  beforeEach(() => {
    // 传入 loading1 ,然后去检测实例化之后 type 是否是 loading1 。
    wrapper = mount(Icon, {
      propsData: {
        type: 'loading1',
      },
    });
    // 不向其传任何参数,去检测针对 type 为空不显示的特殊处理是否生效。
    wrapperNo = mount(Icon);
    // 传前缀 test ,测试实例化之后的前缀是否完全改变
    wrapperPrefix = mount(Icon, {
      propsData: {
        type: 'loading1',
        prefix: 'test',
      },
    });
    // 实例化之后图标是否拥有旋转动画
    wrapperSpin = mount(Icon, {
      propsData: {
        type: 'loading1',
        spin: true,
      },
    });
  });

  it('验证 prop 值是否正确', (done) => {
    wrapper.vm.$nextTick(() => {
      try {
        expect(wrapper.props().type).toBe('loading1');
        done();
      } catch (err) {
        done.fail(err);
      }
    });
  });

  it('验证 class 值是否正确', (done) => {
    wrapper.vm.$nextTick(() => {
      try {
        expect(wrapper.is('i')).toBe(true);
        expect(wrapper.classes().toString()).toBe('w-font,w-loading1');
        done();
      } catch (err) {
        done.fail(err);
      }
    });
  });

  it('验证 prop 为空不显示', (done) => {
    wrapperNo.vm.$nextTick(() => {
      try {
        expect(wrapperNo.is('i')).toBe(false);
        done();
      } catch (err) {
        done.fail(err);
      }
    });
  });

  it('验证 自定义前缀 prefix', (done) => {
    wrapperPrefix.vm.$nextTick(() => {
      try {
        expect(wrapperPrefix.is('i')).toBe(true);
        expect(wrapperPrefix.classes().toString()).toBe('test-font,test-loading1');
        done();
      } catch (err) {
        done.fail(err);
      }
    });
  });

  it('验证 spin 字段转动', (done) => {
    wrapperSpin.vm.$nextTick(() => {
      try {
        expect(wrapperSpin.is('i')).toBe(true);
        expect(wrapperSpin.classes().toString()).toBe('w-font,w-loading1,w-spin');
        done();
      } catch (err) {
        done.fail(err);
      }
    });
  });

  it('检测快照是否一样。', (done) => {
    wrapper.vm.$nextTick(() => {
      try {
        // 检测 UI 是否改变
        expect(wrapper.text()).toMatchSnapshot();
        done();
      } catch (err) {
        done.fail(err);
      }
    });
  });
});
更完整的源码,请移步 w-icon 。
运行 安卓 模拟器的时候 Running Gradle task 'assembleDebug' Forever 一直在跑,很慢很慢
打开目录 android/app/build.gradle 文件中 compileSdkVersion 字段都设置为最新 SDK 版本,当前是 29 。设置之后速度飞快。
Typescript 中使用 antd.form.create ,总是报错,经多方查找学习,记录如下问题及解决方案。
TS2322: Type '{ dataSource: any[]; variableSource: any[]; chosenType: string; isMultiple: boolean; onAddConfigValue: () => void; hasRelatedComponent: boolean; onChangeRelatedComponent: (status: any) => void; onChangeConfigValueStatus: (id: any) => () => void; onUpdateConfigValue: (id: any) => () => void; onDeleteConfigValue: (id:...' is not assignable to type 'IntrinsicAttributes & IntrinsicClassAttributes<Component<Pick<FormComponentProps<any>, "wrappedComponentRef">, any, any>> & Readonly<...> & Readonly<...>'.
  Property 'dataSource' does not exist on type 'IntrinsicAttributes & IntrinsicClassAttributes<Component<Pick<FormComponentProps<any>, "wrappedComponentRef">, any, any>> & Readonly<...> & Readonly<...>'.
import {FormComponentProps} from 'antd/lib/form/Form';
interface CreateNoticeModalProps extends FormComponentProps {
  isShow: boolean
  onCancel: any
  onOk: any
}
class Test extends React.Component<CreateNoticeModalProps{}> {}
最关键的
export default Form.create<CreateNoticeModalProps>()(CreateNoticeModal)
error Command failed.
Exit code: 1
Command: git
Arguments: commit -m v1.0.3
Directory: /Users/lee/lee/npm/vite-plugin-html-mpa
Output:
nvm is not compatible with the "PREFIX" environment variable: currently set to "/usr/local"
Run `unset PREFIX` to unset it.
 > running pre-commit hook: lint-staged
internal/modules/cjs/loader.js:625
  throw e;
  ^

Error: No valid exports main found for '/Users/lee/lee/npm/vite-plugin-html-mpa/node_modules/colorette'
    at resolveExportsTarget (internal/modules/cjs/loader.js:622:9)
    at applyExports (internal/modules/cjs/loader.js:499:14)
    at resolveExports (internal/modules/cjs/loader.js:548:12)
    at Function.Module._findPath (internal/modules/cjs/loader.js:654:22)
    at Function.Module._resolveFilename (internal/modules/cjs/loader.js:953:27)
    at Function.Module._load (internal/modules/cjs/loader.js:859:27)
    at Module.require (internal/modules/cjs/loader.js:1028:19)
    at require (internal/modules/cjs/helpers.js:72:18)
    at Object.<anonymous> (/Users/lee/lee/npm/vite-plugin-html-mpa/node_modules/listr2/dist/utils/colorette.js:4:19)
    at Module._compile (internal/modules/cjs/loader.js:1139:30) {
  code: 'MODULE_NOT_FOUND'
}

pre-commit hook failed (add --no-verify to bypass)
info Visit https://yarnpkg.com/en/docs/cli/publish for documentation about this command.
进入 .zshrc ,添加下面代码即可
export PREFIX= nvm use --delete-prefix stable
因为本项目的依赖有增加 url_launcher 依赖,所以在运行或者打包 Android 版本的时候,会报如下错误:
Plugin project :url_launcher_web not found. Please update settings.gradle.
android/app/build.gradle 中,将 minSdkVersion 版本改为 21,如:android {
// ...
defaultConfig {
// ...
minSdkVersion 21
}
}
android/setting.gradle 中,全部替换以下内容:include ':app'
def flutterProjectRoot = rootProject.projectDir.parentFile.toPath()
def plugins = new Properties()
def pluginsFile = new File(flutterProjectRoot.toFile(), '.flutter-plugins')
if (pluginsFile.exists()) {
pluginsFile.withReader('UTF-8') { reader -> plugins.load(reader) }
}
plugins.each { name, path ->
def pluginDirectory = flutterProjectRoot.resolve(path).resolve('android').toFile()
include ":$name"
project(":$name").projectDir = pluginDirectory
}
启动项目的时候,选择安卓模拟器的时候,报如下错误:
No suitable Android AVD system images are available. You may need to install these using sdkmanager, for example: sdkmanager "system-images;android-27;google_apis_playstore;x86"
用 Android Studio 安装一个安卓模拟器即可
由于国内网速的无敌慢,所以国内镜像就显得尤为重要。
yarn config set registry https://registry.npm.taobao.org -g
yarn config set disturl https://npm.taobao.org/dist -g
yarn config set electron_mirror https://npm.taobao.org/mirrors/electron/ -g
yarn config set sass_binary_site https://npm.taobao.org/mirrors/node-sass/ -g
yarn config set phantomjs_cdnurl https://npm.taobao.org/mirrors/phantomjs/ -g
yarn config set chromedriver_cdnurl https://cdn.npm.taobao.org/dist/chromedriver -g
yarn config set sqlite3_binary_host_mirror https://foxgis.oss-cn-shanghai.aliyuncs.com/
yarn config set profiler_binary_host_mirror https://npm.taobao.org/mirrors/node-inspector/
yarn config set operadriver_cdnurl https://cdn.npm.taobao.org/dist/operadriver -g
yarn config set fse_binary_host_mirror https://npm.taobao.org/mirrors/fsevents -g
yarn config v1.21.1
success Set "registry" to "https://registry.npm.taobao.org".
✨  Done in 0.05s.
yarn config get registry
https://registry.yarnpkg.com
设置淘宝命令: npm config set registry https://registry.npm.taobao.org
设置 npm 命令: npm config set registry http://registry.npmjs.org
命令: npm config get registry
npm set chromedriver_cdnurl http://cdn.npm.taobao.org/dist/chromedriver # chromedriver 二进制包镜像
npm set operadriver_cdnurl http://cdn.npm.taobao.org/dist/operadriver # operadriver 二进制包镜像
npm set phantomjs_cdnurl http://cdn.npm.taobao.org/dist/phantomjs # phantomjs 二进制包镜像
npm set sass_binary_site http://cdn.npm.taobao.org/dist/node-sass # node-sass 二进制包镜像
npm set electron_mirror http://cdn.npm.taobao.org/dist/electron/ # electron 二进制包镜像
npm config get globalconfig
下面代码是某项目中 yarn.lock 的一段。设置了 yarn 的国内镜像,但是安装之后始终显示 https://registry.npmjs.org 的路径而不是已经配置的国内镜像。
"@fe6/norm@^3.0.1":
  version "3.0.1"
  resolved "https://registry.npmjs.org/@fe6/norm/-/norm-3.0.1.tgz#f96197915f6f992ce836d31d2c940fb208c2f8c2"
  integrity sha512-DcMssbbaegpBE/cf2mMQs2Hb/6uemuEdHICqfblv5sLXuy3qSgKfg8FkQBCBId7gXiZm5rJtwtqBdDD68CGLdA==
yarn config list ,会看到一下内容:{
'version-tag-prefix': 'v',
'version-git-tag': true,
'version-commit-hooks': true,
'version-git-sign': false,
'version-git-message': 'v%s',
'init-version': '1.0.0',
'init-license': 'MIT',
'save-prefix': '^',
'bin-links': true,
'ignore-scripts': false,
'ignore-optional': false,
registry: 'https://registry.npm.taobao.org',
'strict-ssl': true,
'user-agent': 'yarn/1.15.2 npm/? node/v13.14.0 darwin x64',
chromedriver_cdnurl: 'https://cdn.npm.taobao.org/dist/chromedriver',
disturl: 'https://npm.taobao.org/dist',
electron_mirror: 'https://npm.taobao.org/mirrors/electron/',
email: '[email protected]',
fse_binary_host_mirror: 'https://npm.taobao.org/mirrors/fsevents',
lastUpdateCheck: 1613726512998,
operadriver_cdnurl: 'https://cdn.npm.taobao.org/dist/operadriver',
phantomjs_cdnurl: 'https://npm.taobao.org/mirrors/phantomjs/',
sass_binary_site: 'https://npm.taobao.org/mirrors/node-sass/',
username: 'fe6'
}
info npm config
{
registry: 'https://registry.npm.taobao.org/',
'serve:dist': true,
'//registry.npmjs.org/:_authToken': '54c237fe-d4f7-4b59-bae4-8e6f8697a5ee',
scope: 'fe6',
'@npm-exp:registry': 'http://registry.npmjs.org/',
'@fe6:registry': 'http://registry.npmjs.org/',
disturl: 'https://npm.taobao.org/dist',
electron_mirror: 'https://npm.taobao.org/mirrors/electron/',
sass_binary_site: 'https://npm.taobao.org/mirrors/node-sass/',
phantomjs_cdnurl: 'https://npm.taobao.org/mirrors/phantomjs/',
python: '/usr/bin/python'
}
从上面一段代码配置可看出,当前电脑用户名是 fe6 , 而 fe6 所设置的注册地址是: http://registry.npmjs.org/ 而不是配置的 https://registry.npm.taobao.org ,这就是问题的关键。综上所述,只需退出当前 fe6 的 npm 用户,重新安装即可。
用 npm login 登录的时候,报如下错误
Username: fe6
Password:
Email: (this IS public) [email protected]
npm ERR! code E409
npm ERR! Registry returned 409 for PUT on https://registry.npm.taobao.org/-/user/org.couchdb.user:fe6: [conflict] User fe6 already exists
可能由于设置了国内镜像的问题,所以在后面添加 --registry 参数:
npm login --registry=http://registry.npmjs.org/
gyp: No Xcode or CLT version detected!
gyp ERR! configure error
gyp ERR! stack Error: `gyp` failed with exit code: 1
gyp ERR! stack     at ChildProcess.onCpExit (/Users/lee/lee/lib/vue/vue-cli/node_modules/node-gyp/lib/configure.js:351:16)
gyp ERR! stack     at ChildProcess.emit (events.js:193:13)
gyp ERR! stack     at Process.ChildProcess._handle.onexit (internal/child_process.js:255:12)
gyp ERR! System Darwin 19.2.0
gyp ERR! command "/Users/lee/.nvm/versions/node/v11.15.0/bin/node" "/Users/lee/lee/lib/vue/vue-cli/node_modules/.bin/node-gyp" "rebuild" "--release"
gyp ERR! cwd /Users/lee/lee/lib/vue/vue-cli/node_modules/fibers
gyp ERR! node -v v11.15.0
gyp ERR! node-gyp -v v5.0.5
gyp ERR! not ok
node-gyp exited with code: 1
Please make sure you are using a supported platform and node version. If you
would like to compile fibers on this machine please make sure you have setup your
build environment--
Windows + OS X instructions here: https://github.com/nodejs/node-gyp
Ubuntu users please run: `sudo apt-get install g++ build-essential`
更新 XCode 之后,重新用 yarn 安装依赖
遇到问题,首先执行 sudo xcode-select --install ,但是并没有成功,报错如下:
xcode-select: error: command line tools are already installed, use "Software Update" to install updates
上面的问题是因为已经安装了,所以得先执行 sudo rm -rf /Library/Developer/CommandLineTools
sudo rm -rf /Library/Developer/CommandLineToolsxcode-select --install需要提前安装 Iterm2和Homebrew
# 本地 Mac 安装
brew install lrzsz

# 远程服务器安装
yum install -y lrzsz
apt-get install lrzsz
将他们拷贝到/usr/local/bin文件夹中
sudo su

wget https://raw.githubusercontent.com/iq9891/blog/master/assets/mac/iterm2-send-zmodem.sh
wget https://raw.githubusercontent.com/iq9891/blog/master/assets/mac/iterm2-recv-zmodem.sh

mv iterm2-send-zmodem.sh /usr/local/bin
mv iterm2-recv-zmodem.sh /usr/local/bin

chmod 777 /usr/local/bin/iterm2-*
❗️ 温馨提示: 要是有不同的 Profiles 要记得在不同的 Profiles 里面在添加一遍,不然不起作用
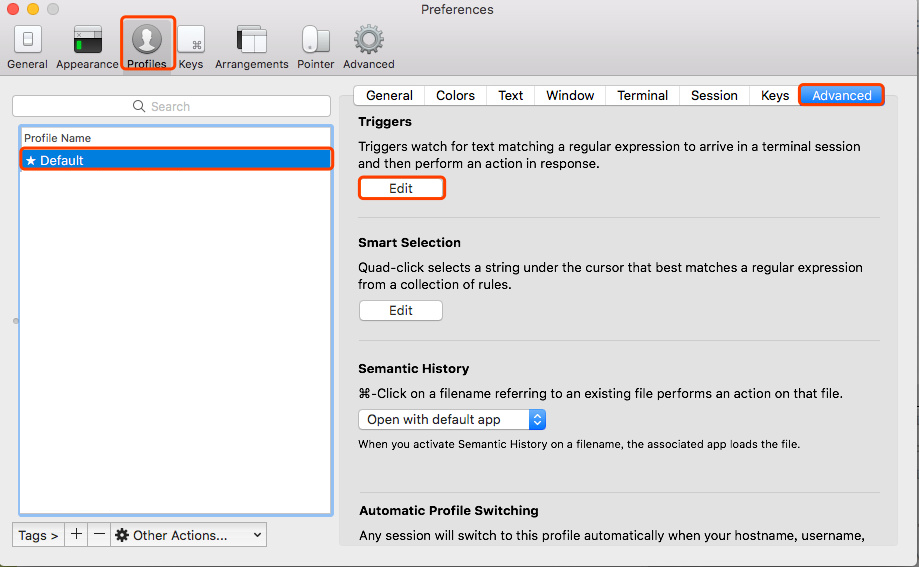

上图每栏的配置具体如下:
// 第一条
Regular expression: rz waiting to receive.\*\*B0100
Action: Run Silent Coprocess
Parameters: /usr/local/bin/iterm2-send-zmodem.sh
Instant: checked

// 第二条
Regular expression: \*\*B00000000000000
Action: Run Silent Coprocess
Parameters: /usr/local/bin/iterm2-recv-zmodem.sh
Instant: checked
expect is the reason why lrzsz can't be used.
If you don't use expect for ssh auto-logging, the lrzsz works.
# ❗️不能使用expect 来实现ssh 自动登录, 需要手工登录或者 so 来登录

ssh [email protected] -p 9922

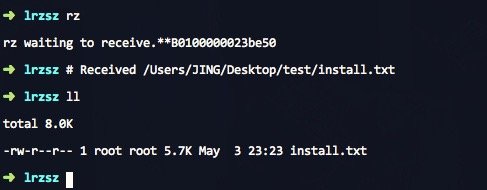
rz 命令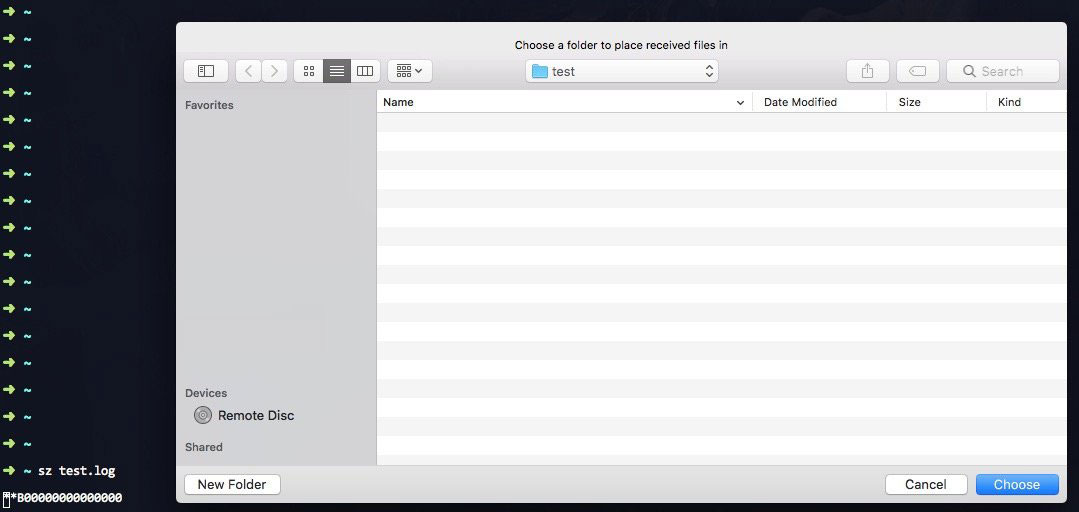
sz filename 命令(将 filename 下载到本地)最近配置 webpack 4 的时候遇到一个经典的问题困扰我一天,关键词 Unknown word 。
ERROR in ./src/style/iconfont.scss
Module build failed: ModuleBuildError: Module build failed: Syntax Error

(13:4) Unknown word

  11 | }
  12 |
> 13 | .#{$font-prefix}font {
     |    ^
  14 |   font-family: $font-name !important;
  15 |   -webkit-font-smoothing: antialiased;

    at runLoaders (/Users/lee/lee/vcmd/node_modules/webpack/lib/NormalModule.js:244:20)
    at /Users/lee/lee/vcmd/node_modules/loader-runner/lib/LoaderRunner.js:364:11
    at /Users/lee/lee/vcmd/node_modules/loader-runner/lib/LoaderRunner.js:230:18
    at context.callback (/Users/lee/lee/vcmd/node_modules/loader-runner/lib/LoaderRunner.js:111:13)
    at Promise.resolve.then.then.catch (/Users/lee/lee/cpt-vue-fe6-iq9891/vue-icon/node_modules/postcss-loader/lib/index.js:196:44)
    at <anonymous>
 @ ./src/style/index.ts 1:0-25
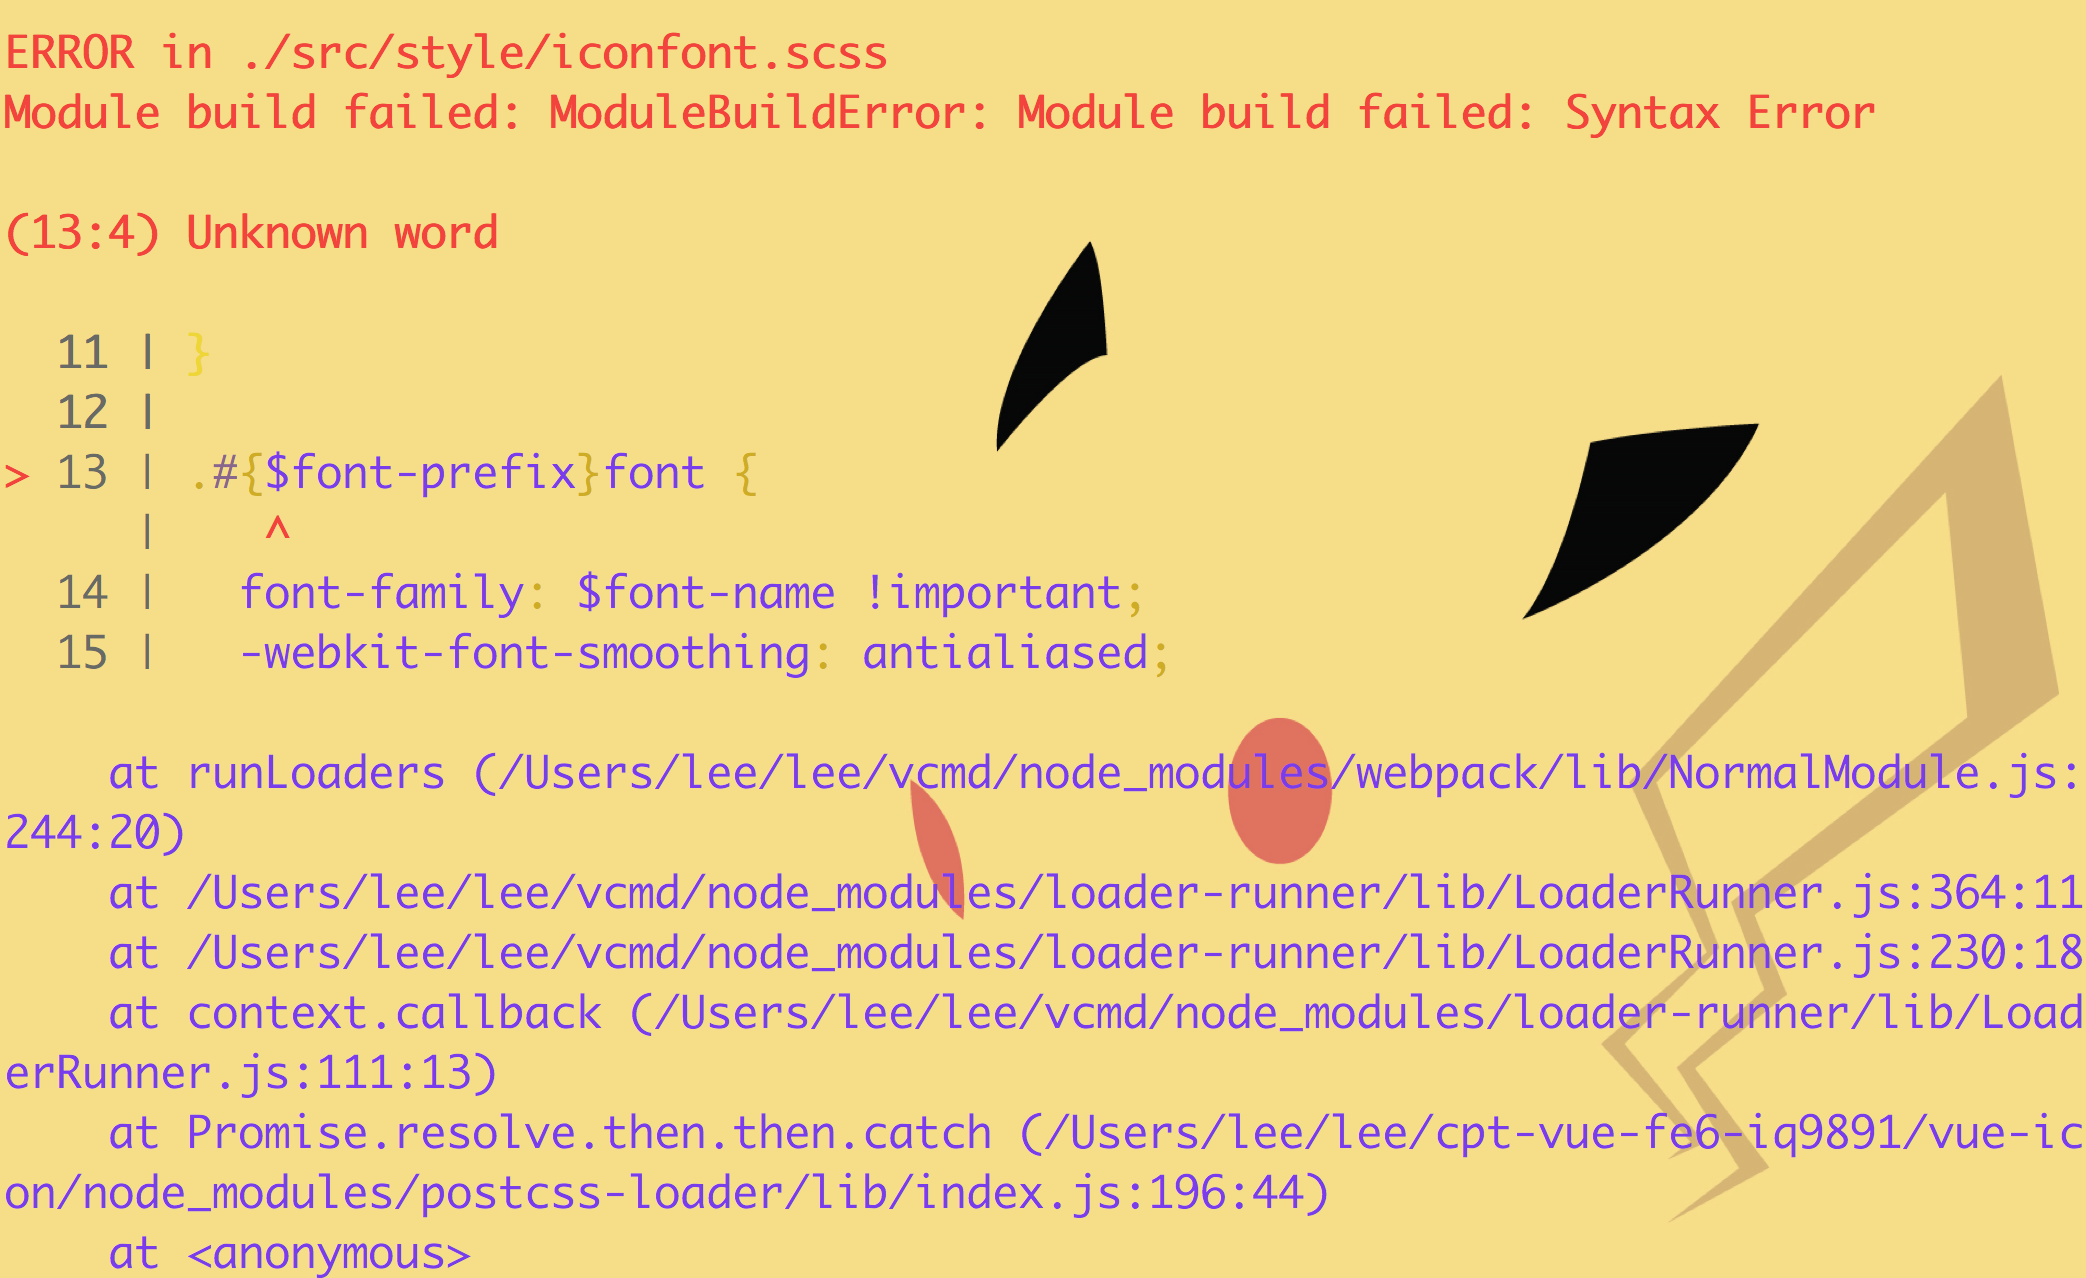
从上面报错得知是有关样式编译的时候报错的,所以主要检查一下关于样式打包的情况。 有可能 postcss 解析不了 sass 的语法 。
代码来自 webpack 4 配置文件的 module 部分。 MiniCssExtractPlugin 是提炼样式的组件 mini-css-extract-plugin 。
resolve是获取文件的路径。
module: {
  rules: [
    {
      test: /.scss$/,
      use: [
        MiniCssExtractPlugin.loader,
        'cache', 'css', 'sass', {
          loader: 'postcss',
          options: {
            config: {
              path: resolve('.postcssrc.js')
            }
          }
        },
      ]
    },
  ]
}
module: {
  rules: [
    {
      test: /.scss$/,
      use: [
        MiniCssExtractPlugin.loader,
        'cache', 'css', {
          loader: 'postcss',
          options: {
            config: {
              path: resolve('.postcssrc.js')
            }
          }
        }, 'sass',
      ]
    },
  ]
}
更全的配置,请移步 76445c0 。
最近配置 webpack 4 的时候遇到有关 mini-css-extract-plugin 的问题。
ERROR in ./src/views/Home.vue (./node_modules/mini-css-extract-plugin/dist/loader.js!./node_modules/css-loader?{"minimize":true,"sourceMap":true}!./node_modules/vue-loader/lib/style-compiler?{"optionsId":"0","vue":true,"scoped":false,"sourceMap":false}!./node_modules/sass-loader/lib/loader.js?{"sourceMap":true}!./node_modules/vue-loader/lib/selector.js?type=styles&index=0!./src/views/Home.vue)
Module build failed: TypeError: this[NS] is not a function
    at childCompiler.runAsChild (/Users/lee/lee/vue-spa-template/tpltest7/node_modules/mini-css-extract-plugin/dist/loader.js:147:15)
    at compile (/Users/lee/lee/vue-spa-template/tpltest7/node_modules/webpack/lib/Compiler.js:242:11)
    at hooks.afterCompile.callAsync.err (/Users/lee/lee/vue-spa-template/tpltest7/node_modules/webpack/lib/Compiler.js:487:14)
    at AsyncSeriesHook.eval [as callAsync] (eval at create (/Users/lee/lee/vue-spa-template/tpltest7/node_modules/tapable/lib/HookCodeFactory.js:24:12), <anonymous>:24:1)
    at AsyncSeriesHook.lazyCompileHook [as _callAsync] (/Users/lee/lee/vue-spa-template/tpltest7/node_modules/tapable/lib/Hook.js:35:21)
    at compilation.seal.err (/Users/lee/lee/vue-spa-template/tpltest7/node_modules/webpack/lib/Compiler.js:484:30)
    at AsyncSeriesHook.eval [as callAsync] (eval at create (/Users/lee/lee/vue-spa-template/tpltest7/node_modules/tapable/lib/HookCodeFactory.js:24:12), <anonymous>:6:1)
    at AsyncSeriesHook.lazyCompileHook [as _callAsync] (/Users/lee/lee/vue-spa-template/tpltest7/node_modules/tapable/lib/Hook.js:35:21)
    at hooks.optimizeAssets.callAsync.err (/Users/lee/lee/vue-spa-template/tpltest7/node_modules/webpack/lib/Compilation.js:966:35)
    at AsyncSeriesHook.eval [as callAsync] (eval at create (/Users/lee/lee/vue-spa-template/tpltest7/node_modules/tapable/lib/HookCodeFactory.js:24:12), <anonymous>:6:1)
    at AsyncSeriesHook.lazyCompileHook [as _callAsync] (/Users/lee/lee/vue-spa-template/tpltest7/node_modules/tapable/lib/Hook.js:35:21)
    at hooks.optimizeChunkAssets.callAsync.err (/Users/lee/lee/vue-spa-template/tpltest7/node_modules/webpack/lib/Compilation.js:957:32)
    at _err0 (eval at create (/Users/lee/lee/vue-spa-template/tpltest7/node_modules/tapable/lib/HookCodeFactory.js:24:12), <anonymous>:11:1)
    at /Users/lee/lee/vue-spa-template/tpltest7/node_modules/uglifyjs-webpack-plugin/dist/index.js:334:11
    at _class.runTasks (/Users/lee/lee/vue-spa-template/tpltest7/node_modules/uglifyjs-webpack-plugin/dist/uglify/index.js:63:9)
    at UglifyJsPlugin.optimizeFn (/Users/lee/lee/vue-spa-template/tpltest7/node_modules/uglifyjs-webpack-plugin/dist/index.js:253:16)
 @ ./src/views/Home.vue 2:2-356
 @ ./src lazy ^\.\/.*$ namespace object
 @ ./src/tools/loadcomponents.js
 @ ./src/routers/index.js
 @ ./src/main.js
 @ multi babel-polyfill ./src/main.js

ERROR in ./src/App.vue (./node_modules/mini-css-extract-plugin/dist/loader.js!./node_modules/css-loader?{"minimize":true,"sourceMap":true}!./node_modules/vue-loader/lib/style-compiler?{"optionsId":"0","vue":true,"scoped":false,"sourceMap":false}!./node_modules/sass-loader/lib/loader.js?{"sourceMap":true}!./node_modules/vue-loader/lib/selector.js?type=styles&index=0!./src/App.vue)
Module build failed: TypeError: this[NS] is not a function
    at childCompiler.runAsChild (/Users/lee/lee/vue-spa-template/tpltest7/node_modules/mini-css-extract-plugin/dist/loader.js:147:15)
    at compile (/Users/lee/lee/vue-spa-template/tpltest7/node_modules/webpack/lib/Compiler.js:242:11)
    at hooks.afterCompile.callAsync.err (/Users/lee/lee/vue-spa-template/tpltest7/node_modules/webpack/lib/Compiler.js:487:14)
    at AsyncSeriesHook.eval [as callAsync] (eval at create (/Users/lee/lee/vue-spa-template/tpltest7/node_modules/tapable/lib/HookCodeFactory.js:24:12), <anonymous>:24:1)
    at AsyncSeriesHook.lazyCompileHook [as _callAsync] (/Users/lee/lee/vue-spa-template/tpltest7/node_modules/tapable/lib/Hook.js:35:21)
    at compilation.seal.err (/Users/lee/lee/vue-spa-template/tpltest7/node_modules/webpack/lib/Compiler.js:484:30)
    at AsyncSeriesHook.eval [as callAsync] (eval at create (/Users/lee/lee/vue-spa-template/tpltest7/node_modules/tapable/lib/HookCodeFactory.js:24:12), <anonymous>:6:1)
    at AsyncSeriesHook.lazyCompileHook [as _callAsync] (/Users/lee/lee/vue-spa-template/tpltest7/node_modules/tapable/lib/Hook.js:35:21)
    at hooks.optimizeAssets.callAsync.err (/Users/lee/lee/vue-spa-template/tpltest7/node_modules/webpack/lib/Compilation.js:966:35)
    at AsyncSeriesHook.eval [as callAsync] (eval at create (/Users/lee/lee/vue-spa-template/tpltest7/node_modules/tapable/lib/HookCodeFactory.js:24:12), <anonymous>:6:1)
    at AsyncSeriesHook.lazyCompileHook [as _callAsync] (/Users/lee/lee/vue-spa-template/tpltest7/node_modules/tapable/lib/Hook.js:35:21)
    at hooks.optimizeChunkAssets.callAsync.err (/Users/lee/lee/vue-spa-template/tpltest7/node_modules/webpack/lib/Compilation.js:957:32)
    at _err0 (eval at create (/Users/lee/lee/vue-spa-template/tpltest7/node_modules/tapable/lib/HookCodeFactory.js:24:12), <anonymous>:11:1)
    at /Users/lee/lee/vue-spa-template/tpltest7/node_modules/uglifyjs-webpack-plugin/dist/index.js:334:11
    at _class.runTasks (/Users/lee/lee/vue-spa-template/tpltest7/node_modules/uglifyjs-webpack-plugin/dist/uglify/index.js:63:9)
    at UglifyJsPlugin.optimizeFn (/Users/lee/lee/vue-spa-template/tpltest7/node_modules/uglifyjs-webpack-plugin/dist/index.js:253:16)
 @ ./src/App.vue 2:2-346
 @ ./src/main.js
 @ multi babel-polyfill ./src/main.js
![this[NS] is not a function](https://raw.githubusercontent.com/iq9891/blog/master/img/error_this_is_not_a_function.png)
mini-css-extract-plugin 使用的必须有 loader ,有调用。但如果光有 loader ,没有调用,那么就会报上面的错误。怎么解决呢?加上调用就可以了
// build/webpack.prod.conf.js

var MiniCssExtractPlugin = require("mini-css-extract-plugin");

var webpackConfig = merge(baseWebpackConfig, {
  // other options...
  plugins: [
    // 提取
    new MiniCssExtractPlugin({
      filename: utils.assetsPath('css/[name].[contenthash].css')
    })
  ]
})
更全的配置,请移步 176f224 。
$ ssh-keygen -t rsa -C "[email protected]"
这时会在用户根目录下生成一个.ssh文件夹,一个私钥:id_rsa,一个公钥:id_rsa_pub,该公钥和私钥包含了你邮箱的信息,具有随机不可复现性!
ssh公钥私钥同时生成且唯一配对。公钥用于远程主机,私钥存储在本地工作机,私钥用于在push(即write操作)时验证身份。因为公钥与私钥的唯一对应性,只有能和公钥配对的私钥才能对远程主机进行写操作!
我们在使用github时会发现有两个地方牵涉到公钥添加,一个是账号设置下的ssh setting,另一个是单个仓库设置的Deploy key。添加至前者则代表 私钥主机可对当前远程主机的所有仓库进行写操作,添加至后者则代表 私钥主机只能对当前仓库进行写操作。
每次连接时SSH客户端发送本地私钥(默认~/.ssh/id_rsa)到远程主机进行公私钥配对验证!
ssh-keygen -t rsa -C "[email protected]" -f ~/.ssh/second
此时 ls 出 .ssh 目录,会发现多了 second 公钥和私钥
id_rsa
id_rsa.pub
known_hosts
list.txt
second
second.pub
用自己喜欢的文本编辑器打开id_rsa.pub文件,里面的信息即为 SSH key,将这些信息复制到 GitHub 的 Add SSH key 页面即可
不同的操作系统,均有一些命令,直接将SSH key从文件拷贝到粘贴板中,如下:
pbcopy < ~/.ssh/id_rsa.pub
# Copies the contents of the id_rsa.pub file to your clipboard
clip < ~/.ssh/id_rsa.pub
# Copies the contents of the id_rsa.pub file to your clipboard
sudo apt-get install xclip
# Downloads and installs xclip. If you don't have `apt-get`, you might need to use another installer (like `yum`)

xclip -sel clip < ~/.ssh/id_rsa.pub
# Copies the contents of the id_rsa.pub file to your clipboard
# Default github user([email protected])  默认配置,一般可以省略
Host github.com
Hostname github.com
User git
Identityfile ~/.ssh/github
# second user([email protected])  给一个新的Host称呼
Host second.github.com  // 主机名字,不能重名
HostName github.com   // 主机所在域名或IP
User git  // 用户名称
IdentityFile C:/Users/username/.ssh/id_rsa_second  // 私钥路径
注意:
$ ssh -T [email protected]
最近修改 Android 启动图片,在网上海搜了很多解决方案,在 launch_background.xml 中配置如下代码:
<?xml version="1.0" encoding="utf-8"?>
<!-- Modify this file to customize your launch splash screen -->
<layer-list xmlns:android="http://schemas.android.com/apk/res/android">
    <item android:drawable="@android:color/white" />
    <item name="android:windowFullscreen">true</item>
    <item name="android:windowDrawsSystemBarBackgrounds">false</item>
    <!-- You can insert your own image assets here -->
    <item>
        <bitmap
          android:gravity="center"
          android:src="@mipmap/launch_image"
        />
    </item>
</layer-list>
启动安卓的时候就报错了报错如下:
first_flutter keeps stopping
截图如下:

解决方案:
对比新建的 flutter 项目,发现下面两句不生效导致的安卓报错,去掉即可
<item name="android:windowFullscreen">true</item>
<item name="android:windowDrawsSystemBarBackgrounds">false</item>
| 电话 | 微信 | 邮箱 |
|---|---|---|
| 13810902078 | 13810902078 | [email protected] |
| 国籍 | 籍贯 |
|---|---|
| China | Beijing |
| 经验 | GitHub |
|---|---|
| 6 years+ | iq9891 |
Vue.js 2.x 项目经验,涉猎 PC | WAP | 微信 | 微信小程序,用户人群是: B 端用户 及 C 端用户;Vue.js 开源 UI库 经验;git 。目前前端团队 10 人,使用 git 合作开发,拥有丰富的团队管理经验;Linux 常用命令,如 rm, ls, ll 等, 了解 nginx;grunt | gulp | webpack 独自搭建项目;nodejs , mongodb | redis ,能够运用 express | thinkjs 搭建网站,编写 RESTful API ,并有项目经验;docker , 拥有 docker 项目经验,能够编写 dockerfile 。Javascript 方面。熟练掌握 JS 语法、会灵活运用函数、掌握元素获取方法、精通 this 指向。能够独立开发 js组件,了解ES5+。会使用 AngularJs、React 及 Vue.js 等框架并有实战经验。
NodeJS 方面,会使用 gulp , grunt , webpack 等构建工具;了解 thinkjs , express ,koa 等框架。 能够使用 node 框架书写 RESTFUL API ,或者结合前端框架 React 或者 Vue.js 开发 SSR 。
CSS 方面。能够手写 CSS 进行网站开发。精通 css3,如过度、动画等 css3 样式。精通响应式布局,适配手机端 pad 端各种机型。精通 css 设计模式 OOCSS 和 SMACSS 。熟练使用 css 预处理器:sass 和 less。
HTML5 方面。熟练运用 canvas,依托 白鹭引擎 独立编写 HTML5 小游戏。熟练运用各种新增语义化标签进行网站开发。熟悉HTML5 的历史管理。能够运用音频视频进行交互。能运用 HTML5 中新增加的表单验证和 type属性提高用户体验。运用本地存储(localstorage)进行数据交互。
开发环境方面。熟悉OS X 和 Linux 开发环境,精通 win 开发环境,熟练使用命令行工具。精通 SVN,GIT 版本管理工具。
部署方面,熟悉 Linux,Nginx,熟悉 docker,会使用 docker 部署项目,利用 strider 或 gitlab 部署项目,并有实战经验。
工作内容:
工作业绩
Github 迁移到 Gitlab,并实现前端自动化部署(Gitlab-runner)2.0 转 3.0 相关
| 版本 | 开发 | 技术栈 | 代码管理 | 上线 |
|---|---|---|---|---|
| 2.0 | 混合开发 | jQuery+css | Github | 手动 |
| 3.0 | 分离开发 | Vue.js+scss+nodeJs+webpack+EM-FE | Gitlab | Gitlab-runner |
最近市面上流行很多很多 Vue.js 的组件库,那么众多组件库是如何搭建的?搭建组件库都需要注意哪些?组件库中都有哪些功能?下面就为大家一一揭晓。如果想略过下面罗里吧嗦的介绍,可以直接移步 component-template 看源码。
一个好的组件库,离不开完整的 开发系统 。一个好的组件库,离不开完整的 打包系统 。一个好的组件库离不开完善的代码 规范检查系统 。一个好的组件,离不开完整高覆盖的 单元测试 。一个好的组件库离不开很好的 自动化集成系统 。组件库有这么多功能,那么每一次搭建组件库,就要配置一次,显然不是明智之举。我们可以将骨干部分提炼出来,变成模板。利用 fecli 脚手架一键拉取。
一个良好的开发系统应该不仅仅包括组件的开发系统,还更应该包括官网的开发系统。
早年间我开发过一个组件库 EM-FE 。现在再看这个库的显然不是很专业。官网和组件并不在里面,维护起来并不是很方便。新组建的建设,不仅编写组件,更要更新独立的官网的 api 及 demo 。如果要是放在一起,那么在编写组件的时候就顺便写好了 demo ,弄好的 api 。并不用移步组件库的官网仓库再维护一遍。
新的开发系统很简单,分为 water 和 site 两个目录。 water 目录则是组件的源码文件夹。 site 则是官网的源码文件夹。这样在开发组件的过程中,也可以编写 demo 了。
一个良好的打包系统,不仅能打包组件库,还能打包官网。组件库不仅实现整体打包,还支持按需加载。官网打包直接继承组件库的东西即可。有关 api 的编写,我选择了 markdown 。直接读取 markdown 文件渲染到官网中。之所以选择 markdown 来编写 api 。考虑到其很流行,可以直接在 github 上编写,利于维护。
一个良好的组件库还应该有配套的语法检测功能,好处就是代码统一。多人开发的代码,形如一人。
良好的组件库必须要稳定,那么怎么做到稳定呢?开发人员在开发过程中的自测是很必要的。但是有些时候开发人员也不一定能面面俱到,这时候就应该引入单元测试了。有时候修改了一个紧急 bug ,上线之后却发现以前好好的功能缺不能用了,有了单元测试,则会避免这样的事情发生。
良好的组件库系统应该有一套完整的上线配置。这就需要自动化集成系统了。有了这套系统,我们可以检测依赖包的安全系数。我们可以不用每次手动的发版组件库,不用手动的发布官网,我们不用手动的单元测试。
请移步 从零开始搭建前端脚手架 。
更全的配置,请移步 component-template 。
当在路由的 path 配置上 '/:path(.*)*' 可以用作 404 监听,但是如果在所有路由,但是已有的路由也会变成 404。
只需要将 '/:path(.*)*' 配置的路由利用 addRoute 方法动态和其他路由添加进去,并且先添加进去即可解决。
error while loading shared libraries: libcrypto.so.6: cannot open shared object file: No such file or directory
CentOS
yum install libcrypto.so.6 安装模块cd /usr/lib64 进入目录ll *ssl* 查看ln -s libssl.so.1.0.1e libssl.so.6 软链ll *libcrypto* 检测是否成功[root@centos ~]# yum-config-manager --add-repo https://download.docker.com/linux/centos/docker-ce.repo
Traceback (most recent call last):
File "/usr/bin/yum-config-manager", line 6, in <module>
import yum
ImportError: No module named yumcentos 6
vi /usr/bin/yum-config-manager#!/usr/bin/python -tt 中的 Python 指定本机的一个版本,如 #!/usr/bin/python2.6.6 -ttuname -acat /etc/redhat-releaseyum list docker-ce --showduplicates | sort -ryum install docker-ce-3:19.03.12-3.el71.查询安装过的包
yum list installed | grep docker
// 结果
docker-engine.x86_64 17.03.0.ce-1.el7.centos @dockerrepoyum -y remove docker-engine.x86_643.删除镜像/容器等
rm -rf /var/lib/dockerdocker rmi $(docker images -q) -fdocker cp /Users/lee/.zshrc node:/root/.zshrcdocker stop $(docker ps -q) & docker rm $(docker ps -aq)docker rmi $(docker images -q) -f| Telephone | ||
|---|---|---|
| +86 13810902078 | 13810902078 | [email protected] |
| Nationality | Hometown |
|---|---|
| China | Beijing |
| Experience | GitHub |
|---|---|
| 6 years+ | iq9891 |
- Vue.js 2.x project experience, involved PC | WAP | WeChat | WeChat applet, user The crowd is: B-end user and C-end user;
- Vue.js open source UI library experience;
- Has many years of front-end experience, has experience in leading junior or intermediate engineers, and has many years of experience in leading the team;
- Skilled in using git. Currently the front-end team 10 people, using git cooperative development, has extensive team management experience;
- Learn about Linux common commands such as rm, ls, ll, etc., to understand nginx;
- Use grunt | gulp | webpack to build the project alone;
- Have experience in mobile and mobile games, have an understanding of the Egret engine, have their own insights on mobile animation; project address ;
- Learn about nodejs, mongodb | redis, use express | thinkjs to build websites, write RESTful APIs, and have project experience;
- Familiar with docker, with docker project experience, able to write dockerfile.
- Open source project
- Company open source UI library
- Self-maintained UI library
- JavaScript native rich text editor
- Front End Resources Accumulation
- English skills are not very good, but also need translation tools
- Projects always like new technology attempts, sometimes delaying the construction period
- After completing an iteration, I always like to come up with a lot of options to choose a quality plan, but because of this project, sometimes it is postponed.
- In terms of the management team, there are always a lot of demands on the front end. I am always in charge of the person in charge, so that the current project can be completed after the quality and quantity are completed.
- Sometimes because the code quality is too much, the project will have an extension.
- Javascript aspect. Proficient in JS grammar, flexible use of functions, mastering element acquisition methods, proficient in this point. Ability to develop js components independently and learn about ES5+. Will use frameworks such as AngularJs, React and Vue.js and have practical experience.
- NodeJS, will use gulp, grunt, webpack and other build tools; understand thinkjs, express, koa and other frameworks. Ability to write RESTFUL APIs using the node framework, or develop SSRs in conjunction with the front-end framework React or Vue.js.
- CSS aspects. Ability to write CSS for website development. Proficient in css3, such as excessive, animation, etc. css3 style. Proficient in responsive layout, adapt to various models on the mobile phone pad side. Proficient in css design patterns OOCSS and SMACSS. Skilled in using css preprocessors: sass and less.
- HTML5 aspect. Skilled in canvas, relying on the Egret Engine to write HTML5 games independently. Skilled in using various new semantic tags for website development. Familiar with the history management of HTML5. Ability to interact with audio and video. The user experience can be enhanced with the new form validation and type attributes in HTML5. Use local storage (localstorage) for data interaction.
- Development environment. Familiar with OS X and Linux development environment, proficient in win development environment, proficient in using command line tools. Proficient in SVN, GIT version management tool.
- For deployment, familiar with Linux, Nginx, familiar with docker, deploying projects with docker, deploying projects with strider or gitlab, and having practical experience.
- Events
- Job content:
- Development of common components
- Formulation of company front-end specifications
- Pre-construction of the project
- Construction and maintenance of open source componentized platform
- Development of core code
- Exploration and practice of cutting-edge technology
- Conquering difficult problems
- Front-end code quality control
- work performance
- Event Easy Platform Project 3.0 Revision
- Lead the company's technical code repository from Github to Gitlab and implement front-end automated deployment (Gitlab-runner)
- Leading the front end 10 people team technical improvement
- Formulate the company's previous paragraph specification
- Constrained backend interface specification
- Control the quality of the design draft provided by the UI designer
- 2.0 to 3.0 related
| Version | Development | Technology Stack | Code management | Online |
|---|---|---|---|---|
| 2.0 | Mixed Development | jQuery+css | Github | Manual |
| 3.0 | Separate development | Vue.js+scss+nodeJs+webpack+EM-FE | Gitlab | Gitlab-runner |
- Appadhoc
- Job content:
- Editor, ics system, SaaS platform development for A/B testing, product iteration for expidea
- Development of common components
- Code style, front-end specification development
- Project structure, construction of the build process
- Exploration and research sharing of new technologies
- work performance
- 2 major refactorings completed during the period (syntax upgrade | technology stack replacement)
- Leading the 4-person front-end team to complete SDK development for A/B testing and SaaS platform development for A/B testing.
ssh 用户名@192.168.1.XXX
之后还得输入密码,那么如何不输入密码快捷键搞定呢?
login.exp 文件,内容如下:#!/usr/bin/expect
set timeout 30
spawn ssh [lindex $argv 0]@[lindex $argv 1] -p [lindex $argv 3]
expect {
"(yes/no)?"
{send "yes\n";exp_continue}
"password:"
{send "[lindex $argv 2]\n"}
}
interact
login.exp 放到 /usr/local/bin/ 目录下+Send text at start 中 login.exp 用户名 ip 密码 端口 , 如 login.exp iq9891 192.168.1.XXX 123 22npx lerna create ui-app -yyarn workspace @fe6/cli-utils add chalkyarn lerna add @fe6/tpl-vue2-js --scope=@fe6/clilerna version --conventional-commitslerna publish from-gitlerna clean第一次玩 mac ,所以多年前不小心没卸载 node ,直接安装的 nvm ,结果导致切换版本总是报下面的错误;
nvm is not compatible with the npm config "prefix" option: currently set to "/Users/XXX/.nvm/versions/node/v0.12.7"
Run `nvm use --delete-prefix v4.6.2` to unset it.
当时处理的问题是直接把原装 node 卸载,结果一直在命令行工具启动的时候,node 都找不到。今天终于找到了办法,记录一下。
解决方案:
将 nvm 管理的所要用的 node 软链到程序目录,每次打开就找到了
ln –s .nvm/versions/node/v13.14.0/bin/node /usr/local/bin/node
参考链接:
3911
// 先下载
yarn global add npm-check-updates
// 更新包(yarn.lock和package.json同步更新)
ncu --upgrade --upgradeAll && yarn upgrade需要手动选择升级的依赖包,按空格键选择,a 键切换所有,i 键反选选择
yarn upgrade-interactive --latestyarn.lock和package.json都会更新,但是会进行版本锁定 "echarts": "4.2.0-rc.2"
yarn upgrade package@version怎么让配置的安卓启动图片撑满屏幕? 原来的代码如下
<bitmap
  android:gravity="center"
  android:src="@mipmap/launch_image"
/>
去掉 android:gravity="center" 代码即可
<bitmap
  android:src="@mipmap/launch_image"
/>
| 命令 | 说明 |
|---|---|
| zip -r water.zip water | 将 water 压缩成 water.zip 文件 |
| unzip water.zip | 将 water.zip 解压 |
| cp -r water/ water-back/ | 将 water 文件夹 复制一份,名字为 water-back |
| pbcopy < ~/.ssh/XX.pub | 复制 XX.pub 公钥文件 |
| ssh-keygen -t rsa -C "[email protected]" -f ~/.ssh/second | 在 ~/.ssh/ 路径生成 名为 second 的公钥和私钥 |
| chmod 777 ./water.md* | 将 water.md 文件夹赋予 777 权限 |
| sudo chown -R XXX:staff | 修改文件用户,将 dir 文件夹及里面的所有用户改成 XXX |
| chgrp qq /home/qq | 命令:chgrp 组 目录或文件名(把home目录下的qq目录的所属组改为qq组) |
| du -sh | 查看当前文件夹大小 |
| ps aux | grep -i docker | 查看 docker 的进程 |
| kill -9 3939 | 杀掉 3939 进程id |
A declarative, efficient, and flexible JavaScript library for building user interfaces.
🖖 Vue.js is a progressive, incrementally-adoptable JavaScript framework for building UI on the web.
TypeScript is a superset of JavaScript that compiles to clean JavaScript output.
An Open Source Machine Learning Framework for Everyone
The Web framework for perfectionists with deadlines.
A PHP framework for web artisans
Bring data to life with SVG, Canvas and HTML. 📊📈🎉
JavaScript (JS) is a lightweight interpreted programming language with first-class functions.
Some thing interesting about web. New door for the world.
A server is a program made to process requests and deliver data to clients.
Machine learning is a way of modeling and interpreting data that allows a piece of software to respond intelligently.
Some thing interesting about visualization, use data art
Some thing interesting about game, make everyone happy.
We are working to build community through open source technology. NB: members must have two-factor auth.
Open source projects and samples from Microsoft.
Google ❤️ Open Source for everyone.
Alibaba Open Source for everyone
Data-Driven Documents codes.
China tencent open source team.
