

We've learned how to use Mongoose to create Schemas and then interact with our MongoDB database. In the following exercise, we will practice how to implement this by creating awesome recipes.
- Fork this repo
- Clone this repo
-
Upon completion, run the following commands:
git add .
git commit -m "Completed lab"
git push origin master
-
Create Pull Request so your TAs can check up your work.
To run the application, the first thing you have to do is install all of its dependencies. Run the following command:
npm installCreate a Recipe model inside of the file /models/Recipe.model.js. The schema should have the following fields:
- title - Type
String. It should be required and unique. - level - Type
String. Can be one of the following values: Easy Peasy - Amateur Chef - UltraPro Chef (remember theenumvalidator 😉). - ingredients - Type
ArrayofStrings (represented as[ String ]). - cuisine - Type
String. Should be required. - dishType - Type
String. Possible values: breakfast, main_course, soup, snack, drink, dessert or other. - image - Type
String. Default value: "https://images.media-allrecipes.com/images/75131.jpg". - duration - Type
Number. The minimum value should be 0. - creator - Type
String. - created - Type
Date. By default, today.
In the index.js, we first connect to the database using mongoose.connect() and following the connection we call the method Recipe.deleteMany() to remove any existing documents from the recipes collection:
// ...

mongoose
  .connect(MONGODB_URI)
  .then(x => {
    console.log(`Connected to the database: "${x.connection.name}"`);
    // Before adding any recipes to the database, let's remove all existing ones
    return Recipe.deleteMany();
  })
// ...
Then, you should add a new recipe document to the database by calling the Model.create method and passing it the recipe details as an object. After inserting the recipe, you should console.log the title of the recipe.
You can use MongoDB Compass to double-check that everything is working as intended.
To run your code, remember you should use:
node index.jsWe are importing an array of recipes from the data.json file. Using the Model.insertMany method, you should add the entire array to the database. After inserting the documents, print the title of each recipe to the console.
Tip: Follow the same tip as in the previous step.
Now you should have six different recipes in the database, but there was a mistake in one of them. The Rigatoni alla Genovese does not take that long. You should update the duration field and set it to 100. You might want to use the Model.findOneAndUpdate method. After updating it, print a success message!
Oh oh! The Carrot Cake is no longer available, so we need to remove it from the database. Using the Model.deleteOne method, remove that recipe from the database and display a success message after doing it!
As the last step, you need to close the database. Otherwise, the connection will stay open until the Node.js process dies. Pay attention to the asynchronicity of the operation. You should only close the connection after everything is done! 😉
Happy coding! ❤️
I am stuck and don't know how to solve the problem or where to start. What should I do?
If you are stuck in your code and don't know how to solve the problem or where to start, you should take a step back and try to form a clear question about the specific issue you are facing. This will help you narrow down the problem and come up with potential solutions.
For example, is it a concept that you don't understand, or are you receiving an error message that you don't know how to fix? It is usually helpful to try to state the problem as clearly as possible, including any error messages you are receiving. This can help you communicate the issue to others and potentially get help from classmates or online resources.
Once you have a clear understanding of the problem, you will be able to start working toward the solution.
How to use then() and catch() with Promises?
When working with Promises or a function that returns a promise, you can attach the .then() method to handle the resolved value and a catch() method to handle the possible rejection value.
Here is an example of how to use .then() and .catch() to handle a simple promise:
myPromise
  .then((result) => {
    console.log(result);
  })
  .catch((error) => {
    console.log(error);
  })
Here is an example of using .then() and .catch() to handle a promise returned by a function/method:
someAPI.getData()
  .then((result) => {
    console.log(result);
  })
  .catch((error) => {
    console.log(error);
  })
If you are trying to execute multiple promises in a sequence, you can do so by returning a promise from a .then() block. Example:
someAPI.getData()
    .then((result1) => {
        console.log(result1
        return someAPI.getData( // Return another pending promise
    .then((result2) => { // Handle the returned promise
        console.log(result2
    })
    .catch((error) => {
        console.log(error
    })
The first line someAPI.getData() initiates an asynchronous operation, which returns a promise. The .then() method is then called on the promise to handle the resolved value.
The first then() returns another promise with another call to someAPI.getData(), which allows to chain another then() function that handles the second resolved value, logging it to the console.
How to use async function and await?
You create an asynchronous function by using the async keyword before the function definition.
An async function allows you to use the await keyword inside the function body to wait for a promise to resolve.
When using an async function to handle asynchronous code (e.g. API call) that may potentially throw an error, we have to add a try/catch block to be able to handle any potential errors.
async function doSomething() {
  try {
    // Code that will be executed asynchronously
    // that might throw an error
  }
  catch (error) {
    // Handle the error
  }
}Here is an example of using await inside of an async function to await for a promise to resolve:
async function getData() {
  try {
    let response = await fetch('https://api.github.com/search/repositories?q=js');
    let data = await response.json();
    console.log(data);
  }
  catch (error) {
    // error handling
  }
}
In the above example, the first await is used to wait for the promise returned by fetch() to resolve. The value of the resolved promise is then assigned to the variable response.
The second await is used to parse the response as json object, and is used to wait for the promise returned by response.json(). The resolved value is then assigned to the variable data.
The function uses the return keyword to return the data to allow consuming the value outside of the function.
The difference between a regular function and an async function is that the async function always returns a Promise.
Once defined, you can invoke an async function just like a regular function and handle the Promise it returns using .then() and .catch() or await.
Here's an example of using then and catch to handle a Promise returned by an async function:
async function greeting() {
  // An `async` function always returns a promise
  // This value will be returned as a Promise
  return "HELLO IRONHACKERS!";
}

greeting()
  .then((result) => {
    console.log(result);
  })
  .catch((error) => {
    console.log("Error:", error);
  })
Here's an example of handling the same async function but this time using await:
async function greeting() {
  // Async function always returns a promise
  // This value will be returned as a Promise
  return "HELLO IRONHACKERS!";
}

// We need another wrapper `async` function so that we can use `await`
async function wrapperFunction() {
  try {
    const result = await greeting()
    console.log(result);
  }
  catch (error) {
    console.log("Error:", error);
  }
}
Note that we needed another wrapper async function to be able to use await.
How to use try / catch block?
The try/catch block is used to handle errors that occur during the execution of a program.
The try block contains the code that might throw an error, and the catch block contains the code that will handle the error.
Here is an example of using a try/catch block:
try {
  // Code that might throw an error
} catch (error) {
  // Handle the error
}
The try/catch block is typically used in async functions when handling asynchronous code that may potentially throw an error.
Here is an example of using a try/catch block in an async function when handling a promise:
async function doSomething() {

  try {
    // Code that might throw an error
    const result = await someAsyncFunction();
  }
  catch (error) {
    // Handle the error
    console.error(error);
  }

}
In the above example, the try block contains an asynchronous operation that might throw an error: await someAsyncFunction(). If an error is thrown, execution will automatically jump to the catch block.
I got the error: "Cannot find module" Node.js". How can I resolve it?
The error "Cannot find module" in a Node.js application means that the module you are trying to import or use does not exist in your project or cannot be found by Node.js.
There are a few things you can try to resolve the issue:
- Dependencies are not installed: Make sure that all dependencies are installed.
To do this, run the command
npm installin the root folder of your project. This will install all of the dependencies listed in the project'spackage.jsonfile, and ensure that all of the modules that your Node'js application requires are available. - Module is not installed: Make sure that the package you are trying to use is listed in the project's
package.jsonand that it is installed. To do this, run the commandnpm install <package_name>, replacing the<package_name>with the name of the package. This will add the package to the list of dependencies in thepackage.jsonfile, and install it in the project. - Module is not imported: Make sure that you've imported the module/package correctly and that the
requirestatement is spelled correctly and available in the correct place in your code. - Wrong file path: If you are importing another file as a module, make sure that the file you are trying to require is located in the correct folder and that you are using the correct file path.
- Wrong module/package name: Check the spelling of the package name you are trying to import.
I got the error "Error: listen EADDRINUSE: Address already in use". How do I fix it?
This error means that the port is taken by another process that is still running on that port. To fix the issue, you need to kill the process using the port and then run the command again. Here's how to do it:
To kill the process running on port 3000, run the following command in the terminal:
sudo kill -9 $(lsof -t -i:3000) Important: Replace the above example port 3000 with the port number of the process you are trying to kill.
To kill the running process on Windows using the Task Manager do the following:
- Open the Task Manager by pressing: Ctrl + Shift + Esc
- Find the Node process you want to terminate.
- Right-click and select End Task
To kill the running process on Windows using the Command Prompt do the following:
- Open the windows Start menu
- Search for CMD in the search bar
- In the search results, right-click on Command Prompt and select Run as administrator. This will open the Command Prompt terminal.
- In the Command Prompt terminal, run the following command to find the process ID:
netstat -ano|findstr "PID :3000"If the process happens to be running on another port, simply replace
3000with the number the port number the process is running on.
This will return the process id (PID). You should then run the following command using the process id (PID) you got in the previous step to terminate the process:
taskkill /PID 12345 /fImportant: Replace the above example PID 12345, with the process id (PID) you got in the previous step.
I got the error "Port is already in use". How do I fix it?
This error means that the port is taken by another process that is still running on that port. To fix the issue, you need to kill the process using the port and then run the command again. Here's how to do it:
To kill the process running on port 3000, run the following command in the terminal:
sudo kill -9 $(lsof -t -i:3000) Important: Replace the above example port 3000 with the port number of the process you are trying to kill.
To kill the running process on Windows using the Task Manager do the following:
- Open the Task Manager by pressing: Ctrl + Shift + Esc
- Find the Node process you want to terminate.
- Right-click and select End Task
To kill the running process on Windows using the Command Prompt do the following:
- Open the windows Start menu
- Search for CMD in the search bar
- In the search results, right-click on Command Prompt and select Run as administrator. This will open the Command Prompt terminal.
- In the Command Prompt terminal, run the following command to find the process ID:
netstat -ano|findstr "PID :3000"If the process happens to be running on another port, simply replace
3000with the number the port number the process is running on.
This will return the process id (PID). You should then run the following command using the process id (PID) you got in the previous step to terminate the process:
taskkill /PID 12345 /fImportant: Replace the above example PID 12345, with the process id (PID) you got in the previous step.
I got the error: "Error: connect ECONNREFUSED ::1:27017". What should I do?
This error means that the Node.js application is unable to connect to a MongoDB instance running on the local (same) machine. There are a few things you should look at to troubleshoot this:
- Check the database connection string: Check that the connection string is correct. The database connection string should be in the format:
mongodb://127.0.0.1:27017/databaseName- Verify that MongoDB is running on your machine: Check that MongoDB is running on your machine. If it is not running, restart the service according to the following instructions:
On Mac:
Check if MongoDB is running on your machine, by running the command:
brew services listYou should see the service mongodb-community listed as started. If not, run the following command to start it:
brew services start mongodb-communityOn Ubuntu:
You can start the mongod process by issuing the following command:
sudo systemctl start mongodIf you receive an error similar to the following when starting mongod:
Failed to start mongod.service: Unit mongod.service not found.
Run the following command first:
sudo systemctl daemon-reloadThen run the start command above again.
On Windows:
To open the MongoDB process on Windows, you will need to do these steps:
-
Go to your Program Files in your C: drive - the local disk
-
In Program Files go to the MongoDB folder
-
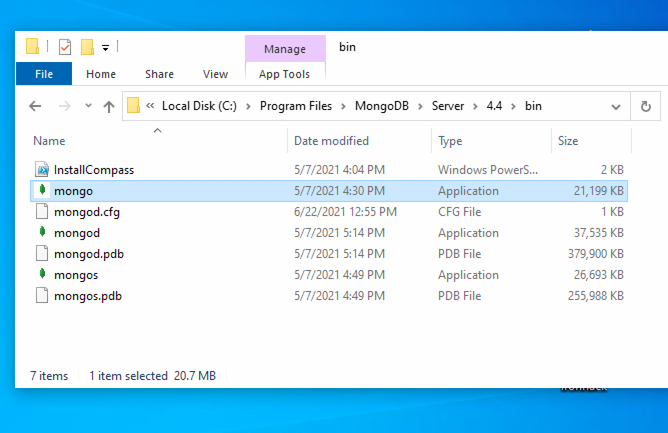
Inside the MongoDB folder, follow this path
Server/4.4/bin. The version number on your system (4.4) may be slightly different for the newer installations. -
Double-click on the file named mongod.exe.
Check the image inside
Why is my database empty even though I am able to connect?
It is normal for the database to be empty if you have not inserted any data into it. If you want to confirm that your connection to the database is working correctly, you can try inserting a simple document into a collection and then querying the collection or checking the database to see if the document was added.
I get the error "MongoDB is not running on the provided host and port" when trying to connect with MongoDB Compass. What should I do?
If you are trying to connect to a MongoDB instance running locally, you should first check that MongoDB is running on your machine. If it is not running, restart the service according to the following instructions:
On Mac:
Check if MongoDB is running on your machine, by running the command:
brew services listYou should see the service mongodb-community listed as started. If not, run the following command to start it:
brew services start mongodb-communityOn Ubuntu:
You can start the mongod process by issuing the following command:
sudo systemctl start mongodIf you receive an error similar to the following when starting mongod:
Failed to start mongod.service: Unit mongod.service not found.
Run the following command first:
sudo systemctl daemon-reloadThen run the start command above again.
On Windows:
To open the MongoDB process on Windows, you will need to do these steps:
-
Go to your Program Files in your C: drive - the local disk
-
In Program Files go to the MongoDB folder
-
Inside the MongoDB folder, follow this path
Server/4.4/bin. The version number on your system (4.4) may be slightly different for the newer installations. -
Double-click on the file named mongod.exe.
Check the image inside
How to create a Mongoose model?
The mongoose model serves as a blueprint for creating and managing documents within MongoDB collections. The mongoose model is an overlay on top of one MongoDB collection, that we use to query and interact with that database collection.
Here is an example of creating a User model to manage documents in the users collection:
// IMPORT MONGOOSE
const mongoose = require("mongoose");

// CREATE A SCHEMA - defines the shape of the documents
const userSchema = new mongoose.Schema({
  firstName: String,
  lastName: String
});

// CREATE THE MODEL
const User = mongoose.model("User", schema);

// EXPORT THE MODEL
module.exports = User;
In the above example, we created and exported a User model, so that it can be imported and used anywhere in the application for managing the database collection users.
Let's break down the above example and the steps in creating a mongoose model:
- Import mongoose: The first step is to import the
mongooselibrary. - Create a schema: The next step is to create a schema, which defines the shape of the documents that will be stored in the
userscollection. In the above example, the schema has two fieldsfirstNameandlastNamewhich are both strings. - Create the model: The last step is to create the model. This is doe using the method
mongoose.model(), which takes two arguments: the name of the model, in this case'User'and the schema it should use. Mongoose automatically pluralizes and converts to lowercase the provided model name and uses it as the name of the collection. In this case, the string'User'is automatically converted into a collection name ->users. - Export the model: After the model is created, it needs to be exported so it can be used in other parts of the application.
How do I resolve the Mongoose error "ValidationError: Path ... is required."?
This error occurs when you try to save a document to the database without a value for a field that is marked as required in the model. To fix this error, make sure that you are providing a value for all required fields when creating or updating a document. You can verify that you are providing the correct values by using the console.log to inspect the data before saving it to the database.
I am getting an error: "not defined". How do I fix it?
The "ReferenceError: variable is not defined" error in JavaScript occurs when you try to access a variable or a function that has not been defined yet or is out of scope. To fix the issue, check that you have defined the variable or function that you are trying to use and double-check the spelling to make sure you are using the correct name. In case the variable or a function is defined in another file, make sure that the file has been imported or loaded correctly.
When I try to run the app, I get an error "command not found: nodemon"
Make sure you have nodemon installed globally:
npm install -g nodemonThis will install nodemon globally on your system, making it available to all of your projects.
I am unable to push changes to the repository. What should I do?
There are a couple of possible reasons why you may be unable to push changes to a Git repository:
- You have not committed your changes: Before you can push your changes to the repository, you need to commit them using the
git commitcommand. Make sure you have committed your changes and try pushing again. To do this, run the following terminal commands from the project folder:
git add .
git commit -m "Your commit message"
git push- You do not have permission to push to the repository: If you have cloned the repository directly from the main Ironhack repository without making a Fork first, you do not have write access to the repository. To check which remote repository you have cloned, run the following terminal command from the project folder:
git remote -vIf the link shown is the same as the main Ironhack repository, you will need to fork the repository to your GitHub account first, and then clone your fork to your local machine to be able to push the changes.
Note: You may want to make a copy of the code you have locally, to avoid losing it in the process.


