Watermark Pod Autoscaler Controller
Disclaimer: This project is in beta - The API might change.
Overview
The Watermark Pod Autoscaler (WPA) Controller is a custom controller that extends the Horizontal Pod Autoscaler (HPA).
The features
- Set high and low bounds to prevent autoscaling events.
- Specify scaling velocity.
- Specify windows of time to restrict upscale or downscale events.
- Different algorithms to compute the desired number of replicas.
The goal
This project is meant to solve the internal limitations faced with the upstream pod autoscaler controller. Many teams expend a lot of manual effort to autoscale. They can't rely on the HPA, as the logic is too simple.
The WPA extends the HPA. We believe that many of, if not all of, the features of the WPA controller should be in the HPA.
While we do use the WPA internally, we also want to submit a KEP to suggest upstreaming the features and making them available to the community.
When to use it
If you want to autoscale some of your applications, but:
- The single threshold logic of the HPA is not enough.
- You need to specify forbidden windows specific to your application.
- You want to limit the scaling velocity.
The WPA is intended to offset the limitations of the HPA.
Usage
The algorithm
There are two options to compute the desired number of replicas. Depending on your use case, you might want to consider one of the following:
-
averageThe ratiovalue from the external metrics provider/current number of replicas, and is compared to the watermarks. The recommended number of replicas isvalue from the external metrics provider/watermark(low or high depending on the current value).The
averagealgorithm is a good fit if you use a metric that does not depend on the number of replicas. Typically, the number of requests received by an ELB can indicate how many webservers we want to have, given that we know that a single webserver should handlenrq/s. Adding a replica will not increase or decrease the number of requests received. -
absoluteThe default value isabsolute. We compare the raw avg metric from the external metrics provider and consider it the utilization ratio. The recommended number of replicas is computed ascurrent number of replicas*value from the external metrics provider/watermark.The
absolutealgorithm is the default, as it represents the most common use case. For example, if you want your application to run between 60% and 80% of CPU, andavg:cpu.usageis at 85%, you need to scale up. The metric has to be correlated to the number of replicas.
Note: In the upstream controller, only the math.Ceil function is used to round up the recommended number of replicas.
This means that if you have a threshold at 10, you will need to reach a utilization of 8.999... from the external metrics provider to downscale by one replica. However, a utilization of 10.001 will make you scale up by one replica.
The WPA controller will use math.Floor if the value is under the lower watermark. This ensures symmetrical behavior. Combined with other scaling options, this allows finer control over when to downscale.
Deployment
To use the Watermark Pod Autoscaler, deploy it in your Kubernetes cluster:
-
Download the [Watermark Pod Autoscaler project zip ball][https://github.com/DataDog/watermarkpodautoscaler/archive/master.zip]. Source code can be found at [
DataDog/watermarkpodautoscaler][https://github.com/DataDog/watermarkpodautoscaler]. -
Unzip the project, and go into the
./watermarkpodautoscalerfolder. -
Define your namespace and Watermark Pod Autoscaler controller:
DD_NAMESPACE="datadog"
DD_NAMEWPA="wpacontroller"
-
Create the namespace:
kubectl create ns $DD_NAMESPACE -
Install the Watermark Pod Autoscaler controller with Helm:
- Helm v2:
helm install --name $DD_NAMEWPA -n $DD_NAMESPACE ./chart/watermarkpodautoscaler
- Helm v3:
helm install $DD_NAMEWPA -n $DD_NAMESPACE ./chart/watermarkpodautoscaler
The process
Create your WPA in the same namespace as your target deployment.
The Datadog Cluster Agent will pick up the creation/update/deletion event. It parses the WPA spec to extract the metric and scope to get from Datadog.
Concrete examples
In this example, we are using the following spec configuration:
apiVersion: datadoghq.com/v1alpha1
kind: WatermarkPodAutoscaler
metadata:
  name: example-watermarkpodautoscaler
spec:
  downscaleForbiddenWindowSeconds: 60
  upscaleForbiddenWindowSeconds: 30
  scaleDownLimitFactor: 30
  scaleUpLimitFactor: 50
  minReplicas: 4
  maxReplicas: 9
  metrics:
  - external:
      highWatermark: 400m
      lowWatermark: 150m
      metricName: custom.request_duration.max
      metricSelector:
        matchLabels:
          kubernetes_cluster: mycluster
          service: billing
          short_image: billing-app
    type: External
tolerance: 0.01- Bounds
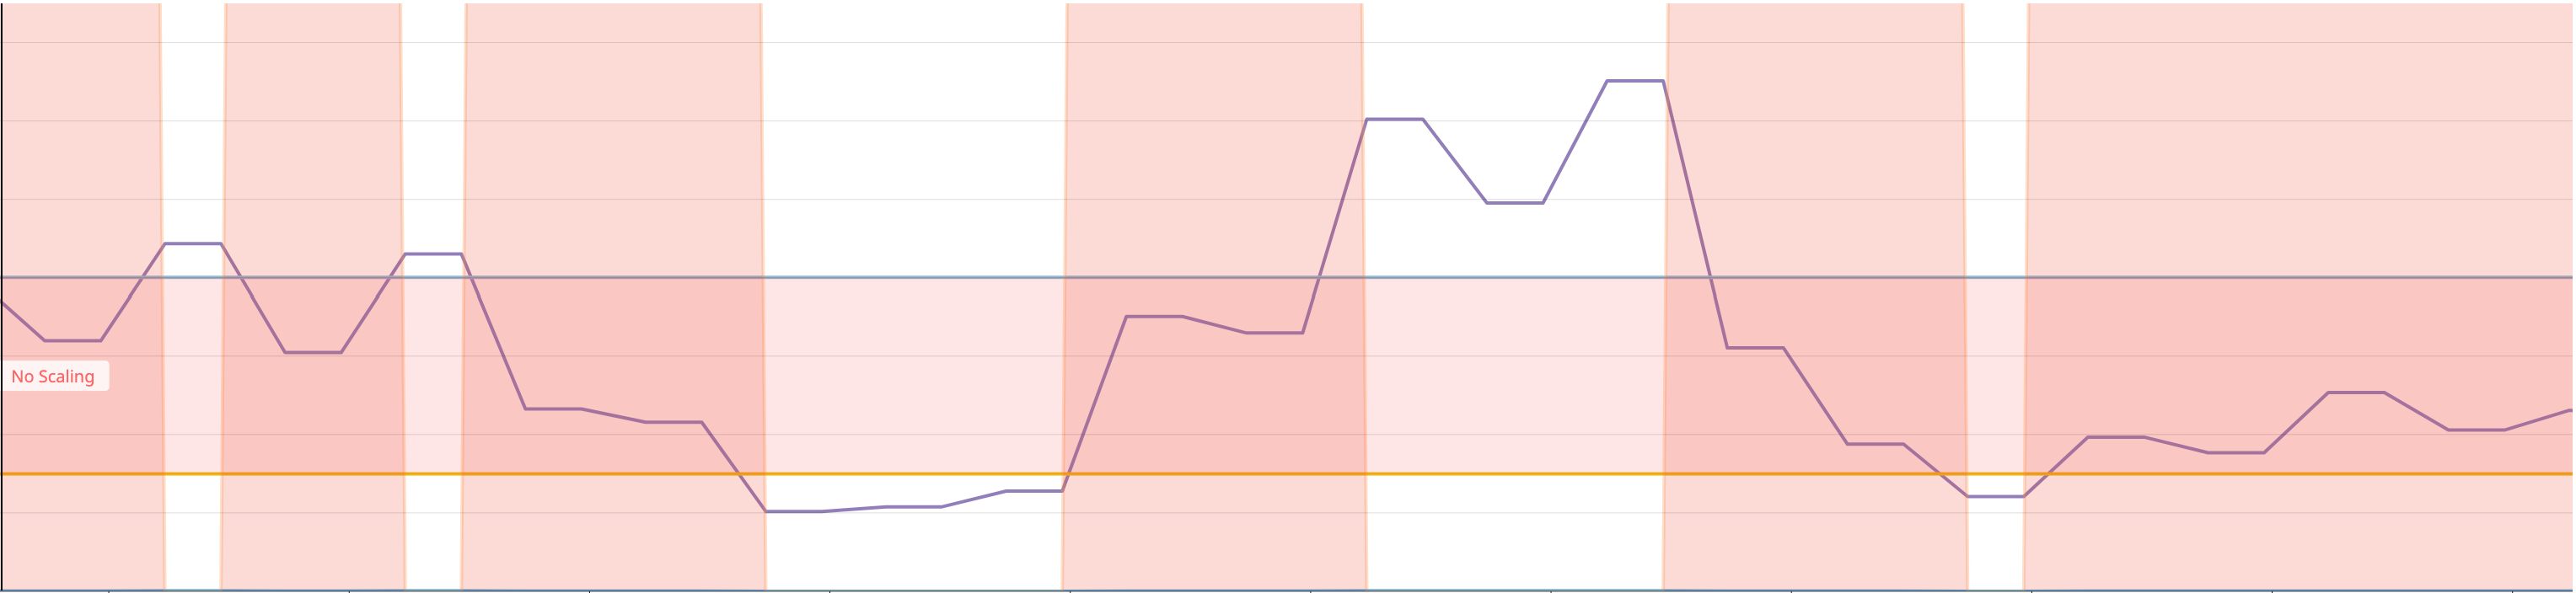
Starting with the watermarks, the value of the metric collected (watermarkpodautoscaler.wpa_controller_value) from Datadog in purple when between the bounds (watermarkpodautoscaler.wpa_controller_low_watermark and watermarkpodautoscaler.wpa_controller_high_watermark) will instruct the controller not to trigger a scaling event. They are specified as Quantities, so you can use m | "" | k | M | G | T | P | E to easily represent the value you want to use.
We can use the metric watermarkpodautoscaler.wpa_controller_restricted_scaling{reason:within_bounds} to verify that it is indeed restricted. Note: the metric was multiplied by 1000 in order to make it more explicit that during this time, no scaling event could have been triggered by the controller.
- Velocity
The second set of configuration options pertains to the scaling velocity of your deployment, controlled by scaleDownLimitFactor and scaleUpLimitFactor.
These are integers between 0 and 100. They represent the maximum ratio of respectively downscaling and upscaling, given the current number of replicas.
In this case, should we have 10 replicas and a recommended number of replicas at 14 (see the Algorithm section for more details on the recommendation) with a scaleUpFactor of 30 (%), we would be capped at 13 replicas.
In the following graph, we can see that the suggested number of replicas (in purple), represented by the metric watermarkpodautoscaler.wpa_controller_replicas_scaling_proposal is too high compared to the current number of replicas. This will trigger the upscale capping logic, which can be monitored using the metric watermarkpodautoscaler.wpa_controller_restricted_scaling{reason:upscale_capping} (Note: Same as above, the metric was multiplied to make it more explicit). Thus, the effective number of replicas watermarkpodautoscaler.wpa_controller_replicas_scaling_effective will scale up, but according to the scaleUpLimitFactor.

In this similar example, we avoid downscaling too much, and we can use the same set of metrics to guarantee that we only scale down by a reasonable number of replicas.

It is important to note that we always make conservative scaling decisions.
- With a
scaleUpLimitFactorof 29%: if we have 10 replicas and are recommended 13, we will upscale to 12. - With a
scaleDownLimitFactorof 29%: if we have 10 replicas and are recommended 7, we will downscale to 8. - The minimum number of replicas we can recommend to add or remove is one (not zero). This is to avoid edge scenarios when using a small number of replicas.
- Note that the options
minReplicasandmaxReplicastake precedence. Refer to the Precedence section.
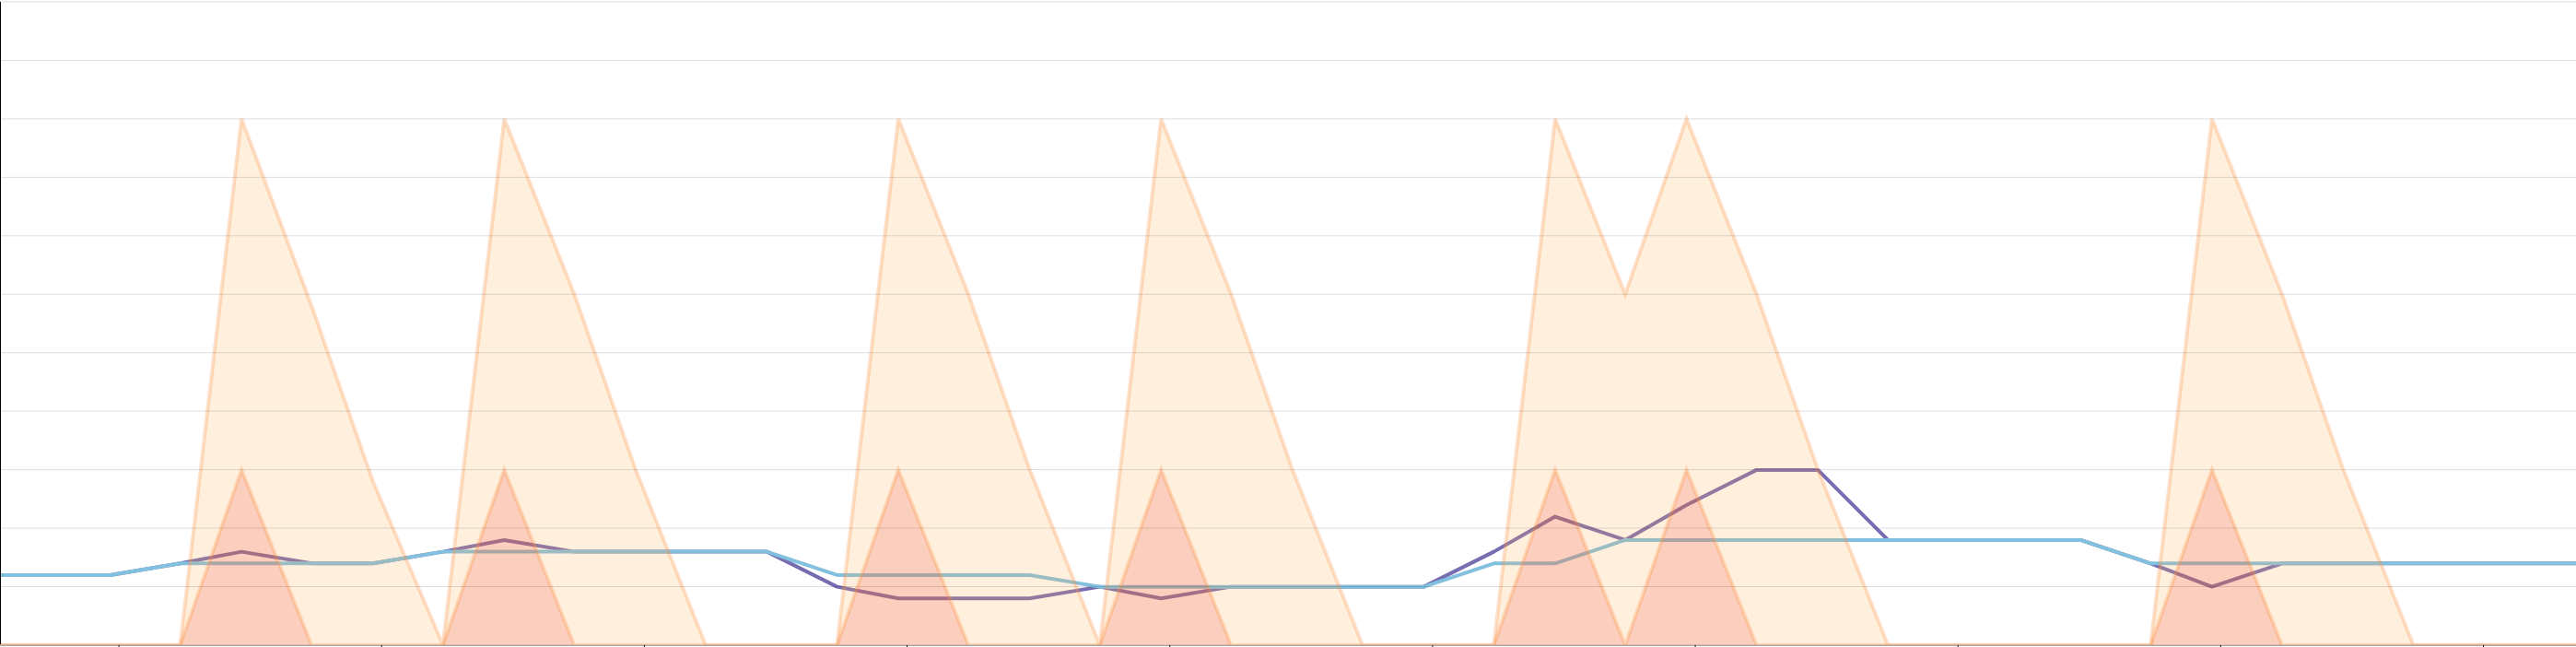
- Cooldown periods
Finally, the last options available are downscaleForbiddenWindowSeconds and upscaleForbiddenWindowSeconds . These represent how much time (in seconds) after a scaling event to wait before scaling down and scaling up, respectively. We only keep the last scaling event, and we do not compare the upscaleForbiddenWindowSeconds to the last time we only upscaled.
In the following example, we can see that the recommended number of replicas is ignored if we are in a cooldown period. The downscale cooldown period can be visualized with watermarkpodautoscaler.wpa_controller_transition_countdown{transition:downscale}, and is represented in yellow on the graph below. We can see that it is significantly higher than the upscale cooldown period (transition:upscale) in orange on our graph. Once we are recommended to scale, we will only scale if the appropriate cooldown window is over. This will reset both countdowns.
As we retrieve the value of the external metric, we will first compare it to the sum highWatermark + tolerance and to the difference lowWatermark - tolerance.
If we are outside of the bounds, we compute the recommended number of replicas. We then compare this value to the current number of replicas to potentially cap the recommended number of replicas also according to minReplicas and maxReplicas.
Finally, we look at if we are allowed to scale, given the downscaleForbiddenWindowSeconds and upscaleForbiddenWindowSeconds.
- Scaling
If all the conditions are met, the controller will scale the targeted object in scaleTargetRef to the recommended number of replicas only if the dryRun flag is not set to true. It will indicate this by logging:
{"level":"info","ts":1566327479.866722,"logger":"wpa_controller","msg":"DryRun mode: scaling change was inhibited currentReplicas:8 desiredReplicas:12"}Limitations
- Only for external metrics.
- Only officially supports one metric per WPA.
- Does not take CPU into account to normalize the number of replicas.
- Does not consider the readiness of pods in the targeted deployment.
- Similar to the HPA, the controller polls the External Metrics Provider every 15 seconds, which refreshes metrics every 30 seconds.
Troubleshooting
On the Datadog Cluster Agent side
The Cluster Agent is running an informer against the WPA resources, and similar to the HPA, upon creation/update/deletion will parse the spec to query the metric from Datadog.
The Cluster Agent doesn't run the WPA listener by default. To enable WPA in the Cluster Agent, set the environment variable DD_EXTERNAL_METRICS_PROVIDER_WPA_CONTROLLER=true and update the ClusterRole assigned to the Cluster Agent Service Account to have access to WatermarkPodAutoscaler objects:
[...]
- apiGroups: ["datadoghq.com"]
  resources:
  - watermarkpodautoscalers
  verbs:
  - get
  - list
  - watch
[...]
Note: To enable WPA in the Cluster Agent using the datadog helm chart, set clusterAgent.metricsProvider.wpaController to true. The ClusterRole will be updated automatically.
Once you have applied those changes and created a WPA object, if you exec in the Datadog Cluster Agent pod and run agent status you will be able to see more specific details about the spec of the autoscalers that were parsed (whether it's a horizontal or a watermark pod autoscaler).
  * watermark pod autoscaler: default/example2-watermarkpodautoscaler
    - name: example2-watermarkpodautoscaler
    - namespace: default
    - type: watermark
    - uid: ff09b7d8-d99b-11e9-a8c1-42010a8001c4
    Metric name: sinus
    Labels:
    - foo: bar
    Value: 75.1297378540039
    Timestamp: 15688259400
    Valid: true

  * horizontal pod autoscaler: default/nginxext
    - name: nginxext
    - namespace: default
    - type: horizontal
    - uid: 61ef3f6e-af32-11e9-a8c1-42010a8001c4
    Metric name: docker.mem.rss
    Labels:
    - cluster-location: us-central1-a
    - cluster-name: charly
    Value: 263888700952
    Timestamp: 15688259400
    Valid: true
Lifecycle of the controller
In addition to the metrics mentioned above, these are logs that will help you better understand the proper functioning of the WPA.
Every 15 seconds, we retrieve the metric listed in the metrics section of the spec from Datadog.
{"level":"info","ts":1566327479.866722,"logger":"wpa_controller","msg":"Target deploy: {namespace1/my-application replicas:6}"}
{"level":"info","ts":1566327479.8844478,"logger":"wpa_controller","msg":"Metrics from the External Metrics Provider: [127]"}
{"level":"info","ts":1566327479.8844907,"logger":"wpa_controller","msg":"About to compare utilization 127 vs LWM 150 and HWM 400"}
{"level":"info","ts":1566327479.8844962,"logger":"wpa_controller","msg":"Value is below lowMark. Usage: 127 ReplicaCount 5"}
{"level":"info","ts":1566327479.8845394,"logger":"wpa_controller","msg":"Proposing 5 replicas: Based on cutom_metric.max{map[kubernetes_cluster:my-cluster service:my-service short_image:my-image]} at 18:57:59 targeting: Deployment/namespace1/my-application"}
Here, the current number of replicas seen in the target deployment is six. We then see the raw value retrieved from the External Metrics Provider, and we compare it to the high and low watermarks. Given the result of this comparison, we print the recommended number of replicas. In this case, it is five.
If you want to query the External Metrics Provider directly, you can use the following command:
kubectl get --raw "/apis/external.metrics.k8s.io/v1beta1/namespaces/<namespace of your deployment>/<name of the metrics>" | jq .You can optionally add label selectors too by adding ?labelSelector=key%3Dvalue.
If we wanted to retrieve our metric in this case, we could use:
kubectl get --raw "/apis/external.metrics.k8s.io/v1beta1/namespaces/<namespace of your deployment>/<name of the metrics>?labelSelector=key%3Dvalue%2Cotherkey%3Dothervalue%2Cshort_image%3Dimage" | jq .If you see logs such as:
{"level":"info","ts":1566397216.8918724,"logger":"wpa_controller","msg":"failed to compute desired number of replicas based on listed metrics for Deployment/datadog/propjoe-green: failed to get external metric dd.propjoe.request_duration.max: unable to get external metric datadog/propjoe-green/&LabelSelector{MatchLabels:map[string]string{fooa: bar,},MatchExpressions:[],}: no metrics returned from external metrics API"}Then you can verify that this metric is indeed not available from the External Metrics Provider. This could be because of a typo in the labels, or the metric can't be fetched from Datadog (which could be due to various factors: too sparse, API down, rate limit hit, etc.). You can look through the External Metrics Provider logs for further investigation.
We then verify the scaling velocity capping and the cooldown windows. In the case of a scaling capping, you would see something like:
{"level":"info","ts":1566327268.8839815,"logger":"wpa_controller","msg":"Upscaling rate higher than limit of 50.0% up to 9 replicas. Capping the maximum upscale to 9 replicas"}
{"level":"info","ts":1566327268.884001,"logger":"wpa_controller","msg":"Returning 9 replicas, condition: ScaleUpLimit reason the desired replica count is increasing faster than the maximum scale rate"}
{"level":"info","ts":1566327479.8845513,"logger":"wpa_controller","msg":" -> after normalization: 9"}
Then we consider the cooldown periods. You will have logs indicative of when the last scaling event was, as well as when the next upscale and downscale events are forbidden until:
{"level":"info","ts":1566327479.8845847,"logger":"wpa_controller","msg":"Too early to downscale. Last scale was at 2019-08-20 18:57:44 +0000 UTC, next downscale will be at 2019-08-20 18:58:44 +0000 UTC, last metrics timestamp: 2019-08-20 18:57:59 +0000 UTC"}
{"level":"info","ts":1566327479.8846018,"logger":"wpa_controller","msg":"Too early to upscale. Last scale was at 2019-08-20 18:57:44 +0000 UTC, next upscale will be at 2019-08-20 18:58:14 +0000 UTC, last metrics timestamp: 2019-08-20 18:57:59 +0000 UTC"}
{"level":"info","ts":1566327479.884608,"logger":"wpa_controller","msg":"backoffUp: true, backoffDown: true, desiredReplicas 5, currentReplicas: 6"}
Finally, we have verification that the deployment was correctly autoscaled:
{"level":"info","ts":1566327253.7887673,"logger":"wpa_controller","msg":"Successful rescale of watermarkpodautoscaler, old size: 8, new size: 9, reason: cutom_metric.max{map[kubernetes_cluster:my-cluster service:my-service short_image:my-image]} above target"}FAQ
-
What happens if I scale manually my deployment?
In the next reconcile loop, the new number of replicas will be considered to compute the desired number of replicas. You might see a log saying that the resource was modified by someone else. If the number of replicas configured is outside of the bounds, however, the controller will scale this back to a number of replicas within the acceptable range. -
What is the footprint of the controller?
From our testing, it is a factor of the number of deployments in the cluster.- 500+ deployments, 65MB - 10mCores
- 1600+ deployments, 105MB - 5mCores
Note: When the API server restarts, the controller runtime caches the old state and the new one for a second and then merges everything. This makes the memory usage shoot up and can OOM the controller.
-
Is the controller stateless?
Yes.
RBAC
Since we watch all the WPA definitions cluster wide, we use a clusterrole.
A useful option is to impersonate the user to verify rights. For instance, to verify that you have the right to get a deployment as the WPA controller's service account:
kubectl get deploy <your_deploy> --as system:serviceaccount:datadog:watermarkpodautoscaler -n <your_ns>Or, query the External Metrics Provider:
kubectl get --raw "/apis/external.metrics.k8s.io/v1beta1/namespaces/<your_ns>/metric --as system:serviceaccount:<your_ns>:watermarkpodautoscalerDeveloper guide
Setup your dev environment
Requirements:
- golang >= 1.13
- make
- docker
- git
After cloning the repository https://github.com/DataDog/watermarkpodautoscaler, set some environment variables:
export GO111MODULE=on
unset GOPATH
export PATH=$PATH:$(pwd)/bin
Then, to install some tooling dependencies, run make install-tools.
Useful commands
make install-tools: Install the tooling to use the operator SDK.make build: Build the controller locally.make generate: Run the several operator SDK generator, which generates code for the controller and the informer's registration.make test: Run unit tests.make validate: Run common Golang linters (golangci-lint).make e2e: Run end-to-end tests on the current configured Kubernetes cluster.make container: Build the controller Docker image using the operator SDK.make container-ci: Build the controller Docker image with the multi-stage Dockerfile.
Releasing
The release process documentation is available here.
Acknowledgements
Some of the features were inspired by the Configurable HPA or CHPA. Most of the code structure was also used for the Watermark Pod Autoscaler, although the overall packaging of the CRD was done with the operator SDK.


