Overview How does it work Steps to INSTALL AND RUN (hard and soft ware) Recommendations
Project Armed is made as a final project for Jaerock Kwons ECE 3641 Robotic Manipulation Class. The idea behind the project is to create a simple robotic arm that will mimic the movements of the user's own arm. This is done by attaching IMUs to the user on the bicep and forearm to collect data on the movements on the two links.
To achieve this goal we decided to utilize the Bosch BNO055 IMUs for data collection of the users arm movements. For the control of the joints of the robot arm we opted to use an Arduino Uno to control servo motors for the shoulder and elbow joints.
To implement this system the output from the BNO055 is sent through a UART adapter to our computer, the data input is sent through the BNO055 ROS Driver where the data is converted from the raw UART data to a test message which is sent to the /imu/data topic. From there the data is sent to our ang_vel_convert node where it will take the angular velocity from the IMUs and converts them to servo motor positions. From there the data is sent to the rosserial_python node which will send the servo positions to the Arduino which will output a PWM signal to the servo to change its position. The Arduino is utilizing the Arduino ROS Driver
Although the base of the drivers are taken from open source ROS drivers, we had to make changes to the BNO055 driver to allow for multiple data inputs at the same time. We found with the originald driver, when we plugged in two IMUs they would both be writing to the same topic with the same name. To fix this we define each of the nodes that the IMUs are outputing data from. This data is still subscribed to the same topic, but when the data is collected later in the ang_vel_convert node we check the name of the sending node to differentiate data sent from the bicep vs data sent from the forearm.
The Arduino Driver already was able to output to multiple servos.
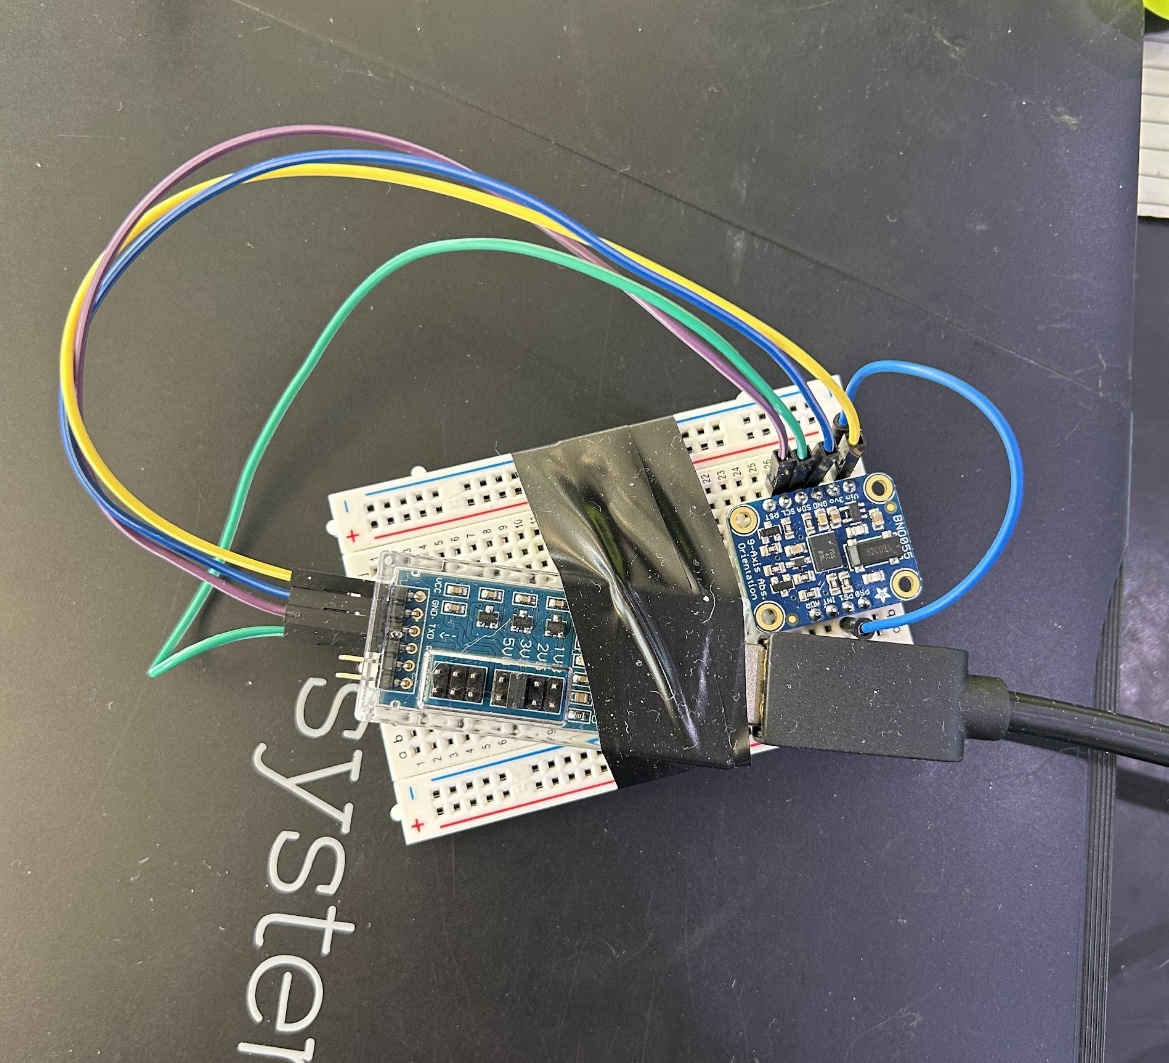
In the system we utilize BNO055 IMUs and UART to USB adapters. We found that the BNO was not able to reliably send data over long distances of wire, so we use short jumpers to connect the BNO to the UART adapter, then get USB extenders to match the lenght we need to attach the IMU from the user's arm to the computer.
We also found (which was stated in the Arduino Driver Docs), that running multiple motors off the arduino USB power supply sometimes caused the board to turn off from over current draw, so we power all of the servos from a desktop power supply. If you do run a desktop power supply, make sure to connect the ground of the power source to the ground of the arduino.
This file is a little rough, but what it is doing is taking in the data from the /imu/data topic, seperating the data based on sending node to differentiate betweeen forearm and bicep link sensors. We found that there is a fair amount of noise coming from the sensors, to help mitigate that we store a set of data point over time, and calculate the average from that set of data. That average is then converted to degrees, dampened to smooth movement, and then sent to the Arduino Node.
Our hardware setup is very rudimentary, utilizing a lot of breadboards and arduino jumpers.
Below we have attached an image of how we have the BNO055 IMU setup with the UART to USB adapter. We have the BNO055 plugged into a small breadboard, then we taped the UART to USB adapter to the breadboard, then utilized simple arduino jumpers to connect the adapter to the sensor. From the UART adapter we used a USB extender to connect to the computer. IMU to UART Setup
NOTE: When connecting the IMUs/Adapters, plug in the sensor you want to use as the bicep sensor FIRST, then plug in the forearm sensor. This is based off of when the USB port gets connected after boot of the computer, NOT when the program is started.
As stated before, if you intend to run more than one servo it is highly recommended to run a seperate power supply, in our case we are using a small desktop power supply, but as long as you supply 5V it will work fine. In our case we plugged the desktop power supply into a breadboard, plugging the power and ground of the servos into the same rail, then plugged the ground rail into the Arduino ground pin. The control wires of the servo are still directly connected to the Arduino output pins (in our case pins 9 and 10).
