Creado en UWP ,identifica las caras en una foto y determina las emociones que presentan las caras en las fotos usando Microsoft's Cognitive Services API.
Dado que el SDK de extensiones IoT no se añade a los proyectos por defecto, tendremos que añadir una referencia para que espacios de nombres como Windows.Devices.Gpio estén disponibles en el proyecto. Para ello, haz clic con el botón derecho del ratón en la entrada References del proyecto, selecciona "Add Reference" y luego navega por el diálogo resultante hasta Universal Windows->Extensions->Windows IoT Extensions for the UWP. Marque la casilla y haga clic en Aceptar.
-
Abra el gestor de paquetes NuGet
En el Explorador de soluciones, haz clic con el botón derecho del ratón en tu proyecto y luego haz clic en "Gestionar paquetes NuGet".
-
Instale los paquetes
En la ventana del Gestor de Paquetes NuGet, seleccione nuget.org como su Fuente de Paquetes y busque Newtonsoft.Json, Microsoft.Azure.CognitiveServices.Vision.Face.ComputerVision, y Microsoft.Azure.CognitiveServices.Vision.Face,. Instale los tres paquetes. Cuando se utiliza una API de servicios cognitivos, es necesario añadir el paquete NuGet correspondiente.
Abrir MainPage.xaml y reemplazar el código existente con el siguiente código para crear la ventana UI:
<Page
	x:Class="CognitiveServicesExample.MainPage"
	xmlns="http://schemas.microsoft.com/winfx/2006/xaml/presentation"
	xmlns:x="http://schemas.microsoft.com/winfx/2006/xaml"
	xmlns:local="using:CognitiveServicesExample"
	xmlns:d="http://schemas.microsoft.com/expression/blend/2008"
	xmlns:mc="http://schemas.openxmlformats.org/markup-compatibility/2006"
	mc:Ignorable="d">

    <Grid Background="{ThemeResource ApplicationPageBackgroundThemeBrush}" BorderThickness="5" Margin="50" >

        <Grid.ColumnDefinitions>
            <ColumnDefinition Width="*" />
            <ColumnDefinition Width="*" />
        </Grid.ColumnDefinitions>


        <StackPanel Grid.Column="0" VerticalAlignment="Center">

            <Border BorderBrush="Black" BorderThickness="1" Margin="20" Width="600" Height="600">
                <Canvas x:Name="ImageCanvas" Width="598" Height="598"/>
                <!-- <Image x:Name="SampleImage" Stretch="Uniform" Width="600" Height="550" Margin="10"/> -->
            </Border>
            <TextBlock Grid.Row="1" x:Name="detectionStatus" Width="600" HorizontalAlignment="Center" Margin="10"/>
            <StackPanel Orientation="Horizontal" HorizontalAlignment="Center" Width="600" Margin="10">
                <TextBox x:Name="ImageURL" Width="440" HorizontalAlignment="Left" Margin="0,0,10,0" Text="http://blogs.cdc.gov/genomics/files/2015/11/ThinkstockPhotos-177826416.jpg"/>
                <Button Content="Detect Emotions" Width="140" HorizontalAlignment="Left" Click="Button_Clicked"/>
            </StackPanel>
        </StackPanel>

        <Grid Grid.Column="1" VerticalAlignment="Center">
            <ListBox x:Name="ResultBox" HorizontalAlignment="Stretch" VerticalAlignment="Stretch"/>
        </Grid>

    </Grid>
</Page>
En la maqueta de la interfaz de usuario, haga doble clic en el botón "Detectar emociones". Verá un "Click="button_Clicked" añadido en el botón en su código XAML. También será redirigido al archivo .xaml.cs con una nueva función llamada "button_Clicked()" creada para usted. Esta función se encargará de las llamadas de Cognitive Services después de que el usuario pulse el botón.
Open MainPage.xaml.cs. At the top of the , directly under the "using" statements and before the "namespace CognitiveServicesExample" line, add the following Cognitive Services namespaces.
using System;
using System.Diagnostics;
using System.Linq;
using System.Runtime.InteropServices.WindowsRuntime;
using System.Threading.Tasks;
using Microsoft.Azure.CognitiveServices.Vision.Face;
using Microsoft.Azure.CognitiveServices.Vision.Face.Models;
using Windows.Graphics.Imaging;
using Windows.UI.Popups;
using Windows.UI.Xaml;
using Windows.UI.Xaml.Controls;
using Windows.UI.Xaml.Media;
using Windows.UI.Xaml.Media.Imaging;
Esto nos permite utilizar las API de Cognitive Services en nuestro código, junto con algunas otras bibliotecas de imágenes necesarias.
Add the following global variables to the MainPage class (as below)
public sealed partial class MainPage : Page
{

private const string _subscriptionKey = "Key API Cognitive Service";
private const string _serviceEndpoint = "Endpoint API CognitiveService";

private FaceClient faceServiceClient;

BitmapImage bitMapImage;
  //...
}
La subscriptionKey permite a tu aplicación llamar a la API de Emotion en Cognitive Services, y la BitmapImage almacena la imagen que tu aplicación subirá.
Añade el siguiente método a la misma clase:
public sealed partial class MainPage : Page
{
  //...
   private async Task<DetectedFace[]> UploadAndDetectFaces(string url)
        {
    Debug.WriteLine("FaceClient is created");

    //
    // Create Project Oxford Emotion API Service client
    //
    faceServiceClient = new FaceClient(
                new ApiKeyServiceClientCredentials(_subscriptionKey),
                new System.Net.Http.DelegatingHandler[] { })
            {
                Endpoint = _serviceEndpoint
            };

    var requiredFaceAttributes = new FaceAttributeType[]
            {
                FaceAttributeType.Age,
                FaceAttributeType.Gender,
                FaceAttributeType.HeadPose,
                FaceAttributeType.Smile,
                FaceAttributeType.FacialHair,
                FaceAttributeType.Glasses,
                FaceAttributeType.Emotion,
                FaceAttributeType.Hair,
                FaceAttributeType.Makeup,
                FaceAttributeType.Occlusion,
                FaceAttributeType.Accessories,
                FaceAttributeType.Blur,
                FaceAttributeType.Exposure,
                FaceAttributeType.Noise
            };

            Debug.WriteLine("Calling Face.DetectWithUrlAsync()...");
    try
    {
      //
      // Detect the emotions in the URL
      //
       var detectedFaces = await faceServiceClient.Face.DetectWithUrlAsync(url, true, false, requiredFaceAttributes);

                return detectedFaces.ToArray();
    }
    catch (Exception exception)
    {
      Debug.WriteLine("Detection failed. Please make sure that you have the right subscription key and proper URL to detect.");
      Debug.WriteLine(exception.ToString());
      return null;
    }
  }
  //...
}
Esta función instala una instancia de la API de Emotion e intenta abrir la URL pasada como argumento (una URL de imagen), escaneándola en busca de caras. Busca emociones en las caras que encuentra y devuelve los objetos Emotion resultantes. Éstos contienen resultados detallados, incluyendo la probabilidad de cada emoción y el cuadro delimitador de la cara. Consulte la documentación para más detalles.
Añade la palabra clave async al método button_Clicked que Visual Studio ha creado para ti. Luego, añade el siguiente código a esa función:
public sealed partial class MainPage : Page
{
  //...
  private async void button_Clicked(object sender, RoutedEventArgs e)
  {

    ImageCanvas.Children.Clear();

    string urlString = ImageURL.Text;
    Uri uri;
    try
    {
      uri = new Uri(urlString, UriKind.Absolute);
    }
    catch (UriFormatException ex)
    {
      Debug.WriteLine(ex.Message);

      var dialog = new MessageDialog("URL is not correct");

      await dialog.ShowAsync();

      return;
    }

    //Cargar imagen del Url
    bitMapImage = new BitmapImage();
    bitMapImage.UriSource = uri;

    ImageBrush imageBrush = new ImageBrush();
    imageBrush.ImageSource = bitMapImage;

    //Cargar imagen al interfaz
    ImageCanvas.Background = imageBrush;

    detectionStatus.Text = "Detecting...";

    DetectedFace[] detectedFaces = await UploadAndDetectFaces(urlString);

     if (detectedFaces != null)
            {
                DisplayParsedResults(detectedFaces);
                DisplayAllResults(detectedFaces);
                DrawFaceRectangle(detectedFaces, bitMapImage, urlString);

                detectionStatus.Text = "Detection Done";
            }
            else
            {
                detectionStatus.Text = "Detection Failed";
            }

  }
  //...
}
Este código lee la cadena del cuadro de entrada de texto del formulario y se asegura de que es una URL. Recupera la imagen de esa URL, la pega en el lienzo y obtiene las emociones detectadas de la imagen utilizando el método UploadAndDetectEmotions definido anteriormente. A continuación, llama a algunas funciones de ayuda para obtener los resultados del análisis de Cognitive Services.
Notarás que el código anterior tiene errores, ya que aún no hemos añadido esas funciones de ayuda. Vamos a añadirlas:
public sealed partial class MainPage : Page
{
//...
private void DisplayAllResults(DetectedFace[] faceList)
{
int index = 0;
foreach (DetectedFace face in faceList)
{
var emotion = face.FaceAttributes.Emotion;
ResultBox.Items.Add("\nFace #" + index
+ "\nAnger: " + emotion.Anger
+ "\nContempt: " + emotion.Contempt
+ "\nDisgust: " + emotion.Disgust
+ "\nFear: " + emotion.Fear
+ "\nHappiness: " + emotion.Happiness
+ "\nNeutral: " + emotion.Neutral
+ "\nSadness: " + emotion.Sadness
+ "\nSurprise: " + emotion.Surprise);
index++;
}
}
private void DisplayParsedResults(DetectedFace[] resultList)
{
int index = 0;
string textToDisplay = "";
foreach (DetectedFace face in resultList)
{
string emotionString = ParseResults(face);
textToDisplay += "Person number " + index.ToString() + " " + emotionString + "\n";
index++;
}
ResultBox.Items.Add(textToDisplay);
}
private string ParseResults(DetectedFace face)
{
double topScore = 0.0d;
string topEmotion = "";
string retString = "";
var emotion = face.FaceAttributes.Emotion;
// anger
topScore = face.FaceAttributes.Emotion.Anger;
topEmotion = "Anger";
// contempt
if (topScore < emotion.Contempt)
{
topScore = emotion.Contempt;
topEmotion = "Contempt";
}
// disgust
if (topScore < emotion.Disgust)
{
topScore = emotion.Disgust;
topEmotion = "Disgust";
}
// fear
if (topScore < emotion.Fear)
{
topScore = emotion.Fear;
topEmotion = "Fear";
}
// happiness
if (topScore < emotion.Happiness)
{
topScore = emotion.Happiness;
topEmotion = "Happiness";
}
// neural
if (topScore < emotion.Neutral)
{
topScore = emotion.Neutral;
topEmotion = "Neutral";
}
// happiness
if (topScore < emotion.Sadness)
{
topScore = emotion.Sadness;
topEmotion = "Sadness";
}
// surprise
if (topScore < emotion.Surprise)
{
topScore = emotion.Surprise;
topEmotion = "Surprise";
}
retString = $"is expressing {topEmotion} with a certainty of {topScore}.";
return retString;
}
public async void DrawFaceRectangle(DetectedFace[] faceResult, BitmapImage bitMapImage, String urlString)
{
if (faceResult != null && faceResult.Length > 0)
{
Windows.Storage.Streams.IRandomAccessStream stream = await Windows.Storage.Streams.RandomAccessStreamReference.CreateFromUri(new Uri(urlString)).OpenReadAsync();
BitmapDecoder decoder = await BitmapDecoder.CreateAsync(stream);
double resizeFactorH = ImageCanvas.Height / decoder.PixelHeight;
double resizeFactorW = ImageCanvas.Width / decoder.PixelWidth;
foreach (var face in faceResult)
{
FaceRectangle faceRect = face.FaceRectangle;
Image Img = new Image();
BitmapImage BitImg = new BitmapImage();
// open the rectangle image, this will be our face box
Windows.Storage.Streams.IRandomAccessStream box = await Windows.Storage.Streams.RandomAccessStreamReference.CreateFromUri(new Uri("ms-appx:///Assets/rectangle.png", UriKind.Absolute)).OpenReadAsync();
BitImg.SetSource(box);
//rescale each facebox based on the API's face rectangle
var maxWidth = faceRect.Width * resizeFactorW;
var maxHeight = faceRect.Height * resizeFactorH;
var origHeight = BitImg.PixelHeight;
var origWidth = BitImg.PixelWidth;
var ratioX = maxWidth / (float)origWidth;
var ratioY = maxHeight / (float)origHeight;
var ratio = Math.Min(ratioX, ratioY);
var newHeight = (int)(origHeight * ratio);
var newWidth = (int)(origWidth * ratio);
BitImg.DecodePixelWidth = newWidth;
BitImg.DecodePixelHeight = newHeight;
// set the starting x and y coordiantes for each face box
Thickness margin = Img.Margin;
margin.Left = faceRect.Left * resizeFactorW;
margin.Top = faceRect.Top * resizeFactorH;
Img.Margin = margin;
Img.Source = BitImg;
ImageCanvas.Children.Add(Img);
}
}
}
//...
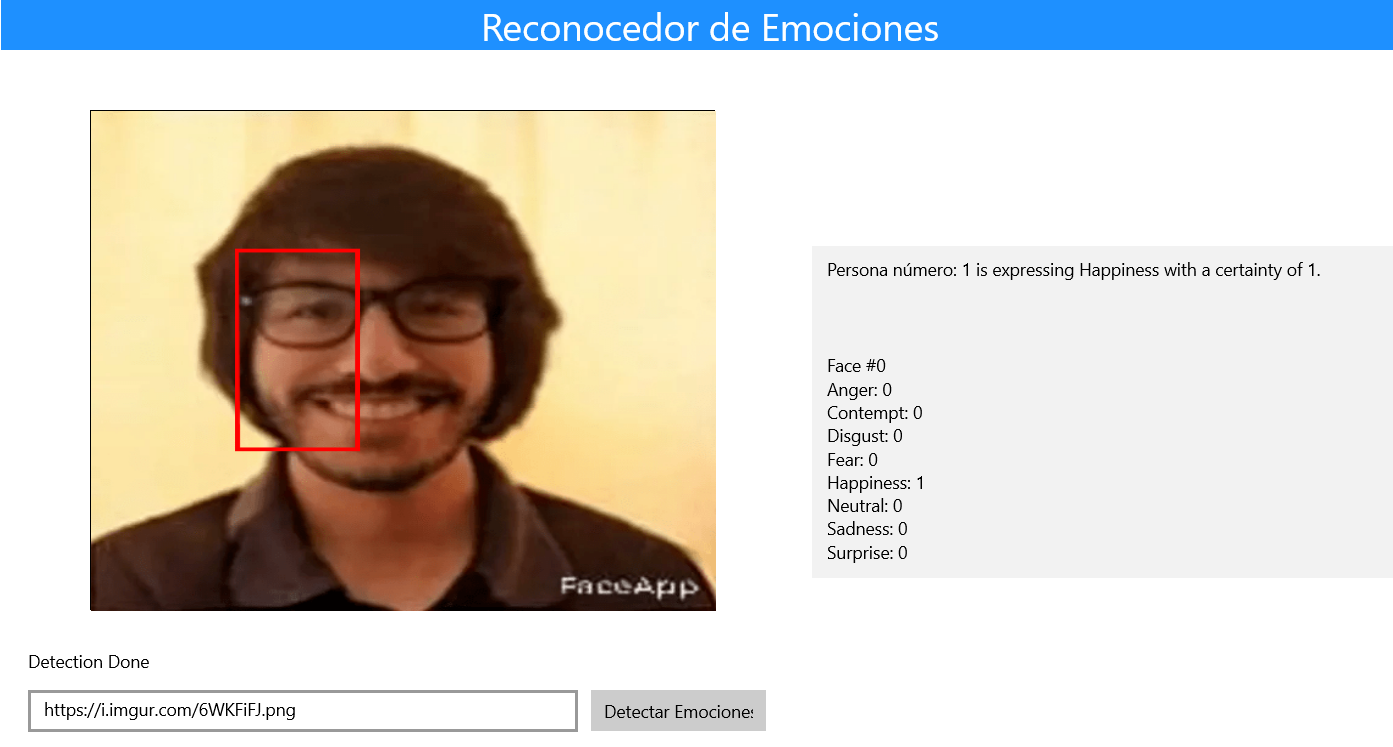
}El primer método da como resultado la puntuación de todas las emociones que Cognitive Services puede detectar. Cada puntuación está comprendida entre 0 y 1 y representa la probabilidad de que el rostro detectado exprese esa emoción.
El segundo y tercer método determinan qué emoción es la más prevalente. A continuación, envía estos resultados en forma de cadena a un panel situado junto a la imagen.
El cuarto método coloca un rectángulo alrededor de cada rostro detectado en la imagen. Dado que UWP aún no permite a las aplicaciones dibujar formas, utiliza en su lugar un rectángulo azul en la carpeta Assets con un fondo transparente. La aplicación coloca cada imagen del rectángulo en las coordenadas iniciales del Rectángulo proporcionado por Cognitive Services y lo escala al tamaño aproximado del rectángulo de Cognitive Services.
Agregar una imagen de rectangular en png y agregarlo a la carpeta de assets del proyecto como rectangle.png

-
Asegúrese de que la aplicación se construye correctamente invocando el comando del menú Build | Build Solución.
-
Como se trata de una aplicación de la Plataforma Universal de Windows (UWP), puedes probar la aplicación también en tu máquina de Visual Studio: Pulsa F5, y la app se ejecutará dentro de tu máquina.
Cambia la URL por una imagen diferente, o simplemente haz clic en "Detectar Emoción" para ejecutar el Reconocedor de Emociones con la imagen por defecto. Después de unos segundos, los resultados deberían aparecer en la ventana de su aplicación como se esperaba: la imagen con rectángulos en ella a la izquierda y una salida de emoción más detallada para cada cara a la derecha.
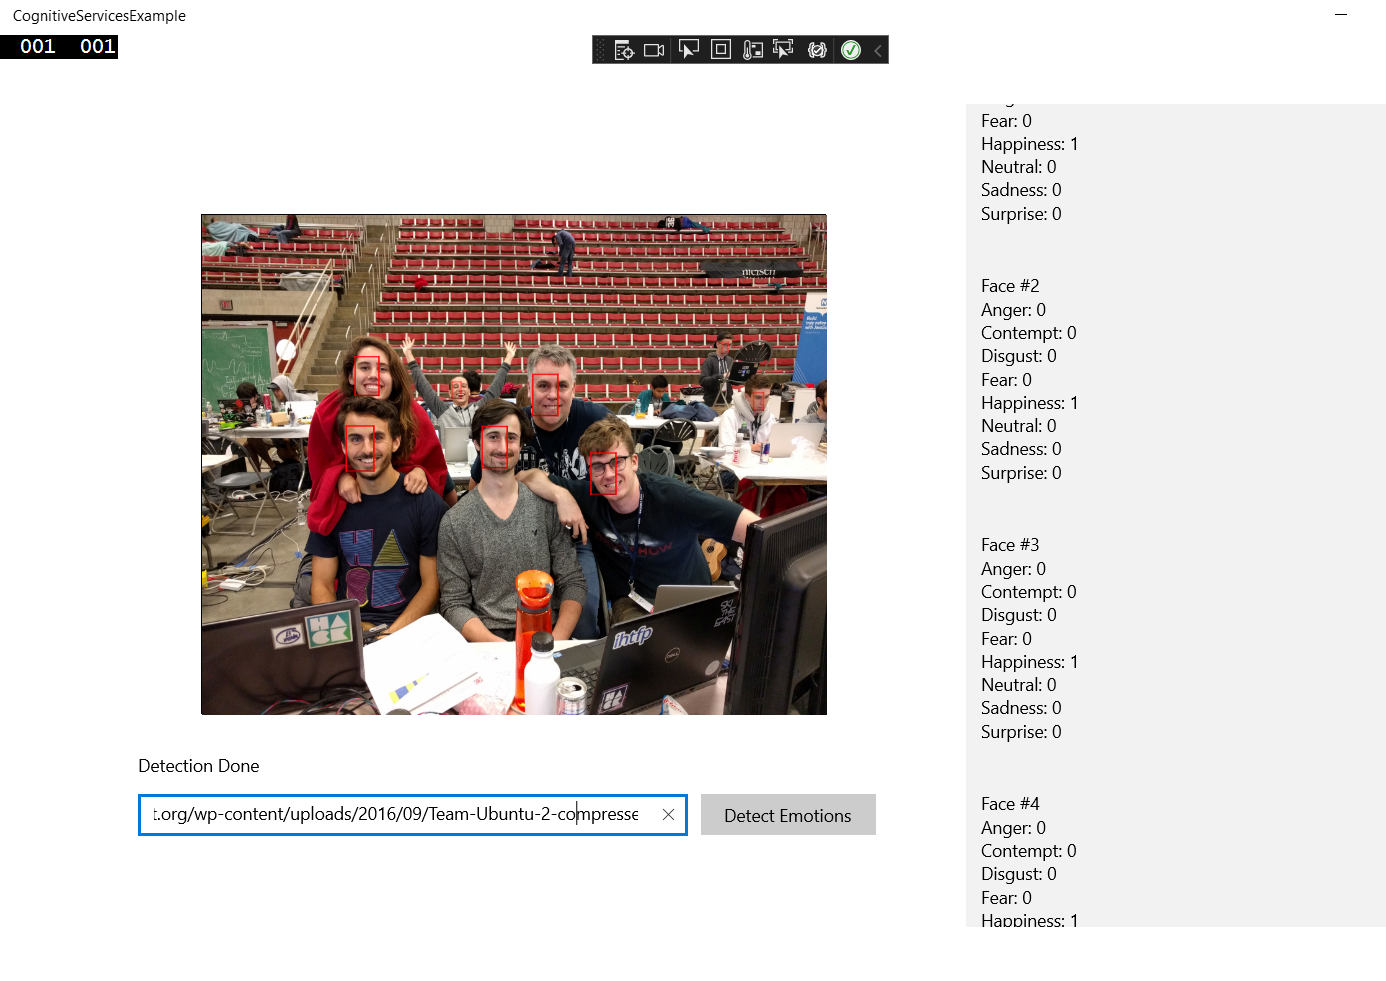
En este caso, el orden se basa en la profundidad: las caras más cercanas al frente serán las primeras, y las más lejanas serán las últimas de la lista.
Cierra tu aplicación cuando hayas terminado de validarla

