Hardware Abstraction Layer (HAL) for IBM's LMIC 1.6 communication stack targeted to Raspberry Pi and Dragino LoRA/GPS HAT hardware version 1.4.

This code was forked from wklenk/lmic-rpi-lora-gps-hat and 915 subbase selection functionality added to allow for subbase 2 selection for Australia.
There is now an additional preprocessor definition named "CFG_au915". Adding -DCFG_au915 along with the -DCFG_us915 on the LMICCFG line in the examples/projects.gmk file will enable Australian frequency selection along with 915 support.
LMICCFG += -DCFG_DEBUG -DCFG_us915 -DCFG_au915 -DCFG_sx1276_radio -DDEBUG_LMIC -DDEBUG_HAL
The lorabase.h 915 Frequency code was modified to add support for Australian LoraWan Frequencies.
#if defined(CFG_au915)  // ==========================================

// Default frequency plan for AU 915MHz
enum { US915_125kHz_UPFBASE = 915200000,
       US915_125kHz_UPFSTEP =    200000,
       US915_500kHz_UPFBASE = 915900000,
       US915_500kHz_UPFSTEP =   1600000,
       US915_500kHz_DNFBASE = 923300000,
       US915_500kHz_DNFSTEP =    600000
};

enum { US915_FREQ_MIN = 915000000,
       US915_FREQ_MAX = 928000000 };

#elif defined(CFG_us915)

// Default frequency plan for US 915MHz
enum { US915_125kHz_UPFBASE = 902300000,
       US915_125kHz_UPFSTEP =    200000,
       US915_500kHz_UPFBASE = 903000000,
       US915_500kHz_UPFSTEP =   1600000,
       US915_500kHz_DNFBASE = 923300000,
       US915_500kHz_DNFSTEP =    600000
};

enum { US915_FREQ_MIN = 902000000,
       US915_FREQ_MAX = 928000000 };

#endifThe code base has been tested with the HopeRF RFM95W transceiver and a Raspberry Pi Zero. You can pick up a RFM95W from Alixpress for US$5, they are cheap but fiddly to solder as pins do not match standard breadboard spacings. Note, the W at the end of RFM95W denotes Worldwide and is the module version that should be used outside of China.
SX1272, SX1276 tranceivers and compatible modules (such as some HopeRF RFM9x modules) should work.
See bme280_periodic sample in the examples director. This sample sensors the environment with a Bosch BME280 (Temperature, Pressure and Humidity) Sensor.
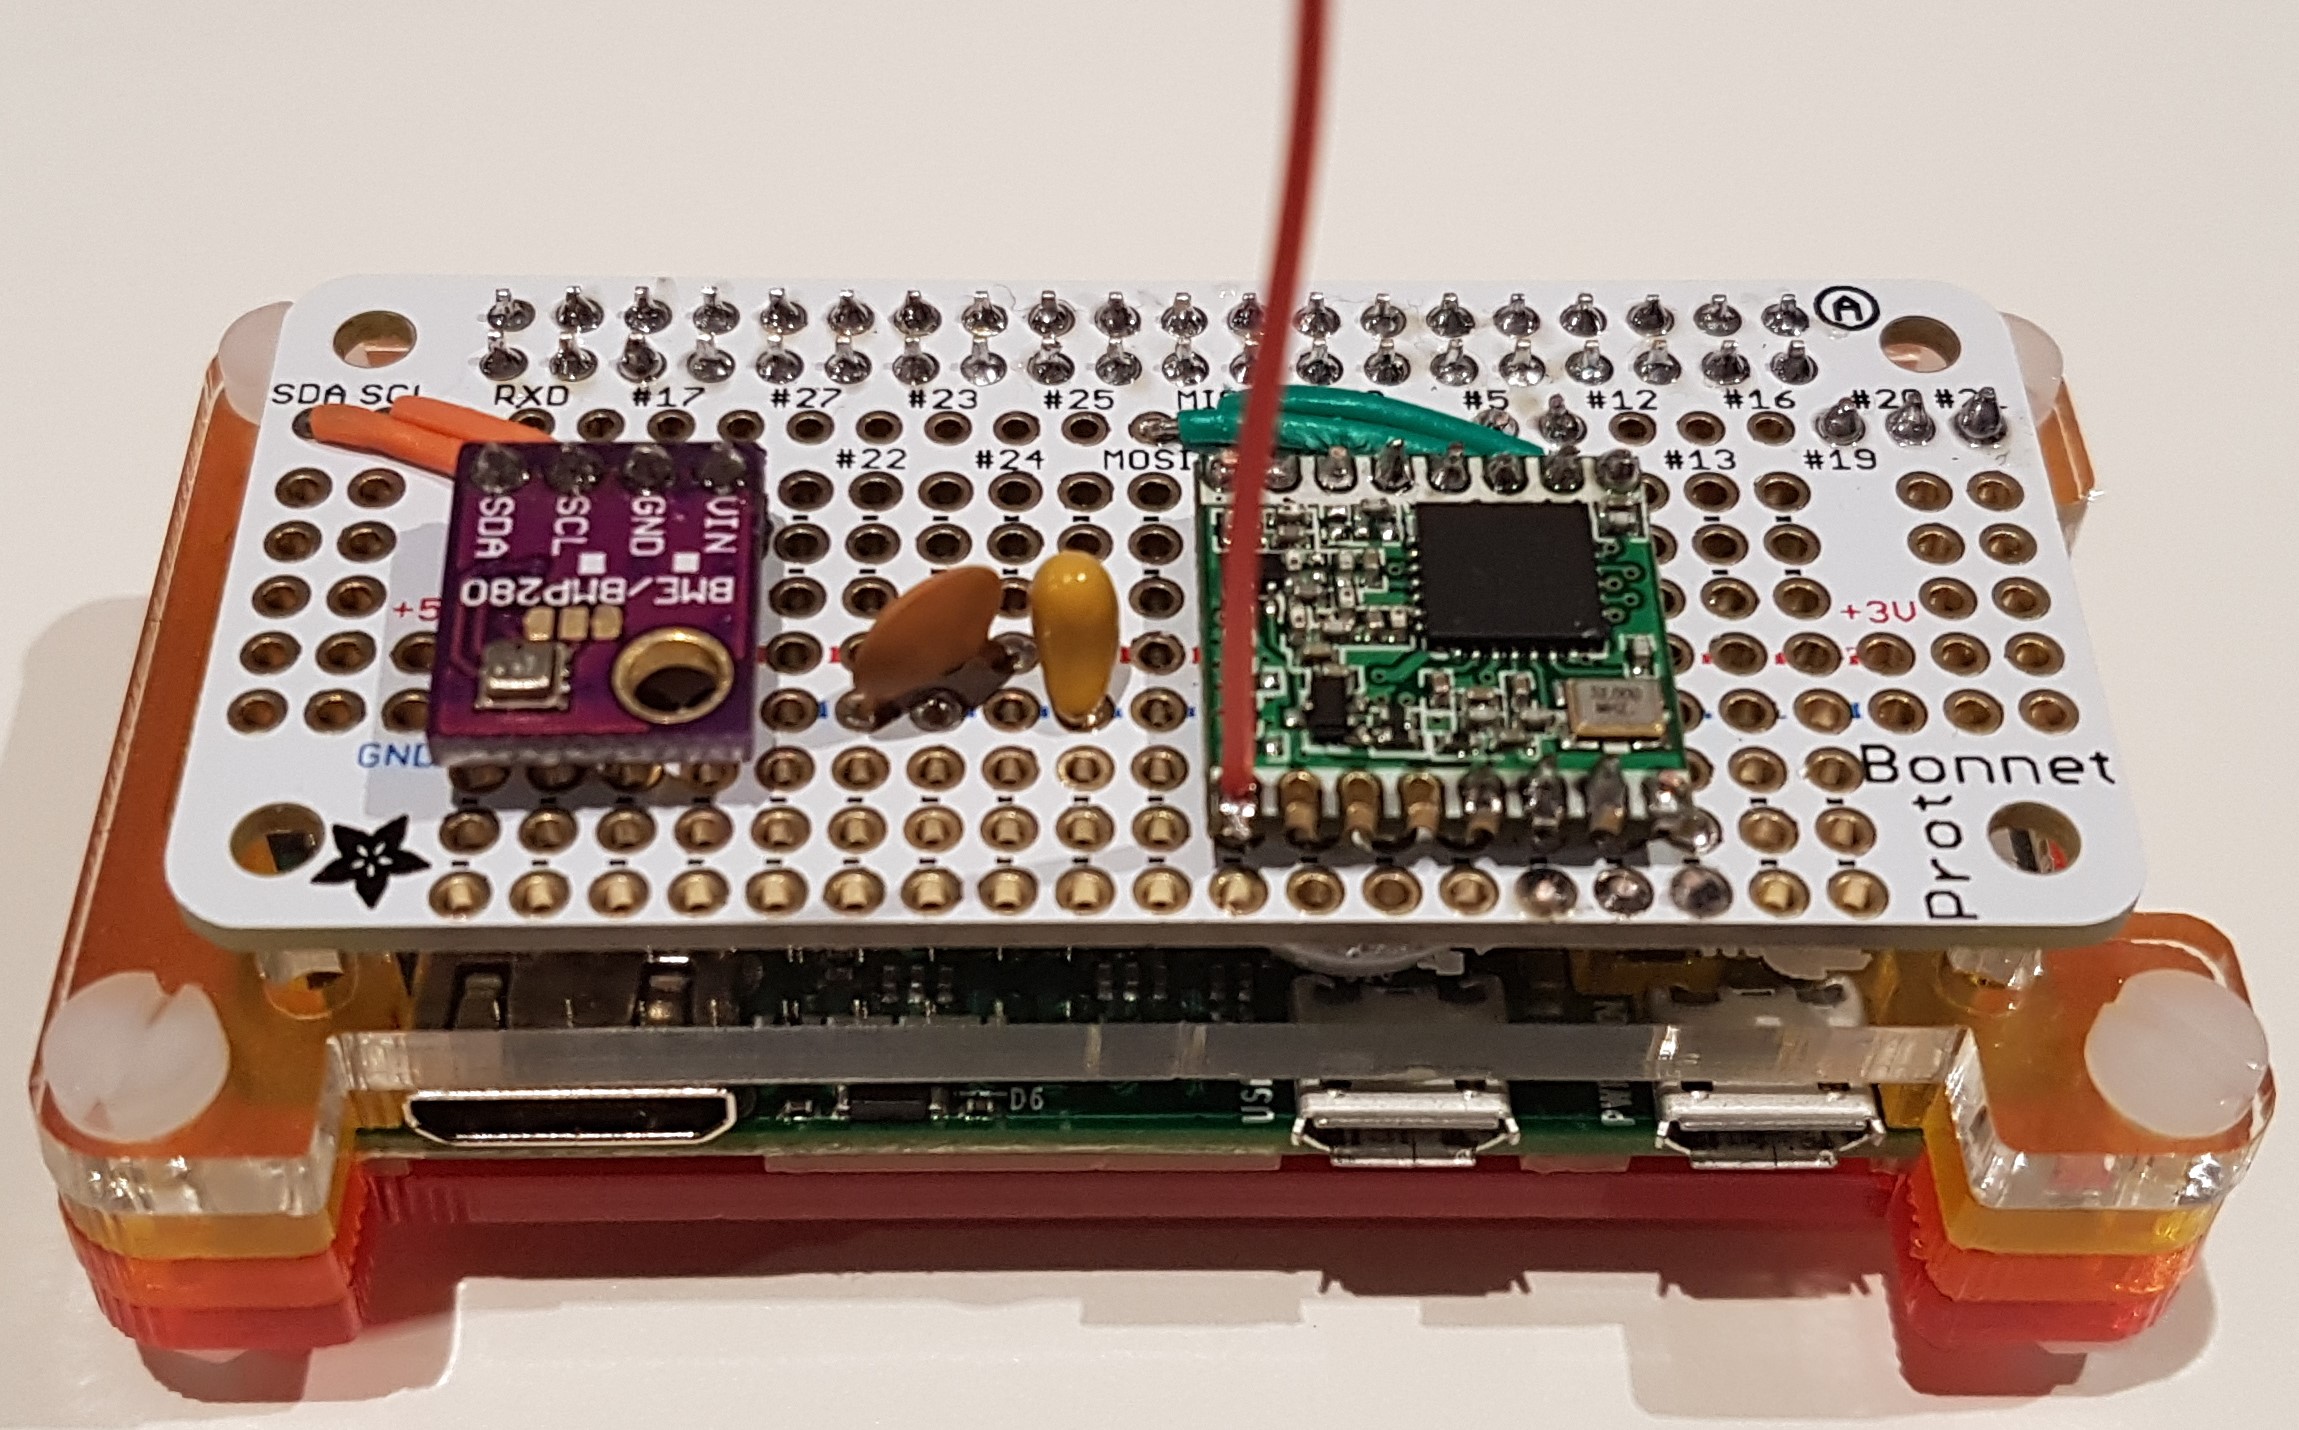
I wired up a standalone HopeFRM RFM95 using an Adafruit Perma Proto Bonnet Mini Kit. I used different pinouts from the Dragino HAT to suit the physical layout of Proto Bonnet. You'll need to modify the default WiringPi and BCM pin definition in the hal.c file you'll find in the lora_gps_hat directory.
The Dragino HAT Schematic is a useful reference.
| function | Wiring Pi | BCM |
|---|---|---|
| NSS | 22 | 6 |
| RESET | 21 | 5 |
| DIO0 | 24 | 19 |
| DIO1 | 28 | 20 |
| DIO2 | 29 | 21 |
| MOSI | 10 | |
| MISO | 9 | |
| SCLK | 11 |
// Note: WiringPi Pin Numbering Schema
const int WIRING_PI_PIN_NSS = 22;
const int WIRING_PI_PIN_RST = 21;
const int WIRING_PI_PIN_DIO[3] = { 24, 28, 29 };

// Note: BCM Pin Numbering Schema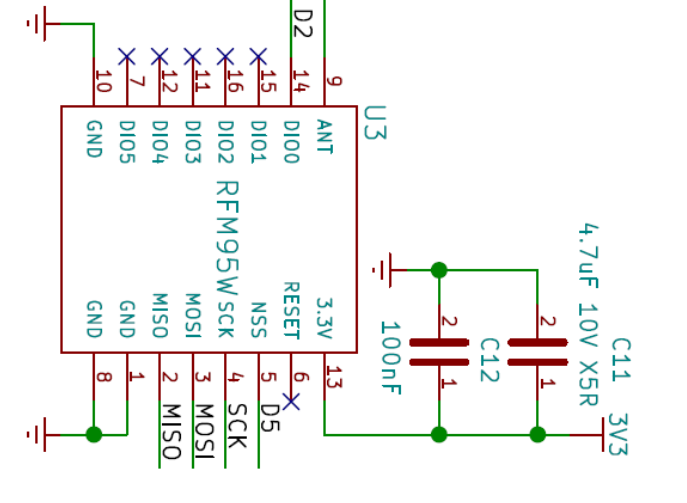
const int BCM_PIN_DIO[3] = { 19, 20, 21 };- 1 x 4.7uF (Tantalum Capacitor)
- 1 x 100nF (Ceramic Capacitor)
Wired as per this schematic.
Information from Adafruit Aerial Assembly
A wire antenna, aka "quarter wave whip antenna" is low cost and works very well! You just have to cut the wire down to the right length.
Cut a stranded or solid core wire the the proper length for the module/frequency
- 433 MHz - 6.5 inches, or 16.5 cm
- 868 MHz - 3.25 inches or 8.2 cm
- 915 MHz - 3 inches or 7.8 cm
Strip a mm or two off the end of the wire, tin and solder into the ANT pad.
See The Things Network Azure IoT Hub Gateway project.

To control the RPi's GPI ports, the WiringPi GPIO interface library has to be installed. On some operating systems WiringPi is already installed per default. For instructions on manual installation please refer to the following site: http://wiringpi.com/download-and-install/
Per default, the SPI ports on the Raspberry Pi are disabled. You need to manually enable them using raspi-config. Follow the instructions given here: https://www.raspberrypi.org/documentation/hardware/raspberrypi/spi/README.md
If you are using the BME280 Sensor then you also need to enable the I2C interface.
Text copied from https://www.research.ibm.com/labs/zurich/ics/lrsc/lmic.html
IBM "LoRa WAN in C" is the LoRa WAN implementation of choice, and a perfect match to the IBM LRSC on the end device. It is provided as open source under the BSD License.
Directory: /examples/hello
Modifications necessary: None
This example does not use radio, it just periodically logs a counter value. Can be used to checked if the timer implementation on RPi works as expected and if SPI communication with the radio board is possible.
cd examples/hello
make clean
make
sudo ./build/hello.out
Possible output:
000000000 HAL: Initializing ...
000000003 HAL: Detected SX1276 radio module.
000000003 HAL: Set radio RST pin to 0x00
000000003 HAL: Wait until 000000004 ms
000000005 HAL: Set radio RST pin to 0x02
000000005 HAL: Wait until 000000010 ms
000000011 HAL: Receiving ...
000000034 Debug: Initializing
000000034 Debug: Hello World!

000000034 Debug: Label 'cnt = ' value 0x0
000001034 Debug: Hello World!

000001034 Debug: Label 'cnt = ' value 0x1
000002034 Debug: Hello World!

000002034 Debug: Label 'cnt = ' value 0x2
000003034 Debug: Hello World!

000003034 Debug: Label 'cnt = ' value 0x3
Directory: /examples/join
Modifications necessary:
File /examples/join/main.c:
-
Adapt "application router ID (LSBF)" according for your network infrastructure. In case of The Things Network, this is the "Application EUI" of the application created in the TTN console. Double check that you use the LSB (least significant byte first) notation of the Application EUI.
-
Adapt "unique device ID (LSBF)" according for your network infrastructure. In case of The Things Network, you need to register a new device using TTN console. Copy this "Device EUI" from the console and make sure you use the LSB notation.
-
Adapt "device-specific AES key (derived from device EUI)". This is the secret shared between your device and The Things Network. In TTN terms this is known as "(LoRa) App Key". Copy this 16 bytes and stick to MSB notation (Most significant byte first)
File /lmic/lmic.c:
The LMIC 1.6 stack randomly chooses one of six frequencies to send the "join" message to the network. Tesing with a Kerlink IoT Station, only the following frequencies worked: 868.1 868.3 868.5 MHz The following default frequency did not work: 864.1 864.3 864.5 For this reason, I modified the code to only randomly choose between the three working join frequencies.
This example verifies that the radio is working and that the node settings are correct and match your network infrastructure. It uses OTAA (Over the Air Activiation) to register the node. Note that this example won't work with a Single Channel Gateway.
cd examples/join
make clean
make
sudo ./build/join.out
Possible outpout:
000000000 HAL: Initializing ...
000000000 HAL: Detected SX1276 radio module.
000000001 HAL: Set radio RST pin to 0x00
000000002 HAL: Wait until 000000002 ms
000000003 HAL: Set radio RST pin to 0x02
000000003 HAL: Wait until 000000008 ms
000000008 HAL: Receiving ...
000000020 Debug: Initializing
000000020 Debug: JOINING
000002625 Debug: EV_TXSTART
000002626 HAL: Sending ...
000007689 HAL: Receiving ...
000007689 HAL: Wait until 000007690 ms
000007762 Debug: JOINED
What can be seen is that after sending the "join" message, the LMIC stack waits 5 seconds for the receive window and receives the acknowledgement from the LoRa gateway.
Directory: /examples/periodic
Modifications necessary:
File /examples/periodic/main.c:
- Adapt "application router ID (LSBF)" like already described under examples/join.
- Adapt "unique device ID (LSBF)" like already described under examples/join.
- Adapt "device-specific AES key " like already described under examples/join.
File /examples/periodic/sensor.c:
Added code that reads the CPU temperature of the RPi and returns it as a 2 byte integer value.
This examples does a "joins" the network and then sends a sensor value (the CPU temperature) every 60 seconds as an unconfirmed message with a payload of 2 bytes.
cd examples/periodic
make clean
make
sudo ./build/periodic.out
Possible output:
000000000 HAL: Initializing ...
000000004 HAL: Detected SX1276 radio module.
000000004 HAL: Set radio RST pin to 0x00
000000005 HAL: Wait until 000000006 ms
000000006 HAL: Set radio RST pin to 0x02
000000006 HAL: Wait until 000000011 ms
000000013 HAL: Receiving ...
000000041 Debug: Initializing
000000041 Debug: JOINING
000004897 Debug: EV_TXSTART
000004898 HAL: Sending ...
000009960 HAL: Receiving ...
000009961 HAL: Wait until 000009962 ms
000010033 Debug: JOINED
000010034 Debug: 54230
000010034 Debug: Label 'val = ' value 0xd3d6
000010034 Debug: EV_TXSTART
000010034 HAL: Sending ...
000011081 HAL: Receiving ...
000011081 HAL: Wait until 000011082 ms
000012128 HAL: Receiving ...
000012128 HAL: Wait until 000012130 ms
000016360 Debug: TXCOMPLETE
000070068 Debug: 53692
000070068 Debug: Label 'val = ' value 0xd1bc
000070069 Debug: EV_TXSTART
000070070 HAL: Sending ...
000071117 HAL: Receiving ...
000071117 HAL: Wait until 000071118 ms
000072164 HAL: Receiving ...
000072164 HAL: Wait until 000072165 ms
000076734 Debug: TXCOMPLETE


