

Spotify is a super cool music streaming service that provides you access to tons of music without ever having to buy an album.
Today, we're going to build an Express app to search Spotify for artists, albums, and tracks. Also, we'll be able to play a preview of some of these songs.
It may seem like a lot, but let's break it down into steps!
- Fork this repo
- Clone this repo
- Upon completion, run the following commands:
$ git add .
$ git commit -m "done"
$ git push origin master
- Create Pull Request so your TAs can check up your work.
Spotify is great for streaming music from the app, but they also have a Web Service for us developers to play with.
For the purpose of this exercise, we will be using the spotify-web-api-node npm package (this is the link that will take you to the documentation so go ahead and open it). As we can find in the docs, this package gives us simple methods to make requests to Spotify, and give us back artists, albums, tracks, and more.
In this lab, we have two main goals:
- We are going to apply our knowledge of the GET method and when and why to use
req.queryandreq.params. - We are going to practice how to read the documentation (of this npm package particularly) and how to use the examples provided by the docs to successfully finish all the iterations.
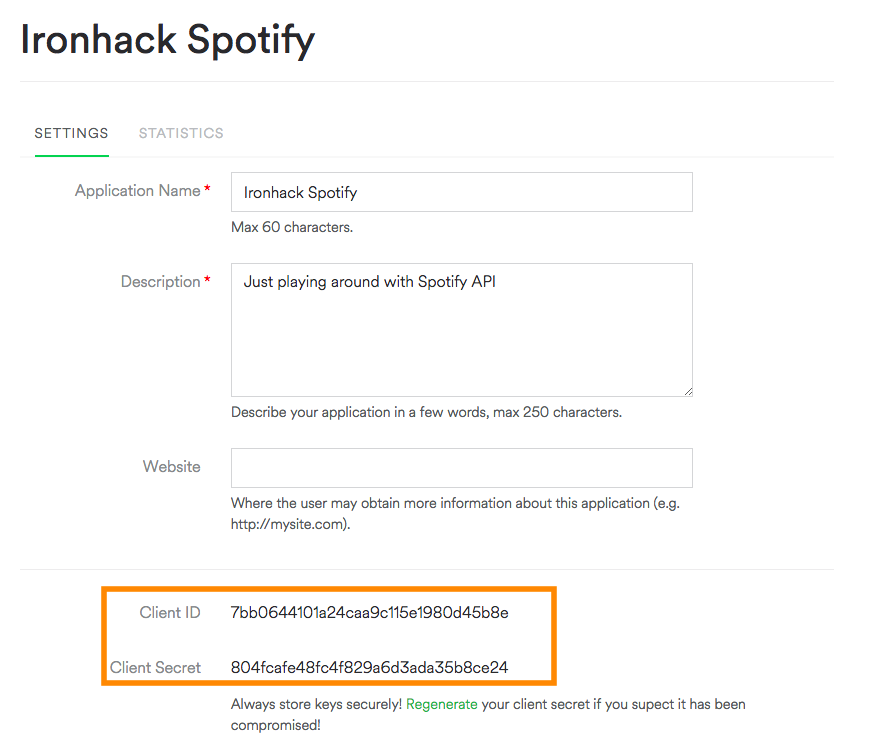
The Spotify API will need a clientId and clientSecret in order to give us permission to make requests and get some data back. To get clientId and clientSecret, we have to register our app on the official Spotify Developers website (you won't be charged for this, and no credit card information will be required). Let's follow these steps:
- Navigate to Spotify Developers.
- Click on the "Log In" button. If you do not have an account, you will be asked to create one, it´s free 😉 .
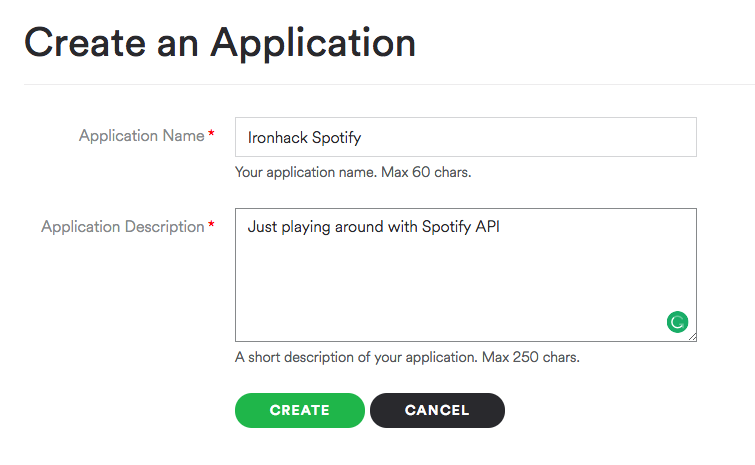
- After logging in, click on the Create an App button.
The following screens might be out of date since Spotify is constantly iterating on its interface, but that shouldn't stop you from completing these steps. You got this!
- Fill in the fields and submit the form.
- We are ready to go! We have all the info we need 💪 Let´s start!
In the next few steps, you'll create all of the files that you need. So far, you have some basic setup in app.js, but that's not quite enough. As you remember, to get some packages (including express) in our app, we have to have them in the package.json file. So let's start listing the steps:
- Let's install all the dependencies we need to run this app:
npm install express hbs spotify-web-api-node dotenv-
nodemonis installed as a dev dependency (our app doesn't depend on it but it helps us in the development process), which means we can use nodemon to run the app withnpm run dev. -
Inside of the
app.jsfile, requirespotify-web-api-node.
const SpotifyWebApi = require('spotify-web-api-node');- Inside the
app.jsfile, you'll find the place where you should paste the following code:
const spotifyApi = new SpotifyWebApi({
  clientId: process.env.CLIENT_ID,
  clientSecret: process.env.CLIENT_SECRET
});

// Retrieve an access token
spotifyApi
  .clientCredentialsGrant()
  .then(data => spotifyApi.setAccessToken(data.body['access_token']))
.catch(error => console.log('Something went wrong when retrieving an access token', error));- See this above?
const spotifyApi = new SpotifyWebApi({
  clientId: process.env.CLIENT_ID,
  clientSecret: process.env.CLIENT_SECRET
});
To avoid making our API keys public, we don't want to add and commit them. We'll use a package named dotenv for that.
This package is imported at the very beginning of app.js. All that is left to do is to add your keys in the .env file.
So go ahead and create a .env file and paste the following lines there, replacing the text with your credentials.
CLIENT_ID=your clientId goes here
CLIENT_SECRET=your clientSecret goes here
⚡ The .env is referred to in the .gitignore file so you're safe!
🔥 Styling should be the last thing you focus on. Functionality first! 🙏🏻
Now let's create a views folder and let's add the layout.hbs file in it.
At this moment we should have the following structure of folders and files:
lab-express-spotify
      ├── app.js
      ├── package.json
      ├── package-lock.json
      ├── public
      │    ├── images
      │    └── stylesheets
      │         └── style.css
      └── views
            └── layout.hbs
As we can see, in your app.js we have required all the packages we need for now:
const express = require('express');
const hbs = require('hbs');
const SpotifyWebApi = require('spotify-web-api-node');
We are good to go. Let's open the spotify-web-api-node documentation and start our journey!
You can keep all your routes in the app.js after where it states: // Our routes go here:.
Create a route that renders a simple home page. You'll need a basic index route, that renders a home page. On this page, you should have a small search form that has an input field receiving an artist's name and a button that submits the request.
This form should direct its query to /artist-search (action="/artist-search", method="GET").
The result should be something along these lines but leave styling for the end.

Okay, our search form was submitted to the /artist-search route. We still don't have this route created so let's do it!
This route will receive the search term from the query string, and make a search request using one of the methods of the Spotify npm package. You have the documentation open 😉 but we will help you with your first step.
The method we will use from the npm package is: spotifyApi.searchArtists(). In this route, you should have something like this:
spotifyApi
  .searchArtists(/*'HERE GOES THE QUERY ARTIST'*/)
  .then(data => {
    console.log('The received data from the API: ', data.body);
    // ----> 'HERE'S WHAT WE WANT TO DO AFTER RECEIVING THE DATA FROM THE API'
  })
  .catch(err => console.log('The error while searching artists occurred: ', err));
In order to display the found artists' information, create an artist-search-results.hbs file inside the views folder and display the name, image, and button (or link) to show the albums for a particular artist on a new view (for now just create the button/link and we will take care of the rest in the next step). Again, styling is not your priority, so let's move to the next step.

On the artist-search-results.hbs page we created the View albums button/link. Users should be taken to some other page after clicking on it and there be able to see all the albums of that particular artist. Hint: the URL should include artist's id 🤓 and should change dynamically.
<a href="/albums/someArtistIdGoesHere">View Albums</a>So let's create a new page - albums.hbs where all the results will be displayed. Make sure you show the name and the cover of each album and add a button/link to see the tracks (next iteration).
⚡ Check out the .getArtistAlbums() method in the spotify-web-api-node documentation.
Hint:
Your route should look like the following:
app.get('/albums/:artistId', (req, res, next) => {
  // .getArtistAlbums() code goes here
});
This is going well so far, so let's finish up with our last iteration.
Create the View tracks link on the albums page. This link should take you to a page with a list of all of the tracks on a particular album.
Hint: The link to the tracks page should have each album's id in it.
Note: ⚡ Check out the .getAlbumTracks() method in the spotify-web-api-node documentation.
A track object comes with a preview_url, which is the source for a 30-second preview of a particular song. You can plug this into an HTML audio tag, and it will play the preview.

- Total of five pages with (1)artist / (2)album / (3)track information (all populated from Spotify) + (4)layout + (5)home.
- Some styling, it doesn't have to look like the example.
Happy Coding! ❤️
I am stuck and don't know how to solve the problem or where to start. What should I do?
If you are stuck in your code and don't know how to solve the problem or where to start, you should take a step back and try to form a clear question about the specific issue you are facing. This will help you narrow down the problem and come up with potential solutions.
For example, is it a concept that you don't understand, or are you receiving an error message that you don't know how to fix? It is usually helpful to try to state the problem as clearly as possible, including any error messages you are receiving. This can help you communicate the issue to others and potentially get help from classmates or online resources.
Once you have a clear understanding of the problem, you will be able to start working toward the solution.
How to use then() and catch() with Promises?
When working with Promises or a function that returns a promise, you can attach .then() method to handle the resolved value and a catch() method to handle the possible rejection value.
Here is an example of how to use .then() and .catch() to handle a simple promise:
myPromise
  .then((result) => {
    console.log(result);
  })
  .catch((error) => {
    console.log(error);
  });
Here is an example of using .then() and .catch() to handle a promise returned by a function/method:
someAPI.getData()
  .then((result) => {
    console.log(result);
  })
  .catch((error) => {
    console.log(error);
  })
If you are trying to execute multiple promises in a sequence, you can do so by returning a promise from a .then() block. Example:
someAPI.getData()
    .then((result1) => {
        console.log(result1);
        return someAPI.getData()
    }) // Return another pending promise
    .then((result2) => { // Handle the returned promise
        console.log(result2);
    })
    .catch((error) => {
        console.log(error);
    })
The first line someAPI.getData() initiates an asynchronous operation, which returns a promise. The .then() method is then called on the promise to handle the resolved value.
The first then() returns another promise with another call to someAPI.getData(), which allows to chain another then() function that handles the second resolved value, logging it to the console.
How to use async function and await?
You create an asynchronous function by using the async keyword before the function definition.
An async function allows you to use the await keyword inside the function body to wait for a promise to resolve.
When using an async function to handle asynchronous code (e.g. API call) that may potentially throw an error, we have to add a try/catch block to be able to handle any potential errors.
async function doSomething() {
  try {
    // Code that will be executed asynchronously
    // that might throw an error
  }
  catch (error) {
    // Handle the error
  }
}Here is an example of using await inside of an async function to await for a promise to resolve:
async function getData() {
  try {
    let response = await fetch('https://api.github.com/search/repositories?q=js');
    let data = await response.json();
    console.log(data);
  }
  catch (error) {
    // error handling
  }
}
In the above example, the first await is used to wait for the promise returned by fetch() to resolve. The value of the resolved promise is then assigned to the variable response.
The second await is used to parse the response as json object, and is used to wait for the promise returned by response.json(). The resolved value is then assigned to the variable data.
The function uses the return keyword to return the data to allow consuming the value outside of the function.
The difference between a regular function and an async function is that the async function always returns a Promise.
Once defined, you can invoke an async function just like a regular function and handle the Promise it returns using .then() and .catch() or await.
Here's an example of using then and catch to handle a Promise returned by an async function:
async function greeting() {
  // An `async` function always returns a promise
  // This value will be returned as a Promise
  return "HELLO IRONHACKERS!";
}

greeting()
  .then((result) => {
    console.log(result);
  })
  .catch((error) => {
    console.log("Error:", error);
  })
Here's an example of handling the same async function but this time using await:
async function greeting() {
  // Async function always returns a promise
  // This value will be returned as a Promise
  return "HELLO IRONHACKERS!";
}

// We need another wrapper `async` function so that we can use `await`
async function wrapperFunction() {
  try {
    const result = await greeting(
    console.log(result);
  }
  catch (error) {
    console.log("Error:", error);
  }
}
Note that we needed another wrapper async function to be able to use await.
How to use try / catch block?
The try/catch block is used to handle errors that occur during the execution of a program.
The try block contains the code that might throw an error, and the catch block contains the code that will handle the error.
Here is an example of using a try/catch block:
try {
  // Code that might throw an error
} catch (error) {
  // Handle the error
}
The try/catch block is typically used in async functions when handling asynchronous code that may potentially throw an error.
Here is an example of using a try/catch block in an async function when handling a promise:
async function doSomething() {

  try {
    // Code that might throw an error
    const result = await someAsyncFunction();
  }
  catch (error) {
    // Handle the error
    console.error(error);
  }

}
In the above example, the try block contains an asynchronous operation that might throw an error: await someAsyncFunction(). If an error is thrown, execution will automatically jump to the catch block.
I got the error: "Cannot find module 'dotenv' error in Node.js". How can I resolve it?
When you get the error "Cannot find module 'dotenv'" in a Node.js application, it usually means that the "dotenv" package has not been installed in your project yet. The dotenv is a package that is used to load environment variables from a .env file.
To fix the error, you should install the dotenv package by running the following command in the root directory of your project:
npm install dotenvThis will install the dotenv package and add it to the package.json file as a project dependency.
After the package is installed, you can use it by importing it at the top of your file. Remember to import it at the top, before other packages:
require("dotenv").config();Also, you should check that there is a .env file in the root directory of your project.
I got the error: "Cannot find module" Node.js". How can I resolve it?
The error "Cannot find module" in a Node.js application means that the module you are trying to import or use does not exist in your project or cannot be found by Node.js. There are a few things you can try to resolve the issue:
-
Dependencies are not installed: Make sure that all dependencies are installed. To do this, run the command
npm installin the root folder of your project. This will install all of the dependencies listed in the project'spackage.jsonfile, and ensure that all of the modules that your Node'js application requires are available. -
Module is not installed: Make sure that the package you are trying to use is listed in the project's
package.jsonand that it is installed. To do this, run the commandnpm install <package_name>, replacing the<package_name>with the name of the package. This will add the package to the list of dependencies in thepackage.jsonfile, and install it in the project. -
Module is not imported: Make sure that you've imported the module/package correctly and that the
requirestatement is spelled correctly and available in the correct place in your code. -
Wrong file path: If you are importing another file as a module, make sure that the file you are trying to require is located in the correct folder and that you are using the correct file path.
-
Wrong module/package name: Check the spelling of the package name you are trying to import.
I got the error: "Invalid access token". How can I resolve it?
The error "Invalid access token" typically indicates that the token you are using to authenticate your API request is not valid. This can be caused by a few things, such as the token being incorrect, not having the right permissions, or the token/access keys not being included in the request.
To resolve the issue try the following:
-
Make sure that the required token or access keys are included in the request. Use
console.log()to print out the values being passed and check if they are available and notundefined. -
If you are loading the token string or access keys using
dotenvmake sure that values are included in the.envfile and that you are using the correct names to access them. For example, if you are storing your Spotify API access keys in the.envfile like this:
CLIENT_ID=aW9uaGFja2VycyBhcmUgdGhlIGJlc3Q
CLIENT_SECRET=AGgAZQBsAGwAbwAgAHcAbwByAGwAZA
You would access them in the following way:
const spotifyApi = new SpotifyWebApi({
  clientId: process.env.CLIENT_ID,
  clientSecret: process.env.CLIENT_SECRET
});Why are my CSS styles not loading after linking the stylesheet?
There are a few reasons why your CSS styles might not be loading after linking the stylesheet:
- Incorrect file path: Make sure that the file path for the stylesheet in the
linktag of your Handlebars template is correct. If the path is incorrect, the browser will not be able to locate the stylesheet and the styles will not be applied. For example, if the file structure of your project is as follows:
- views/
    - layout.hbs
    - index.hbs

- public/
    - stylesheets/
        - style.css
...
The correct file path for the stylesheet in the link tag of the layout.hbs file would be:
<link rel="stylesheet" href="/stylesheets/style.css">Important: The href path starts with a /, representing the path starting from the base folder where the static files are being served from, in this case, the public/ folder.
-
Incorrect file name: Make sure that you are referring to the file by its right name in the
hrefof thelinktag. -
Middleware not configured correctly: Make sure that you have the
express.staticmiddleware, that serves static files correctly configured in your Express app and that the right folder path and name are specified. If this middleware is not set up correctly, the server will not send the stylesheet when requested. -
Restart the server: Sometimes, even if you made the correct changes, the browser might still be loading an old version of the file. You should try restarting your Express server. This will ensure that the new changes are loaded and being served by the server, making sure the browser will load the most recent version of the stylesheet."
Why are my images not loading/displaying on the page?
There are a few reasons why your images might not be loading after linking the file:
- Incorrect file path: Make sure that the file path for the image in the
imgtag of your Handlebars template is correct. If the path is incorrect, the browser will not be able to locate the stylesheet and the styles will not be applied.
For example, if the file structure of your project is as follows:
- views/
    - layout.hbs
    - index.hbs

- public/
    - images/
        - dog.jpg
...
The correct file path for loading the image in the index.hbs file would be:
<img alt="dog" src="/images/dog.jpg" />Important: The src path starts with a /, representing the path starting from the base folder where the static files are being served from, in this case, the public/ folder.
-
Incorrect file name: Make sure that you are referring to the file by its right name in the
srcof theimgtag. -
Middleware not configured correctly: Make sure that you have the
express.staticmiddleware, that serves static files correctly configured in your Express app and that the right folder path and name are specified. If this middleware is not set up correctly, the server will not send the images when requested. -
Restart the server: Sometimes, even if you made the correct changes, the browser might still be loading an old version of the file. You should try restarting your Express server. This will ensure that the new changes are loaded and served by the server.
My GET form is not working properly. What should I do?
Here are the things you should check in order to fix your GET form:
- Check that the path for your GET route in Express matches the
actionandmethodattributes in the form. For example, if you have a routeGET/search:
app.get('/search', (req, res) => {
  // form handling logic
})
Your form action attribute should have the same path and the method should be the same:
<form action="/search" method="GET">- Check the data you are receiving from the form on the
req.queryby usingconsole.log(). For example, if you have a routeGET/search, you can add aconsole.log()like this:
app.get('/search', (req, res) => {
  // Print the data coming from the form
  console.log(req.query);
});- Check that the
formtag is properly formatted and that it has an opening and a closing tag. Example:
<form action="/search" method="GET">

  <!-- Form inputs, labels, button -->

</form>- Check that the submit button is configured properly to submit the form when clicked. Make sure that the button is located inside of the form tag and that it has a
type="submit"attribute. Example:
<form action="/search" method="GET">
  <label>Enter search prompt</label>
  <input type="text" name="prompt">

  <button type="submit"> Search </button>
</form>My links are not working properly. Should I use a relative or an absolute path?
When linking to other pages within your Express app, as a general rule you should use relative paths that start with a forward slash /.
This way you ensure that the links will work correctly both in your development environment and when the app is deployed.
For example, instead of linking to a page with an absolute path like this:
<a href="http://yourdomain.com/contact"> Contact </a>You should use a relative path starting with a forward slash / like this:
<a href="/contact"> Contact </a>If you are embedding values in your Handlebars template, you should still use the relative path that starts with a forward slash / like this:
I got the error "Error: listen EADDRINUSE: Address already in use". How do I fix it?
This error means that the port is taken by another process that is still running on that port. To fix the issue, you need to kill the process using the port and then run the command again. Here's how to do it:
To kill the process running on port 3000, run the following command in the terminal:
sudo kill -9 $(lsof -t -i:3000) Important: Replace the above example port 3000 with the port number of the process you are trying to kill.
To kill the running process on Windows using the Task Manager do the following:
- Open the Task Manager by pressing: Ctrl + Shift + Esc
- Find the Node process you want to terminate.
- Right-click and select End Task
To kill the running process on Windows using the Command Prompt do the following:
- Open the windows Start menu
- Search for CMD in the search bar
- In the search results, right-click on Command Prompt and select Run as administrator. This will open the Command Prompt terminal.
- In the Command Prompt terminal, run the following command to find the process ID:
netstat -ano|findstr "PID :3000"If the process happens to be running on another port, simply replace
3000with the number the port number the process is running on.
This will return the process id (PID). You should then run the following command using the process id (PID) you got in the previous step to terminate the process:
taskkill /PID 12345 /fImportant: Replace the above example PID 12345, with the process id (PID) you got in the previous step.
I got the error "Port is already in use". How do I fix it?
This error means that the port is taken by another process that is still running on that port. To fix the issue, you need to kill the process using the port and then run the command again. Here's how to do it:
To kill the process running on port 3000, run the following command in the terminal:
sudo kill -9 $(lsof -t -i:3000) Important: Replace the above example port 3000 with the port number of the process you are trying to kill.
To kill the running process on Windows using the Task Manager do the following:
- Open the Task Manager by pressing: Ctrl + Shift + Esc
- Find the Node process you want to terminate.
- Right-click and select End Task
To kill the running process on Windows using the Command Prompt do the following:
- Open the windows Start menu
- Search for CMD in the search bar
- In the search results, right-click on Command Prompt and select Run as administrator. This will open the Command Prompt terminal.
- In the Command Prompt terminal, run the following command to find the process ID:
```bash
netstat -ano|findstr "PID :3000"
```

> If the process happens to be running on another port, simply replace `3000` with the number the port number the process is running on.

This will return the process id (PID). You should then run the following command using the process id (PID) you got in the previous step to terminate the process:

```bash
taskkill /PID 12345 /f
```

**Important:** Replace the above example PID *12345*, with the process id (PID) you got in the previous step.
How do I ignore certain files or directories when using Git?
You can ignore certain files or directories when using Git by creating a file called .gitignore in the root of your repository. Inside the file, you should list all the files and folders that you want Git to ignore, one per line.
For example, to ignore the .env file and the node_modules/ folder in your project, you should add the following to your .gitignore file:
.env
node_modules/
For more information, check: Getting Started with Git - Ignoring Files
How do I pass the JSON data to the .hbs view to show it on the page?
To render and show the JSON data on a page, you first have to render the view and pass the data to the template. Example:
app.get('/', (req, res) => {
    // JSON mock data
    const data = {
      name: "Sarah",
      languages: ["javascipt", "python", "java"]
    };

    // Render the `index.hbs` view and pass it to the `data` object
    res.render("index", data);
});
In the above example, the variable named data represents the JSON mock data we want to display in the view. The data object is then passed to the index.hbs view in the res.render method. This makes the data object available in the view.
After you pass the data object to the view, you can use handlebars expressions to access and display the values from the object on the webpage. To access the values from the passed object we use the object's property names. Example:
In the above example, we access the values from the data object by using the property names name and languages.
I am getting an error: "not defined". How do I fix it?
The "ReferenceError: variable is not defined" error in JavaScript occurs when you try to access a variable or a function that has not been defined yet or is out of scope. To fix the issue, check that you have defined the variable or function that you are trying to use and double-check the spelling to make sure you are using the correct name. In case the variable or a function is defined in another file, make sure that the file has been imported or loaded correctly.
I am unable to push changes to the repository. What should I do?
There are a couple of possible reasons why you may be unable to push changes to a Git repository:
- You have not committed your changes: Before you can push your changes to the repository, you need to commit them using the
git commitcommand. Make sure you have committed your changes and try pushing again. To do this, run the following terminal commands from the project folder:
git add .
git commit -m "Your commit message"
git push- You do not have permission to push to the repository: If you have cloned the repository directly from the main Ironhack repository without making a Fork first, you do not have write access to the repository. To check which remote repository you have cloned, run the following terminal command from the project folder:
git remote -vIf the link shown is the same as the main Ironhack repository, you will need to fork the repository to your GitHub account first, and then clone your fork to your local machine to be able to push the changes.
Note: You may want to make a copy of the code you have locally, to avoid losing it in the process.


