Learn - Lab Guide
This guide is meant as a reference that provides the detailed steps to go through when working on labs in Learn. You can come back to this reference later if you forget any of the steps below.
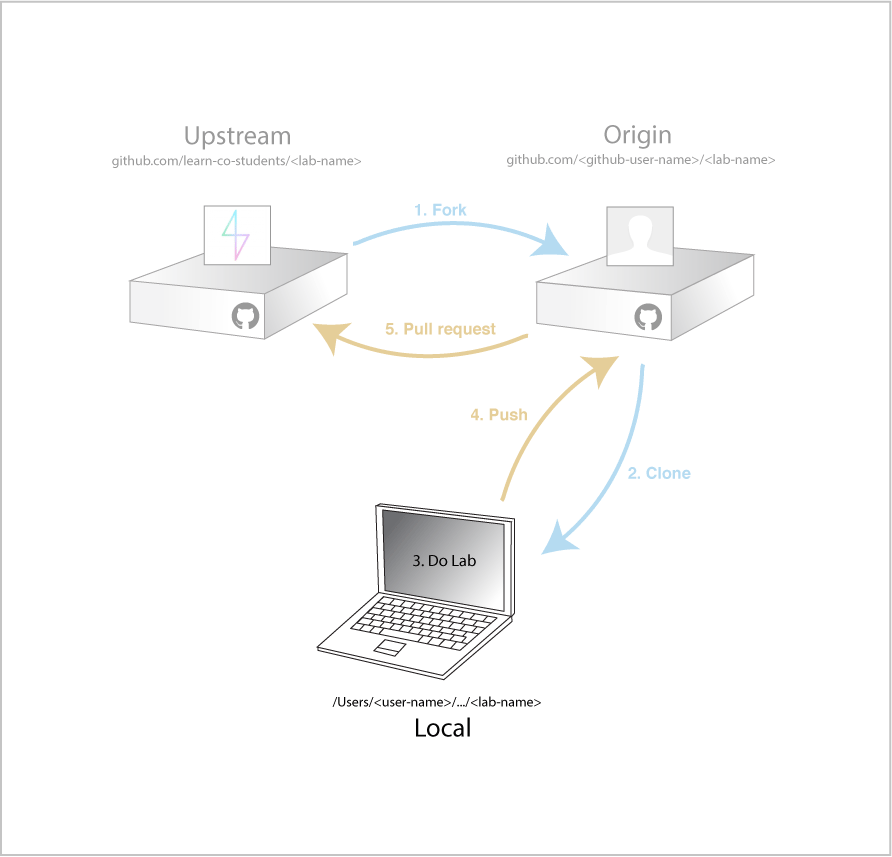
1. Fork
Forking is the process of making a personal remote copy of the Learn lab.

To get started, in Learn click the title of the lab to go to Learn's copy of the lab on Github.

Next at learn-co-students Github page for the lab click the Fork button.

Then select your personal Github account as the location to fork to.

2. Clone
Cloning is the process of making a local copy of the lab from your personal remote on Github.

To clone, click the copy button next to the Clone URL to copy it to your clipboard.

Next, in Terminal navigate to the parent directory where you would like to place this lab. Then type ♥ git clone <paste the clone URL here>
Note: You should replace the <paste the clone URL here> including the < and > symbols in the snippet above with your actual clone URL by pressing command+v on mac or ctrl+v on windows. Example: git clone [email protected]:jongrover/html-album-cover-fe-004.git

3. Work on the Lab
Now we can work on the lab locally and even offline if we wish. Let's change directory into the folder for the lab ♥ cd <lab-directory-name>

Then bring the lab up in Sublime text by typing ♥ subl .

Follow the instructions in README.md file to complete the lab.
As you are completing your lab you may want to occassionally save your work by staging and committing files. To stage files in terminal type ♥ git add <files or folders to add> or you can also use this shortcut to stage all files in the current folder ♥ git add .
Then we can take a snapshot of those files by commiting our changes. To do so type ♥ git commit -m "<message about what we did in this commit>"
Note: inside the quotes you want to put a message about what you did in this commit. Commit messages are conventionally in present tense. Something like: "add image to home page" or "finish contact form".
4. Push Your Work to Origin

After adding and commiting your most recent work next we want to push our work up to our personal Github remote (origin). To push up to your remote type ♥ git push <remote-name> <branch-name>
Note: The standard for labs would be to push to your (personal) remote named origin. By default you would push the work on your master branch. Example: ♥ git push origin master
5. Submit A Pull Request
Submitting a pull request can be described as the process of asking the maintainer of the Learn lab (upstream remote) to consider pulling (fetching & merging) in your work from your personal remote copy (origin remote). This enables your instructor to see your solution for the lab.

To do so, in Learn click the title of the lab to go to your forked copy on Github.

Then click the green Pull Request button.

After reviewing the comparison code and making sure it shows your solution, click the Create pull request button.

Then click Create pull request button again.

That's it your done! Now go back to Learn and click the I'm Done button.

View Learn - Lab Guide on Learn.co and start learning to code for free.


