Getting Started with Learn on Linux
Overview
At this point, you probably already have an environment setup that you like – we don't want to mess with that. We do, however, want to make sure that your environment can talk to Learn.
TL;DR
What follows will walk you through installing a few necessary libraries on your system. If you trust us, you can just run the following (or the appropriate substitutes for your OS) in your terminal:

sudo apt-get update
sudo apt-get install git
sudo apt-get install -y libssl-dev libreadline-dev zlib1g-dev

gpg --keyserver hkp://keys.gnupg.net --recv-keys 409B6B1796C275462A1703113804BB82D39DC0E3
\curl -sSL https://get.rvm.io | bash -s stable --ruby

# (restart your shell)

gem install learn-co
learn hello

# If you run into an issue about a missing .netrc,
# run the following:

touch ~/.netrc
chmod 0600 ~/.netrc

# and then try `learn hello` again

sudo apt-get install default-jre
sudo apt-get install default-jdk
sudo apt-get install ant

# Configure your SSH keys with GitHub:
# https://help.github.com/articles/generating-a-new-ssh-key-and-adding-it-to-the-ssh-agent/#platform-linux
Read on if you're the detail-oriented type.
<3 Your Package Manager
You probably already know and love your package manager – we just wanted to remind you.
For what follows, we'll assume that you're running on a system that has apt; modify the commands as necessary if you're more the yum type (for example).
First, let's make sure we're up to date:
sudo apt-get updateInstall git
Now we're going to install git. We'll cover git in more detail soon, but for now know that it's version control software – it has fancy ways of keeping track of your work that allow you to selectively apply changes or to revert to a prior state. Pretty sweet.
apt makes installation easy:
sudo apt-get install gitAnd you're done!
Configuring Git and GitHub
Next, you'll need to set up your SSH keys so that GitHub can recognize your local machine.
Log in on GitHub, and then go to your settings.
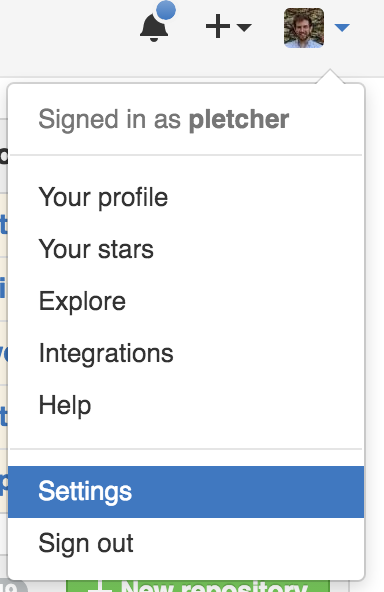
On the lefthand side of the screen, click "SSH keys".
At the bottom of the "SSH keys" box that shows up on the next screen, click the link for "generating SSH keys" and follow the instructions there.
Now when you go to clone a repository, be sure to clone it with SSH!
Install Ruby
Prerequisites
Ruby requires a few additional libraries to install. Run
sudo apt-get install -y libssl-dev libreadline-dev zlib1g-devto get them.
The Main Attraction
To install Ruby, we're going to use a version manager called rvm. The reason that we're adding this bit of indirection is that your system probably already has its own version of Ruby – we don't want to mess with it.
(Note: Some of you might be complaining about installing Ruby for a series of Java lessons. Learn's software depends on Ruby, and while we won't be covering it much here, Ruby is an interesting language and one that's used all over the place in software engineering (especially web development). You don't have to like it, but you'd do well to learn it.)
Feel free to follow along with the official instructions: https://rvm.io/rvm/install. We are just copying them from that site, so feel free to just head over there.
First let's setup the gpg key so that everything is secure:
gpg --keyserver hkp://keys.gnupg.net --recv-keys 409B6B1796C275462A1703113804BB82D39DC0E3Then we are going to do the actual install of RVM. This will take a while
\curl -sSL https://get.rvm.io | bash -s stable --rubyGive your terminal a restart and you should now have ruby. Check it out by typing ruby --version
Install Learn
Ruby packages are called gems; a local Learn CLI application is one of them. Let's install it with
gem install learn-coThen run learn hello to get the ball rolling.
Note: If you get an error about a missing ~/.netrc (or /home/[your username]/.netrc), you can just create the file and give it the correct permissions:
touch ~/.netrc
chmod 0600 ~/.netrc
Then run learn hello again and follow the instructions.
Install Java and Ant
Compared to installing Ruby, installing Java and Ant (a Java build tool) is easy. Just run
sudo apt-get install default-jre default-jdk antBada-bing!
Resources
View Getting Started With Learn (Linux) on Learn.co and start learning to code for free.


