
Globally interconnected In-App Chat, user profile and relationship chains and offline push.
More languages: 简体中文-TUIKit介绍 简体中文-快速集成
TUIKit has Chat SDK, UI components and basic business logic inside. You can choose our pure Chat SDK tencent-cloud-chat-sdk if you tend to build the UI yourself.
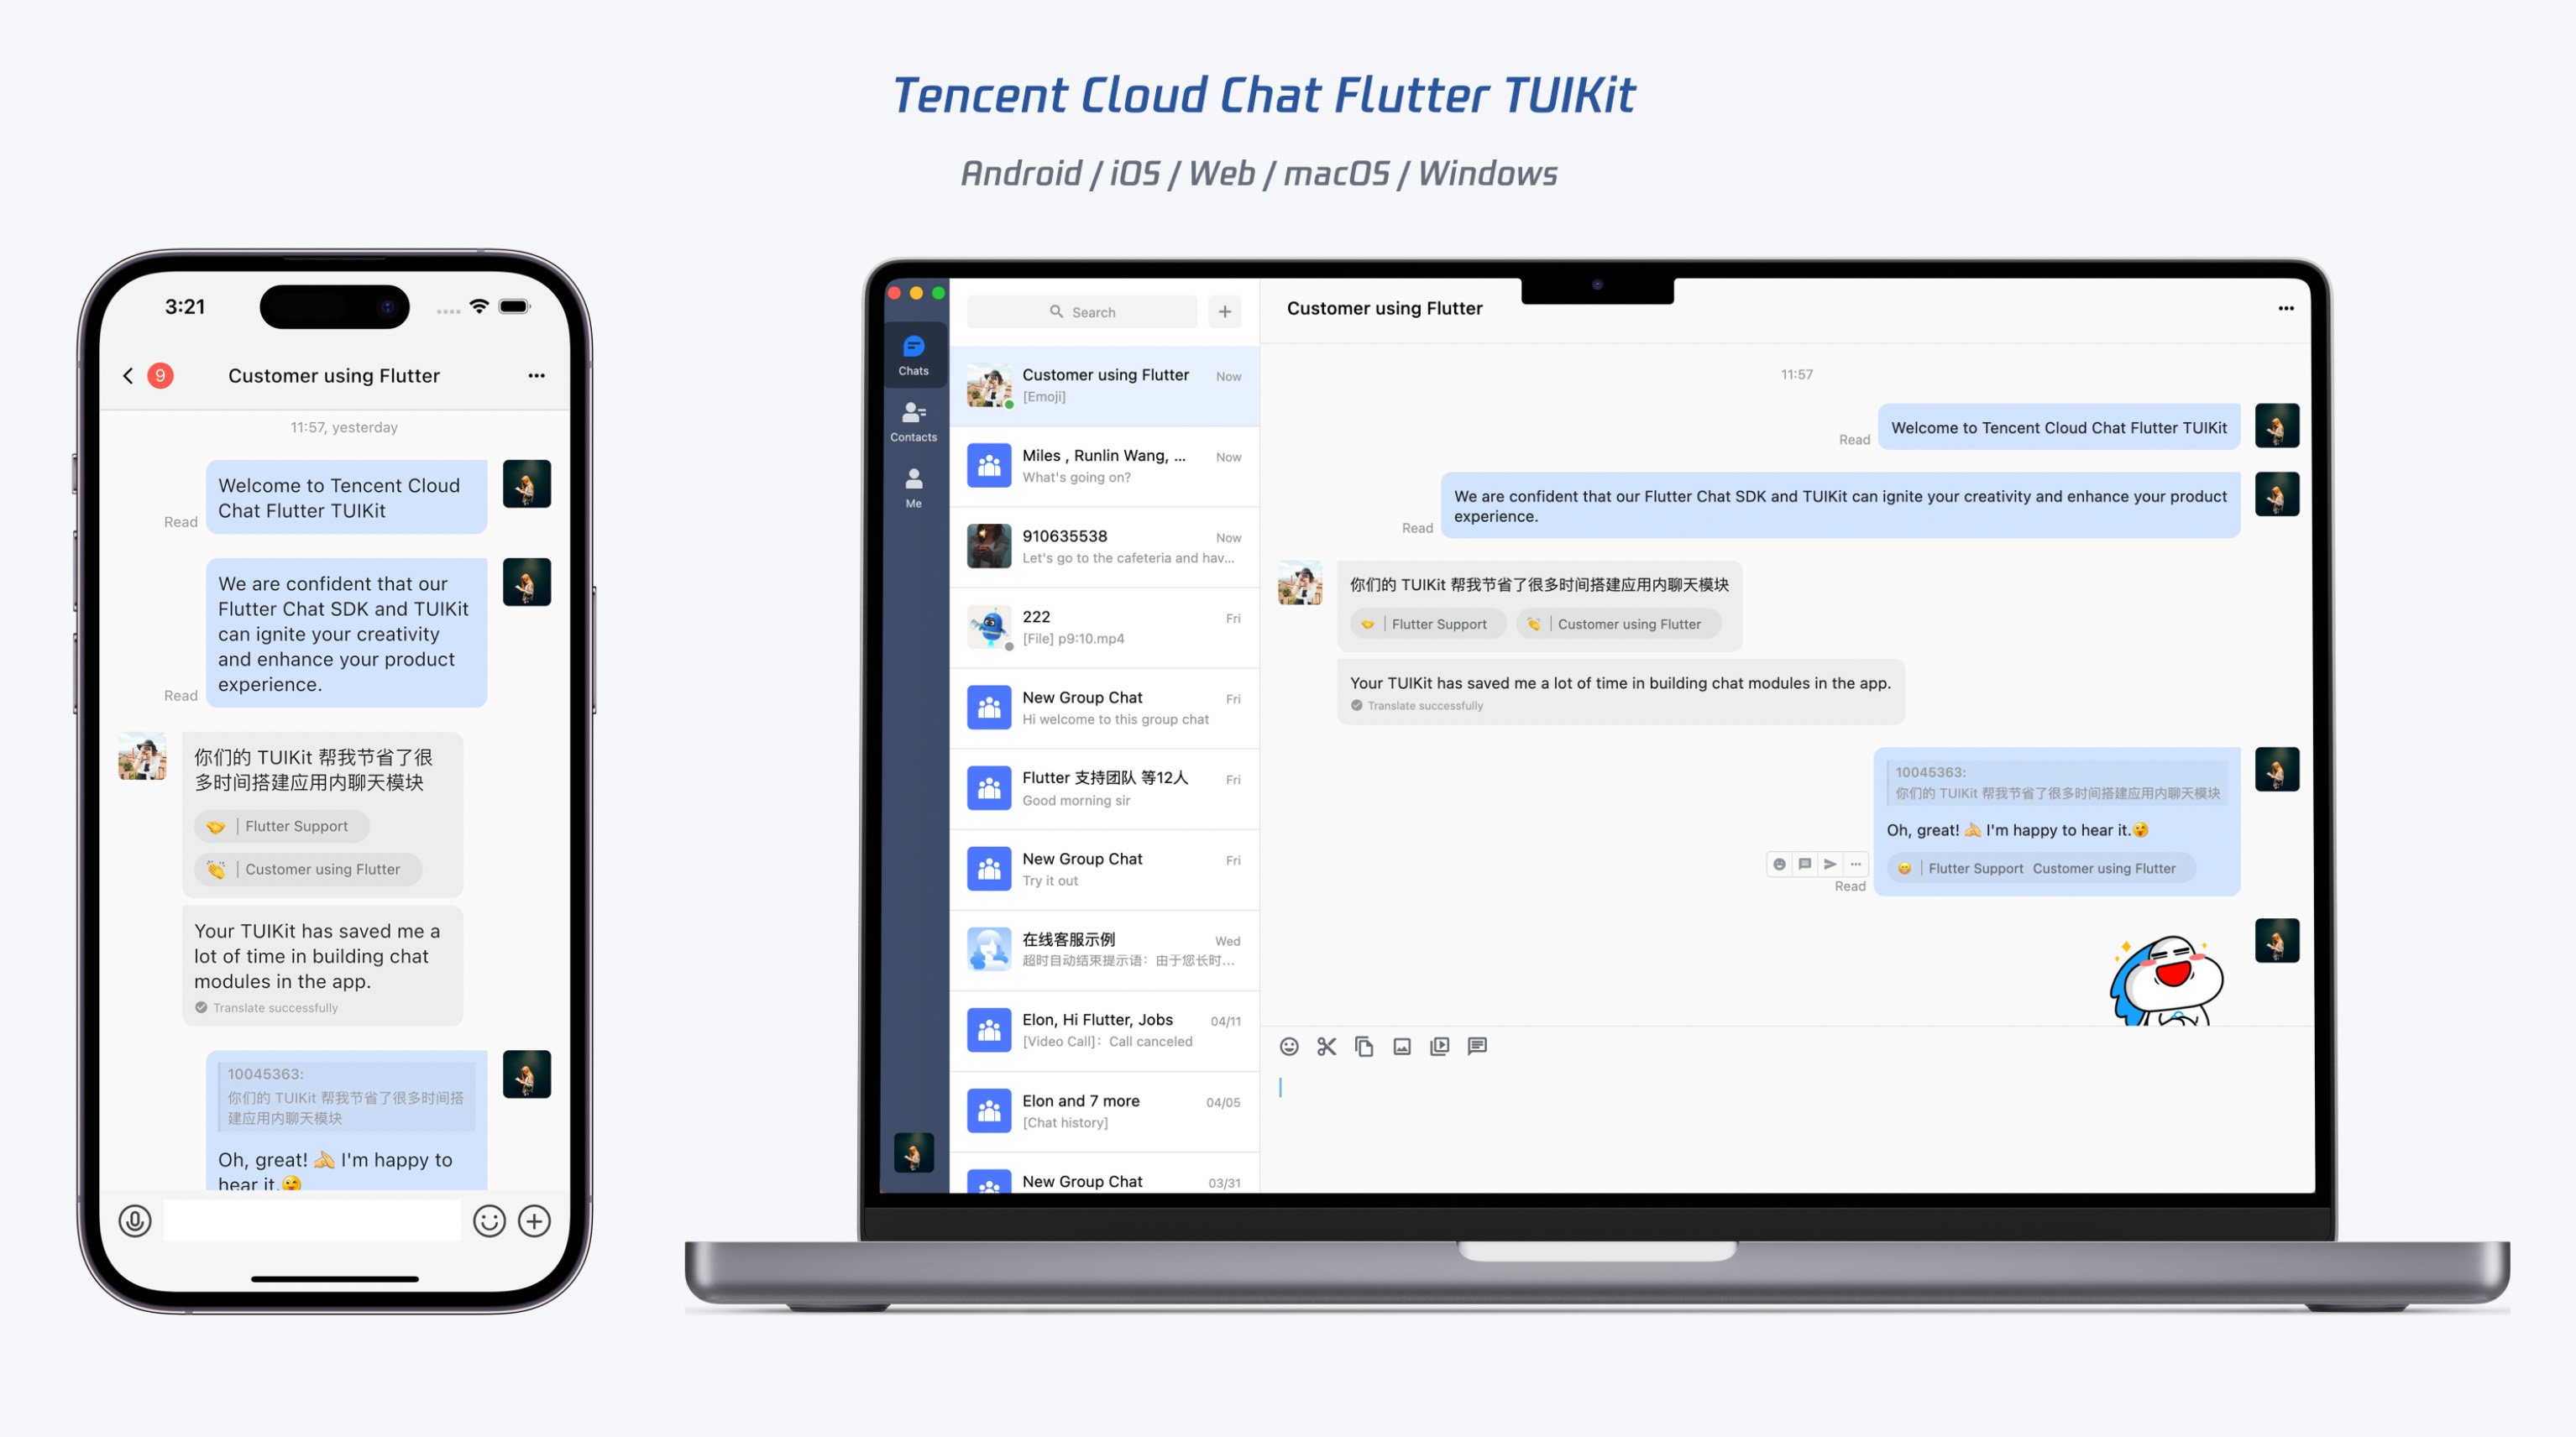
Experience our Chat and Voice/Video Call modules by trying out our sample apps.
These apps have been created using the same Flutter project as our SDKs and extensions.
| Platform | Link | Remark |
|---|---|---|
| Android / iOS |  |
Scan to download app for both Android and iOS. Automatically identifies platform. |
| Web |  |
Supports both desktop and mobile browsers and automatically adjusts its layout accordingly. Same website as link below. |
| Web | Visit Now | Supports both desktop and mobile browsers and automatically adjusts its layout accordingly. Same website as previous QR code. |
| macOS | Download Now | The macOS version of our sample app. Control-click the app icon, then choose "Open" from the shortcut menu. |
| Windows | Download Now | The Windows version of our sample app, which is a UWP (Universal Windows Platform) application. |
| Linux | Coming Soon... | Will be available later this year. |
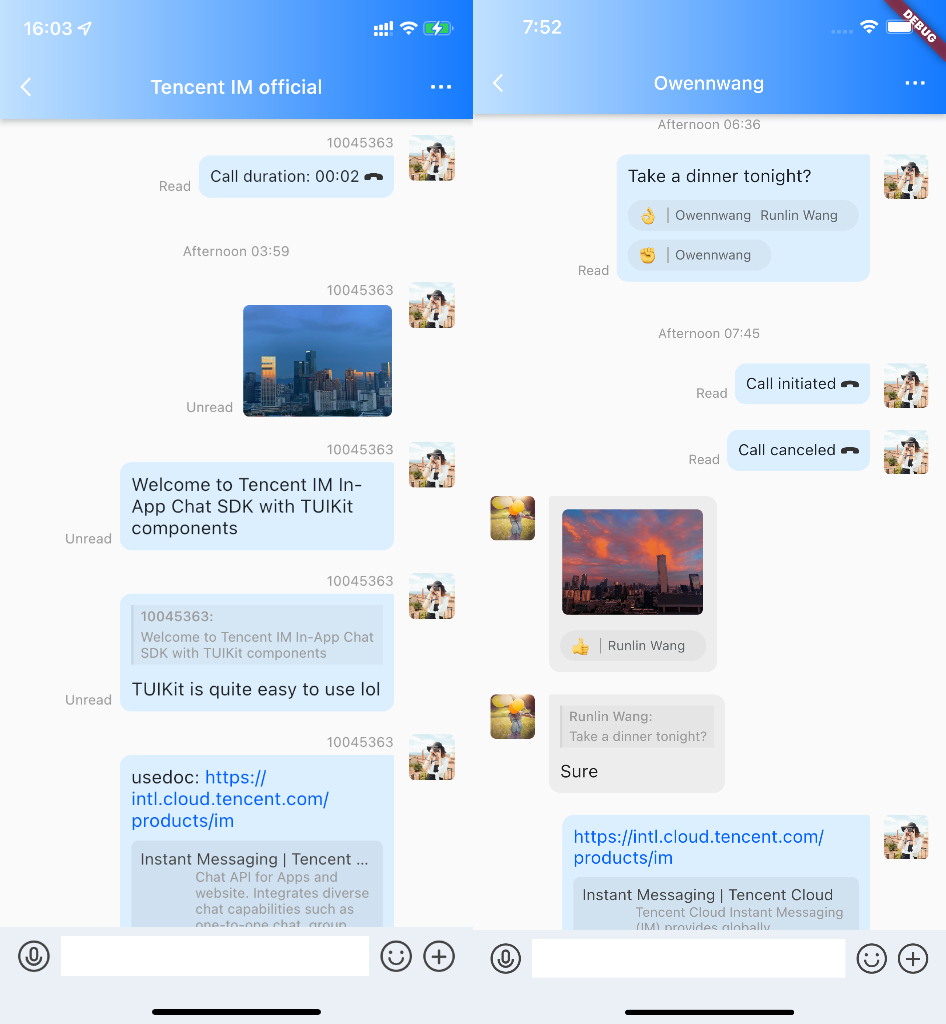
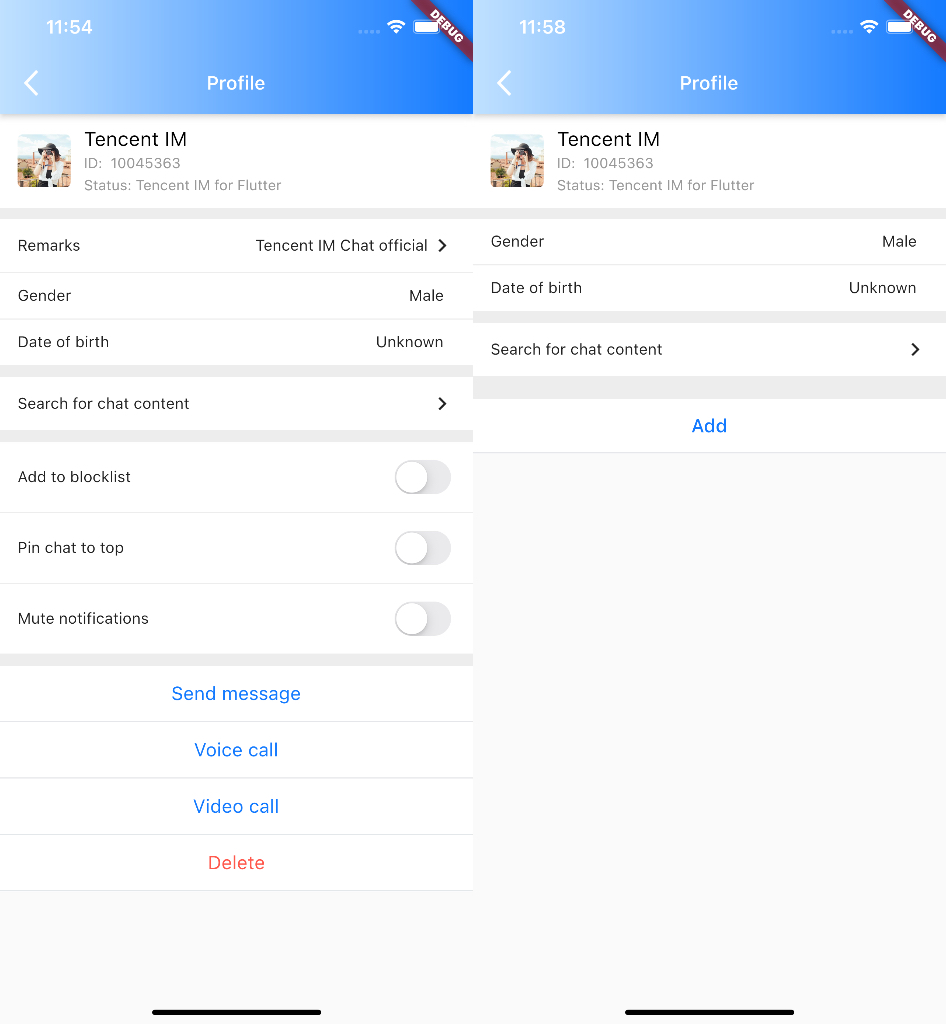
Take a look at the screenshots of TUIKit here to get an idea of what to expect.
Tencent Cloud Chat SDK comes with TUIKit, which is an official set of UI components that have chat business logic built-in. TUIKit includes components like conversation, chat, relationship chain, and group.
Developers can use these UI components to quickly and easily add In-APP chat modules to their mobile applications.
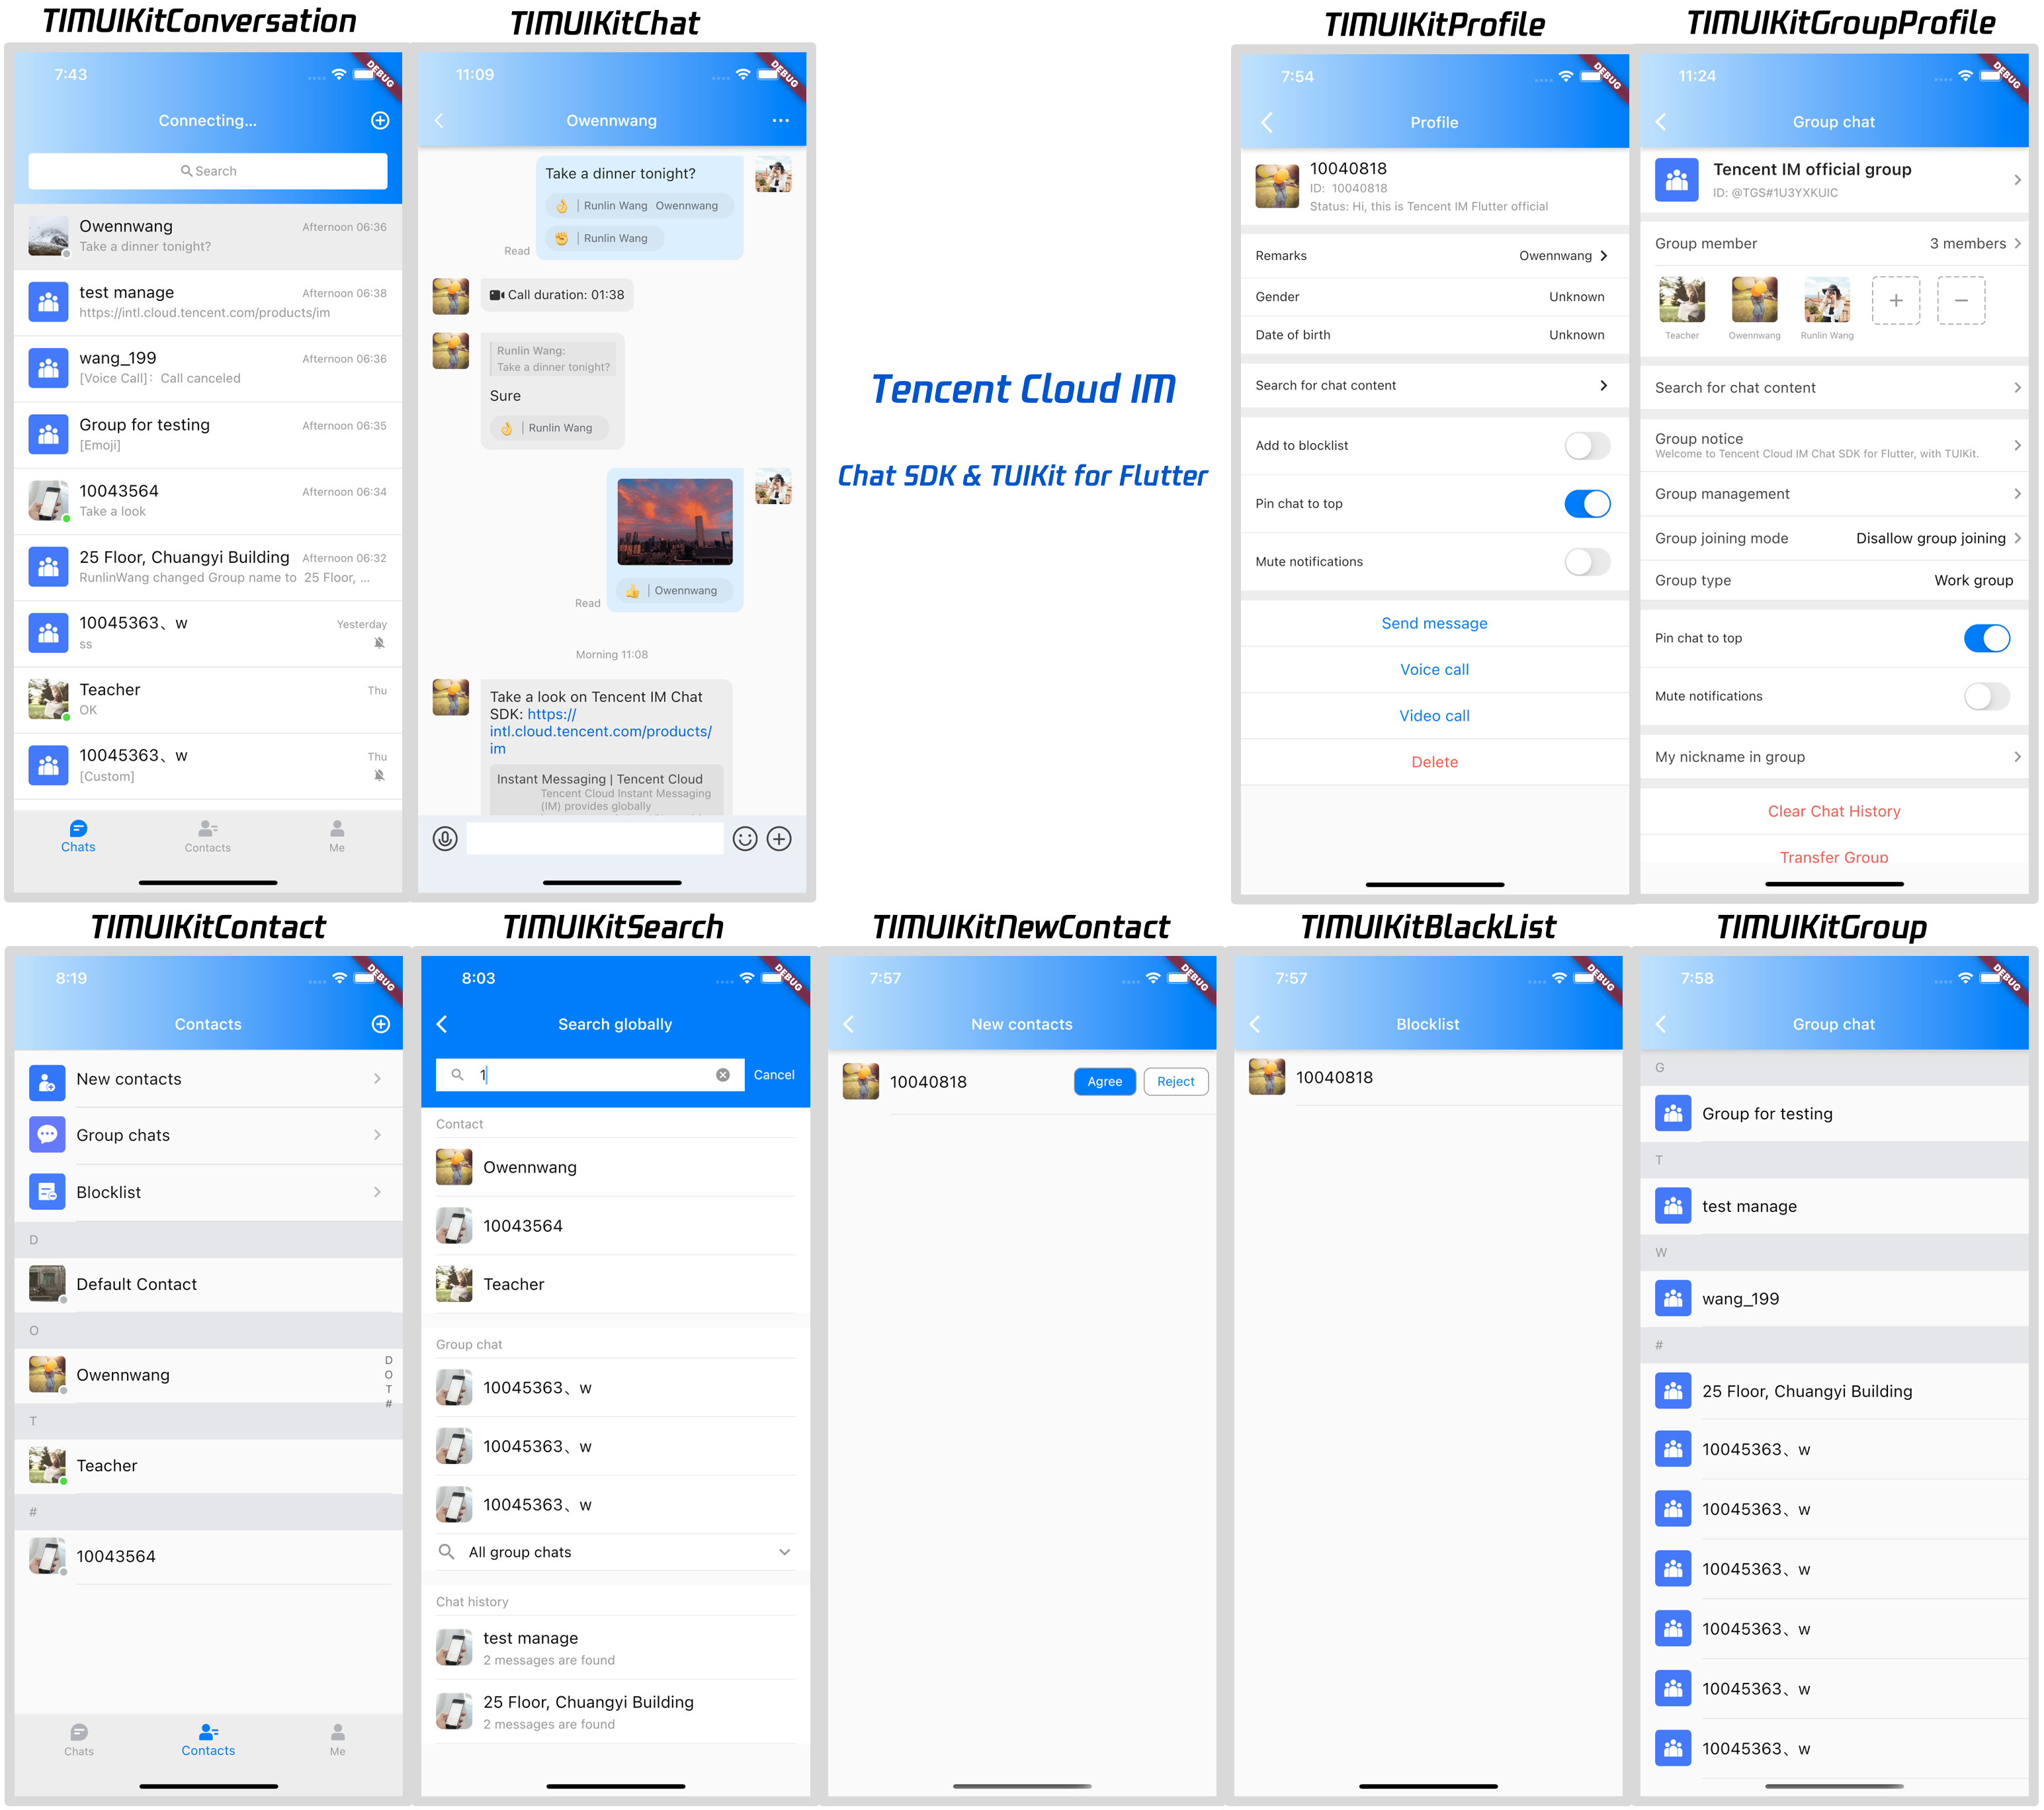
Currently, Flutter TUIKit contains the following main components:
- TIMUIKitCore: Core entry
- TIMUIKitConversation: Conversation list
- TIMUIKitChat: Chat module, includes historical message list and message sending area, with some other features like message reaction and URL preview, etc.
- TIMUIKitContact: Contacts list
- TIMUIKitProfile: User profile and relationship management
- TIMUIKitGroupProfile: Group profile and management
- TIMUIKitGroup: The list of group self joined
- TIMUIKitBlackList: The list of user been blocked
- TIMUIKitNewContact: New contacts application list
- TIMUIKitSearch: Search globally
- TIMUIKitSearchMsgDetail: Search in specific conversation
In addition to these components, there are other useful components and widgets available to help developers meet their business needs, such as group entry application list and group member list.
For the source code of the project shown in the image above, please refer to chat-demo-flutter. This project is open source and can be directly used by developers.
The platforms are compatible with the deployment of our Chat UIKit.
- Android
- iOS
- Web (version 0.1.4 and later)
- Windows (version 2.0.0 and later)
- macOS (version 2.0.0 and later)
Please refer to this document for a complete and detailed guide on getting started.
The following guide describes how to quickly build a simple chat application using Flutter TUIKit.
Refer to the appendix if you want to learn about the details and parameters of each widget.
If you want to directly add Flutter TUIKit to your existing application, refer to this document. You can add the Flutter module to your existing application, code once, and deploy to all platforms. This can significantly reduce the workload of adding chat and call modules to your existing application.
Sign up and log in to the Tencent Cloud Chat console.
Create an application and enter it.
Select Auxiliary Tools > UserSig Generation and Verification on the left sidebar. Generate two pairs of "UserID" and the corresponding "UserSig," and copy the "key" information. Refer to this document.
Tips: You can create "user1" and "user2" here.
Note:
The correct way to distribute
UserSigis to integrate the calculation code forUserSiginto your server and provide an application-oriented API. WhenUserSigis needed, your application can send a request to the business server for a dynamicUserSig.For more information, see How do I calculate UserSig on the server?.
Create a Flutter app quickly by following the Flutter documentation.
TUIKit needs the permissions of shooting/album/recording/network for basic messaging functions. You need to declare these permissions manually to use the relevant capabilities normally.
Open android/app/src/main/AndroidManifest.xml and add the following lines between <manifest> and </manifest>.
<uses-permission android:name="android.permission.INTERNET" />
<uses-permission android:name="android.permission.RECORD_AUDIO" />
<uses-permission android:name="android.permission.FOREGROUND_SERVICE" />
<uses-permission android:name="android.permission.ACCESS_NETWORK_STATE" />
<uses-permission android:name="android.permission.VIBRATE" />
<uses-permission android:name="android.permission.ACCESS_BACKGROUND_LOCATION" />
<uses-permission android:name="android.permission.WRITE_EXTERNAL_STORAGE" />
<uses-permission android:name="android.permission.READ_EXTERNAL_STORAGE" />
<uses-permission android:name="android.permission.CAMERA" />
<uses-permission android:name="android.permission.READ_MEDIA_IMAGES"/>
<uses-permission android:name="android.permission.READ_MEDIA_VIDEO"/>Open ios/Podfile and add the following lines to the end of the file.
post_install do |installer|
  installer.pods_project.targets.each do |target|
    flutter_additional_ios_build_settings(target)
    target.build_configurations.each do |config|
            config.build_settings['EXCLUDED_ARCHS[sdk=iphonesimulator*]'] = 'arm64'
            config.build_settings['ENABLE_BITCODE'] = 'NO'
            config.build_settings["ONLY_ACTIVE_ARCH"] = "NO"
        end
    target.build_configurations.each do |config|
          config.build_settings['GCC_PREPROCESSOR_DEFINITIONS'] ||= [
            '$(inherited)',
            'PERMISSION_MICROPHONE=1',
            'PERMISSION_CAMERA=1',
            'PERMISSION_PHOTOS=1',
          ]
        end
  end
end
Add tencent_cloud_chat_uikit under dependencies in the pubspec.yaml file, or run the following command:
flutter pub add tencent_cloud_chat_uikitIt supports Android and iOS by default. If you also want to use it on the web, refer to the following guide.
Version 0.1.4 or later is required to support web.
If your existing Flutter project does not support web, run flutter create . in the project root directory to add web support.
Install JavaScript dependencies to web/ using npm or yarn.
cd web

npm init

npm i tim-js-sdk

npm i tim-upload-plugin
Open web/index.html and add the following two lines between <head> and </head> to import them.
<script src="./node_modules/tim-upload-plugin/index.js"></script>
<script src="./node_modules/tim-js-sdk/tim-js-friendship.js"></script>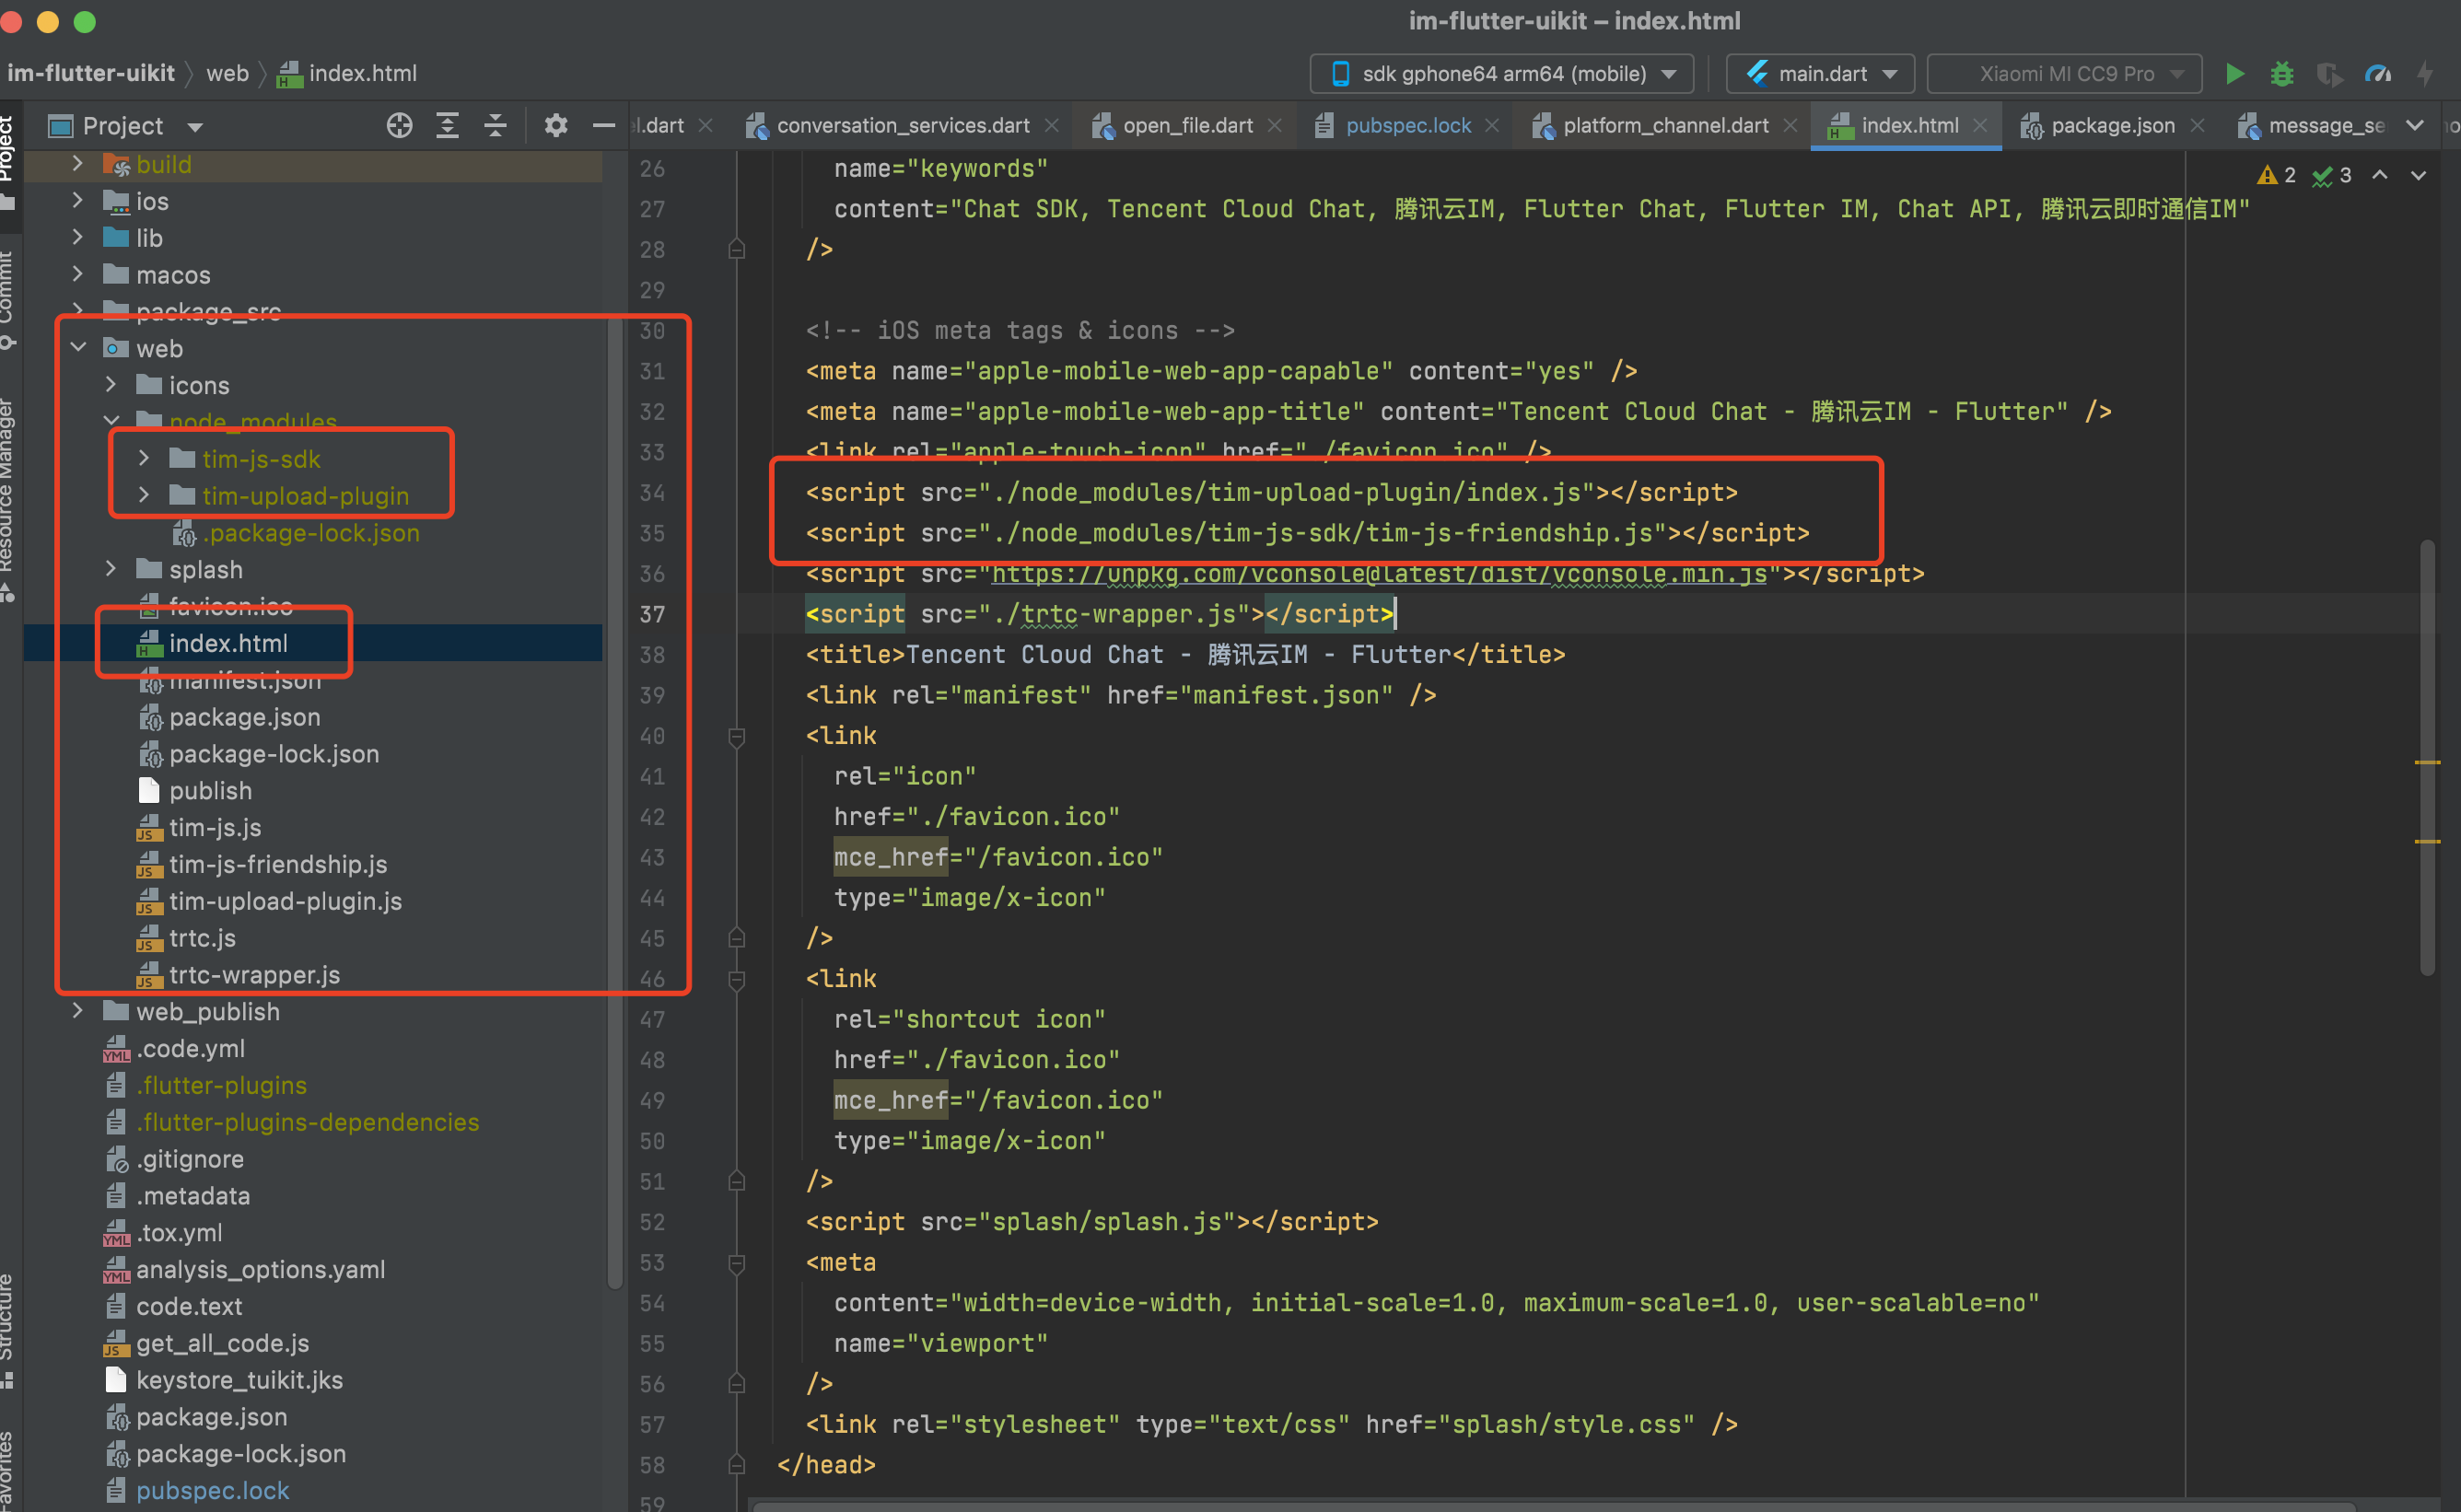
Initialize TUIKit when your app starts. You only need to perform the initialization once for the project to start.
Get the instance of TUIKit first using TIMUIKitCore.getInstance(), followed by initializing it with your sdkAppID.
/// main.dart
import 'package:tencent_cloud_chat_uikit/tencent_cloud_chat_uikit.dart';

final CoreServicesImpl _coreInstance = TIMUIKitCore.getInstance();

@override
void initState() {
  _coreInstance.init(
      sdkAppID: 0, // Replace 0 with the SDKAppID of your Tencent Cloud Chat application
      loglevel: LogLevelEnum.V2TIM_LOG_DEBUG,
      listener: V2TimSDKListener());
  super.initState();
}}
You may also want to register a callback function for
onTUIKitCallbackListenerhere. Refer to the appendix.
You can now log in one of the testing accounts generated in Step 0 to start the Tencent Cloud Chat module.
Log in using _coreInstance.login.
/// main.dart
import 'package:tencent_cloud_chat_uikit/tencent_cloud_chat_uikit.dart';

final CoreServicesImpl _coreInstance = TIMUIKitCore.getInstance();
_coreInstance.login(userID: userID, userSig: userSig);
Note: Importing UserSig to your application is only for debugging purposes and cannot be used for the release version. Before publishing your app, you should generate your UserSig from your server. Refer to: https://www.tencentcloud.com/document/product/1047/34385?from=pub
You can use the conversation (channel) list page as the homepage of your Chat module, which includes all conversations with users and groups that have chat records.
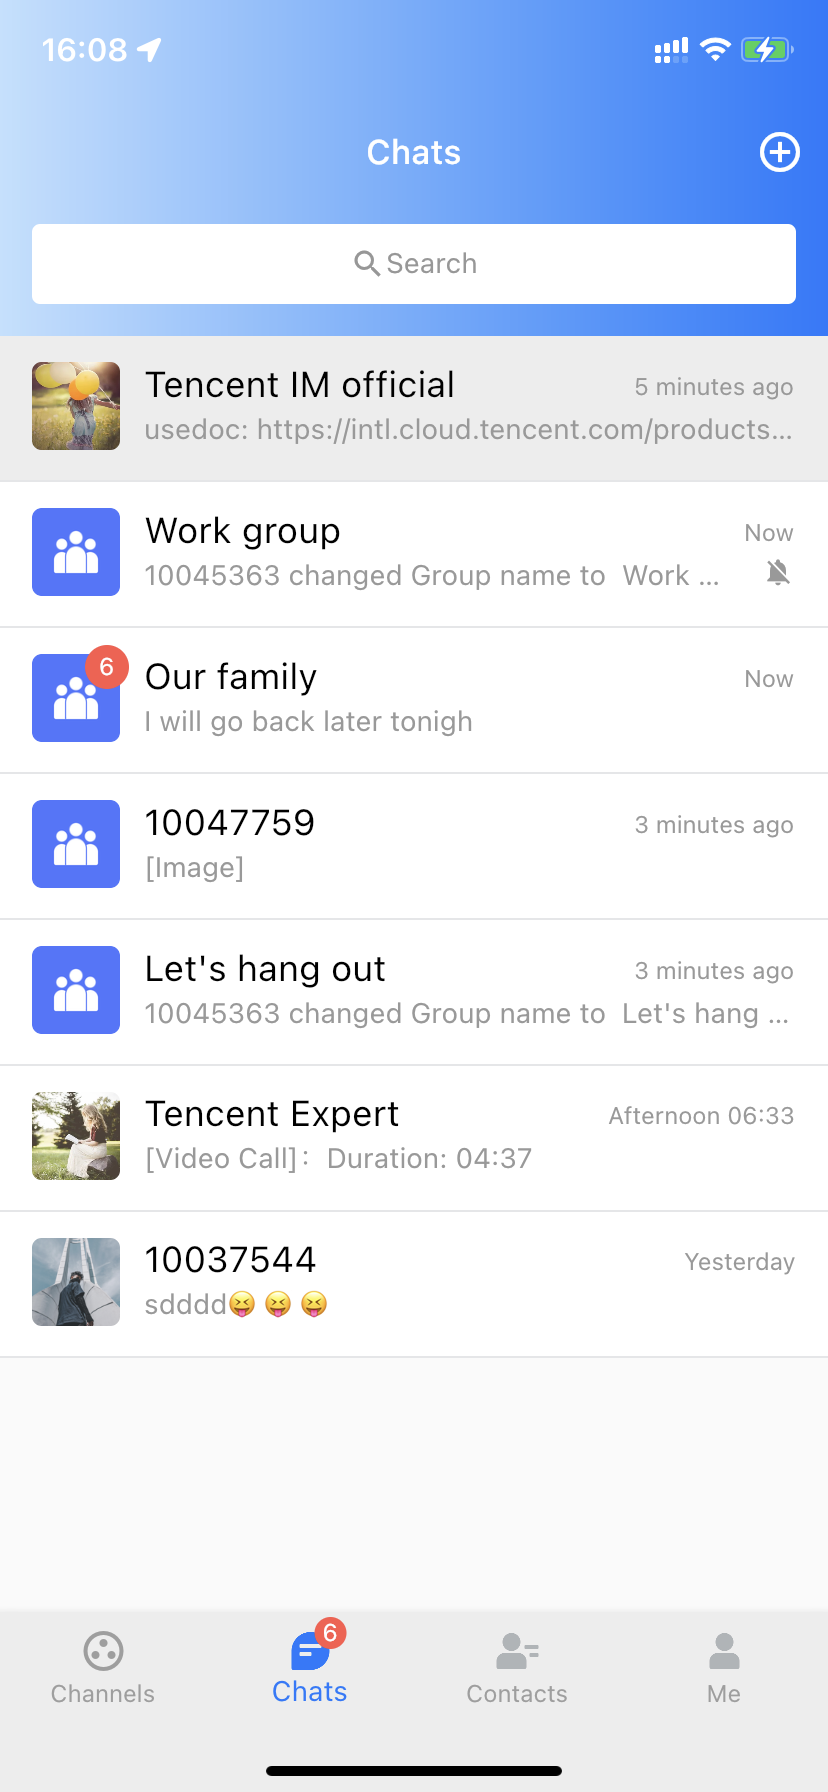
You can create a `Conversation` class, with `TIMUIKitConversation` as its body, to render the conversation list. You only need to provide the `onTapItem` callback, which allows users to navigate to the Chat page for each conversation. In the next step, we'll introduce the `Chat` class.
```dart
import 'package:flutter/material.dart';
import 'package:tencent_cloud_chat_uikit/tencent_cloud_chat_uikit.dart';
class Conversation extends StatelessWidget {
const Conversation({Key? key}) : super(key: key);
@override
Widget build(BuildContext context) {
return Scaffold(
appBar: AppBar(
title: const Text(
"Message",
style: TextStyle(color: Colors.black),
),
),
body: TIMUIKitConversation(
onTapItem: (selectedConv) {
Navigator.push(
context,
MaterialPageRoute(
builder: (context) =>
Chat(
selectedConversation: selectedConv,
),
));
},
),
);
}
}The chat page consists of the main message list and a message sending bar at the bottom.
You can create a `Chat` class, with `TIMUIKitChat` as its body, to render the chat page. We recommend providing an `onTapAvatar` callback function to navigate to the profile page for the current contact, which we'll introduce in the next step.
```dart
import 'package:flutter/material.dart';
import 'package:tencent_cloud_chat_uikit/tencent_cloud_chat_uikit.dart';
class Chat extends StatelessWidget {
final V2TimConversation selectedConversation;
const Chat({Key? key, required this.selectedConversation}) : super(key: key);
String? _getConvID() {
return selectedConversation.type == 1
? selectedConversation.userID
: selectedConversation.groupID;
}
@override
Widget build(BuildContext context) {
return TIMUIKitChat(
conversationID: _getConvID() ?? '',
conversationType: selectedConversation.type ?? 1,
conversationShowName: selectedConversation.showName ?? "",
onTapAvatar: (_) {
Navigator.push(
context,
MaterialPageRoute(
builder: (context) => UserProfile(userID: userID),
));
},
);
}This page shows the profile of a specific user and maintains the relationship between the current logged-in user and the other user.
You can create a `UserProfile` class, with `TIMUIKitProfile` as its body, to render the user profile page.
The only parameter you have to provide is `userID`, while this component automatically generates the profile and relationship maintenance page based on the existence of friendship.
> **TIP**: Please use `profileWidgetBuilder` first to customize some profile widgets and determine their vertical sequence using `profileWidgetsOrder` if you want to customize this page. If this method cannot meet your business needs, you may consider using `builder` instead.
```dart
import 'package:flutter/material.dart';
import 'package:tencent_cloud_chat_uikit/tencent_cloud_chat_uikit.dart';
class UserProfile extends StatelessWidget {
final String userID;
const UserProfile({required this.userID, Key? key}) : super(key: key);
@override
Widget build(BuildContext context) {
return Scaffold(
appBar: AppBar(
title: const Text(
"Message",
style: TextStyle(color: Colors.black),
),
),
body: TIMUIKitProfile(
userID: widget.userID,
),
);
}
}Now your app can send and receive messages, display the conversation list, and manage contact friendships. You can use other components from TUIKit to quickly and easily implement the complete Chat module.
No. You don't need to integrate Chat SDK again. If you want to use Chat SDK related APIs, you can
get them via TIMUIKitCore.getSDKInstance(). This method is recommended to ensure Chat SDK version
consistency.
Check whether you have enabled the camera, mic, album, or other related permissions.
Refers to Step 1 above.
What should I do if clicking Build And Run for an Android device triggers an error, stating no available device is found?
Check that the device is not occupied by other resources. Alternatively, click Build to generate an APK package, drag it to the simulator, and run it.
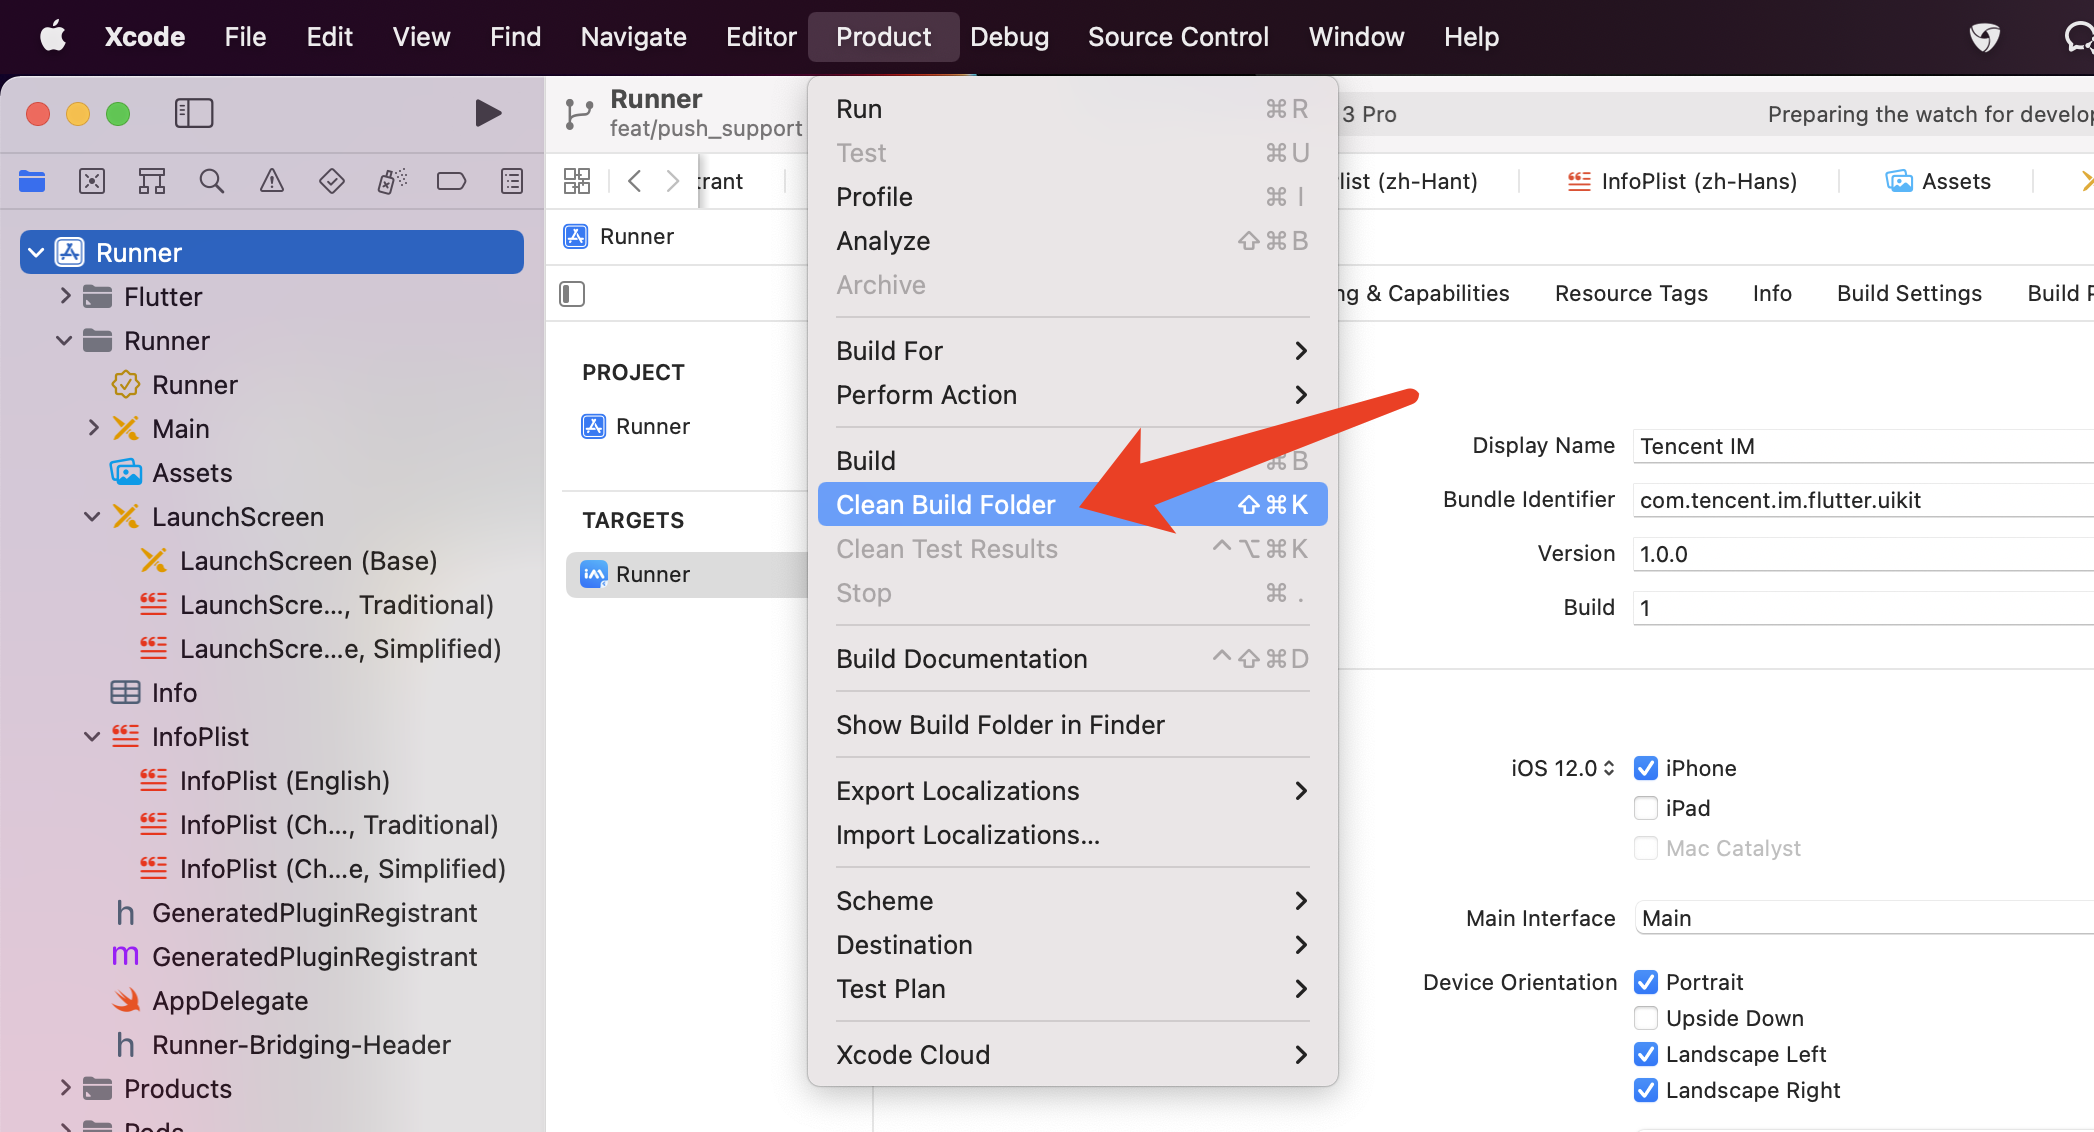
If an error occurs after the configuration, click Product > Clean Build Folder , clean the
product, and run pod install or flutter run again.
What should I do if an error occurs during debugging on a real iOS device when I am wearing an Apple Watch?

Turn on Airplane Mode on your Apple Watch, and go to Settings > Bluetooth on your iPhone to turn off Bluetooth.
Restart Xcode (if opened) and run flutter run again.
What should I do when an error occurs on an Android device after TUIKit is imported into the application automatically generated by Flutter?

- Open
android\app\src\main\AndroidManifest.xmland completexmlns:tools="http://schemas.android.com/tools" / android:label="@string/android_label" / tools:replace="android:label"as follows.
<manifest xmlns:android="http://schemas.android.com/apk/res/android"
    package="Replace it with your Android package name"
    xmlns:tools="http://schemas.android.com/tools">
    <application android:label="@string/android_label" tools:replace="android:label"
        android:icon="@mipmap/ic_launcher"
    // Specify an icon path
    android:usesCleartextTraffic="true"
android:requestLegacyExternalStorage="true">- Open
android\app\build.gradleand completeminSdkVersionandtargetSdkVersionindefaultConfig.
defaultConfig {
  applicationId "" // Replace it with your Android package name
  minSdkVersion 21
  targetSdkVersion 30
}Please do not hesitate to contact us in the following place, if you have any further questions or tend to learn more about the use cases.
- Telegram Group: https://t.me/+1doS9AUBmndhNGNl
- WhatsApp Group: https://chat.whatsapp.com/Gfbxk7rQBqc8Rz4pzzP27A
- QQ Group: 788910197, chat in Chinese
Our Website: https://www.tencentcloud.com/products/im?from=pub


