I. Register and configure SDK-KEY
II.About AdViewSDK_Android-3.4.4
IV. AndroidManifest.xml text configuration
VII. Create interstitial advertising
VIII. Create opening screen ad
- Visit AdView website adview.com and complete the registration process.
- After Login you will land on "My Products" page by default, select "Publish App” .
- Select “Android” follow the prompts to complete the relevant information About the application and click on "Next" button at the end where you will be redirected to “APP management” page
- Under "App managemnet" page Click "Next" button at the bottom --> you will get the sole SDK key --> click "Finish" button at the bottom centre of the page and you will be redirected to the below page
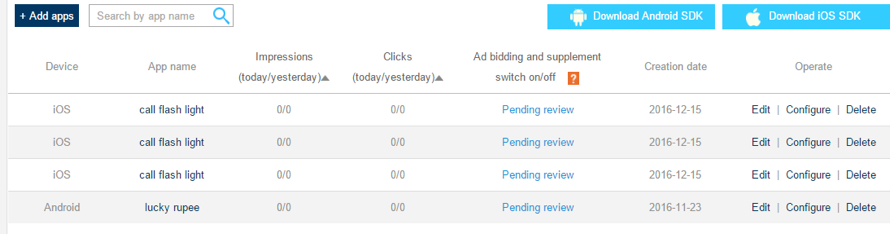
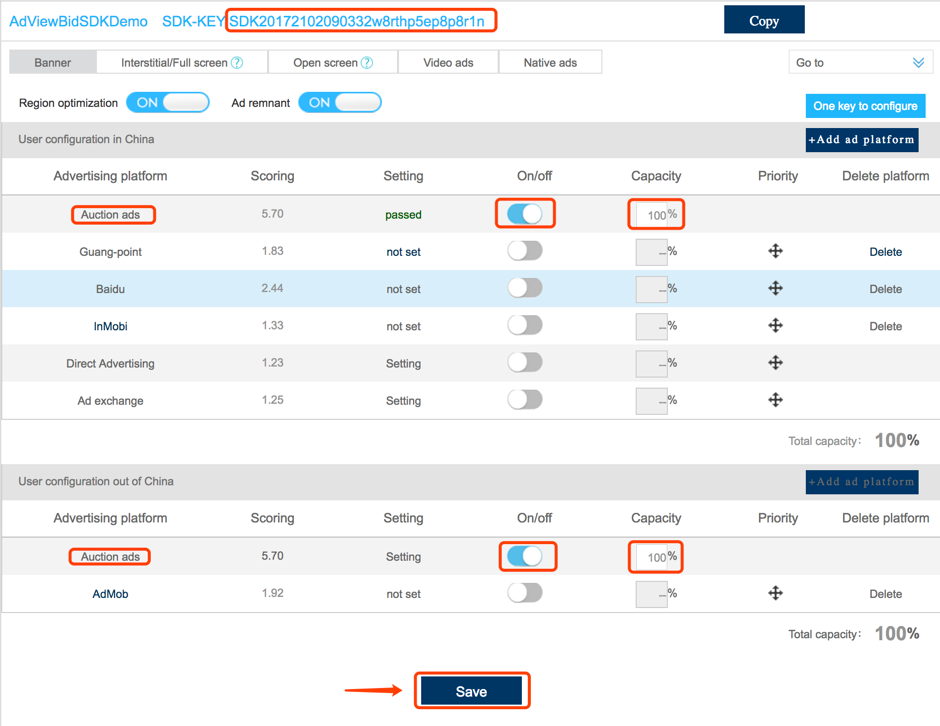
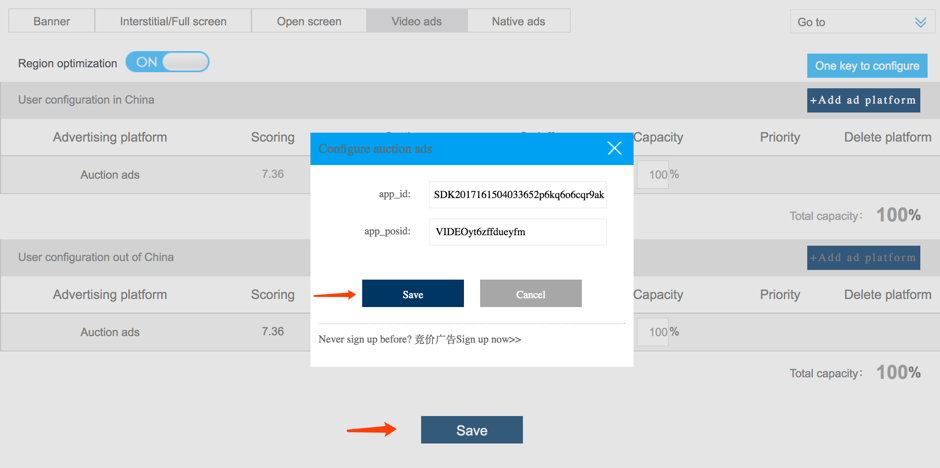
- Now click on "configure" against your application, then you will be redirected to “APP management” page → under the Ad format you want to configure (Banner,interstitial,video,open screen and native) open the switch against Auction ads(AdView Ads) and in case you want to add any custom ad networks (like InMobi, AdMob etc..,) click “Add ad platform” and please refer to this link Adding custom ad network for further steps, the cumulative percentage muste be 100%,then click save button. Generally recommended number of platforms is 1-3.
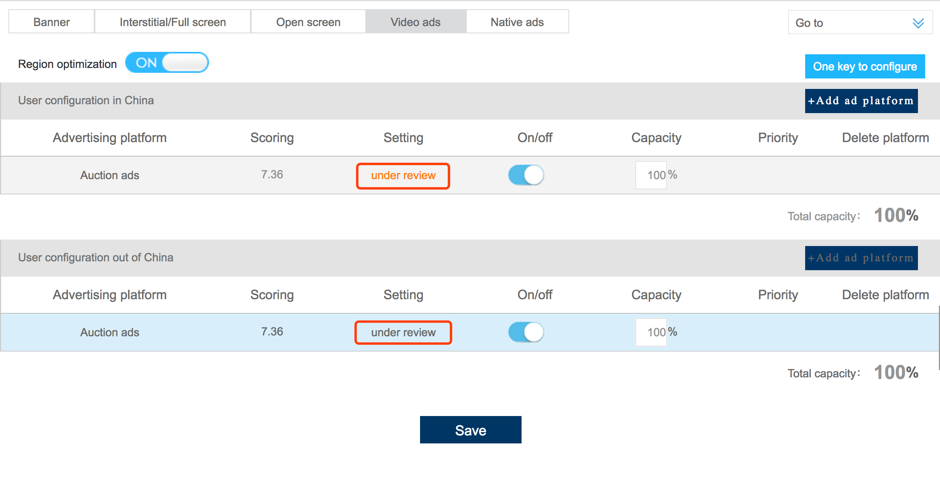
6.For video ad or native ad,Please configure in AdView Dash board .Please click under review or setting label ,you will get dialog box.In the dialog box For Auction ads ,please click save button in dialog box and click save button in bottom of the page .For other platforms ,please configure those custom adNetworks ids .
- (Optional) if you wish to show prompt when you click on the ad - Under app management --> select "Edit" against your app, Switch on "Twice confirmation" button under "Advertising text settings".

Notes:
-
In This Github repository we have provided you with Adview Android SDK which gives you the freedom to choose your favourite ad network. in order to add custom ad networks please refer to this Adding custom ad network
-
If you are fresher, you don’t know much about ad platform, which ad platform to choose or which ad platform revenue is stable, we suggest you to use bidding first.
-
Bidding and remnant ads need to complement market information at background, if the status is "Under review" you will be receiving test ads. and you will get formal ads only after "pass reviewed" by the AdView team.
-
Ads will be shown of only those ad platforms for which the switch is on against them.
-
Only the "capacity" of those ad platforms for which the switch is on will be valid, the ad newtork with higher proportion will get prior request, for all ad platforms with status as ON, the cumulative should be 100%. Other wise the your priority can't be saved.
-
For Banner ad, full screen/interstitial, opening screen ,etc, there’s a save button at the bottom of the page. You should click the save button every time you modify a ad format, otherwise the modification is invalid .
-
Region optimization: Region optimization function means mobile phone displays the regional configured ads when it’s with in the region, while in foreign country it display foreign configured ads to meet the different demands to the maximum extent. When the region optimization function is closed, it does not distinguish between home and abroad.
-
In case you wish to show the same ad format more than once (like 2 banner ads) you need to create a new project (My product page --> publish app) with same credentials to get a new SDK key and the integration process remains same, you need not create a new project if the ad formats are different
- Clone or download AdViewSDK_Android-3.4.4 package to go ahead with the integration process. This package contains all files needed for smooth integration and some of the important fils include AdViewTestDemoEN and libs.
AdViewTestDemoEN AdViewTestDemoEN project which includes all types of ad format (banner,interstitial,video,native,open screen) sample code with explanation.you can run the application. you can see the test ads.
libs It contains all the .jar file SDK needed for ad platform integration. (Libinfo.pdf has the ad platform instructions corresponding to each jar.)
-
Clone or download AdViewSDK_Android-3.4.4 package here.In the AdViewSDK_Android-3.4.4 folder contains libs folder ,it contains the SDK for all ad platforms. (Libinfo.pdf has the ad platform instructions corresponding to each jar.)
-
Please copy and paste AdViewSDK_Android.jar,google-play-services.jar into your application lib folder.you'll need to integrate the Google Play Services SDK into your app.This is mandatory; without Google Play Services, the SDK cannot function.
-
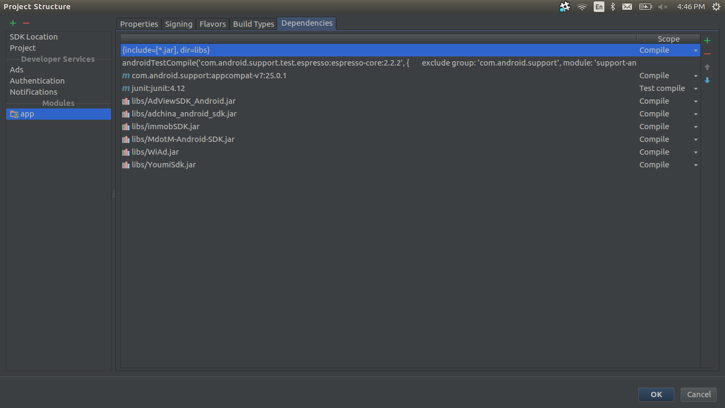
In order to add new ad network please copy the .jar file of that particular ad platform provided by AdView to your lib folder and follow the same for all other ad platforms you would like to integrate. In case of InMobi add the InMobi.jar and Picaso.jar files.Please refer for adding custom ad Network this procedure Adding custom ad network
4.1 Add permission code
Required permissions should be added (please refer to AndroidManifest file in the AdViewTestDemoEN project).
	<uses-permission android:name="android.permission.READ_PHONE_STATE" />
	<uses-permissionandroid:name="android.permission.ACCESS_COARSE_LOCATION"/>
	<uses-permissionandroid:name="android.permission.ACCESS_FINE_LOCATION" />
	<uses-permissionandroid:name="android.permission.ACCESS_WIFI_STATE" />
	<uses-permissionandroid:name="android.permission.WRITE_EXTERNAL_STORAGE"/>
	<uses-permissionandroid:name="android.permission.READ_EXTERNAL_STORAGE"/>
Note:
-INTERNET: allow to visit network (required)
-ACCESS_NETWORK_STATE: allow to visit various status of mobile phone (required)
-ACCESS_COARSE_LOCATION: allow a procedure to visit CellID or WIFI to get the rough position.
-ACCESS_FINE_LOCATION: allow a procedure to visit the accurate position (for example, GPS)
-ACCESS_WIFI_STATE: allow a procedure to visit WIFI status
-WRITE_EXTERNAL_STORAGE: allow a procedure to visit outside storage device and can cache ads.
-READ_EXTERNAL_STORAGE: allow a procedure to visit outside storage device
4.2 Add Activity declaration
The given code should be added to in AndroidManifest file for AdView, as some platforms need to declare activity to work normal, please refer to AndroidManifest file in AdViewTestDemoEN project.
Configurations that adview bidding ads should add:
	<service android:name="com.kyview.DownloadService" />
	<activity android:name="com.kyview.AdviewWebView" />
	<activity android:name="com.kyview.AdActivity" />
	<!-- Adiview bidding video -->
	<activity android:name="com.kuaiyou.video.vast.activity.VASTAdActivity"
	android:hardwareAccelerated="true"
	android:screenOrientation="landscape"/>
4.3 Appointed app channel
Please add the below code in the AndroidMainfest file:
	<meta-data android:name="AdView_CHANNEL" android:value=“GFAN">
	</meta-data>
(You must add the above code,otherwise you application won't be able to pass the review);
Note:
- InitConfiguration serve for the overall procedure, just need to transfer once only.
- The set methods above are optional, not required.
- From 3.2.4 version, SDK supports setting up multiple ad slots (SDK-KEY) in one application. Take 3 ad slots of demo keyset for example, some APP would like to set different ad slots in multiple Activities, thus to statistic the user visit amount of each Activity based on the amount of ad display. If one ad slot can meet the demand of APP, then there’s no need to apply multiple ad slots.
	// Be sure to initialize before requesting ads, otherwise the ads cannot be used
	// set ad request configured parameter,
	//you can use default configuration : InitConfiguration. createDefault(this);
	InitConfiguration initConfig = new
	InitConfiguration.Builder(this)
	//real-time access to configuration, not required
	.setUpdateMode(UpdateMode.EVERYTIME)
	// banner switcher can be closed
	.setBannerCloseble(BannerSwitcher.CANCLOSED)
	//Interstitial Type
        .setInstlDisplayType(InitConfiguration.InstlDisplayType.POPUPWINDOW_MODE).build();


	//respectively request banner,interstitial,native, opening screen ad configuration,SDK_KEY can be one key
	AdViewBannerManager.getInstance(this).init(MainActivity.initConfiguration,new String[]{MainActivity.SDK_KEY});
	AdViewInstlManager.getInstance(this).init(MainActivity.initConfiguration,new String[]{MainActivity.SDK_KEY});
	AdViewNativeManager.getInstance(this).init(MainActivity.initConfiguration,new String[]{MainActivity.SDK_KEY});
	AdViewSpreadManager.getInstance(this).init(MainActivity.initConfiguration,new String[]{MainActivity.SDK_KEY});
	AdViewVideoManager.getInstance(this).init(MainActivity.initConfiguration,new String[]{MainActivity.SDK_KEY});

	// respectively request banner, interstitial, native, opening screen ad configuration, keyset can be one or more key.
	AdViewBannerManager.getInstance(this).init(initConfig,MainActivity.keySet);
	AdViewInstlManager.getInstance(this).init(initConfig,MainActivity.keySet);
	AdViewNativeManager.getInstance(this).init(initConfig,MainActivity.keySet);
	AdViewVideoManager.getInstance(this).init(initConfig,MainActivity.keySet);
Note: You can refer to the code of Main Activity in AdViewTestDemoEN Project.
6.1 Add ads through adding code
Add a banner code to layout file,
	<FrameLayout
	      android:id="@+id/ad_view"
	      android:layout_width="match_parent"
              android:layout_height="wrap_content"
	      android:gravity="center_horizontal" />
Add the following code to your activity:
	 //Basic Initialization
	 InitConfiguration initConfiguration = new InitConfiguration.Builder(this)
		   .setUpdateMode(InitConfiguration.UpdateMode.EVERYTIME)
		   .setBannerCloseble(InitConfiguration.BannerSwitcher.CANCLOSED)
		   .setInstlDisplayType(InitConfiguration.InstlDisplayType.POPUPWINDOW_MODE).build();


	 //Initialization for Banner
	 AdViewBannerManager.getInstance(this).init(initConfiguration,new String[]{SDK_KEY});
	 // Gets the currently requested banner View,upload it to your own layout.
	 FrameLayout layout = (FrameLayout) findViewById(R.id.adLayout);

        if (layout == null)
            return;
        View view = AdViewBannerManager.getInstance(this).getAdViewLayout(this,
                SDK_KEY);
        if (null != view) {
            ViewGroup parent = (ViewGroup) view.getParent();
            if (parent != null) {
                parent.removeAllViews();
            }
        }

	// request banner ads after initialization
        AdViewBannerManager.getInstance(this).requestAd(this, SDK_KEY, this);
        view.setTag(SDK_KEY);
        layout.addView(view);
        layout.invalidate();
       // onAdClose Call Back method
       @Override
       public void onAdClose(String arg0) {
       Log.i("AdBannerActivity", "onAdClose");
       if (null != layout)
            layout.removeView(layout.findViewWithTag(arg0));
       }
     //Removing all views while closing the application
     @Override
     protected void onDestroy() {
        super.onDestroy();
        AdViewBannerManager.getInstance(this).destroy();
        try {
            if (null != layout)
                layout.removeAllViews();
        } catch (Exception e) {
            e.printStackTrace();
        }

     }
6.2 Ad Banner events handling
To receive events from ad, you should implement an event listener interface AdViewBannerListener. After you implement this listener you will get the following methods.
     public interface AdViewBannerListener{

        /**
         * Use this function when the ad is clicked
         */
        public void onAdClick(String key);

        /**
         * Use this function when the ad is displayed
         */
        public void onAdDisplay(String key);

        /**
         * Use this function when the ad is closed
         */
        public void onAdClose(String key);

        /**
         * Use this function only when the ad is interrupted
         by abnormity or failure
         */
        public void onAdFailed(String key);

        /**
         * once ad is Ready while this function will triggered
         */
        public void onAdReady(String key);
    }
Note: You can refer to the code of AdBannerActivity in AdViewTestDemoEN Project.
7.1 create interstitial
Note:
Since interstitial ad has a certain life cycle, Please do not wait too long after the request to call showAd method, so as to avoid invalid advertising.
Add the following code to your activity:
	 //Basic Initialization
	 InitConfiguration initConfiguration = new InitConfiguration.Builder(this)
			.setUpdateMode(InitConfiguration.UpdateMode.EVERYTIME)
			.setBannerCloseble(InitConfiguration.BannerSwitcher.CANCLOSED)
			 .setInstlDisplayType(InitConfiguration.InstlDisplayType.POPUPWINDOW_MODE).build();


	//Initialization for interstitual advertisement
	AdViewInstlManager.getInstance(this).init(initConfiguration,new String[]{SDK_KEY});
	// interstitial ad request after initialization, ad request and display, used alone
	AdViewInstlManager.getInstance(this).requestAd(this,SDK_KEY);

	// After ad request succeed , call the display ad
	AdViewInstlManager.getInstance(this).showAd(this,SDK_KEY);
7.2 Ad Interstitial Event Handling
To receive events from ad, you should implement an event listener interface AdViewInstlListener. After you implement this listener you will get the following methods.
    public interface AdViewInstlListener {
        /**
         * Use this function when the ad is clicked
         */
        public void onAdClick(String key);

        /**
         * Use this function when the ad is displayed
         */
        public void onAdDisplay(String key);

        /**
         * Use this function when the ad is disappeared
         */
        public void onAdDismiss(String key);

        /**
         * Use this function when the ad is successfully received
         */
        public void onAdReceived(String key);

        /**
         * Use this function when the ad is failed
         */
        public void onAdFailed (String key);

    }
7.3 Create custom style interstitial
You can customize the popup Intrstitial ad, please refer AdInstlActivity for the entire code .Please refer AdInstlActivity in AdViewTestDemoEN Project.
	// You need to set the user-managed mode when initialization, and you must manually call the display
	//after the setting
	InitConfiguration.setInstlControlMode(InstlControlMode.USERCONTROL);

	// request interstitial ads after initialization
	AdViewInstlManager.getInstance(this).requestAd(this,SDK_KEY);

	// You need to call it when the ads need to be displayed, the return is not null (review)  there’s an ad to return,
	otherwise it does not get ads.
	// The returned view can be placed in a customcontainer, such as dialog
	AdViewInstlManager.getInstance(this).getInstlView (SDK_KEY);

	// Display report method should be called when successfully display (required)
	AdViewInstlManager.getInstance(this).reportImpression(SDK_KEY);

	// When the ad is clicked, the click event handling method should be called ,otherwise there will no response(required)
	AdViewInstlManager.getInstance(this).reportClick(SDK_KEY);
Note: Please refer to the code of popup Interstitial ad in AdInstlActivity in AdViewTestDemoEN Project.
8.1 Create opening screen ad
Add the following code to your activity:
Example We are here used Relative Layout for Opening Screen ad,
	<RelativeLayout xmlns:android="http://schemas.android.com/apk/res/android"
	    android:id="@+id/spreadlayout"
	    android:layout_width="match_parent"
	    android:layout_height="match_parent"
	    android:orientation="vertical" >

	</RelativeLayout>
Add the following code to your activity:
	//Basic Initialization
	InitConfiguration initConfiguration = new InitConfiguration.Builder(this)
			.setUpdateMode( InitConfiguration.UpdateMode.EVERYTIME)
			.setBannerCloseble(InitConfiguration.BannerSwitcher.CANCLOSED)
			 .setInstlDisplayType(InitConfiguration.InstlDisplayType.POPUPWINDOW_MODE).build();

	//Intialization for Open Screen ad
	AdViewSpreadManager.getInstance(this).init(initConfiguration, new String[]{SDK_KEY});
	// Set the logo at the bottom of opening screen (not required), you can also upload local images or images
	AdViewSpreadManager.getInstance(this).setSpreadLogo(R.drawable.spread_logo);

	// Set background color of opening screen( not required)
	AdViewSpreadManager.getInstance(this).setSpreadBackgroudColor( Color.WHITE);

	// Request opening screen ads
	AdViewSpreadManager.getInstance(this).request(this,SDK_KEY,this,(RelativeLayout) findViewById(R.id.spreadlayout));
8.2 Ad Opening screen Event Handling
To receive events from ad, you should implement an event listener interface AdViewSpreadListener. After you implement this listener you will get the following methods.
    public interface AdViewSpreadListener {
        /**
         * This function is called when the ad is displayed.
         */
        public void onAdDisplay(String key);

        /**
         * This function is called when the ad requestsucceeds.
         */
        public void onAdReceived(String key);

        /**
         * Click to callback .
         */
        public void onAdClick(String key);

        /**
         * This function is called when the ad request failed.
         */
        public void onAdFailed(String key);

        /**
         *This function is called when the ad is closed.
         */
        public void onAdClose(String key);

        /**
         * Custom callback
         */
        public void onAdNotifyCustomCallback(String key,ViewGroup view,int ruleTime,int delayTime);

    }
Note: Please refer to the code of SpreadScreenActivity in AdViewTestDemoEN Project.
8.3 Custom notification on top of opening screen with countdown options
	// Skip button will appears on the top after settings
	AdViewSpreadManager.getInstance(this).setSpreadNotifyType(this, AdSpreadManager.NOTIFY_COUNTER_NUM);

	// Defaults, none notification will be displayed
	public final static int NOTIFY_COUNTER_NULL = 0;

	// Countdown will be shown after settings
	public final static int NOTIFY_COUNTER_NUM = 1;

	// Skip button will be shown on the top after settings,but it will appear only after specified times.
	public final static int NOTIFY_COUNTER_TEXT = 2;

	// Will call this after settings:onAdNotifyCustomCallback(String key,ViewGroup view,intruleTime,int delayTime)                 //interface, you can custom notification styles
	public final static int NOTIFY_COUNTER_CUSTOM = 3;
Note:
For opening advertising please make sure the exposure time is sufficient, otherwise it will affect the ad revenue. Please refer to the code of SpreadScreenActivity in AdViewTestDemoEN Project.
9.1 create native advertising
Add a RecyclerView to layout file, e.g :
    <android.support.v7.widget.RecyclerView
        android:id="@+id/list"
        android:layout_width="match_parent"
        android:layout_height="match_parent" />
Add the following code to your activity:
	//Basic Initialization
	InitConfiguration initConfiguration = new InitConfiguration.Builder(this)
			.setUpdateMode( InitConfiguration.UpdateMode.EVERYTIME)
			.setBannerCloseble(InitConfiguration.BannerSwitcher.CANCLOSED)
			 .setInstlDisplayType(InitConfiguration.InstlDisplayType.POPUPWINDOW_MODE).build();

	//Intialization for Native advertisement
	AdViewNativeManager.getInstance(this).init(initConfiguration,new String[]{SDK_KEY});
	//Initialized native ads should custom ad layout in advance, and apply native ad ID at app background
	AdViewNativeManager.getInstance(this).requestAd(this,SDK_KEY, 2,this);


	/**
         * Please add this code in the onAdReceived call back.
	 * For creating this call back method you can refer 9.2
         */


	// Ad successfully Received
	@Override
	public void onAdRecieved(String arg1, ArrayList arg0) {
		for (int i = 0; i < arg0.size(); i++) {
			Data data = new Data();
			NativeAdInfo nativeAdInfo = (NativeAdInfo) arg0.get(i);
			data.title = ((NativeAdInfo) arg0.get(i)).getTitle();
			data.descript = nativeAdInfo.getDescription();
			data.icon = nativeAdInfo.getIconUrl();
			data.image= nativeAdInfo.getImageUrl();
			data.adInfo = (NativeAdInfo) arg0.get(i);
			((NativeAdInfo) arg0.get(i)).getIconHeight();
			data.setAd(true);
			data.setType(STREAM_AD);
			Log.i("Native info:", "data.title:" + data.title + "\ndata.descript: " + data.descript + "\ndata.icon: "
					+ data.icon + "\ndata.image: " + data.image );
			list.add(3, data);
			((NativeAdInfo) arg0.get(i)).onDisplay(new View(
					AdNativeActivity.this));
		}
		adAdapter.notifyDataSetChanged();

	}
Note:
please refer to the code of AdNativeActivity in AdViewTestDemoEN Project.
please add DividerItemDecoration ,MyItemClickListener files for Native ad. you can get it from AdViewTestDemoEN Project .
9.2 Ad Native Event Handling
To receive events from ad, you should implement an event listener interface AdViewNativeListener. After you implement this listener you will get the following methods.
    public interface AdViewNativeListener {

        /**
         * This function is called when the ad request succeed.
         */
        public void onAdReceived(String key, List<NativeAdInfo> adMaps);

        /**
         * This function is called when ad request failed.
         */
        public void onAdReceived(String key);

        /**
         * When the ad status changed.
         */
        public void onAdStatusChanged(String key, int status);

    }
10.1 create video advertising
Add the following code in activity,
	//Basic Initialization
	InitConfiguration initConfiguration = new InitConfiguration.Builder(this)
			.setUpdateMode( InitConfiguration.UpdateMode.EVERYTIME)
			.setBannerCloseble(InitConfiguration.BannerSwitcher.CANCLOSED)
			 .setInstlDisplayType(InitConfiguration.InstlDisplayType.POPUPWINDOW_MODE).build();

	//Initialization For Video ads
	AdViewVideoManager.getInstance(this).init(initConfiguration,new String[]{SDK_KEY});
	//Request video ads after initialization. Request and display ads should be used separately.
	AdViewVideoManager.getInstance(this).requestAd(this,SDK_KEY,this);

	//set video callback interface
	// Call display ad after ad request succeed.
	AdViewVideoManager.getInstance(this).playVideo(this,SDK_KEY);
10.2 Ad Video Event Handling
To receive events from ad, you should implement an event listener interface AdViewVideoListener. After you implement this listener you will get the following methods.
    public interface AdViewVideoListener{

        /**
         * Play start event notification
         */
        public void onAdPlayStart(String key);

        /**
         * Play end event notification
         */
        public void onAdPlayEnd(String key, Boolean isEnd);

        /**
         * Close event notification
         */
        public void onAdClose(String key);

        /**
         * Ad Ready notification
         */
	public void onAdReady(String s);

        /**
         * Request succeed notification
         */
        public void onAdReceived(String key);

        /**
         * Request failed notification
         */
        public void onAdFailed (String key);

    }
Note:
You can refer to the code of AdVideoActivity in AdViewTestDemoEN Project.
If you have a ProGuard configuration file please add the below lines of code in proguard-rules.pro file
	-keep public class com.kyview.** {*;}
	-keep public class com.kuaiyou.** {*;}
In case you add other adnetworks ( like InMobi, AdMob etc..,) add their proguard rules to proguard-rules.pro file.
For example In case of InMobi add the below lines of code to the proguard-rules.pro.
	-keep class com.google.android.gms.ads.identifier.AdvertisingIdClient{
	    public *;
	}

	-keep class com.google.android.gms.ads.identifier.AdvertisingIdClient$Info{
	    public *;
	}

	-keep class com.inmobi.**
	{ *; }

	-dontwarn com.inmobi.**
Note:
You can refer to the code of AdVideoActivity in AdViewTestDemoEN Project.
AdView has integrated various ad networks (InMobi, AdMob, etc..,) where you are given flexibility to add the ad network of your choice and prioritize accordingly, there are various advantages of integrating more than one ad networks to monetize your app, some them include
--> Good fill rates - we suggest to include on an avrage of 3 ad netwroks for good fill rates --> More revenue --> You can prioritize according to the ad platform performance
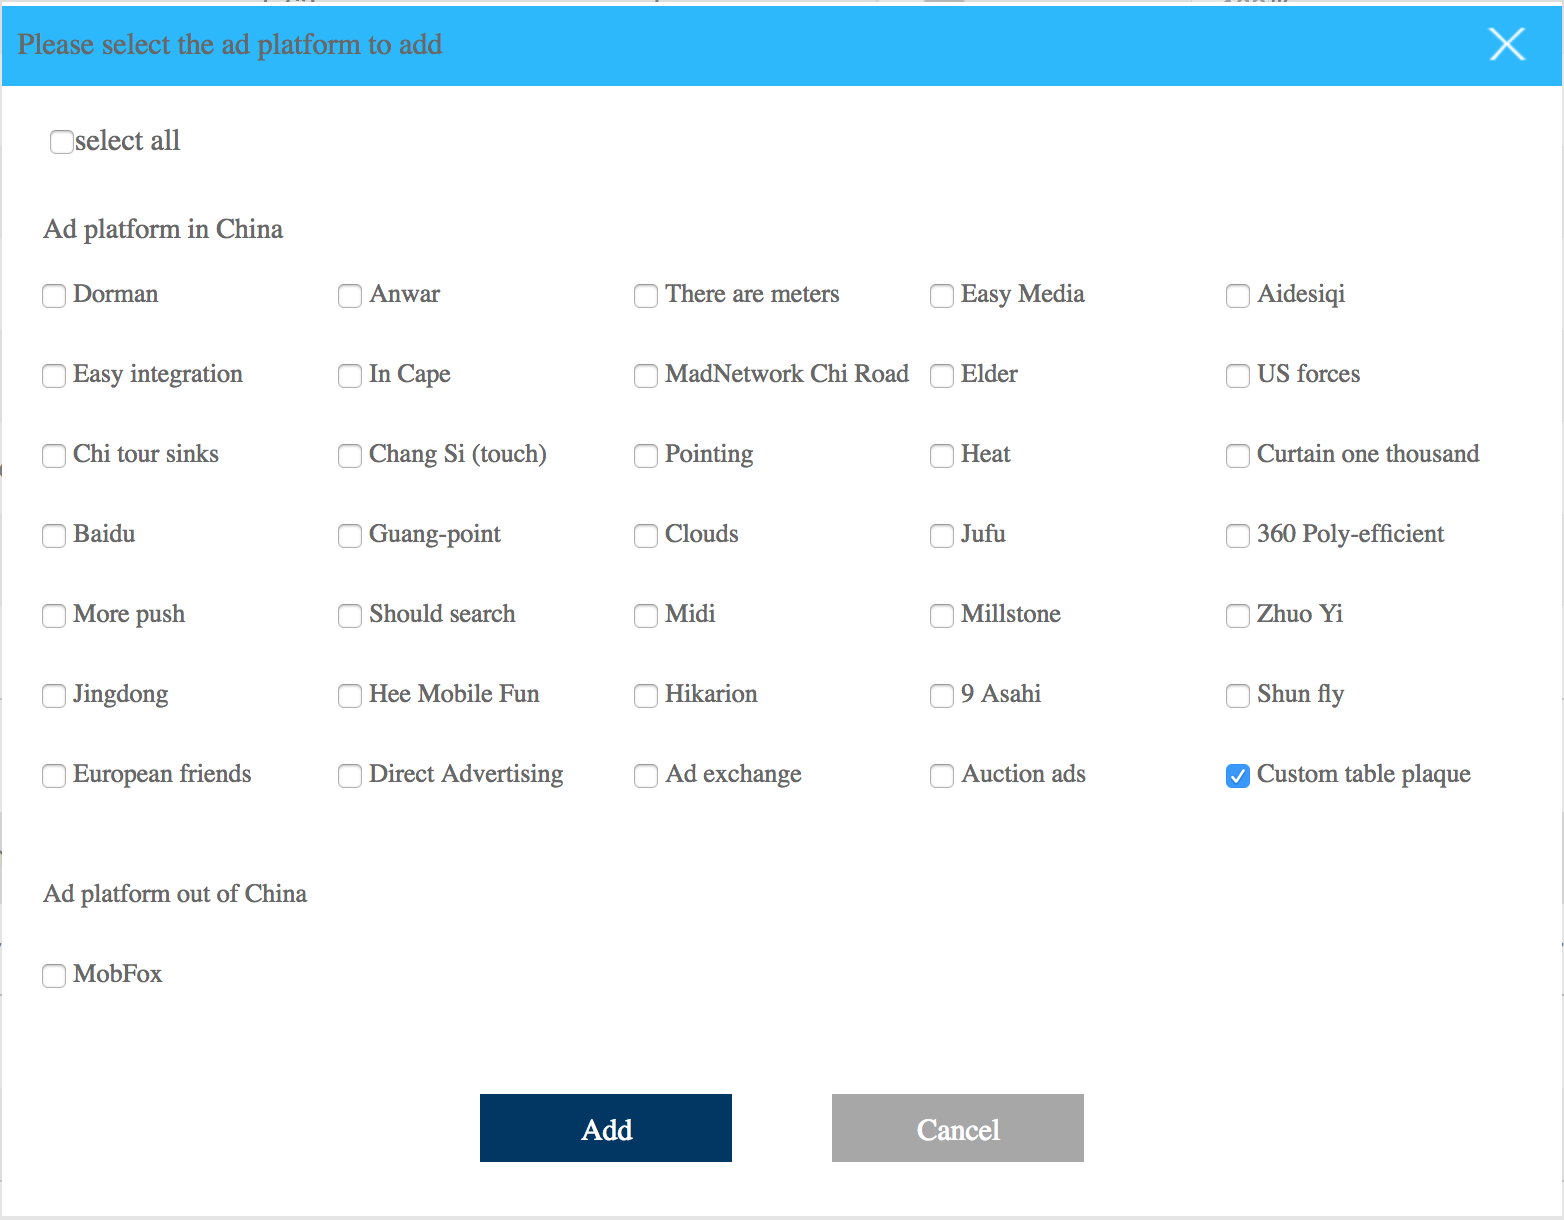
- In your publisher dashboard http://adview.com/user/appreport click on the "App Management" tab --> click "Configure" against your app name which you want to add custom ad networks, then click on "Add Platform" button (out of China or within China depending on your region ) --> you will be redirected to the popup as shown below where you can choose ad network of your choice.
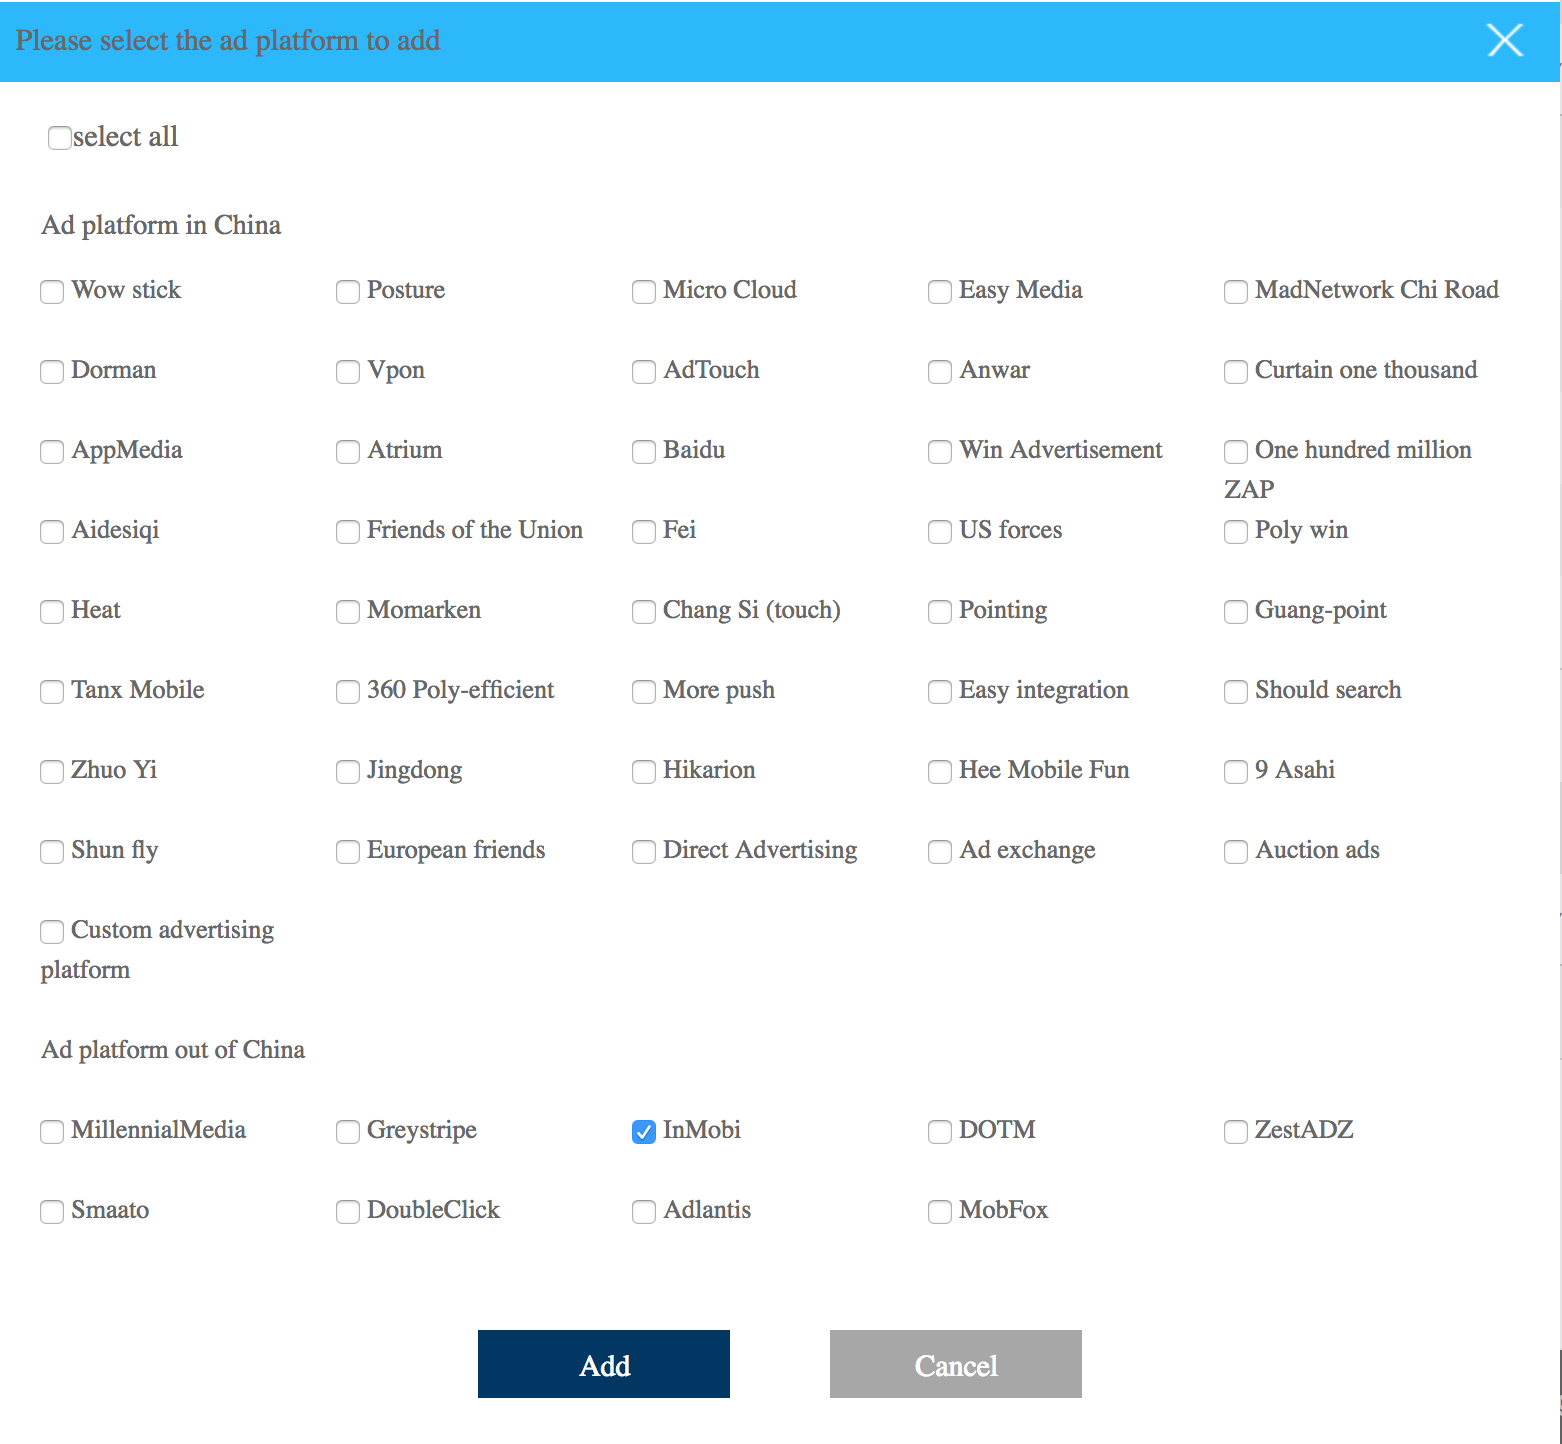
2.In this example we will be adding InMobi as the custom Ad Netwrok, select InMobi in the popup and click on "Add" button, this will redirect you to the AdView dashboard --> here turn on the switch again InMobi give the priority(%) of your choice then click on "not set" in InMobi row you will get "Configure InMobi" popup with Signup link at the bottom which will redirect you to the below login page, complete the login procedure

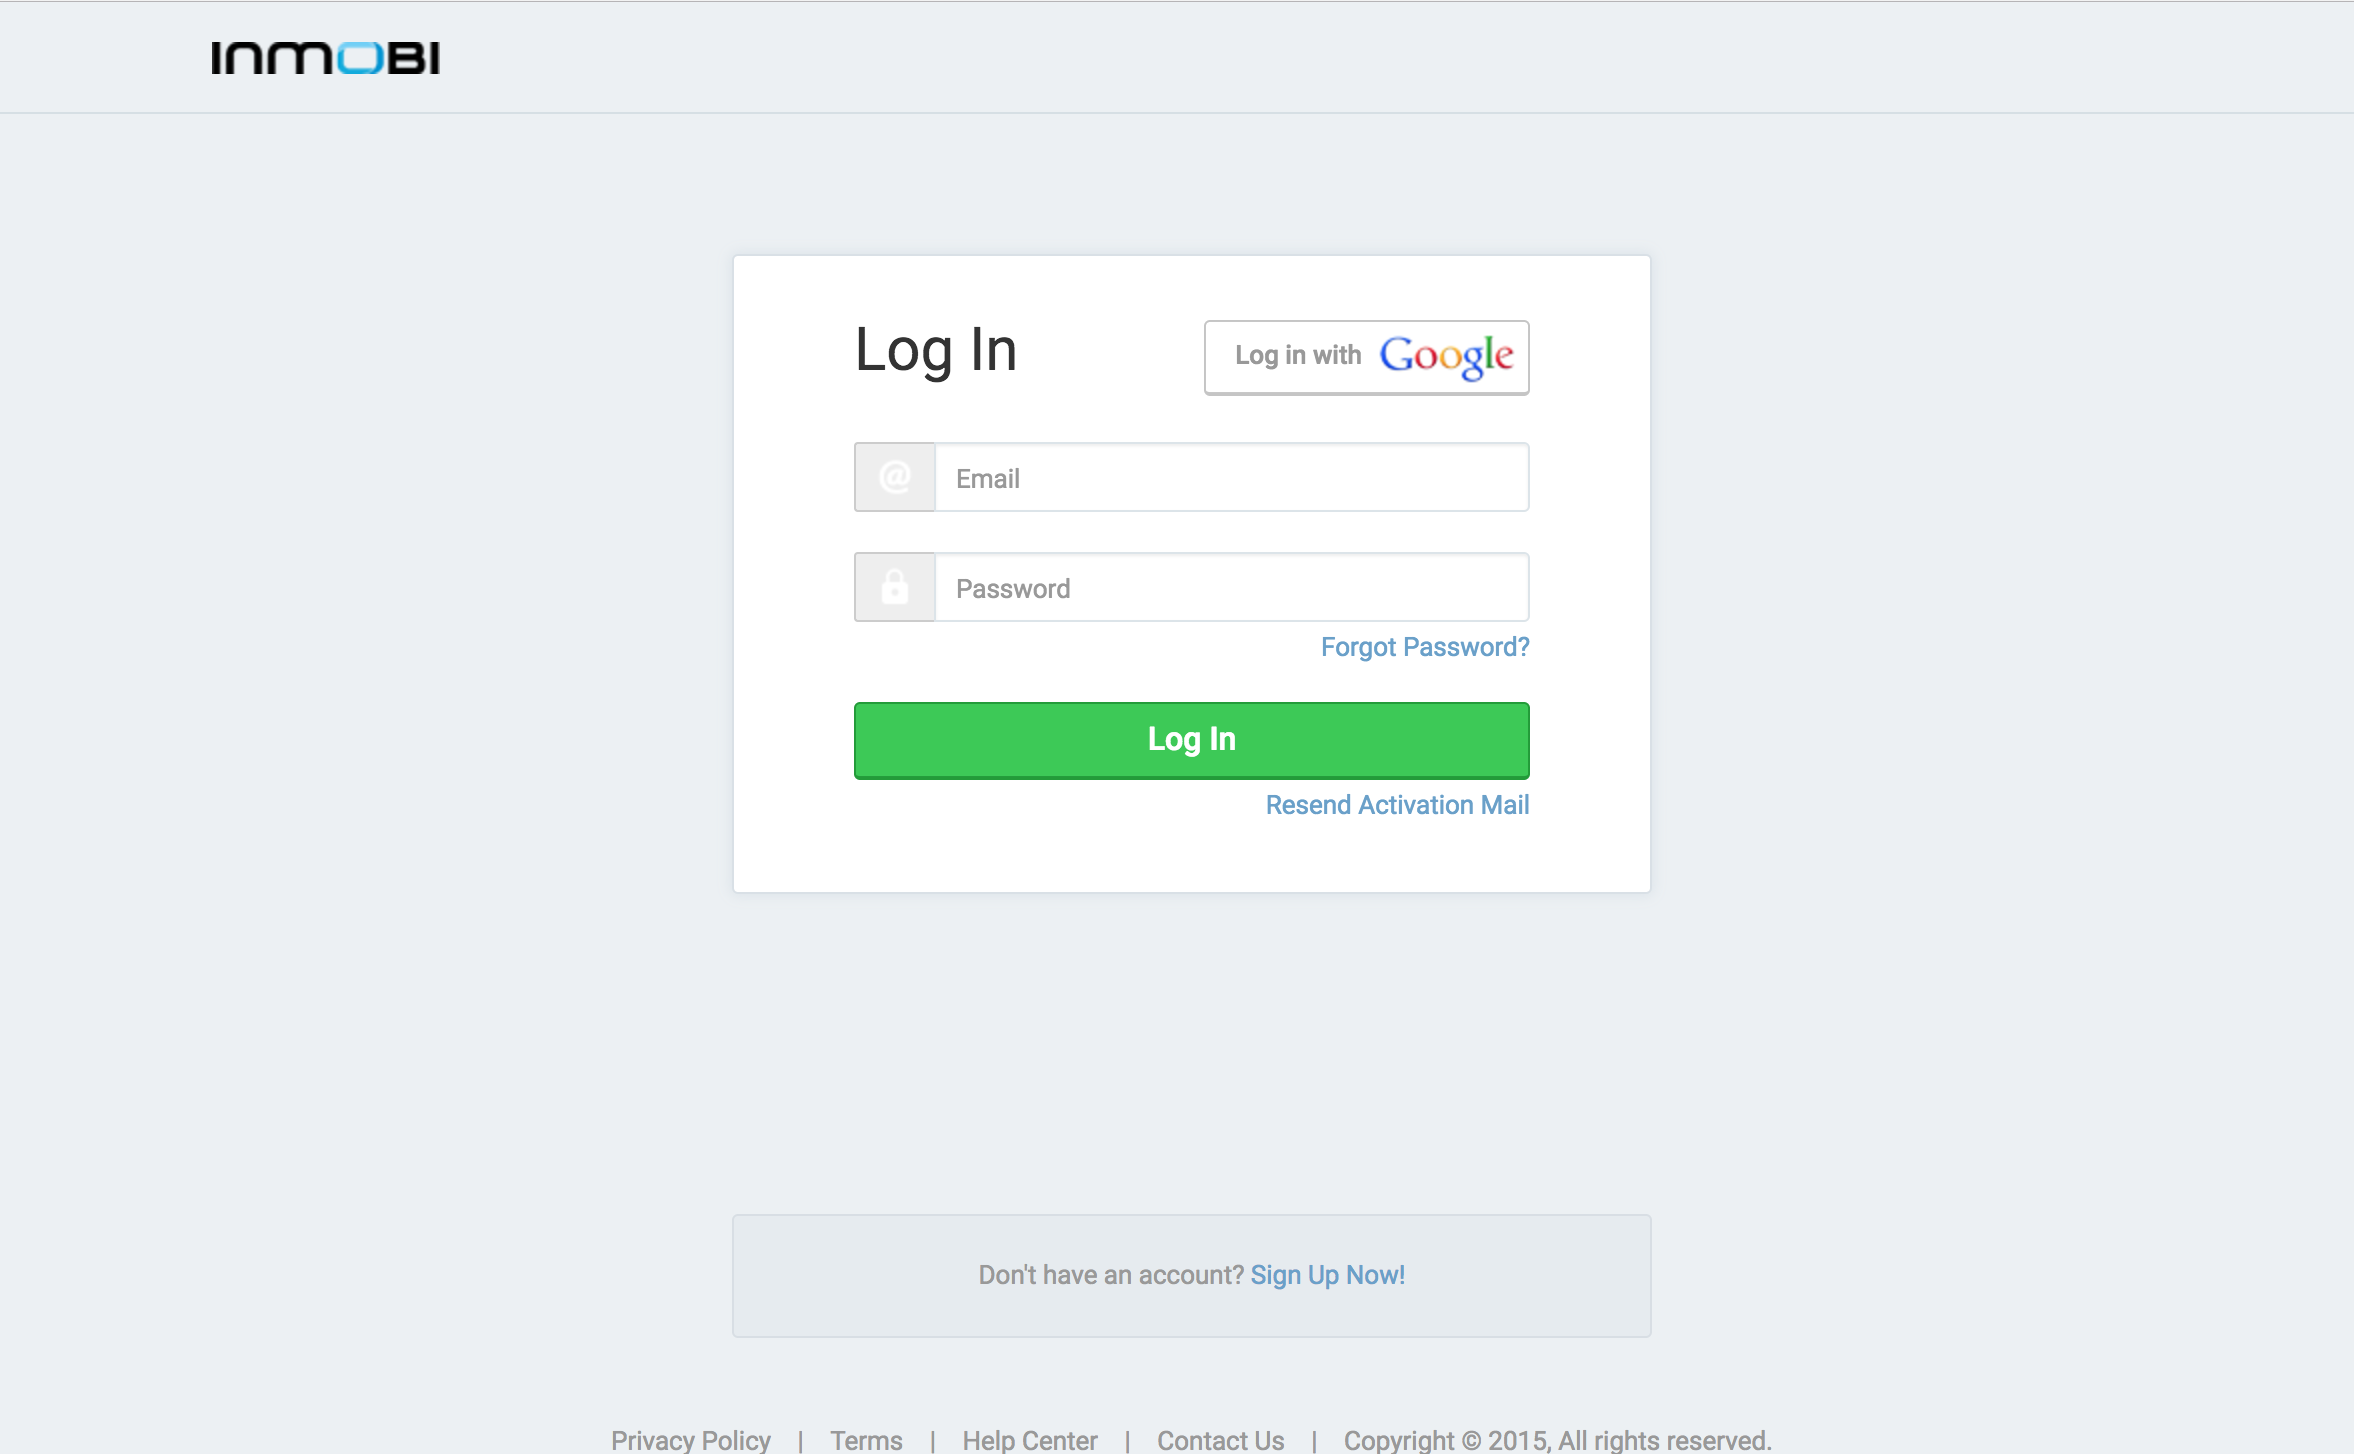
Please add the SDK of InMobi--> you can follow this procedure
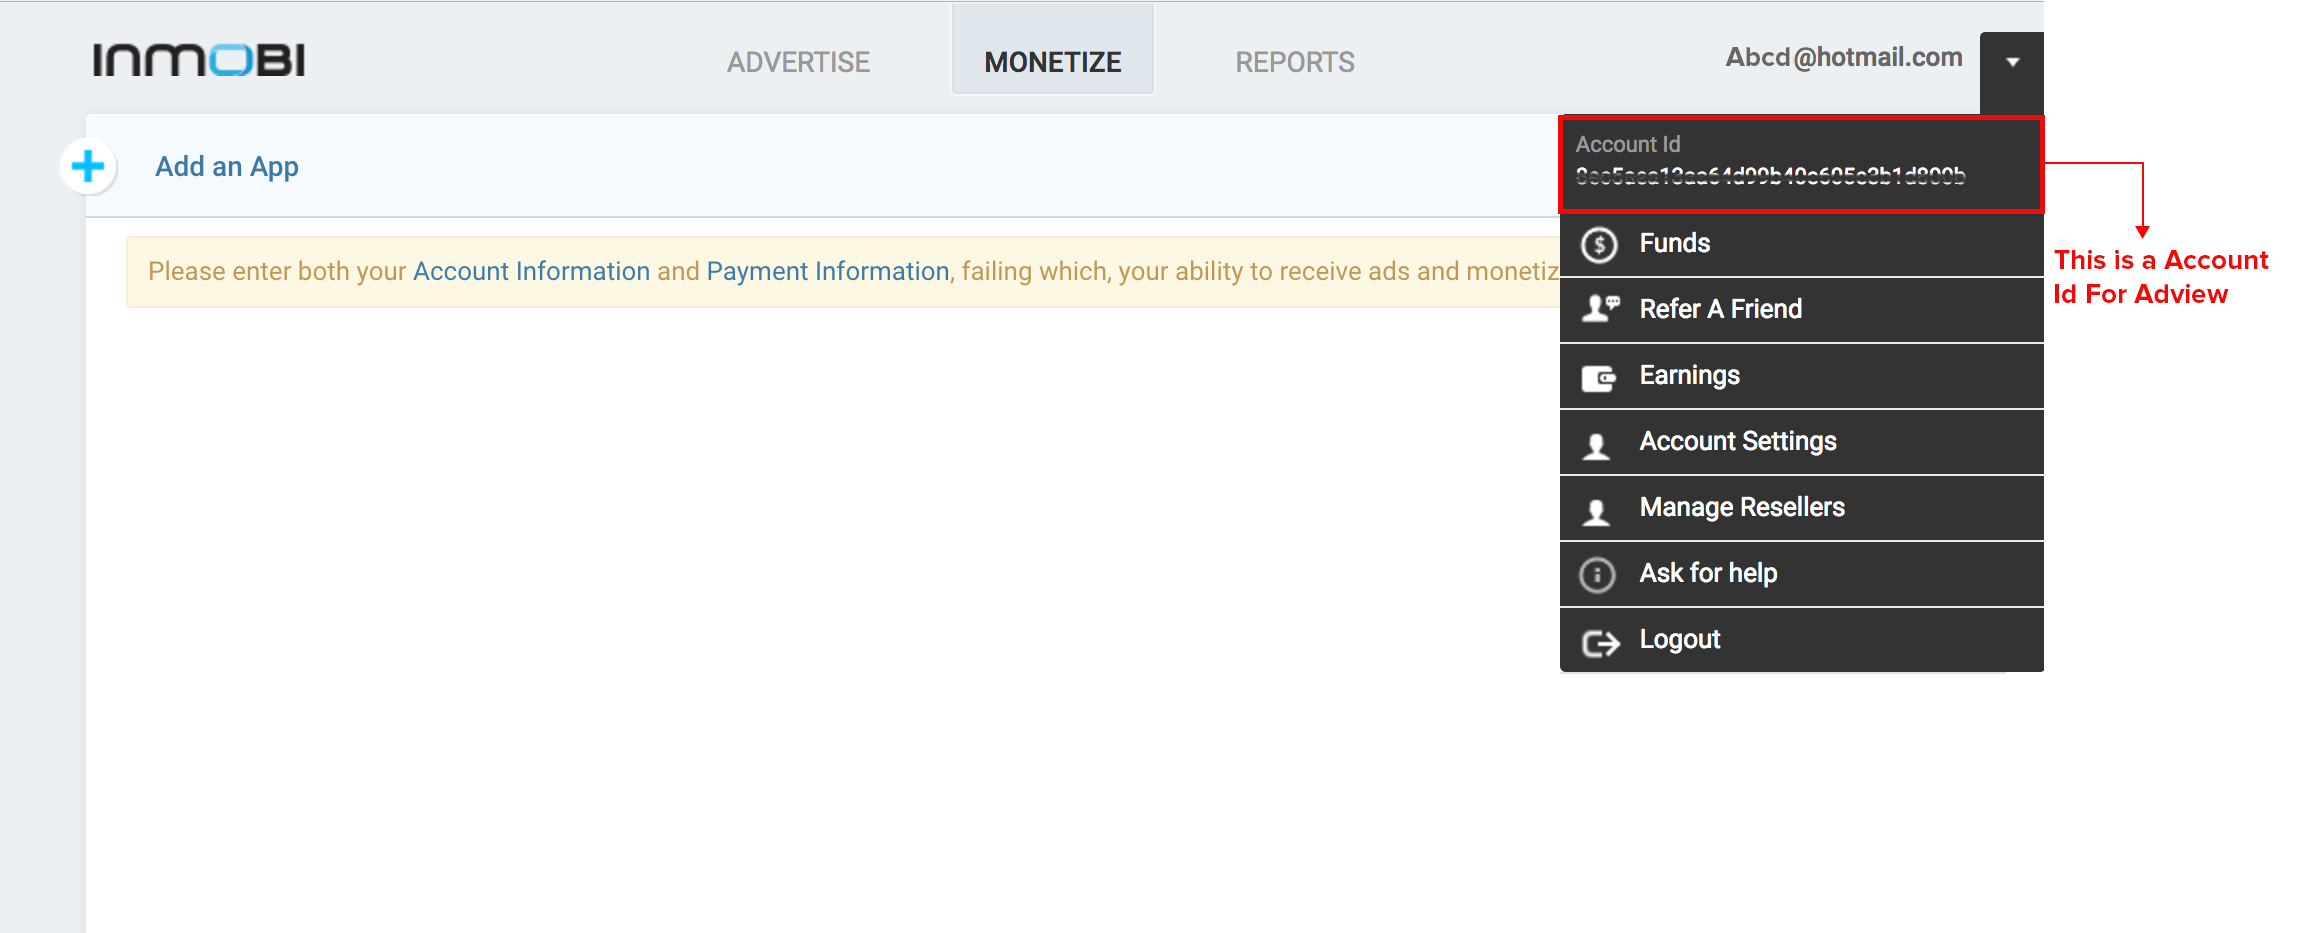
- After login you will get the the account ID as shown in the below image, click on Add an App.
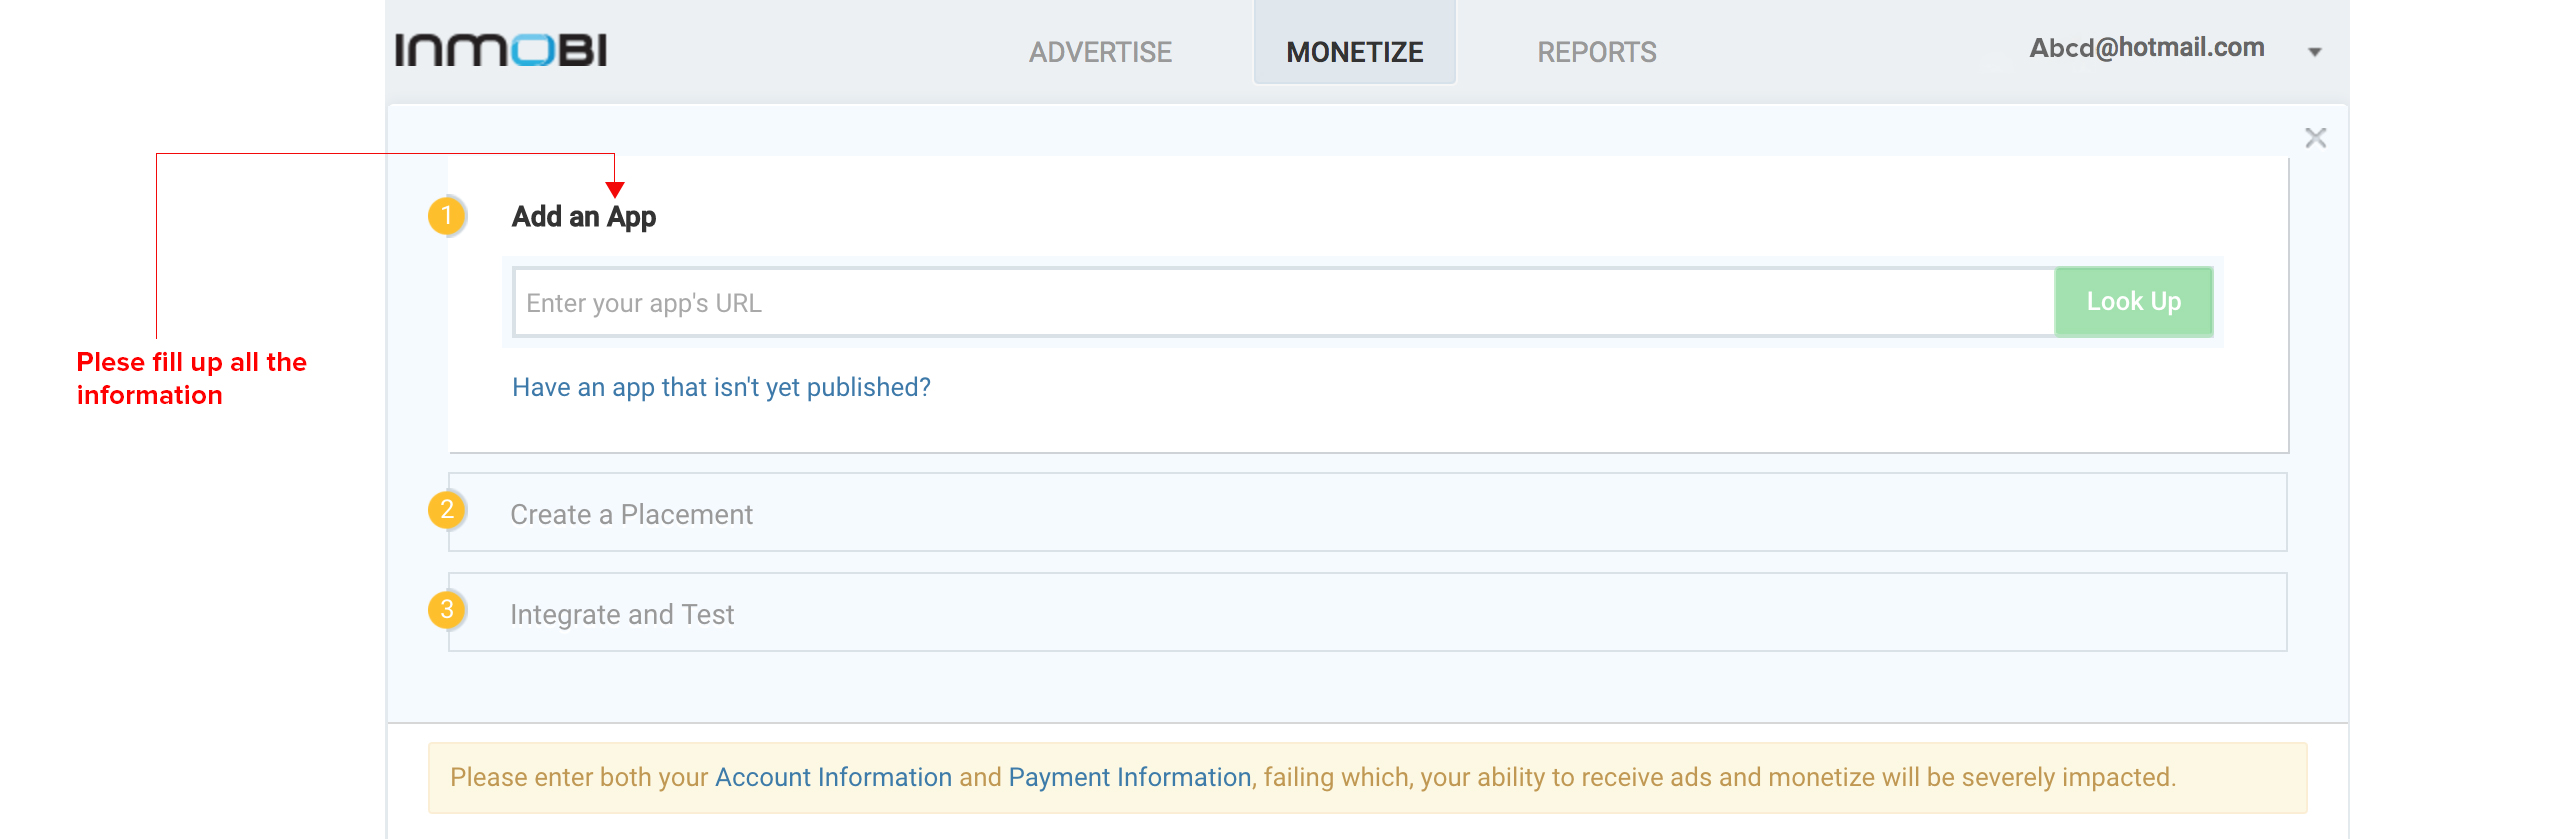
- Please add your application ( the same application you want to add custom Ad platform in AdView) by filling in the details as asked in below image, in case of any proguard rules in the Ad Network integration part just copy and paste them in proguard-rules.pro file in your project.
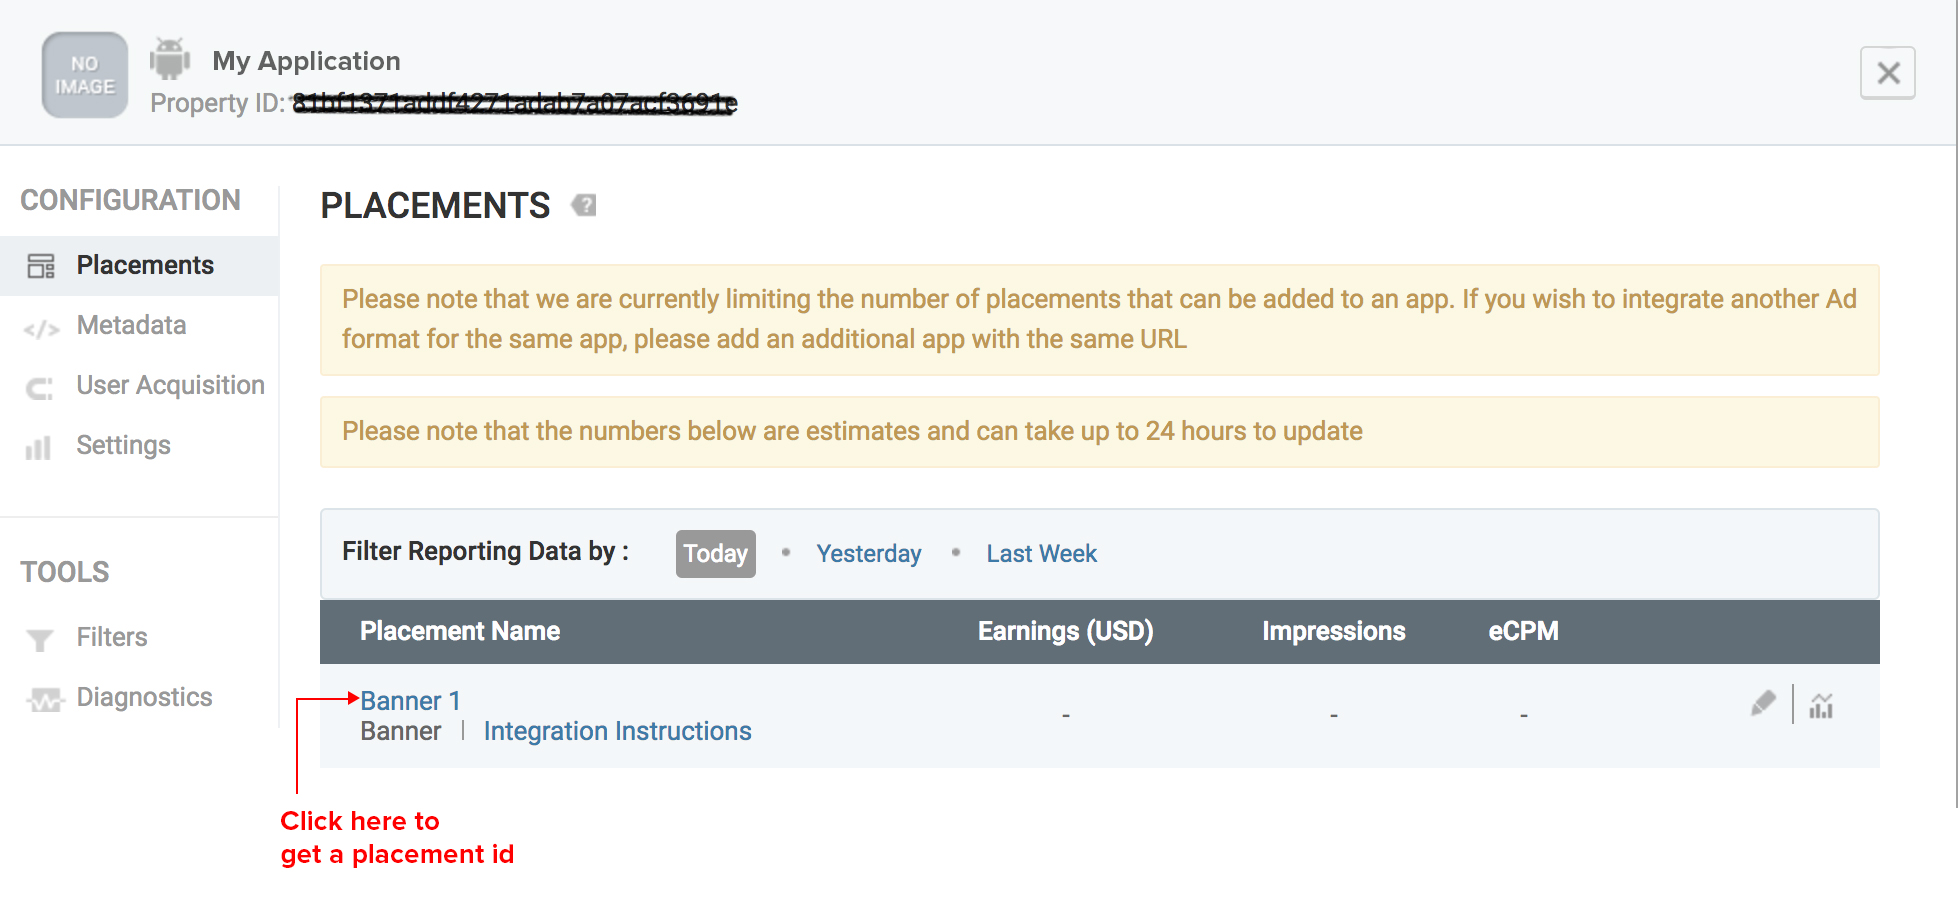
- After adding the App to InMobi then click on the application name, where you will be redirected to the below window, please click on the option marked in the below image to get Placement ID.
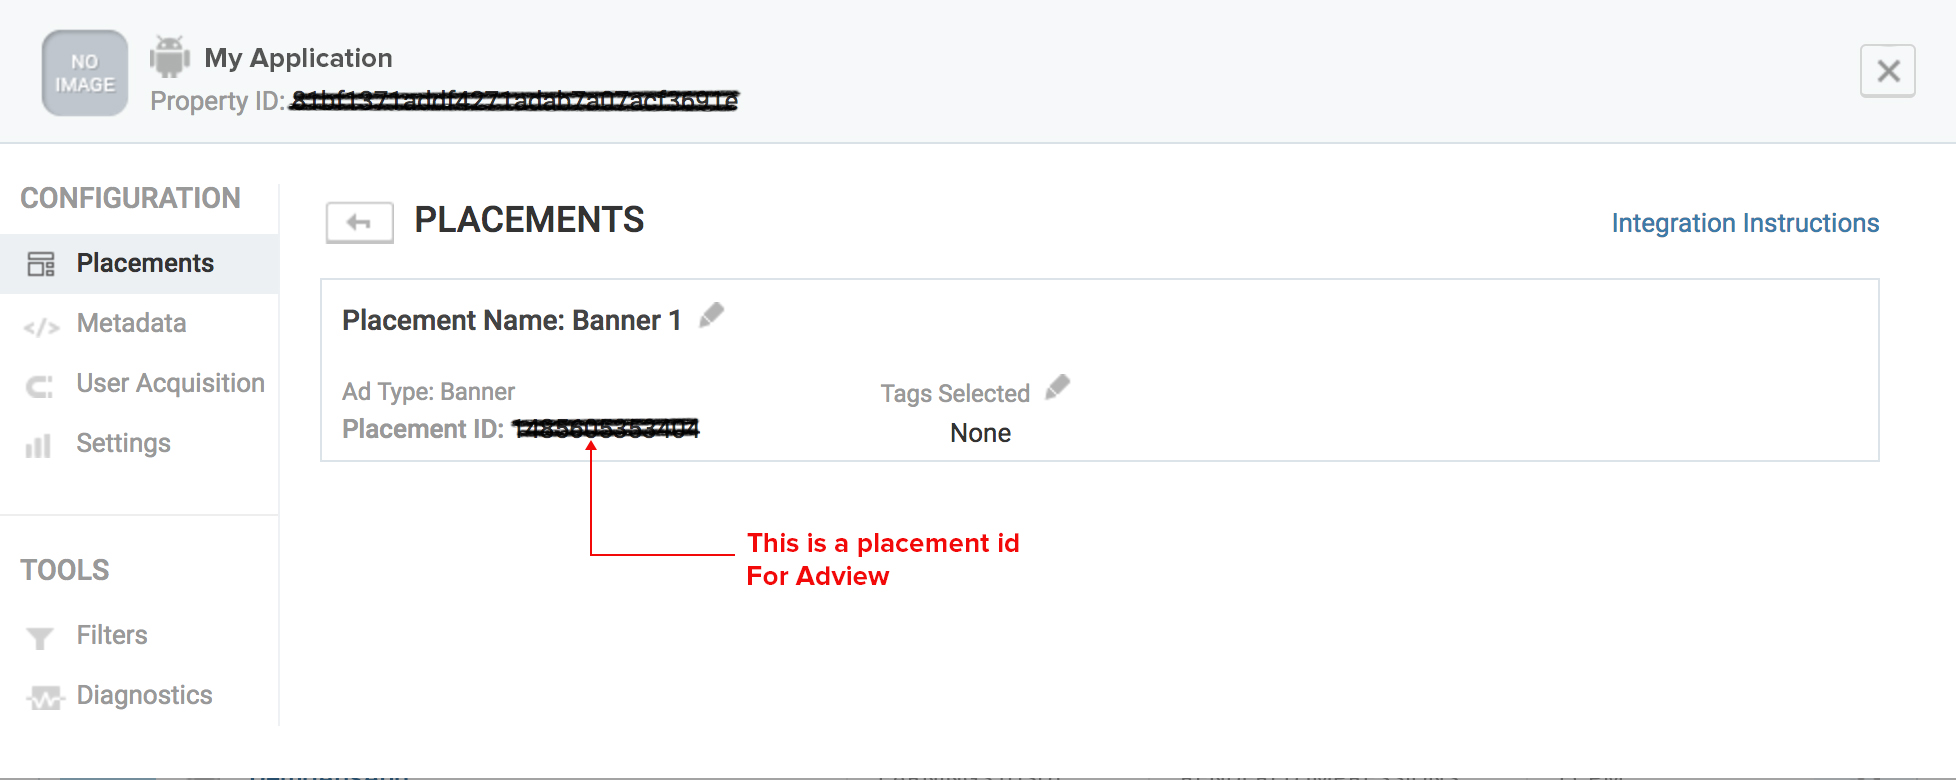
- Please copy the placement ID and Account ID which you need to add it in AdView dashobard as shown in the 2nd image
In the same way you can configure different custom Ad Networks to your app (different Ad networks might demand different ID's to be configured )
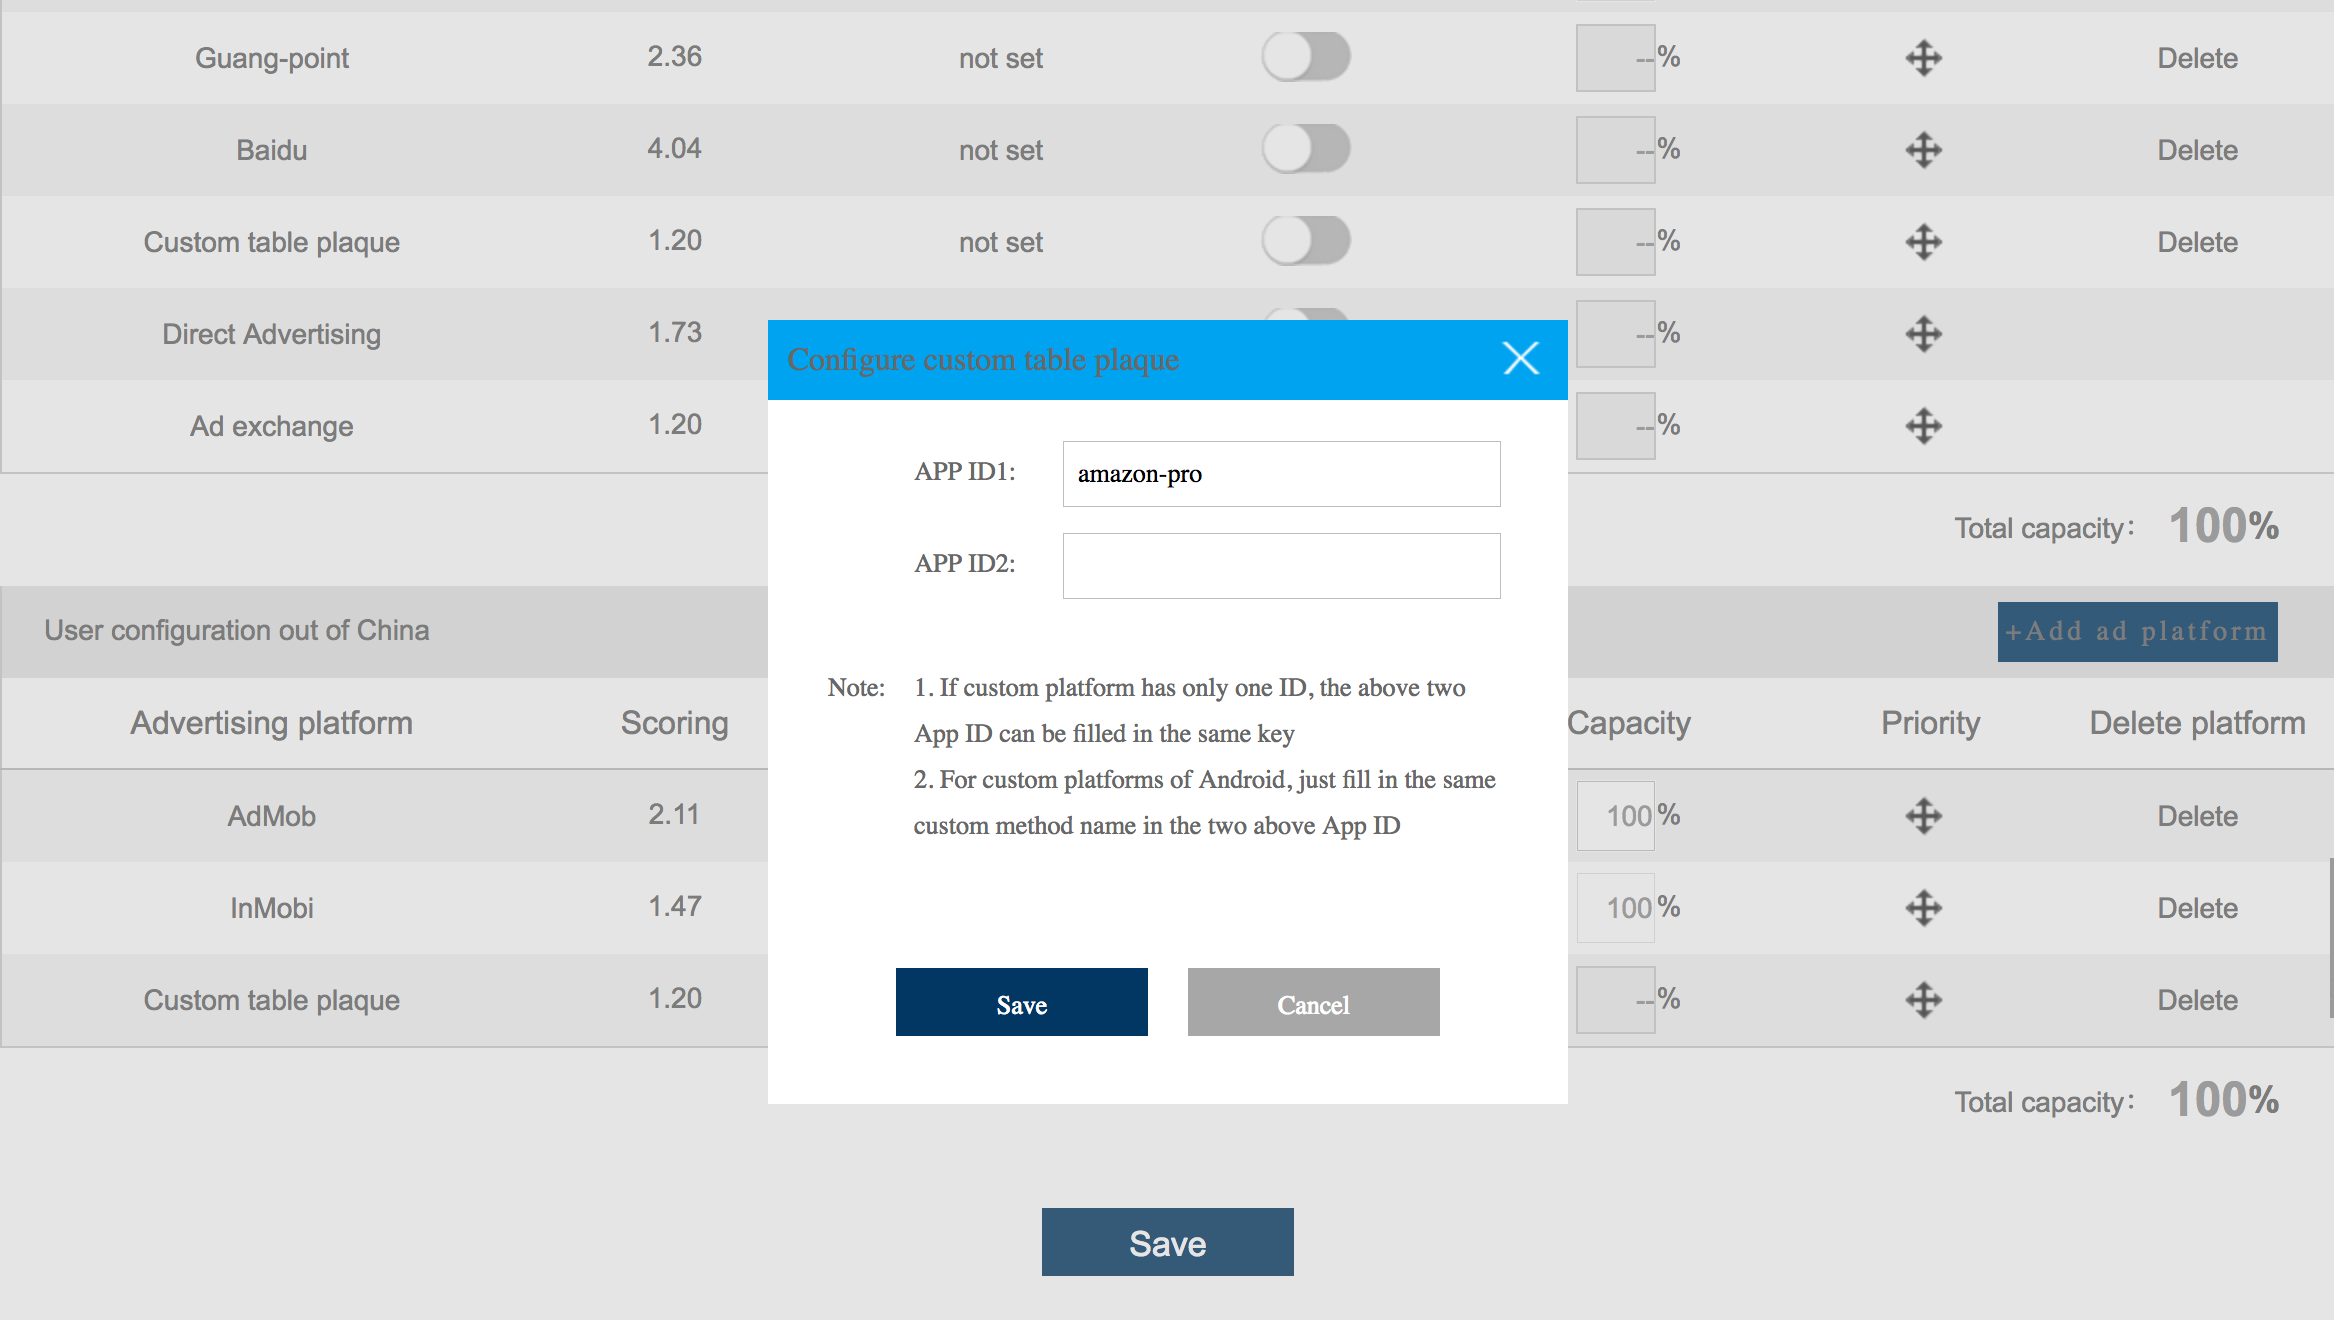
Sometimes developers would like to add a platform which is not aggregated, Adview provide ways to meet this demand.
There’s a “Custom ad platform” in add ad platform . Developer needs to fill in app ID1, this is the name of a function which needs client side to complete. The function of this function is to call the ad platform interface . As for App ID2, just fill in something, otherwise you cannot save it.
11.1 For Custom platform (Amazon) function implementation
	// you can visit https://developer.amazon.com/sdk/mobileads.html
	// Must with: final AdViewAdapter adapter, final String key these two parameter
	// Otherwise will result in the failure in custom ad

	public void amazon_proc(final AdViewAdapter adapter,final String key){

	// TODO Auto-generated method stub
	AdRegistration.enableLogging(this, true);
	AdRegistration.enableTesting(this, true);
	AdRegistration.setAppKey(this, "sample-app- v1_pub-2");

	// Create an example of amazon in adview
	adView = new AdLayout(this, AdSize.AD_SIZE_320x50);

	//appointed listen interface
	adView.setListener(new AdListener() {
	@Override
	Log.d("AdViewSample", arg1.getAdType().toString()+ " Ad loaded successfully.");

	// after the ad request succeed, start the timer and request another ad when time’s up.
	adapter.reportImpression(key);
	adapter.rotateDelayedAd(key);
	}
	@Override
	public void onAdExpanded(AdLayout arg0) {
	// TODO Auto-generated method stub
	}
	@Override
	public void onAdCollapsed(AdLayout arg0) {
	// TODO Auto-generated method stub
	}
	@Override
	public void onAdFailedToLoad(AdLayout arg0, AdError arg1) {
	// TODO Auto-generated method stub
	Log.w("AdViewSample","Ad failed to load. Code: "+ arg1.getResponseCode() +", Message: "+arg1.getResponseMessage());

	// start to request another ad when failed.
	adapter.rotatePriAd(key);
	}
	});
	AdViewBannerManager.getInstance(AdBannerActivity.this).addSubView(AdViewBannerManager.getInstance(AdBannerActivity.this) .
	getAdViewLayout(AdBannerActivity.this,key), adView, key);
	AdTargetingOptions adOptions = new AdTargetingOptions();
	adView.loadAd(adOptions);

	}
You can refer the code in AdViewTestDemoEN project --> BannerActivity for implementation of Amazon ad;
Users can login Adview, there are service E-mail, service contact number and enterprise QQ customer service at the bottom of the homepage