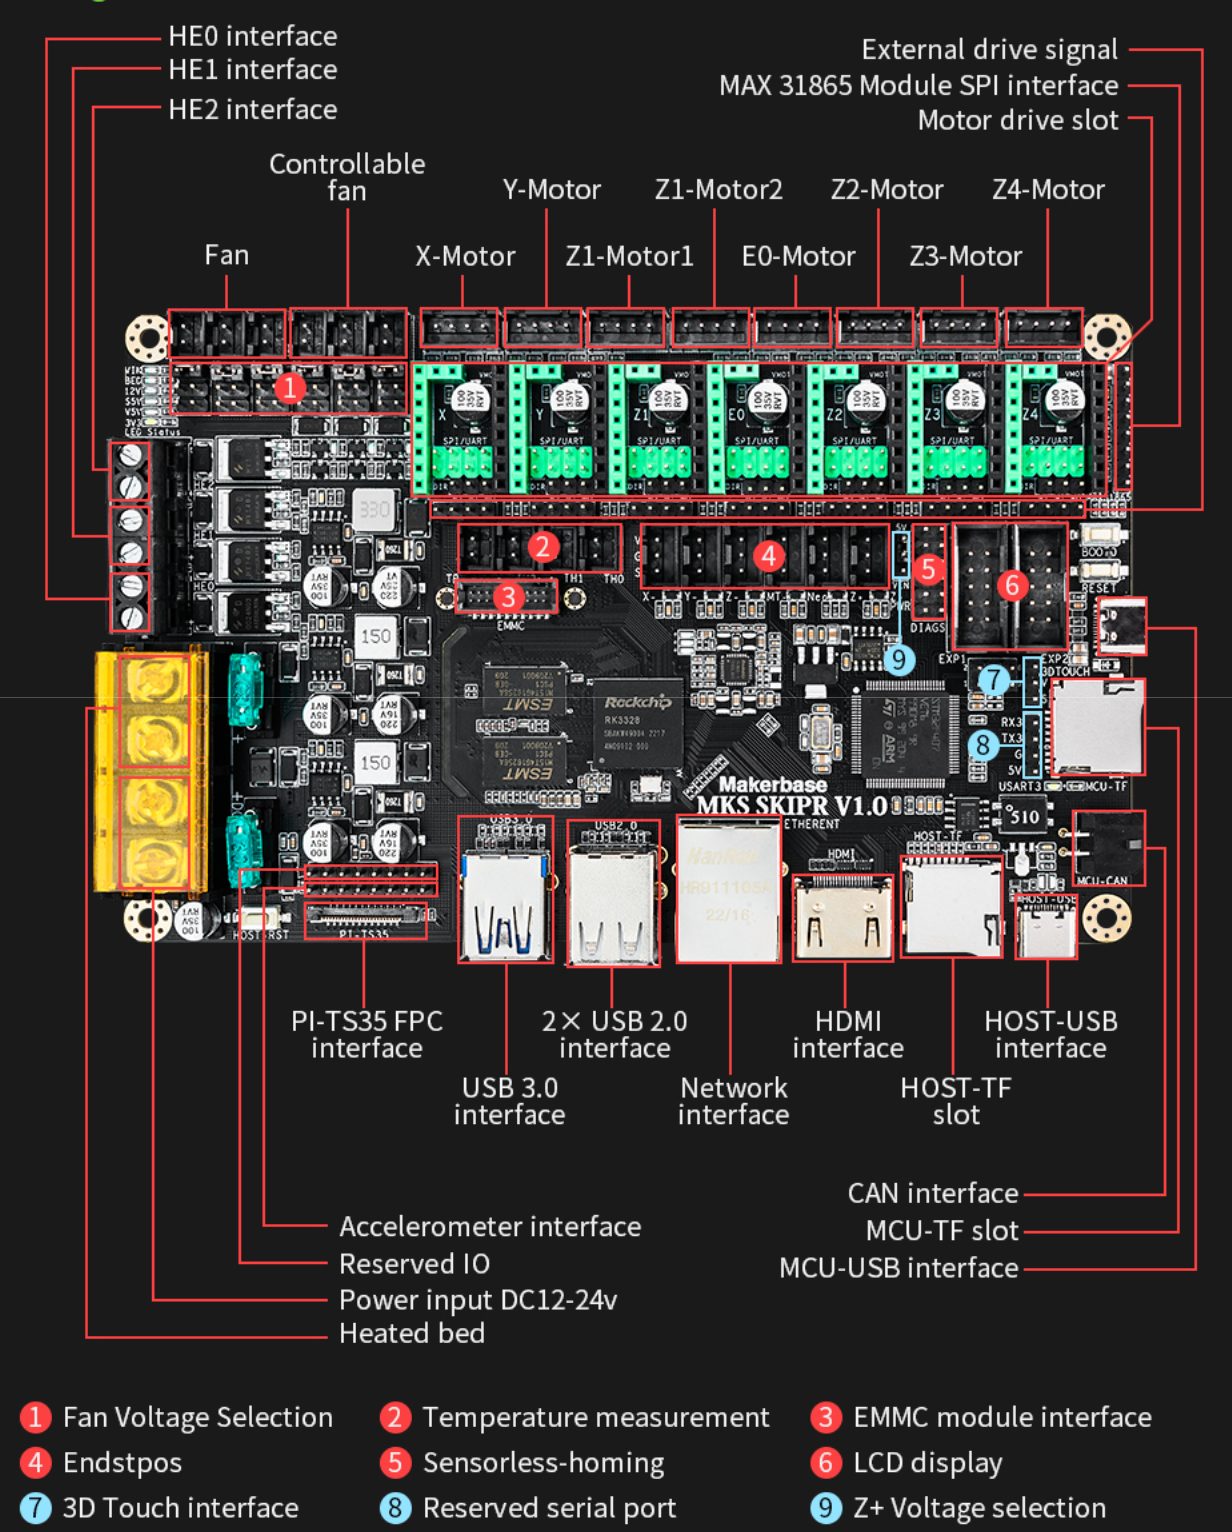
MKS SKIPR is an all-in-one board launched by Makerbase for running Klipper. It integrates the RK3328 SOC running the Klipper host and the STM32F407VET6 MCU responsible for executing specific machine actions. It meets the use of most 3D printers.
- SOC uses Rockchip's 4-core Cortex-A53 architecture RK3328 with Armbian system, perfectly running Klipper host
- MCU uses STM32F407VET6 of Cortex-M4 architecture, 168Mhz main frequency, easy to control various machine actions
- Retain the rich interface resources of MKS PI [with 1GBytes of DDR3 memory, support HDMI screen interface, PI-TS35 screen interface, provide wired Ethernet port, 3-way USB interface (can be externally connected to the main control board, USB wireless network card, USB camera, U disk, USB keyboard and mouse, etc.)]
- Support booting the system from TF card and EMMC module (EMMC module is more stable than TF card, and has faster read and write speed), and provides supporting EMMC burning tools
- Support 7-axis stepper drive to meet the requirements of most 3D printer models
- 3 independent MP1584PEN DC/DC modules provide a strong guarantee for the stable operation of the entire board circuit
- 3-way controllable fans, plus 3-way normally open output, can independently select VIN, 12V or 5V voltage
- Design Schottky diode protection for MOS circuits and temperature measurement circuits
- Design the back EMF energy absorption circuit to protect the stepper driver module
- The Z+ interface can independently set the voltage selection to adapt to different models of PROBE
https://github.com/makerbase-mks/MKS-SKIPR/wiki

Makerbase provides a complete Klipper firmware transplanted based on the Armbian desktop system, and directly supports klipperScreen. Users only need to download the image file provided by Makerbase, burn it to the EMMC module or TF card, without a lot of construction work(If you have purchased a package that includes an EMMC module, the EMMC module has already been burned into the system before leaving the factory, and you do not need to burn it again unless you want to update a new image.).
- An EMMC module or A TF memory card not less than 8G
- TF card reader
- PC with windows operating system installed
- Wireless network card or network cable
- Type_C cable
- System image download link: https://drive.google.com/drive/folders/1tTuSvF9OL2qtPXElau8YOXn2sWbdxa9e?usp=sharing
- Install balenaEtcher v1.5 and above, download link: https://www.balena.io/etcher/
- Install putty, download link: https://www.chiark.greenend.org.uk/~sgtatham/putty/latest.html
- Insert the MKS EMMC module(need an EMMC adapter) or TF card into the card reader, and insert the card reader into the PC
- Format EMMC module or TF card to FAT32 format before flash system files
- Unzip the downloaded image file
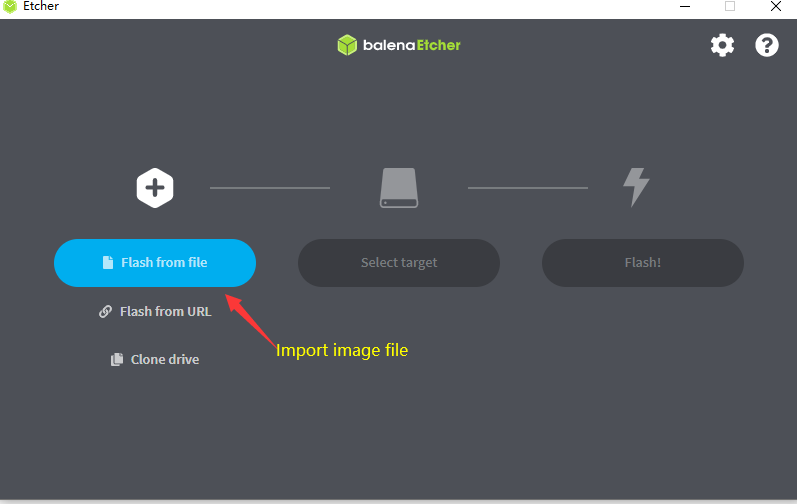
- Run balenaEtcher, import the decompressed image file->Select TF card->Click to start flash
- After the flashing is finish, insert the MKS EMMC module to the EMMC interface of MKS SKIPR or insert the TF card into the MKS SKIPR's host TF slot, then power on MKS SKIPR board
Just set your router to using DHCP, plug the network cable into the MKS SKIPR, done.
MKS SKIPR supports USB WiFi Adapter, but not every type is guaranteed to be available. Now, we the types we have tested available include those based on RTL8188CUS(VID:PID = 0bda:8176)/RTL8188EUS(VID:PID = 0bda:8179)/RTL8188GU(RTL8710B)/(VID:PID = 0x0BDA:0xB711). According to the current testing experience, it is not recommended to use adapters based on RTL8188GU(RTL8710B), it has been supported on MKS SKIPR, but it's driver takes a lot of CPU load(about 27% in our test). Other adapters like the one based on RTL8188CUS/RTL8188EUS have a perfect perfomance. Insert the USB WiFi adapter to one of the 3 usb ports of MKS SKIPR, you have two ways to config it to connect to your router.
- Before power on, insert the TF card to the PC with TF card reader, it would generate two disks on PC
- Open the "Boot" disk, find the config file "wpa_supplicant-wlan0.conf" and open it with text editing software (e.g. notepad, notepad++, etc.)
- Modify the ssid and psk according to your router, save the config file
- Remove the TF card from the PC, and insert it to the MKS SKIPR It would connect to your router automatically.
- Prepare putty according to the steps
- On the shell, use the command of "armbian-config" to enter config tool, then choose "network" -> "WIFI” to choose the hotpot to connect to the network.
After connect MKS SKIPR to the network, you can get its IP address in two ways
Enter the command “sudo ifconfig” and view the IP
If you have a PI-TS35 or HDMI screen connected with MKS SKIPR, it would run KlipperScreen after system boot. You can find your IP address on the "Config"->WiFi
After connect the MKS SKIPR to the network, you can directly enter the IP address of MKS SKIPR with your PC's browser, and you can enter fluidd interface(Makerbase's image has installed fluidd, of cause you can install other interface).

Putty is a famous tool, you can use either SSH or Serial to connect to the MKS SKIPR.
- Connect the MKS SKIPR with the TYPE-C cable to the PC, supply power to the PI, check the COM port in the device manager of the PC, and then open Putty
- Select the COM port, set the baud rate to 1500000, and click “Open” to connect

- If you open a black empty window, click the Enter key, and it will ask you to enter the login user and password
- There are two users in the system provided by Makerbase:
root user: root
user2: mks
their origin passwords are the same: makerbase - After enter the user and password, you can enter the system now.
On MKS SKIPR, the RK3328 SOC uses the /dev/ttyS0 to connect to the UART1 of STM32F407VET MCU.
On the "printer.cfg" file of Klipper, the serial should be "/dev/ttyS0":
[mcu] serial:/dev/ttyS0
If you want to use the ADXL345, it is very easy to connect on MKS SKIPR.
The MKS SKIPR image has the acceleration calculation library and the dependent library installed by default, no additional configuration is required, just configure the ADXL345 and test position parameters in the "printer.cfg" file.
-
Configure adxl345 in the configuration file, copy the following parameters to the "printer.cfg" file
[mcu rpi] serial: /tmp/klipper_host_mcu [adxl345] cs_pin: rpi:None spi_bus: spidev0.2 -
Save and restart Klipper, and send the query command after the web interface does not report an error:
ACCELEROMETER_QUERY
Now the acceleration sensor data can be received. The data is similar to the following:
Recv: // adxl345 values (x, y, z): 430.619210, 831.432400, 8718.156800...
-
Configure the test position of adxl345, generally installed in the middle of the platform
[resonance_tester] accel_chip: adxl345 probe_points: 115, 115, 20 # an example -
Test acceleration and configure input_shaper data
Before the test, first increase the acceleration configuration of the printer (you can change it to a smaller value after the test):
[printer] max_accel: 7000 max_accel_to_decel: 7000 -
If there is an input_shaper function parameter in the configuration file, you need to send an instruction to turn it off:
SET_INPUT_SHAPER SHAPER_FREQ_X=0 SHAPER_FREQ_Y=0 -
Then send the auto test configuration command to start testing the vibration:
SHAPER_CALIBRATE -
After the test, it will return the recommended configuration method and configuration value of the x-axis and y-axis, configure the value in the configuration file, then save and restart, the configuration is similar to the following:
[input_shaper] shaper_type_x = 3hump_ei shaper_freq_x = 52.4 shaper_type_y = 2hump_ei shaper_freq_y = 37.5
The default image of MKS SKIPR has already installed MJPG-Streamer and enable the USB camera. MKS SKIPR supports most of the commonly used USB cameras(but not guaranteed). Normally, just connect your USB camera to one of B-Type USB port on MKS SKIPR, you will see the preview video on the Fluidd interface.
If you don't want to use the USB camera, you had better to disable it to reduce CPU load:
Enter the setting item on the Fluidd interface -> camera -> default -> disable
Support using SKIPR with the tool header modules like MKS THR36/42, more details refer to : https://github.com/makerbase-mks/MKS-THR36-THR42-UTC
Refer to https://github.com/makerbase-mks/MKS-PI/blob/main/README.md#how-to-modify-the-device-tree-file
Refer to https://github.com/makerbase-mks/MKS-PI/blob/main/README.md#how-to-rotate-180-for-the-ts35-display


