GithubHelp home page GithubHelp logo

mdbloice / augmentor Goto Github PK

View Code? Open in Web Editor NEW
5.0K 125.0 863.0 1.54 MB

Image augmentation library in Python for machine learning.

Home Page: https://augmentor.readthedocs.io/en/stable

License: MIT License

Python 100.00%
augmentation machine-learning deep-learning neural-networks

augmentor's Introduction

AugmentorLogo

Augmentor is an image augmentation library in Python for machine learning. It aims to be a standalone library that is platform and framework independent, which is more convenient, allows for finer grained control over augmentation, and implements the most real-world relevant augmentation techniques. It employs a stochastic approach using building blocks that allow for operations to be pieced together in a pipeline.

PyPI Supported Python Versions PyPI Install Pytest Documentation Status License Project Status: Active – The project has reached a stable, usable state and is being actively developed. Binder

Installation

Augmentor is written in Python. A Julia version of the package is also being developed as a sister project and is available here.

Install using pip from the command line:

pip install Augmentor

See the documentation for building from source. To upgrade from a previous version, use pip install Augmentor --upgrade.

Documentation

Complete documentation can be found on Read the Docs: https://augmentor.readthedocs.io

Quick Start Guide and Usage

The purpose of Augmentor is to automate image augmentation (artificial data generation) in order to expand datasets as input for machine learning algorithms, especially neural networks and deep learning.

The package works by building an augmentation pipeline where you define a series of operations to perform on a set of images. Operations, such as rotations or transforms, are added one by one to create an augmentation pipeline: when complete, the pipeline can be executed and an augmented dataset is created.

To begin, instantiate a Pipeline object that points to a directory on your file system:

import Augmentor
p = Augmentor.Pipeline("/path/to/images")

You can then add operations to the Pipeline object p as follows:

p.rotate(probability=0.7, max_left_rotation=10, max_right_rotation=10)
p.zoom(probability=0.5, min_factor=1.1, max_factor=1.5)

Every function requires you to specify a probability, which is used to decide if an operation is applied to an image as it is passed through the augmentation pipeline.

Once you have created a pipeline, you can sample from it like so:

p.sample(10000)

which will generate 10,000 augmented images based on your specifications. By default these will be written to the disk in a directory named output relative to the path specified when initialising the p pipeline object above.

If you wish to process each image in the pipeline exactly once, use process():

p.process()

This function might be useful for resizing a dataset for example. It would make sense to create a pipeline where all of its operations have their probability set to 1 when using the process() method.

Multi-threading

Augmentor (version >=0.2.1) now uses multi-threading to increase the speed of generating images.

This may slow down some pipelines if the original images are very small. Set multi_threaded to False if slowdown is experienced:

p.sample(100, multi_threaded=False)

However, by default the sample() function uses multi-threading. This is currently only implemented when saving to disk. Generators will use multi-threading in the next version update.

Ground Truth Data

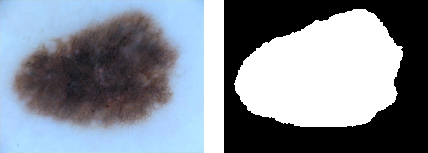
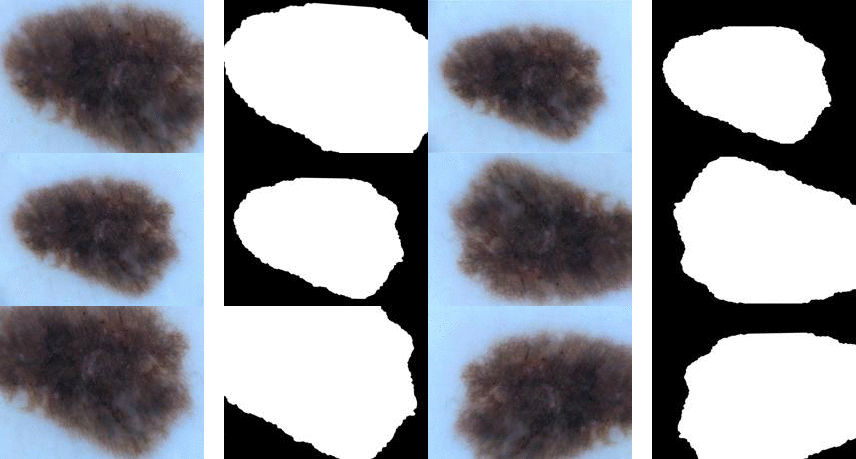
Images can be passed through the pipeline in groups of two or more so that ground truth data can be identically augmented.

Original image and mask[3] Augmented original and mask images
OriginalMask AugmentedMask

To augment ground truth data in parallel to any original data, add a ground truth directory to a pipeline using the ground_truth() function:

p = Augmentor.Pipeline("/path/to/images")
# Point to a directory containing ground truth data.
# Images with the same file names will be added as ground truth data
# and augmented in parallel to the original data.
p.ground_truth("/path/to/ground_truth_images")
# Add operations to the pipeline as normal:
p.rotate(probability=1, max_left_rotation=5, max_right_rotation=5)
p.flip_left_right(probability=0.5)
p.zoom_random(probability=0.5, percentage_area=0.8)
p.flip_top_bottom(probability=0.5)
p.sample(50)

Multiple Mask/Image Augmentation

Using the DataPipeline class (Augmentor version >= 0.2.3), images that have multiple associated masks can be augmented:

Multiple Mask Augmentation
MultipleMask

Arbitrarily long lists of images can be passed through the pipeline in groups and augmented identically using the DataPipeline class. This is useful for ground truth images that have several masks, for example.

In the example below, the images and their masks are contained in the images data structure (as lists of lists), while their labels are contained in y:

p = Augmentor.DataPipeline(images, y)
p.rotate(1, max_left_rotation=5, max_right_rotation=5)
p.flip_top_bottom(0.5)
p.zoom_random(1, percentage_area=0.5)

augmented_images, labels = p.sample(100)

The DataPipeline returns images directly (augmented_images above), and does not save them to disk, nor does it read data from the disk. Images are passed directly to DataPipeline during initialisation.

For details of the images data structure and how to create it, see the Multiple-Mask-Augmentation.ipynb Jupyter notebook.

Generators for Keras and PyTorch

If you do not wish to save to disk, you can use a generator (in this case with Keras):

g = p.keras_generator(batch_size=128)
images, labels = next(g)

which returns a batch of images of size 128 and their corresponding labels. Generators return data indefinitely, and can be used to train neural networks with augmented data on the fly.

Alternatively, you can integrate it with PyTorch:

import torchvision
transforms = torchvision.transforms.Compose([
    p.torch_transform(),
    torchvision.transforms.ToTensor(),
])

Main Features

Elastic Distortions

Using elastic distortions, one image can be used to generate many images that are real-world feasible and label preserving:

Input Image Augmented Images
eight_hand_drawn_border eights_border

The input image has a 1 pixel black border to emphasise that you are getting distortions without changing the size or aspect ratio of the original image, and without any black/transparent padding around the newly generated images.

The functionality can be more clearly seen here:

Original Image[1] Random distortions applied
Original Distorted

Perspective Transforms

There are a total of 12 different types of perspective transform available. Four of the most common are shown below.

Tilt Left Tilt Right Tilt Forward Tilt Backward
TiltLeft Original Original Original

The remaining eight types of transform are as follows:

Skew Type 0 Skew Type 1 Skew Type 2 Skew Type 3
Skew0 Skew1 Skew2 Skew3
Skew Type 4 Skew Type 5 Skew Type 6 Skew Type 7
Skew4 Skew5 Skew6 Skew7

Size Preserving Rotations

Rotations by default preserve the file size of the original images:

Original Image Rotated 10 degrees, automatically cropped
Original Rotate

Compared to rotations by other software:

Original Image Rotated 10 degrees
Original Rotate

Size Preserving Shearing

Shearing will also automatically crop the correct area from the sheared image, so that you have an image with no black space or padding.

Original image Shear (x-axis) 20 degrees Shear (y-axis) 20 degrees
Original ShearX ShearY

Compare this to how this is normally done:

Original image Shear (x-axis) 20 degrees Shear (y-axis) 20 degrees
Original ShearX ShearY

Cropping

Cropping can also be handled in a manner more suitable for machine learning image augmentation:

Original image Random crops + resize operation
Original Original

Random Erasing

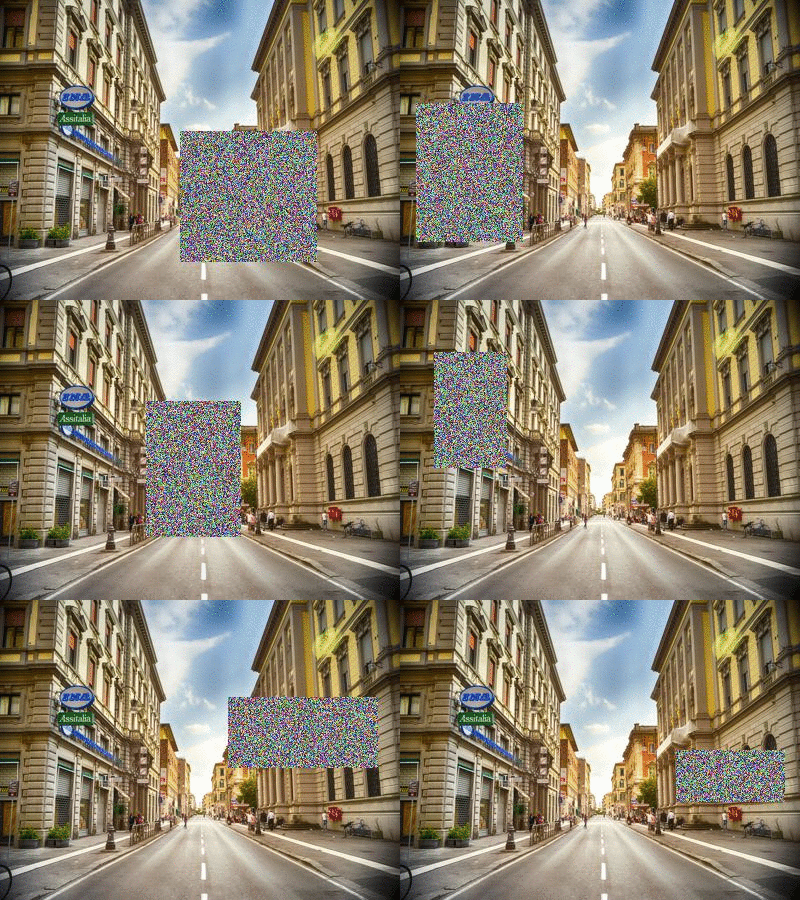
Random Erasing is a technique used to make models robust to occlusion. This may be useful for training neural networks used in object detection in navigation scenarios, for example.

Original image[2] Random Erasing
Original Original

See the Pipeline.random_erasing() documentation for usage.

Chaining Operations in a Pipeline

With only a few operations, a single image can be augmented to produce large numbers of new, label-preserving samples:

Original image Distortions + mirroring
Original DistortFlipFlop

In the example above, we have applied three operations: first we randomly distort the image, then we flip it horizontally with a probability of 0.5 and then vertically with a probability of 0.5. We then sample from this pipeline 100 times to create 100 new data.

p.random_distortion(probability=1, grid_width=4, grid_height=4, magnitude=8)
p.flip_left_right(probability=0.5)
p.flip_top_bottom(probability=0.5)
p.sample(100)

Tutorial Notebooks

Integration with Keras using Generators

Augmentor can be used as a replacement for Keras' augmentation functionality. Augmentor can create a generator which produces augmented data indefinitely, according to the pipeline you have defined. See the following notebooks for details:

  • Reading images from a local directory, augmenting them at run-time, and using a generator to pass the augmented stream of images to a Keras convolutional neural network, see Augmentor_Keras.ipynb
  • Augmenting data in-memory (in array format) and using a generator to pass these new images to the Keras neural network, see Augmentor_Keras_Array_Data.ipynb

Per-Class Augmentation Strategies

Augmentor allows for pipelines to be defined per class. That is, you can define different augmentation strategies on a class-by-class basis for a given classification problem.

See an example of this in the following Jupyter notebook: Per_Class_Augmentation_Strategy.ipynb

Complete Example

Let's perform an augmentation task on a single image, demonstrating the pipeline and several features of Augmentor.

First import the package and initialise a Pipeline object by pointing it to a directory containing your images:

import Augmentor

p = Augmentor.Pipeline("/home/user/augmentor_data_tests")

Now you can begin adding operations to the pipeline object:

p.rotate90(probability=0.5)
p.rotate270(probability=0.5)
p.flip_left_right(probability=0.8)
p.flip_top_bottom(probability=0.3)
p.crop_random(probability=1, percentage_area=0.5)
p.resize(probability=1.0, width=120, height=120)

Once you have added the operations you require, you can sample images from this pipeline:

p.sample(100)

Some sample output:

Input Image[3] Augmented Images
Original Augmented

The augmented images may be useful for a boundary detection task, for example.

Licence and Acknowledgements

Augmentor is made available under the terms of the MIT Licence. See Licence.md.

[1] Checkerboard image obtained from Wikimedia Commons and is in the public domain: https://commons.wikimedia.org/wiki/File:Checkerboard_pattern.svg

[2] Street view image is in the public domain: http://stokpic.com/project/italian-city-street-with-shoppers/

[3] Skin lesion image obtained from the ISIC Archive:

You can use urllib to obtain the skin lesion image in order to reproduce the augmented images above:

>>> from urllib import urlretrieve
>>> im_url = "https://isic-archive.com:443/api/v1/image/5436e3abbae478396759f0cf/download"
>>> urlretrieve(im_url, "ISIC_0000000.jpg")
('ISIC_0000000.jpg', <httplib.HTTPMessage instance at 0x7f7bd949a950>)

Note: For Python 3, use from urllib.request import urlretrieve.

Logo created at LogoMakr.com

Tests

To run the automated tests, clone the repository and run:

$ py.test -v

from the command line. To view the CI tests that are run after each commit, see https://travis-ci.org/mdbloice/Augmentor.

Asciicast

Click the preview below to view a video demonstration of Augmentor in use:

asciicast

augmentor's People

Contributors

aniket965 avatar carkusl avatar dabauxi avatar daisukelab avatar eddiesmo avatar evizero avatar florist-notes avatar gauthiermartin avatar jjhbw avatar juneoh avatar kmader avatar lb-desupervised avatar lradacher avatar mdbloice avatar mdraw avatar puhoshville avatar s1mona avatar svendula avatar yananjian avatar

Stargazers

 avatar  avatar  avatar  avatar  avatar  avatar  avatar  avatar  avatar  avatar  avatar  avatar  avatar  avatar  avatar  avatar  avatar  avatar  avatar  avatar  avatar  avatar  avatar  avatar  avatar  avatar  avatar  avatar  avatar  avatar  avatar  avatar  avatar  avatar  avatar  avatar  avatar  avatar  avatar  avatar  avatar  avatar  avatar  avatar  avatar  avatar  avatar  avatar  avatar  avatar  avatar  avatar  avatar  avatar  avatar  avatar  avatar  avatar  avatar  avatar  avatar  avatar  avatar  avatar  avatar  avatar  avatar  avatar  avatar  avatar  avatar  avatar  avatar  avatar  avatar  avatar  avatar  avatar  avatar  avatar  avatar  avatar  avatar  avatar  avatar  avatar  avatar  avatar  avatar  avatar  avatar  avatar  avatar  avatar  avatar  avatar  avatar  avatar  avatar  avatar

Watchers

 avatar  avatar  avatar  avatar  avatar  avatar  avatar  avatar  avatar  avatar  avatar  avatar  avatar  avatar  avatar  avatar  avatar  avatar  avatar  avatar  avatar  avatar  avatar  avatar  avatar  avatar  avatar  avatar  avatar  avatar  avatar  avatar  avatar  avatar  avatar  avatar  avatar  avatar  avatar  avatar  avatar  avatar  avatar  avatar  avatar  avatar  avatar  avatar  avatar  avatar  avatar  avatar  avatar  avatar  avatar  avatar  avatar  avatar  avatar  avatar  avatar  avatar  avatar  avatar  avatar  avatar  avatar  avatar  avatar  avatar  avatar  avatar  avatar  avatar  avatar  avatar  avatar  avatar  avatar  avatar  avatar  avatar  avatar  avatar  avatar  avatar  avatar  avatar  avatar  avatar  avatar  avatar  avatar  avatar  avatar  avatar  avatar  avatar  avatar  avatar

augmentor's Issues

How to pass an image path as parameter and only preprocess it?

It seems Augmentor needs a work directory as the parameter and it will preprocess all files in it.
However, we always need to preprocess a specific image and use the image path as the parameter.
So how to use Augmentor in this situation?
Thank you.

histogram_equalisation method does not recover from IOError

While using histogram_equalisation method i got multiple error that go raised by PIL.

Here is the error returned by my terminal

Processing 000010.jpg: 81%|███████████████████████████████████████████████████████████████████████████████████████████████████▋ | 342/422 [00:29<00:06, 12.99 Samples/s]Output directory set to /home/spark/Desktop/Augmentation/images/Pont Jacques-Cartier/_histogram_equalisation.Traceback (most recent call last):
File "core/main.py", line 43, in
main = Main()
File "core/main.py", line 10, in init
self.main()
File "core/main.py", line 40, in main
augmentator.execute_all_single_image_augmentation()
File "/home/spark/Projects/image-augmentation-tool/core/augmentator.py", line 457, in execute_all_single_image_augmentation
self._histogram_equalisation()
File "/home/spark/Projects/image-augmentation-tool/core/augmentator.py", line 229, in _histogram_equalisation
pipeline.sample(count)
File "/home/spark/.virtualenvs/image-augmentation-tool/lib/python3.6/site-packages/Augmentor/Pipeline.py", line 254, in sample
self._execute(augmentor_image)
File "/home/spark/.virtualenvs/image-augmentation-tool/lib/python3.6/site-packages/Augmentor/Pipeline.py", line 192, in _execute
image = operation.perform_operation(image)
File "/home/spark/.virtualenvs/image-augmentation-tool/lib/python3.6/site-packages/Augmentor/Operations.py", line 123, in perform_operation
return ImageOps.equalize(image)
File "/home/spark/.virtualenvs/image-augmentation-tool/lib/python3.6/site-packages/PIL/ImageOps.py", line 248, in equalize
return _lut(image, lut)
File "/home/spark/.virtualenvs/image-augmentation-tool/lib/python3.6/site-packages/PIL/ImageOps.py", line 57, in _lut
raise IOError("not supported for this image mode")
OSError: not supported for this image mode

Summary functions.

Both ImageSource and Pipeline object require functions, named summary that output details regarding that object's state. For the ImageSource class that is a run down of the image sources that are currently loaded. The Pipeline's summary should output the operations that have been added so far,

Also, the ImageSource and Pipeline's summary function should output tables in Markdown valid syntax. This would mean that if the package is being used in Jupyter, a nicely formatted table will render when summary is called. Also, they would look fine in a REPL interpreter.

It should output valid Markdown such as the following output from an ImageSource object:

| Summary           |                    |
|:-----------------:|--------------------|
| Image count       | 120                |
| Dimensions        | 480x480 (120)      |
| Aspect ratio(s)   | 1:1                |
| File type(s)      | 1                  |
| File extension(s) | BMP                |
| File format(s)    | Grayscale          |

Example rendered output for an ImageSource object:

Summary
Image count 120
Dimensions 480x480 (120)
Aspect ratio(s) 1:1
File type(s) 1
File extension(s) BMP
File format(s) Grayscale

Note that the idea is that summary provides an overview of the interesting properties of the data source. For example it could be the case that all images are of different size, in that situation it wouldn't be very informative to print every size there is. However, if it is still the case that all images are of the same aspect ratio than that information is interesting and worth printing.

Rotate to the same angle?

The description of the function "rotate" says: "If you wish to rotate the images by an exact number of degrees, set both :attr:max_left_rotation and :attr:max_right_rotation to the same value."
I am confused by this. If I set the attr:max_left_rotation and :attr:max_right_rotation to the same value, then which angle does it rotate? To left or to right?

Add support for semantic segmentation problems

It would be useful if the pipelines could be applied in parallel to both the image and label dataset for segmentation problems. It is possible to sync two pipelines and have them operate independently on the input images and output labels, but it would be useful to support both

Resolution for output images

Marcus, Thanks for sharing your nice augmentation tool. I really like it.

I am wondering how to keep output images to be the same resolution as input images after finishing augmentation. I do see that there is a loss of resolution for augmented images. Please let me know where I could make a change for the code in order to keep the same resolutions. Thank you for your advice!

Best regards,
Peter

Something wrong occured when applying function ' ground_truth() function'

When I was using your demo code to augment original and mask images identically, I found I got different number of augmented mask and images! I can't figure out why this happened. This meant the mask and image were NOT AUGMENTED IDENTICALLY, were they? Could you please help me to deal with this question, thanks.

Keras Generator with RGB images

Hello,
I'm trying to create a keras generator using the Augmentor library but I'm running into an issue with the Pil library. My training data is in a numpy array of form [num_samples, width, height, num_channels] where num_channels =3. I tried running the jupyter notebook Augmentor_Keras_Array_Data.ipynb using the mnist dataset and it worked fine, but with the 3 layer images once I try to visualize a sample using the X, y = next(generator) function I get the following errors:

File "C:/Users/amand/Documents/Masters Thesis/Cow Injury Project/cow_injury_CNN/augment_dataset.py", line 61, in
X, y = next(generator)

File "C:\Anaconda3\envs\ConvNeuralNet\lib\site-packages\Augmentor\Pipeline.py", line 489, in keras_generator_from_array
numpy_array = self._execute_with_array(np.reshape(images[random_image_index], (w, h, l)))

File "C:\Anaconda3\envs\ConvNeuralNet\lib\site-packages\Augmentor\Pipeline.py", line 226, in _execute_with_array
pil_image = [Image.fromarray(image)]

File "C:\Anaconda3\envs\ConvNeuralNet\lib\site-packages\PIL\Image.py", line 2426, in fromarray
raise TypeError("Cannot handle this data type")

TypeError: Cannot handle this data type

Is this function designed to work with RGB images?

Inside output folder an empty directory named "0" is created

While I processed a batch of multiple files in the output folder besides output files an empty directory with name "0" is created.
Same things does not happen if I have only 1 file to be processed inside my Pipeline.

This is a small reproducer

pipeline = Augmentor.Pipeline(source_directory="my_input",
                    output_directory="test_out", save_format="PNG")
        pipeline.random_distortion(probability=1, grid_width=3, grid_height=4, magnitude=3)
        pipeline.sample(100)

in this case folder 'my_input' contains multiple image files.

Option for absolute output path

Hi,

currently, only a relative output path can be defined in Pipeline(). It would be helpful to be able to specify an absolute output path.

Cheers

Adding black_and_white to the pipeline should force a lossless format (Not JPEG)

Currently, even if you specify a black and white operation but don't change the default picture format (.jpeg) the resulting picture contains values besides 0 and 255 due to compression.

To be clear black_and_white is not malfunctioning, changing to a lossless format (.png for example) when creating the pipeline fixes the problem.

Pipelining multiple image with a probability of 1.0 to trigger each function

This is actually more a question then an issue.

I was wondering if their was an existing feature that grants us the ability to trigger each augmentor function on a set of images with a percentage of 100% in a way that every image in a dataset for exemple get generated for each available function of augmentor ... if not is their an easy way you could think of for doing this.

module 'Augmentor' has no attribute 'Pipeline'

Thanks for the wonderful library. But I am having an issue here. First time it worked alright but now as soon as I import Augmentor in Python I get the message

builtins.AttributeError: module 'Augmentor' has no attribute 'Pipeline'

Is there anything I can do about that?

Iterate over mini-batches of image source

It should be possible in a convenient way to use an image source as an iterator to iterate over the whole dataset one image at a time or in mini-batches of a specified size

Unable to save out images after augmenting

Hello,

I installed Augmentor successfully using pip. After that I was able to write a short script to augment images and ran it without any issue.

Today, when I tried to run the script on a different set of images, I got the error :
Error writing f8aee8ea-418c-4742-a977-5896b2b160d5, .
Change save_format to PNG?
You can change the save format using the set_save_format(save_format) function.

I tried using set_save_format("auto") and the problem still persists. Can you please help?

Object detection

Hey. Is data augmentation supported for object detection tasks?

Possible to run multiple pipeline at the same time

I was wondering if it was possible to run multiple pipeline at the same time

Here is what im trying to achieve, we are trying to create multiple pipeline for each of our classes and then trigger random augmentation on each of them now we run on job after the other but is it possible to run like 2 or 3 at once ?

Use Augmentor to predict a image, but don't know how to pre-process test image

Hi,
Now, I am using Augmentor to get a generator and use Keras fit_generator function to train my model.
After I trained, I am facing a problem.
I don't know how Augmentor pre-processing the train set. But as a result it normalized the input image value between 0 and 1. So I don't know how to pre-process my test set so that it can be predict from the trained model.
I tried to devide my test set by 255.. but the result is wrong...
Can you give me any help? Or just show how you reappear your image processed by Augmentor. Then I will know how to go on.
Thank you !

apply_current_pipeline fails trying to save the file

It looks like output_directory is not available for apply_current_pipeline.

from Augmentor import Pipeline

aug = Pipeline(source_directory='./',
               output_directory='out')

aug.apply_current_pipeline('pic.png', save_to_disk=True)
Traceback (most recent call last):
  File "bug.py", line 6, in <module>
    aug.apply_current_pipeline('pic.png', save_to_disk=True)
  File "/Users/Arseny/.pyenv/versions/3.6.0/lib/python3.6/site-packages/Augmentor/Pipeline.py", line 268, in apply_current_pipeline
    return self._execute(AugmentorImage(os.path.abspath(image_path), None), save_to_disk)
  File "/Users/Arseny/.pyenv/versions/3.6.0/lib/python3.6/site-packages/Augmentor/Pipeline.py", line 205, in _execute
    image.save(os.path.join(augmentor_image.output_directory, file_name), self.save_format)
  File "/Users/Arseny/.pyenv/versions/3.6.0/lib/python3.6/posixpath.py", line 78, in join
    a = os.fspath(a)
TypeError: expected str, bytes or os.PathLike object, not NoneType

Randomizing the images used by the pipeline

Is there a way to randomize the images the pipeline processes? For me it always takes the images one by one in the listdir() list... Kind of a problem when I perform the same program several times.

Zoom-out functionality available but turned off?

First thing - thanks for this great repo!

The input for the zoom operation is limited to min_factor>1.
I actually needed to use it for a "zoom out" functionality and simply disabled the input check - then everything worked as expected.
Should this input check even be there? I know for most users adding a black margin for the "zoom out" effect is unwanted, but they can simply only use min_factor>1 - no need to forbid it.
What do you think?

Feeding Pipeline with numpy array

The library looks pretty good. I would like to ask about a feature.

In addition to reading from directory and writing to directory, Is it possible to add a feature that can read from numpy array and returns augmented numpy array images?

How to preserve the name of the files?

When a file image110.png gets passed into the pipeline, out comes out something like parent_dir_png_original_.... where ... is a hash. Is there a way to know which image augmented image is related to the original image?

Using Augmentor with TensorFlow

How can i use Augmentor on the fly with tensorflow? There's an example with Keras. Can you provide an example with tensor flow too?

not an issue - potential break through in 3d Point cloud scanning inference

I watched this video this morning on 3d point cloud + ARKit
https://www.youtube.com/watch?v=kupq1C41XcU&feature=youtu.be
and it seems like a trained Augmentor model could help bridge the inference here in conjunction with trained model. Not sure if you agree, or if this is the correct repo for this - perhaps it is a new project.

screen shot 2017-10-03 at 9 42 19 am

I guess as a feature request / potential enhancement for Augmentor to solve / (unless you can think of something better or maybe it already does this)
we need a way to guess (train a model) the transformation necessary to go from one transformation to the other.
eg. given a view is transformed from
A -> B
// what was the transformation??? then from this glue / and some kalman filters - retrofit the point cloud.

screen shot 2017-10-03 at 9 46 16 am

Step 2 could be to isolate this to bounding box. just thinking out loud here.

this is the code from video above
https://github.com/johndpope/ARKitExperiments

rotation changes the scale of the image

Just curious about the rotation operation. Shouldn't rotation preserve the scale of the image? I don't see the benefits of cropping out the largest rectangular area of the rotated image just to get rid of the black padding. In my opinion, scale and rotation should be isolated.

Also there're too many interfaces to rotation and sometimes they are confusing.

Anyway, awesome work.

Grayscale class

I've been trying to add the grayscale option to the pipeline, as said in the documents, but when I do it shows the following error.
>>> p.greyscale(probability=1.0) Traceback (most recent call last): File "<stdin>", line 1, in <module> AttributeError: 'Pipeline' object has no attribute 'greyscale'

I'm using Python 2.7.12.

tif files are not loaded

from Augmentor import Pipeline
from skimage.io import imread

aug = Pipeline(source_directory='./',
               output_directory='out')

print(imread('sample.tif'))
aug.apply_current_pipeline('sample.tif')

Let's try to read a file using scikit-image to be sure it is valid tiff file, and see how Augmentor fails:

Initialised with 1 image(s) found in selected directory.
Output directory set to ./out.
[[[3366 2681 1454 4441]
  [3248 2588 1490 4039]
  [3422 2731 1579 4285]
  ...,
  [3659 3072 1881 7845]
  [3733 3154 1954 8042]
  [3751 3110 1889 7561]]

 [[3357 2647 1488 4480]
  [3161 2559 1437 4037]
  [3400 2719 1584 4146]
  ...,
  [3645 3124 1882 7944]
  [3642 3137 1811 8230]
  [3690 3155 1925 7592]]

 [[3409 2690 1481 4475]
  [3343 2637 1539 4038]
  [3444 2764 1626 4112]
  ...,
  [3798 3186 1921 7724]
  [3863 3266 2034 8210]
  [3662 3080 1836 7586]]

 ...,
 [[3670 3012 1836 5635]
  [3654 3005 1810 5861]
  [3545 2963 1774 5925]
  ...,
  [3567 2858 1712 6473]
  [3706 2971 1852 7023]
  [3742 3049 1853 7311]]

 [[3677 3031 1837 5715]
  [3599 3015 1815 5769]
  [3593 2994 1817 5706]
  ...,
  [3620 2938 1757 7244]
  [3702 3052 1834 7525]
  [3696 3098 1857 7699]]

 [[3540 2968 1778 5665]
  [3572 2987 1818 5662]
  [3549 2952 1805 5710]
  ...,
  [3611 3023 1809 7788]
  [3657 3114 1822 7792]
  [3717 3168 1896 7859]]]
Traceback (most recent call last):
  File "bug.py", line 8, in <module>
    aug.apply_current_pipeline('sample.tif')
  File "/Users/Arseny/.pyenv/versions/3.6.0/lib/python3.6/site-packages/Augmentor/Pipeline.py", line 268, in apply_current_pipeline
    return self._execute(AugmentorImage(os.path.abspath(image_path), None), save_to_disk)
  File "/Users/Arseny/.pyenv/versions/3.6.0/lib/python3.6/site-packages/Augmentor/Pipeline.py", line 189, in _execute
    image = Image.open(augmentor_image.image_path)
  File "/Users/Arseny/.pyenv/versions/3.6.0/lib/python3.6/site-packages/PIL/Image.py", line 2452, in open
    % (filename if filename else fp))
OSError: cannot identify image file '/Users/Arseny/dev/kaggle/amzn/sample.tif'

param name out of sync with readme & code?

Hi,

Thank you for the library.

I was trying to run with my own sample found that, it seems there is some changes not getting reflected in readme?

Eg., as of now readme & docs site both says

`
p.rotate(probability=0.7, max_left=10, max_right=10)
p.zoom(probability=0.5, min_scale=1.1, max_scale=1.5)

`
but i found out that the arguments have a different name (based on autogenerated documentation)

p.rotate(probability=0.7, max_left_rotation=10, max_right_rotation=10) p.zoom(probability=0.5, min_factor=1.1, max_factor=1.5)

Error writing processed data when multi-procesed

Processing fer2013_6_35656.png: 100%|█████████▉| 18872/18888 [03:42<00:00, 86.62 Samples/s]Error writing 6_sadness__bc322a31-1668-412c-9314-4ea527d9666c.JPEG.
Error writing 6_sadness__e97e2502-e259-4a05-ac95-d9f1c67c1e90.JPEG.
Error writing 6_sadness__4739eb49-99fa-4e54-92db-77c770248bf6.JPEG.
Error writing 6_sadness__8754065a-56fd-494f-9d51-719d71552011.JPEG.
Error writing 6_sadness__0e20f205-97fc-4d14-9c51-044033f8c404.JPEG.
Error writing 6_sadness__0e14d4ed-93e6-4132-a20c-e6f6199a0e42.JPEG.
Error writing 6_sadness__a68996d9-c0a6-4079-999f-1a3536cf6edb.JPEG.
Error writing 6_sadness__fa9383c6-a94f-4466-afc0-359efe320a62.JPEG.
Error writing 6_sadness__8f877a1d-d65e-4d13-97ce-e92f03612860.JPEG.
Error writing 6_sadness__30e297ef-2996-45fb-bf42-e458b1b2ed21.JPEG.

Hi, I run the pipeline in three loops, applying different operation strategy for each one, then I got writing error for the last two loops. The code follows:

for f in glob.glob(root_dir):
    if os.path.isdir(f):
        folders.append(os.path.abspath(f))
        
print("Folders (classes) found: %s " % [os.path.split(x)[1] for x in folders])

pipelines = {}
for folder in folders:
    print("Folder %s:" % (folder))
    pipelines[os.path.split(folder)[1]] = (Augmentor.Pipeline(folder))
    print("\n----------------------------\n")

for p in pipelines.values():
    p.flip_left_right(probability=1)
    p.sample(len(p.augmentor_images))
    
for p in pipelines.values():
#    p.flip_left_right(probability=1)
    p.rotate(probability=1,max_left_rotation=15,max_right_rotation=15)
    p.sample(len(p.augmentor_images)*6)
    
for p in pipelines.values():
    p.flip_left_right(probability=1)
    p.rotate(probability=1,max_left_rotation=15,max_right_rotation=15)
    p.sample(len(p.augmentor_images)*6)
    print("Class %s has down processing %s samples." % (p.augmentor_images[0].class_label, len(p.augmentor_images)))

(edited by @Evizero for readability)

How to crop a rotated image without losing content?

When using the rotation function the automatic crop removes some of the content of the original image.

Here is an example:

augtest_cf0ec659-3417-4ce9-ae55-aaa4e4586297
c1

Is there a way to avoid this?

I looked at the source code and found no way to pass parameters that control the crop mode but maybe there is some other way?

Can I achieve this by defining a new operation? It feels like overkill to do so.

Perform image operations in-memory

It should not be default that images need to be stored to disk. Instead the operations should be performed in-memory such that operations can be chained easily

Define a class label / class integer map - content of image

I am new to this and excuse the question if it is too silly.
I am trying to construct a different set of images (rather than with mnist as basis) and have created a set of basic images.
In the integer_labels assigning part, it is not clear how the int:label to be assigned. the content of my image is not an integer but an image. Is it okay if the following syntax is used:
integer_labels = {'a':0, 'b':1, 'c':2} where 'a' is the content of the image?
in the given example of MNIST, it is '0', '1' etc. which makes it straight forward. thank you for the support. BTW, I have stored the images as .png files (0.png, 1.png etc), if that is a clue to what is going wrong
Error: Image.fromarray(x_array) - TypeError: Cannot handle this data type

Reproducible issue: black image (all pixels are zero) after rotate

from skimage import io
import Augmentor.Operations as ops
from PIL import Image
import numpy as np
from matplotlib import pyplot as plt

sample = io.imread('train.jpg')
rotate = ops.RotateRange(probability=1, max_left_rotation=50, max_right_rotation=10)

for i in range(6):
  img_ro = np.array(rotate.perform_operation(Image.fromarray(sample)))
  plt.imshow(img_ro)
  plt.show()

Sometimes, you can get a black image after rotate the image.

how to install this by anaconda

how to use conda install this lib
my default python interpreter is anaconda, if i use pip install this lib I can't use it
I use pycharm(backend by anaconda as interpreter)

Adding operations on keypoints/landmarks?

This tool is awesome, especially for the elastic distortion function. Is is possible to add operations on given keypoints/landmarks, which means the inputs and outputs are images and corresponding points? This is helpful for alignment problems.

augment only a single, or set of images

I was wondering if it is possible to use Augmentor to augment a single image or augment multiple images in exactly the same manner (e.g. multiple np.array as input, not filename)? if you have image + Masks, it may be necessary to augment masks the exact same way.

so something like:

i1 = cv2.imread (f1)
i2 = cv2.imread (f2)

x = []
x.append (i1)
x.append (i2)
print(np.array(x).shape)

rotate = ops.RotateRange(probability=0, max_left_rotation=50, max_right_rotation=10)

img_ro = np.array(rotate.perform_operation(Image.fromarray(x)))
for ii in img_ro:
  plt.imshow(ii) # each image in x is rotated in the same way
  plt.show()

Unit Tests for lossless image operations

Each lossless image operation should have a test in place that makes sure it does what it promises to do. Lossless in this context just means that there is no interpolation or extrapolation going on. For example flipping the x dimension is just a rearrangement of pixels (As a negative example rotating 3 degrees forces one to interpolate between neighbouring pixels in order to get good results).

Since testing these kind of lossless transformations is a lot easier than the others they deserve separate issues. In the Julia version I test those using an artificial 2x2 pixel which I then check manually. This approach seems to work pretty well. See: https://github.com/Evizero/Augmentor.jl/blob/master/test/tst_crop.jl

Recommend Projects

  • React photo React

    A declarative, efficient, and flexible JavaScript library for building user interfaces.

  • Vue.js photo Vue.js

    🖖 Vue.js is a progressive, incrementally-adoptable JavaScript framework for building UI on the web.

  • Typescript photo Typescript

    TypeScript is a superset of JavaScript that compiles to clean JavaScript output.

  • TensorFlow photo TensorFlow

    An Open Source Machine Learning Framework for Everyone

  • Django photo Django

    The Web framework for perfectionists with deadlines.

  • D3 photo D3

    Bring data to life with SVG, Canvas and HTML. 📊📈🎉

Recommend Topics

  • javascript

    JavaScript (JS) is a lightweight interpreted programming language with first-class functions.

  • web

    Some thing interesting about web. New door for the world.

  • server

    A server is a program made to process requests and deliver data to clients.

  • Machine learning

    Machine learning is a way of modeling and interpreting data that allows a piece of software to respond intelligently.

  • Game

    Some thing interesting about game, make everyone happy.

Recommend Org

  • Facebook photo Facebook

    We are working to build community through open source technology. NB: members must have two-factor auth.

  • Microsoft photo Microsoft

    Open source projects and samples from Microsoft.

  • Google photo Google

    Google ❤️ Open Source for everyone.

  • D3 photo D3

    Data-Driven Documents codes.