In this codealong we will build out a simple band listing application, which will demonstrate user interaction with flux.
- Explain the results of a user interaction with a component
- Describe the return value of an action
- Describe how a store responds to new data
- Describe how a store broadcasts data
We now have a basic idea of how our components should interact with the store's state. Let's apply this knowledge and show exactly how it is done. This code along will help demonstrate when and how state should be handled when a user interacts with our application.
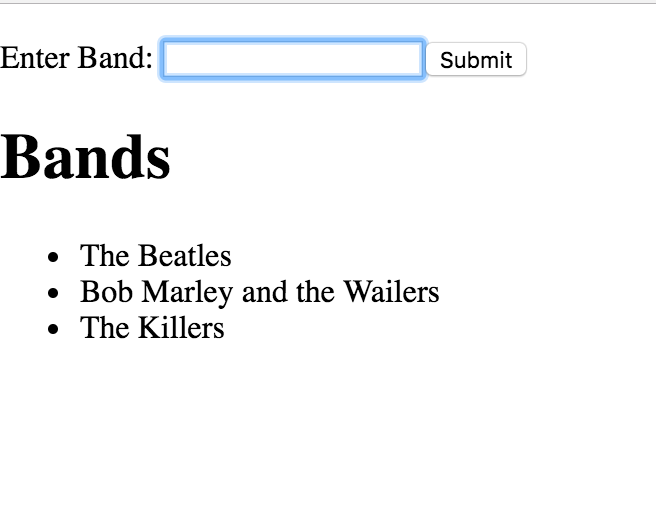
We will be building out a very simple concert venue band list. The application will allow the adding of new bands, the removal of old bands and diplaying each band on one page.
Before we begin let's think about what is needed in React to build out this application. We'll need to mock out our components so that we have a template to build towards. This will help our application building process and shrink our need to "figure it out as we go" (possibly leading to later hours of refactoring).
As we can see in the picture above our application will need an input field to enter the bands and another html element to display them. Because these two functionalities are seperate we can break them up into two different components. Also, though these functionalities are seperate (one requires user input and the other just displays the input) they are also related (they interact with the same exact data) meaning that one of our components will likely be a parent of the other. Let's name our two components:
band_input_componentwill handle our band input logic.band_index_componentwill only diplay the bands.
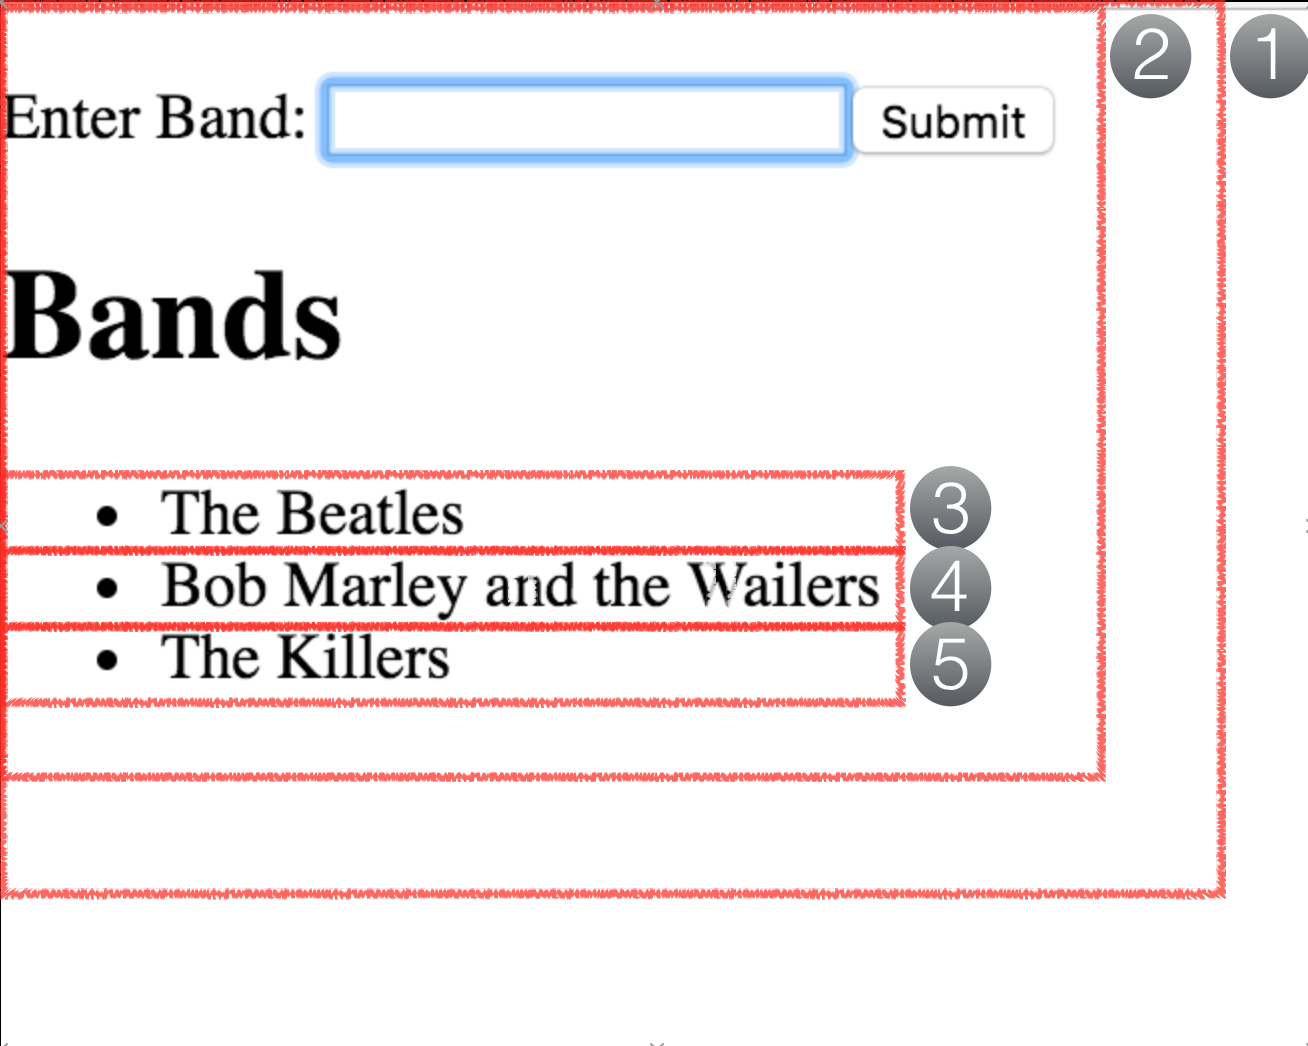
The image above is a visual representation of how our components should be broken out.
- is the full application and refers to our
index.jsfile - is our
band_input_component, which will handle the user input and also wrap ourband_index_component -
-
- show our
band_index_component. Each of these components will display only one of the bands.
- show our
-
Because our band_index_component is only displaying data from band_input_component we can make it a functional child component. Our band_input_component will hold all of the logic for the two components and pass down only the relevant information for band_index_component to display.
Last, but not least, we'll need one reducer band_reducer to update state when store.dispatch(action) is called. This reducer will only need to update our band array held in store.state whenever a new band is entered into our input field. This should be all we need to get started, so let's begin!
We'll start with our index.js file. When you open up the lab there should be some basic code already in the file. Now, because this is a flux application we know that our applications state will be held within a custom store. Let's bring in our store from a previous lab - it should look something like:
	export const createStore = (reducer) => {
		let state;
		let listeners = [];
		const getState = () => state;

		const dispatch = (action) => {
			state = reducer(state, action);
			listeners.forEach(listener => listener())
		};

		const subscribe = (listener) => {
			listeners.push(listener);
		};

		dispatch({});
		return {
			getState: getState,
			dispatch: dispatch,
			subscribe: subscribe
		};
	}
Let's import that into our index.js:
index.js
	...

	import { createStore } from './store';

	...
Quick aside: why do we need the curly braces around our createStore import? Because our store.js is only using export to export the createStore function. If we changed our store.js to:
	const createStore = (reducer) => {
  		...
	}
	export default createStore;
our import in index.js would change from import { createStore } from './store'; to import createStore from './store';. We traditionally use export when we might want to import multiple functions from the same file. Now back to your regularly scheduled broadcast.
Now that we've properly imported our createStore function into our index.js file, let's use it. We'll create a constant called store and set it equal to the return of our createStore function:
index.js
	...
	const store = createStore(reducer)
	...
If we take a look back at our createStore function in store.js we'll notice that it takes one argument - a reducer. Let's quickly create our reducer in a new file and import it into our index.js.
src/reducers/band_reducer.js
	export default (state=[], action) => {
		switch (action.type) {
		case 'ADD_BAND':
		  return [...state, action.payload];
		default:
		  return state;
		}
	}
As we know, reducers are often just functions with giant switch statements in them. Their main purpose is to reset the state of our application. For our band app the only time we want to change the state of our application is when a user adds a new band to the list. To hold all of the information for our bands we'll want to store each band as an object. Meaning that our state will eventually be an array of band objects looking something like: state = [{title: "The Beatles"}, {title: "Bob Marley and the Wailers"}].
In our reducer above we can imagine that our action.payload will be the new band that we want to add to state. We use the spread operator (...) on state to "spread" out our original array of objects, creating a copy of this original array with the added new band object. It's important to remember that the reducer function should never mutate, or change, state. It should instead return new copies of the previous state, plus whatever change you needed to make.
Ex:
action.payload = {title: "The Killers"}
state = [{title: "The Beatles"}, {title: "Bob Marley and the Wailers"}]

[...state, action.payload]
	=> [{title: "The Beatles"}, {title: "Bob Marley and the Wailers"}, {title: "The Killers"}]
We'll import our reducer into index.js and pass it as an argument to our createStore function call:
// src/index.js

import ReactDOM from 'react-dom';
import { createStore } from './store';
import bandReducer from './reducers/band_reducer'
const store = createStore(bandReducer)

ReactDOM.render(<InsertTopLevelComponent />, document.getElementById('container'))
Now we're ready to build out our parent component band_input_component.
Note: A parent component is often refered to as a container component, and the pattern in which a container component renders child functional, or presentational, components, is called the container pattern.
We have our store, our reducer, but no actual way to display or interact with the application. We'll create a new component in src/components/band_input_component.js and import it into our index.js. The last piece before we start actually building out our component is making sure our index.js mounts the band_input_component when our application initially loads. `Member how to do this?

ReactDOM.render(<BandInput />, document.getElementById('container'))
ReactDom.render(TopComponent, HTMLElement) takes the two arguments and ultimately renders the TopComponent into the specified HTMLElement. So our index.js should look like:
import React from 'react';
import ReactDOM from 'react-dom';

import { createStore } from './store';

import BandInput from './components/band_input_component';
import bandReducer from './reducers/band_reducer.js';

const store = createStore(bandReducer);

ReactDOM.render(<BandInput />, document.getElementById('container'))
There is one crucial piece missing from our index.js. How will our band_input_component.js know about the application's store? It won't... yet. Inside band_input_component.js we want to be able to access our applications store through props. So we'll have to send down our store as a prop to band_input_component.js.
...
const store = createStore(bandReducer);

ReactDOM.render(<BandInput store={store}/>, document.getElementById('container'))
Now we'll have access to store inside our components!

When creating a new component there is one question that you should always ask yourself: will this component be class based or just a functional component? In other words will our component hold a lot of logic to change state or will our component simply need to display information from state?
For our band_input_component.js will we need a class based component or a functional component? Because this component will need to constantly update our applications state it will have to be class based.
band_input_component.js
import React from 'react';

export default class BandInput extends React.Component {
	render(){
		return <div>I LIEK TEH BANDZ</div>
	}
}
If we start up our server and navigate to http://localhost:8080 we should see how much we like the bands on the page. This is great... but not the purpose of our band_input_component.js. We want this component to hold an input field that will add a band to state when submitted. You know what that means FORM!
band_input_component.js
...
	render(){
		return(
			<div>
				<form>
					<label>Enter Band: </label>
					<input />
					<button type="submit">Submit</button>
				</form>
			</div>
		)
	}
Ok... now I'm le tired - we're done right? Pfff, no, we're about to get to the best part. We can enter a band into our input field on the page, but how will our application's state update to include the new band? We'll define a function to update the application's state and call that funcion every time the form is submitted.
Let's try it out:
band_input_component.js
...
onSubmit(){
	console.log("NOMG I'm in teh onSubmit() functions")
}
	render(){
		return(
			<div>
				<form onSubmit={this.onSubmit}>
					<label>Enter Band: </label>
					<input />
					<button type"submit">Submit</button>
				</form>
			</div>
		)
	}
Open up your browser console, refresh the page and try typing something into your input field and submitting. What happened to your console.log("NOMG I'm in the onSubmit() functions")? If you pay attention to your console when you submit you should see the console.log display before vanishing. Like most event handlers onSubmit={function} tries to refresh our page. How were we able to... prevent... this in the past? Did someone say event.preventDefault()? Suck up... But that's exactly right. We'll need to preventDefault in our callback function to avoid the page refresh. Luckily our event handlers pass in an event object as an argument to our callback.
band_input_component.js
...
onSubmit(event){
	event.preventDefault();
	console.log("NOMG I'm in teh onSubmit() functions")
}
We are now successfully displaying our very accurate console log notifying us that the page did not refresh. In our onSubmit() function we want to add the new band entere into the input field into our application's state.
We know that our reducer was created for the sole purpose of updating state. First, how will we get into our reducer? Let's check out the dispatch function inside of store.
store.js
export const createStore = (reducer) => {
	let state;
	...
	const dispatch = (action) => {
		state = reducer(state, action);
		listeners.forEach(listener => listener())
	};
	...
}
If we call on store.dispatch(action) we will be able to get into our reducer.
Ok, so we know that somewhere inside of our onSubmit function we'll have to call on store.dispatch(action) to get into our reducer to ultimately update our application's state.
We know that a store needs to dispatch an action. An action is responsible for telling the reducer what code to enact, and sending any information that the reducer needs to enact that code. In this case, in order to add a new band, the store will have dispatch an action that tells the reducer what to do (i.e. add a new band to state please) and how to do it (i.e. here is the new band to add to state).
Let's build out the action!
If we look back at the reducer we can see that the function takes in two arguments state and action. The reducer will grab state from the dispatch function in store and the action argument from where we call dispatch. Because we want our switch statement to end up in the 'ADD_BAND': case we'll want our action to have a key value pair of type: 'ADD_BAND'. The last piece for our action will be the payload key, which should have the value of the band object we want to add to state. So we know that our action should be an object that looks something like:
action = {type: 'ADD_BAND', payload: {title: 'New Band'}}In our onSubmit function we'll want to call our store.dispatch({type: 'ADD_BAND', payload: {title: 'New Band'}}. We passed in our store as a prop to the band_input_component.js component so in an ideal world within onSubmit we should be able to call this.props.store.dispatch({type: 'ADD_BAND', payload: {title: 'New Band'}}).
But, we have one issue... because onSubmit is an event handler that calls the onSubmit function we lose score of our class BandInput this. Instead, right now, inside of onSubmit this refers to the event handler. We'll need to bind the appropriate this to our onSubmit function so that we can interact with the propsthat we wanted to pass down.
band_input_component.js
...
render(){
	return(
		<form onSubmit={this.onSubmit.bind(this)}>
			<label>Enter Band: </label>
			<input />
			<button type="submit">Submit</button>
		</form>
		...
	)
}
Note: Another option for bind-ing this is to do it in the constructor of the class:
import React from 'react';

export default class BandInput extends React.Component {
  constructor(props) {
  	super(props)
  	this.onSubmit = this.onSubmit.bind(this)
  }

  onSubmit(e) {
  	e.preventDefault()
  	this.props.store.dispatch({type: 'ADD_BAND', payload: {title: 'New Band'}})
  }

  render(){
    return(
      <div>
        <form onSubmit={this.onSubmit}>
          <label>Enter Band: </label>
          <input />
          <button type="submit">Submit</button>
        </form>
      </div>
    )
  }
}
Shweet! Now we have the right this reference inside our onSubmit function.
Let's now bring in our ideal code to dispatch the action and figure out how we should capture the input value for our band object. If we were using jQuery, or another language that interacts with event handlers, how would we go about grabbing our forms input value? We would be able to use our event object. Inside our event object we would call on .target, which refers to our form. Then we would need to grab our input field inside of that form with .children[1] (if you look at just .children you should see that it is an array containing each html tag within our form - label, input, button). Now that we have our input field selected all we want is the .value of that field. It should look something like:
band_input_component.js
onSubmit(event){
	event.preventDefault();
	this.props.store.dispatch({type: 'ADD_BAND', payload: {title: event.target.children[1].value}})
}
Now, if we were to look at the state of our app every time a new band is added, that new band will be included in state!
band_index_component.js
Great! We've made it this far. We're about to input a new band and update our application's state. The last thing we want to do is output each band's title to a list. We already know that another component will handle the rendering of these bands to our page.
This new component will be a child of our band_input_component.js (meaning that it will be mounted within the parent, or container, component.
Before we talk about how to use a new component to show the band's content let's talk about how we would show this data without a new component. Our application's state holds all of the information that we want to display. Inside of band_input_component.js we are able to call this.props.store.getState(), which should return our array of band objects. Unfortunately, we cannot just put this inside our JSX code and see all of the new objects appear. We would have to map through each of the objects in our state array and tell our JSX exactly how to display this information.
...
render(){
	return(
		<div>
			...
			<h1>Bands</h1>
			<ul>
				{this.props.store.getState().map((band, i) => <li key={i}> {band.title} </li>)}
			</ul>
		</div>
	)
}
The above code will work, but it's not the best way to handle our band displaying on the page. It's not a good example of separation of concerns. Our band_input_component.js component should not directly handle the input AND display of our data. However, we are in the right direction. Knowing the above let's just refactor so that our li will be handled by the band_index_component.js component.
band_input_component.js
import BandIndex  from './band_index_component';
...
render(){
	return(
		<div>
			...
			<h1>Bands</h1>
			<ul>
				{this.props.store.getState().map((band, i) => <BandIndex key={i} band={band} />)}
			</ul>
		</div>
	)
}
Now, the only thing our new component will need to do is handle the output of our liwith the appropriate information inside. As we mentioned before, we need to ask ourselves: is our band_index_component.js going to be a class based or functional component? It's going to be a functional component because it doesn't manipulate our application's state. With this in mind let's create our new component and use export default to export the function.
band_index_component.js
import React from 'react';

const BandIndex = (props) => {
	return
}

export default BandIndex;
NOTE: using export default (props) => { } will also work.
The only purpose of this component is to return an li with our band's title. In our band_input_component.js when we mounted our BandIndex component we also sent down our band object as a prop. So all we need to do for this new component is:
import React from 'react';

const BandIndex = (props) => {
  return(
    <li>
      {props.band.title}
    </li>
  )
}

export default BandIndex;
Hooray! Now we should be able to see our lovely band list on the page as we submit new ones... Or so we thought. Remember back to the readme when we discussed that a component will need to re-render when state is changed to display the new information. 'Member how we do that in our index.js? We had to wrap our ReactDOM.render() in a renderApp function that we pushed to our listeners array and called each time dispatch was called. We will need this functionality so that whenever a new band is added to state our whole application will re-render so that our band_index_component.js shows the updated bands.
index.js
...
const renderApp = () => {
  ReactDOM.render(<BandInput store={store}/>, document.getElementById('container'))
}

store.subscribe(renderApp);
store.dispatch({})
NOTE: If you're thinking "why should we re-render the whole application? Shouldn't we only want the specific component that displays the data to re-render?" The answer is...React is waaay ahead of you!
React uses something called the virtual DOM to keep track of changes that have been made to state and the impact that those changes have on DOM. React will go through some super fast calculations, comparing the virtual DOM, which will re-render in its entirety, to the actual DOM, and then only re-render the portion of the actual DOM that has actually changed! That is super cool, in case that wasn't clear. We are very impressed.
That's it! You've done it! Your hot new band display app is ready for the world!


